
Thanks for your feedback.
Webex Edge Connect
 Feedback?
Edge Connect leverages a cloud exchange provider, either Equinix or Megaport, to seamlessly link the customer’s routing edge to the Webex backbone’s edge routers through a private network peering connection. This peering connection significantly enhances the experience for calling, contact center agents, and meeting users thanks to guaranteed bandwidth and direct connectivity, which reduces network latency, packet loss, and jitter.
The connection between the customer premise equipment and the Webex provider edge router helps ensure low latency. As a general guideline, connect to the Webex Edge Connect on-ramp data centers in your region to access Webex services. Large customers with a national or international network should think about peering with Webex regionally to further reduce latency.
For reference information about the cloud exchange provider’s fabric workflow, visit the documentation at https://docs.equinix.com/ or https://docs.megaport.com.
Network latency can negatively affect the Webex user experience. Latency can be influenced by geographic location, Internet routing patterns, user network connectivity method (LAN versus Wi-Fi), and the overall health of the network paths between each connection point.
Also, see the Cisco Preferred Architecture for Webex Edge Connect for Webex Meetings, Calling Multi-Tenant and Dedicated Instance, which provides detailed information on the design and deployment of Edge Connect.
| Revision date | New or changed information |
|---|---|
| February 25, 2026 |
IP ranges added to Webex Calling (By Theater):
|
| June 09, 2025 |
|
| September 20, 2024 |
This documentation update and the previous one are aimed at matching the BGP advertised routes. IP ranges added to Webex Meetings (By Theater):
IP ranges added to Webex Calling (By Theater):
Added a note in Webex Public IP Block Ranges By Theater and Solution. |
| August 28, 2024 |
IP ranges added to Webex Meetings (By Theater):
IP ranges added to Webex Calling (By Theater):
IP ranges removed from Webex Meetings (By Theater):
IP ranges removed from Webex Calling (By Theater):
|
| August 01, 2024 |
IP ranges added to Webex Calling (By Theater):
|
| August 14, 2023 |
The following IP ranges will go live on September 15, 2023. IP ranges added to Webex Meetings (By Theater):
|
| July 17, 2023 |
IP ranges added to Webex Meetings (By Theater):
IP ranges removed from Webex Meetings (By Theater):
|
| April 12, 2023 |
IP ranges added to Webex Meetings (By Theater):
|
| March 28, 2023 | Restructured article into tabbed format. Added article revision history, starting March 17th. |
| March 17, 2023 |
IP ranges added to Webex Meetings (By Theater):
IP ranges removed from Webex Meetings (By Theater):
|
The following are the base requirements for establishing Edge Connect peering:
-
An active connection and port on the Equinix or Megaport Cloud Exchange.
-
A Public or Private Border Gateway Protocol (BGP) Autonomous System Number (ASN).
-
Customer provided IP addresses for both sides of the BGP peering connection.
-
Your BGP peering link address space, which is a public IP with /30 or /31 prefix
-
Your advertised public IP space (must be provider-independent)
-
An IP space that is public and provider independent.
-
Edge Connect does not accept private prefix advertisements like RFC1918.
-
An IT team with knowledge of BGP and peering principles.
-
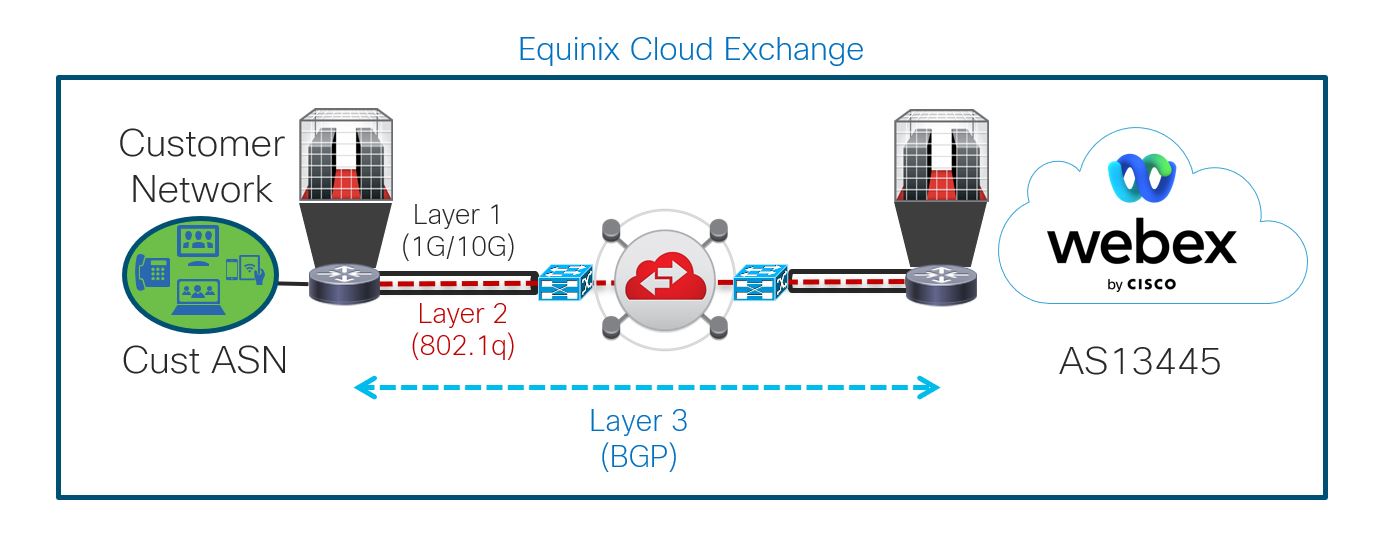
A network device capable of running BGP and 802.1Q tagging.
-
Layer 1 – Physical Connectivity through Equinix or Megaport.
-
Layer 2 – Data-link Connectivity through Equinix or Megaport.
-
Layer 3 – Network Connectivity with Webex through the Equinix or Megaport Cloud Fabric.
To set up Edge Connect, you need to first work with an Equinix or Megaport representative on two tasks: establishing Physical Connectivity and establishing Data-link Connectivity. When these tasks are complete, you can continue to the third task: establishing Network Connectivity with Webex through the Webex Edge Connect Portal.
The diagram illustrates the Layer 1, Layer 2, and Layer 3 connections that must be set up to configure Edge Connect in the corresponding tasks.
Physical Connectivity
You will need to consult with an Equinix or Megaport representative to set up your Physical and Data-link connectivity. There are three available methods for provisioning physical connectivity for Edge Connect.
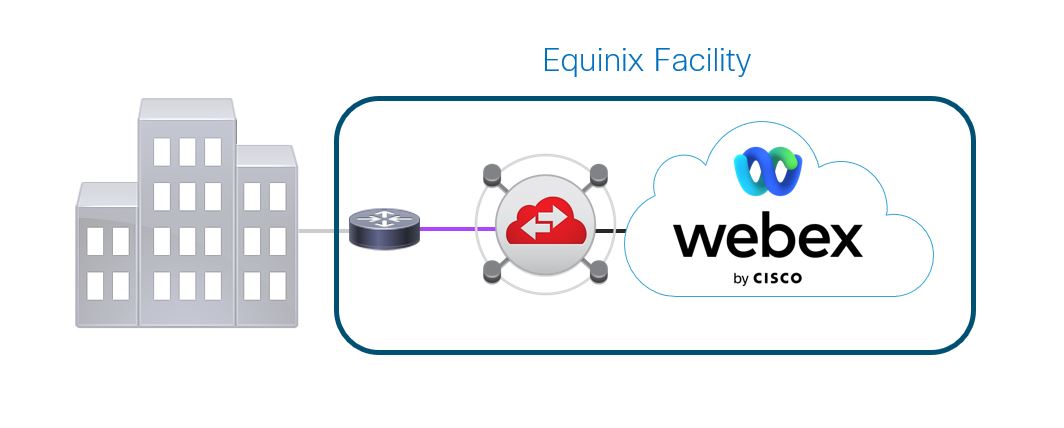
-
An Equinix or Megaport local facility cross-connect between your router in an Equinix or Megaport facility and the fabric switch. The purple segment below shows the connection that must be made between your cage and the fabric switch.
These are the data centers where customers can connect to get on the Webex backbone.
North American Locations
International Locations
-
Ashburn, VA, US
-
Chicago, IL, US
-
Dallas, TX, US
-
New York, NY, US
-
San Jose, CA, US
-
Montreal, Canada
-
Toronto, Canada
-
Amsterdam, NL
-
London, GB
-
Frankfurt, DE
-
Singapore, SG
-
Sydney, AU
-
Tokyo, JP
-
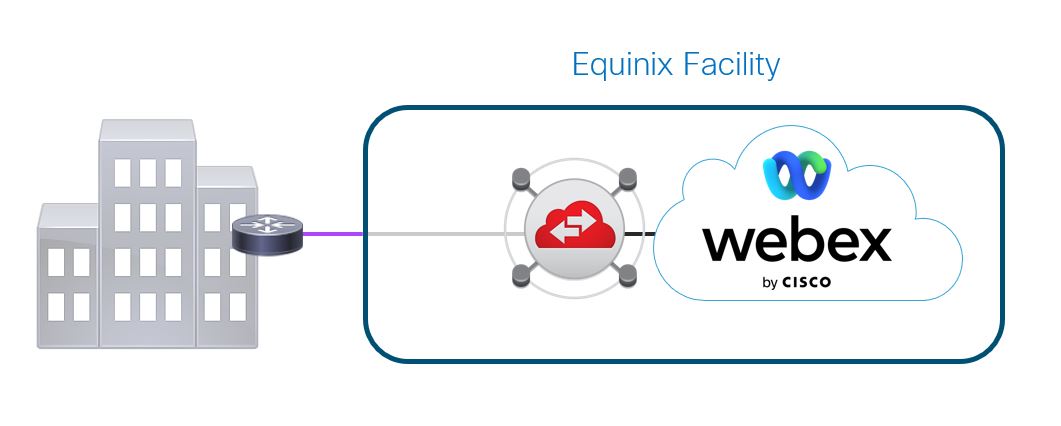
-
A network connection that creates a circuit between your building and the closest Equinix or Megaport facility that colocates with the Webex cloud. The purple segment below shows the connection that must be made between your building and an Equinix or Megaport facility.
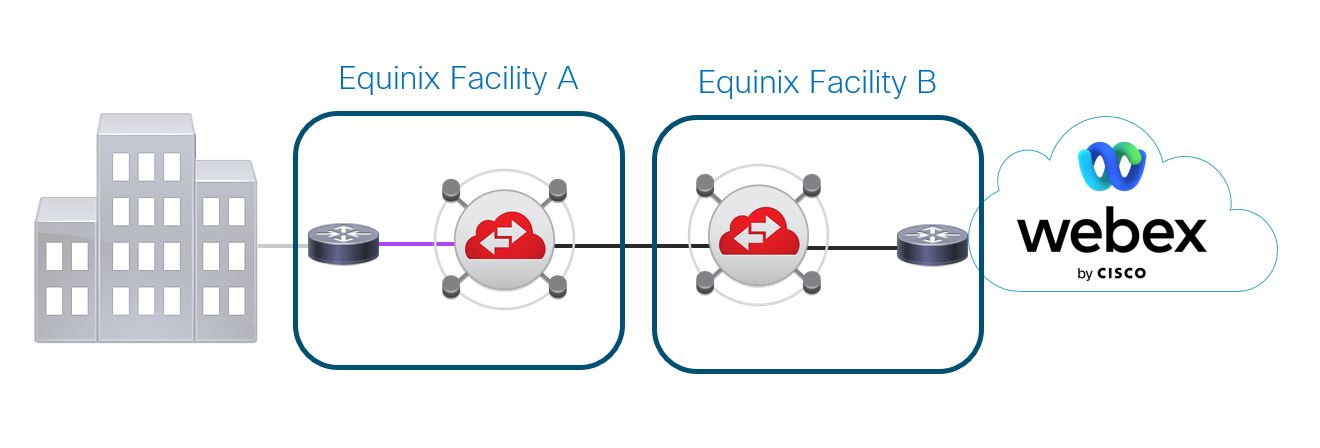
-
There is an Equinix or Megaport facility, Facility A, close to your building but it does not colocate with the Webex cloud. You can create a circuit between your building and Facility A. Equinix or Megaport then connects Facility A with a facility that colocates with the Webex cloud, Facility B, using their network.
The purple segment and cloud in the image below shows the connection that must be made to the cloud exchange providers fabric in Facility A, the connecting circuit between the Equinix or Megaport facility closest to you, and the Equinix or Megaport colocation facility.
Data-link Connectivity
You must provision an Ethernet virtual circuit connection to Webex using the Cloud Exchange providers website with a service key that is provided by Cisco after the Webex backbone is configured..
See the Cisco Preferred Architecture for Webex Edge Connect for Webex Meetings, Calling Multi-Tenant, and Dedicated Instance for information on how to create a connection.
See the Cisco Preferred Architecture for Webex Edge Connect for Webex Meetings and Calling for information on how to create a connection.
Route Policy Technical Details
-
The Webex public BGP ASN is 13445.
-
The maximum length prefix that Webex advertises is /24. The maximum length prefix that Webex accepts is /29.
-
The number of routes that Webex advertises may change over time. We recommend that customers allow 500 routes from Webex on the BGP peering.
-
The maximum number of routes Webex accepts is 100.
-
Customers can use Bidirectional-Forwarding Detection (BFD). BFD is enabled with a default value of 300 ms x 3 on the Webex Edge routers for Edge Connect for Meetings and Calling links and 300 ms x 3 for Edge Connect for Dedicated Instance links.
-
All Webex routes are included in the BGP advertisements.
-
Customer traffic-engineering techniques such as NAT, BGP AS-PATH prepending, or predefined BGP communities are available to influence traffic flows within the Cisco Backbone. BGP communities may be implemented to limit the scope of customer route propagation between the Webex geographic theaters.
-
Customers can use the Webex Looking Glass portal to see advertised BGP routes and perform ping and traceroute tests.
AS-PATH prepending is not supported when using Private ASNs. This is because to support Private ASNs in Edge Connect, Webex strips the ASN after ingress into the Webex backbone network. It is recommended to use Link Priority Communities instead to affect BGP routing path priorities from Webex back towards the private network.
Webex Public IP Block Ranges By Theater and Solution
We encourage customers to accept all Webex routes with a prefix length that is less than or equal to /24. Route advertisements may change over time so customers shouldn’t set up filters using IP prefix lists. The prefix lists are purely informational. Use Network Requirements for Webex Services and Port Reference Information for Webex Calling CIDRs to create firewall rules. Additionally, customers may create custom filters using BGP communities to accept routes based on geographic theater or Webex solution (Webex Meetings or Webex Calling).
Edge Connect notifications are sent out to notification contacts, Webex Control Hub administrators, when Webex advertises a new IP subnet range or removes an IP subnet. These emails reflect the dates when any changes will occur in the network.
Webex Meetings (By Theater)
AMER
-
23.89.0.0/18
-
23.89.0.0/20
-
23.89.16.0/20
-
23.89.32.0/20
-
23.89.48.0/20
- 23.89.192.0/20
- 23.89.208.0/20
-
64.68.96.0/19
-
64.68.104.0/21
-
66.163.32.0/19
-
66.163.52.0/24
-
66.163.53.0/24
-
144.196.0.0/19
-
144.196.32.0/20
-
144.196.48.0/20
-
144.196.128.0/19
-
144.196.224.0/20
-
144.196.240.0/20
-
150.253.128.0/18
-
150.253.160.0/21
-
163.129.0.0/19
-
170.72.128.0/18
-
170.72.128.0/20
-
170.72.144.0/21
-
170.72.152.0/21
-
170.72.160.0/20
-
170.72.192.0/19
-
170.133.128.0/19
-
173.243.0.0/20
-
173.39.224.0/19
-
207.182.160.0/19
-
207.182.172.0/22
-
209.197.192.0/19
-
209.197.192.0/21
-
216.151.128.0/19
-
216.151.128.0/20
APAC
-
23.89.128.0/20
-
23.89.144.0/20
-
23.89.154.0/24
-
23.89.160.0/20
-
23.89.176.0/21
-
69.26.176.0/20
-
69.26.176.0/24
-
114.29.192.0/23
-
114.29.196.0/23
-
114.29.200.0/22
-
114.29.204.0/22
-
114.29.208.0/21
-
114.29.216.0/21
-
144.196.80.0/20
-
144.196.96.0/20
-
144.196.160.0/20
-
144.196.208.0/20
-
150.253.192.0/19
-
150.253.192.0/21
-
150.253.200.0/21
-
150.253.208.0/21
-
150.253.216.0/21
-
150.253.240.0/20
-
163.129.32.0/22
-
163.129.48.0/20
-
163.129.64.0/20
-
170.133.176.0/23
-
170.133.178.0/23
-
170.133.180.0/22
-
170.133.181.0/24
-
170.133.184.0/22
-
170.133.188.0/22
-
170.72.48.0/21
-
170.72.56.0/21
-
170.72.64.0/20
-
170.72.64.0/21
-
170.72.72.0/21
-
170.72.80.0/21
-
170.72.88.0/21
-
170.72.96.0/20
-
210.4.194.0/23
-
210.4.196.0/23
-
210.4.198.0/23
-
210.4.198.0/24
-
210.4.200.0/22
-
210.4.204.0/22
-
210.4.206.0/23
EMEA
-
23.89.64.0/18
-
23.89.64.0/20
-
23.89.80.0/20
-
23.89.96.0/20
-
23.89.112.0/21
-
23.89.120.0/21
-
69.26.160.0/24
-
62.109.192.0/18
-
69.26.160.0/20
-
144.196.64.0/20
-
144.196.112.0/22
-
144.196.116.0/23
-
144.196.118.0/23
-
144.196.176.0/20
-
144.196.192.0/20
-
150.253.224.0/20
-
170.133.160.0/20
-
170.72.0.0/19
-
170.72.0.0/20
-
170.72.16.0/20
-
170.72.16.0/21
-
170.72.24.0/21
-
170.72.32.0/20
-
170.72.32.0/21
-
170.72.40.0/21
-
170.72.112.0/20
-
170.72.208.0/20
Global Anycast
-
66.163.52.0/24
-
66.163.53.0/24
-
69.26.160.0/24
Webex Calling (By Theater)
AMER
-
23.89.1.128/25
-
23.89.33.0/24
-
23.89.40.0/25
-
128.177.14.0/24
-
128.177.36.0/24
-
135.84.171.0/24
-
135.84.172.0/24
-
135.84.173.0/24
-
135.84.174.0/24
-
139.177.64.0/24
-
139.177.65.0/24
-
139.177.72.0/24
-
139.177.73.0/24
-
139.177.94.0/24
-
139.177.95.0/24
-
199.19.197.0/24
-
199.19.199.0/24
-
199.59.65.0/24
-
199.59.66.0/24
EMEA
-
23.89.76.128/25
-
85.119.56.0/24
-
85.119.57.0/24
-
139.177.66.0/24
-
139.177.67.0/24
-
144.196.114.0/24
-
144.196.115.0/24
-
144.196.70.0/24
-
144.196.71.0/24
-
170.72.0.128/25
-
170.72.17.128/25
-
170.72.29.0/24
-
185.115.196.0/24
-
185.115.197.0/24
ANZ
-
139.177.70.0/24
-
139.177.71.0/24
-
139.177.76.0/24
-
199.59.64.0/24
-
199.59.67.0/24
APAC
-
23.89.154.0/25
-
135.84.169.0/24
-
135.84.170.0/24
-
139.177.68.0/24
-
139.177.69.0/24
-
150.253.209.128/25
-
150.253.214.128/25
-
150.253.220.0/24
The following BGP communities are honored by Webex inbound route policies and may be used by customers to influence Edge Connect link priority.
Link Priority Communities
-
None — Default (least desirable path)
-
13445:200 — Local Preference 200
-
13445:300 — Local Preference 300
-
13445:400 — Local Preference 400
-
13445:500 — Local Preference 500
-
13445:600 — Local Preference 600
-
13445:700 — Local Preference 700
-
13445:800 — Local Preference 800
-
13445:900 — Local Preference 900 (most desirable path)
Route Propagation Scoping Communities
Customers that have a global peering arrangement with Webex may want to limit route advertisements within the Cisco Webex cloud to the local geographic theater. The following communities may be used to limit customer route propagation across the Webex network.
-
None — Default permit global reachability
-
13445:677 — Permit local theater reachability
Webex Route Origin Communities
Webex applies BGP community tags to indicate where the Webex prefix originates. This can be helpful if you want to perform route filtering based on location tag. The following BGP communities indicate the origin of the Webex prefix.
Webex Meetings Communities (By Theater)
-
13445:10000—AMER
-
13445:10010—EMEA
-
13445:10020—APAC
Webex Calling Communities (By Theater)
-
13445:20000—AMER
-
13445:20010—EMEA
-
13445:20020—ANZ
-
13445:20060—APAC
Webex Edge Connect ordering and provisioning process
When placing an order for an Edge Connect for Meetings and Calling or Edge Connect for Dedicated Instance link, it is best to understand the overall process. The steps below outline the major items that need to be done during the ordering and provisioning process.
- Customer needs to have an account and port purchased with Equinix or Megaport. This is done with Equinix and Megaport directly.
- Purchase Webex Edge Connect.
- All sales, customer, partner, and technical information is entered in the Cisco Edge Connect Request portal web page.
- Webex edge routers are configured based on the information provided, along with the appropriate backbone connectivity to the different data centers.
- Customer receives an email from csg-peering@cisco.com with a service key. The customer enters the service key in the Equinix or Megaport website.
- Customer configures their edge router.
- IP connectivity is established between the customer router and Webex router.
Follow the steps below to order Webex Edge Connect using CCW:
| 1 |
Navigate to the CCW Ordering site, and then click Login to sign on to the site. |
| 2 |
Create Estimate. |
| 3 |
Add“A-FLEX-3” SKU. 
|
| 4 |
Click Select Options. 
|
| 5 |
In the Subscription tab that appears, select Options and Add-ons. 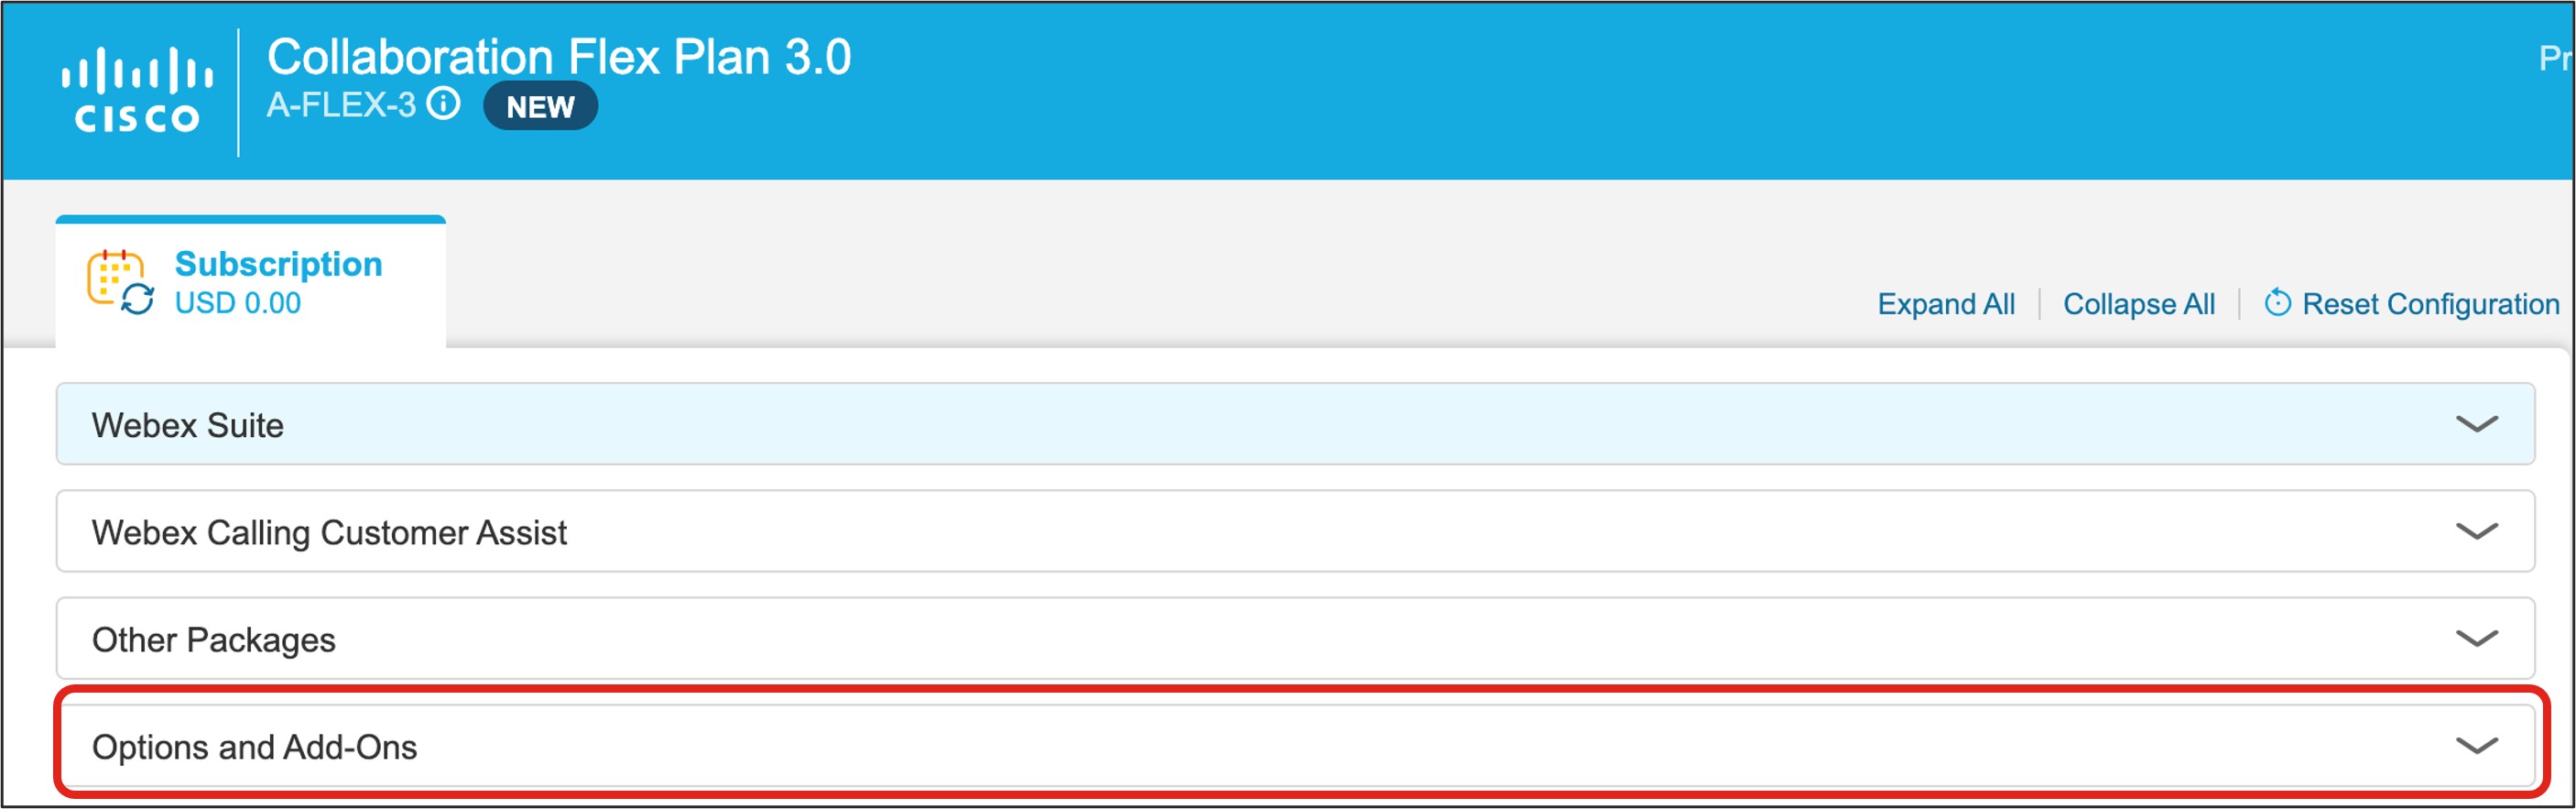
|
| 6 |
Under Additional Add-ons, select the check box beside Edge Connect. 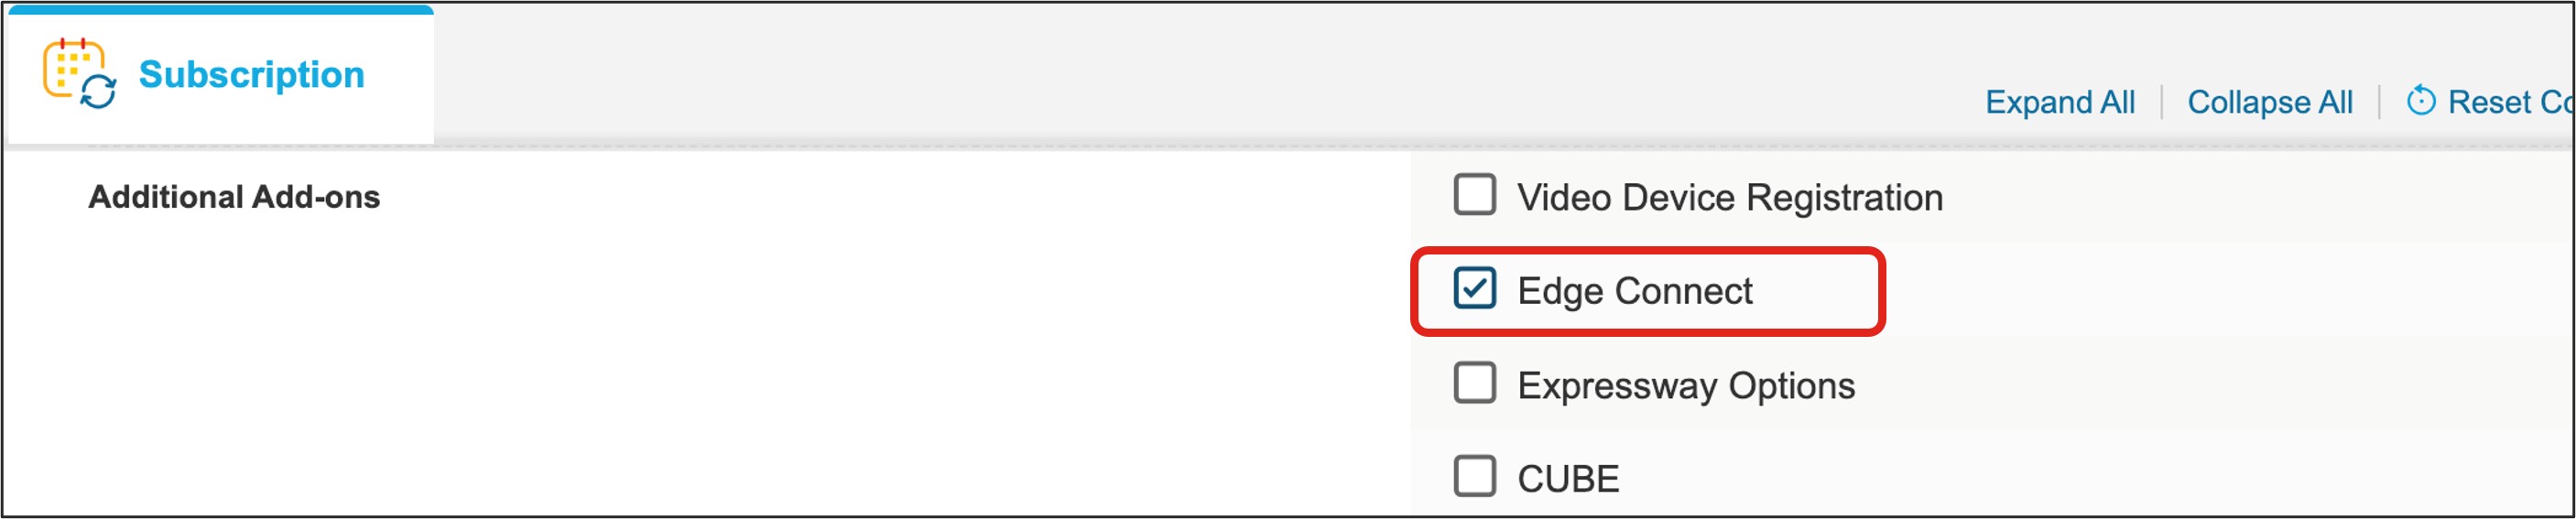
|
| 7 |
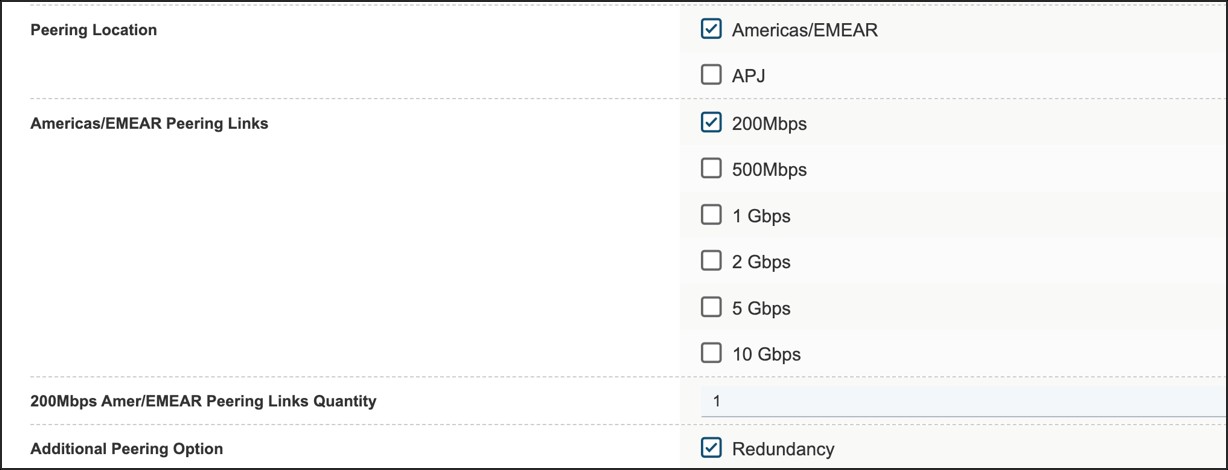
Under Select location, select the location(s) you’d like to set up, Americas/EMEAR and/or APJ. 
|
| 8 |
After selecting your connection location(s), select the link bandwidth. 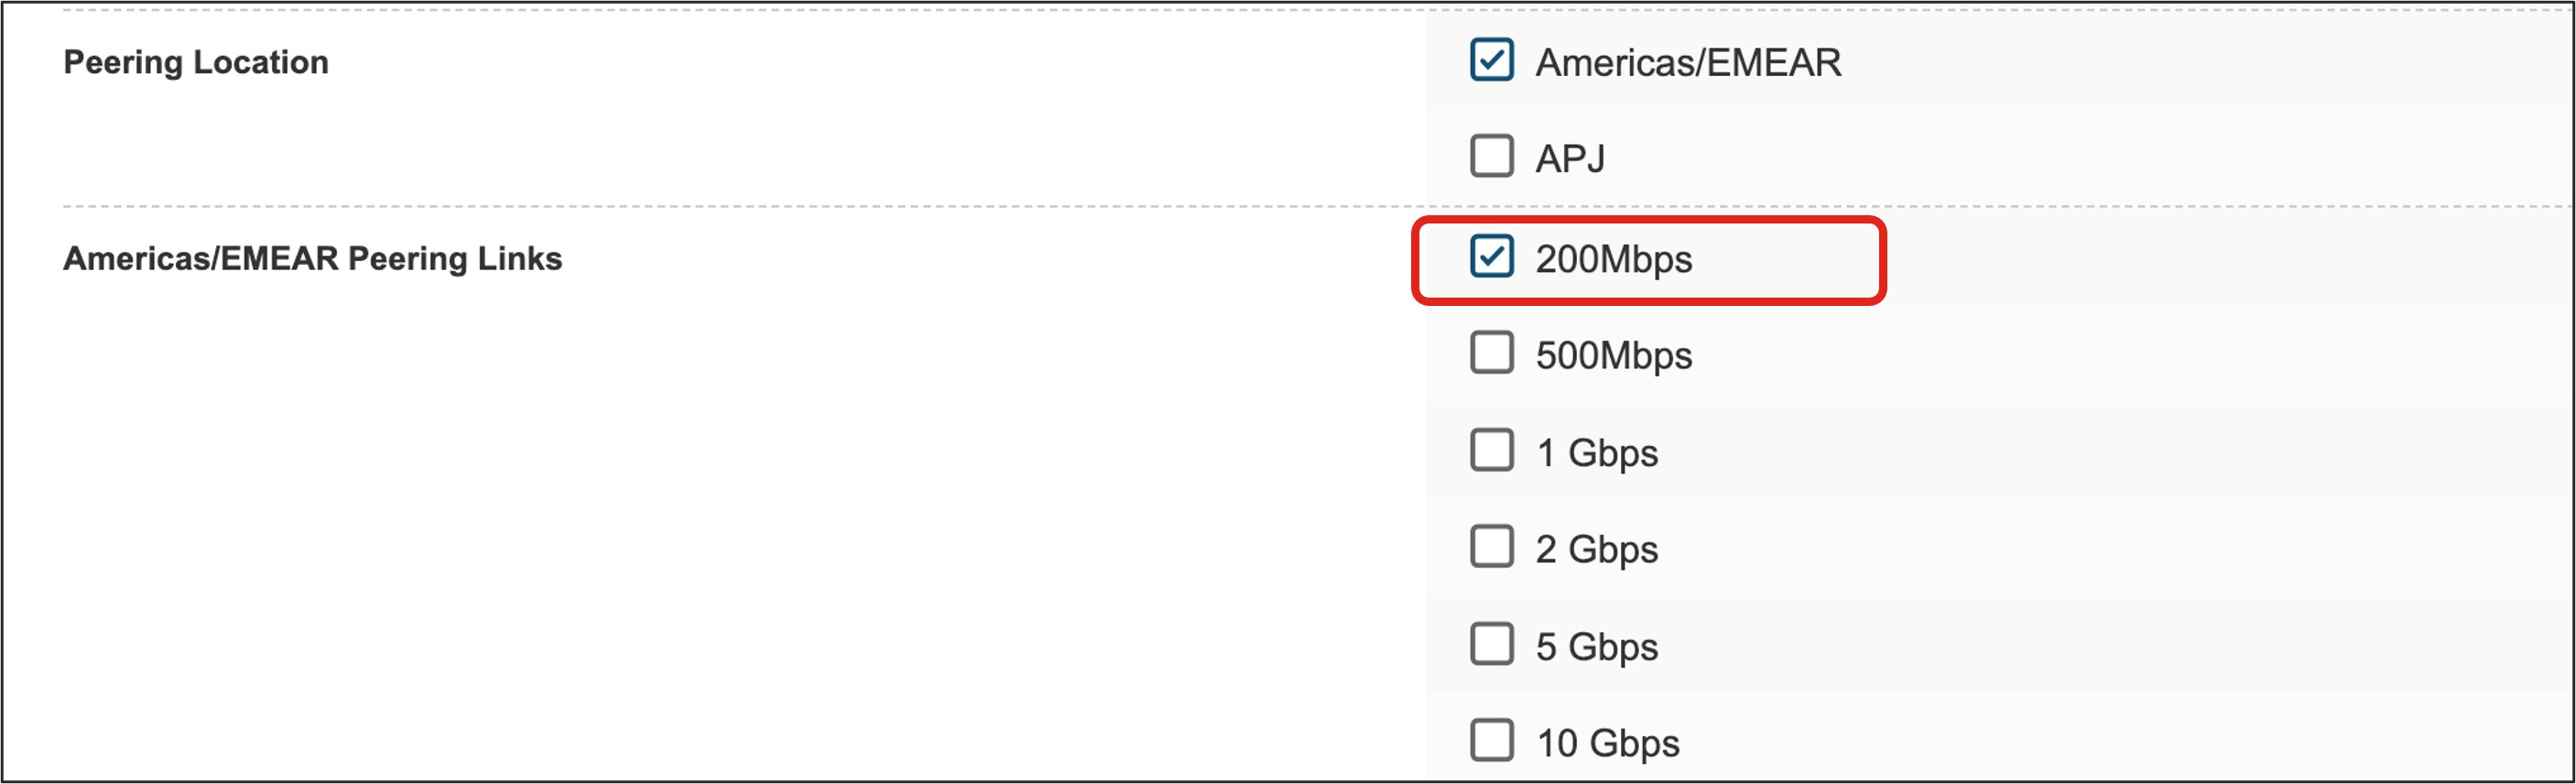
The redundancy option will allow for either a discounted second connection to the Webex backbone for an Edge Connect for Meetings and Calling link or a second link (included in the price) for an Edge Connect for Dedicated Instance (Meetings, Calling, and DI) link or Dedicated Instance only link. This redundant link will serve as the second connection to the Webex backbone, connecting to a different Webex datacenter in a geographical region distinct from the first connection. For an Edge Connect for Dedicated Instance link, selecting the redundancy check box is mandatory when ordering to ensure service redundancy in the architecture. 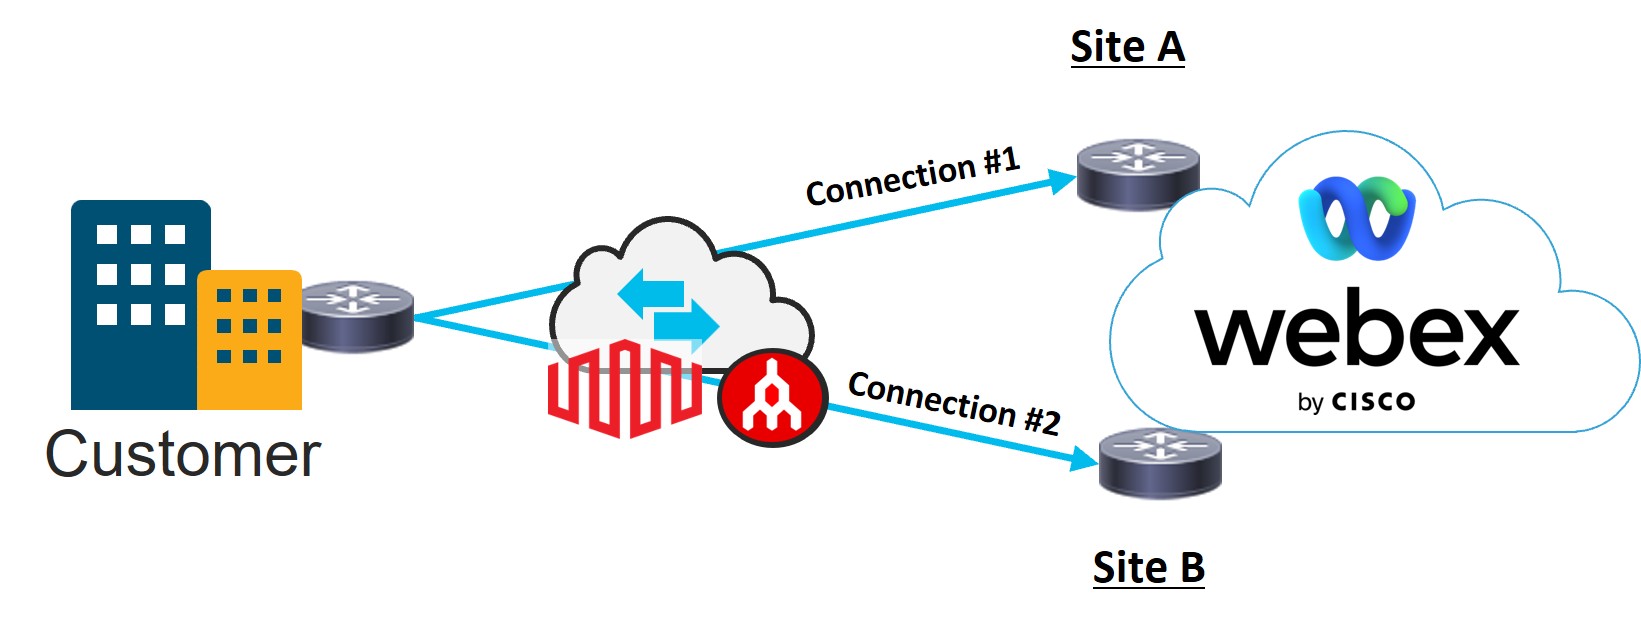
|
| 9 |
When you are satisfied with your selections, click Verify and Save in the upper right portion of the page. |
| 10 |
Click Save and Continue to finalize your order. Your finalized order now appears in the order grid. |
| 1 |
Navigate to the Edge Connect Request Portal site and login.
| ||||||||||||||||||
| 2 |
Enter the customer name. 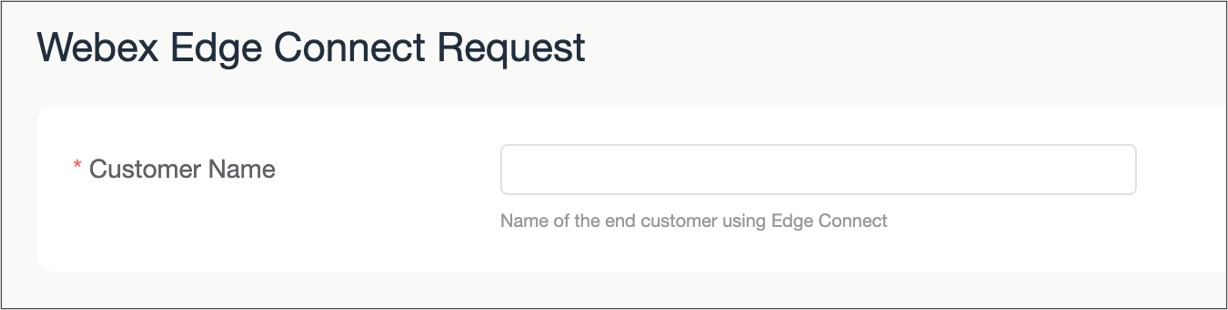
| ||||||||||||||||||
| 3 |
Enter the Webex Org ID of the customer. This information is located in Control Hub ( Management > Account). Enter the type of Edge Connect link being requested. 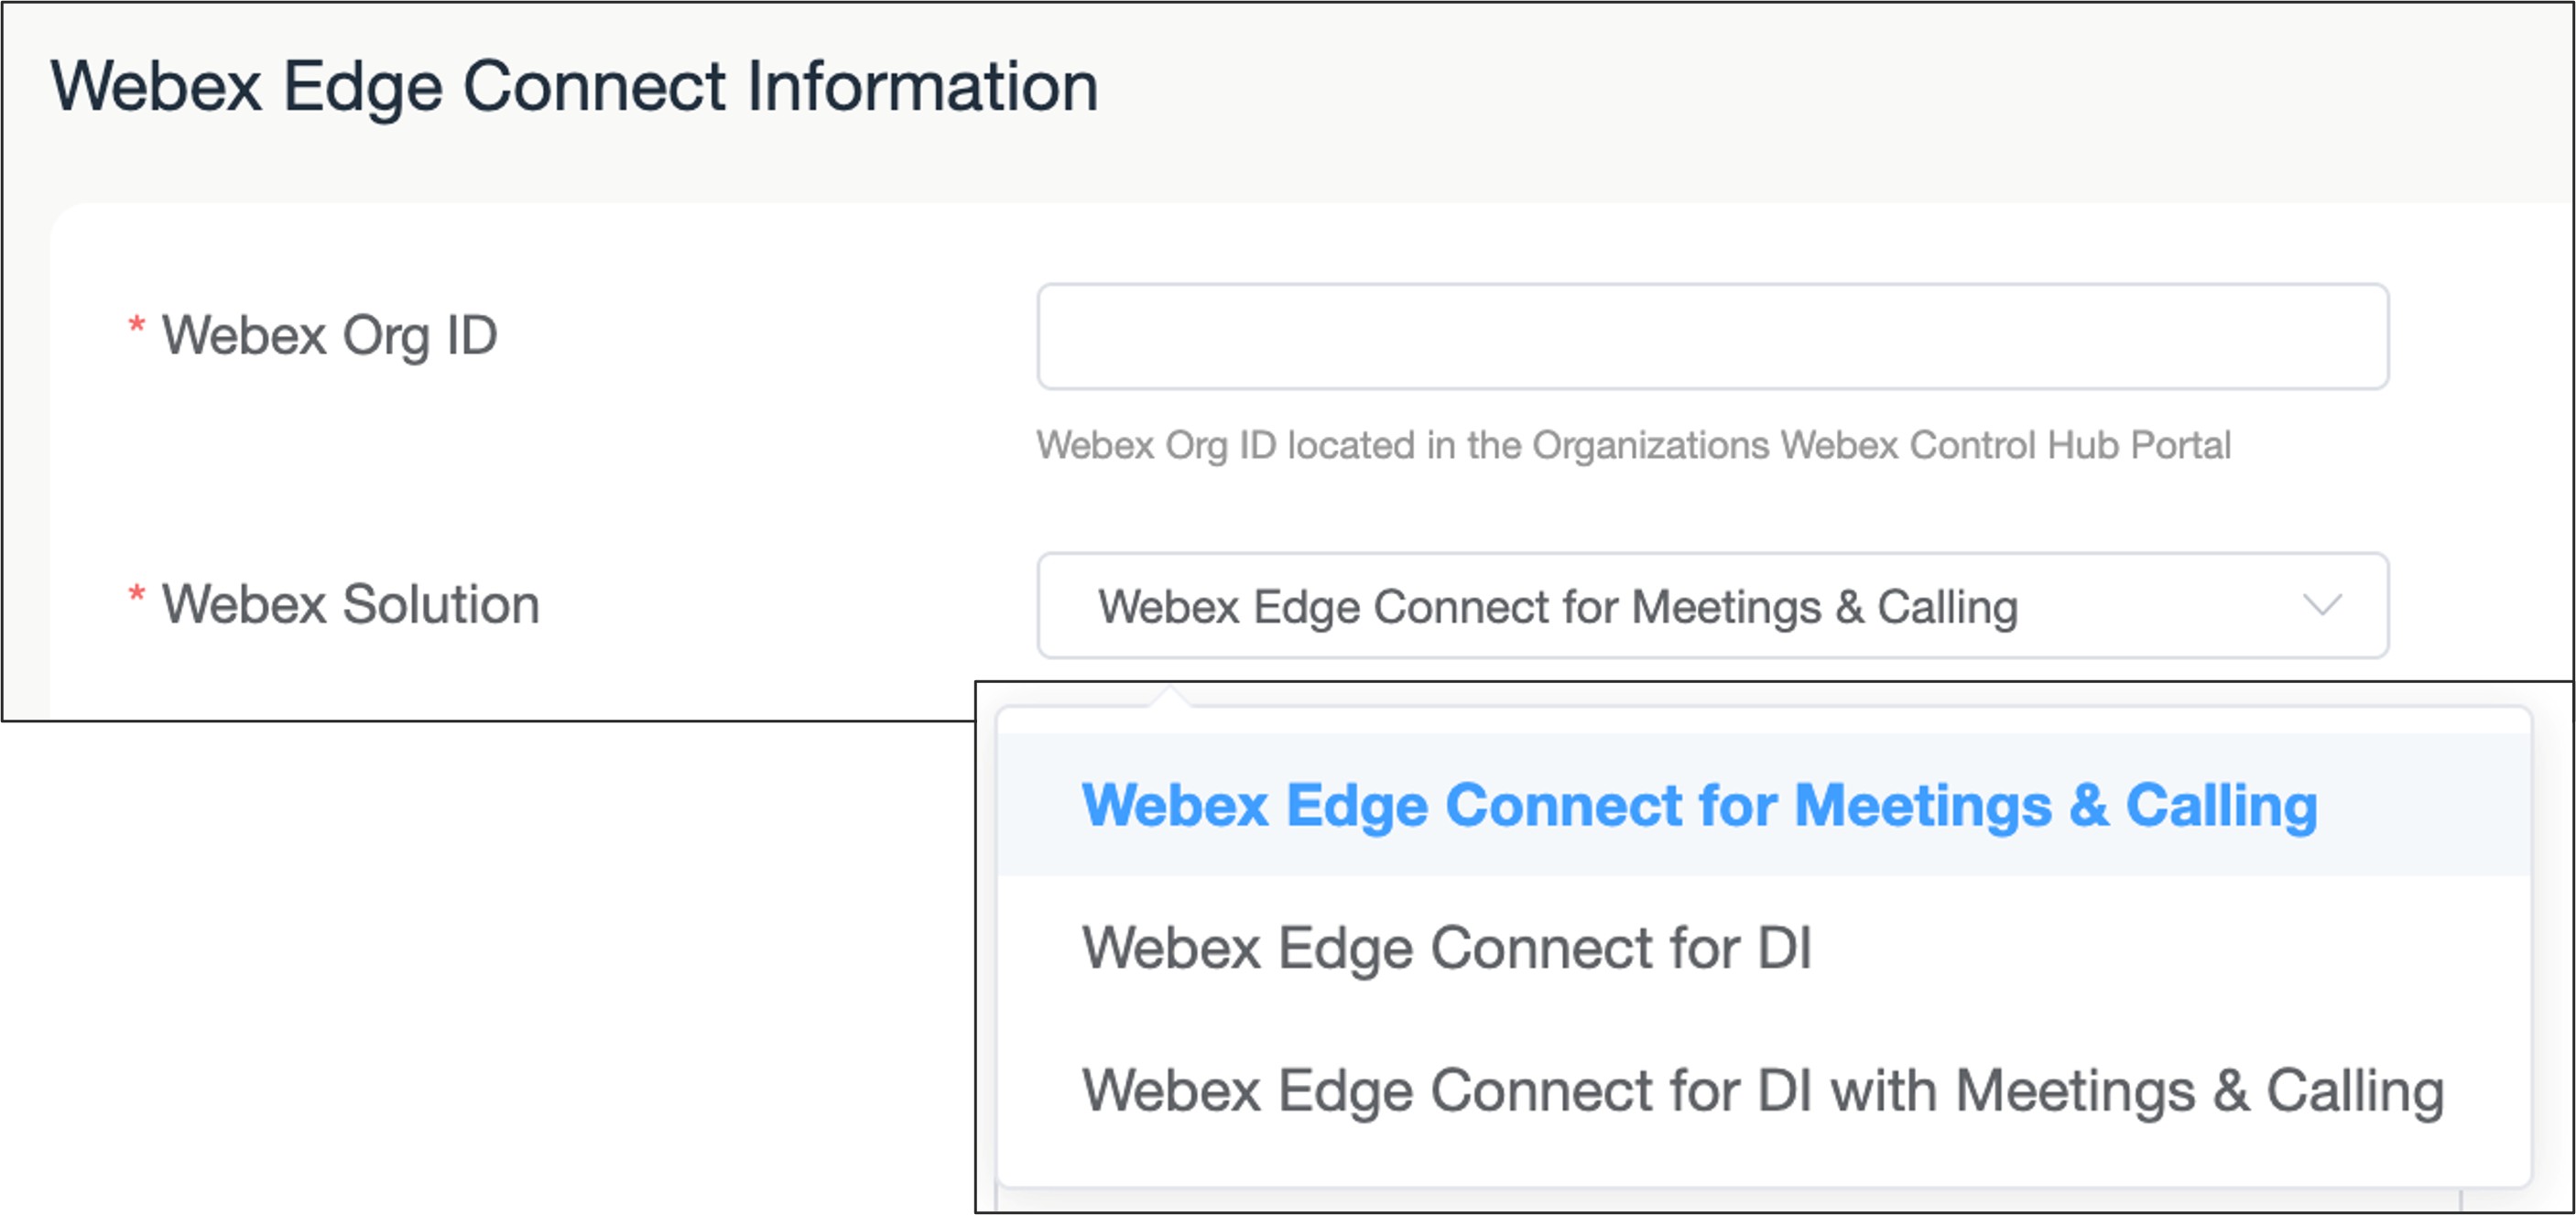
| ||||||||||||||||||
| 4 |
Select the number of connections requested to be provisioned If the redundancy option is selected on the Cisco order, then two connections must be chosen. If the Webex Solution selected is "Edge Connect for Dedicated Instance", then two connections are necessary. 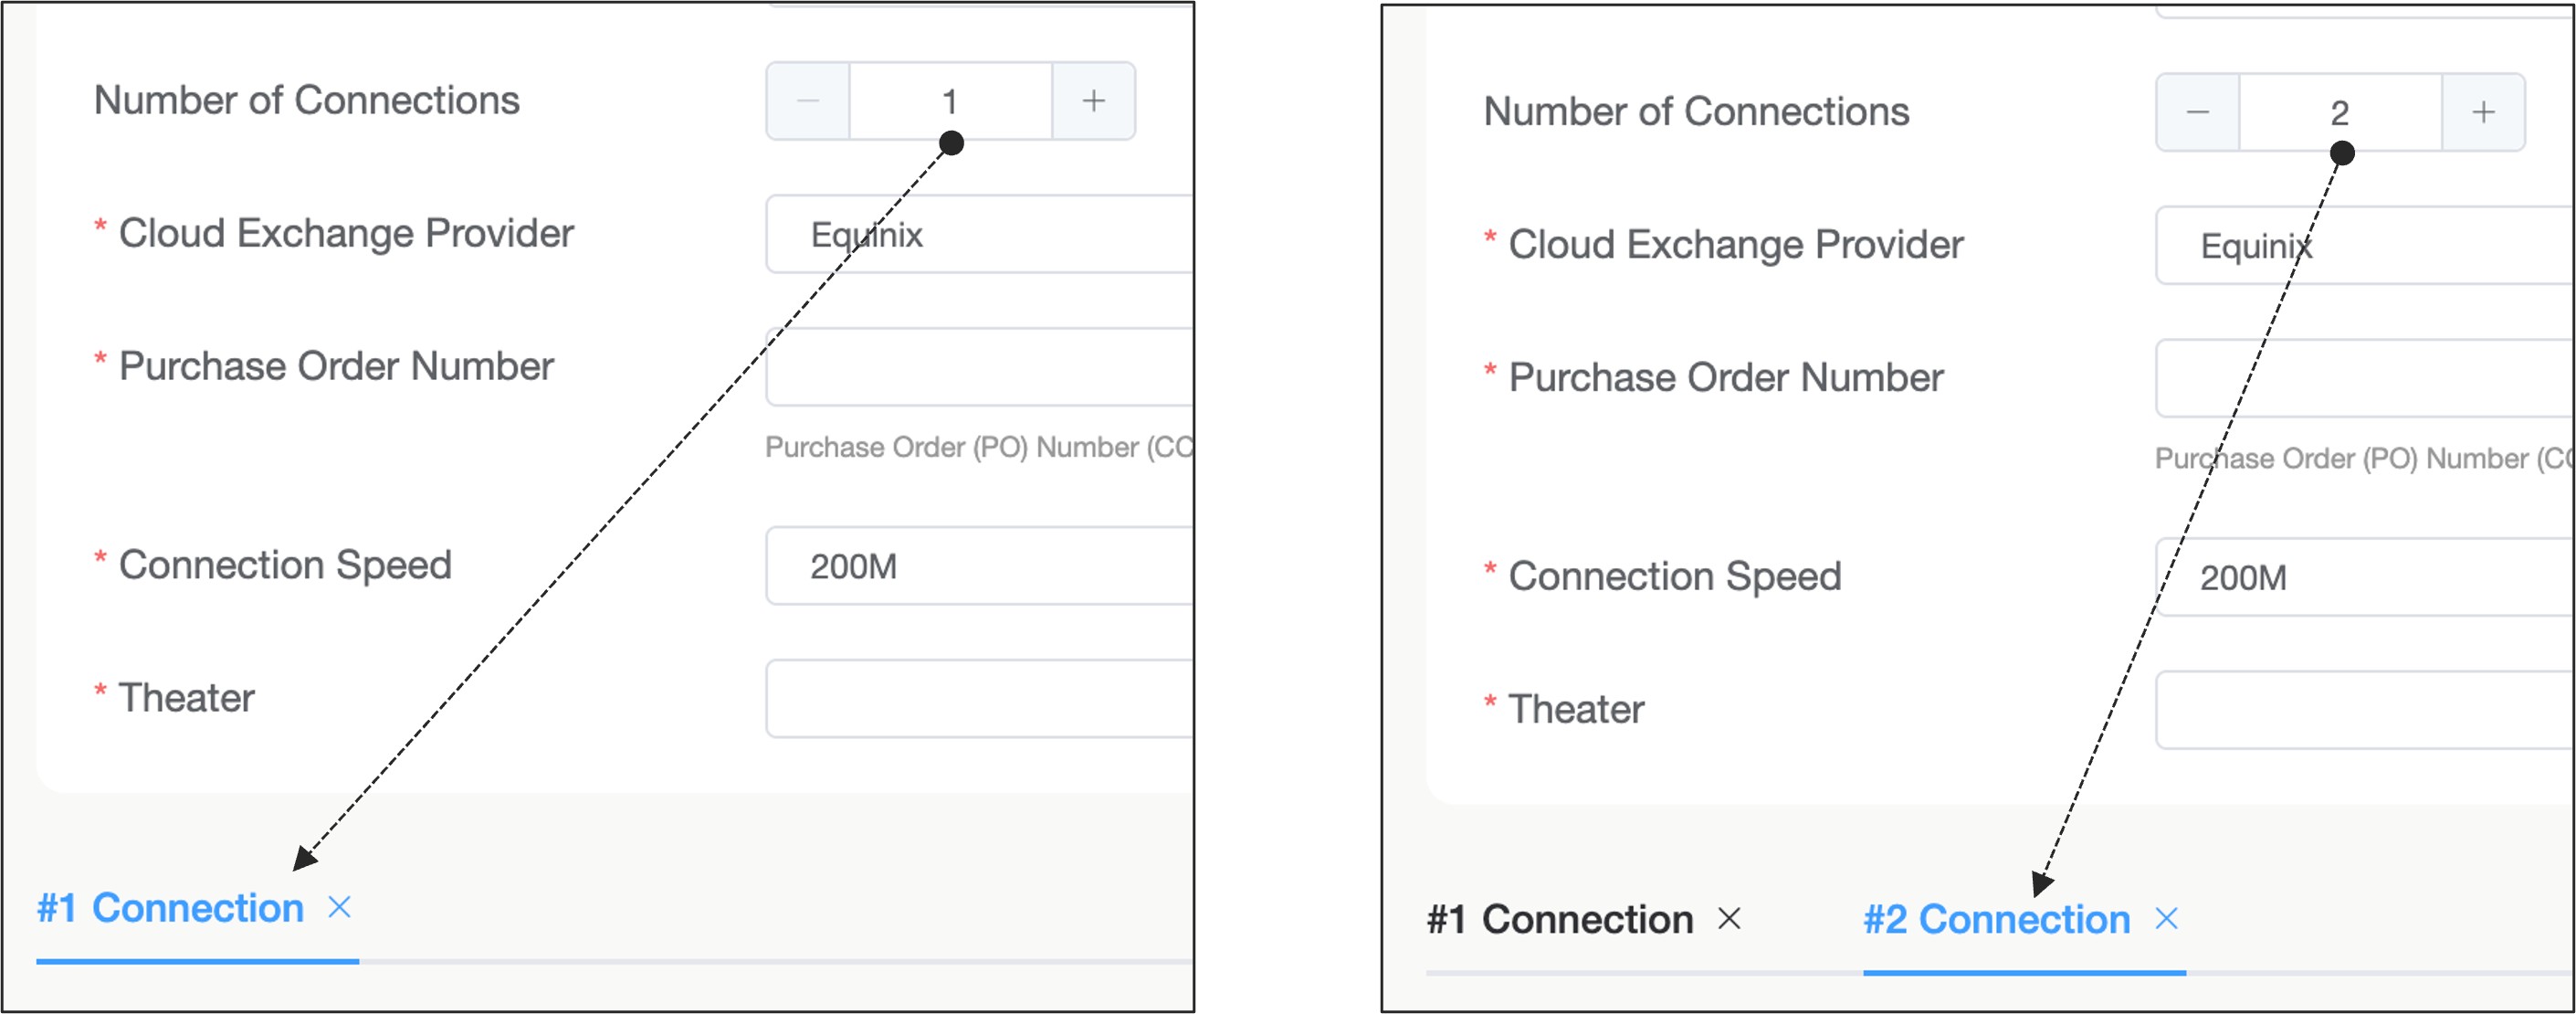
| ||||||||||||||||||
| 5 |
Select the cloud exchange provider, either Equinix or Megaport. 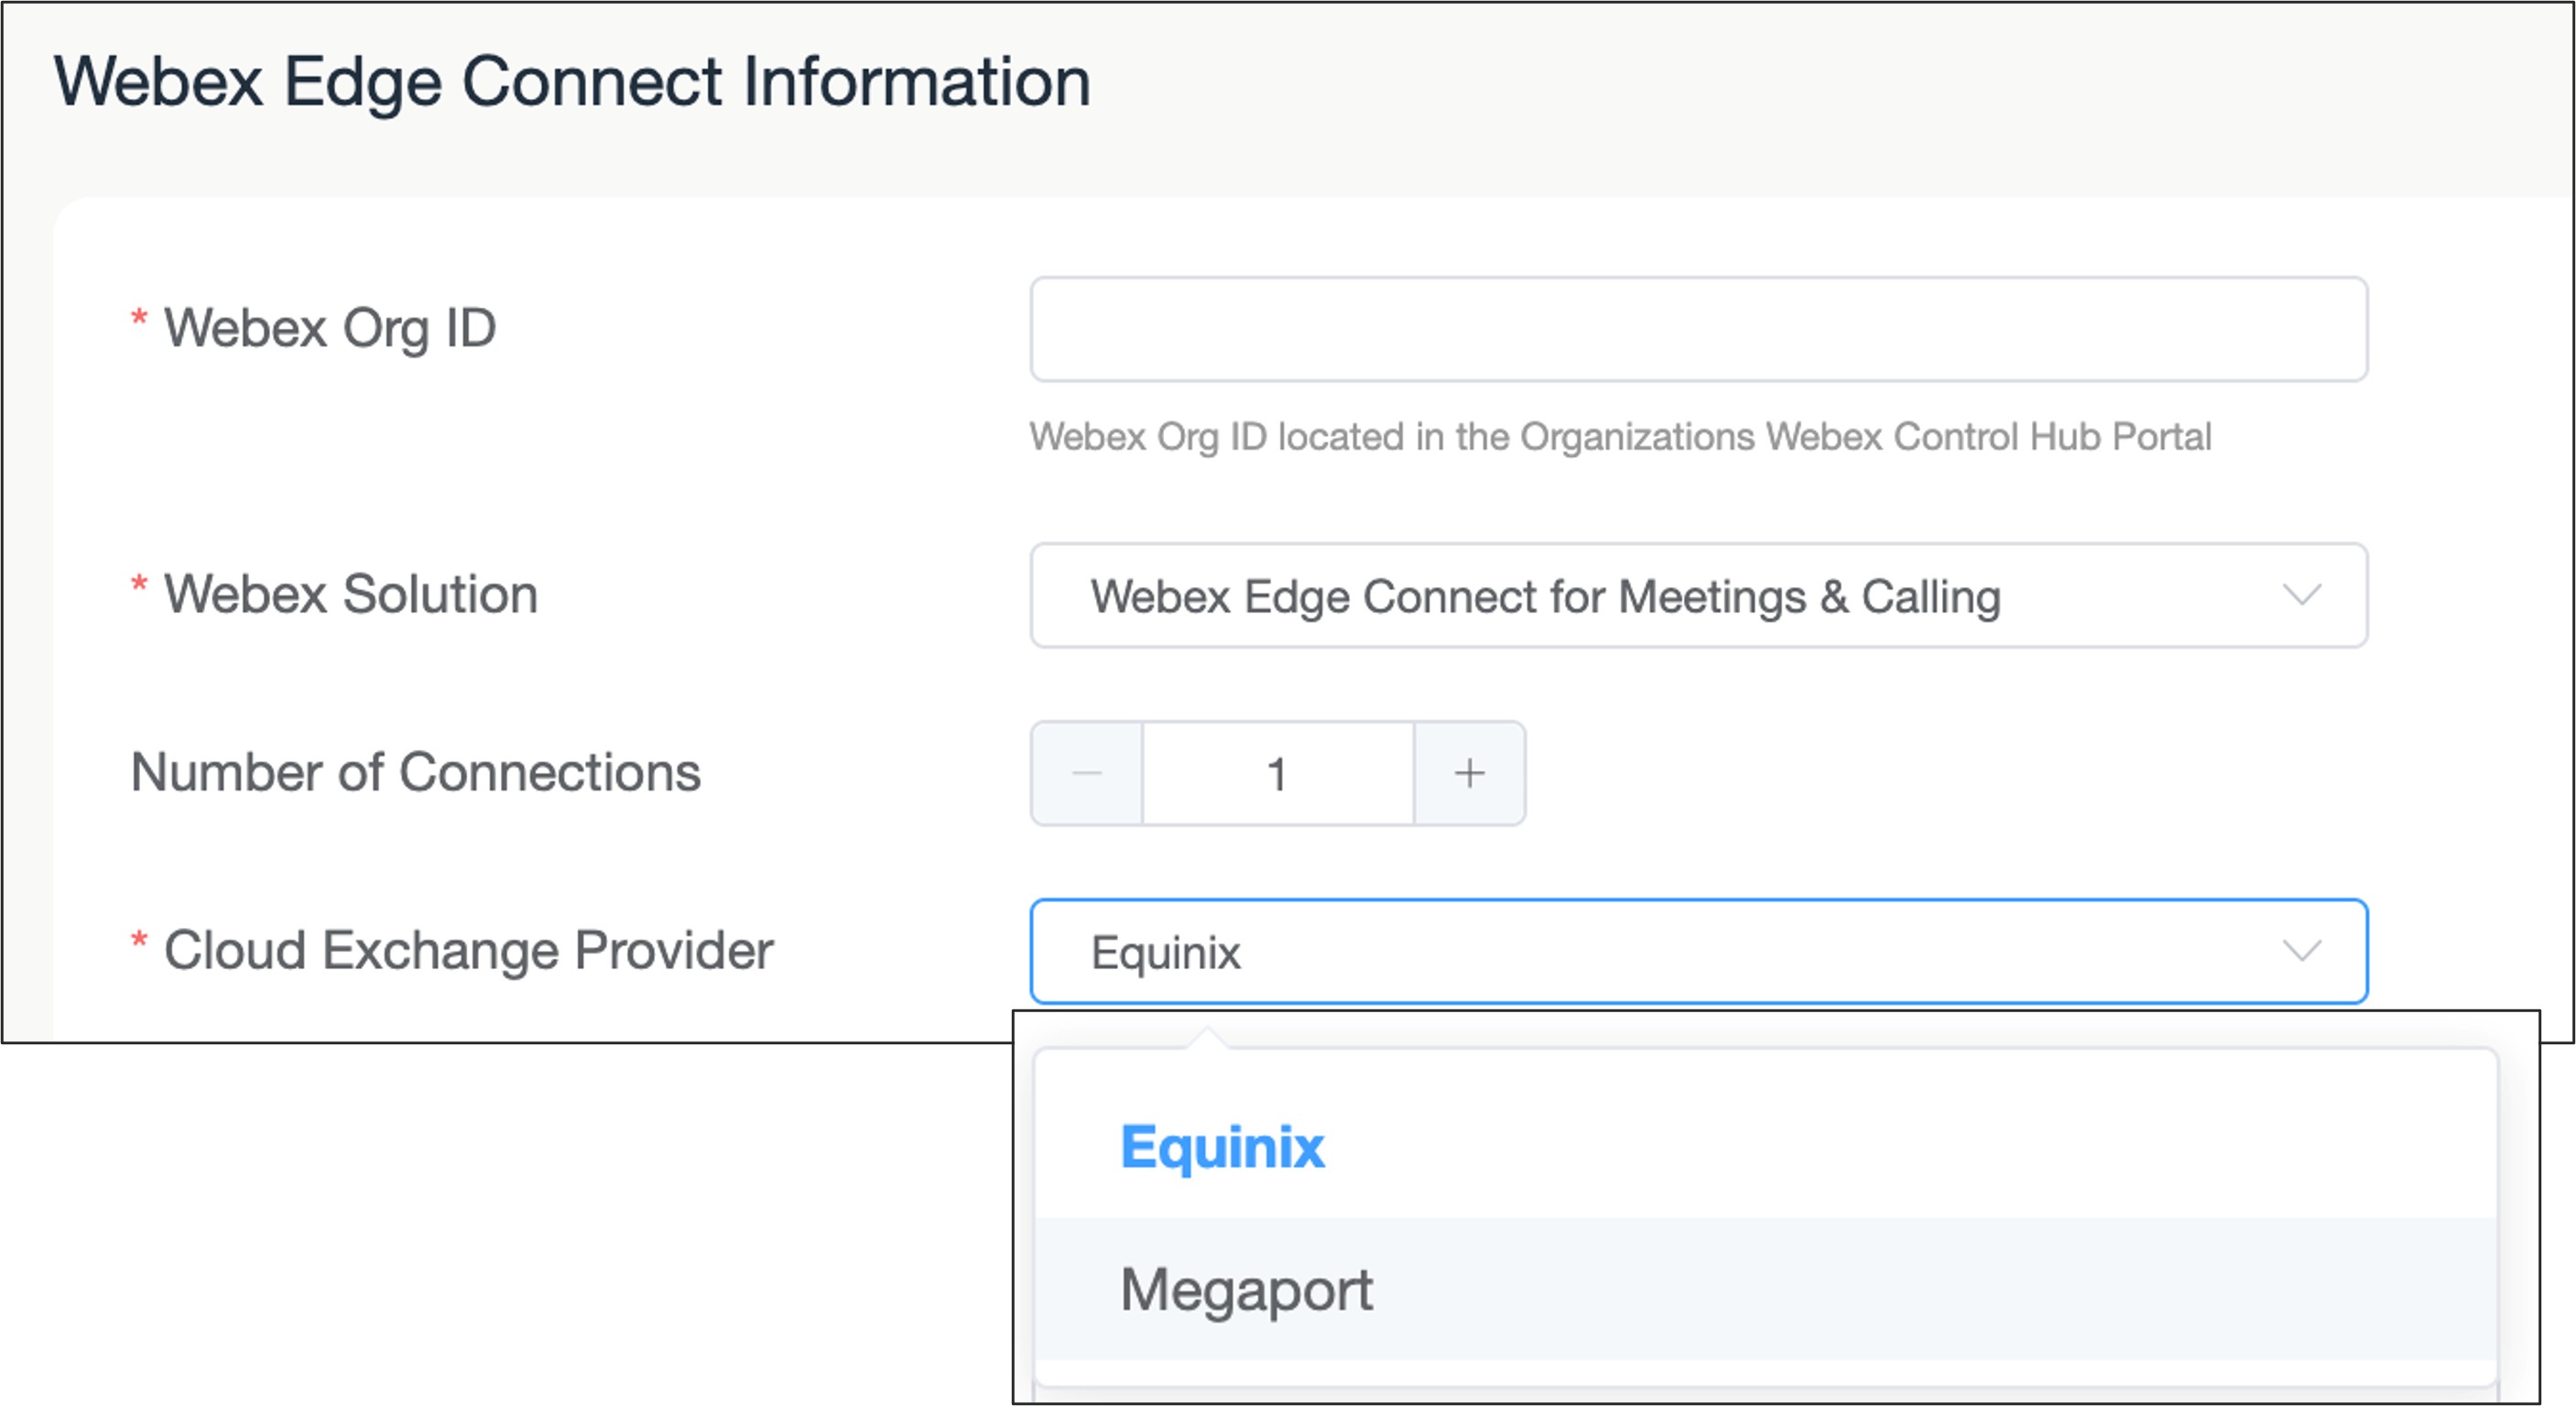
| ||||||||||||||||||
| 6 |
Enter the Cisco Purchase Order (PO#). 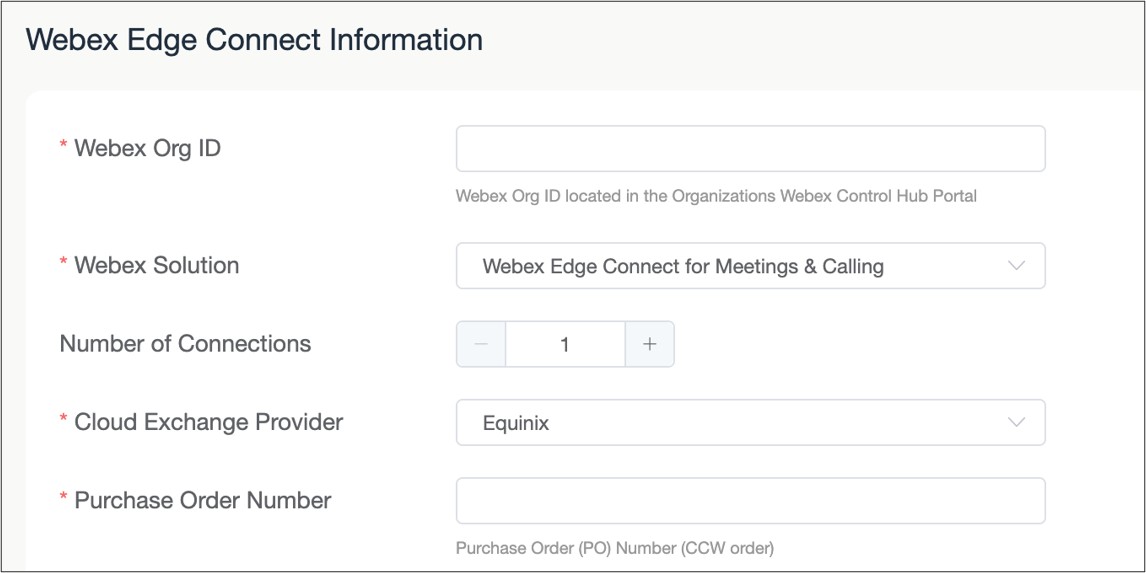
| ||||||||||||||||||
| 7 |
Select the connection speed of the link. 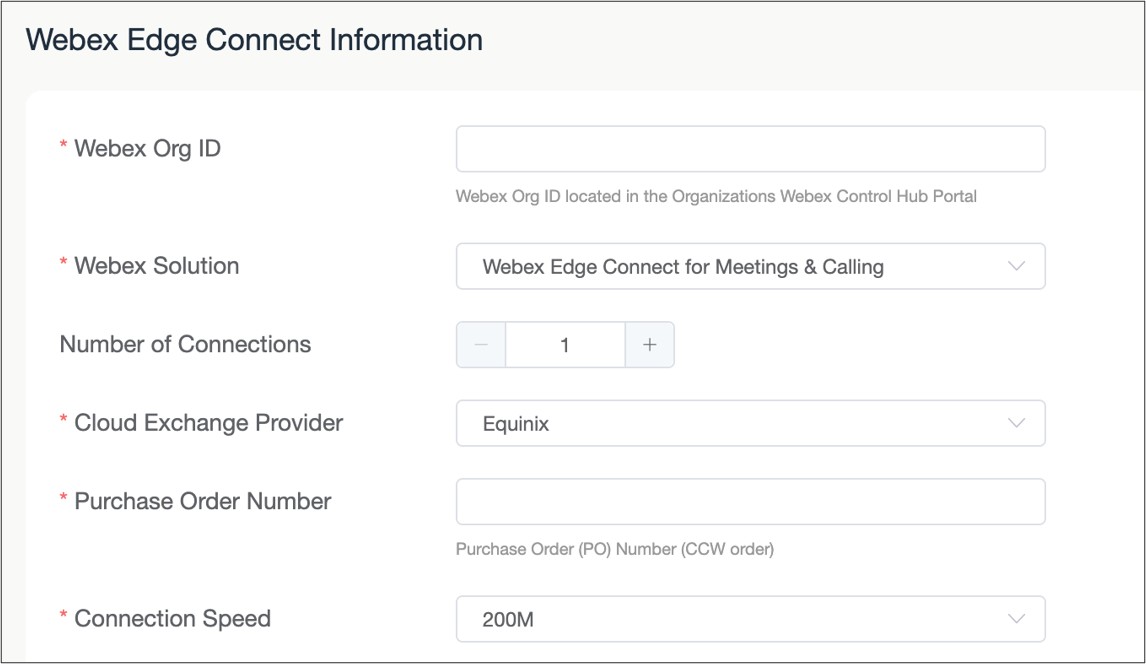
| ||||||||||||||||||
| 8 |
Select the Theater where the Edge Connect link will be provisioned. 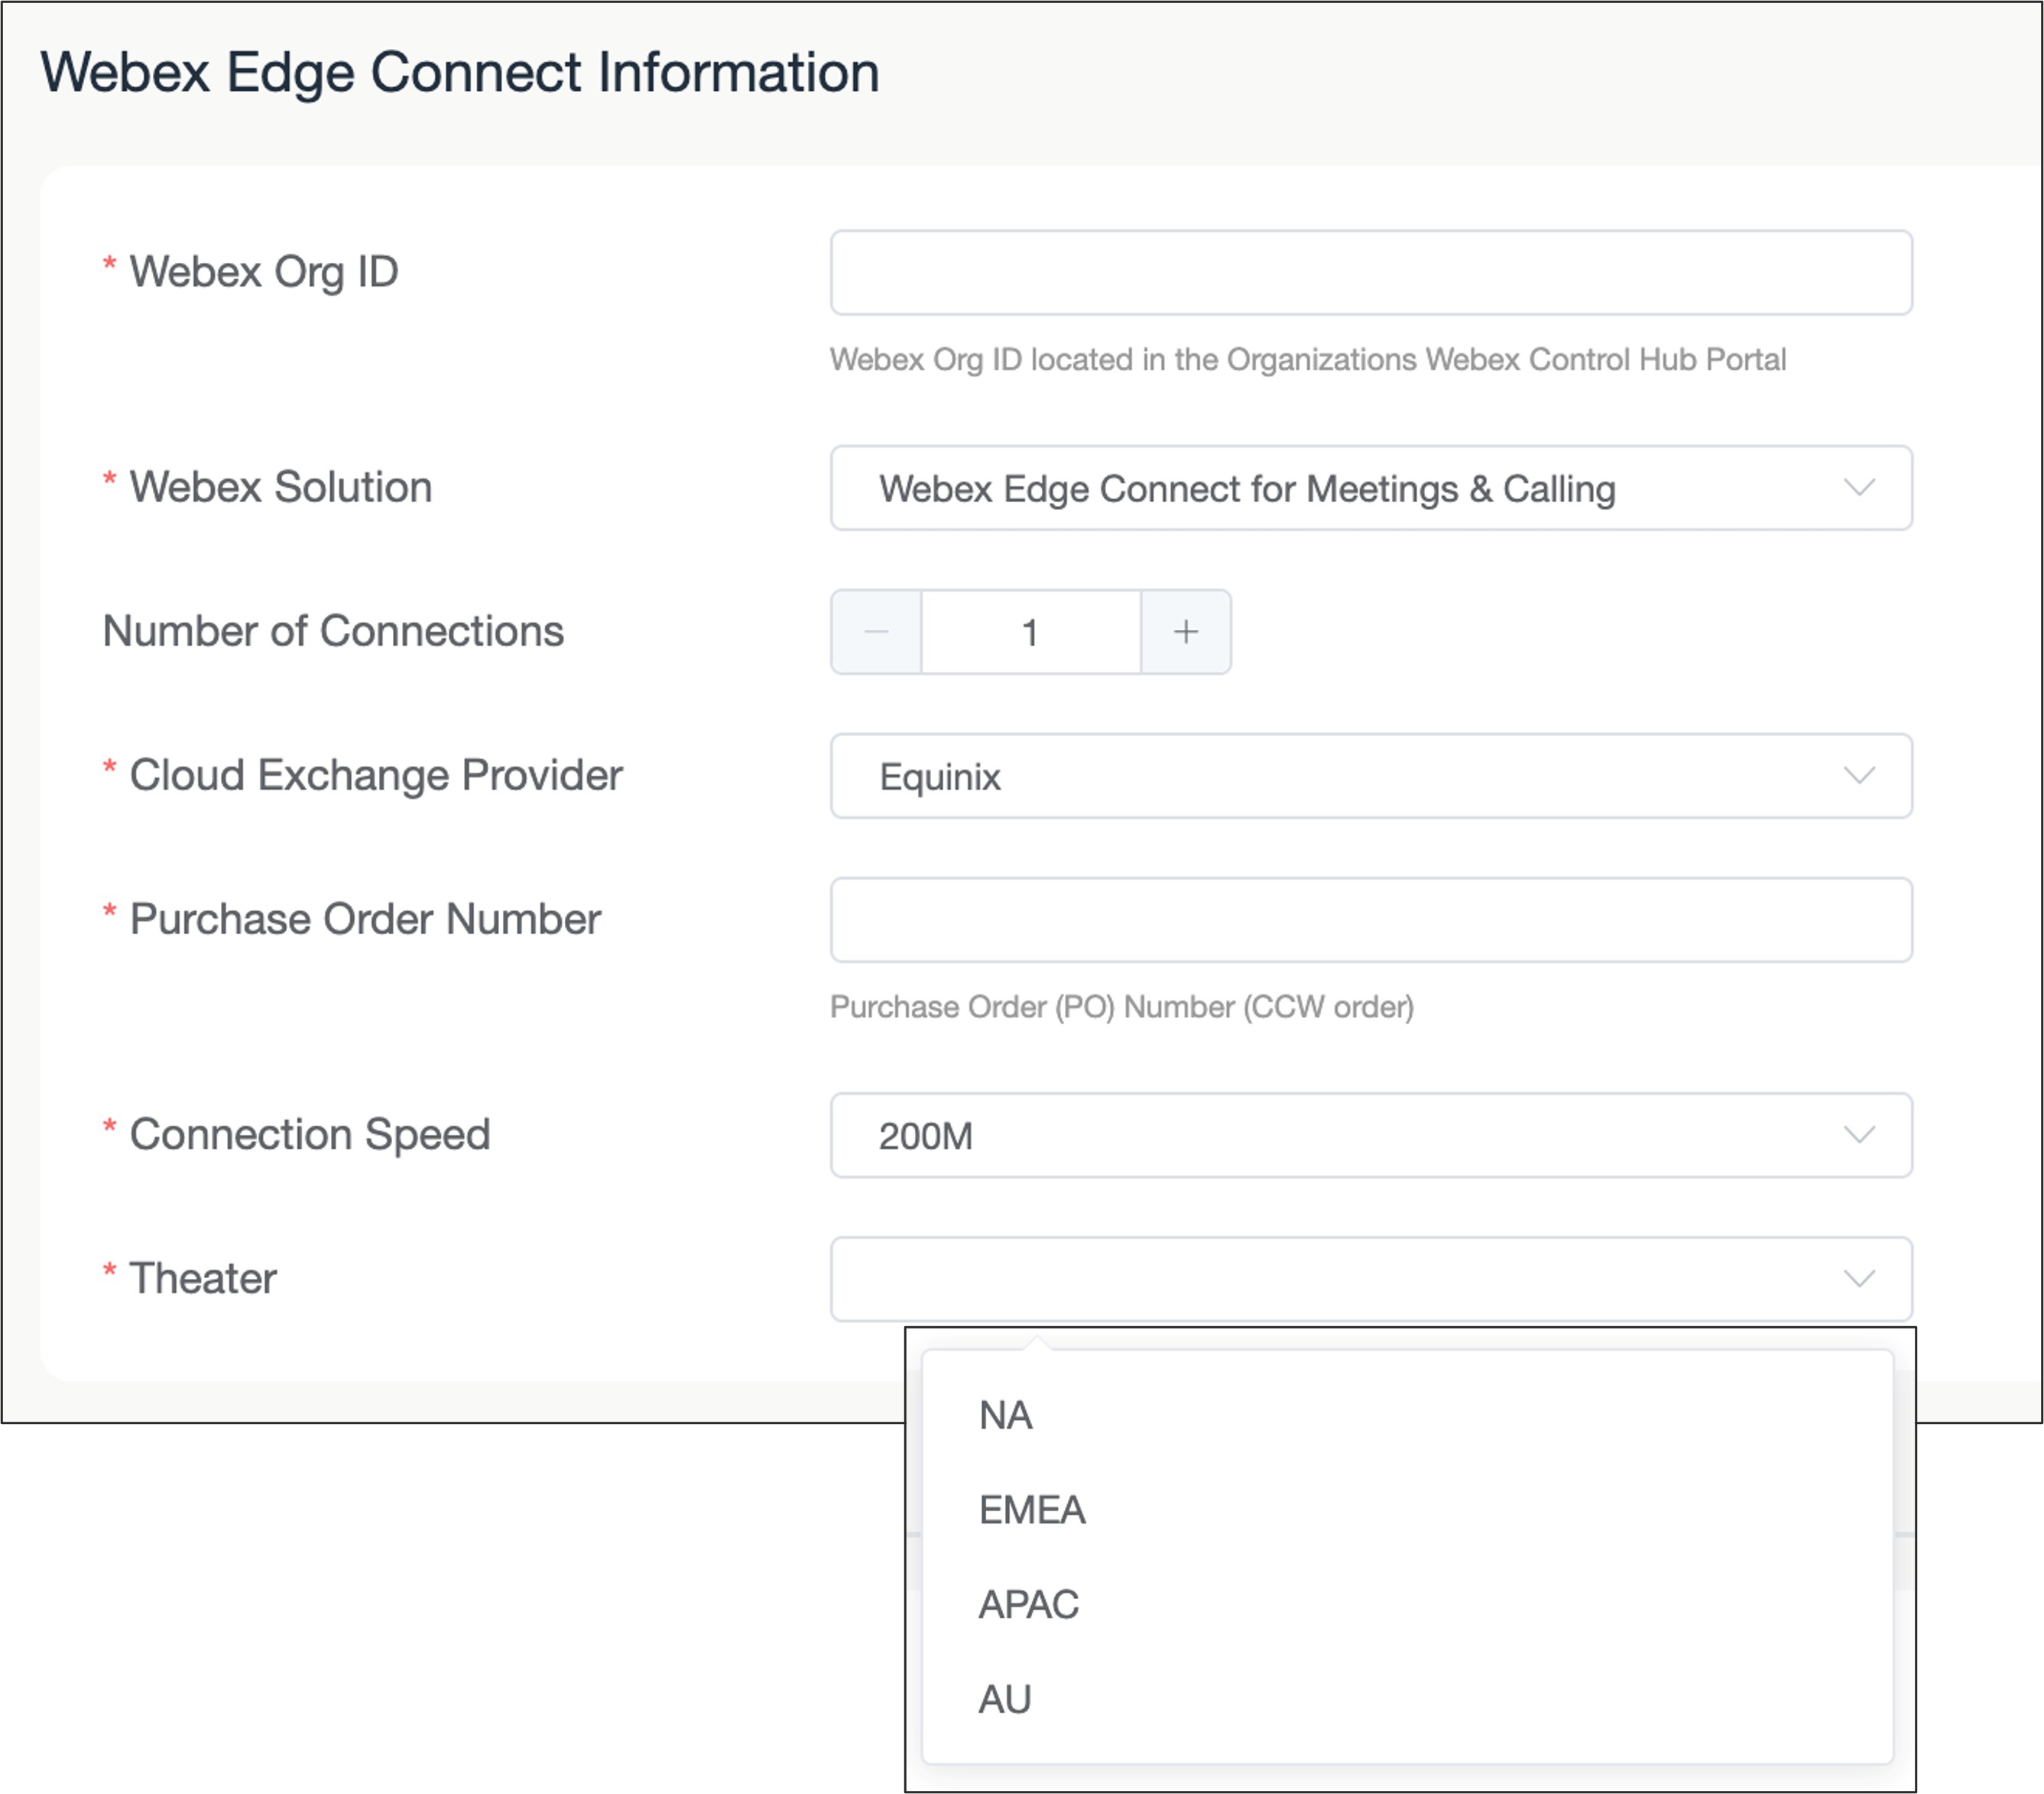
| ||||||||||||||||||
| 9 |
Select the Webex Data center peering location that will terminate the customer link and access the Webex backbone. The listing will update the local data centers based on the Theater selection 
| ||||||||||||||||||
| 10 |
If the Webex Solution selected is "Edge Connect for Dedicated Instance", then two connections are required. For each connection a dedicated primary and secondary Dedicated Instance Data Center location needs to be selected. 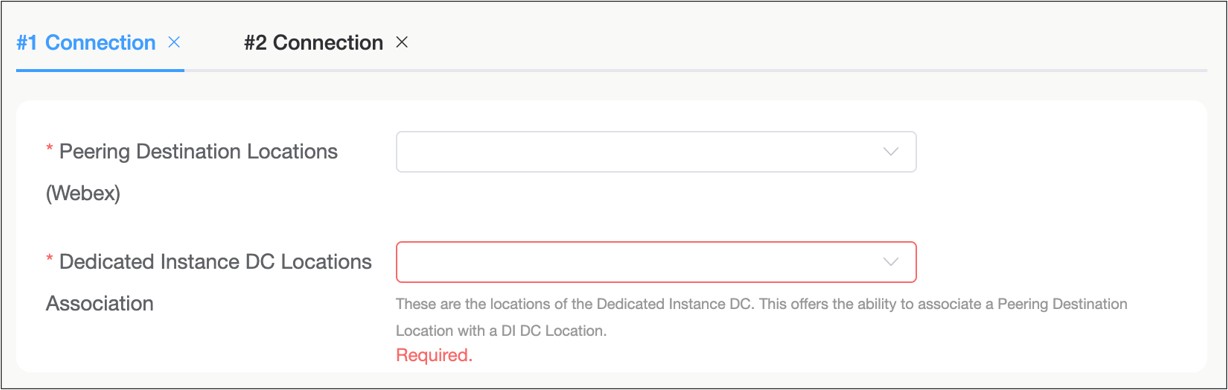
The Dedicated Instance primary and secondary DC locations are grouped together as a pair in each region. The below table is the pairing options per theater, and either can be assigned as the primary or secondary location within the pairing
Saudi Arabia data centers are not supported. | ||||||||||||||||||
| 11 |
Enter all the IP and BGP information to create the layer 3 connections from the customer’s edge router to the Webex edge router for the link. IP addressing is provided by the customer. 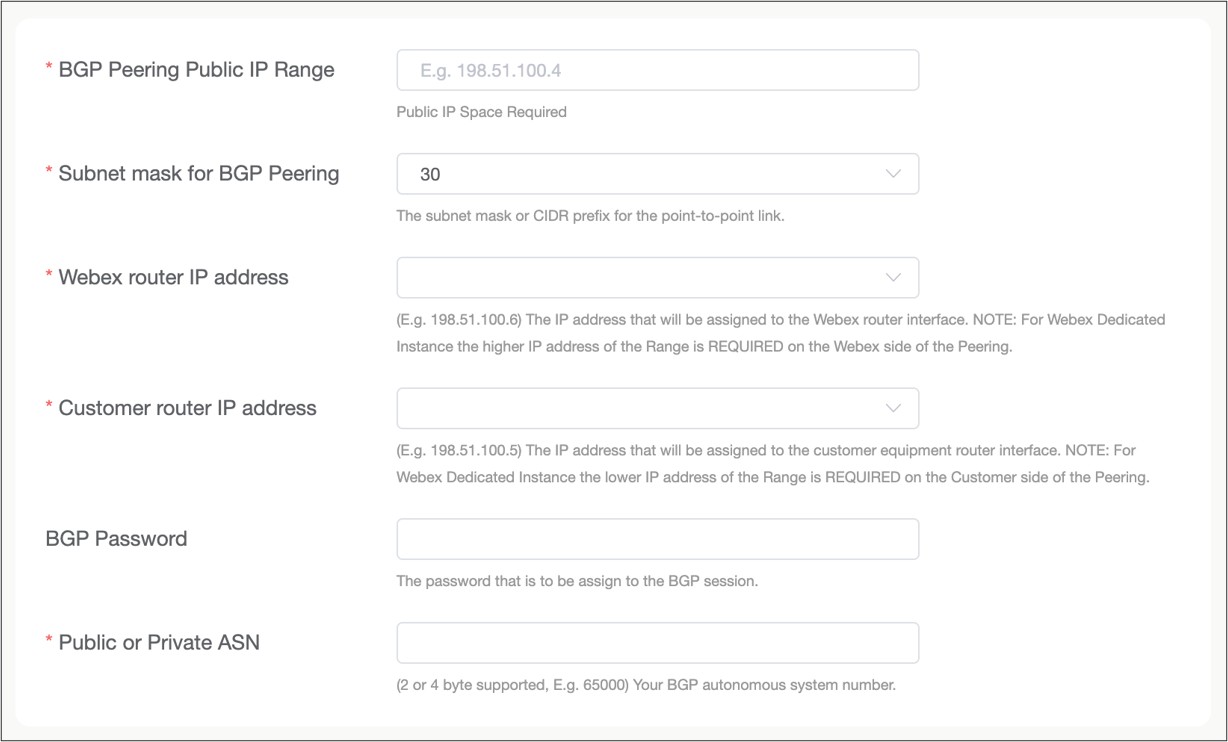
| ||||||||||||||||||
| 12 |
Enter the IP subnets that the customer is advertising to Webex. This is only applicable to the Edge Connect for Meetings and Calling links. All other types of Edge Connect links can skip this field. 
| ||||||||||||||||||
| 13 |
Enter the contact details of the team provisioning and managing the Edge Connect link. It is recommended to put multiple email addresses versus a single person’s email. 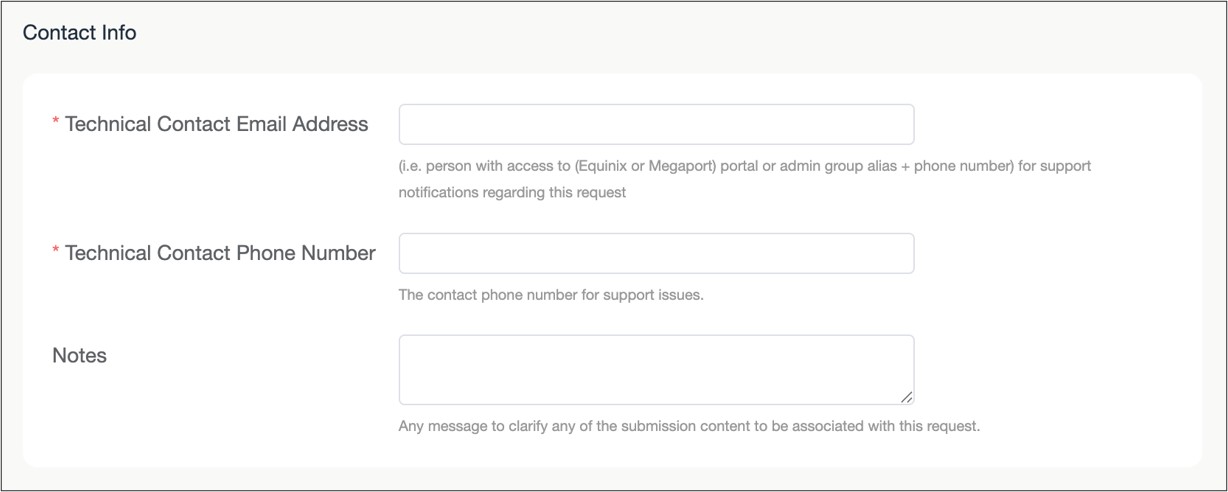
| ||||||||||||||||||
| 14 |
Review the request in the web page and then click Submit to enter your provisioning request. |
What to do next


