- Home
- /
- Article

Thanks for your feedback.

Webex Engage Administration guide
 In this article
 Feedback?
This guide provides an overview of the Webex Engage admin console and its capabilities. It covers how to view groups and users, configure various system settings, manage digital channel assets and conversation templates, and set up proactive chat features. The guide is designed to help administrators effectively use the console to streamline communication and manage customer interactions across multiple digital channels.
Get started with Webex Engage Admin console
Digital channels have made it easier for businesses to connect with their customers. As customer preferences change, people now expect to contact companies using their preferred channels. To meet these expectations, businesses need to be available on all major digital platforms. This shift toward digital communication gives companies more ways to engage with customers and deliver intuitive, interactive experiences. Today, providing excellent customer experience is a key factor that sets successful businesses apart.
Webex Engage is a cloud-based, omnichannel Webex Contact Center solution designed to help businesses deliver customer support across multiple digital channels. It enables agents to manage conversations on digital channels such as SMS, Facebook Messenger, Livechat, Email, Apple Messages for Business, and WhatsApp Business.
Key features:
- Multi-channel support: Effortlessly manages customer interactions across multiple channels, including messaging apps and social media.
- Intuitive interface: Easy-to-use interface to view customer conversations using filters and search functionality.
- Predefined templates: Empower agents with quick responses for consistent and efficient customer support.
- Handle events: Use events (manually triggered by agents) and rules (automatically triggered based on system events) to fetch data from or post data to external systems on demand.
- Workflow automation: Integrates with Webex Connect to automate workflows and streamline processes within the Webex Contact Center.
- Proactive engagement: Enables businesses to initiate conversations with customers using predefined rules and triggers, enhancing engagement and resolving issues faster.
- Agent productivity: Improves agent efficiency by offering tools and information that simplify customer interactions.
- Customer profile management: Provides agents with relevant customer details for more personalized and effective service.
In the Webex Engage Admin Console, administrators manage organization-wide settings for digital channels, including policies and channel asset configurations.
Prerequisites
- To sign-up for digital channels subscription, customers must purchase Flex-3.0 Contact Center license.
For more information, see Create a Webex Contact Center Order for a Customer.
- Based on entitlements, your organization needs to have digital services, such as Webex Engage and Webex Connect provisioned. For more information, see the Provision digital channels section in the Set up digital channels in the Webex Contact Center article.
- You must have administrator role and access credentials for the following applications:
- Control Hub
- Webex Contact Center
- Webex Connect
- Webex Engage
Access Webex Engage admin console
| 1 |
Sign in to Control Hub with your organization credentials. |
| 2 |
Go to Services > Contact Center. |
| 3 |
In the Quick Links section on the right pane, go to Digital Channels and click Webex Engage to access the Webex Engage admin console application. This opens the Webex Engage admin application in a new browser tab.
|
Navigate the admin console interface
When you launch the application from Control Hub in a new browser tab, the navigation panel appears on the left side of the interface. This panel allows you to quickly access different menus or sections of the admin console.
Left navigation panel
- Conversations: View customer conversations handled by agents.
- Groups: View default group details, such as information about the default team and a list of agents assigned to the default team. You can also configure events and rules within a team to allow your agents to retrieve or send data to third-party applications.
- Users: View all live agents enabled with omnichannel access or licensed as a premium agent, synchronized from Control Hub.
- Settings: Configure system-wide settings, such as conversation, contact policies, and agent console options, for your Webex contact center.
- Assets: View all digital channel assets and manage response templates that agents use to interact with customers.
- Proactive messaging: Set up and manage proactive messages to interact with customers.
- Help: Access help documentation for the Webex Engage admin console.
View chat conversations
You can view all the chat conversations that agents have handled in the past or are currently handling. The following table displays the columns in the Conversations list view.
| Column | Description |
|---|---|
| Created on | The date the conversation was initiated. |
| Conversation ID | The unique identifier generated by the system when the conversation is initiated. |
| Current priority | The queue priority of a conversation, ranges from P1 (highest) to P9 (lowest). |
| Alias ID | Indicates an external ID that can be used to reference a conversation. |
| Customer name | The name of the customer. |
| Customer ID | The unique identifier of the customer. |
| Channel |
The channel in which the chat was initiated:
|
| Status |
Status of the conversation. Possible values:
|
| Current team | Indicates the team that has handled or is currently handling the conversation. |
| Current assignee | Login ID of the agent to whom the conversation is currently assigned. |
| Actions | Click the Conversation log icon to view the transcript of the conversation. |
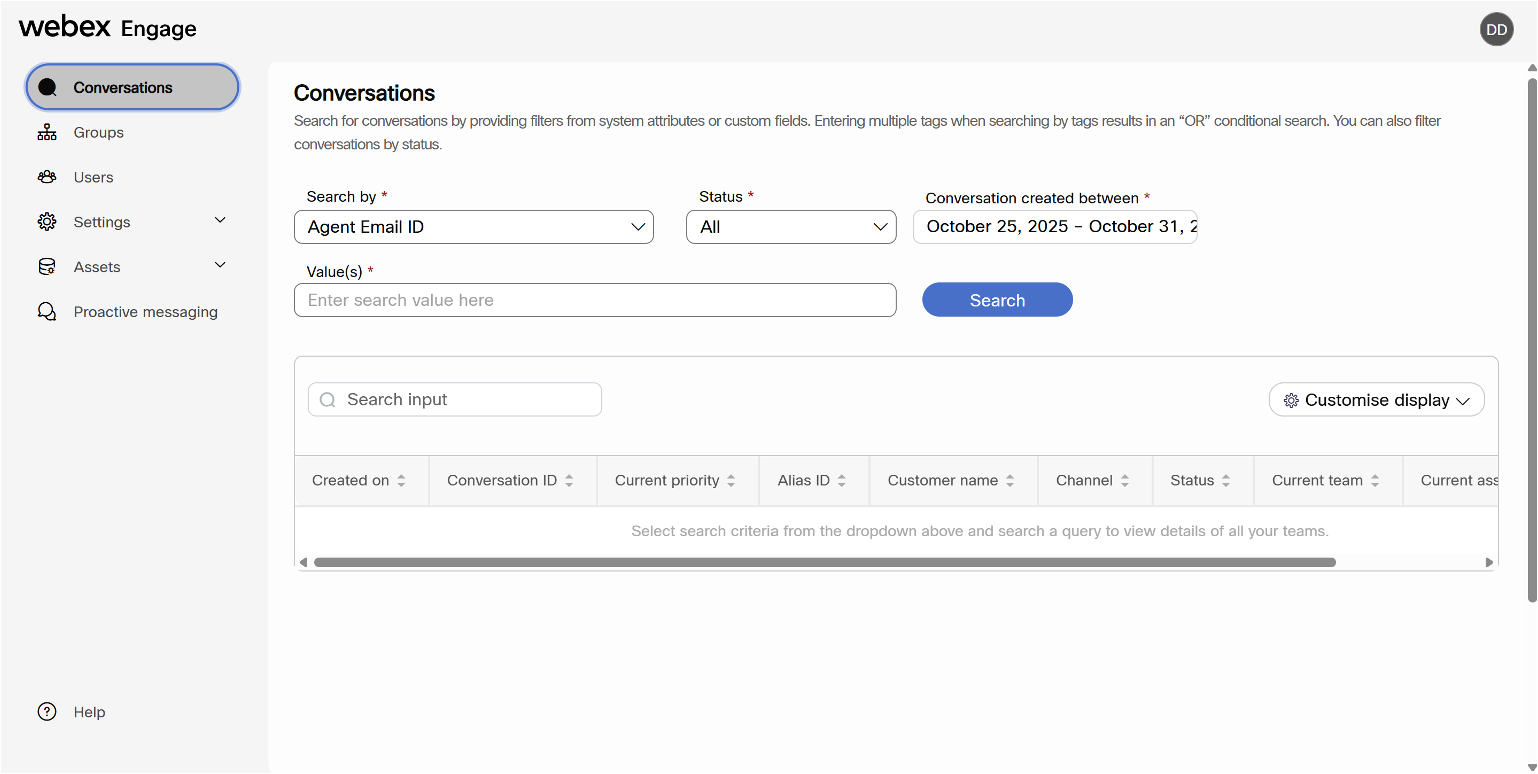
Search conversations by filters
In the Webex Engage admin console, you can search for customer conversations using various filters such as system attributes, status, date, and keywords. To find specific conversations:
| 1 |
In the navigation panel on the left, click Conversations. |
| 2 |
Use the Search by drop-down to choose a system attribute, such as Agent Email ID, Agent First Name, Agent Last Name, Agent Login ID, Alias ID, Conversation ID, Customer ID, Customer name, Email ID, Livechat ID, Mobile number, or Twitter ID. |
| 3 |
In the Status drop-down, choose a chat status to filter by: All, Closed, On hold, Open, or In Queue. |
| 4 |
Set the desired date range for when the conversations were created. |
| 5 |
Enter your search value in the text box provided. |
| 6 |
After selecting the necessary filters, click Search to view conversations that match your criteria. 7. |
| 7 |
(Optional) Click Customise display to modify the columns shown in the Conversations list view. Customise display of table. The Customise display option allows you to select which columns appear in the conversations list view.
|
Customise display of table
| 1 |
Hover over the Customise display drop-down in the top-right corner of the conversations table. |
| 2 |
Choose the columns you want to display by checking the checkboxes next to each column name. You can immediately view the changes in the search results as you check or clear
the columns.
|
View Groups
The Groups menu represents geographical sites. You can manage the sites from the Control Hub, but currently, you can't synchronize them in the Admin Console. By default, the Admin Console has one preconfigured group called Default. The Default group contains all agents with premium agent licenses.
The following table describes the details of the Groups menu:
| Field Name | Description |
|---|---|
| Group name | Name of the group. |
| Department | An alias to map the group to the physical org hierarchy. |
| No. of teams | Number of teams within the group. |
| No. of group admins | Number of group admins within the group. |
You can't change a group name.
View team
The Teams menu represents a group of people working in a particular function in a specific group (site). For example, Sales or Complaints. Although you can manage the sites from Control Hub, they currently can't be synchronized in the Admin Console. By default, the Admin Console has one team within the Default group called Default. All premium agent-licensed agents are mapped to the default team.
| Column Name | Description |
|---|---|
| Team logo | Displays the default logo. |
| Team name | Displays the name of the team that is set to Default. |
| Channels | Set to SMS, Facebook Messenger, Livechat, Email, Apple Messages for Business (AMB) and WhatsApp. |
| No. of managers | Displays the number of administrators that manage this team. |
| No. of agents | Displays the number of agents that are part of this team. |
| Others | Displays the number of users belong to other roles, such as Analyst, which aren’t applicable to Webex Contact Center today. |
When you click Default team, you can view the following tabs:
- Users
- Events and Rules
View users
Click Default team to view the users tab.
The Users table displays a read-only view of the users mapped to the Default team.
| Column Name | Description |
|---|---|
| Name | Name of the user (<First Name> <Last Name) as configured in Control Hub. |
| Login ID |
User's Login ID – Set to Cisco CI User ID. This has no bearing on the way users log in to Webex Contact Center. |
| Email ID of the user as configured in Control Hub. | |
| Role | Role of the user that can be Client Admin or Agent. |
| Status | Status of the user on the Agent Desktop, such as active or inactive. |
| Date | Date when the user was last active. |
| Time | Time when the user was last active. |
Configure events and rules
Events and rules allow you to post conversational data to trigger workflows or any HTTP APIs on external systems. Events allow your agents to trigger workflows on demand during an active conversation. The system triggers the rules on the back of various conversational lifecycle events.
Add a new event
| 1 |
In the Webex Engage admin console, choose . |
| 2 |
In the Teams screen, click Default to view the team details. |
| 3 |
Click the Events and Rules tab. |
| 4 |
Click Add new event on the top-right corner of the screen. The Configure Events page appears. |
| 5 |
Enter the Name of the event. |
| 6 |
Choose one of the following methods:
|
| 7 |
Enter the URL in the given field. On trigger of an event, the system calls this URL. |
| 8 |
Set the type of response format in the Expected response format field to JSON. |
| 9 |
Check the Wait for Response check box, which disables retriggering the same event until a response is received from the target system. |
| 10 |
Check the Display Response on the Chat Console check box to enable the agent to see the target system response in the chat console. |
| 11 |
You can choose to send the payload using either Key value pair or Custom payload.
|
Add a new rule
| 1 |
In the Webex Engage admin console, choose Groups > Default. |
| 2 |
In the Teams screen, click Default to view the team details. |
| 3 |
Click the Events and Rules tab. |
| 4 |
Click Add new rule on the top-right corner of the screen. The Configure Rule page appears. |
| 5 |
Enter the Rule Name. |
| 6 |
Choose the condition from the Fire when drop-down list. The rules trigger automatically based on a certain preconfigured condition. The rule allows the following conditions in the list:
|
| 7 |
Choose one of the following methods:
|
| 8 |
Enter the URL to make a request in the given field when the event is triggered. |
| 9 |
Choose the type of response format in the Expected response format field as JSON. |
| 10 |
You can choose to send the payload using either Key Value Pair or Custom payload.
|
| 11 |
Click Save to apply the configurations. Not all rules listed in the UI are applicable to the Webex Contact Center solution. |
View events and rules
Once you configure events and rules, you can view the following details on the Events and Rules page.
| Column | Description |
|---|---|
| Event ID | The unique identifier for the event or rule. |
| Event name | The configured name of the event or rule. |
| Type | Indicates whether the entry is an event or a rule. |
| Created on | The system records the date when it creates the event or rule. |
| Action | You can perform edit and delete actions on the events and rules. Edit event or rule
Delete event or rule
|
View Users
The Users section provides a list of live agents assigned to either premium or standard agent licenses. If some licensed users do not appear in this list, you can manually resynchronize users using Control Hub.
For details on creating users in Control Hub, see Manage Contact Center Users.
The synchronized user list doesn’t include the currently logged-in user or administrator.
The following Users table displays a read-only view of the user’s details:
| Column Name | Description |
|---|---|
| First name | First name of the user as configured in Control Hub. |
| Last name | Last name of the user as configured in Control Hub. |
| Status | Status of the user on the Agent Desktop, such as active or inactive. |
| Login ID |
User's login ID – Set to Cisco CI user ID. This has no bearing on the way users log in to Webex Contact Center. |
| Email ID | Email ID of the user as configured in Control Hub. |
| Created on | The date and time the user was created in Control Hub. |
| Role type | Role of the user that can be Administrative or Customer Care. |
Customise display of table
The Customise display option allows you to choose which columns to show in the Users list view.
| 1 |
Hover over the Customise display drop-down list in the top-right corner of the Users table. |
| 2 |
Choose the columns that you want to display by checking the check boxes next to each column name. You can immediately view the changes in the search results as you check or clear the columns.
|
Manage conversation settings
You can set up automated alert messages for both customers and agents when either party becomes inactive during an ongoing digital channel interaction. If a customer is unresponsive, automated alerts will prompt them to reply. If an agent is unresponsive, alerts inform the customer that the agent is busy and will respond soon.
You can configure up to three auto-responses for each scenario, specifying the time interval (minutes, hours, or days) after which the message is sent if there is no response. These settings help reduce agent handling time and notify customers about any delays in connecting to agents across all channels.
Configure auto-response message
| 1 |
In the Webex Engage admin console, go to Settings > Conversation configuration > Auto-actions. |
| 2 |
In the Unresponsive conversations tab, click Add auto-reply in the top-right corner of the screen. |
| 3 |
Choose a channel from the Channel drop-down list. |
| 4 |
Choose an Asset from the Asset name drop-down list. |
| 5 |
Enable the Unresponsive agents toggle button to send the auto-response messages to the customer. Configure the following settings: |
| 6 |
Enable the Unresponsive customers toggle button to send the auto-response messages to the customer. Configure the following settings: |
| 7 |
Click Save to save the configuration. |
View and manage auto-response messages
You can view all the configured auto-response messages in the Auto-reply for unresponsive conversations list view.
| Column | Description |
|---|---|
| Channel | The name of the channel used for sending the auto-response message. |
| Asset name | The name of the channel asset. |
| For unresponsive agent | Possible values: Yes and No |
| For unresponsive customer | Possible values: Yes and No |
| Actions |
You can perform edit and delete actions on an auto-response message. Edit auto-response message:
Delete auto-response message:
|
Manage contact policy settings
In the Contact policy settings, you can:
- Configure restricted words for both customer and agent messages. Restricted words in customer messages are masked, and agents are prevented from sending messages that contain them.
Configure restricted words
You can configure a list of words that agents must not use during conversations. If these words appear in a customer's message, the system masks them and hides them from agents unless an agent has explicit permission to view masked words.
| 1 |
In the Webex Engage admin console, go to Settings > Contact policy > Restricted words. |
| 2 |
Choose the Default team from the Team drop-down list. |
| 3 |
In the Default restricted word list, view and search for all system-defined restricted words in the Active section.
You can move restricted words between the Active and Inactive sections, but you cannot delete them. |
| 4 |
To configure the Custom restricted word list, enter the restricted word in the text field and click Add word. |
| 5 |
Enable the Notify on usage of restricted words toggle to alert agents when users of a team try to send messages containing any configured restricted words. |
| 6 |
Enable the Allow agent to unmask restricted word that appear in inbound messages toggle to grant agents permission to unmask restricted words in inbound messages. |
Manage agent console settings
You can configure and manage conversation-specific settings in the Agent console menu.
Manage conversation pane settings
You can manage both global and team-specific settings for conversations in the Conversation pane menu. In Global settings, you can configure options such as attachments. In Teamwise settings, you can configure settings for adding recipients to email conversations.
Configure attachments
You can enable attachments and set the allowable attachment size and file formats. When enabled, agents can use attachments in conversations. If disabled, attachments won’t be allowed on any channel.
| 1 |
In the Webex Engage admin console, navigate to Settings > Agent console > Conversation pane. | ||||||||||||||
| 2 |
Go to Global settings and click the Attachments tab. | ||||||||||||||
| 3 |
Enable the Enable attachment toggle. You will see channel-specific details for attachment size and file formats.
| ||||||||||||||
| 4 |
To edit the attachment details: | ||||||||||||||
| 5 |
Click Save. |
Add recipients to email conversation
You can configure whether agents are allowed to add additional recipients to customer-initiated or agent-initiated email conversations. This includes allowing carbon copies (CC), forwarding, and adding external email addresses.
| 1 |
In the Webex Engage admin console, go to Settings > Agent console > Conversation pane. |
| 2 |
Go to the Team wise settings tab. |
| 3 |
To allow agents to send carbon copies (CC) or forward emails, go to Add recipients to email conversation and enable the Allow carbon copy (CC) and forward toggle. |
| 4 |
To allow agents add external email addresses as recipients, check the Allow external email IDs check box.
|
Manage digital channel assets
This section outlines the list of different channel assets configured in Webex Connect application and how to configure livechat widget for the customer conversations.
For more information about configuring channel assets in Webex Connect, see the Channel Asset Configuration documentation.
View channel assets
Channel assets are business entry points for your customers to reach out to the business contact center. Channel assets registered with Webex Contact Center from the Webex Connect application appear here.
If you do not see your asset, such as SMS number, Facebook Messenger page, Livechat App, Apple Messages for Business (AMB), WhatsApp, or Business Email Account in the Assets page, check the registration status of the asset on the Webex Connect application and ensure that it states Registered on <timestamp>.
- When an administrator deletes assets on Webex Connect, those assets will no longer appear on the Control Hub or Webex Engage Assets screen.
- Don't edit any asset details directly on the Channel Assets page except the Livechat widget configuration.
When you click the Channel Assets icon on the left menu, you see a list of current channel assets registered with Webex Contact Center. Each tab displays the channel and contains the channel assets.
| Column | Description |
|---|---|
| Channel | Name of the channel. |
| Asset Details | Business address of the asset, such as SMS number, WhatsApp number, Livechat App ID, Business Email ID, Apple Messages for Business ID, and Facebook page link. |
| Asset Name | Name of the asset as configured on the Webex Connect application. |
| ID | Internal ID generated for the asset by Webex Contact Center. |
| Added on | Timestamp when the asset was registered with Webex Contact Center. |
| Action | Edit option (available only for the Livechat channel). For all other channels, clicking this option will display a read-only view of the page. |
Configure livechat widget
The Livechat channel enables businesses to engage and support their website visitors and customers. Customers can initiate a conversation with the contact center using the Livechat widget.
Before you begin
The Livechat channel assets must be created in the Webex Connect application.
| 1 |
In the Webex Engage admin console, navigate to . |
| 2 |
Click the Livechat tab. |
| 3 |
Click the Edit icon in the Action column of a Livechat asset. The configuration of LiveChat asset is done in three sections:
|
Configure livechat asset
Go to the Configure Assets tab of the Livechat settings page and configure the following settings:
| 1 |
Choose Default Team from the Default team drop-down list. |
| 2 |
Enable or disable the Show chat conversation history to the end user on re-login toggle to show or hide chat conversation history to customers on revisiting the website. |
| 3 |
Enable or disable the Allow customer to request for chat transcript from Livechat widget toggle to enable or disable customers to request a chat transcript from the Livechat widget. You can configure the agent name or generic alias in the chat transcript as the agent identifier to protect the agents' privacy. |
| 4 |
Enable or disable the Clear threads at end user's widget toggle to clear or retain conversations when customer clicks End chat, or navigates to a different website, or closes the browser. |
| 5 |
Ensure that the Close chats on the server upon chat abandonment toggle is disabled. This toggle instructs the application to automatically close chats on the server when customers abandon the chats. This feature doesn’t apply yet to Webex Contact Center tenants. |
| 6 |
Enable the Notification sounds toggle to play a chime sound when the end user receives a new message. |
| 7 |
Click Save changes. |
Configure Website settings
Go to the Websites tab of the Livechat settings page and configure the following settings:
| 1 |
Click Add Website. The Website Settings page appears with the following four sections:
|
| 2 |
In the General tab, configure the following settings: |
| 3 |
Click the Conversation tab, configure the following settings: |
| 4 |
In the Banned Customers tab, you can ban customers from reaching out to agents on the Livechat widget. You can configure their IP addresses in the banned customer's list. To add banned customer IP Addresses:
A success message appears on the screen, and the system lists the IP details on the banned customer’s screen. To edit a banned customer IP address:
To delete a banned customer IP address, click the Delete icon in the Actions column of a specific customer. |
Configure Installation settings
Navigate to the Installation tab of the Livechat settings page and configure the following settings:
| 1 |
Enable the Take consent from the customer toggle to take manual consent from customers on Livechat widget. |
| 2 |
Click Copy to copy the widget script. |
| 3 |
Paste the script above the Do not modify the installation script (of the Livechat widget within the client’s code) except for the consent message and button labels. For best results and to avoid conflicts with the site, embed the script exactly as provided, directly beneath the body tag. Customer experience on the Livechat widget When the Take consent from the customer setting setting is enabled for an asset, the customers will navigate through the following journey:
If the network connection drops, end customers will see a weak network connection banner on the Livechat widget. |

Manage conversation templates
You can preset responses that agents can use when they respond to customer queries. You can create, edit, and delete templates on all channels in the Templates tab. You can also create multiple text templates at once by using the Upload Templates feature on the Templates page. This allows for efficient and streamlined template management.
Upload templates
Use the Upload Templates feature to perform bulk upload of templates. Bulk upload reduces the time taken to create templates for individual widgets.
| 1 |
In the Webex Engage admin console, navigate to . | ||||||||||||||||
| 2 |
In the Organisation tab, click Upload templates. | ||||||||||||||||
| 3 |
Click the Download sample file here link to download the sample .csv file. Rename the sample file with a unique name. Open the sample file and enter the following details in the corresponding cells: Don't edit or change the column header names. Ensure the team names are comma-separated in the TeamNames column.
| ||||||||||||||||
| 4 |
Delete the help notes in the .csv file before you upload it. | ||||||||||||||||
| 5 |
Save the file. | ||||||||||||||||
| 6 |
Click Upload File. Upload the file only in .csv format. | ||||||||||||||||
| 7 |
Click Track Upload Status to view the status of the files that you uploaded.
| ||||||||||||||||
| 8 |
If the status is Completed with errors or Failed:
|
Manage categories
You can use categories to organize groups of templates. A folder icon precedes each category. A category containing templates is represented by a filled folder icon, while an empty folder icon indicates a category without templates. Following are the category tabs:
- Organization level category: You can create and manage list of categories.
- Group level category: You can view categories assigned to the Default group. Currently, this category is not applicable to Webex Contact Center tenants.
- Team level category: You can view categories assigned to the Default team. Currently, this category is not applicable to Webex Contact Center tenants.
Add a category
| 1 |
In the Webex Engage admin console, navigate to . |
| 2 |
Click the Categories tab. |
| 3 |
Click Add category on the top-right corner of the page. A pop-up window appears. |
| 4 |
Enter the Category name and click Add. A success message appears; the category is listed in the table list. The maximum character limit allowed for the Category name field is 35. |
View, edit, and delete categories
| 1 |
In the Webex Engage admin console, navigate to . | ||||||||||||||||||
| 2 |
Click the Categories tab and go to the Organization tab. | ||||||||||||||||||
| 3 |
To search for a category, enter your search criteria in the Search field. The matching results will appear in the list view. The following table outlines the category details.
| ||||||||||||||||||
| 4 |
To customize columns in table: You can instantly view the results on the screen by checking and unchecking the check boxes. By default, the Category and Actions columns are preselected and can’t be disabled. |
Add a template
You can create and manage templates which your agents can use as canned responses within a conversation. You can choose to create a common template for all channels or create channel-specific templates. You can create templates for the following channels:
- SMS
- Facebook Messenger
- Livechat
- Apple Messages for Business (AMB)
Create a common template
You can create a common template for all channels.
| 1 |
In the Webex Engage admin console, navigate to . |
| 2 |
Click Add template. |
| 3 |
Choose All from the Channel drop-down list to create a universal template for all channels. |
| 4 |
Choose the required category from the Template category drop-down list. |
| 5 |
In the Template name field, enter the name of the template. |
| 6 |
(Optional) In the Sender ID field, enter the sender ID. The default Sender ID (a short code assigned to the team if SMS is enabled as a Channel) loads automatically when you create a template. This feature allows you to create and track the templates. |
| 7 |
In the Template text field, enter the text.
|
| 8 |
Enable the Lock template toggle to lock text templates. Agents can edit only custom or dynamic fields when you lock a template. |
| 9 |
Click Save. |
Create an SMS template
| 1 |
In the Webex Engage admin console, navigate to . |
| 2 |
Click Add template. |
| 3 |
Choose SMS from the Channel drop-down list to create an SMS template. |
| 4 |
Choose the required category from the Template category drop-down list. |
| 5 |
(Optional) In the Sender ID field, enter the sender ID. The default Sender ID (a short code assigned to the team if SMS is enabled as a Channel) loads automatically when you create a template. This feature allows you to create and track the templates. |
| 6 |
In the Template name field, enter the name of the template. |
| 7 |
In the Template text field, enter the text.
|
| 8 |
Enable the Lock template toggle to lock text templates. Agents can edit only custom or dynamic fields when you lock a template. |
| 9 |
Click Save. |
Create an email template
| 1 |
In the Webex Engage admin console, navigate to . | ||||||||||||||||||||||
| 2 |
Click Add template. | ||||||||||||||||||||||
| 3 |
Choose Email from the Channel drop-down list to create an email template. | ||||||||||||||||||||||
| 4 |
Choose the required category from the Template category drop-down list. | ||||||||||||||||||||||
| 5 |
In the Template name field, enter the name of the template. | ||||||||||||||||||||||
| 6 |
In the Template text field, enter the text. You can add emojis to the customized text. You can apply the rich formatting styles to the text as described in the table.
| ||||||||||||||||||||||
| 7 |
Enable the Lock template toggle to lock text templates. Agents can edit only custom or dynamic fields when you lock a template. | ||||||||||||||||||||||
| 8 |
Click Save. |
Create a livechat template
| 1 |
In the Webex Engage admin console, navigate to . |
| 2 |
Click Add template. |
| 3 |
Choose Livechat from the Channel drop-down list to create a livechat template. |
| 4 |
Choose the required category from the Template category drop-down list. |
| 5 |
In the Template name field, enter the name of the template. |
| 6 |
In the Template text field, enter the text.
|
| 7 |
Enable the Lock template toggle to lock text templates. Agents can edit only custom or dynamic fields when you lock a template. |
| 8 |
Click Save. |
Create a Facebook messenger template
| 1 |
In the Webex Engage admin console, navigate to . |
| 2 |
Click Add template. |
| 3 |
Choose Facebook from the Channel drop-down list to create a Facebook messenger template. |
| 4 |
Choose the required category from the Template category drop-down list. |
| 5 |
In the Template name field, enter the name of the template. |
| 6 |
Choose one of the following template types for the Facebook messenger:
|
| 7 |
Enable the Lock template toggle to lock text templates. Agents can edit only custom or dynamic fields when you lock a template. |
| 8 |
Click Save. |
Create a WhatsApp template
| 1 |
In the Webex Engage admin console, navigate to . |
| 2 |
Click Add template. |
| 3 |
Choose WhatsApp from the Channel drop-down list to create a facebook messenger template. |
| 4 |
Choose the required category from the Template category drop-down list. |
| 5 |
In the Template name field, enter the name of the template. |
| 6 |
Choose one of the following template types for the WhatsApp messenger:
|
| 7 |
Enable the Lock template toggle button to lock text templates. Agents can edit only custom or dynamic fields when you lock a template. This is not applicable for WhatsApp message templates. |
| 8 |
Click Save Changes to save the template. |
Create an Apple Messages for Business (AMB) template
Create an Apple Messages for Business (AMB) template.
| 1 |
In the Webex Engage admin console, navigate to . |
| 2 |
Click Add template. |
| 3 |
Choose AMB from the Channel drop-down list to create an Apple Messages for Business template. |
| 4 |
Choose the required category from the Template category drop-down list. |
| 5 |
In the Template name field, enter the name of the template. |
| 6 |
Choose a template type from the Template type drop-down list. You can create Text, Text with Attachment, Time Picker, List Picker, Rich Link, Quick Reply, and Form template types for the AMB channel.
|
| 7 |
Click Save. |
Manage proactive chat
In Webex Contact Center, proactive chat enables businesses to start conversations with customers using predefined rules and triggers. This approach enhances engagement and speeds up issue resolution. Businesses can send automated messages based on user behavior, such as page visits or time spent on a website. Administrators configure these messages through the Webex Engage admin console. You can set multiple rules for different assets and websites under a single account and customize messages to align with business hours. The system tracks performance analytics, including match rates, sends, opens, and replies, ensuring timely and effective customer interactions. This feature improves engagement by delivering tailored, rule-based messages triggered by user activity on your website.
Create proactive messages
| 1 |
Sign in to Control Hub. |
| 2 |
Go to Contact Center. |
| 3 |
In the Quick links section, go to . You can also access by navigating to the Proactive messaging menu from the Webex Engage admin console. The Proactive messaging screen appears.
|
| 4 |
Click Add message. The screen guides you through the following steps:
|
| 5 |
Enter the Name of the message. |
| 6 |
Choose the asset from the Asset name drop-down list. This auto-populates the Websites drop-down list. |
| 7 |
In the Add trigger conditions section, configure the following parameters to define how to trigger an automated message using one of the following options.
Even if a customer matches the trigger conditions multiple times while navigating the website of the business, the system delivers the proactive chat invite only once. The customer's browser stores triggered rules locally. If the customer clears their browser storage, the system triggers the rule again upon the next match. |
| 8 |
In the Configure message section, configure the following parameters:
|
| 9 |
In the Control behaviour section, you can qualify the proactive chat rule using business hours. Enable the Business Hours toggle. Then, select the working hours from the drop-down list as configured in Control Hub to check team availability when a customer replies. For more information to configure business hours in Control Hub, see Business Hours. |
| 10 |
(Optional) To review or change settings on the previous page, click Previous. |
| 11 |
(Optional) Click Save as draft to save your message as a draft and return later to review or complete the configuration. |
| 12 |
Click Save and publish. A success message appears and the proactive message is live and listed on the proactive messaging page. After completing these steps, configure flows in Webex Connect to handle replies to proactive chats. For more information, see Configure flows for proactive chat. |
View and manage proactive message
The Proactive messaging page allows you to view, search, filter, and manage all proactive messages configured for your assets and websites. You can monitor the status of each message and perform actions such as editing, deleting, or unpublishing messages.
| 1 |
From the Webex Engage admin console menu, click Proactive messaging. |
| 2 |
Use the Asset name and Website name drop-down list to filter proactive messages by asset or website, if needed. |
| 3 |
To search for a specific proactive message, enter keywords in the Search input field. |
| 4 |
To manage proactive message, go to the Actions column of a specific proactive message and do the following tasks:
|
| 5 |
To customize the table columns, hover over the Customise display drop-down list and select the desired columns by checking the boxes next to each column name. You can instantly view the results on the screen by checking and clearing the check
boxes.
By default, the system preselects the Title and Actions columns and doesn’t allow you to disable them. |


