- Home
- /
- Article

Thanks for your feedback.

Webex Contact Center integration with Epic
 In this article
 Feedback?
Webex Contact Center integrates with Epic EHR, embedding its communication tools directly into the platform to improve patient interactions.
Overview
Webex Contact Center integrates with Epic EHR by embedding multichannel communication tools directly in Epic so that agents can manage interactions without switching between applications.
This document provides end-to-end setup instructions for Epic administrators and Webex Contact Center administrators. It includes prerequisites, configuration steps, required URLs, validation checks, and troubleshooting guidance.
The above diagram is an example of Webex Contact Center embedded within Epic (Floating and Sidebar/SplitWindow).
Architecture at a glance
- Epic Hyperdrive launches the integration UI via configured launch URLs (Floating or Sidebar/SplitWindow).
- When an agent accepts a call, Epic can display a screen pop with a list of relevant patients based on the caller. Epic agent identity must be mapped to the corresponding Webex Contact Center agent identity.
- Click-to-Dial and Disconnect are executed through backend endpoints configured in Epic.
- Automatic Pause/Resume recording uses dedicated pause/resume endpoints configured in Epic.
Prerequisites
Before you begin, ensure you have:
- Webex Contact Center agent licenses and the Epic Desktop Connector add-on (as applicable).
- Epic Hyperdrive license and permissions to configure launch points / apps.
- Administrative access to Webex Control Hub (and Webex Contact Center administration as needed).
- Network access from your Epic environment (including VDI) to required domains and endpoints.
Desktop Connector applications and Client IDs
You may configure one or both of the following applications, depending on which features you plan to enable. Use the Client IDs below when prompted during setup.
Webex CC Integration Frontend
Purpose: Embeds the Agent Desktop inside Epic (Floating / Sidebar).
Reference: SLG #10170915 contains the Epic checklist for configuring the Frontend portion of this specific integration.
Sherlock checklist template 1249 is a general template that outlines CTI setup steps in Epic. It is provided here for background and may not match this integration step-for-step.
|
Environment |
Client ID |
|---|---|
|
Non-production |
3caba412-2f13-47e8-8c21-f328e4204c59 |
|
Production |
f02d4c5b-2c2e-41f3-9873-112dcc758032 |
Click-to-dial Backend Application
Purpose: Enables outbound click-to-dial from Epic patient records; calls can be initiated and terminated within Epic.
|
Environment |
Client ID |
|---|---|
|
Non-production |
27820d42-aedf-4438-98ad-d4ca1d95877f |
|
Production |
80aa5d2f-6e84-404f-917e-c5c8b5c46fc5 |
Network allowlist (recommended)
The Webex CC Integration Frontend application makes API calls to Webex backend services. To ensure proper communication, allow outbound access to the following domains from the Epic frontend and any intervening firewalls/proxies—especially in Virtual Desktop Infrastructure (VDI) environments.
- cisco.com
- epic.com
- webex.com
- webexapis.com
- ciscospark.com
Setup steps
Configure Webex Control Hub
Complete the following tasks in Webex Control Hub before configuring Epic.
Step A — Register your domains
In Control Hub, go to Organization Settings and add/verify your organization domains as required by your deployment.
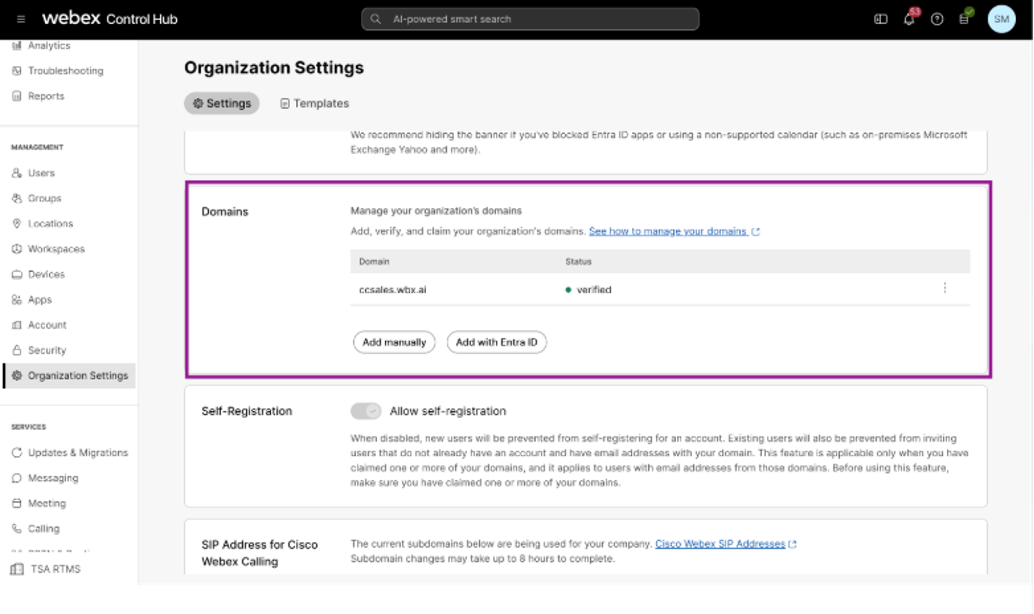
The above figure shows Control Hub example: Organization Settings → Domains.
Step B — Retrieve Cisco User IDs (for agent identity mapping)
Epic and Webex Contact Center can use different identifiers for the same agent. To ensure the screen pop appears in the correct Epic session when the agent accepts a call, Epic administrators map each Epic agent identity to the corresponding Webex Contact Center agent identity. In Control Hub, go to Contact Center → Contact Center Users, open the user, and copy the Cisco User ID.
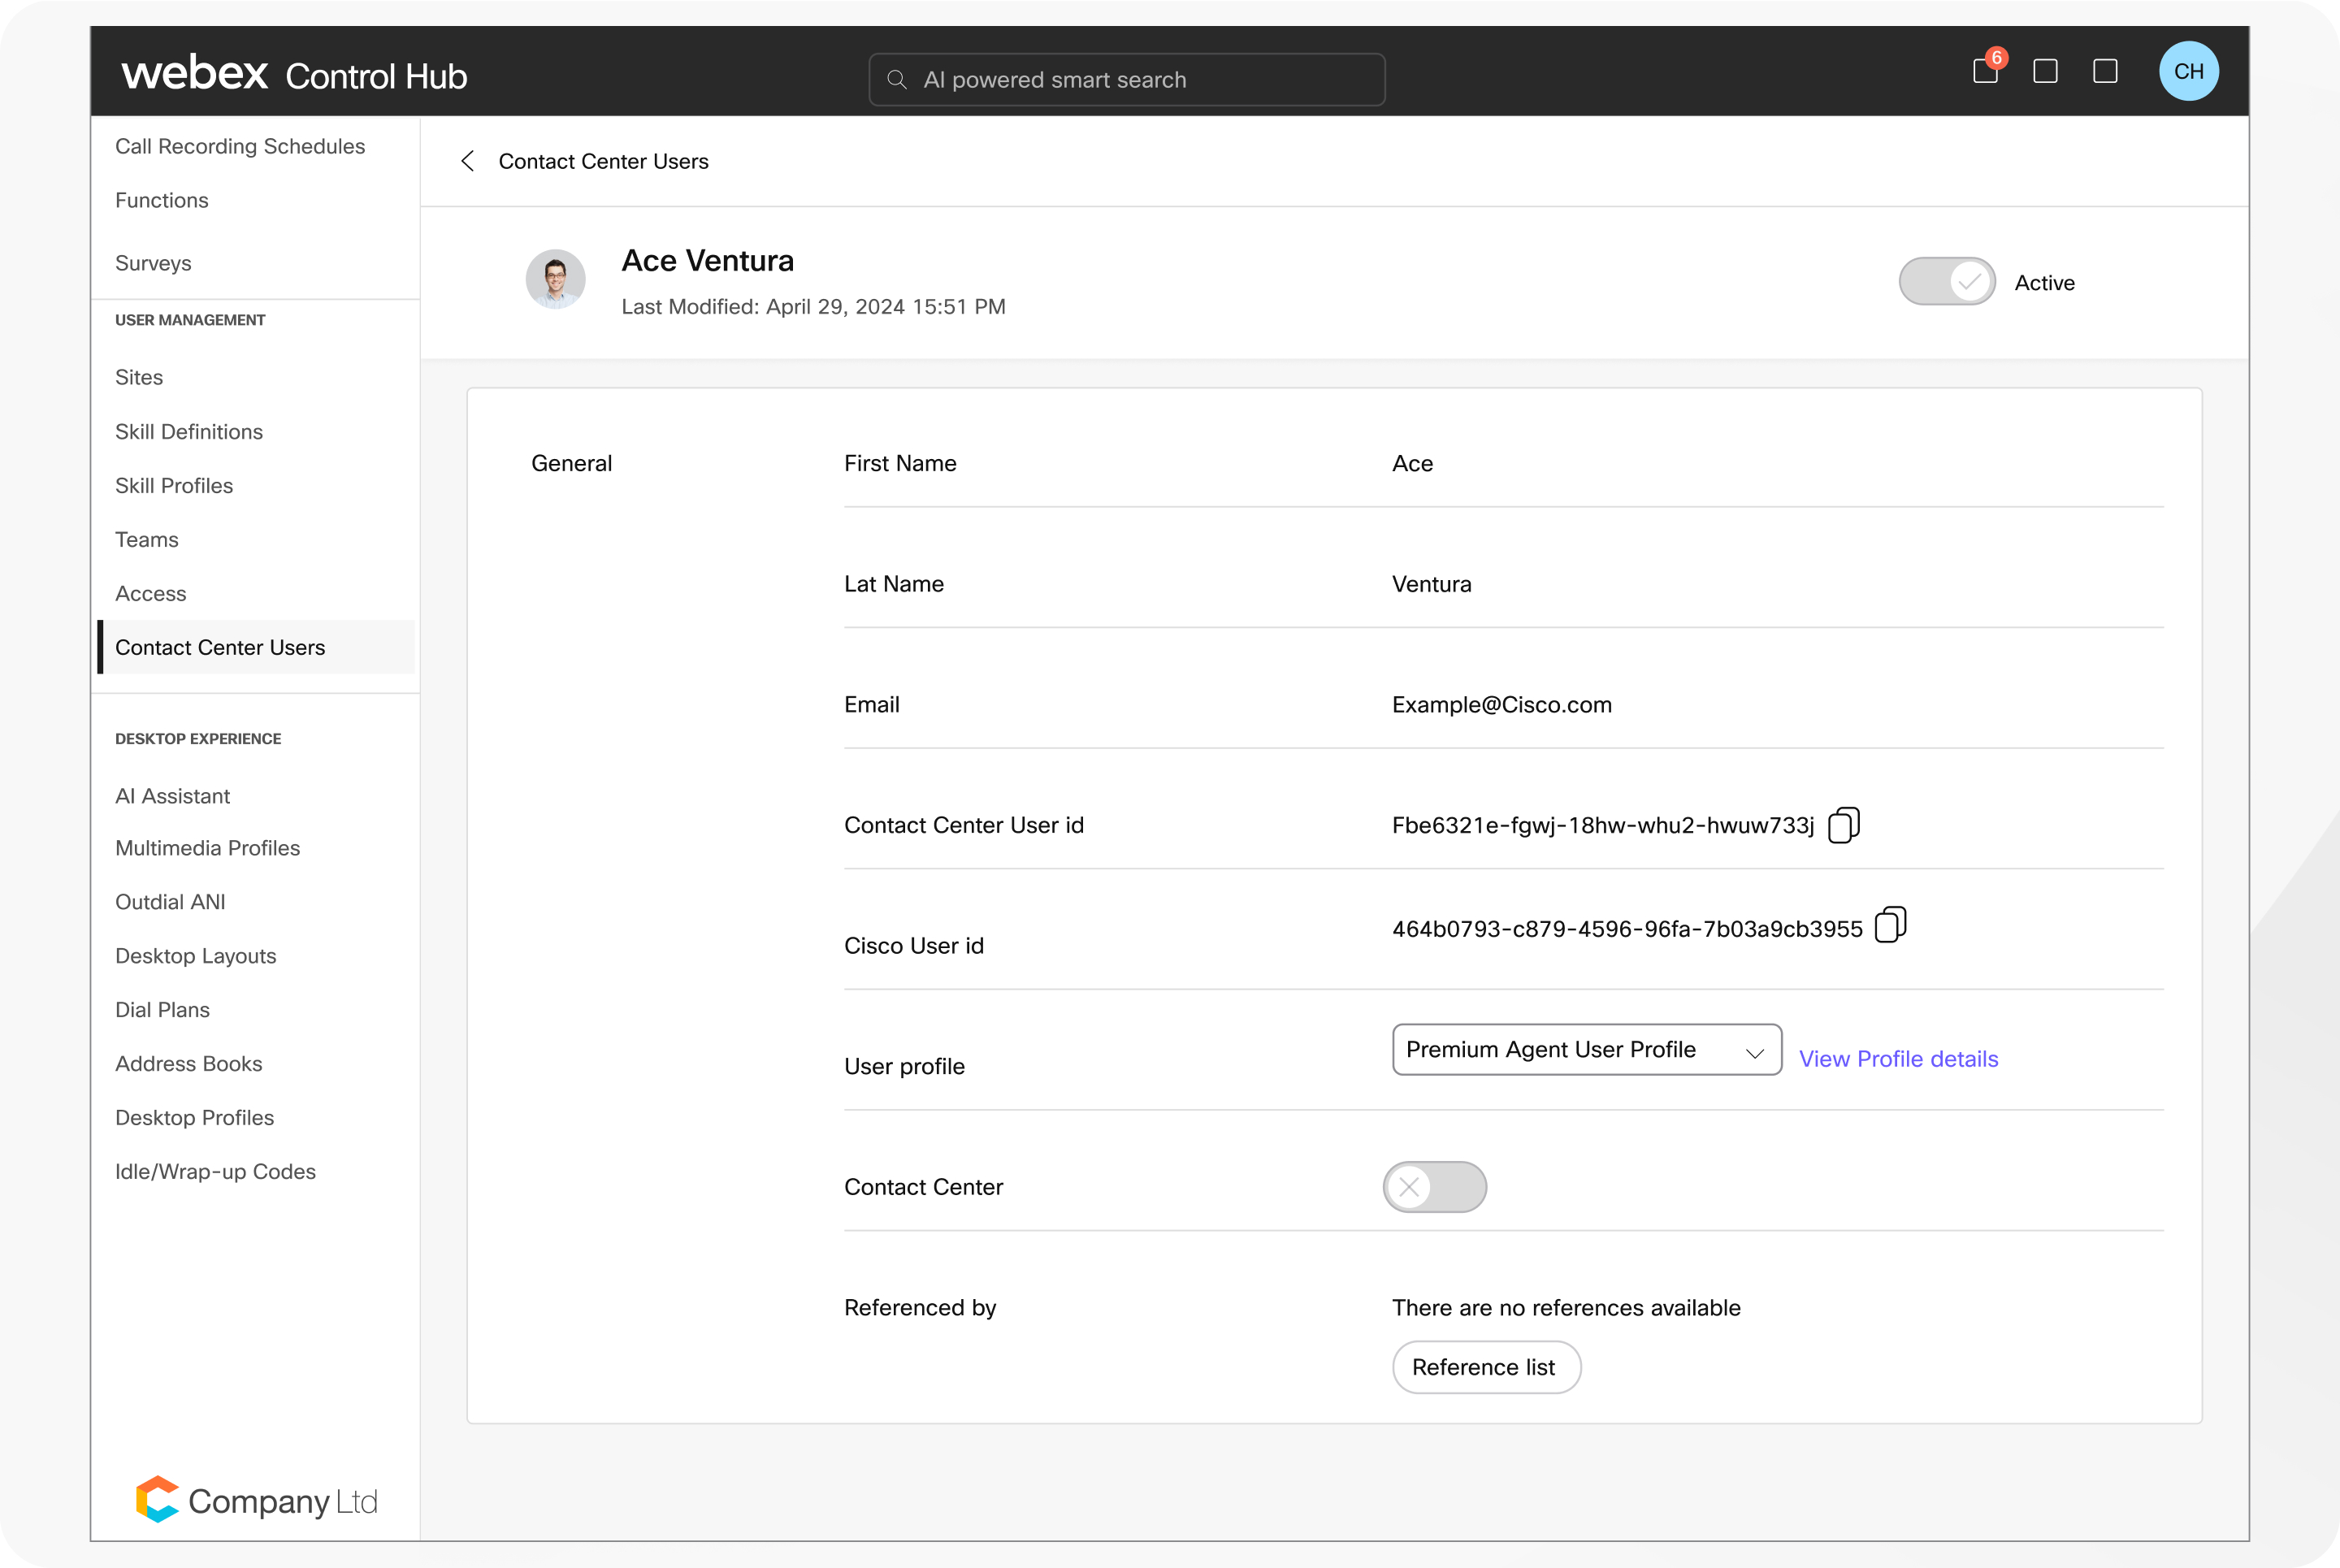
The above figure shows Control Hub example: Contact Center Users → Cisco User ID.
If your deployment uses JWT claims for the integration, include the claim key organization_id with the value set to your Webex Organization ID.
Configure Epic launch points and endpoints
Epic uses launch URLs for the embedded UI, and backend endpoints for click-to-call and recording controls. Use the correct environment and parameters as described below.
Frontend configuration checklist for this integration: refer to SLG #10170915
|
Environment |
Floating |
Sidebar/SplitWindow |
|---|---|---|
|
Epic Production |
phoneSystemId=<value> &userEmail=%USEREMAIL% |
epic.wxcc.cisco.com/sidebar?
phoneSystemId=<value> &userEmail=%USEREMAIL% |
|
Epic Non-Production |
phoneSystemId=<value> &userEmail=%USEREMAIL% &env=nonProd |
phoneSystemId=<value> &userEmail=%USEREMAIL% &env=nonProd |
Transfer Center: append &context=TC to the chosen Floating/Sidebar URL (Prod or Non-Prod).
|
Function |
URL |
|---|---|
|
Click-to-Dial |
https://epic-integration.wxcc-us1.cisco.com/v1/calls orgId=<OrgId> |
|
Disconnect (Hangup) |
https://epic-integration.wxcc-us1.cisco.com/v1/calls/disconnect orgId=<OrgId> |
|
Function |
URL |
|---|---|
|
Pause recording |
https://epic-integration.wxcc-us1.cisco.com/v1/calls/recording/pause orgId=<OrgId> |
|
Resume recording |
https://epic-integration.wxcc-us1.cisco.com/v1/calls/recording/resume orgId=<OrgId> |
Validate the integration
Launch (Sidebar)
What you do: Launch Sidebar/SplitWindow from Epic using the configured URL.
What you should see: The embedded UI loads inside Epic.
Common issues: Missing parameters or wrong environment.
Launch (Floating)
What you do: Launch Floating from Epic using the configured URL.
What you should see: A new tab opens with the integration UI.
Common issues: Pop-up blockers or VDI restrictions.
Agent identity mapping (screen pop)
What you do: Place an inbound call and accept it in Epic; confirm the correct patient list appears in the screen pop.
What you should see: Screen pop shows a relevant patient list for the caller in the correct Epic session.
Common issues: Epic agent identity not mapped to the matching Webex Contact Center agent identity.
Click-to-Dial
What you do: Dial a patient number from Epic.
What you should see: Outbound call starts successfully.
Common issues: OrgId missing/incorrect; endpoints not configured.
Disconnect
What you do: Hang up from Epic.
What you should see: Call ends and state updates.
Common issues: Disconnect endpoint misconfigured.
Pause/Resume recording
What you do: Trigger pause then resume.
What you should see: Recording state changes as expected.
Common issues: Pause/resume endpoints missing or policy restrictions.
Transfer Center context
What you do: Launch a Transfer Center workflow with &context;=TC.
What you should see: UI opens in Transfer Center context.
Common issues: context parameter missing.
Troubleshooting
Integration page does not load
Verify URL correctness (including required parameters) and confirm network allowlists.
Screen pop shows the wrong patient list or does not show
Verify Epic agent identity → Webex Contact Center agent identity mapping (Cisco User ID) and confirm the mapping values are correct.
Click-to-dial fails
Confirm OrgId, endpoint configuration, and that required OAuth/token requirements are met in your deployment.
Transfer Center opens standard UI
Ensure &context;=TC is appended after other query parameters.
Quick Start
- Collect OrgId, Cisco User IDs (for mapping), and Epic phoneSystemId.
- In Control Hub: add/verify domains; retrieve Cisco User IDs for agent identity mapping used by screen pops.
- In Epic: configure Frontend launch URLs for Floating and Sidebar/SplitWindow (Prod/Non-Prod).
- If using Transfer Center: append &context;=TC to the chosen Frontend URL.
- Configure click-to-dial and disconnect endpoints (replace with your OrgId).
- Configure pause/resume recording endpoints if required.
- Validate: launch UI, verify screen pops, click-to-dial, disconnect, recording controls.


