- Home
- /
- Article

Thanks for your feedback.


 In this article
 Feedback?
You can install a Custom Device Certificate (CDC) either manually or automatically. In certain environments, use DHCP option 43 to provide the Simple Certificate Enrollment Protocol (SCEP) parameters required for certificate installation. This Help article is for Cisco Wireless Phone 9821 registered to Webex Calling.
To install a Custom Device Certificate (CDC) on your phone, use one of the following ways based on your situation:
- Manual installation—you can install a certificate by uploading it from the phone administration web page. For details, see Manual installation of Custom Device Certificate by upload.
- Automatic installation—you can configure the Simple Certificate Enrollment Protocol (SCEP)
parameters to trigger an automatic installation of a certificate. The phone sends SCEP
requests to a SCEP server to install the certificate.
The SCEP parameters can be configured via the phone administration web page, the phone configuration file (cfg.xml) or Control Hub. For details, see Auto installation of Custom Device Certificate by SCEP and Parameters for phone settings on Control Hub.
- DHCP option 43—In certain environment, you can install a certificate by utilizing the DHCP
option 43. The option 43 can provide the SCEP parameters for the certificate installation.
For details, see SCEP parameters configuration via DHCP option 43.
When you use the DHCP option 43 for provisioning of SCEP parameters, the phone can also retrieve the domain name carried from the DHCP option 15. Based on the retrieved domain name, the phone can construct the 802.1X User ID for wired network connection. For details, see Provisioning of User ID via DHCP option 15.
For more information about how to configure DHCP options, see Configure DHCP options.
The most recently installed certificate on the phone takes effect.
Manual installation of Custom Device Certificate by upload
You can manually install a Custom Device Certificate (CDC) on the phone by uploading the certificate from the phone administration web page.
Before you begin
Before you can install a custom device certificate for a phone, you must have:
- A certificate file (.p12 or .pfx) saved on your PC. The file contains the certificate and private key.
- The extract password of the certificate. The password is used to decrypt the certificate file.
| 1 |
Access the phone administration web page. |
| 2 |
Select Certificate. |
| 3 |
In the Add Certificate section, click Browse.... |
| 4 |
Browse to the certificate on your PC. |
| 5 |
In the Extract password field, enter the certificate extract password. |
| 6 |
Click Upload. If the certificate file and password are correct, you will receive the message "
Certificate added.". Otherwise, the uploading fails with an error message indicating that the certificate can't be uploaded. |
| 7 |
To check details of the installed certificate, click View in the Existing Certificates section. |
| 8 |
To remove the installed certificate from the phone, click Delete in the Existing Certificates section. Once you click the button, the removal operation starts immediately without a confirmation. After the certificate is removed, the |
Auto installation of Custom Device Certificate by SCEP
You can configure the Simple Certificate Enrollment Protocol (SCEP) related parameters to interact with the SCEP server to install the Custom Device Certificate (CDC) automatically.
Once any of the SCEP parameters is configured, the phone will send an SCEP enrollment request to the server. The phone will validate the received CA certificate using the configured fingerprint.
Before you begin
Before you can perform an auto installation of a Custom Device Certificate (CDC) for a phone, you must have:
- SCEP server address
- SHA-1 or SHA-256 fingerprint of the root CA certificate for the SCEP server
| 1 |
Access the phone administration web page. |
| 2 |
Select Certificate. |
| 3 |
In the SCEP Configuration 1 section, set the parameters as described in Parameters for SCEP configuration . |
| 4 |
Click Submit All Changes. |
Parameters for SCEP configuration
The following table defines the function and usage of SCEP configuration parameters in the SCEP Configuration 1 section under the Certificate tab in the phone web interface. It also defines the syntax of the string that is added in the phone configuration file (cfg.xml) to configure a parameter.
Any changes of parameters will cause the phone to request a new certificate.
| Parameter | Description |
|---|---|
| Server |
SCEP server address. This parameter is mandatory. Cisco Wireless Phone 9821 does not support the use of a challenge password in this release. Ensure that the Certificate Authority (CA) server used to issue certificates for the phone is not configured to require a challenge password. Perform one of the following:
Valid values: A URL or IP address. The HTTPS scheme is not supported. Default: Empty |
| CA Fingerprint |
SHA256 or SHA1 fingerprint of the Root CA for validation during the SCEP process. This parameter is mandatory. Perform one of the following:
Default: Empty |
Certificate renewal by SCEP
The device certificate can be refreshed automatically by the SCEP process.
- The phone checks whether the certificate will expire in 15 days every 4 hours. If so, the phone starts the certificate renewal process automatically.
- The phone doesn't remove the old device certificate until it retrieves the new one.
SCEP parameters configuration via DHCP option 43
In certain environment where you can't install the Custom Device Certificate (CDC) via uploading it or directly configuring the SCEP parameters. In this situation, you can utilize the DHCP option 43 to populate the parameters from a DHCP server. The DHCP option 43 can be configured to provide the SCEP parameters to the phone. Once the phone is factory reset, it can receive the parameters from the DHCP server to install the CDC via the SCEP protocol.
- This feature (SCEP parameters configuration via DHCP option 43) is available only for the phone that is factory reset.
- Phones shall not be placed in the network that has supported Option 43 and remote provisioning (for example, Options 66,160,159,150, or cloud provisioning). Otherwise, the phones might not get the option 43 configurations.
Follow these steps to install a CDC certificate by the SCEP parameters provided from the DHCP option 43.
| 1 |
Prepare an SCEP environment. For information about SCEP environment setup, see your SCEP server documentation. | ||||||||||||||||||||||||||||||||||||
| 2 |
Set up DHCP option 43 (defined in 8.4 Vendor Specific Information, RFC 2132). Suboptions (10–12) are reserved for the method:
* means that the parameter is configured according to the actual situation. When you use the DHCP option 43, notice the following characteristics of the method:
Example of DHCP option 43 (suboptions 10–15):
Summary of the parameter values:
The syntax of the final hex value is:
According to the parameter values above, the final hex value is as the follows: 0a01000b12687474703a2f2f31302e37392e35372e39310c1412040870625C5B755D73F5925285F8F5FF5D55AF
| ||||||||||||||||||||||||||||||||||||
| 3 |
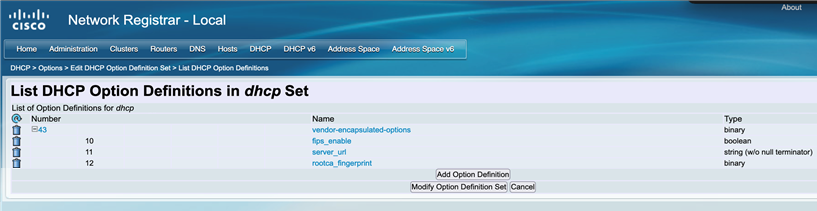
Configure DHCP option 43 on a DHCP server. This step provides an example of the DHCP option 43 configurations on Cisco Network Register.
| ||||||||||||||||||||||||||||||||||||
| 4 |
Perform a factory reset for the phone. After the phone is reset, the parameters Server and Root CA Fingerprint will be filled in automatically. These parameters are located in the section SCEP Configuration 1 from on the phone administration web page. To check details of the installed certificate, click View in the Existing Certificates section. To check the certificate installation status, select . The Download Status 1 shows the latest result. If any issue occurs during the certificate enrollment, the download status can show the problem reason for troubleshooting purposes. | ||||||||||||||||||||||||||||||||||||
| 5 |
(Optional) To remove the installed certificate from the phone, click Delete in the Existing Certificates section. Once you click the button, the removal operation starts immediately without a confirmation. |
Provisioning of User ID via DHCP option 15
This section is for 802.1X authentication for wired networks only.
During the SCEP certificate enrollment via the DHCP option 43, the phone can also get the domain name provided in the DHCP option 15 (if configured). After the phone receives the domain name, it can construct the User ID with the domain name, which is represented as following.
- User ID = <Common Name in MIC/SUDI
>@<Domain Name in Option 15>
The User ID will be used as the identity for wired 802.1X authentication.
For example, the MAC address of a Cisco Wireless Phone 9821phone is C8:78:F7:7C:09:F9.
| Domain name in DHCP option 15 | User ID |
|---|---|
| example.nl | WP-9821-SEPC878F77C09F9@example.nl |
| Empty | WP-9821-SEPC878F77C09F9 |


