- Startseite
- /
- Artikel

Danke für Ihr Feedback.

Auswählen, welche Anrufe angenommen, abgelehnt und weitergeleitet werden
 In diesem Artikel
 Feedback?
Sie können unterschiedliche Regeln für die Annahme, Ablehnung oder Umwahl bestimmter Anrufe basierend auf der Telefonnummer, dem Anrufer und/oder der Uhrzeit und dem Tag des Anrufs erstellen.
Die selektiven Funktionen (Annehmen, Ablehnen, Weiterleiten) eines Anrufs haben Vorrang vor anderen Anrufeinstellungen.
Vorbereitungen
-
Ihr Administrator muss diese Funktion für Sie aktiviert haben, damit Sie darauf zugreifen und sie konfigurieren können. Wenn diese Einstellung nicht angezeigt wird, wenden Sie sich an den Administrator.
-
Sie können alle Anrufeinstellungen über den User Hub konfigurieren, indem Sie zu .
Die Option Calling ist nur für Benutzer mit der Webex Calling-Lizenz verfügbar. Wenn Sie die Option Calling nicht sehen, bedeutet dies, dass Sie nicht über die Webex Calling-Lizenz verfügen.
Wenn Sie herausfinden möchten, mit welchem Anrufdienst Sie eingerichtet sind, können Sie dies über die Webex-App überprüfen. Weitere Informationen finden Sie unter Finden Sie heraus, welchen Anrufdienst Sie haben .
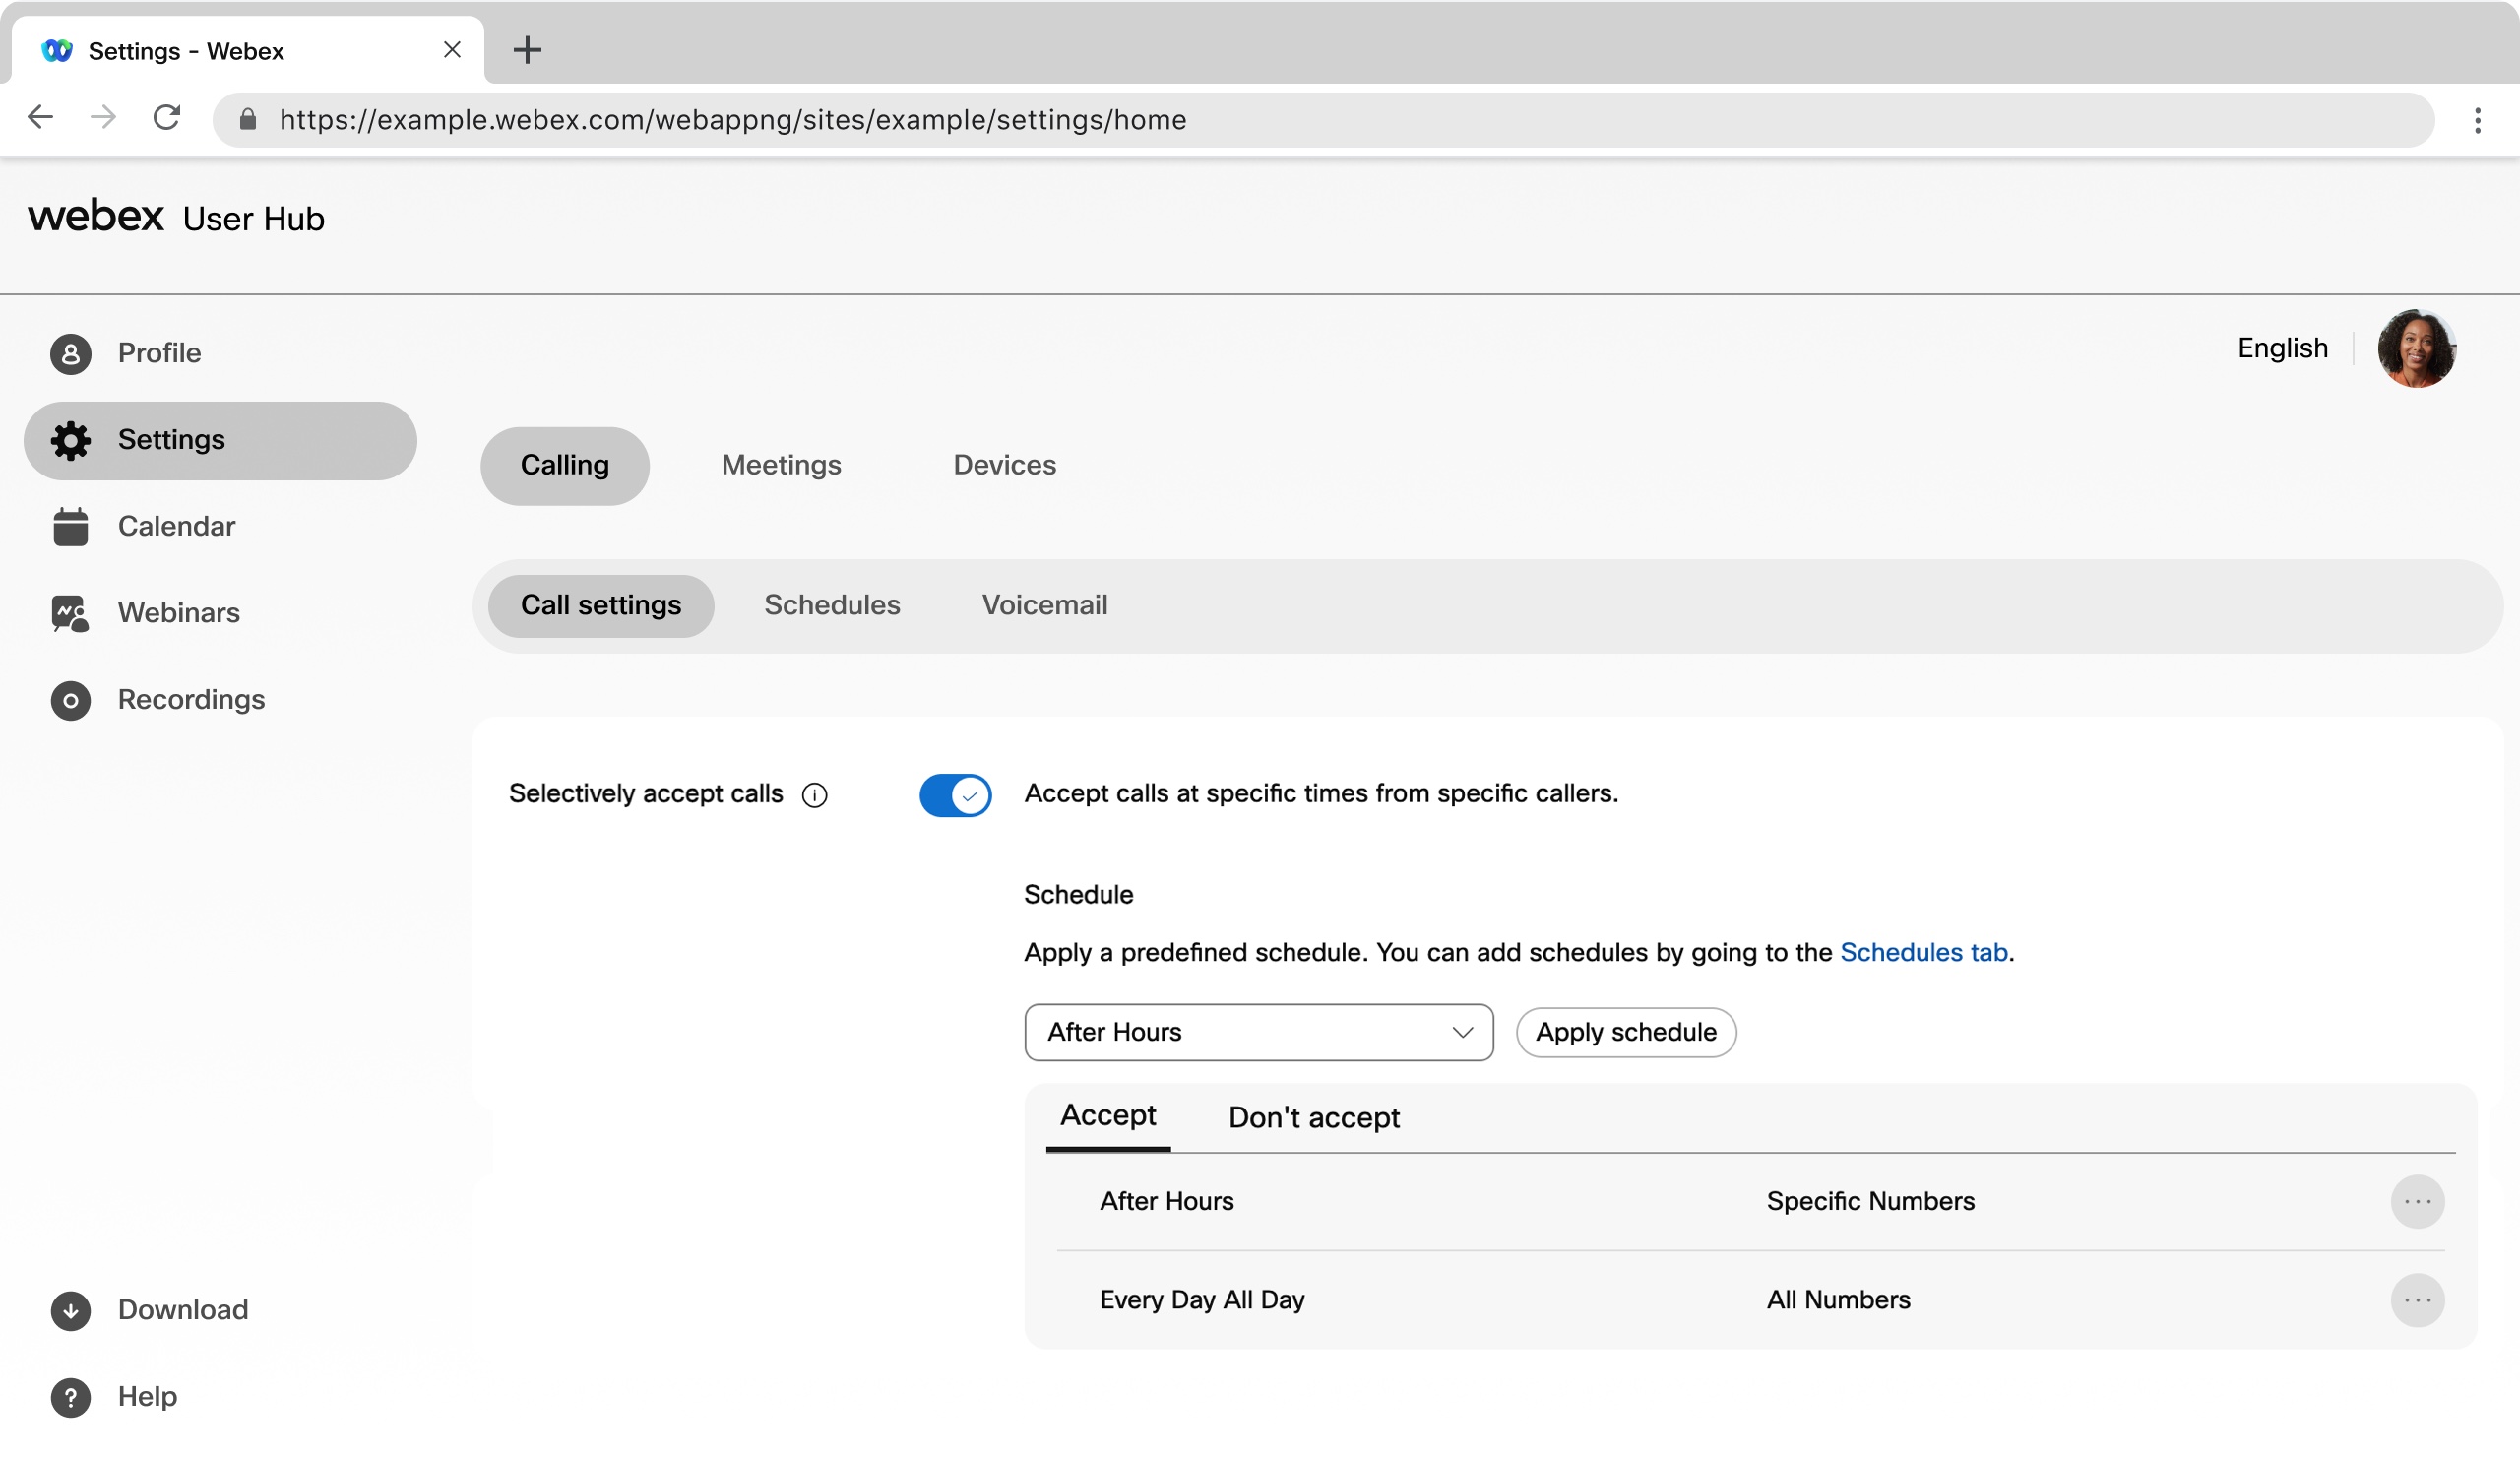
Selektive Annahme von Anrufen
Sie können anrufe zu bestimmten Zeiten von bestimmten Anrufern annehmen.
| 1 |
Melden Sie sich bei User Hub . |
| 2 |
Gehen Sie zu . |
| 3 |
Wechseln Sie zum Abschnitt „Anrufe selektiv annehmen“ und aktivieren Sie die Umschaltfunktion. |
| 4 |
Wählen Sie einen vordefinierten Zeitplan aus der Dropdown-Liste aus. Wenn Sie keinen Zeitplan sehen, den Sie für diese Einstellung verwenden möchten, können Sie einen Zeitplan auf der Registerkarte „Zeitpläne“ hinzufügen. Weitere Informationen finden Sie unter Erstellen eines Zeitplans für Anrufeinstellungen . |
| 5 |
Klicken Sie auf Plan übernehmen , um die folgenden Parameter festzulegen:
|
| 6 |
Klicken Sie auf „Speichern“. Ihr Zeitplan wird der Tabelle Akzeptieren oder Nicht akzeptieren hinzugefügt. Sie können die Zeitpläne nach Bedarf aus den Tabellen bearbeiten oder löschen. „Nicht akzeptieren“ hat Vorrang vor „Annehmen“ . |
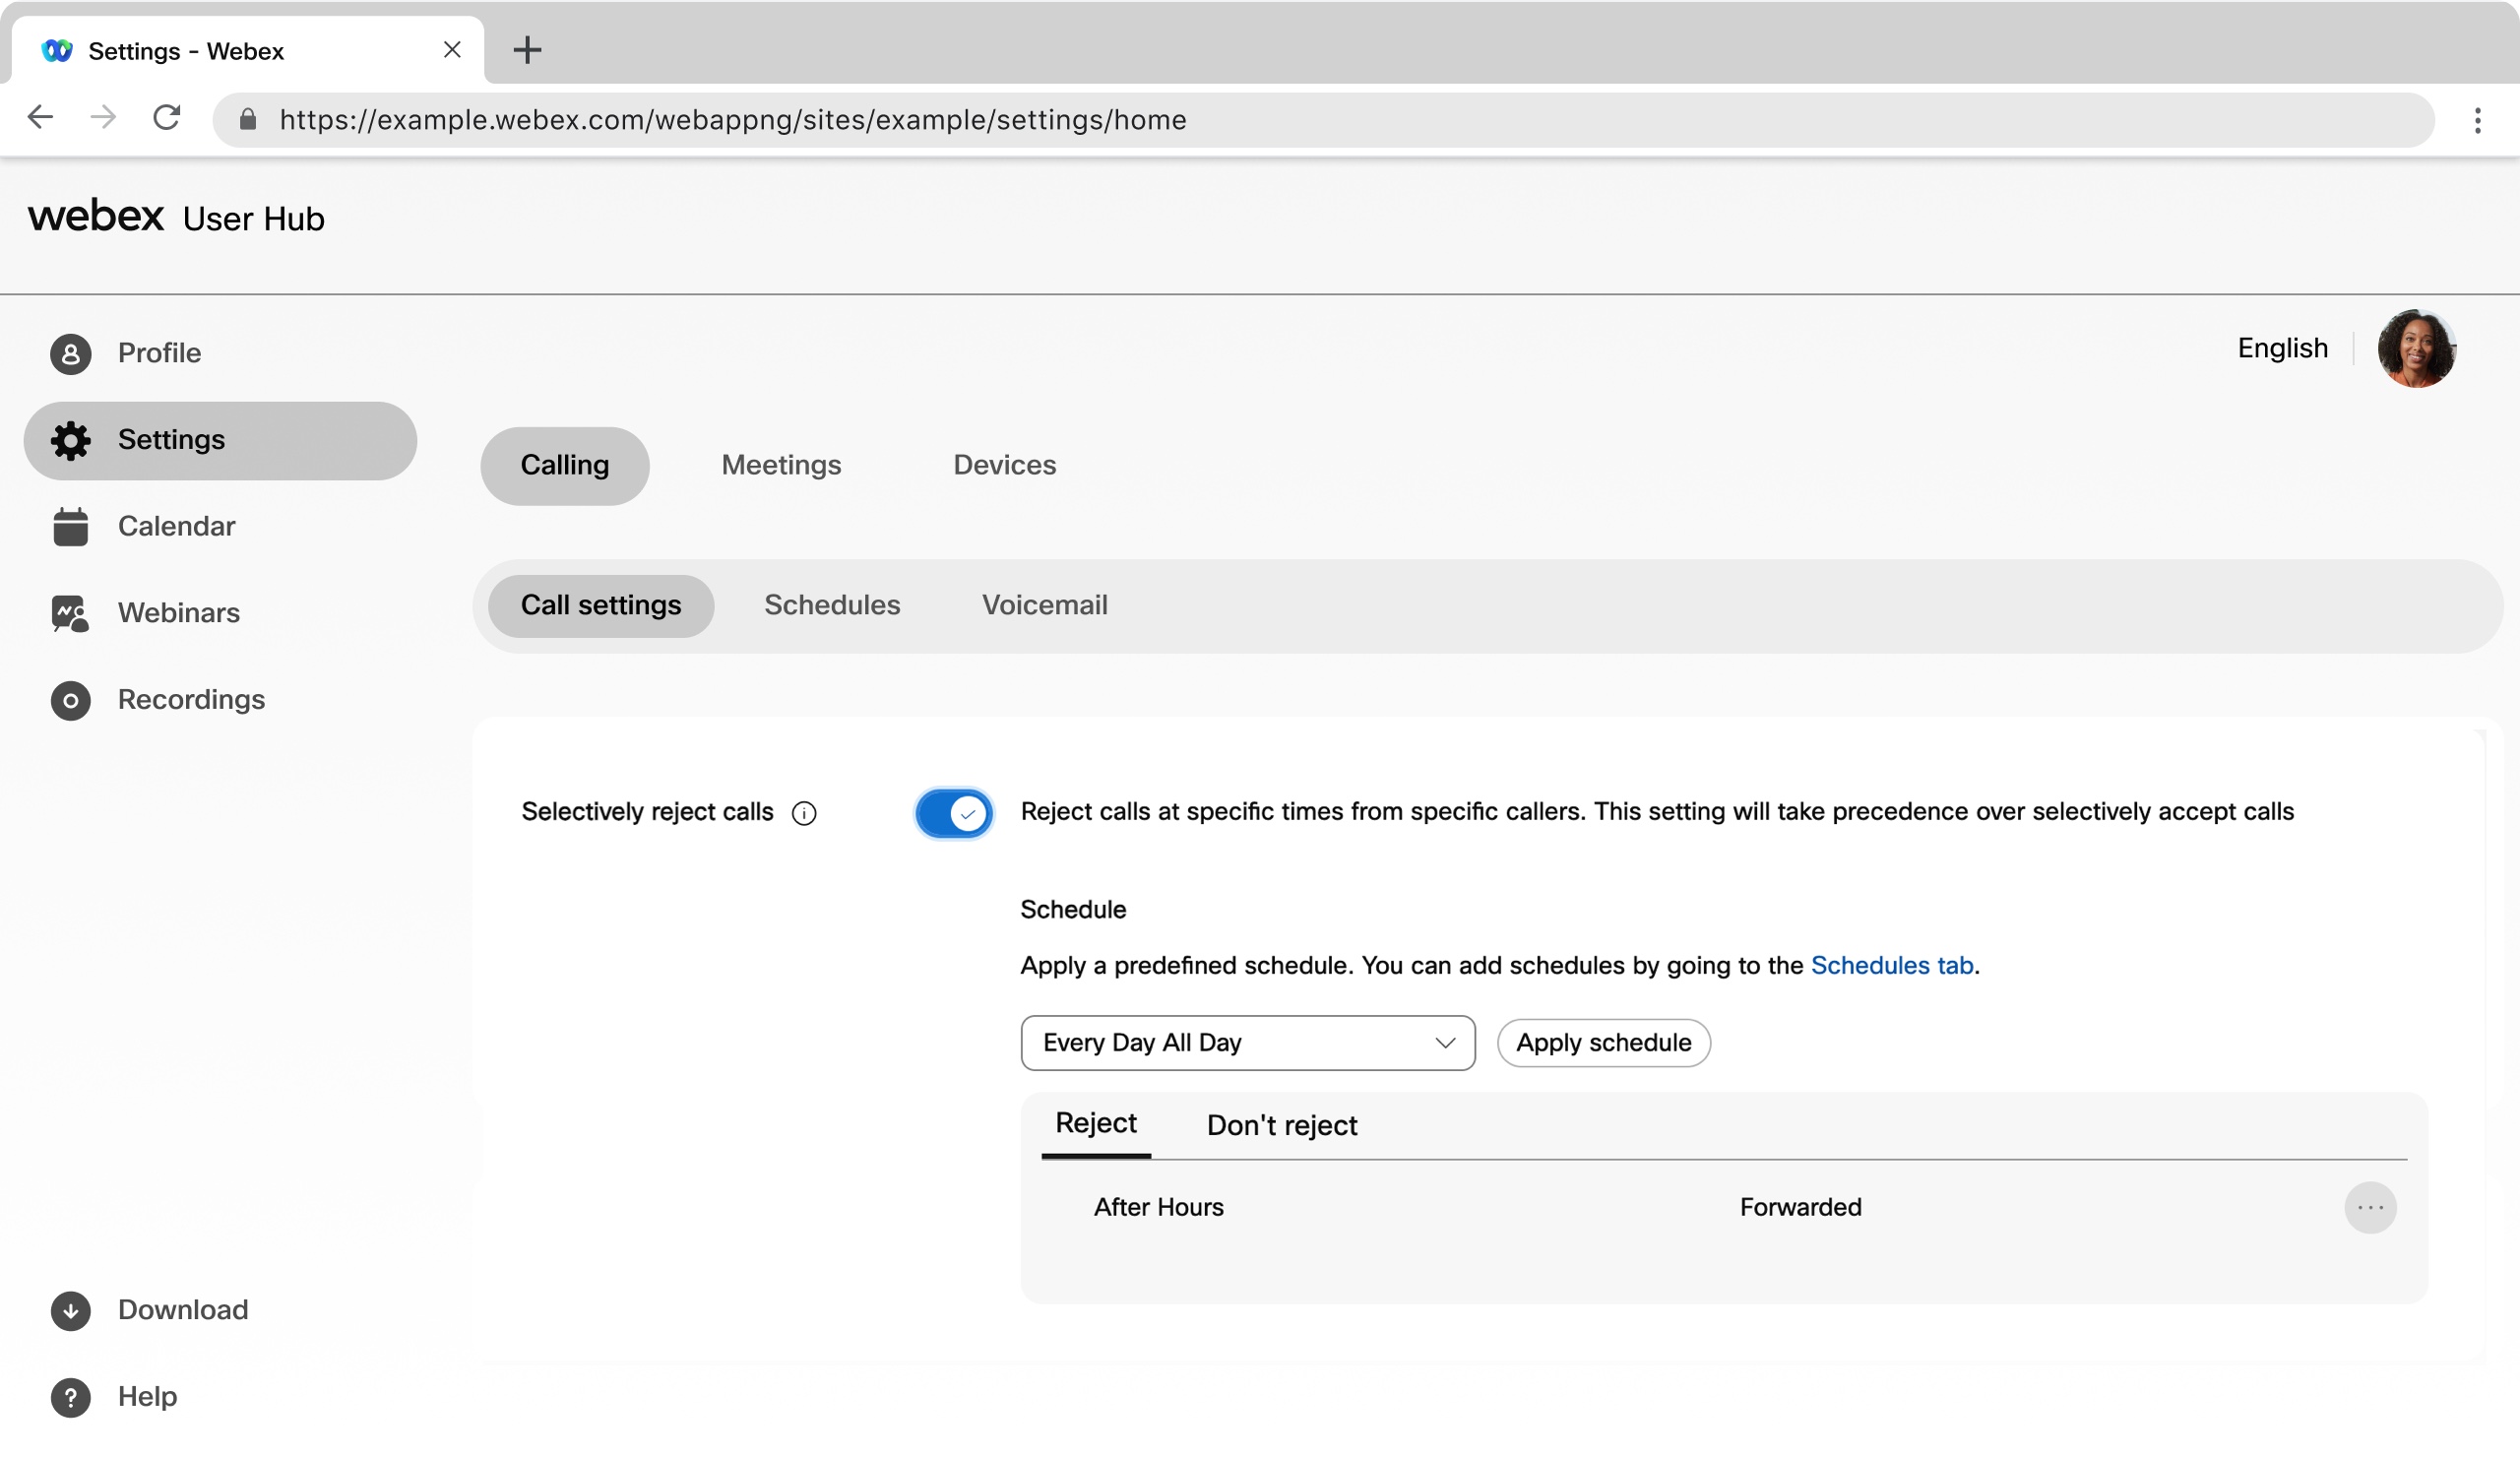
Anruf selektiv ablehnen
Sie können Anrufe bestimmter Anrufer zu bestimmten Zeiten ablehnen. Diese Einstellung hat Vorrang vor „Anrufe selektiv annehmen“.
| 1 |
Melden Sie sich bei User Hub . |
| 2 |
Gehen Sie zu . |
| 3 |
Wechseln Sie zum Abschnitt „Anrufe selektiv ablehnen“ und aktivieren Sie die Umschaltfunktion. |
| 4 |
Wählen Sie einen vordefinierten Zeitplan aus der Dropdown-Liste aus. Wenn Sie keinen Zeitplan sehen, den Sie für diese Einstellung verwenden möchten, können Sie einen Zeitplan auf der Registerkarte „Zeitpläne“ hinzufügen. Weitere Informationen finden Sie unter Erstellen eines Zeitplans, der auf Anrufeinstellungen angewendet werden soll . |
| 5 |
Klicken Sie auf Plan übernehmen , um die folgenden Parameter festzulegen:
|
| 6 |
Klicken Sie auf „Speichern“. Ihr Zeitplan wird einer Tabelle " Ablehnen" oder "Nicht ablehnen" hinzugefügt. Sie können die Zeitpläne nach Bedarf aus den Tabellen bearbeiten oder löschen. „Nicht ablehnen“ hat Vorrang vor „Ablehnen“ . |
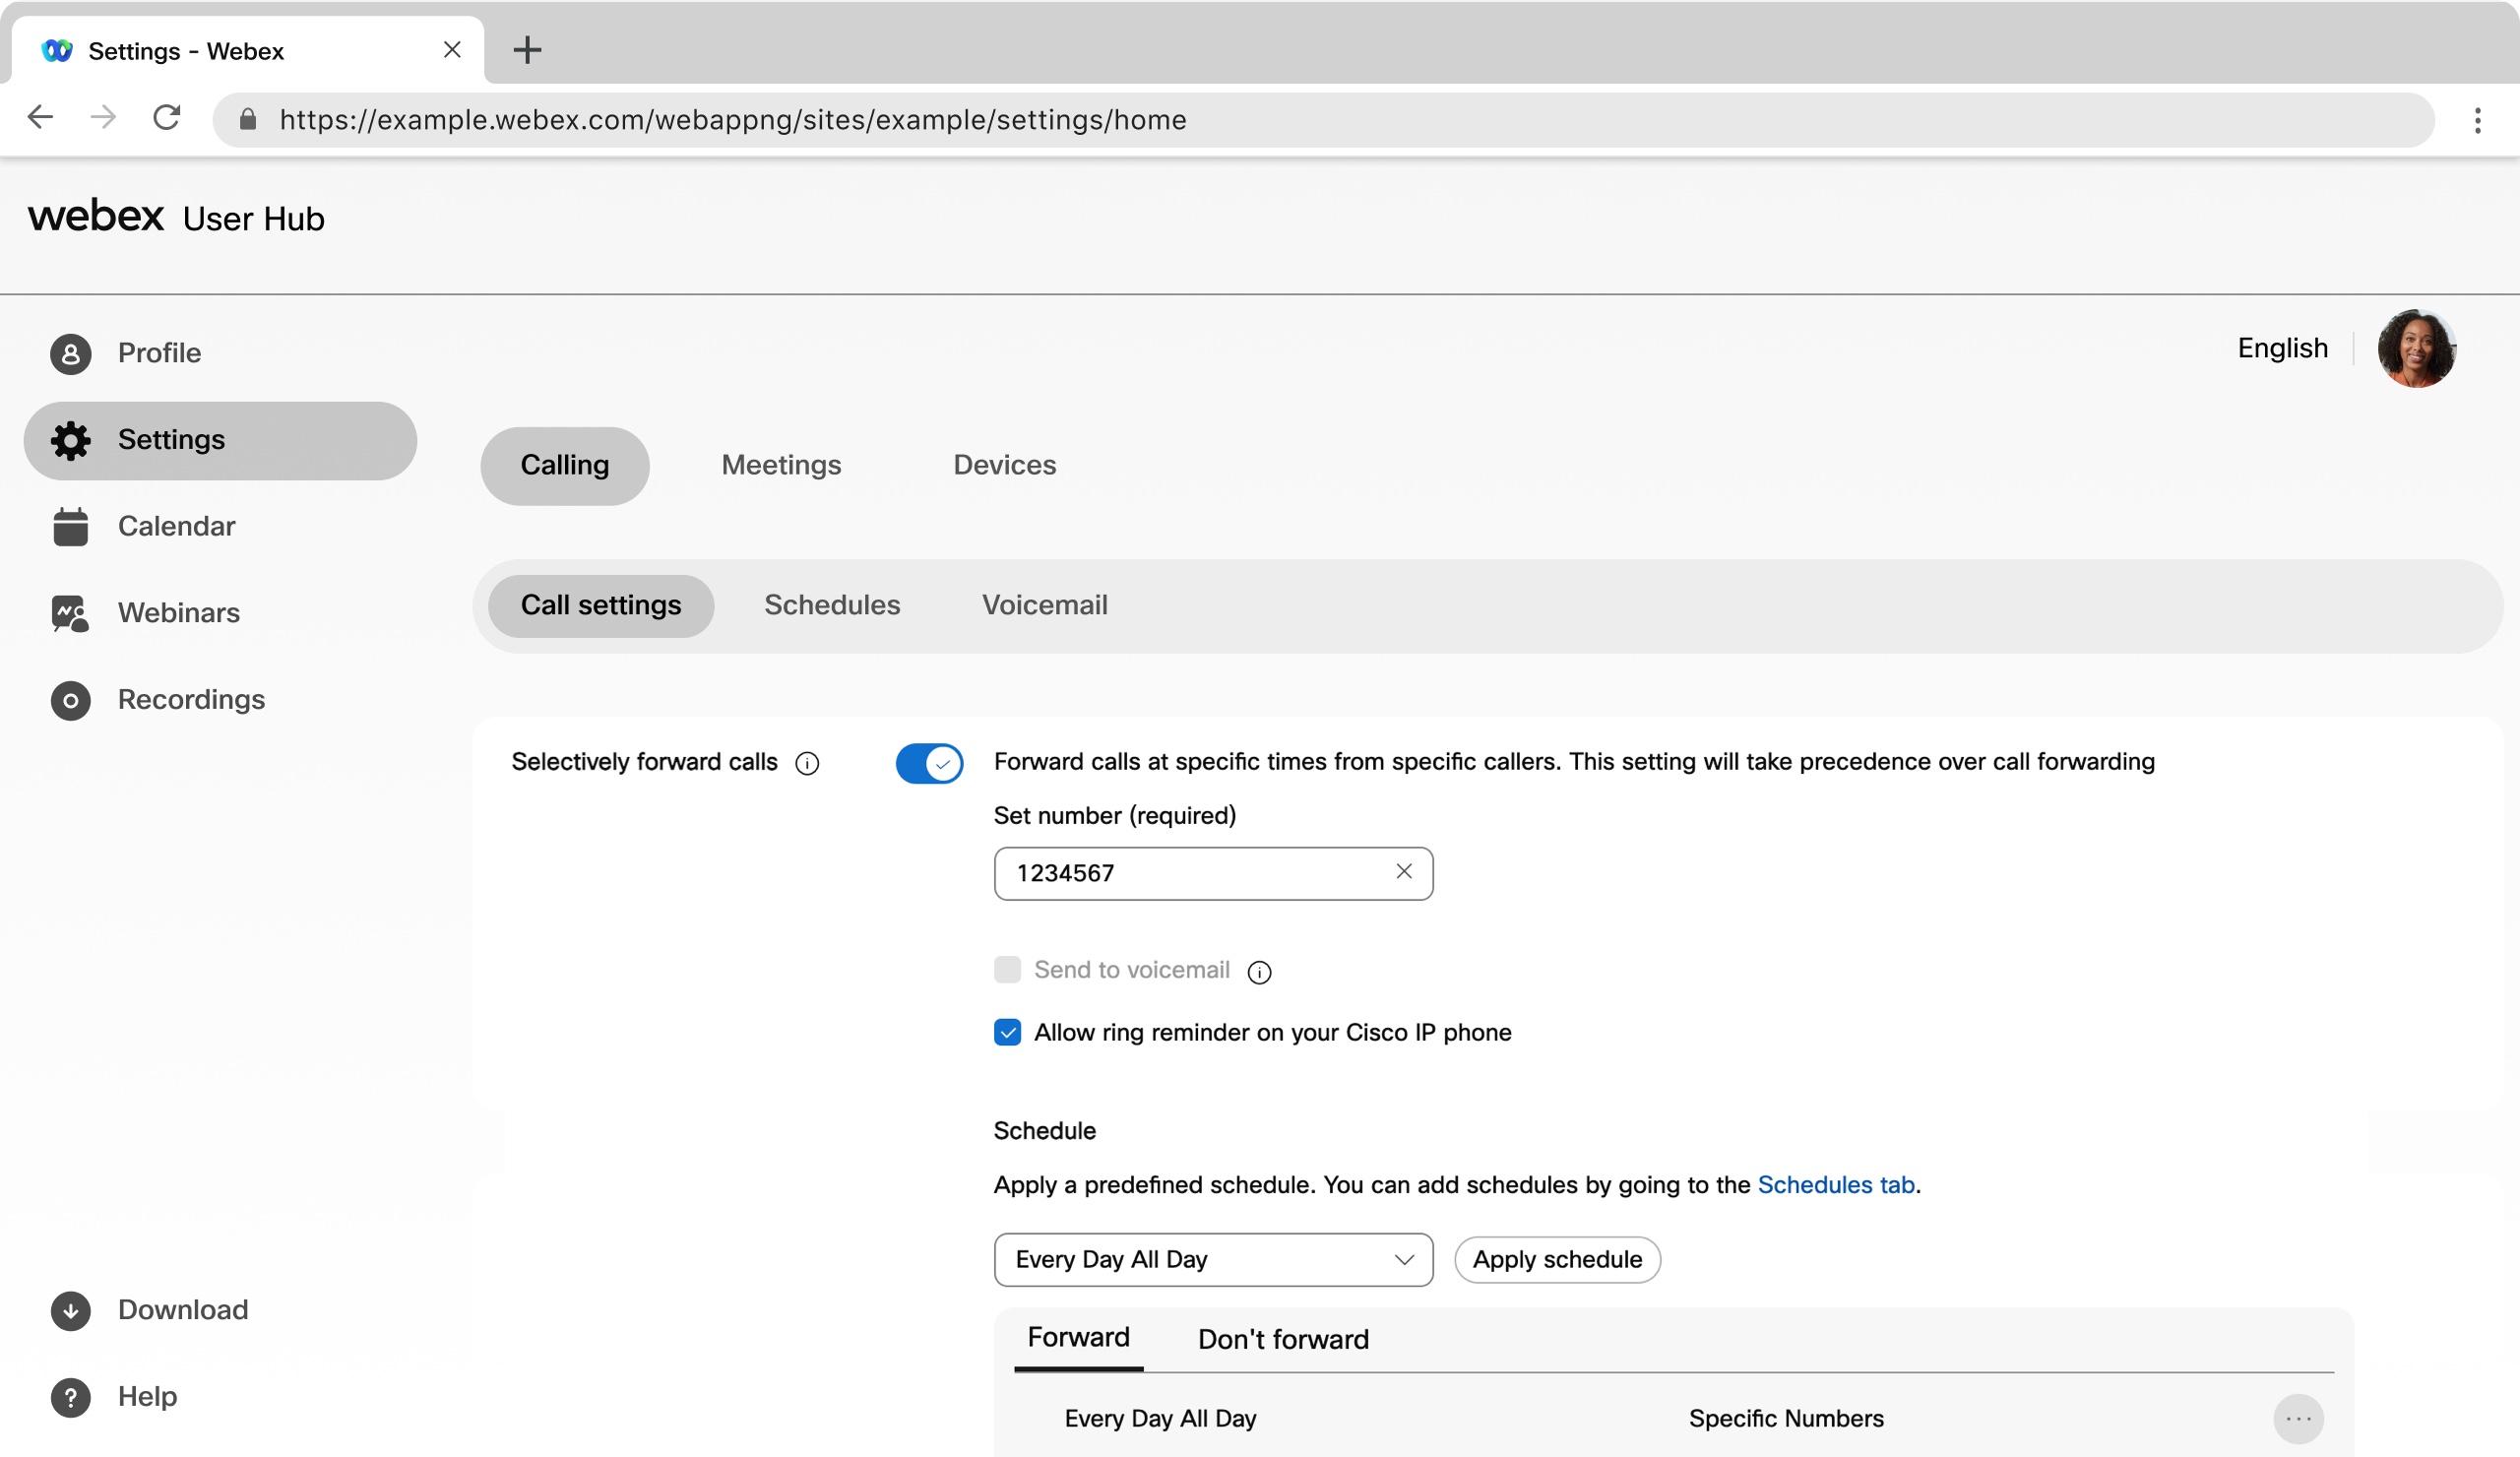
Anruf selektiv umfrufen
Sie können Anrufe zu bestimmten Zeiten von bestimmten Anrufern um forwarden. Diese Einstellung hat Vorrang vor der Rufumleitung.
| 1 |
Melden Sie sich bei User Hub . |
| 2 |
Gehen Sie zu . |
| 3 |
Wechseln Sie zum Abschnitt „Selektive Anrufweiterleitung “ und aktivieren Sie die Umschaltfunktion. |
| 4 |
Geben Sie die Telefonnummer ein, an die Sie Anrufe umrufen wollen. |
| 5 |
Wählen Sie An Voicemail senden aus, um alle Anrufe an die Voicemail weiterzuleiten. Die Option „An Voicemail senden“ ist nur für interne Telefonnummern oder Durchwahlen verfügbar. |
| 6 |
Wählen Sie Erinnerungston auf Ihrem Cisco IP-Telefon aktivieren aus, um eine Erinnerungston für diese Anrufe zu aktivieren. |
| 7 |
Wählen Sie einen vordefinierten Zeitplan aus der Dropdown-Liste aus. Wenn Sie keinen Zeitplan sehen, den Sie für diese Einstellung verwenden möchten, können Sie einen Zeitplan auf der Registerkarte „Zeitpläne“ hinzufügen. Weitere Informationen finden Sie unter Erstellen eines Zeitplans, der auf Anrufeinstellungen angewendet werden soll . |
| 8 |
Klicken Sie auf Plan übernehmen , um die folgenden Parameter festzulegen:
|
| 9 |
Klicken Sie auf Speichern. Ihr Zeitplan wird zur Tabelle Vorwärts oder Nicht vorwärts hinzugefügt. Sie können die Zeitpläne nach Bedarf aus den Tabellen bearbeiten oder löschen. Nicht weiterleiten hat Vorrang vor Weiterleiten . |


