- Home
- /
- Article

Thanks for your feedback.

Certificate Management in Webex Cloud-Connected UC
 In this article
 Feedback?
Certificate Management Overview
Centralized Certificate Management is a cloud-based service offering a single place to view and manage certificates of Cisco Unified Communications Manager, IM and Presence, and Cisco Unity Connection and Cisco Emergency Responder across multiple clusters.
Before you begin:You must enable the Certificate Management service on the Service Management page for the desired cluster. For more information, see Enable Cloud-Connected UC Services in Control Hub.
Centralized Certificate Management offers these key functionalities:
-
Multi-cluster dashboard showing certificate status for each cluster.
-
Detailed view of identity and trust certificates at an individual cluster-level.
-
Ability to perform certificate operations such as generate CSR, upload certificate, renew, download, copy, replace, and remove.
-
Alerts dashboard to view expired and expiring soon certificates.
-
Ability to configure notification such as email notification for certificate expiration.
-
Distribute the certificates across multiple trust stores and clusters.
-
Define certificate profile with various settings and assign to a cluster.
You cannot Distribute and Replace Certificates on Cisco Emergency Responder application.
Access the Certificate Management Service
The Certificate Management service within the Cloud-Connected UC suite of services manages certificates for on-premises deployment.
To access the Certificate Management, perform the following steps:
| 1 |
From the customer view in the Webex Control Hub, go to . The Connected UC page appears. The Certificate Management card in this page provides the Certificate Management features and functionalities. | ||||||||||
| 2 |
On the Certificate Management card, click any link to access the various functionalities of certificate management. The following table lists the functionalities that are available in the Certificate Management:
|
Use the Alerts page to do the following:
-
View Expired or Expiring Soon certificates
-
Filter by certificate
-
Filter by product to view the certificate status.
| 1 |
From the customer view in the Webex Control Hub, go to . The Connected UC page appears. | |||||||||||||||||||||||||||||||||||||||
| 2 |
Click Alerts from the Certificate Management card. The page displays both expired and soon to expire certificates. The certificates list details such as the cluster name, common name, certificate type, certificate status, and expiry date. | |||||||||||||||||||||||||||||||||||||||
| 3 |
(Optional) Choose one of the following options:
The selected certificates appear in the certificate list along with details such as Cluster, Certificate, Common Name, Product, Type, Status, Server Name, and Expiration. | |||||||||||||||||||||||||||||||||||||||
| 4 |
Select a record from the listing page to view the certificate details. A side panel opens to display the certificate details. You can see the Certificate Details or Copy the PEM format certificate. Perform all operations listed in step 6 from this panel. | |||||||||||||||||||||||||||||||||||||||
| 5 |
Click Close to close the side panel and return to the listing page. | |||||||||||||||||||||||||||||||||||||||
| 6 |
Hover over a certificate record and click the ellipsis to perform various operations on Identity and Trust Store Certificates. Operations on Identity Certificates are:
If the settings configured by the administrator in the profile do not match with the certificate attributes, a warning icon appears against the certificate. Example: Tomcat certificate is self signed but in the profile settings it is set to CA signed, this leads to a mismatch. Do not click Submit unknowingly without verifying the mismatches as it may lead to issues. Operations on Trust Store Certificates are:
Remove Certificate or Replace Certificate trust operation may fail with an error File not found. This error appears when the operation is performed on many clusters with mixed versions of 12.5 SU5 and 14 SU1 releases. Solution: Retry the operation on failed nodes. Verify the error on Jobs detail page for the corresponding cluster, which reads The certificate could not be removed because it is not present on this node. Common operations on Trust Store Certificates and Identity Certificates are:
| |||||||||||||||||||||||||||||||||||||||
| 7 |
The certificate operation is added to the Jobs list. You can view the progress under the Jobs tab. OR
|
Clusters page lists a summary of certificate status on a per cluster basis for all clusters in an organization.
| 1 |
From the customer view in the Webex Control Hub, go to . The Connected UC page appears. |
| 2 |
Click Clusters from the Certificate Management card. The Cluster summary page displays clusters with details such as the cluster name, status, product, and the profile associated with the cluster. The administrator can change the default association of standard profile with the custom profile for a cluster. |
| 3 |
(Optional) Choose one of the following options:
|
| 4 |
Click on a cluster record in the listing page to visit Cluster Details page which displays the identity certificates that are associated to the selected cluster. You can navigate to the Trust Store tab or Jobs tab. The Trust Store tab displays all the certificates in a cluster across various trust stores. The Jobs tab lists the operations that are performed on certificates and status of the action. The dashboard pane displays these cards:
For identity and trust certificates card a summary of valid, expired, and expiring soon certificates is displayed. For Jobs card a summary of total, complete, and pending jobs for the current month is displayed. |
Access Identity Certificate Tab
Access Identity Certificate Tab
| 1 |
From the customer view in the Webex Control Hub, go to Services> Connected UC. The Connected UC page appears. |
| 2 |
Click Clusters from the Certificate Management card. |
| 3 |
Click on a cluster record in the listing page to visit Cluster details page which displays the identity certificates that are associated to the cluster. For clusters with Cisco Emergency Responder 12.5 or 14 versions, the tomcat-ECDSA certificate is not supported. |
| 4 |
(Optional) Click Search to search for a specific certificate. |
| 5 |
(Optional) In the Filter Certificate drop-down, select one or more certificates based on their type. The certificates appear in the certificate list along with details like server name, common name, certificate type, certificate status, and the expiry date. |
| 6 |
Click on a record from the listing page to view certificate details. A side panel opens to display the certificate details. You can see Certificate Details or Copy the PEM format certificate. You can also perform all operations that are listed in step 8 from this panel. |
| 7 |
Click Close to close the side panel and return to the listing page. The Warning Sign appears when the existing certificate attribute does not match the profile and the certificate is non-compliant. |
| 8 |
Hover over the certificate record and click the ellipsis to perform various operations. See Operations on Identity Certificates for details. |
| 9 |
(Optional) Click View Profile. The profile associated to the cluster is displayed. |
Access Trust Store Tab
Access Trust Store Tab
| 1 |
From the customer view in the Webex Control Hub, go to . The Connected UC page appears. |
| 2 |
Click Clusters from the Certificate Management card. |
| 3 |
Click on a cluster record in the listing page to visit Cluster details page. |
| 4 |
Click the Trust Store tab to view the list of certificates. The certificates appear in the certificate list with details such as the common name, serial number, Issued By, Status, and expiry date. |
| 5 |
(Optional) Click Search to search for a specific certificate. |
| 6 |
(Optional) In the Filter Certificate drop-down, select one or more certificates. The certificates appear in the certificate list with details such as the common name, serial number, Issued By, Status, and expiry date. |
| 7 |
Click on a record from the listing page to view certificate details. A side panel opens to display the certificate details. To view all clusters that are associated to the certificate, see Certificate Details or Copy the PEM Format Certificate. You can also perform all operations that are listed in step 9 from this panel. |
| 8 |
Click Close to close the side panel and return to the listing page. |
| 9 |
Hover over a certificate record and click the ellipsis to perform various operations. See Operations on Trust Store
Certificates for detials.
|
| 10 |
Click the certificate record with expired status to upload an updated certificate to the Trust Store. |
| 11 |
Click Upload to Trust. The Upload Certificate window displays. |
| 12 |
Select the required clusters to associate with the trust store. Read the displayed warning message carefully before you perform the operation. |
| 13 |
Click Choose File to browse for a certificate. |
| 14 |
Click Upload to upload the certificate into the trust store for required clusters. Trust operations for IPsec and CAPF are not supported through subscriber nodes in the Control Hub. The administrator has to perform these operations on-premise. |
Limitations
Limitation on CH for Trust Certificates operations:
- If there is any trust service for which replication doesn't happens on nodes of the same cluster, The administrator has to perform these operations on-premise. E.g. CAPF, IPSEC.
- All Trust related operations are sent only to the Publisher node of the cluster, so the operation can be performed only through pub node, cannot be performed from sub nodes.
- Remove trust
- Replace trust
- Distribute Trust
- Upload Trust
Limitation on Remove Trust Operations:
- Operation can be performed only through Pub node.
- If the certificate is not present in Pub node and present in sub nodes, operation cannot be performed through Control hub. Operation needs to be done through on-premise.
Access Jobs Tab
Access Jobs Tab
Jobs tab shows a summary of all the operations that are performed. The Jobs tab shows a summary of total, complete, and pending jobs for the current month.
| 1 |
From the customer view in the Webex Control Hub, go to . The Connected UC page appears. |
| 2 |
Click Clusters from the Certificate Management card. |
| 3 |
Click on a cluster record in the listing page to visit Cluster details page. |
| 4 |
Click the Jobs tab to view the list of jobs executed in the current month. |
| 5 |
In the Current Month drop-down, select the required period to view the job summary. The Job Status appears in the job summary along with details such as the Job Type, Node, Time Stamp, Certificate, and Product information. |
| 6 |
Click on a record from the listing page to view the job details. A side panel opens to display the job details. |
| 7 |
Click Close to close the side panel and return to the listing page. |
Profiles page allows you to define settings such as Multi-Server/Multi-SAN, CA-Signed vs. Self-Signed, validity period, RSA vs. ECDSA, Key Length, Hash algorithm.
Use separate profiles for each version of the cluster. For example, if the cluster runs 12.x version, you must see only 12.x features while performing certificate operations.
On creating the custom profile, the administrator can associate the newly created custom profile to a cluster.
| 1 |
From the customer view in the Cisco Webex Control Hub, go to . The Connected UC page appears. | ||||||||||||||||||||
| 2 |
Click Profiles from the Certificate Management card. The Profiles page appears with the list of profiles created. By default, certificate management service provides the standard profile and all clusters enabled for certificate management service are associated with this profile. It is a view only profile. Hover over the profile and click the ellipsis to either view or copy the profile. | ||||||||||||||||||||
| 3 |
Hover over a profile name and click the ellipsis to perform various operations like:
| ||||||||||||||||||||
| 4 |
Click Add Profile to create a new custom profile. | ||||||||||||||||||||
| 5 |
Enter a Profile Name. | ||||||||||||||||||||
| 6 |
Check the checkbox if you want to set the profile to default. | ||||||||||||||||||||
| 7 |
Enter a Description for the profile. | ||||||||||||||||||||
| 8 |
Define the various certificate settings for each of the products | ||||||||||||||||||||
| 9 |
Click Create to create the profile. If you have set a custom profile to default, de-select the default checkbox on the custom profile to switch back to standard profile as default. | ||||||||||||||||||||
| 10 |
(Optional) Associate a Profile to a cluster. Click Clusters tab from the top menu, the Clusters list page displays. You can associate a profile to a cluster from the listing page. Validity Period for 11.5x and 12.5x versions is 5 years irrespective of the value chosen in the validity drop-down. Release 14 onwards, the validity period can be between 5-20 years. Do not run operations that are listed as N in the table, else the operations fail.
| ||||||||||||||||||||
The system automatically sends an email message to the recipients when a certificate is close to its expiration date.
| 1 |
From the customer view in the Webex Control Hub, go to . The Connected UC page appears. |
| 2 |
Click Settings from the Certificate Management card. |
| 3 |
Set Notification Start Time. You can set the Notification Start Time between 30-365 days. |
| 4 |
Set Notification Frequency. You can set the Notification Frequency between 1-30 days. |
| 5 |
Enter the email address of Notification Recipients. You can enter a maximum of 25 email addresses. |
| 6 |
Click Save. All recipients receive an email notification as shown in the image when certificates are close to the expiry date. 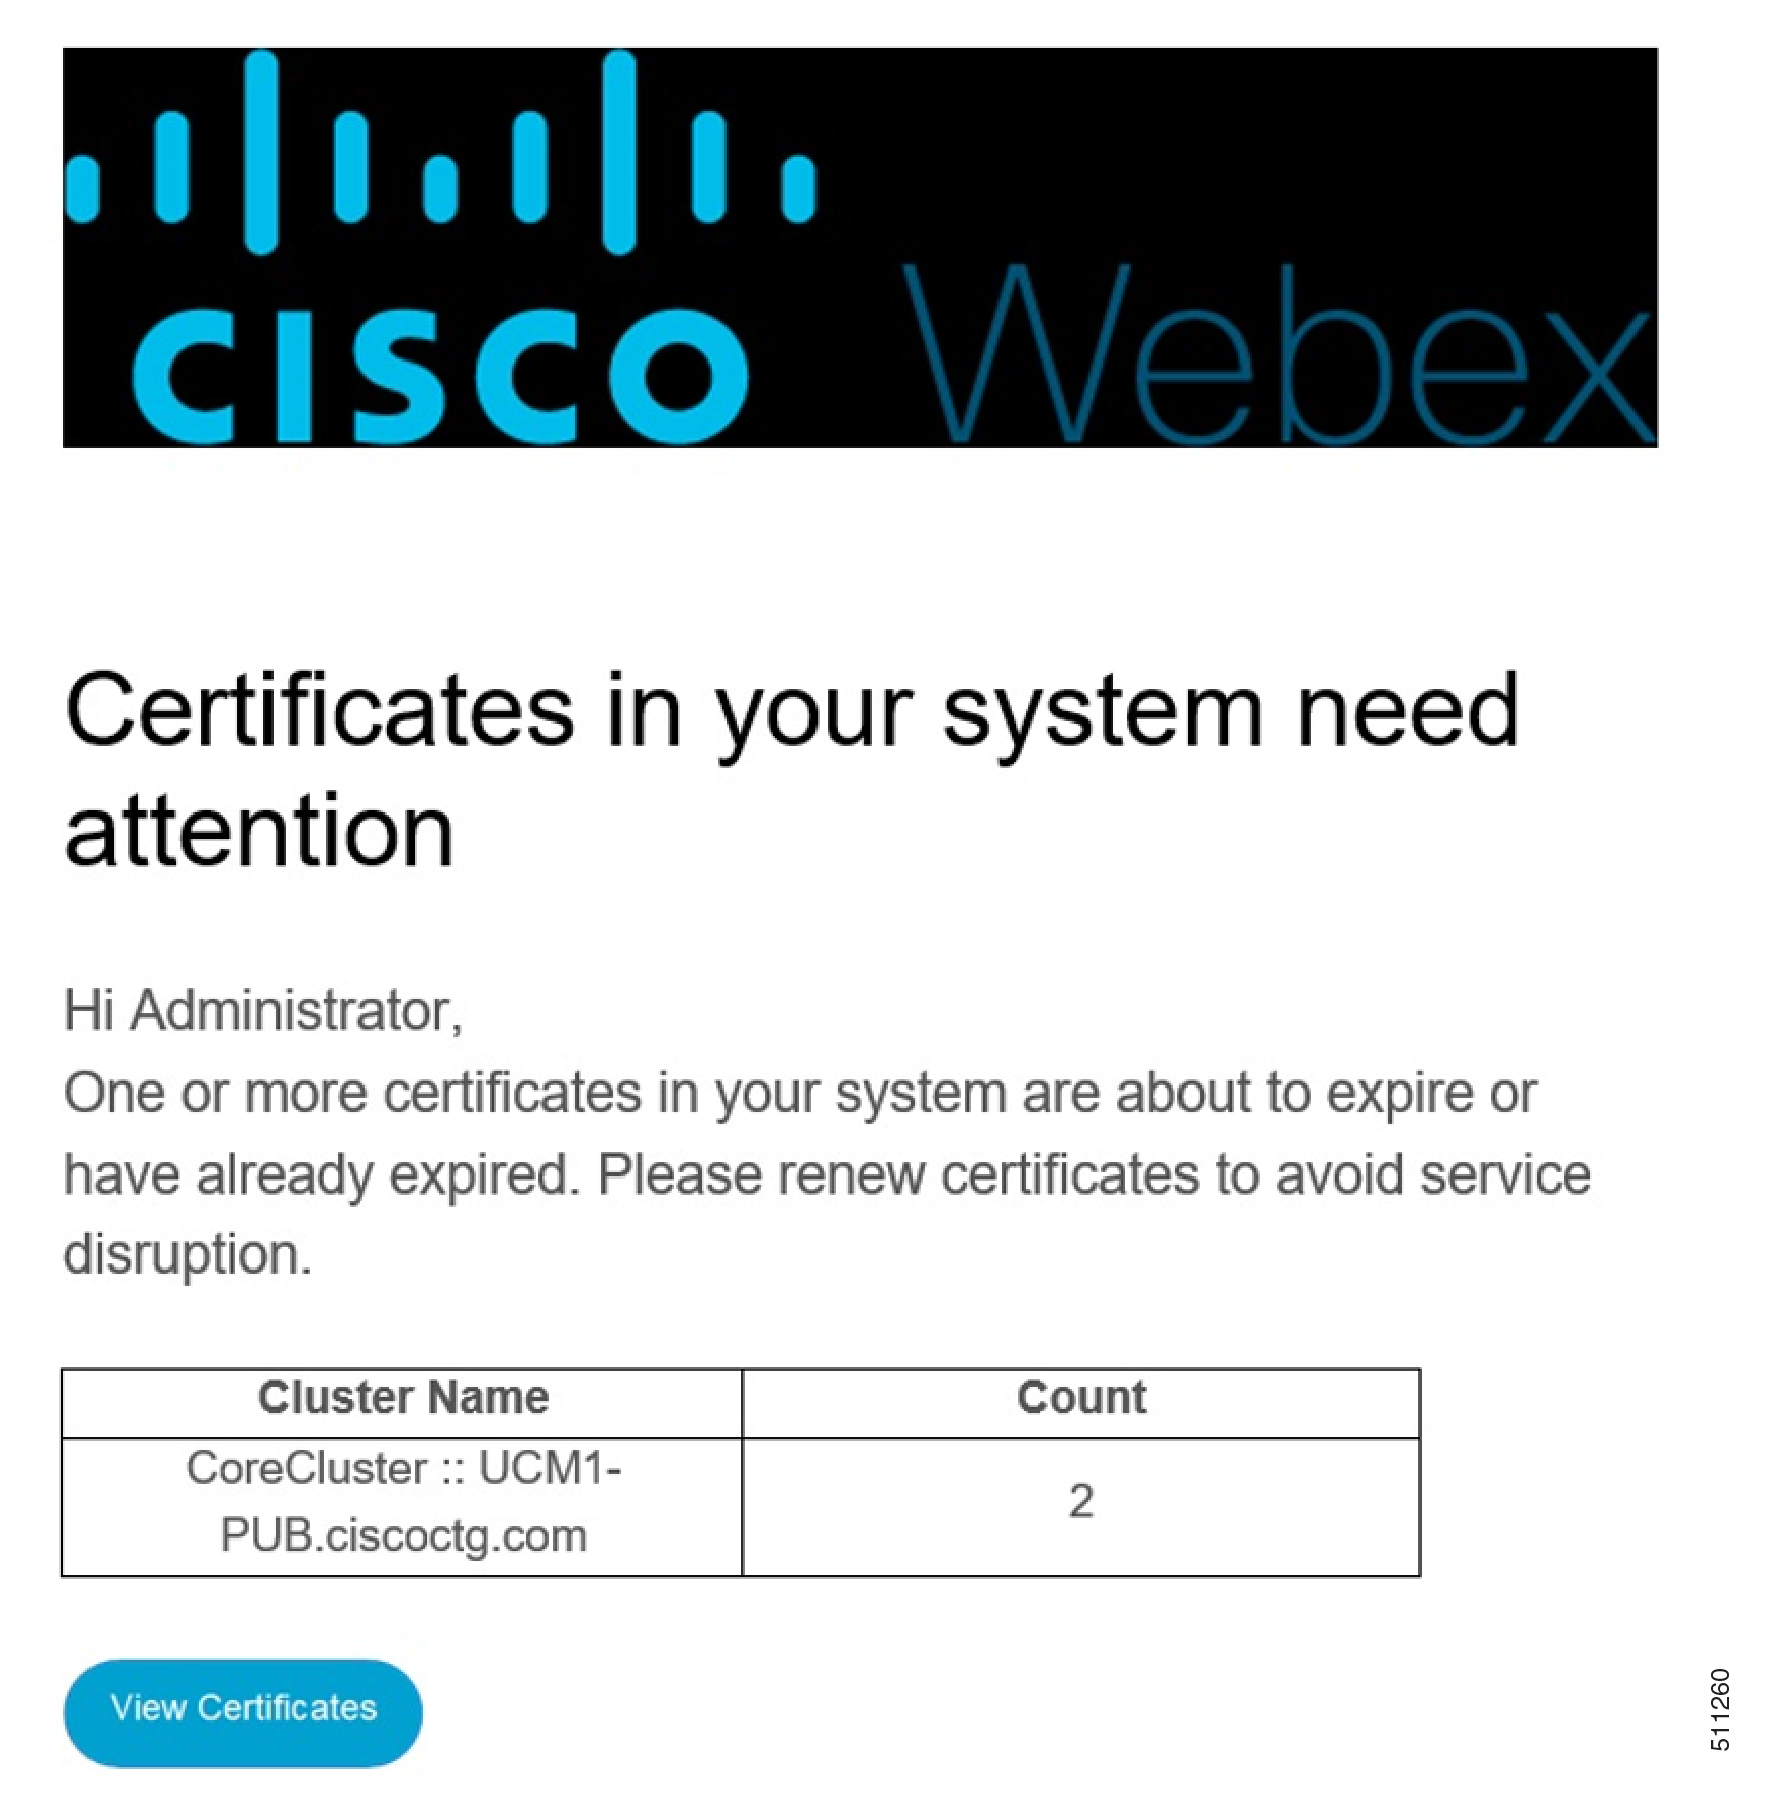
|


