
Thanks for your feedback.
Zero Touch Provisioning (ZTP) for Board, Desk, and Room Series devices
 Feedback?
Disclaimer:
Zero-Touch Provisioning (ZTP) is currently available starting with the 26.5 software image. However, this availability is limited and the feature is not yet considered fully General Availability (GA). Full availability in Control Hub will occur only after the 26.5 image has been distributed through all necessary channels, including the pre-onboard upgrade channel, the on-premises release COP file, and as a factory image on new devices. This phased rollout approach ensures thorough validation and integration before broad customer access. The complete rollout and full availability in Control Hub are expected in the June to July timeframe. Customers should consider this a controlled release and plan deployments accordingly.
Key Benefits
- Automatic Device Registration: Devices are registered to Webex seamlessly based on their MAC address when assigned to a workspace in Control Hub, eliminating manual activation code entry.
- Simplified Setup: Leveraging Control Hub’s default settings and pre-configurations, the First Time Wizard (FTW) experience is streamlined, significantly reducing manual steps during physical device setup.
- Efficient Bulk Operations: Devices can be added in bulk by importing CSV files containing MAC addresses, enabling large-scale deployments with minimal effort.
- Pre-Activation Capability: Devices can be activated in advance, even before they connect to the network or are assigned to a specific workspace, allowing for flexible deployment workflows.
- Reduced Onboarding Complexity: By automating network onboarding and device provisioning, ZTP reduces the time, cost, and complexity traditionally associated with device setup.
Key Terms for Device Onboarding in Control Hub
- Unclaimed: The device’s MAC address is not registered within your organization.
- Claimed: The device’s MAC address has been added to your organization.
- Unassigned: A claimed device that has not yet been linked to any workspace.
- Assigned: A claimed device that is linked to a specific workspace and is ready for onboarding.
- Pending: The status shown in Control Hub for a device that has been claimed and/or assigned but has not yet come online.
- Pre-configuration: The process of applying device configuration settings to a pending device before it connects to the network or comes online.
Requirements
Ensure your environment meets these requirements before deployment:
- Software Version: Devices must run RoomOS 26.5.0 or later. RoomOS 11 is not supported.
- Network Connectivity: Devices require reliable network access with connectivity to Webex services.
- Configuration Defaults: Define Organization and Location defaults in Control Hub for Time Format, Time Zone, and Language to minimize onboarding prompts during the First Time Wizard (FTW).
Prerequisites: Upgrading to the Minimum Version for Zero Touch Activation
To upgrade to version 26.5, you will need to manually perform the upgrade for now. In the coming months, a pre-onboard upgrade feature will automate this process, and factory images will be updated accordingly. Until then, customers must upgrade by using the package links or the xcommand interface to install the update, followed by performing a factory reset to complete the process.
Package Mapping and Commands
Select the appropriate package based on your hardware. Use the provided
xCommand to initiate the upgrade.
| Device Category | Package Name |
|---|---|
| Cisco Room Navigator | bifrost.pkg |
| Newer Products (Codec Pro G2, Desk Pro G2) | luna.pkg |
| Standard RoomOS Endpoints (Room Bar, Room Kit EQ, Board Pro, Desk, Codec Pro) | zenith.pkg |
For Cisco Room Navigator:
xCommand SystemUnit SoftwareUpgrade URL: "https://binaries.webex.com/collaboration-endpoint-ce-production-stable/20260415114153/bifrost.pkg" Forced: True
For Codec Pro G2 and Desk Pro G2:
xCommand SystemUnit SoftwareUpgrade URL: "https://binaries.webex.com/collaboration-endpoint-ce-production-stable/20260415114153/luna.pkg" Forced: True
For Room Bar, Room Kit EQ, Board Pro, Desk, and Codec Pro:
xCommand SystemUnit SoftwareUpgrade URL: "https://binaries.webex.com/collaboration-endpoint-ce-production-stable/20260415114153/zenith.pkg" Forced: True
Initiating Zero Touch Activation through CLI
You can manually trigger the Zero Touch Activation process using the Command Line Interface (CLI) or API. Use the following command to begin the workflow:
xCommand Webex Registration ZeroTouchProvisioning Start SecurityAction: <Harden, NoAction>
Parameters:
Harden: Applies enhanced security settings to the device during the activation process.
NoAction: Proceeds with the activation using the current device security configuration.
Setup Steps in Control Hub
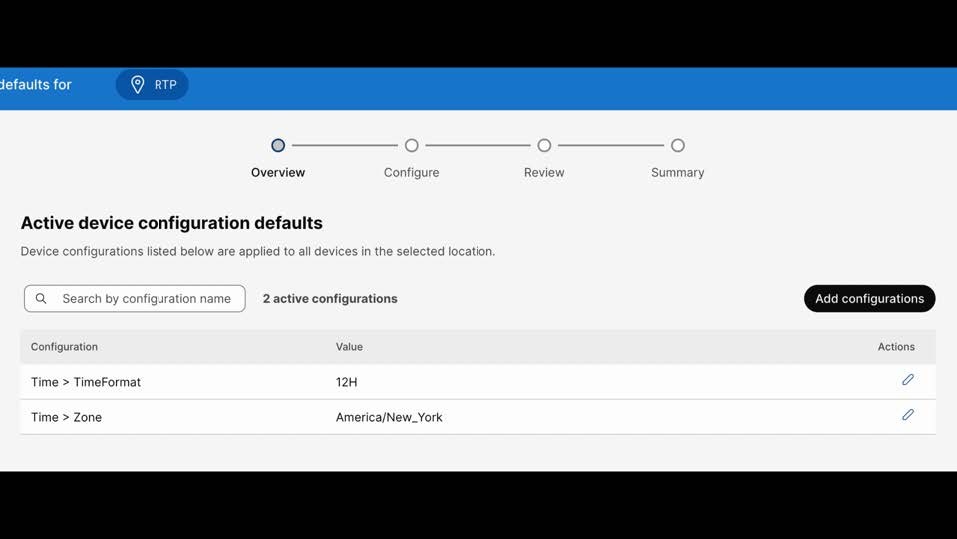
- Configure Defaults
Setting defaults helps the device skip manual setup steps during onboarding. Navigate to Control Hub and configure the following:
- Time -> TimeFormat (e.g., 12h/24h)
- Time -> Zone (e.g., America/New_York)
- UserInterface -> Language (e.g., English)
Optionally, assign the workspace to the location where these defaults are configured, or apply the organization-wide defaults.
- Add the device by MAC address
- Go to Control Hub ->Devices -> Add Device (or Create Workspace).
- Select Cisco Room or Desk Device.
- Configure your workspace settings (scheduling, calling, etc.).
- When prompted, select MAC Address and enter the wired ethernet MAC address, product type, and platform (RoomOS or Microsoft Teams).
- If you select Microsoft Teams, the platform will be installed automatically upon completion of the wizard.
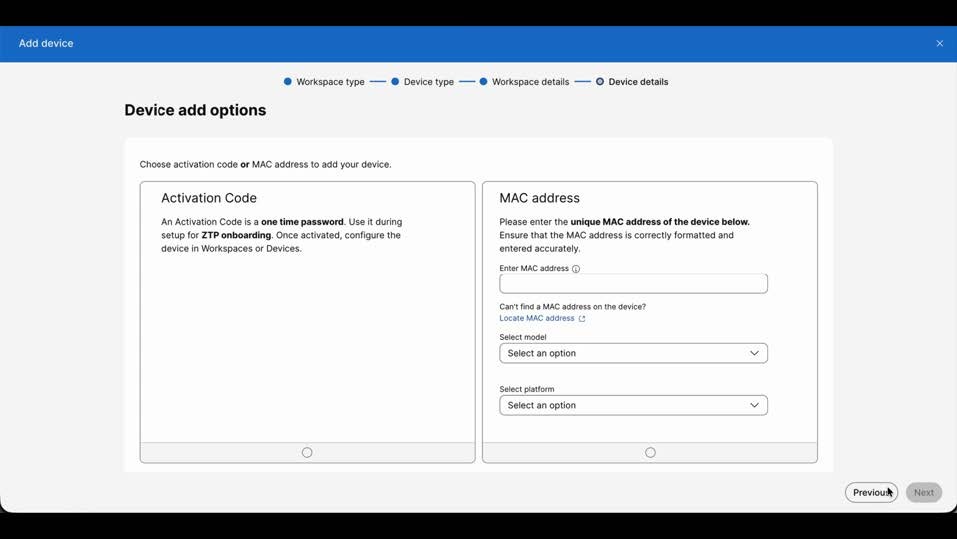
See the section to Locate your device’s physical MAC address label learn how to find the device’s MAC address.
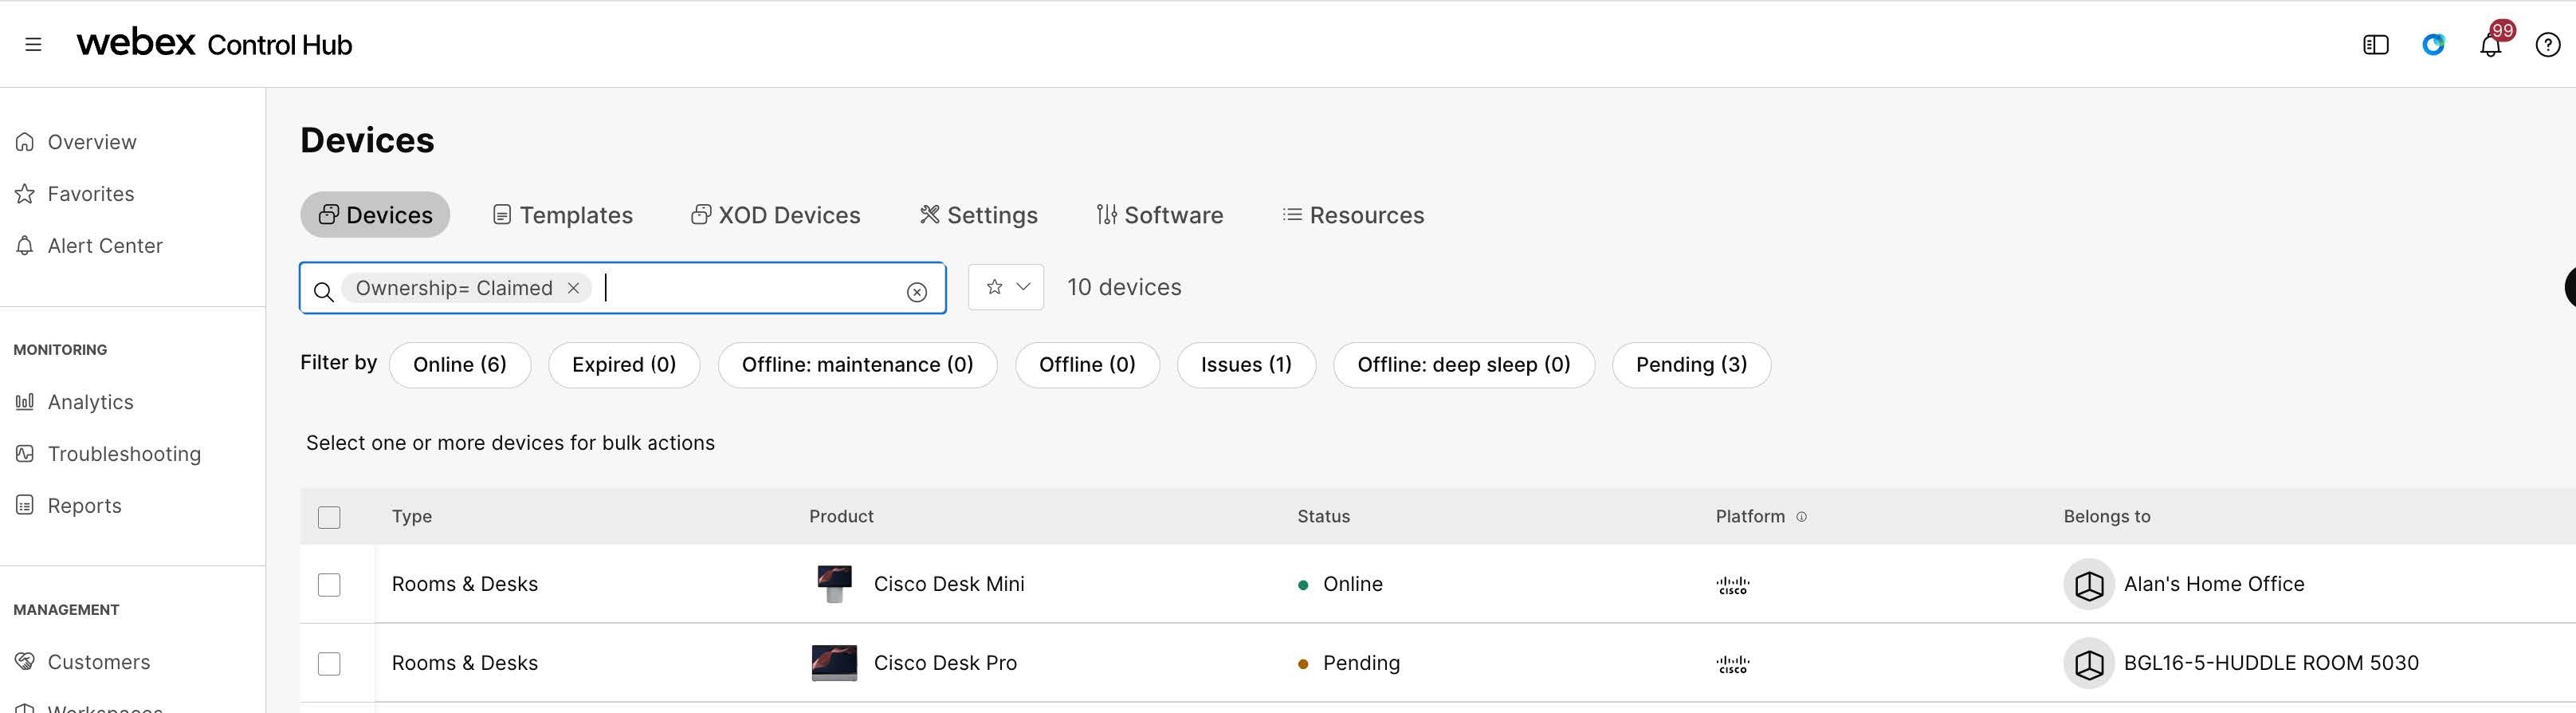
Claimed devices that have not yet connected to the network will appear with a status of "Pending." You can filter all devices that have been claimed—whether they are currently online or offline—by using the “Ownership” filter on the devices page and selecting “Claimed.”
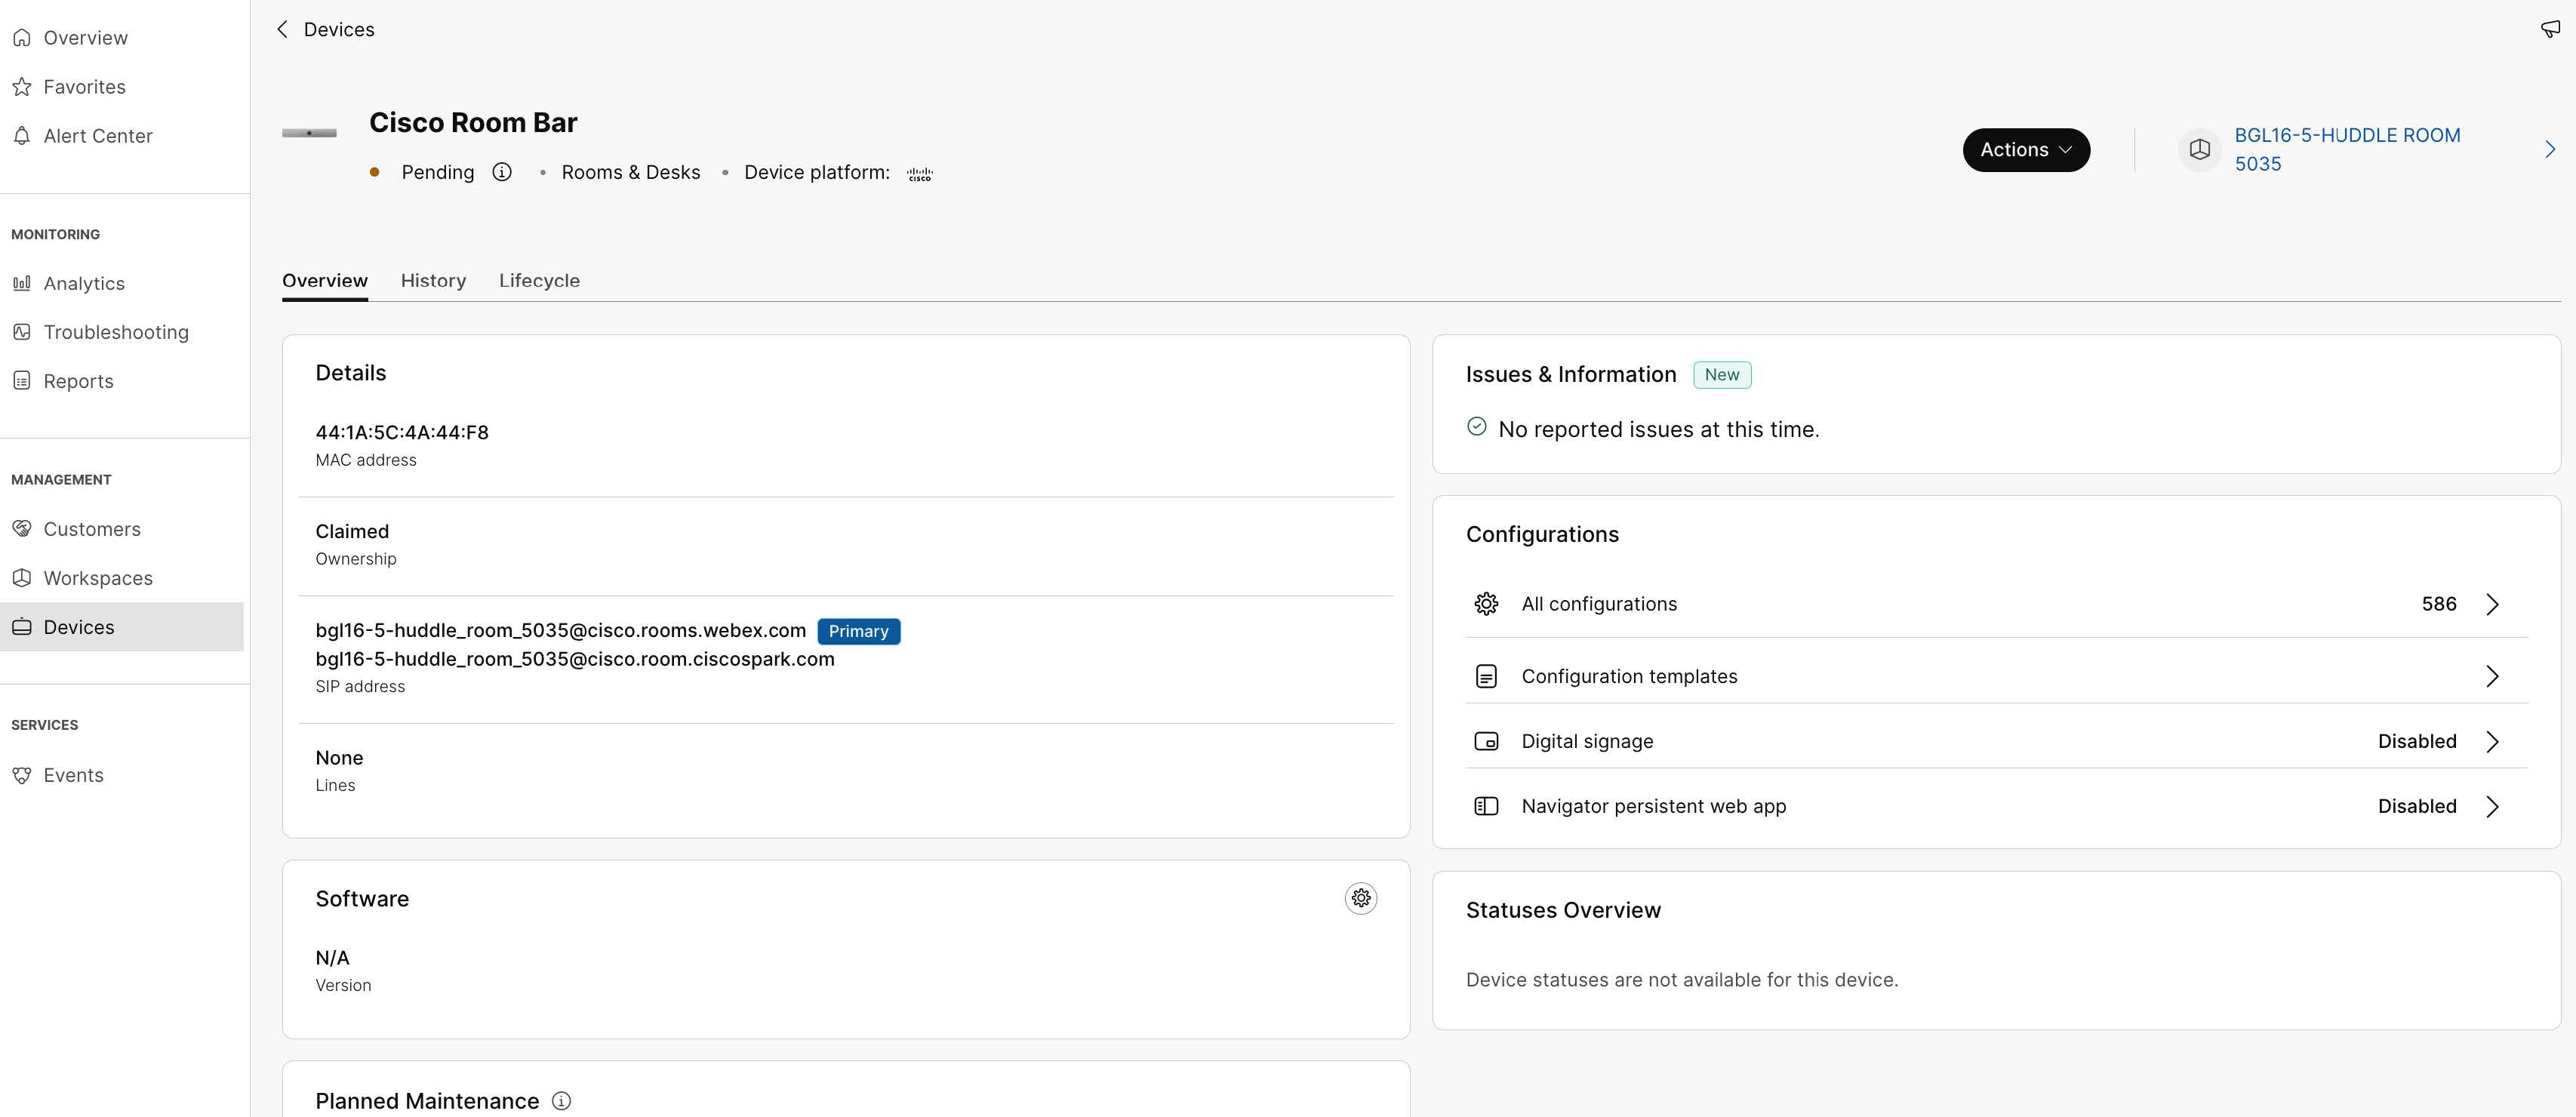
- Apply Pre-configurations to pending devices (optional, recommended)
You can apply device-level pre-configurations before the device comes online for any supported configuration by following these steps:
- Open the pending device page in Control Hub.
- Click on "All Configurations."
- Apply the necessary settings.
During onboarding, the device consumes configuration settings from these sources in hierarchical order:
- Organization-level defaults
- Location-level defaults
- Device-level pre-configurations on the pending device
Settings defined at any of these levels are applied automatically during the First Time Wizard onboarding flow.
For the automatic onboarding wizard to complete successfully, the following configurations must be set:
All Devices:
- Time > TimeFormat (e.g., 12h/24h)
- Time > Zone (e.g., America/New_York)
- UserInterface > Language (e.g., English)
Board Series Only:
- Audio > Placement (Wallmount, Freestanding)
Result:
- The device is claimed and assigned.
- It is pre-configured with location and device-level settings.
- When the factory-reset device connects to the network, it will register and onboard automatically.
Locate your device’s physical MAC address label
If you cannot locate your MAC address, it is typically printed on the product label found
on the back or underside of your device. This label often includes other important
identifiers such as the serial number and product ID. For many Cisco products, the MAC
address label is clearly marked and can be found on the chassis or a label tray. If you are
unable to locate it physically, some devices also allow you to view the MAC address through
their user interface or web page under product or system information settings.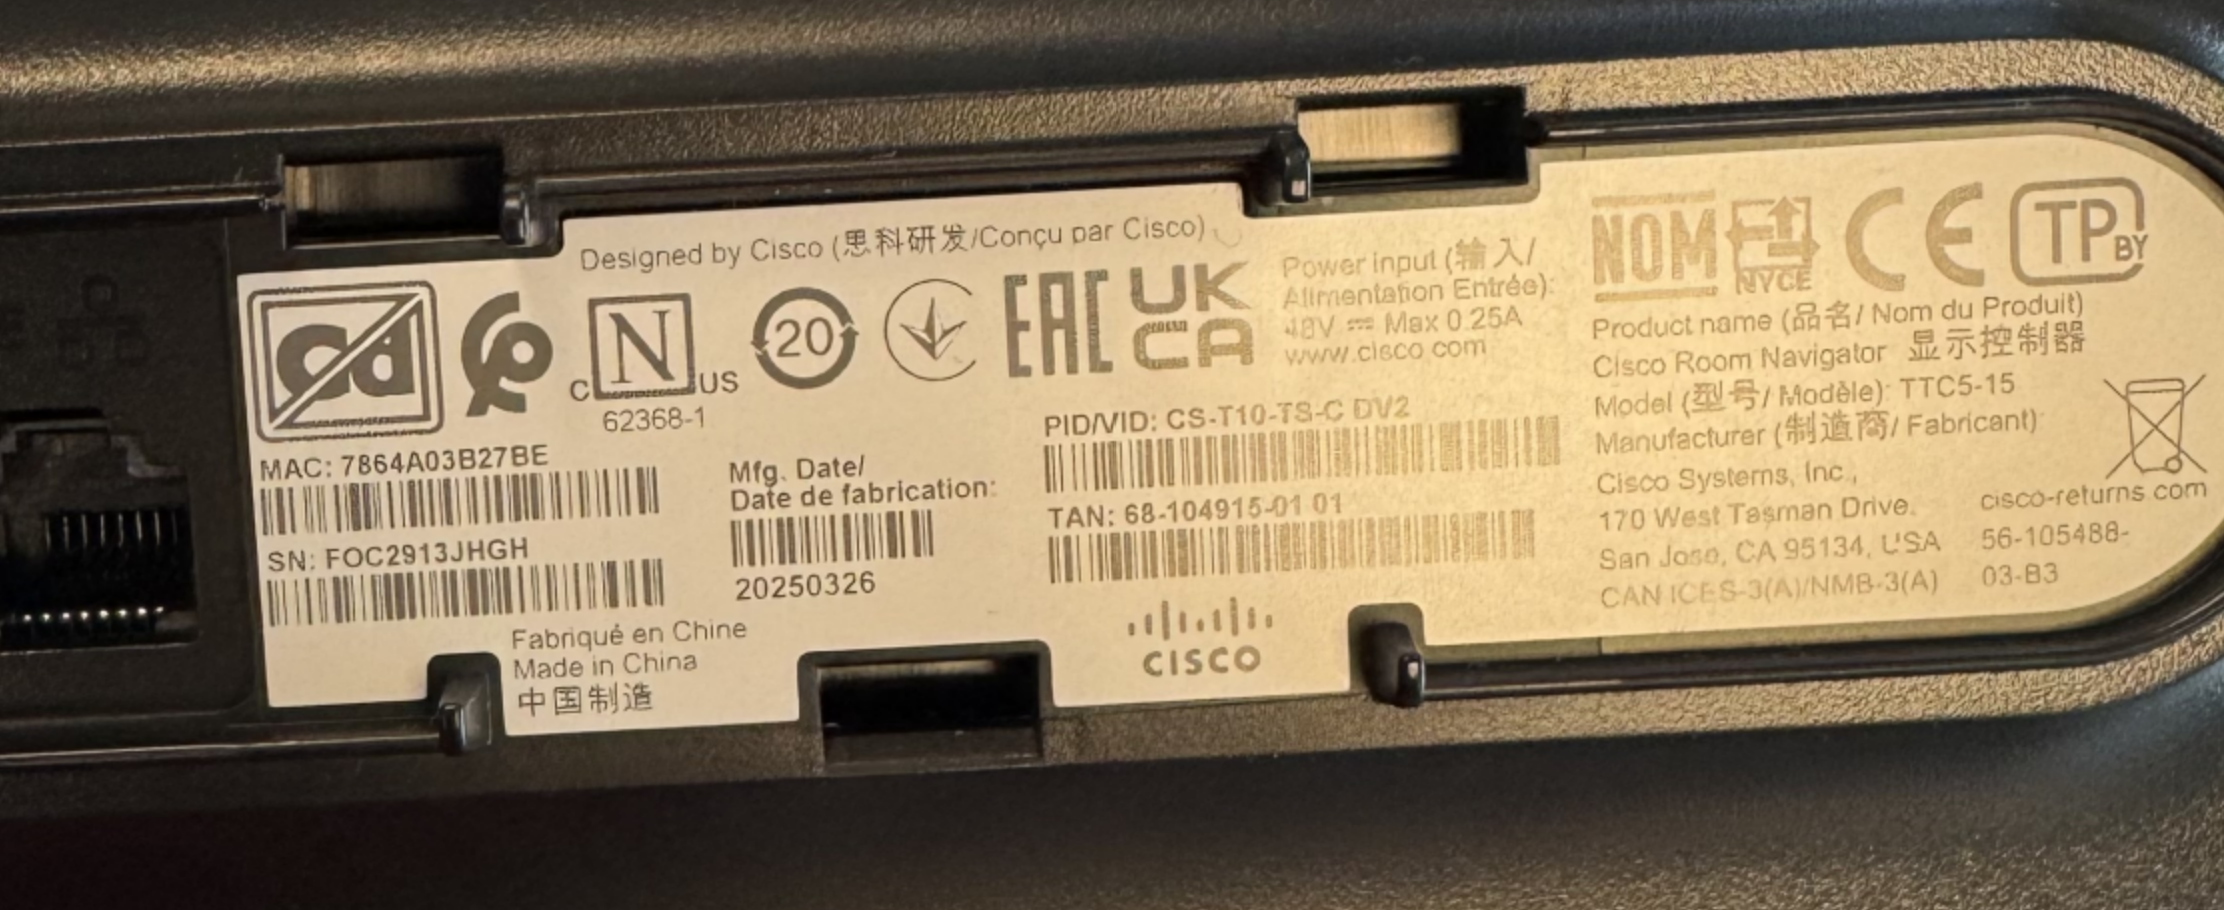
Onboarding Process
Once the device is claimed and assigned in Control Hub:
- Ensure the device is factory reset.
- Connect the device to the network.
- On the Welcome screen, select the automatic onboarding option.
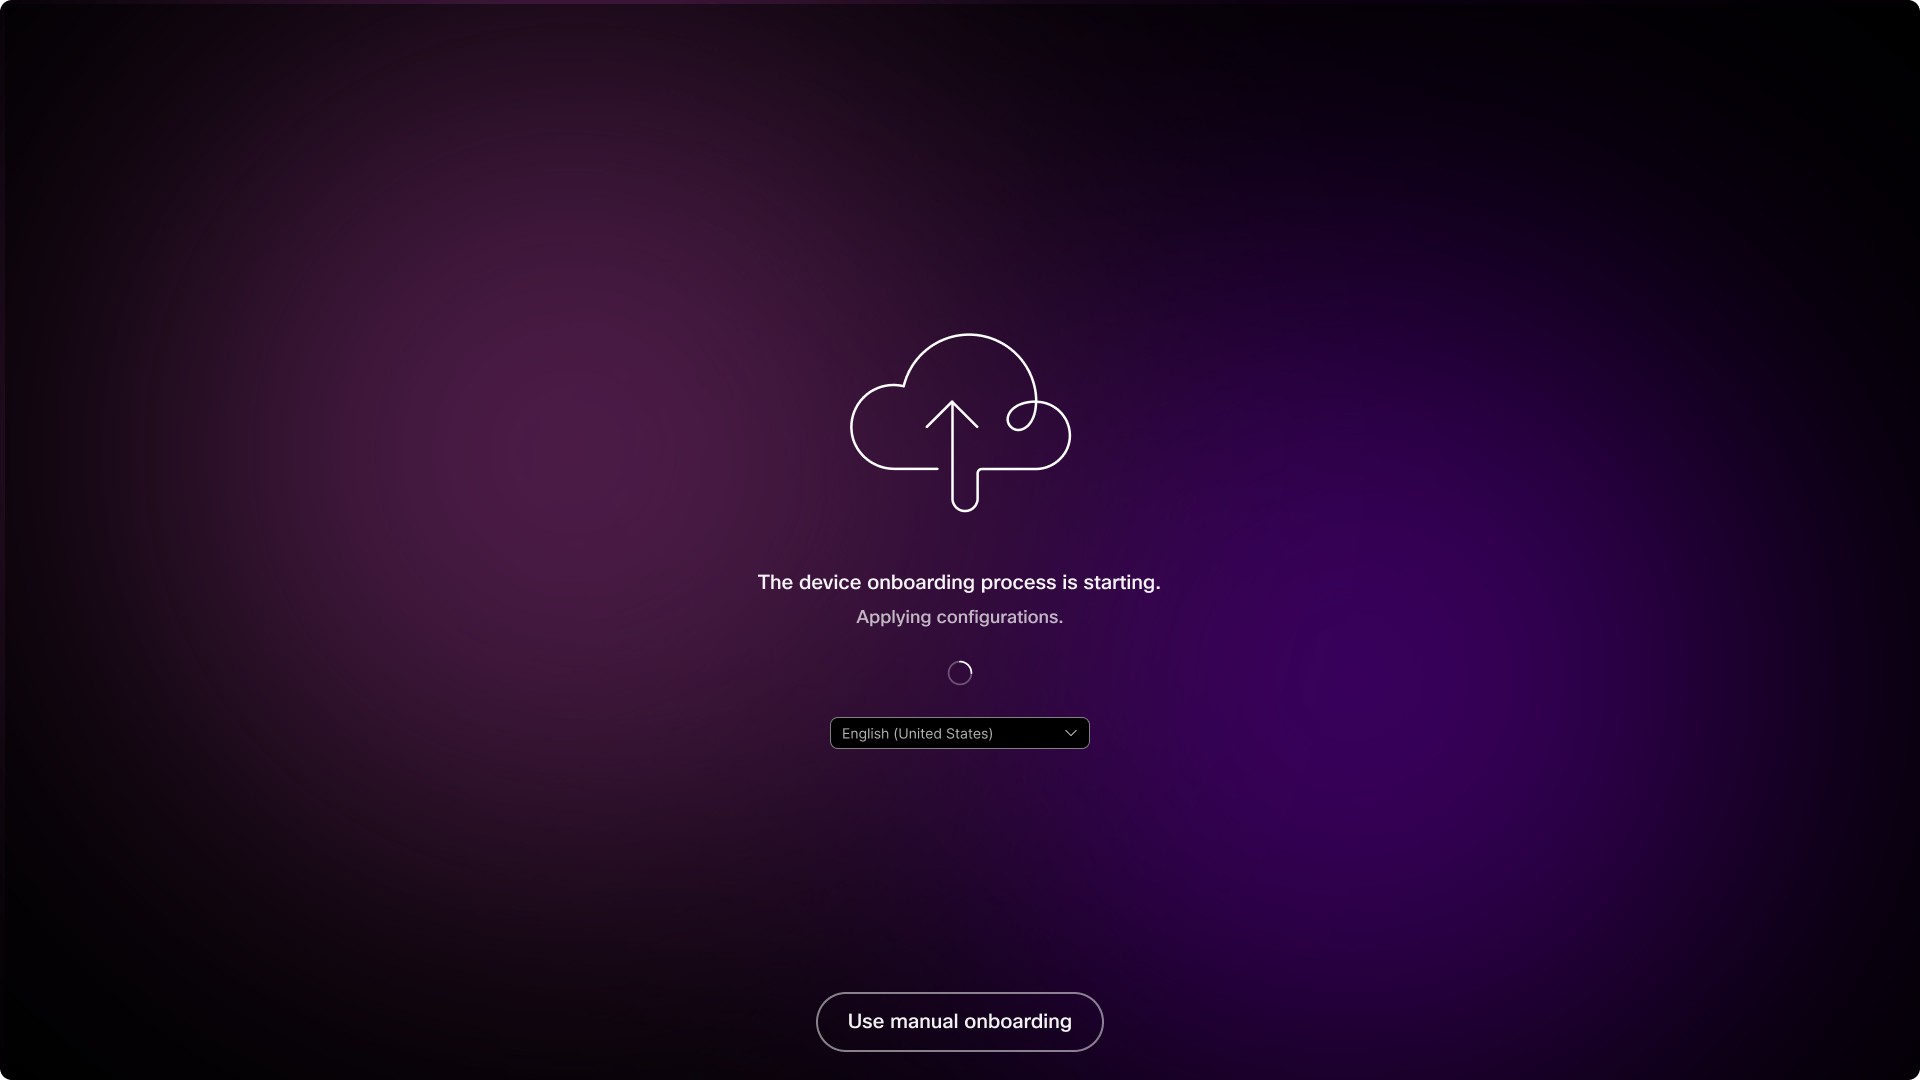
Device activation in progress - Follow any remaining prompts for items not configured in Control Hub.
- If you did not complete certain settings during pre-configuration, the setup wizard will prompt you to configure these items during device onboarding.
- Additionally, complete the necessary hardware setup, such as positioning the camera correctly, to ensure optimal device performance.
If the automatic onboarding option is not shown, verify the following:
- The MAC address is correctly entered and assigned to the intended workspace.
- The device has been factory reset.
- The device has verified internet access to Webex services.
- The device is running the minimum required software version (RoomOS 26.5.0+).
Bulk device onboarding (CSV)
Use the bulk onboarding process to claim and assign multiple devices in a single import.
- In Control Hub, navigate to Devices and click Add device.
- Select Bulk Add Devices.
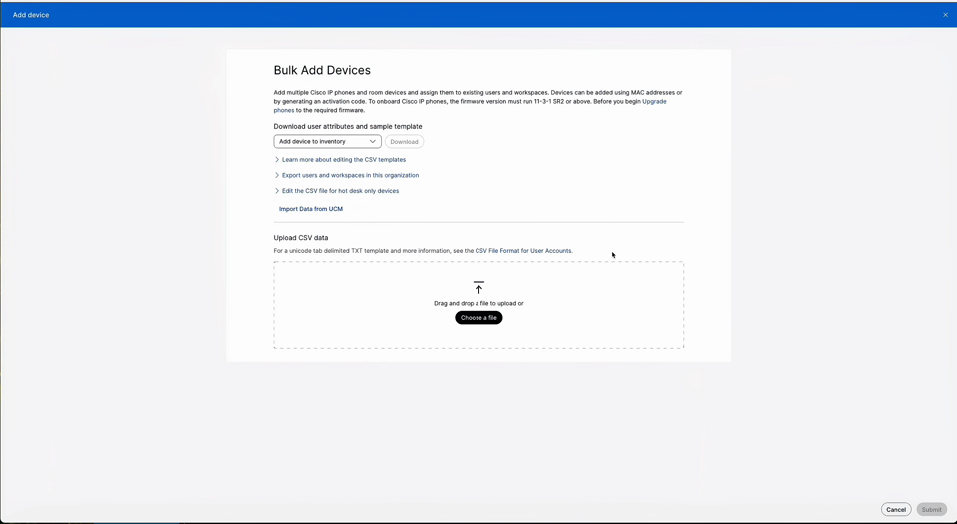
Bulk add devices - From the template dropdown, choose the zero-touch onboarding template and
download the CSV file.
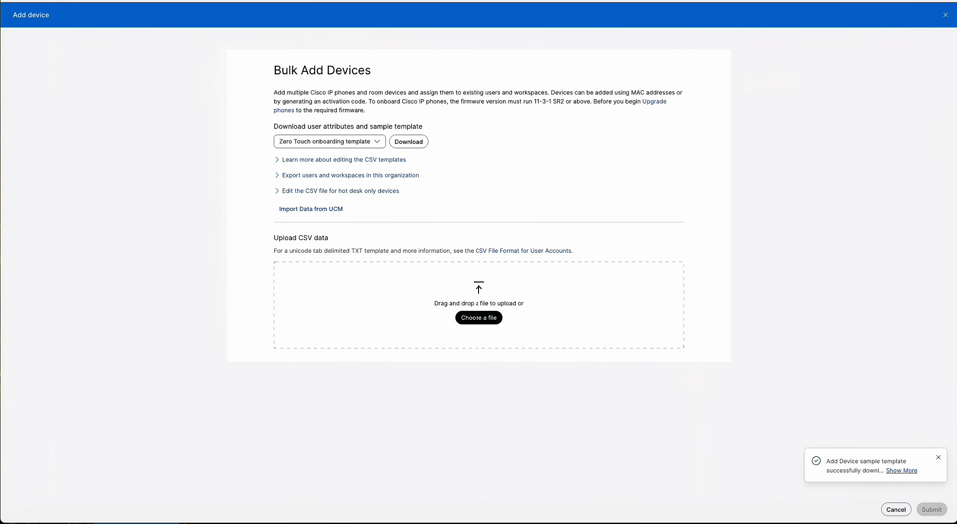
Zero touch template selection - Populate the CSV file with your device and assignment information, ensuring all required fields are completed.
- Upload the completed CSV file and submit the import.
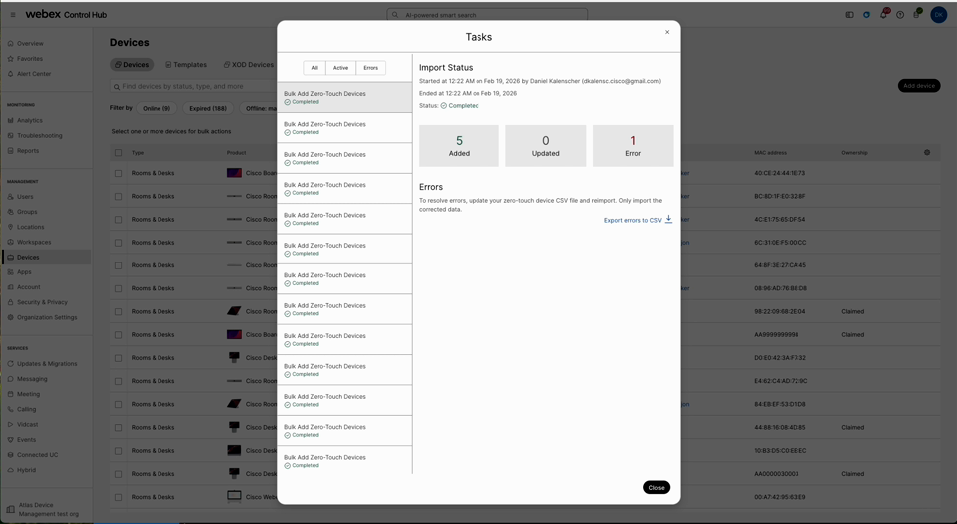
- Open the Tasks page to monitor the import progress and download an error CSV
file if any rows fail.
Bulk import task status - Verify the imported devices in the Devices list, where they may initially
appear as Claimed and Pending before their first connection.
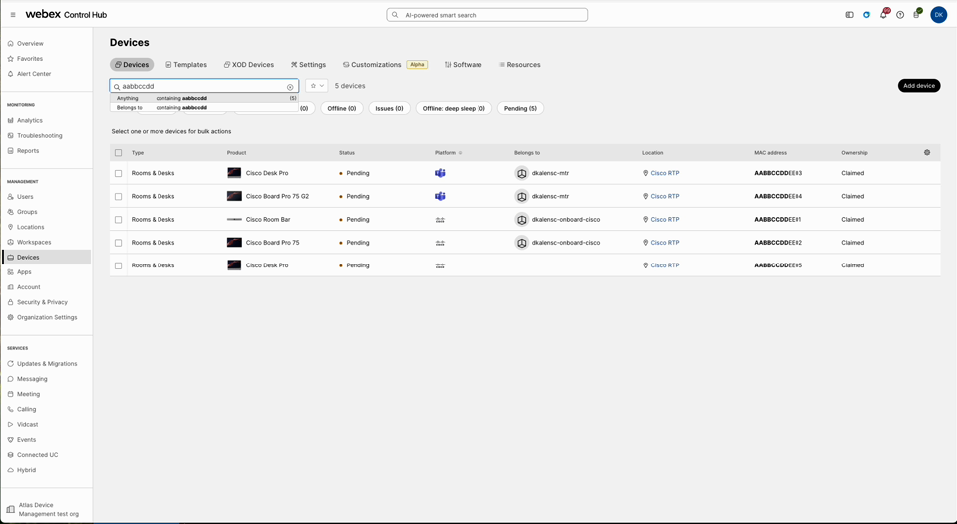
Imported devices in pending state
Device Web Page Onboarding (Remote)
Use the device web page for remote onboarding when you do not have physical access to the device interface. This method is especially useful for deployments without a Room Navigator attached, such as Room Bar BYOD and Room Bar Pro BYOD devices.
- Open a web browser and enter the device’s IP address in the address bar.
- Log in using the username admin with no password.
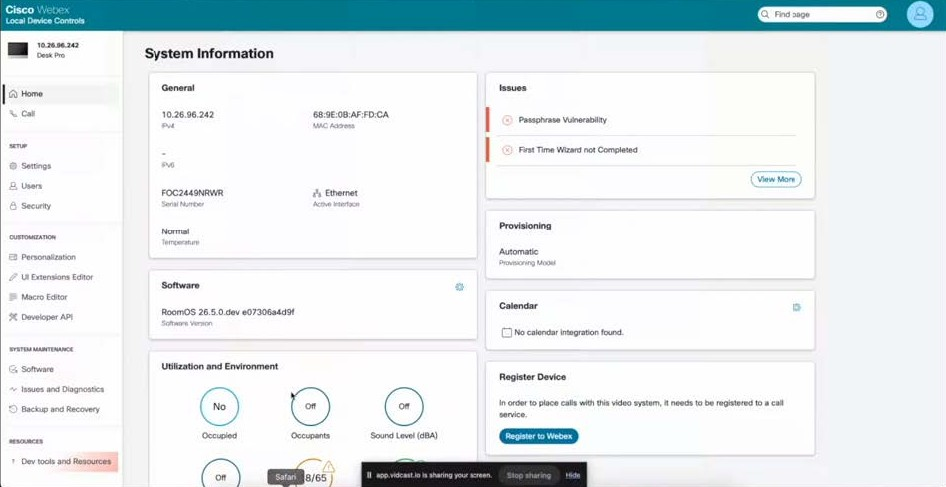
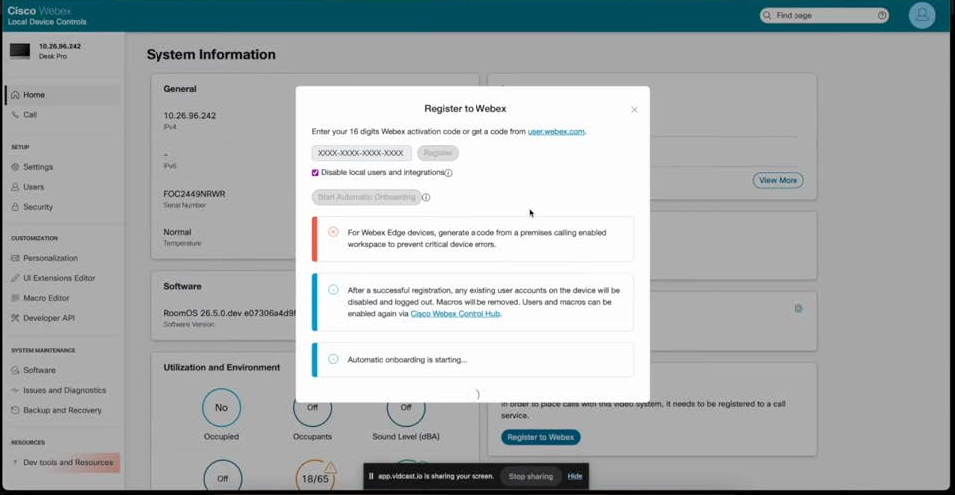
Device web page home - On the system page, click the Register to Webex button.
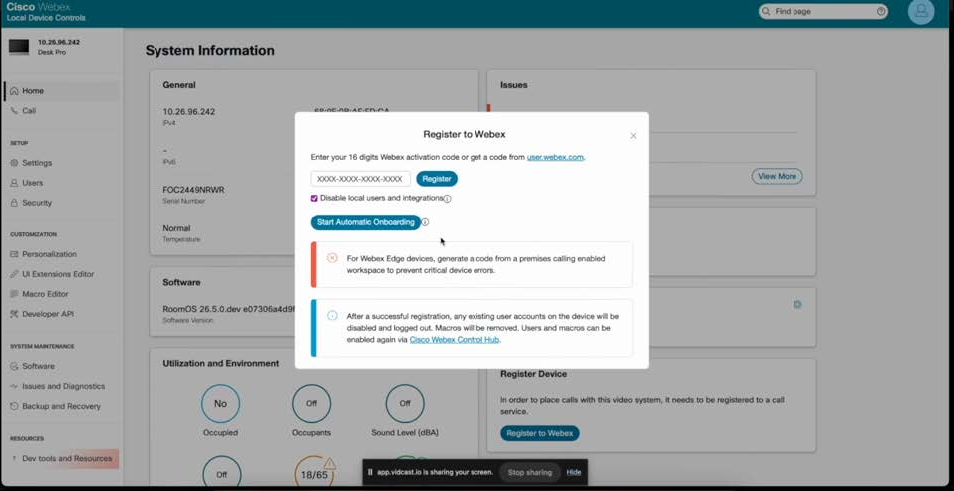
Register to Webex - In the registration dialog, click Start Automatic Onboarding to begin the
process.
Automatic onboarding started - Wait for the onboarding to start. Then, verify the device state and registration status in Control Hub to ensure successful onboarding.
Additional Information
- This onboarding method enables you to configure and manage devices remotely without needing a physical Room Navigator or direct device interaction.
- After registration, the device can be managed and monitored through Cisco Webex Control Hub.
- For Room Bar BYOD devices, this process allows enabling network connectivity and Control Hub registration, which unlocks advanced features such as software management, peripheral visibility, and remote access.
- Ensure that the device is connected to the network and accessible via its IP address before starting the onboarding process.
This streamlined remote onboarding process helps simplify deployment and management of Cisco collaboration devices in environments where physical access is limited or unavailable.
First Time Wizard (FTW) Behavior
The First Time Wizard (FTW) guides the initial onboarding process for Cisco collaboration devices. Its behavior includes the following key actions:
- Automatic Onboarding Start: The FTW begins onboarding once the user selects the automatic onboarding option on the Welcome screen.
- Use of Configured Defaults: When available, the wizard applies configured defaults such as Language and Time Zone.
- Application of Preconfigurations: It applies configurations from the Organization, Location, and any pending-device preconfigurations set in Control Hub.
- Prompting for Missing Settings: The wizard prompts the user to enter any settings that are not already configured in Control Hub.
- Microsoft Teams Installation: If the Microsoft Teams platform was selected during the Add Device process, the wizard installs Microsoft Teams at the end of the onboarding.
- Manual Hardware Checks: Certain hardware setup tasks, such as camera positioning, require manual completion by the user.
Limitations and Manual Tasks
- Physical hardware installation, such as camera positioning and mounting, must still be performed manually.
- You may need to manually complete certain First-Time Wizard steps if the corresponding default settings are not configured in Control Hub.
- Zero Touch Pairing is not available in the initial release. Support for this feature is planned for a future update.
- The current version of Zero Touch Activation does not support Webex Edge. This functionality will be introduced in a subsequent release.
- Personal Mode is not currently supported. Support for Personal Mode is planned for a future update.
- TLS-intercepting proxies are not currently supported. For Zero Touch Activation to function, the device must establish a direct, trusted connection with Webex services. A simplified trust bootstrap process for these environments is currently in development.
- For deployments requiring 802.1X or SCEP, certificate enrollment remains a manual process and is handled independently of Zero Touch Activation. While an automated certificate loading tool is currently in development, the current Zero Touch workflow assumes the device has already established network connectivity to Webex services.


