- Home
- /
- Article

Thanks for your feedback.

Set up classroom on Room Series
 In this article
 Feedback?
The classroom setup makes it easy to set up, manage, and use a room to deliver training and education sessions to groups of people. Whether the presenter is in the room or calling in from a remote location, participants receive a good and engaging experience.
The classroom setup has the following predefined room modes that accommodate different scenarios.
Local presenter mode
-
The presenter is in the room. This mode also covers the case when someone in the local audience asks a question (Q&A).
-
If automatic switching is enabled (default), the device switches to this mode when the presenter camera detects a presenter in the room.
-
Sends video from the presenter camera to the far end. In the Q&A case: Sends split-screen video from the presenter camera and the person asking the question (audience camera) to the far end.
Remote presenter mode
-
The presenter is calling in.
-
If automatic switching is enabled (default), the room device switches to this mode when the presenter camera doesn't detect a presenter in the room.
-
Sends video from the audience camera to the far end.
Discussion mode
-
For discussions between different sites. A local presenter is in the room.
-
Always use the touch controller to activate this mode.
-
Sends video from the audience camera to the far end.
The classroom setup is available as a room type template. When you set up a room using a template, a set of configurations is pushed automatically to the device. It is important that the room is set up correctly, and that the cameras are connected exactly as specified. Otherwise, the configurations will not match the room.
Devices have a number of smart camera modes: Presenter and Audience, Briefing Room, and Classroom mode. Updating the camera mode while the device is in a call or a meeting is not recommended. This may lead to issues with the UI and the camera setup.
If you want to change the camera mode on a device that is in a call, first disconnect from the call, change the camera mode, and then join the call again.
Differences between the room type templates
Presenter and audience, briefing room, and classroom are room type templates.
Presenter and audience
This is the newest room type templates for such scenarios. Later updates and improvements will only be for presenter and audience.
-
Supported products:
- Board Pro G2
- Room Kit EQ (Codec EQ), Room Kit EQX
- Room Kit Plus (Codec Plus), Room Kit Pro (Codec Pro)
- Room Bar Pro
- Room 55 Dual, Room 70, and Room 70 G2
-
Compared to the older setups, you get easier manual layout selection, improved camera switching based on voice activity detection, and improved diagnostics tools. You can use either two or three screens.
Briefing room
-
Supported products:
- Board Pro G2
- Room Kit EQ (Codec EQ), Room Kit EQX
- Room Kit Pro (Codec Pro)
- Room Bar Pro
- Room 70 G2
-
The setup requires three screens, and the layouts on the screens are preconfigured (and fixed) to match that particular scenario.
Classroom
The classroom setup is more flexible than the briefing room setup regarding the number of screens and how the layout is distributed on the screens.
-
Supported products:
- Board Pro G2
- Room Kit EQ (Codec EQ), Room Kit EQX
- Room Kit Plus (Codec Plus), Room Kit Pro (Codec Pro)
- Room Bar Pro
- Room 55 Dual, Room 70, and Room 70 G2
-
You can use any number of screens that the device supports, typically two or three. Use the video monitor settings to configure the distribution of layouts on the screens if the default behavior doesn't fulfill your requirements.
Required equipment
One of the following devices:
- Board Pro G2
- Room Kit EQ (Codec EQ), Room Kit EQX
- Room Kit Plus (Codec Plus), Room Kit Pro (Codec Pro)
- Room Bar Pro
- Room 55 Dual, Room 70 Single, Room 70 Dual, Room 70 Single G2, Room 70 Dual G2
Screens:
-
You can use one or more screens (the maximum number of screens depends on your device).
-
For most setups, we recommend that you use two or more screens. Place the main screen at the front of the room. Place a second screen on the side or at the back, so that a local presenter can see the remote audience.
Two cameras:
-
Audience camera: Use the integrated camera for devices that have that. For other devices, we recommend the Quad Camera or SpeakerTrack 60 camera. We recommend a camera that supports speaker tracking, but it is also possible to use a camera without speaker tracking capabilities.
-
Presenter camera: A PTZ 4K or Precision 60 camera with presenter tracking enabled.
Microphones:
-
We recommend a Cisco Ceiling Microphone for good coverage of the room. Also other microphone solutions can be used.
Speakers:
-
Use the integrated speakers for devices that have that. For other devices, we recommend good quality stereo speakers placed next to the main screen at the front of the room.
Cisco touch controller
Classroom setup limitations
The classroom setup doesn't support this functionality:
-
Directional audio
-
Snap to whiteboard
Room arrangement examples
These diagrams show examples of how to arrange screens, cameras, and microphones, and where to place people for the best experience.
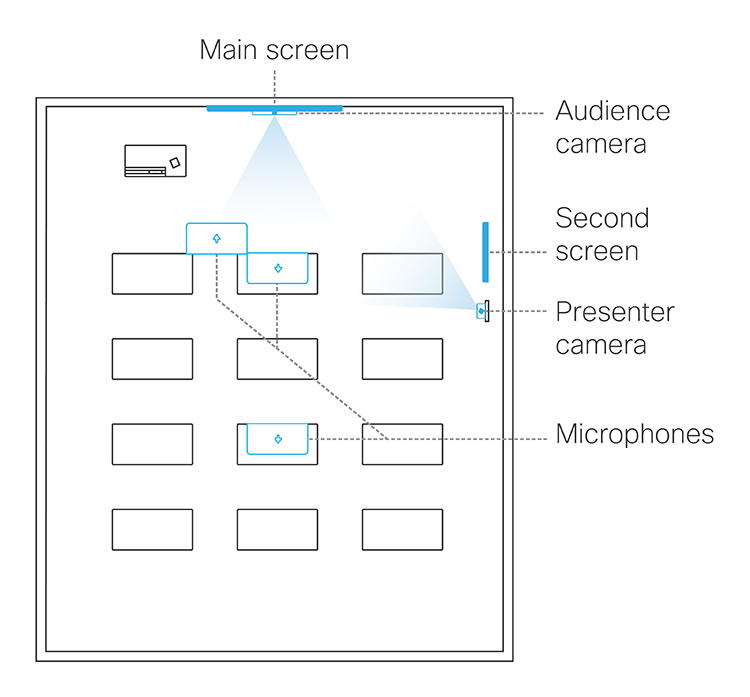
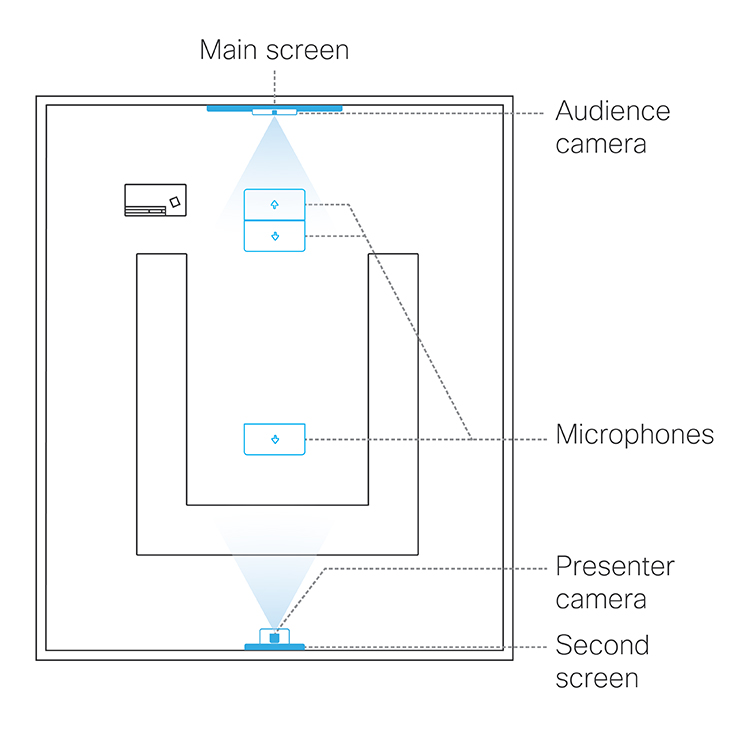
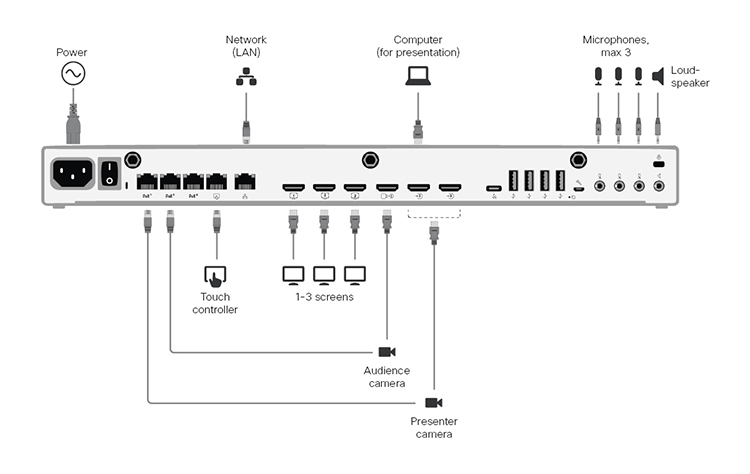
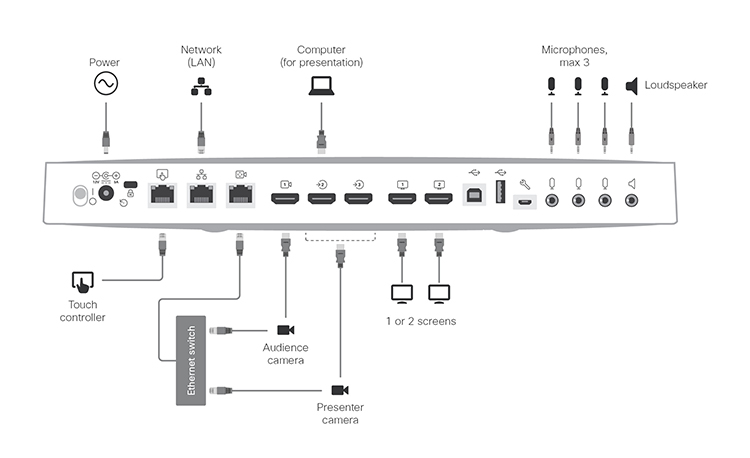
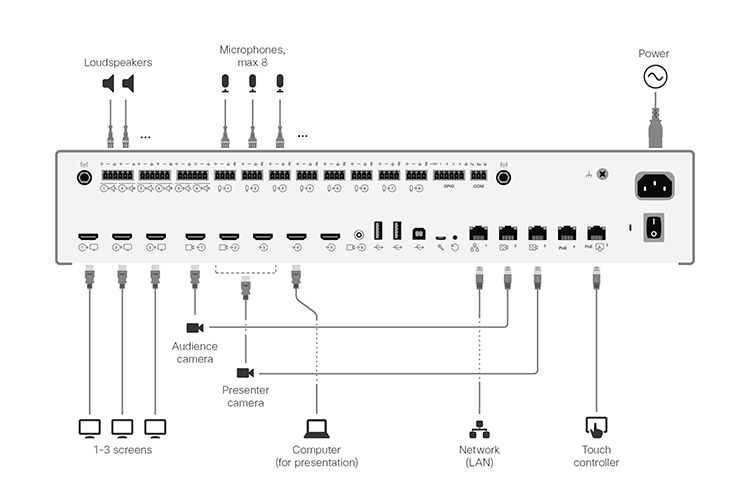
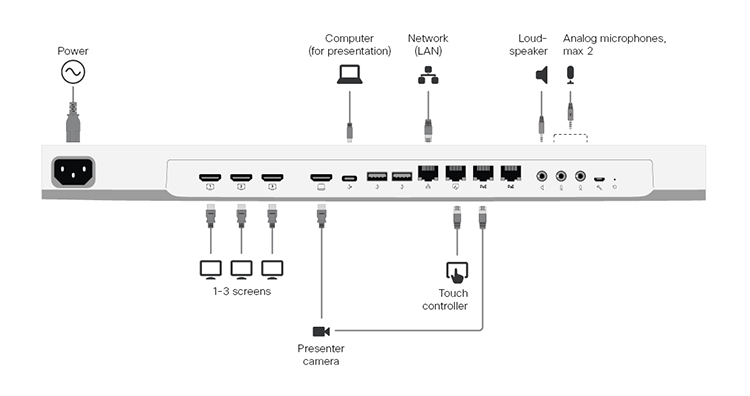
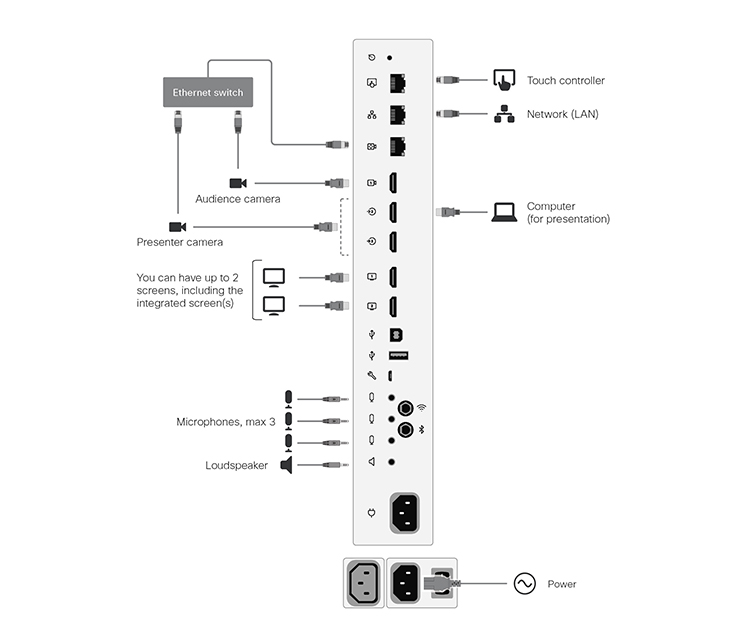
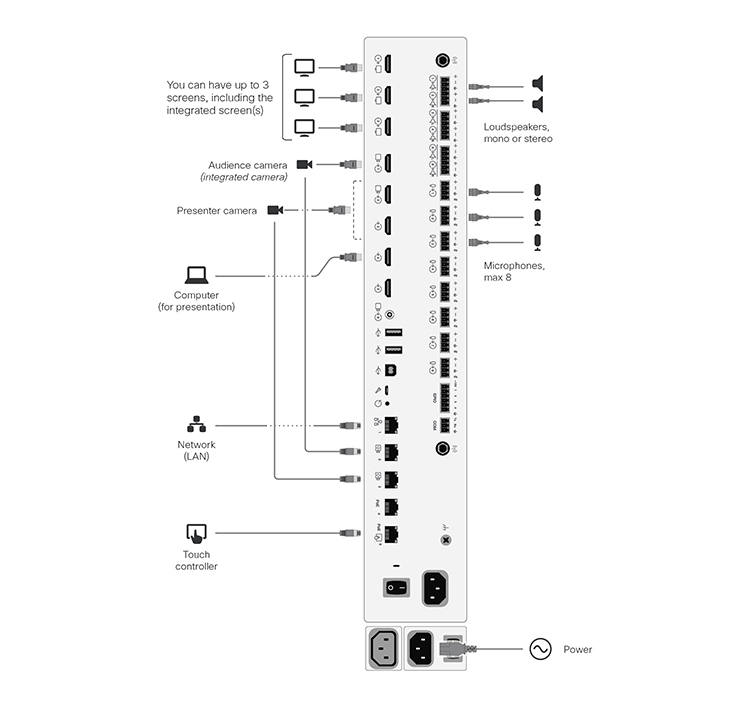
Connect cables
Connect the cameras to the device as shown in the diagrams. Following the diagram ensures that the configurations that are automatically pushed to the device when you select the classroom room type template, match your actual room setup.
Board Pro G2
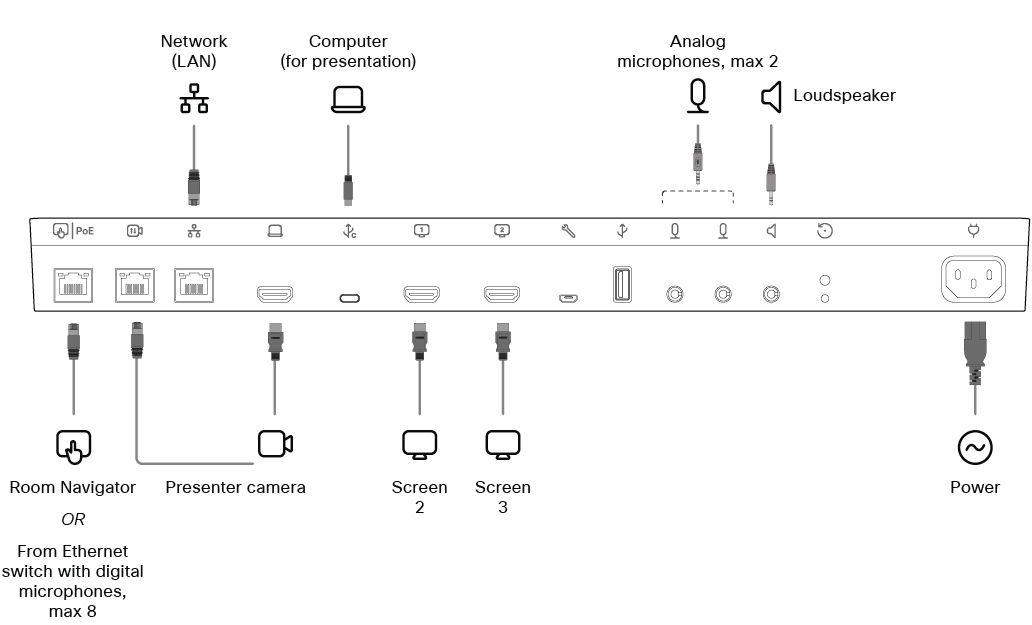
Codec EQ
Codec Plus
Codec Pro
If the audience camera is a SpeakerTrack 60 camera, then it uses two HDMI inputs.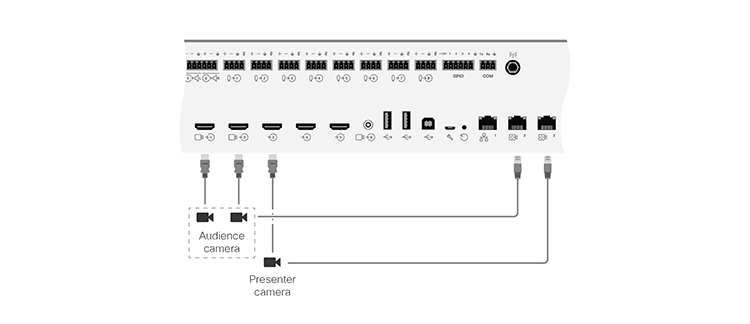
Room Kit EQX
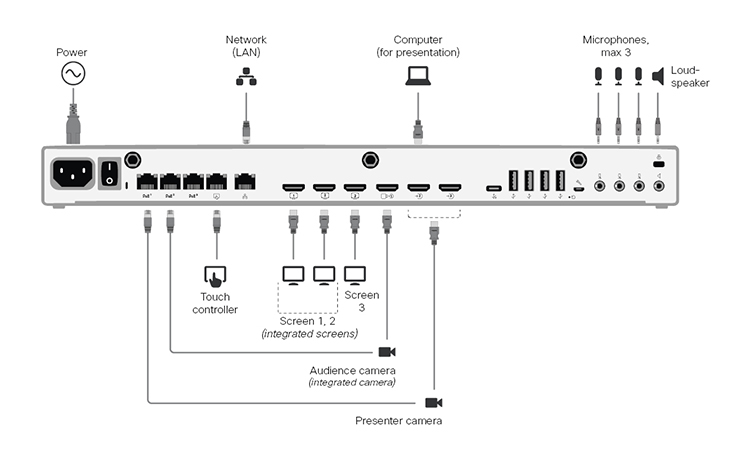
Keep all cables connected as described in the Room Kit EQX installation guide. This includes the cables for the integrated camera and screens. You only have to connect external cameras and screens: the presenter camera and the third screen.
-
HDMI outputs 1 and 2 are for the integrated screens. An external screen may be connected to HDMI output 3.
-
The audience camera on HDMI input 1 is the integrated camera.
Room Bar Pro
-
The device's integrated camera is the audience camera.
Room 55 Dual, Room 70 Single, and Room 70 Dual
Keep all preconnected cables, including the cables for the integrated camera and screens, as delivered from the factory. You only have to connect the external screens and cameras.
Room 70 Single:
-
HDMI output 1 is for the integrated screen. An external screen may be connected to HDMI output 2.
-
The audience camera on HDMI input 1 is the integrated camera.
Room 55 Dual, Room 70 Dual:
-
HDMI outputs 1 and 2 are for the integrated screens. External screens are not supported.
-
The audience camera on HDMI input 1 is the integrated camera.
Room 70 Single G2 and Room 70 Dual G2
Keep all preconnected cables, including the cables for the integrated camera and screens, as delivered from the factory. You only have to connect the external screens and cameras.
Room 70 Single G2:
-
HDMI output 1 is for the integrated screen. External screens may be connected to HDMI output 2 and 3.
-
The audience camera on HDMI input 1 is the integrated camera.
Room 70 Dual G2:
-
HDMI outputs 1 and 2 are for the integrated screens. An external screen may be connected to HDMI output 3.
-
The audience camera on HDMI input 1 is the integrated camera.
Configure the device
We recommend you to be in the same room when setting up classroom. Otherwise, it is difficult to set up PresenterTrack properly.
| 1 |
Use the touch controller to stop sharing the video from the presenter camera. It is important that video from the presenter camera is not displayed on any screen while setting up classroom. |
| 2 |
From the customer view in https://admin.webex.com, go to the Devices page, and click on your device in the list. Under Support, click Local Device Controls to launch the local device web interface. If you have set up an Admin user locally on the device, you can access the device web interface directly. Just open a web browser and type in http(s)://<device ip or hostname>. |
| 3 |
Go to Settings, open the Configurations tab, and navigate to the section and set the following (n is the number of the Connector where the presenter camera is connected):
Click Save for the changes to take effect. |
| 4 |
Go to Settings, open the Audio and Video tab, and click Presenter Track. Then, follow the instructions on the web page to set up the PresenterTrack feature for the presenter camera. This feature enables the camera to follow a presenter that is moving about on stage. |
| 5 |
Go to Settings, open the Configurations tab, and navigate to . Then, choose whether to enable (default) or disable automatic switching between local presenter and remote presenter modes. Regardless of this setting, the room mode will not change automatically when in discussion mode. Click Save for the changes to take effect. |
| 6 |
If the default screen and layout behavior doesn't suit your setup, you must configure the screens and layouts using the following settings:
|
| 7 |
Go to Settings, open the Room Types tab, and click the Classroom thumbnail to push the corresponding configuration to the device. |
Switching between room modes
Switching between room modes (local presenter, remote presenter, discussion), which implies that camera input sources, and remote and local screen layouts, are changed, can be done in two ways:
-
Manually, using the buttons on the touch controller.
-
Automatically, based on who is speaking and whether a local presenter is present on stage. Automatic switching is only between the local presenter and remote presenter modes. The room mode doesn't change automatically if the current mode is discussion. You can disable all automatic switching by setting Cameras PresenterTrack PresenterDetectedStatus to Disabled.
Automatic switching is supported only when the PresenterTrack feature is enabled (Cameras PresenterTrack Enabled set to True).
Automatic switching implies:
-
The device switches to the local presenter mode when a person is detected in the PresenterTrack trigger zone.
-
The device switches to the remote presenter mode when the local presenter, who is tracked, leaves the stage.
-
If someone in the local audience asks a question when the device is in local presenter mode, the device sends split-screen video showing both the presenter and the person asking the question. This behavior requires a Quad Camera or SpeakerTrack 60 camera as audience camera, and that speaker tracking is switched on.


