Webex LTI Registration Hub for Webex admins
 Feedback?
Registration Hub is an administrative console where you can create and manage the Webex LTI and Webex LTI Legacy registrations for your institution. Registration Hub includes the functionality previously available in the admin console of Webex Education Connector.
In Registration Hub, you can:
-
View a list of all your Webex LTI and Webex LTI Legacy registrations in one place.
-
Manage which features are available in each registration for instructors to configure for their courses.
-
Create new Webex LTI registrations. These new registrations can be linked to existing Webex LTI Legacy registrations or can be created independently.
- A linked Webex LTI registration helps with a smooth transition from Webex LTI Legacy, because the Webex LTI registration inherits the data of its linked Webex LTI Legacy registration, including courses, meetings, and recordings.
- An unlinked registration is an opportunity to start fresh without any previous data or settings.
-
See identifier information for each of your Webex LTI and Webex LTI Legacy registrations.
Accessing Registration Hub
To access Registration Hub, you must have full administrator permissions for at least one Webex site.
Webex administrators can access Registration Hub through Control Hub.
The first time that you access Registration Hub, you are asked to accept permissions. These permissions give Registration Hub the ability to determine which registrations you can access based on the Webex sites you're an administrator for in your Control Hub organization.

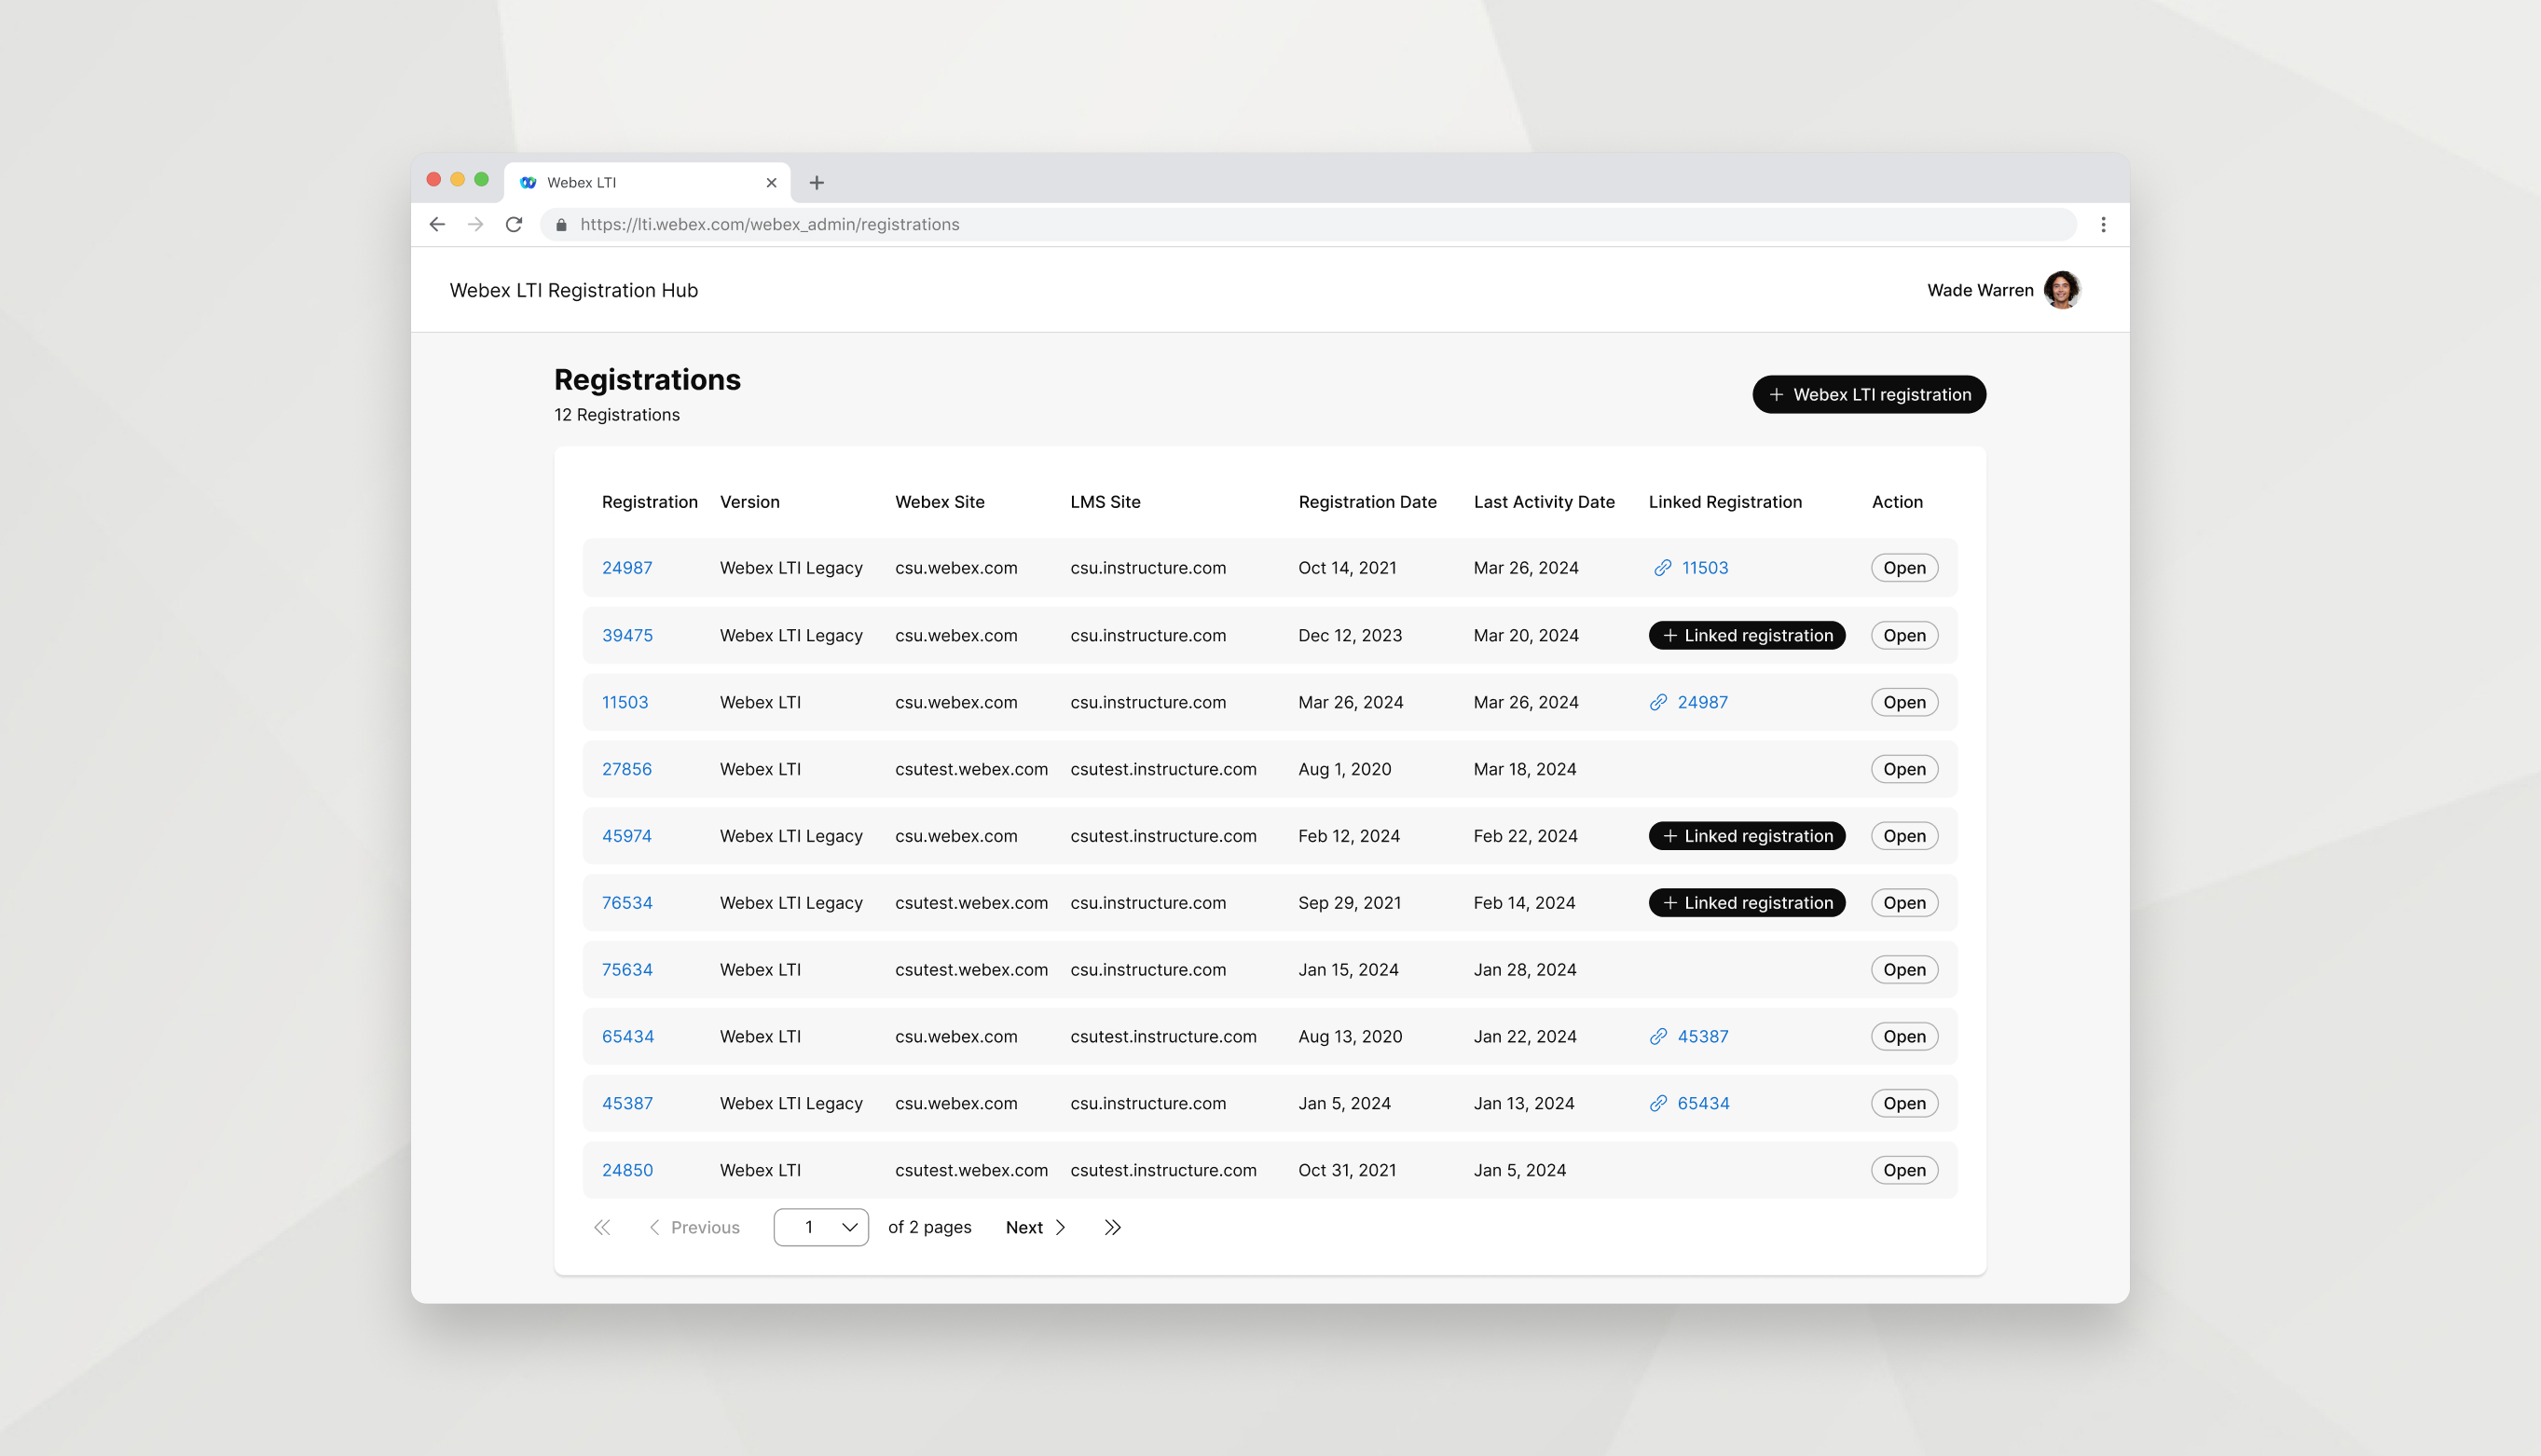
View a list of your existing Webex LTI and Webex LTI Legacy registration in one place.
This list of registrations also includes a snapshot of important information about each registration, including:
-
Registration number—Used to help you identify which registration is which.
-
Version—Webex LTI or Webex LTI Legacy.
-
Webex site—URL of the Webex site used in the registration.
-
LMS URL—URL of the LMS site where the registration is installed.
-
Registration date—Date the registration was created.
-
Last activity date—Date the registration was last launched in your LMS.
You can also create a new or linked Webex LTI registration from this page, and you can open a registration to configure the settings for that registration.

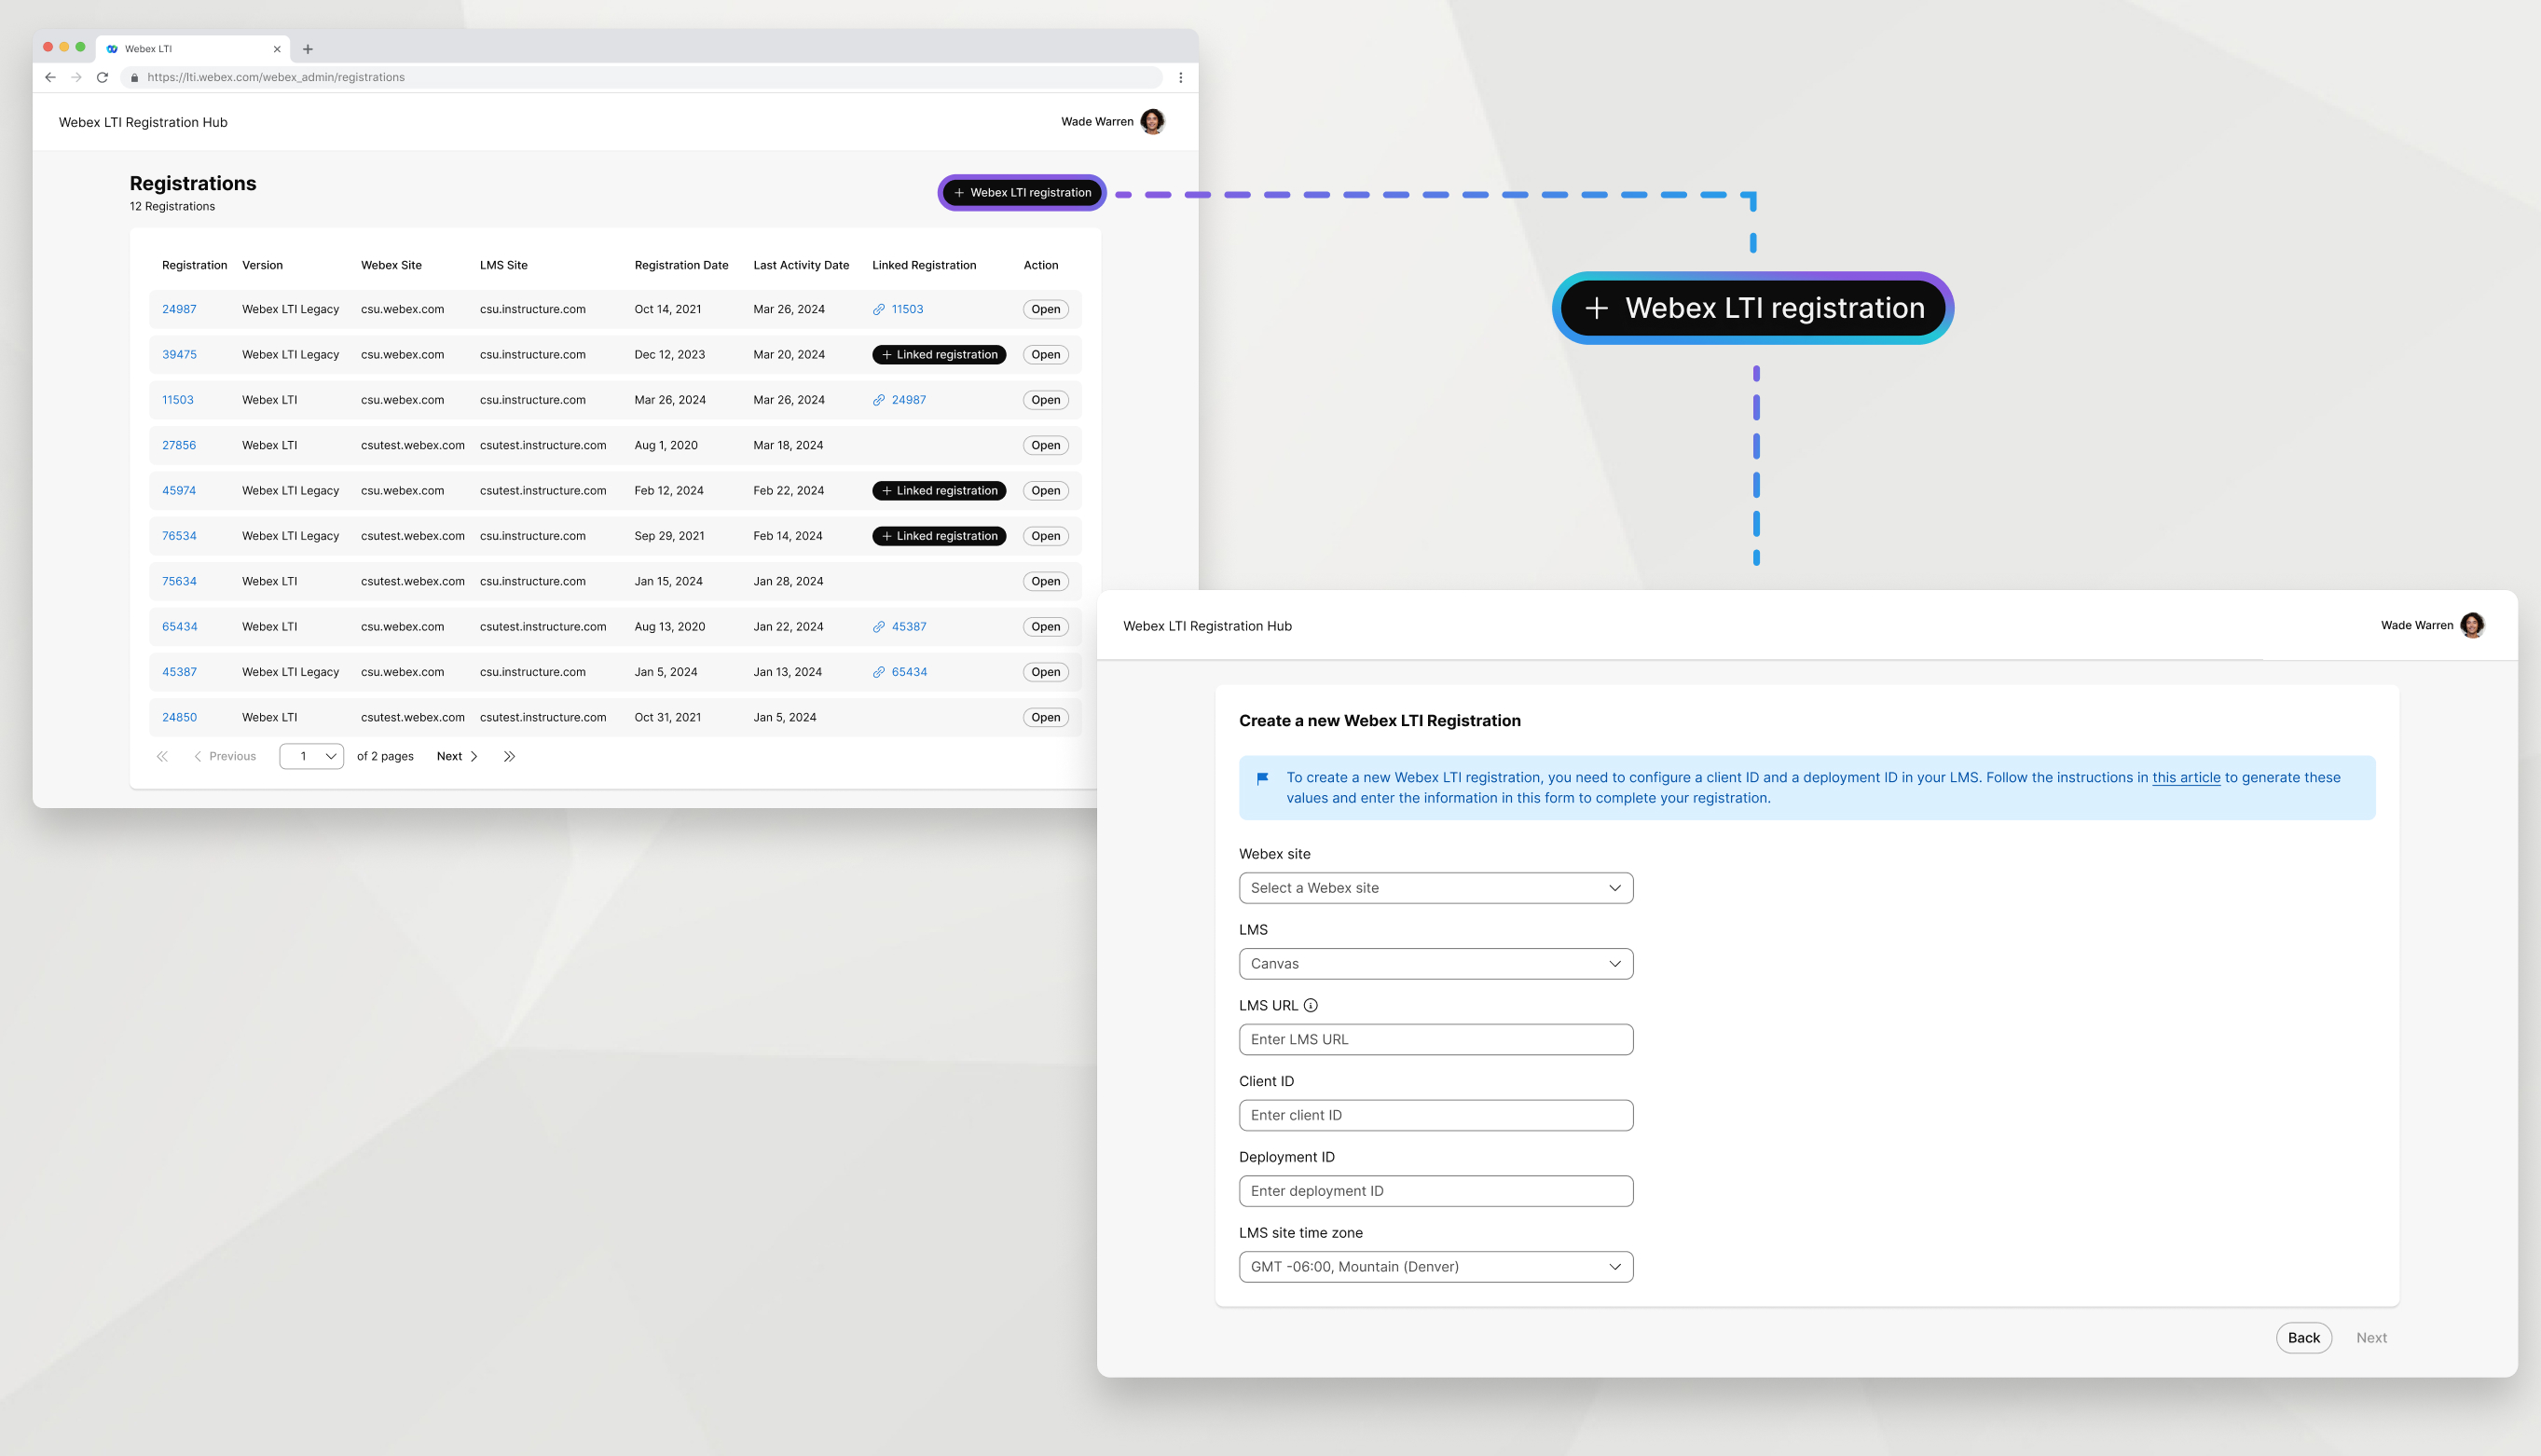
Click the + Webex LTI Registration button to create a new Webex LTI that is not linked to an existing Webex LTI Legacy registration.
If you have an existing Webex LTI Legacy registration, creating a new, unlinked Webex LTI is an opportunity to start fresh without any previous data or settings.
If you don't have any Webex LTI Legacy registrations, creating a new, unlinked Webex LTI is the only option available to you in Registration Hub.
To create a new, unlinked Webex LTI registration, follow the installation instructions for your LMS.

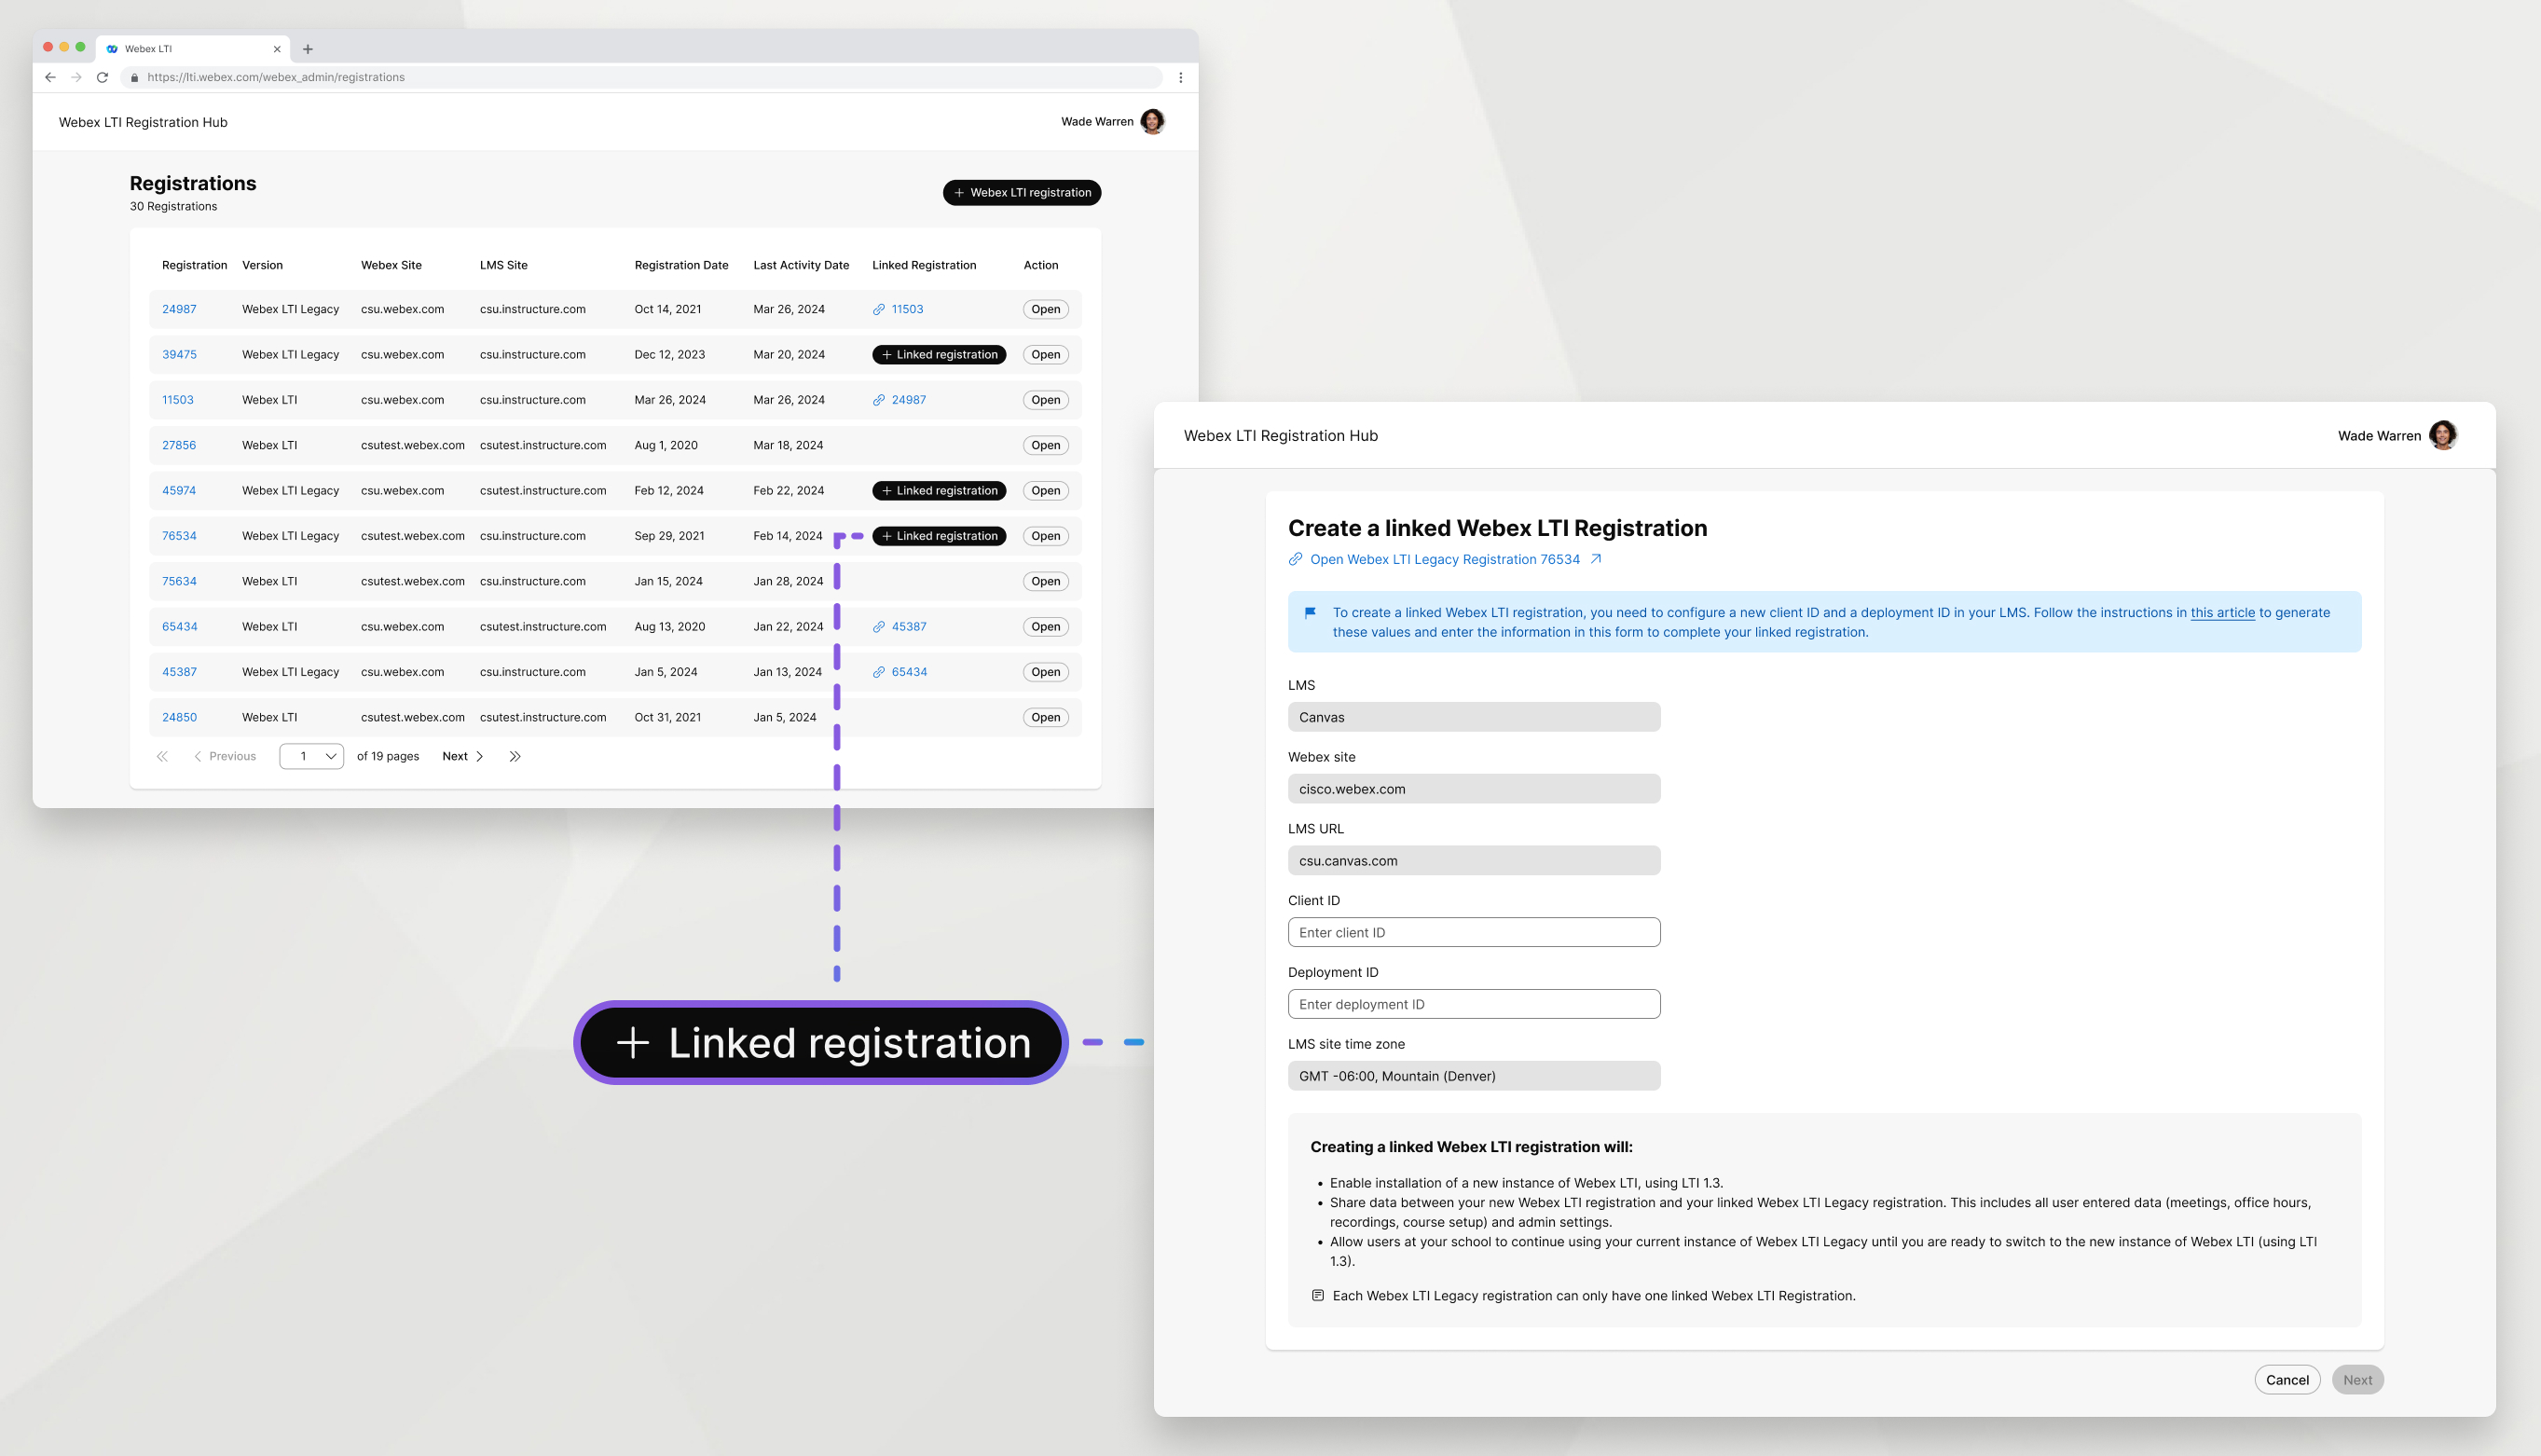
Click +Linked registration in an unlinked Webex LTI Legacy registration to create a Webex LTI that's linked to a specific Webex LTI Legacy registration.
A linked Webex LTI registration inherits the data of its corresponding Webex LTI Legacy registration, including courses, meetings, recordings, and course settings.
A linked Webex LTI registration is useful when you want to use Webex LTI, but don't want students and teachers to have to recreate content or reconfigure settings.
Each Webex LTI Legacy registration can have one linked Webex LTI registration.
Registrations can only be linked when the Webex LTI is first created. After a Webex LTI registration is created, you can't go back and link it to a Webex LTI Legacy registration.
To create a new, unlinked Webex LTI registration, follow the installation instructions for your LMS.

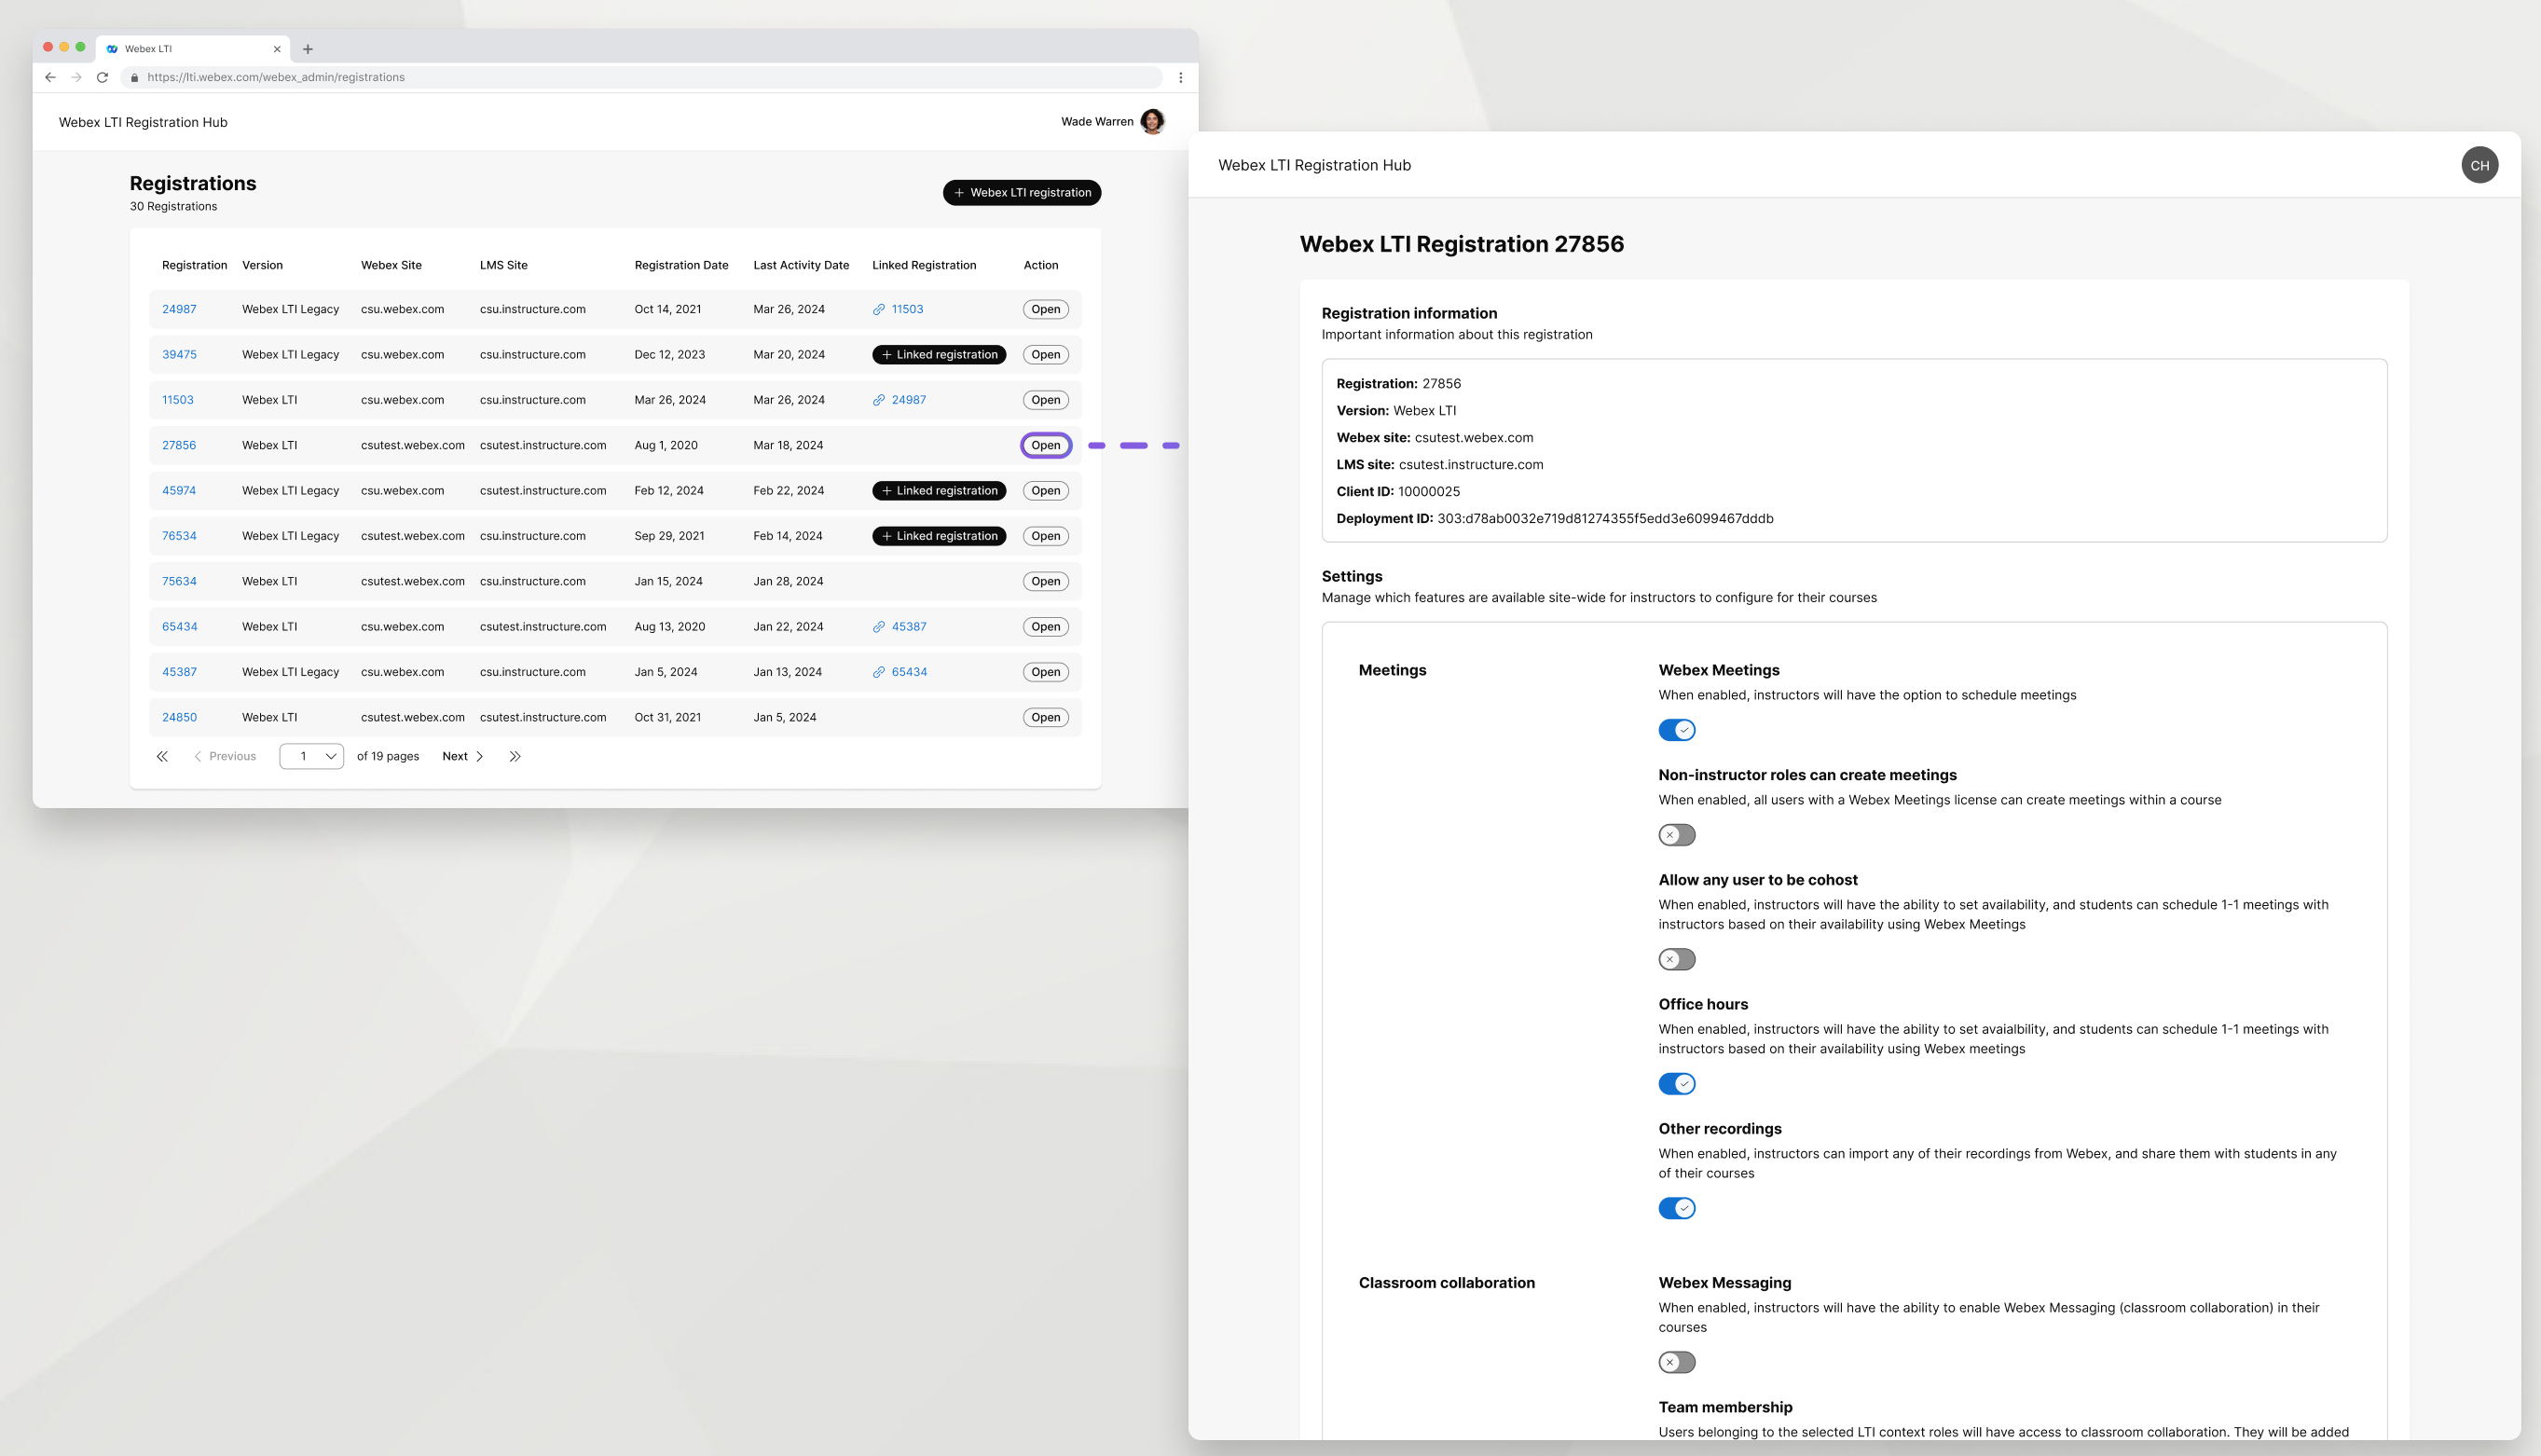
Open a registration to view details about that registration and manage site-wide settings.
The Registration information section shows the information that you entered during the creation of the registration.
Linked Webex LTI and Webex LTI Legacy registrations have a Linked registration section with details about the registration that is linked to the registration you're looking at.
Manage which features are available site-wide for instructors to configure in their courses in the Settings section. The available settings are as follows:
-
Webex Meetings—When enabled, instructors can turn on meetings in their courses.
Enable this setting first before you can enable Non-instructor roles can create meetings, Allow any user to be cohost, Office hours, and Other recordings.
-
Non-instructor roles can create meetings—Enable this setting to allow class members with a Webex Meetings license the ability to create a meeting in their class.
-
Allow any user to be cohost—Enable this setting to allow anyone with a host account on your Webex site to become a cohost when they join a class meeting.
-
Office hours—Enable this setting to allow teachers to turn on the office hours feature in their courses.
-
Other recordings—Enable this setting to allow teachers to turn on the other recordings feature in their courses.
-
Webex Messaging—When enabled, instructors can turn on classroom collaboration in their courses.
Enable this setting first before you can configure the team membership setting.
-
Team membership—Select the LTI roles to determine which class members are added to a course's team when classroom collaboration is enabled in a course.
- This setting is only available in Webex LTI.
- If a course already has classroom collaboration enabled, changes to the roles selected will be applied during the next membership sync. Learn more about membership sync settings for classroom collaboration in Webex LTI for teachers.
-
Custom support URL—Specify a URL for the support button in Webex LTI. Leave this field blank to use the default Webex Support URL.
Delete registrations in Registration Hub to get rid of any old or unused registrations of Webex LTI Legacy or Webex LTI that are associated with your Webex site.
Open any registration, scroll to the bottom of the page, and click Delete registration.
Deleting a registration erases all data and information, including courses, users, meetings, and recordings created within the registration.
Deleting a linked registration turns the registration that it was linked to into an unlinked registration.
This action is permanent and cannot be undone.


