
Thanks for your feedback.
Proxy Support for Hybrid Data Security and Video Mesh
 Feedback?
This section describes the proxy support feature for Hybrid Data Security. It is intended to supplement the Deployment Guide for Cisco Webex Hybrid Data Security, available at https://www.cisco.com/go/hybrid-data-security. In a new deployment, you configure the proxy setup on each node after uploading and mounting the HDS configuration ISO on the node, and before registering the node with the Cisco Webex cloud.
Hybrid Data Security supports explicit, transparent inspecting, and non-inspecting proxies. You can tie these proxies to your deployment so that you can secure and monitor traffic from the enterprise out to the cloud. You can use a platform admin interface on the nodes for certificate management and to check the overall connectivity status after you set up the proxy on the nodes.
The Hybrid Data Security nodes support the following proxy options:
-
No proxy—The default if you do not use the HDS node setup Trust Store & Proxy configuration to integrate a proxy. No certificate update is required.
-
Transparent non-inspecting proxy—The nodes are not configured to use a specific proxy server address and should not require any changes to work with a non-inspecting proxy. No certificate update is required.
-
Transparent tunneling or inspecting proxy—The nodes are not configured to use a specific proxy server address. No HTTP or HTTPS configuration changes are necessary on the nodes. However, the nodes need a root certificate so that they trust the proxy. Inspecting proxies are typically used by IT to enforce policies on which websites can be visited and which types of content are not permitted. This type of proxy decrypts all your traffic (even HTTPS).
-
Explicit proxy—With explicit proxy, you tell the HDS nodes which proxy server and authentication scheme to use. To configure an explicit proxy, you must enter the following information on each node:
-
Proxy IP/FQDN—Address that can be used to reach the proxy machine.
-
Proxy Port—A port number that the proxy uses to listen for proxied traffic.
-
Proxy Protocol—Depending on what your proxy server supports, choose between the following protocols:
-
HTTP—Views and controls all requests that the client sends.
-
HTTPS—Provides a channel to the server. The client receives and validates the server's certificate.
-
-
Authentication Type—Choose from among the following authentication types:
-
None—No further authentication is required.
Available if you select either HTTP or HTTPS as the proxy protocol.
-
Basic—Used for an HTTP User Agent to provide a user name and password when making a request. Uses Base64 encoding.
Available if you select either HTTP or HTTPS as the proxy protocol.
Requires you to enter the user name and password on each node.
-
Digest—Used to confirm the account before sending sensitive information. Applies a hash function on the user name and password before sending over the network.
Available only if you select HTTPS as the proxy protocol.
Requires you to enter the user name and password on each node.
-
-
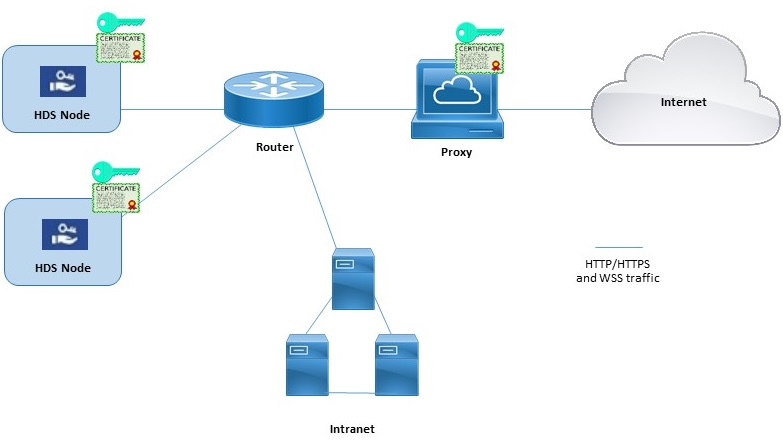
Example of Hybrid Data Security Nodes and Proxy
This diagram shows an example connection between the Hybrid Data Security, network and a proxy. For the transparent inspecting and HTTPS explicit inspecting proxy options, the same root certificate must be installed on the proxy and on the Hybrid Data Security nodes.
Blocked External DNS Resolution Mode (Explicit Proxy Configurations)
When you register a node or check the node's proxy configuration, the process tests DNS look-up and connectivity to the Cisco Webex cloud. In deployments with explicit proxy configurations that do not allow external DNS resolution for internal clients, if the node can't query the DNS servers, it automatically goes into Blocked External DNS Resolution mode. In this mode, node registration and other proxy connectivity tests can proceed.
-
We officially support the following proxy solutions that can integrate with your Hybrid Data Security nodes.
-
Transparent proxy—Cisco Web Security Appliance (WSA).
-
Explicit proxy—Squid.
Squid proxies that inspect HTTPS traffic can interfere with the establishment of websocket (wss:) connections. To work around this issue, see Configure Squid Proxies for Hybrid Data Security.
-
-
We support the following authentication type combinations for explicit proxies:
-
No authentication with HTTP or HTTPS
-
Basic authentication with HTTP or HTTPS
-
Digest authentication with HTTPS only
-
-
For a transparent inspecting proxy or an HTTPS explicit proxy, you must have a copy of the proxy's root certificate. The deployment instructions in this guide tell you how to upload the copy to the Hybrid Data Security nodes' trust stores.
-
The network hosting the HDS nodes must be configured to force outbound TCP traffic on port 443 to route through the proxy.
-
Proxies that inspect web traffic may interfere with web socket connections. If this problem occurs, bypassing (not inspecting) traffic to
wbx2.comandciscospark.comwill solve the problem.
If the network environment requires a proxy, use this procedure to specify the type of proxy that you want to integrate with Hybrid Data Security. If you choose a transparent inspecting proxy or an HTTPS explicit proxy, you can use the node's interface to upload and install the root certificate. You can also check the proxy connection from the interface, and troubleshoot any potential issues.
Before you begin
-
See Proxy Support for an overview of the supported proxy options.
| 1 |
Enter the HDS node setup URL |
| 2 |
Go to Trust Store & Proxy, and then choose an option:
Follow the next steps for a transparent inspecting proxy, an HTTP explicit proxy with Basic authentication, or an HTTPS explicit proxy. |
| 3 |
Click Upload a Root Certificate or End Entity Certificate, and then navigate to a choose the root certificate for the proxy. The certificate is uploaded but not yet installed because you must reboot the node to install the certificate. Click the chevron arrow by the certificate issuer name to get more details or click Delete if you made a mistake and want to reupload the file. |
| 4 |
Click Check Proxy Connection to test the network connectivity between the node and the proxy. If the connection test fails, you'll see an error message that shows the reason and how you can correct the issue. If you see a message saying that external DNS resolution was not successful, the node was unable to reach the DNS server. This condition is expected in many explicit proxy configurations. You can continue with the setup, and the node will function in Blocked External DNS Resolution mode. If you think this is an error, complete these steps, and then see Turn off Blocked External DNS Resolution Mode. |
| 5 |
After the connection test passes, for explicit proxy set to https only, turn the toggle on to Route all port 443/444 https requests from this node through the explicit proxy. This setting requires 15 seconds to take effect. |
| 6 |
Click Install All Certificates Into the Trust Store (appears for an HTTPS explicit proxy or a transparent inspecting proxy) or Reboot (appears for an HTTP explicit proxy), read the prompt, and then click Install if you're ready. The node reboots within a few minutes. |
| 7 |
After the node reboots, sign in again if needed, and then open the Overview page to check the connectivity checks to make sure they are all in green status. The proxy connection check only tests a subdomain of webex.com. If there are connectivity problems, a common issue is that some of the cloud domains listed in the install instructions are being blocked at the proxy. |
When you register a node or check the node's proxy configuration, the process tests DNS look-up and connectivity to the Cisco Webex cloud. If the node's DNS server can't resolve public DNS names, the node automatically goes into Blocked External DNS Resolution mode.
If your nodes are able to resolve public DNS names through internal DNS servers, you can turn off this mode by rerunning the proxy connection test on each node.
Before you begin
| 1 |
In a web browser, open the Hybrid Data Security node interface (IP address/setup, for example, https://192.0.2.0/setup), enter the admin credentials you set up for the node, and then click Sign In. |
| 2 |
Go to Overview (the default page). 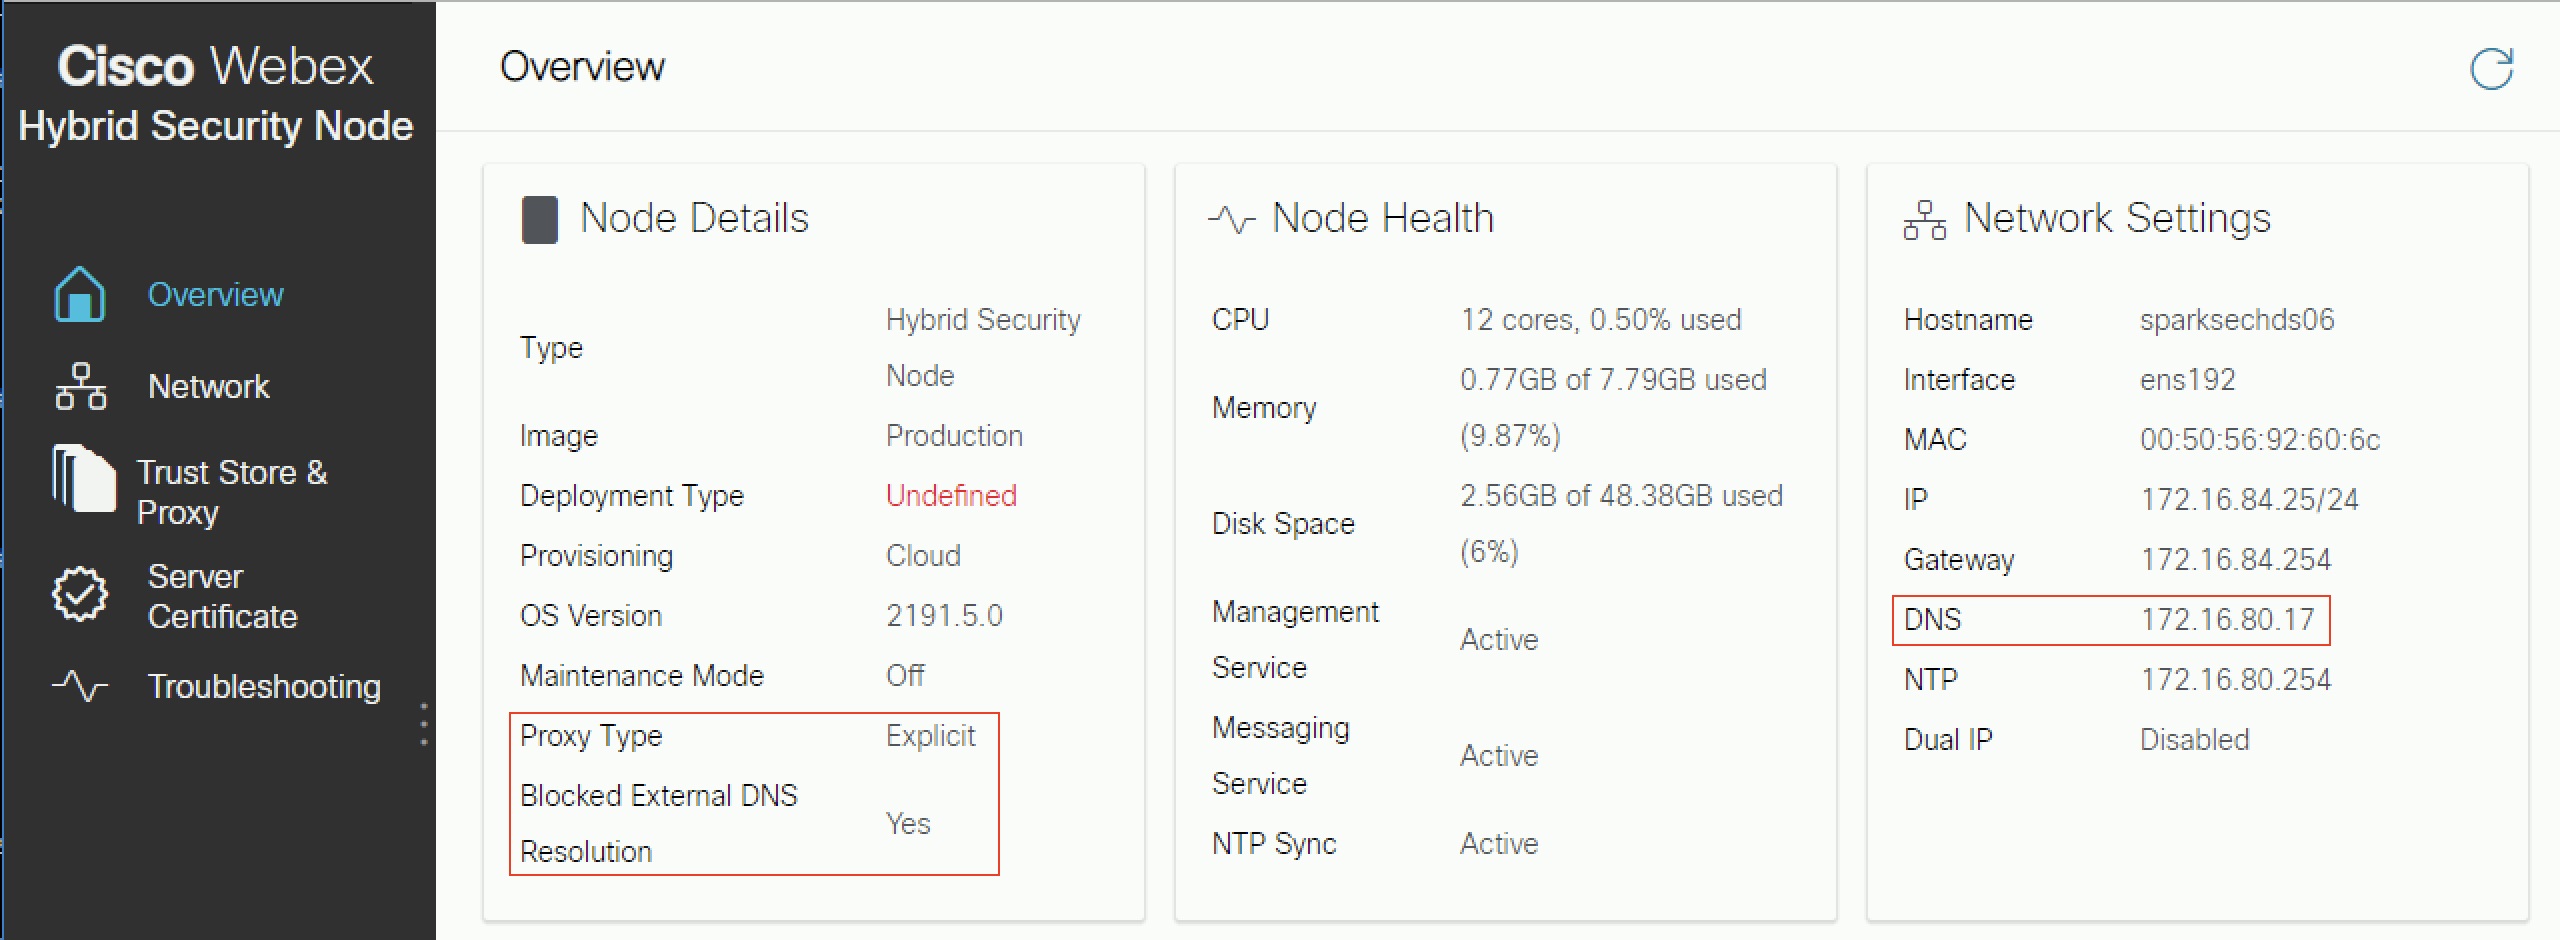
When enabled, Blocked External DNS Resolution is set to Yes. |
| 3 |
Go to the Trust Store & Proxy page. |
| 4 |
Click Check Proxy Connection. If you see a message saying that external DNS resolution was not successful, the node was unable to reach the DNS server and will remain in this mode. Otherwise, after you reboot the node and go back to the Overview page, Blocked External DNS Resolution should be set to no. |
What to do next
This section describes the proxy support feature for Webex Video Mesh. It is intended to supplement the Deployment Guide for Cisco Webex Video Mesh, available at https://www.cisco.com/go/video-mesh. In a new deployment, you configure the proxy setup on each node after deploying the Video Mesh software on a virtual machine environment, and before registering the node with the Cisco Webex cloud.
Video Mesh supports explicit, transparent inspecting, and non-inspecting proxies. You can tie these proxies to your Video Mesh deployment so that you can secure and monitor traffic from the enterprise out to the cloud. This feature sends signaling and management https-based traffic to the proxy. For transparent proxies, network requests from Video Mesh nodes are forwarded to a specific proxy through enterprise network routing rules. You can use the Video Mesh admin interface for certificate management and the overall connectivity status after you implement the proxy with the nodes.
Media does not travel through the proxy. You must still open the required ports for media streams to reach the cloud directly. See Ports and Protocols for Management.
The following proxy types are supported by Video Mesh:
-
Explicit Proxy (inspecting or non-inspecting)—With explicit proxy, you tell the client (Video Mesh nodes) which proxy server to use. This option supports one of the following authentication types:
-
None—No further authentication is required. (For HTTP or HTTPS explicit proxy.)
-
Basic—Used for an HTTP user agent to provide a username and password when making a request, and uses Base64 encoding. (For HTTP or HTTPS explicit proxy.)
-
Digest—Used to confirm the identity of the account before sending sensitive information, and applies a hash function on the username and password before sending over the network. (For HTTPS explicit proxy.)
-
NTLM—Like Digest, NTLM is used to confirm the identity of the account before sending sensitive information. Uses Windows credentials instead of the username and password. This authentication scheme requires multiple exchanges to complete. (For HTTP explicit proxy.)
-
-
Transparent Proxy (non-inspecting)—Video Mesh nodes are not configured to use a specific proxy server address and should not require any changes to work with a non-inspecting proxy.
-
Transparent Proxy (inspecting)—Video Mesh nodes are not configured to use a specific proxy server address. No http(s) configuration changes are necessary on Video Mesh, however, the Video Mesh nodes need a root certificate so that they trust the proxy. Inspecting proxies are typically used by IT to enforce policies regarding which websites can be visited and types of content that are not permitted. This type of proxy decrypts all your traffic (even https).
-
We officially support the following proxy solutions that can integrate with your Video Mesh nodes.
-
Cisco Web Security Appliance (WSA) for transparent proxy
-
Squid for explicit proxy
-
-
For an explicit proxy or transparent inspecting proxy that inspects (decrypts traffic), you must have a copy of the proxy's root certificate that you'll need to upload to the Video Mesh node trust store on the web interface.
-
We support the following explicit proxy and authentication type combinations:
-
No authentication with http and https
-
Basic authentication with http and https
-
Digest authentication with https only
-
NTLM authentication with http only
-
-
For transparent proxies, you must use the router/switch to force HTTPS/443 traffic to go to the proxy. You can also force Web Socket to go to proxy. (Web Socket uses https.)
Video Mesh requires web socket connections to cloud services, so that the nodes function correctly. On explicit inspecting and transparent inspecting proxies, http headers are required for a proper websocket connection. If they are altered, the websocket connection will fail.
When the websocket connection failure occurs on port 443 (with transparent inspecting proxy enabled), it leads to a post-registration warning in Control Hub: “Webex Video Mesh SIP calling is not working correctly.” The same alarm can occur for other reasons when proxy is not enabled. When websocket headers are blocked on port 443, media does not flow between apps and SIP clients.
If media is not flowing, this often occurs when https traffic from the node over port 443 is failing:
-
Port 443 traffic is allowed by the proxy, but it is an inspecting proxy and is breaking the websocket.
To correct these problems, you may have to “bypass” or “splice” (disable inspection) on port 443 to: *.wbx2.com and *.ciscospark.com.
-
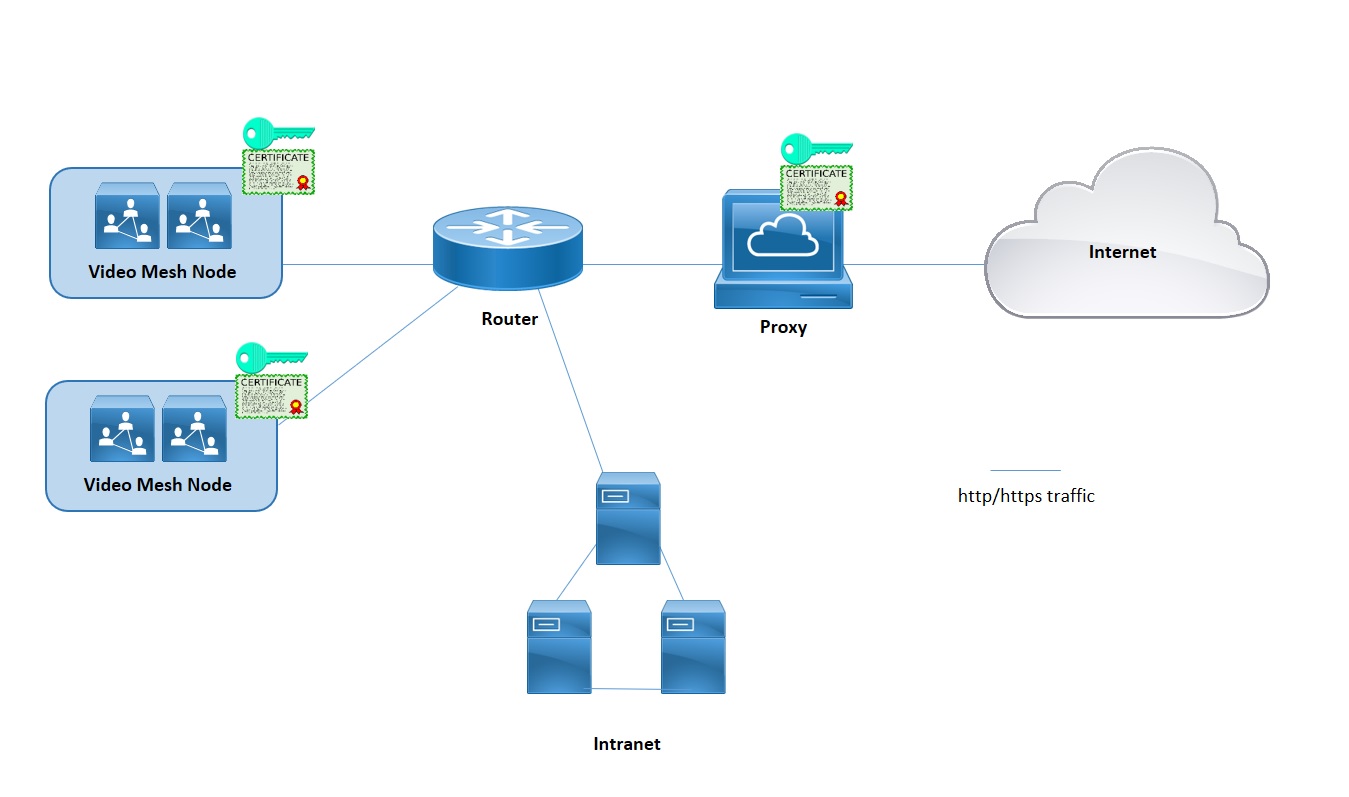
Use this procedure to specify the type of proxy that you want to integrate with a Video Mesh. If you choose a transparent inspecting proxy or an explicit proxy, you can use the node's interface to upload and install the root certificate, check the proxy connection, and troubleshoot any potential issues.
Before you begin
-
See Proxy Support for Video Mesh for an overview of the supported proxy options.
| 1 |
Enter the Video Mesh setup URL | ||||||||||
| 2 |
Go to Trust Store & Proxy, and then choose an option:
Follow the next steps for a transparent inspecting or explicit proxy. | ||||||||||
| 3 |
Click Upload a Root Certificate or End Entity Certificate, and then locate and choose the root certificate for the explicit or transparent inspecting proxy. The certificate is uploaded but not yet installed because the node needs to be rebooted to install the certificate. Click the arrow by the certificate issuer name to get more details or click Delete if you made a mistake and want to reupload the file. | ||||||||||
| 4 |
For transparent inspecting or explicit proxies, click Check Proxy Connection to test the network connectivity between the Video Mesh node and the proxy. If the connection test fails, you'll see an error message that shows the reason and how you can correct the issue. | ||||||||||
| 5 |
After the connection test passes, for explicit proxy, turn the toggle on to Route all port 443 https requests from this node through the explicit proxy. This setting requires 15 seconds to take effect. | ||||||||||
| 6 |
Click Install All Certificates Into the Trust Store (appears whenever a root certificate was added during proxy setup) or Reboot (appears if no root certificate was added), read the prompt, and then click Install if you're ready. The node reboots within a few minutes. | ||||||||||
| 7 |
After the node reboots, sign in again if needed, and then open the Overview page to check the connectivity checks to make sure they are all in green status. The proxy connection check only tests a subdomain of webex.com. If there are connectivity problems, a common issue is that some of the cloud domains listed in the install instructions are being blocked at the proxy. |
What Traffic Goes Through Proxy
For Video Mesh, media does not traverse the proxy. This feature sends signaling and management https-based traffic to the proxy.You must still open the required ports for media streams to reach the cloud directly.
TCP Port 444 Is Not Enabled on Proxy
This port is a requirement for Video Mesh, because the Video Mesh uses this port to access cloud-based services that it must use to function correctly. A proxy exception must be made for this port and ANY as documented in the Video Mesh deployment guide and the Network Requirements for Webex Teams Services.
Filtering signaling traffic by IP address is not supported as the IP addresses used by our solutions are dynamic and may change at any time.
No Root Certificate Installed
When your nodes are talking to an explicit proxy, you must install the root certificate and enter an exception for that URL on your firewall.
Connectivity Check Fails
If the proxy connectivity check passed and the proxy install was completed, the connectivity checks on the overview page may still fail for these reasons:
-
The proxy is inspecting traffic that does not go to webex.com.
-
The proxy is blocking domains other than webex.com.
Authentication Details are Incorrect
For proxies that use an authentication mechanism, ensure that you add the correct authentication details in the node.
Congestion on the Proxy
Congestion on your proxy can cause delay and drops with traffic to the cloud. Check your proxy environment to see if traffic throttling is required.
Websocket Cannot Connect Through Squid Proxy
Squid proxies that inspect HTTPS traffic can interfere with the establishment of websocket (wss:) connections that Hybrid Data Security requires. These sections give guidance on how to configure various versions of Squid to ignore wss: traffic for proper operation of the services.
Squid 4 and 5
Add the on_unsupported_protocol directive to squid.conf:
on_unsupported_protocol tunnel allSquid 3.5.27
We successfully tested Hybrid Data Security with the following rules added to squid.conf. These rules are subject to change as we develop features and update the Webex cloud.
acl wssMercuryConnection ssl::server_name_regex mercury-connection

ssl_bump splice wssMercuryConnection

acl step1 at_step SslBump1
acl step2 at_step SslBump2
acl step3 at_step SslBump3
ssl_bump peek step1 all
ssl_bump stare step2 all
ssl_bump bump step3 all


