
Thanks for your feedback.
Manage single sign-on integration in Control Hub
 Feedback?
If you want to set up SSO for multiple identity providers in your organization, refer to SSO with multiple IdPs in Webex.
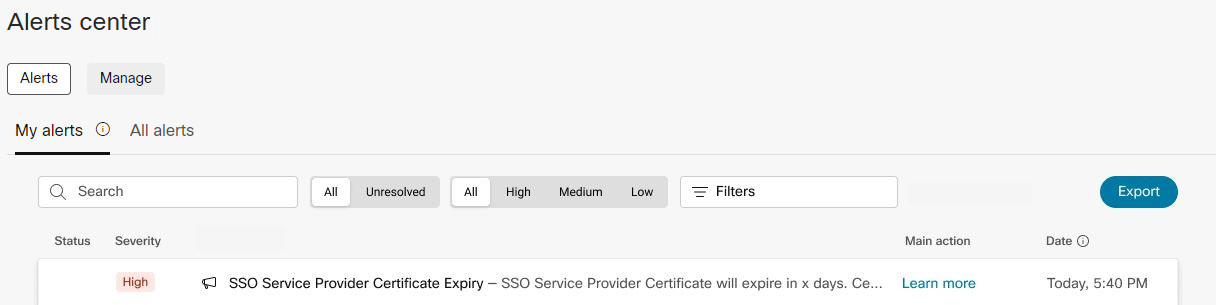
A vulnerability was identified in the single sign-on (SSO) certificate validation process for Cisco Webex Services by the Cisco Security and Trust team. As a result, the SSO trust anchors will be removed on May 22, 2026. To ensure uninterrupted access to Webex, please upload a new certificate template to Control Hub before this date.
If you are unable to upload the new certificate in time, users will be unable to sign in to Webex. In this case, you can use the SSO self recovery option to temporarily disable SSO and regain access to your Webex organization. To upload a new certificate, refer to the Identity provider (IdP) certificate section in this article.
If your organization's certificate usage is set to None but you're still receiving an alert, we recommend that you still proceed with the upgrade. Your SSO deployment is not using the certificate today but you may need the certificate for future changes.
From time to time, you may receive an email notification or see an alert in Control Hub that the Webex single sign-on (SSO) certificate is going to expire. Follow the process in this article to retrieve the SSO cloud certificate metadata from us (the SP) and add it back to your IdP; otherwise, users won't be able to use Webex services.
If you’re using the SAML Cisco (SP) SSO Certificate in your Webex organization, you must plan to update the cloud certificate during a regular scheduled maintenance window as soon as possible.
All services that are part of your Webex organization subscription are affected, including but not limited to:
-
Webex App (new sign-ins for all platforms: desktop, mobile, and web)
-
Webex services in Control Hub, including Calling
-
Webex Meetings sites managed through Control Hub
-
Cisco Jabber if it's integrated with SSO
Before you begin
Please read all directions before beginning. After you change the certificate or going through the wizard to update the certificate, new users may not be able to sign in successfully.
If your IdP doesn’t support multiple certificates (most IdPs in the market don’t support this feature), we recommend that you schedule this upgrade during a maintenance window where Webex App users aren’t affected. These upgrade tasks should take approximately 30 minutes in operational time and postevent validation.
| 1 |
To check if the SAML Cisco (SP) SSO certificate is going to expire:
You can go directly into the SSO wizard to update the certificate, too. If you decide to exit the wizard before you complete it, you can access it again any time from in Control Hub. |
| 2 |
Go to the IdP and click |
| 3 |
Click Review certificates and expiry date. This takes you to the Service Provider (SP) certificates page.
You can click If your organization uses dual certificates, you also have the option to switch a secondary certificate to a primary certificate or delete an existing secondary certificate. |
| 4 |
Click Renew certificate. |
| 5 |
Choose the type of IdP that your organization uses.
If your IdP supports a single certificate, we recommend that you wait to perform these steps during scheduled downtime. While the Webex certificate is being updated, new user sign-ins briefly won't work; existing sign-ins are preserved. |
| 6 |
Choose the certificate type for the renewal:
|
| 7 |
To confirm that you want to replace the current certificate with your selected one, check By clicking Replace a certificate I'll swap the current certificate with my selected one, and then click Replace a certificate. |
| 8 |
In the Renew Service Provider (SP) certificates page, click Download metadata or Download certificate to download a copy of the updated metadata file or certificate from the Webex cloud. |
| 9 |
Navigate to your IdP management interface to upload the new Webex metadata file.
|
| 10 |
Return to the Control Hub interface. On the Renew Service Provider (SP) certificates page, check I've already updated the metadata for all IdPs, and then click Next. |
| 11 |
Click Done. |
 .
. to download the SP metadata or certificate.
 From time to time, you may receive an email notification or see an alert in Control Hub that the IdP certificate is going to expire. Because IdP vendors have their own specific documentation for certificate renewal, we cover what's required in Control Hub, along with generic steps to retrieve updated IdP metadata and upload it to Control Hub to renew the certificate.
| 1 |
To check if the IdP SAML certificate is going to expire:
|
| 2 |
Navigate to your IdP management interface to retrieve the new metadata file.
|
| 3 |
Return to the Identity provider tab. |
| 4 |
Go to the IdP, click |
| 5 |
Drag and drop your IdP metadata file into the window or click Choose a file and upload it that way. |
| 6 |
Choose Less secure (self-signed) or More secure (signed by a public CA), depending on how your IdP metadata is signed. |
| 7 |
Click Test SSO Update to confirm that the new metadata file was uploaded and interpreted correctly to your Control Hub organization. Confirm the expected results in the pop-up window, and if the test was successful, select Successful test: Activate SSO and the IdP and click Save. To see the SSO sign-in experience directly, we recommend that you click Copy URL to clipboard from this screen and paste it in a private browser window. From there, you can walk through signing in with SSO. This helps to remove any information cached in your web browser that could provide a false positive result when testing your SSO configuration. After uploading the new certificate, it may take up to 24 hours for the change to take effect. Result: You're finished and your organization's IdP certificate is now renewed. You can check the certificate status at any time under the Identity provider tab.
|

 and select
 You can export the latest Webex SP metadata whenever you need to add it back to your IdP. You'll see a notice when the imported IdP SAML metadata is going to expire or has expired.
This step is useful in common IdP SAML certificate management scenarios, such as IdPs that support multiple certificates where export was not done earlier, if the metadata was not imported into the IdP because an IdP admin wasn't available, or if your IdP supports the ability to update only the certificate. This option can help minimize the change by only updating the certificate in your SSO configuration and post-event validation.
| 1 |
Sign in to Control Hub. |
| 2 |
Go to . |
| 3 |
Go to the Identity provider tab. |
| 4 |
Go to the IdP, click The Webex App metadata filename is idb-meta-<org-ID>-SP.xml. |
| 5 |
Import the metadata into your IdP. Follow the documentation for your IdP to import the Webex SP metadata. You can use our IdP integration guides or consult the documentation for your specific IdP if not listed. |
| 6 |
When you're finished, run the SSO test using the steps in |
 and select
 When your IdP environment changes or if your IdP certificate is going to expire, you can import the updated metadata into Webex at any time.
Before you begin
Gather your IdP metadata, typically as an exported xml file.
| 1 |
Sign in to Control Hub. |
| 2 |
Go to . |
| 3 |
Go to the Identity provider tab. |
| 4 |
Go to the IdP, click |
| 5 |
Drag and drop your IdP metadata file into the window or click Choose a metadata file and upload it that way. |
| 6 |
Choose Less secure (self-signed) or More secure (signed by a public CA), depending on how your IdP metadata is signed. |
| 7 |
Click Test SSO setup, and when a new browser tab opens, authenticate with the IdP by signing in. |
You'll receive alerts in Control Hub before certificates are set to expire, but you can also proactively set up alert rules. These rules let you know in advance that your SP or IdP certificates are going to expire. We can send these to you through email, a space in the Webex App, or both.
Regardless of the delivery channel configured, all alerts always appear in Control Hub. See Notifications in Control Hub for more information.
| 1 |
Sign in to Control Hub. |
| 2 |
Go to Notifications. |
| 3 |
Choose Manage then All rules. |
| 4 |
From the Rules list, choose any of the SSO rules that you'd like to create:
|
| 5 |
In the Delivery channel section, check the box for Email, Webex space, or both. If you choose Email, enter the email address that should receive the notification. If you choose the Webex space option, you're automatically added to a space inside of the Webex App and we deliver the notifications there. |
| 6 |
Save your changes. |
What to do next
We send certificate expiry alerts once every 15 days, starting 60 days before expiry. (You can expect alerts on day 60, 45, 30, and 15.) Alerts stop when you renew the certificate.
You may see a notice that the single logout URL isn’t configured:
We recommend that you configure your IdP to support Single Log Out (also known as SLO). Webex supports both the redirect and post methods, available in our metadata that is downloaded from Control Hub. Not all IdPs support SLO; please contact your IdP team for assistance. Sometimes, for the major IdP vendors like AzureAD, Ping Federate, ForgeRock, and Oracle, that do support SLO, we document how to configure the integration. Consult your Identity & Security team on the specifics of your IDP and how to configure it properly.
If single logout url isn’t configured:
-
An existing IdP Session remains valid. The next time users sign in, they may not be asked to reauthenticate by the IdP.
-
We display a warning message on sign out, so Webex App logout doesn't happen seamlessly.
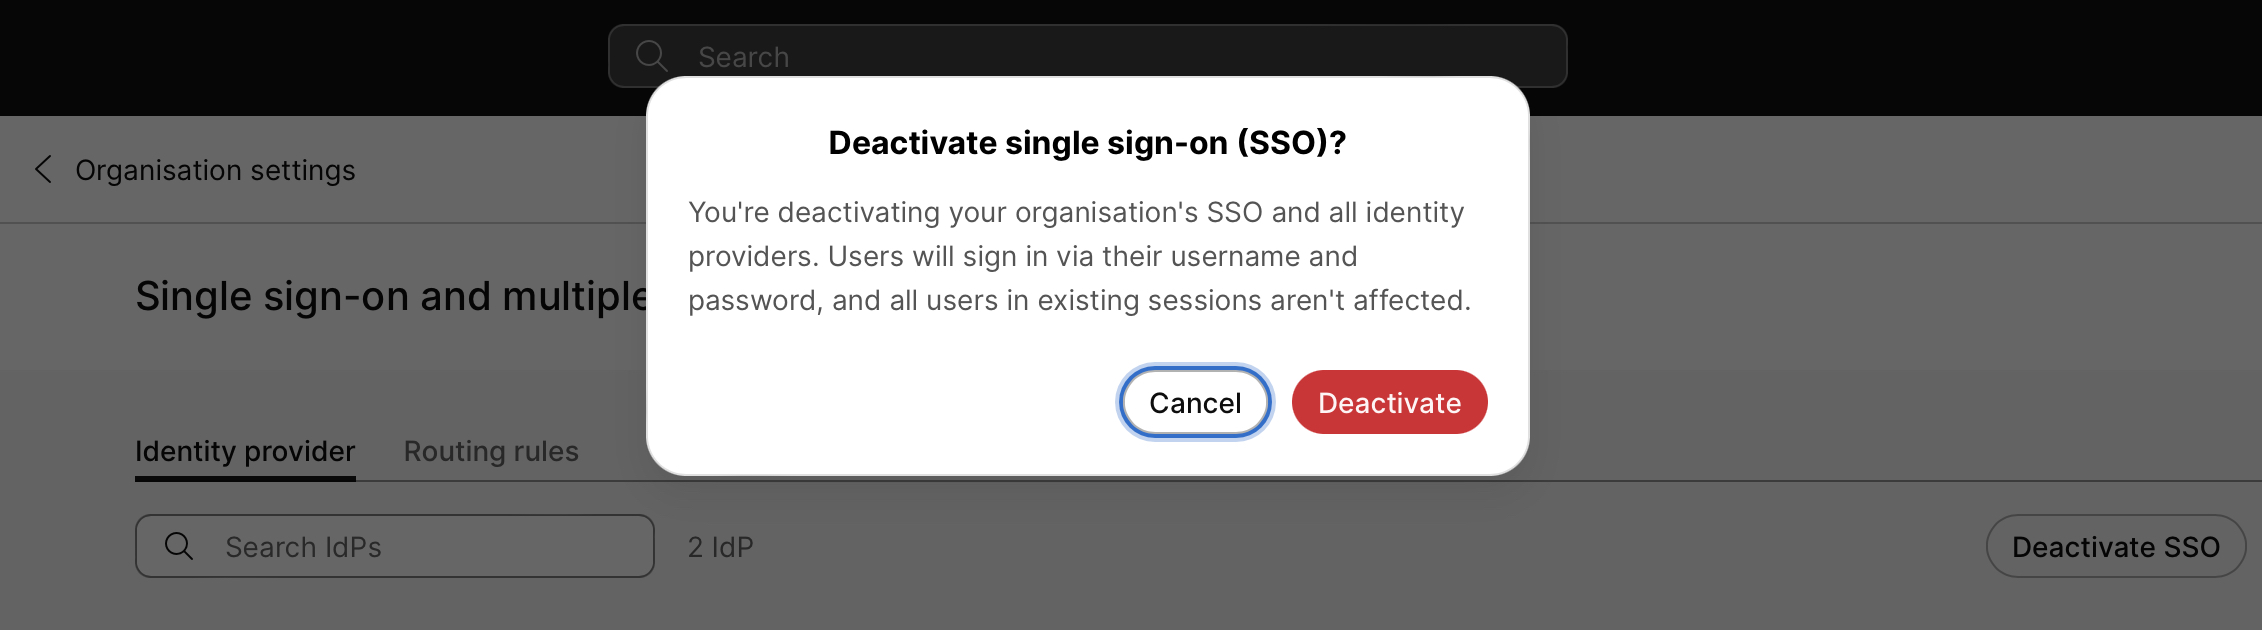
You can disable single sign-on (SSO) for your Webex organization managed in Control Hub. You may want to disable SSO if you're changing identity providers (IdPs).
If single sign-on has been enabled for your organization but is failing, you can engage your Cisco partner who can access your Webex organization to disable it for you.
| 1 |
Sign in to Control Hub. |
| 2 |
Go to . |
| 3 |
Go to the Identity provider tab. |
| 4 |
Click Deactivate SSO. A popup window appears that warns you about disabling SSO:
If you disable SSO, passwords are managed by the cloud instead of your integrated IdP configuration. |
| 5 |
If you understand the impact of disabling SSO and want to proceed, click Deactivate. SSO is deactivated and all SAML certificate listings are removed. If SSO is disabled, users who have to authenticate will see a password entry field during the sign-in process.
|
What to do next
If you or the customer reconfigure SSO for the customer organization, user accounts go back to using the password policy that is set by the IdP that is integrated with the Webex organization.
If you run into problems with your SSO login, you can use the SSO self recovery option to get access to your Webex organization managed in Control Hub. The self recovery option allows you to update or disable SSO in Control Hub.


