- Početak
- /
- Članak

Hvala na povratnim informacijama.

Alatke za migraciju na rešenja veleprodajnog RTM-a
 U ovom članku
 Povratne informacije?
Pokrenite migraciju sa minimalnom predkonfiguracijom. Olakšajte komande za pokretanje. Administratori mogu pregledati svoje podatke nakon obezbeđivanja i upućivati i primati pozive odmah nakon migracije . Podržava automatsku nadogradnju na Vebek aplikaciju za UC-One klijente.
Pregled
Svrha ovog dokumenta je da pruži detaljna uputstva o korišćenju alata za migraciju sa Cisco BroadVorks, Vebek za BroadVorks i BroadCloud na veleprodaju i Vebek pozive. Ovaj dokument pokriva skup alata za migraciju dizajniranih da pomognu u migraciji postojećih Cisco BroadVorks, Vebek za BroadVorks i BroadCloud korisnike na veleprodajno rešenje Route-to-Market.
Alati za migraciju imaju za cilj da olakšaju potpuni prelazak sa BroadVorks-a na veleprodajne usluge. Oni nisu dizajnirani za dugoročnu koegzistenciju obe usluge u okviru iste organizacije kupaca.
Uticaj migracija
Uticaji nakon migracije su sledeći:
Administratori
Nakon migracije, administratori moraju:
- Počnite da koristite Partner Hub i Control Hub da biste konfigurisali funkcije, a ne CommPilot.
- Ponovo konfigurišite sve funkcije koje nisu deo migracije.
Potrebno je da ručno migrirate funkcije koje se ne migriraju automatski nakon završetka alata za migraciju.
Korisnici
Podržane funkcije treba da rade nakon migracije isto kao što su radili pre migracije. Funkcije Vebek poziva koje migracija ne podržava moraju se rekonfigurisati na Vebek-u nakon migracije:
- Korisnici će izgubiti istoriju poziva i istoriju poruka.
- Korisnici će izgubiti sve lične postavke i prilagođavanja ključne linije i moraju ponovo konfigurisati ova podešavanja nakon migracije. Primeri uključuju brzo biranje.
- Korisnici moraju resetovati svoje pristupne kodove i lozinke pri prvom prijavljivanju.
- Korisnici koji koriste UC-One klijent moraju se prvo prijaviti za nadogradnju na Vebek aplikaciju.
Arhitektura alata za migraciju
Arhitektura alata za migraciju sastoji se od četiri različita alata:
- Alat za izdvajanje—Izdvaja preduzeća, grupe, brojeve, korisnike, usluge, telefone i meke klijente iz Cisco BroadWorks-a. BroadCloud partneri moraju da podnesu zahtev za izvod na portalu provajdera usluga.
- Transform tool—Transforms the information extracted by the extract tool into a JSON file that may be edited.
- Alat za obezbeđivanje - Koristi JSON izlaznu datoteku iz alata Transform Tool za obezbeđivanje kupaca, lokacija, brojeva, korisnika, usluga i telefona pomoću Vebek javnih API-ja.
- Alat za premeštanje uređaja—Koristi Transform Tool JSON izlaznu datoteku Transform Tool za obnovu profila i ponovno pokretanje telefona, aktiviranje brojeva u veleprodajnom RTM rešenju i deaktiviranje telefonskih brojeva u Cisco BroadWorks.
- Ovaj alat podržava vraćanje profila telefona i mekih klijenata i aktivaciju broja nazad u Cisco BroadVorks.
- BroadCloud partneri moraju da podnesu zahtev za migraciju na portalu provajdera usluga.
Sledeća ilustracija predstavlja kako četiri alata funkcionišu sekvencijalno komunicirajući sa Cisco BroadVorks-om, javnim API-jima i učitavanjem metrika u Vebek usluge za buduću analitiku nakon što administrator pokrene zadatke migracije.
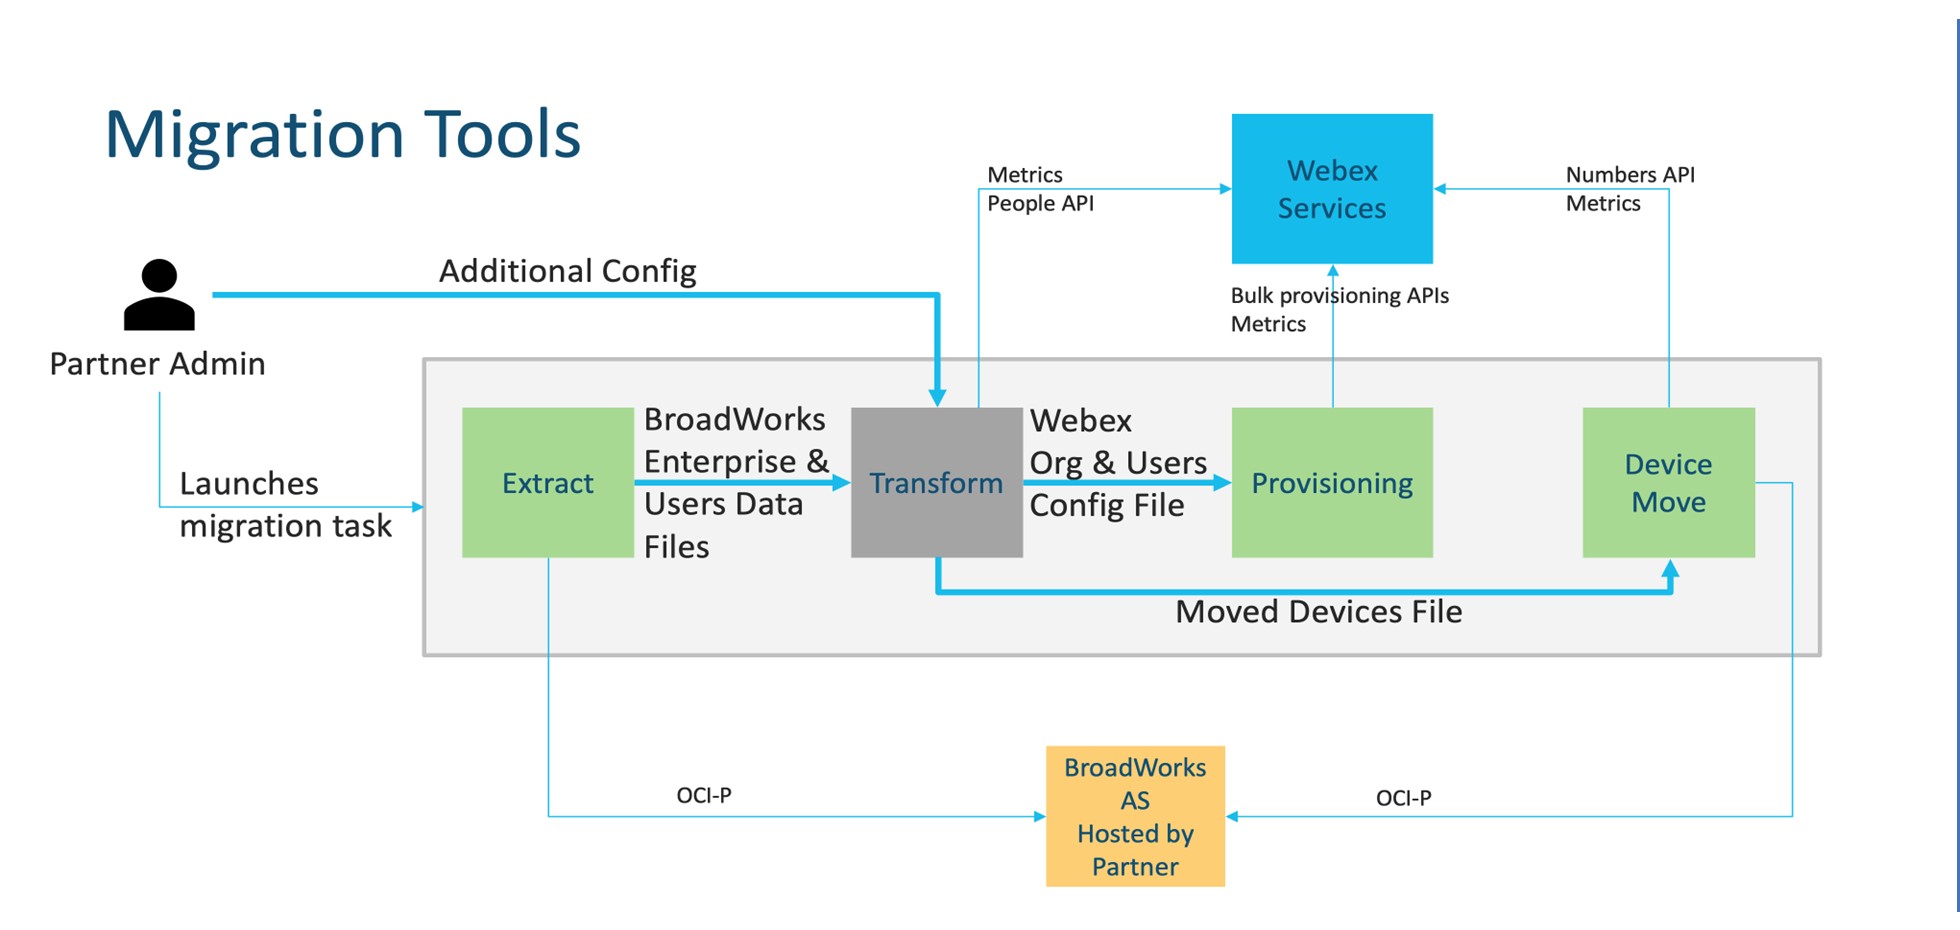
Slika 1: Alatke za migraciju
Zahtevi
Pre pokretanja alata za migraciju, partner mora da ispuni sledeće zahteve:
- Administrator partnera i partnera mora biti uključen u veleprodajno RTM rešenje. Tokom faze pre prodaje, partneri nisu obavezni da budu uključeni u veleprodajno RTM rešenje za pokretanje alata za izvlačenje.
- Partner mora proći kroz kontrolnu listu pre migracije kako bi se uverio da su ispunjeni svi zahtevi.
- Cisco BroadVorks sistemski administratorski akreditivi su potrebni za pokretanje alata za izvlačenje i premještanje uređaja. Ovo se ne odnosi na partnere BroadCloud-a.
- Alati za izvlačenje i premještanje uređaja moraju se pokrenuti sa sekundarnog Cisco BroadVorks Application Servera tokom prozora održavanja kako bi se smanjio rizik. Partneri BroadCloud-a će pokrenuti alat za premještanje uređaja sa portala provajdera usluga.
- Pregledajte listu podržanih uređaja za Vebek pozive.
- Pregledajte listu nepodržanih Vebek Calling uređaja.
- Partneri moraju da zatraže od svog tima za naloge u Ciscu da dobiju podržanu verziju firmvera za telefone i uređaje.
- UC-One klijenti moraju nadograditi na sledeće verzije:
- Desktop Communicator klijenti moraju biti verzija 22.9.12 ili novija
- Mobile Connect klijenti moraju biti verzija 3.9.14 ili novija.
- Mašina administratora mora imati:
- JDK / JRE 1.8 je potreban za Provisioning Tool.
- MAC i Linuk mašine zahtevaju Pithon KSNUMKS ili noviji za Transform Tool.
- Kupci moraju imati važeću adresu za naplatu, a krajnji korisnici moraju imati poslovnu adresu e-pošte konfigurisanu u Cisco BroadVorks-u. Ako vrednosti nisu postavljene, administratori partnera moraju kontaktirati svoje klijente da bi ih dobili. Ovi detalji moraju biti dodani u CSV (vrednosti odvojene zarezom) pre pokretanja alata za transformaciju. Primeri CSV datoteka su obezbeđeni sa alatom za transformaciju.
Plan migracije
Plan migracije ima 3 faze:
- Priprema
- Nabavite kopiju korisničkih podataka pomoću alata za izvlačenje
- Generišite token koristeći Token Generator Tool
- Koristite Transform Tool za formatiranje korisničkih podataka
- Dodela privilegija
- Nabavite najnovije korisničke podatke pomoću alata Ekstrakt
- Koristite Transform Tool za formatiranje korisničkih podataka
- Obezbeđivanje korisnika pomoću alata za obezbeđivanje
- Migracija
- Migrirajte uređaje pomoću alata za premeštanje uređaja
- Migracije bez uređaja [ Aktiviranje telefonskih brojeva preko Control Hub-a ]
Ako administratori partnera nemaju uređaje za prelazak sa Cisco BroadVorks-a na veleprodaju, onda pokretanje alata za premeštanje uređaja nije potrebno. Administratori partnera mogu da koriste javnu vezu ispod da aktiviraju telefonske brojeve direktno preko portala Control Hub. Za više informacija, pogledajte Upravljanje brojevima telefona u Control Hub-u.
Deaktiviranje telefonskih brojeva u Cisco BroadVorks-u nije obavezno ako administratori partnera aktiviraju svoje telefonske brojeve preko Control Hub-a.
Karakteristike automatski migriraju u Vholesale Calling
Ove korisničke funkcije se automatski migriraju alatima za migraciju:
- Podešavanja glasovnih poruka i prilagođeni pozdravi (glasovne poruke, personalizovano ime audio i PIN korisnika se ne migriraju)
- Rezervni brojevi
- BroadWorks Anywhere
- Zauzet lampa polje
- ID pozivaoca (prilagođeno ime i broj telefona)
- Poziv je na čekanju
- Podešavanja prosleđivanja poziva (prosleđivanje poziva uvek / zauzet / bez odgovora / nije dostupan)
- Presretanje poziva
- Ne uznemiravaj
- Podešavanja faksa
- Udaljena kancelarija
- Izgled deljenog poziva
- Istovremeni lični prsten (uključujući raspored i selektivne kriterijume)
- Pozovite obaveštenje (uključujući raspored i selektivne kriterijume)
- Odbijanje anonimnog poziva
- Selektivno odbijanje poziva
- Selektivno prosleđivanje poziva
- Selektivno prihvatanje poziva
- Sekvencijalno zvono
- Usmereni poziv pickup i barge-in
- Barža u oslobođen
- Guraj da razgovaraš
- Privatnost
- Muzika na čekanju
- Usluga tokom odmora
- Noćna usluga
- Odlazni plan poziva
- Plan odlaznih poziva - Ovlašćeni kodovi
- Plan odlaznih poziva - Broj prenosa
- Plan dolaznog poziva
- Klijent recepcionera
- Snimanje poziva
Ove karakteristike grupe se automatski migriraju alatima za migraciju:
- Automatski službenik
- Prilagođeni pozdravi
- Podešavanja za prosleđivanje poziva (uvek, zauzet, selektivan)
- Rezervni brojevi
- Meni za odmor nije dostupan u Vebek-u
- Selektivno odbijanje poziva
- Cisco BroadVorks Call Center Standard i BroadCloud Call Queue:
- Osnovna konfiguracija
- Prilagođeni pozdravi
- Agenti i supervizori
- Podešavanja za prosleđivanje poziva (uvek, zauzet, selektivan)
- Rezervni brojevi
- Muzika na čekanju
- Prinudno prosleđivanje
- Komforna poruka bajpas
- Zajednički radni prostor:
- Prosleđivanje poziva
- Ne uznemiravaj
- Poziv je na čekanju
- Presretanje poziva
- Muzika na čekanju
- Zauzet lampa polje (Monitoring)
- ID pozivaoca
- Rezervni brojevi
- Plan dolaznog poziva
- Odlazni plan poziva
- Plan odlaznih poziva - Ovlašćeni kodovi
- Plan odlaznih poziva - Broj prenosa
- Profesionalni radni prostor:
- Prosleđivanje poziva
- Govorna pošta
- Govorna pošta - Zauzet pozdrav
- Govorna pošta - Nema odgovora pozdrav
- Ne uznemiravaj
- Poziv je na čekanju
- Presretanje poziva
- Muzika na čekanju
- Zauzet lampa polje (Monitoring)
- Guraj da razgovaraš
- Istovremeno zvono
- Odbijanje anonimnog poziva
- Selektivno prosleđivanje poziva
- Selektivno odbijanje poziva
- Selektivno prihvatanje poziva
- Sekvencijalno zvono
- Ubacivanje
- Podešavanja zaštite privatnosti
- ID pozivaoca
- Rezervni brojevi
- Plan dolaznog poziva
- Odlazni plan poziva
- Plan odlaznih poziva - Ovlašćeni kodovi
- Plan odlaznih poziva - Broj prenosa
- Snimanje poziva
- Virtuelna linija:
- Prosleđivanje poziva
- Govorna pošta
- Govorna pošta - Zauzet pozdrav
- Govorna pošta - Nema odgovora pozdrav
- Poziv je na čekanju
- Presretanje poziva
- Muzika na čekanju
- Guraj da razgovaraš
- Ubacivanje
- Podešavanja zaštite privatnosti
- ID pozivaoca
- Plan dolaznog poziva
- Odlazni plan poziva
- Plan odlaznih poziva - Ovlašćeni kodovi
- Plan odlaznih poziva - Broj prenosa
- Snimanje poziva
- Parkiranje poziva
- Preuzimanje poziva
- Ciljana grupa
- Podešavanja za prosleđivanje poziva (uvek, zauzet, selektivan, nije dostupan)
- Rezervni brojevi
- Pozivni broj lokacije (jedan po lokaciji ili grupi)
- Pejdžing grupa
- Rasporedi (rasporedi preduzeća se ne migriraju)
- Glasovni portal
- Muzika na čekanju
- Uobičajena lista telefona
- Grupa za govornu poštu
Podržani uređaji
Podržani telefoni će biti automatski kreirani i dodeljeni korisnicima u Vebek Calling-u pomoću alata za obezbeđivanje. Telefoni označeni sa "da" u koloni "Podržano u alatu za premeštanje uređaja" takođe će se automatski premjestiti iz Cisco BroadVorks-a ili BroadCloud-a u Vebek pozive kada se pokrene alat za premještanje uređaja. Telefoni označeni sa "Ne" u toj koloni trebaju ručnu intervenciju da bi promenili DMS URL adresu u šablonu Cisco BroadVorks uređaja ili u samom telefonu.
Poslednja kolona obezbeđuje mapiranje modela telefona u kolonu "Tip uređaja" fajl transform-tool/input/newphones.csv. (Vidi Odeljak alata za transformaciju ovog članka za više informacija o newphones.csv).
|
Model telefona |
Podržano u alat za kretanje uređaja |
Tip uređaja u newphones.csv |
|---|---|---|
|
Srpski/srpski |
Da |
DMS Cisco 6821 |
|
Srpski/srpski |
Da |
DMS Cisco 6841 |
|
Srpski/srpski |
Da |
DMS Cisco 6851 |
|
Srpski/srpski |
Da |
DMS Cisco 6861 |
|
Srpski/srpski |
Da |
DMS Cisco 6871 |
|
Srpski/srpski |
Da |
DMS Cisco 7811 |
|
Srpski/srpski |
Da |
DMS Cisco 7821 |
|
Srpski/srpski |
Da |
DMS Cisco 7832 |
|
Srpski/srpski |
Da |
DMS Cisco 7841 |
|
Srpski/srpski |
Da |
DMS Cisco 7861 |
|
Srpski/srpski |
Da |
DMS Cisco 8811 |
|
Srpski/srpski |
Da |
DMS Cisco 8832 |
|
Srpski/srpski |
Da |
DMS Cisco 8841 |
|
Srpski/srpski |
Da |
DMS Cisco 8845 |
|
Srpski/srpski |
Da |
DMS Cisco 8851 |
|
Srpski/srpski |
Da |
DMS Cisco 8861 |
|
Srpski/srpski |
Da |
DMS Cisco 8865 |
|
Srpski/srpski |
Da |
DMS Cisco 8875 |
|
Srpski/srpski |
Da |
DMS Cisco 191 |
|
Srpski/srpski |
Da |
DMS Cisco 192 |
|
Srpski/srpski |
Da |
DMS Cisco DBS110 |
|
Srpski/srpski |
Da |
DMS Polycom VVKS101 |
|
Srpski/srpski |
Da |
DMS Polycom VVKS150 |
|
Srpski/srpski |
Da |
DMS Polycom VVKS201 |
|
Srpski/srpski |
Da |
DMS Polycom VVX250 |
|
Srpski/srpski |
Da |
DMS Polycom VVKS301 |
|
Srpski/srpski |
Da |
DMS Polycom VVKS311 |
|
Srpski/srpski |
Da |
DMS Polycom VVX350 |
|
Srpski/srpski |
Da |
DMS Polycom VVKS401 |
|
Srpski/srpski |
Da |
DMS Polycom VVKS411 |
|
Srpski/srpski |
Da |
DMS Polycom VVKS450 |
|
Srpski/srpski |
Da |
DMS Polycom VVX501 |
|
Srpski/srpski |
Da |
DMS Polycom VVKS601 |
|
Srpski/srpski |
Da |
DMS Polycom Trio8300 |
|
Srpski/srpski |
Da |
DMS Polycom Trio8500 |
|
Srpski/srpski |
Da |
DMS Polycom Trio8800 |
|
Srpski/srpski |
Da |
DMS Polikom SSIP5000 |
|
Polikom SoundStation 6000 |
Da |
DMS Polikom SSIP6000 |
|
Srpski/srpski |
Da |
DMS Iealink T33G |
|
Iealink T41S |
Da |
DMS Iealink T41S |
|
Srpski/srpski |
Da |
DMS Iealink T42S |
|
Srpski/srpski |
Da |
DMS Iealink T43U |
|
Iealink T46U |
Da |
DMS Iealink T46U |
|
Iealink T46S |
Da |
DMS Iealink T46S |
|
Iealink T48S |
Da |
DMS Iealink T48S |
|
Srpski/srpski |
Da |
DMS Iealink T48U |
|
Srpski/srpski |
Da |
DMS Iealink T53W |
|
Srpski/srpski |
Da |
DMS Iealink T54W |
|
Iealink T57W |
Da |
DMS Iealink T57W |
|
Iealink T58V |
Da |
DMS Iealink T58V |
|
Iealink CP920 |
Da |
DMS Iealink CP920 |
|
Iealink CP960 |
Da |
DMS Iealink CP960 |
|
Srpski/srpski |
Da |
DMS Iealink V52P |
|
Srpski/srpski |
Da |
DMS Iealink V56P |
|
Srpski/srpski |
Da |
DMS Iealink V60P |
|
Srpski/srpski |
Da |
DMS Iealink V70P |
|
Iealink CP925 |
Da |
DMS Iealink CP925 |
|
Iealink CP965 |
Da |
DMS Iealink CP965 |
|
Audiokodovi MP204R |
Da |
DMS AudioCodes MP204R |
|
Audiokodovi MP202R |
Da |
DMS Audiokodovi MP202R |
|
Audiokodovi MP204 |
Da |
DMS Audiokodovi MP204 |
|
Audiokodovi MP202 |
Da |
DMS Audiokodovi MP202 |
Uređaji koji nisu podržani
Ako kupac koristi nepodržane uređaje od strane veleprodajnog RTM rešenja, onda ti uređaji ne ispunjavaju uslove za migraciju. U ovom slučaju imate sledeće opcije:
- Obezbedite nove telefone na Cisco BroadVorks-u pre nego što migrirate.
- Ostavite stare telefone u Cisco BroadVorks-u, a korisnici moraju instalirati aplikaciju Vebek za upućivanje i primanje poziva.
Veleprodaja Pozivni paketi
Alati za migraciju imaju skup podrazumevanih vrednosti za odabir veleprodajnih poziva paketa za pretplatnike. Ako se kasnije želi drugačiji paket, oni se mogu promeniti u Control Hub-u od strane partnerskog administratora.
Konfiguracija paketa migracije Cisco BroadVorks
Svi pretplatnici koji migriraju sa Cisco BroadVorks-a će podrazumevati paket Vebek Calling. Ako je Vebek glasovni paket poželjan za pretplatnike koji nemaju dodeljen poziv na čekanju ili govornu poštu, ovo se može omogućiti u datoteci partner.cfg alata Transform tako što ćete odkomentirati liniju KORISTI_VEBEK_GLASOVNI_PAKET.
Vebek za mapiranje paketa migracije BroadVorks
Migracija iz Vebek za Broadvorks pakete zasniva se na tipu paketa Broadvorks. Konfigurišite podrazumevano mapiranje u konfiguracionoj datoteci Transform Tool-a na conf / v4b_package_to_wholesale_package.csv.
|
Vebek za BroadVorks paket |
Veleprodaja Pozivni paket |
|---|---|
|
Softfon |
Webex Voice |
|
Osnovno |
Webex Calling |
|
Standardno |
Webex Suite |
|
Premijum |
Webex Suite |
Mapiranje paketa migracije BroadCloud-a
Migracije iz paketa mapa BroadCloud Carrier zasnovane na tipu stanice. Podrazumevano mapiranje se može konfigurisati u konfiguracionoj datoteci Transform Tool-a conf/rialto_station_type_to_wholesale_package.csv.
|
BroadCloud Tip nosača stanice |
Veleprodaja Pozivni paket |
|---|---|
|
Osnovno |
Webex Voice |
|
Sala za sastanke |
Webex Voice |
|
Razmena poruka |
Webex Voice |
|
Standardno |
Webex Voice |
|
Izvršni rukovodilac |
Webex Suite |
|
Svi ostali tipovi stanica |
Webex Voice |
Transformišite korisnički nalog BroadVorks ili BroadCloud u radni prostor Vebek Calling-a
Vebek radni prostor je telefon koji se deli među mnogim ljudima, na primer: Na primer: telefoni u konferencijskoj sali, skladištu ili predvorju. Takvi telefoni se mogu konfigurisati u Vebek pozivima kao Vebek radni prostori umesto Vebek korisnika. Dostupna je opcija za automatsku transformaciju korisničkih naloga iz Cisco BroadVorks-a ili BroadCloud Carrier-a u radne prostore tokom procesa migracije.
Koraci:
- U datoteci transform_tool/input/users.csv, dodelite paket "common_area" korisnicima koji će se transformisati u radni prostor.
- Primer: bwuser@domain,,,common_area
- (Samo BroadCloud) Da biste pretvorili sve korisničke naloge određenog tipa stanice u radne prostore, dodajte unos u transform-tool / conf /rialto_station_type_to_wholesale_package .csv i podesite veleprodajni paket na "common_area_calling".
- Primer: conference_room_v2,common_area_calling
- Pokrenite alat za transformaciju.
- Pokrenite alat za obezbeđivanje.
- Otvorite Control Hub novokreirane organizacije kupaca i podesite SIP domen (pogledajte sliku 2, Konfigurisanje SIP domena u Control Hub-u).
- Ponovo pokrenite alat za obezbeđivanje. Ovo stvara radne prostore i dodeljuje telefone na njega.
Ograničenja:
Konfiguracija korisničkih funkcija (na primer, prosleđivanje poziva, ne uznemiravaj) se ne automatski migrira u radni prostor.
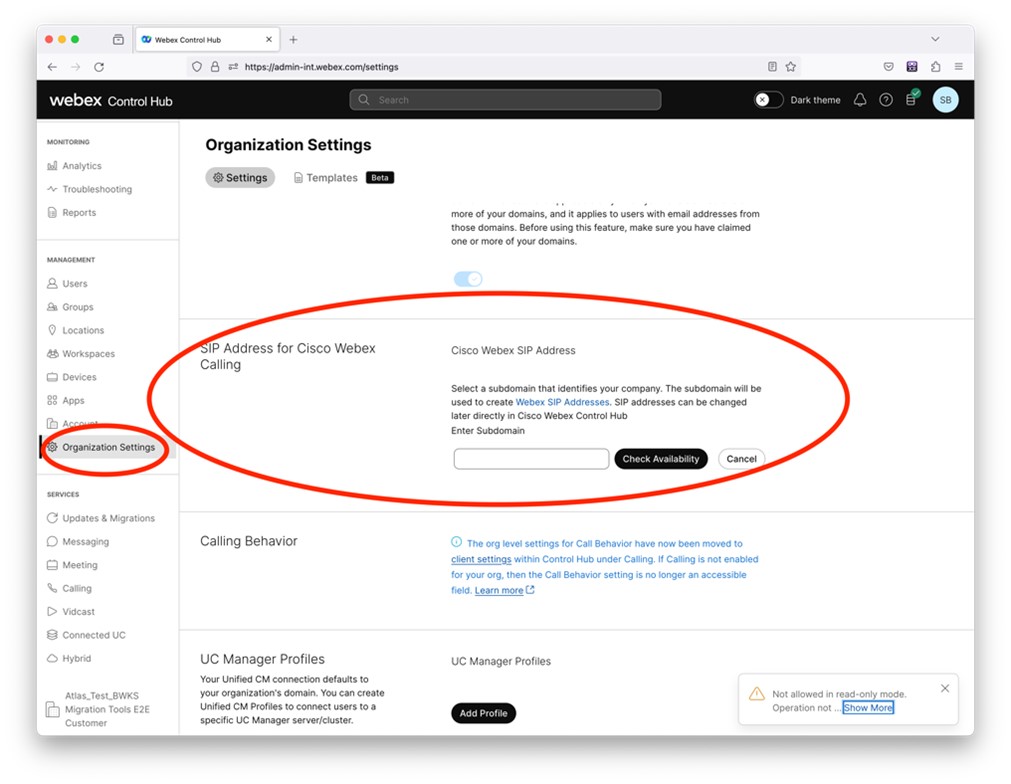
Slika 2: Konfigurisanje SIP domena u Control Hub-u
Token generator alat
Partnerski administratori pokreću ovaj alat za generisanje tokena najmanje jednom pre nego što počnu da pokreću alate za migraciju. Pokretanje ovog alata je jednokratna aktivnost nakon što se partnerski račun uključi u veleprodajno RTM rešenje. Ovaj alat omogućava administratorima partnera da se prijave preko veb pretraživača kako bi dobili jedinstveni TOKEN koji je potreban za ažuriranje konfiguracionih datoteka partnera za alate za migraciju.
Preduslovi
Instalirajte Java 8, 11, 17 ili 21 na računaru. Java je dostupna iz mnogih izvora, uključujući:
- https://learn.microsoft.com/en-us/java/openjdk/download
- https://aws.amazon.com/corretto/
- https://www.oracle.com/java/technologies/downloads/#java21
Nakon preuzimanja, izvadite binarne datoteke alata za migraciju.
Ovaj korak je opcioni
Uputstva za pokretanje
Pokrenite sledeću komandu u terminalu unutar direktorijuma token generatora:
-
Sledeći portovi moraju biti dostupni za pokretanje token generator alata. Portovi: 8080, 50009, 50010, 50011, 50012 i 50013
-
Najmanje jedan od ovih navedenih portova mora biti otvoren za povezivanje u računaru korisnika.
Prozori:
token_generator.batMacOS:
./token_generator.shIzlaz:
Tool Name: Token Generator Tool
Version: 1.13.0
Load the URL in your web browser: http://localhost:8080
Otvorite URL adresu u veb pretraživaču na terminalu, prijavite se sa akreditivima administratora partnera da biste dobili TOKEN i kopirajte isti za dalju upotrebu.
Ilustracije korisničkog interfejsa su date u nastavku za referencu:
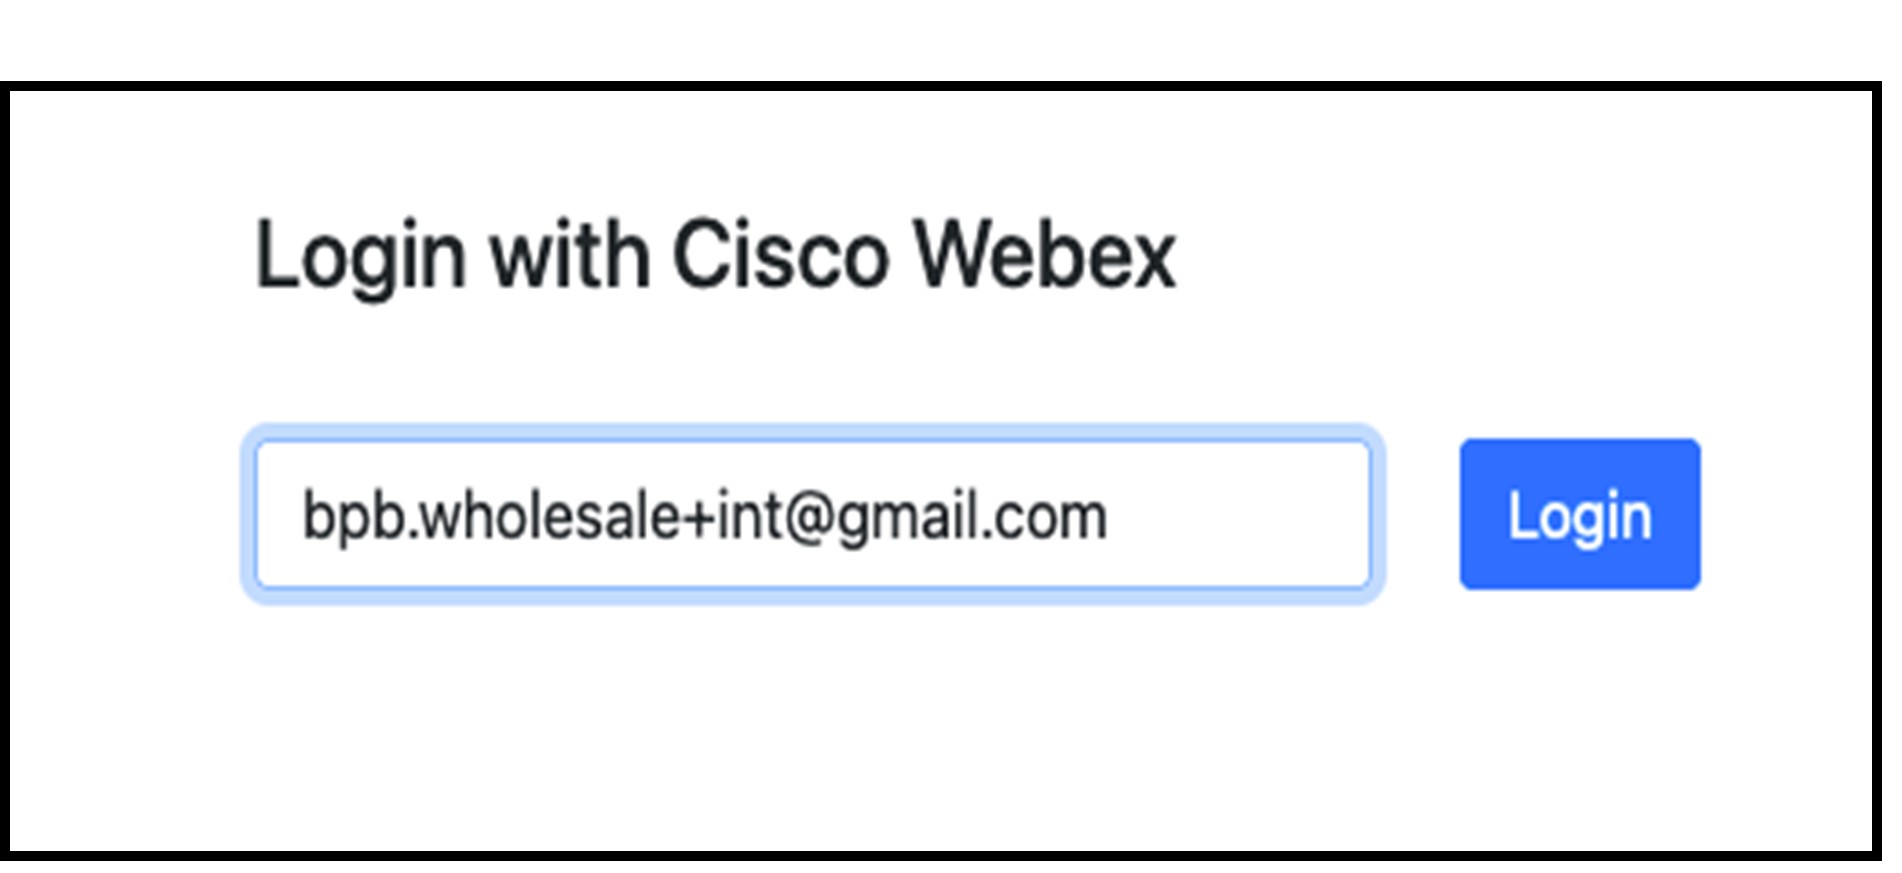
Slika 3: Prijavite se sa Cisco Vebeksom
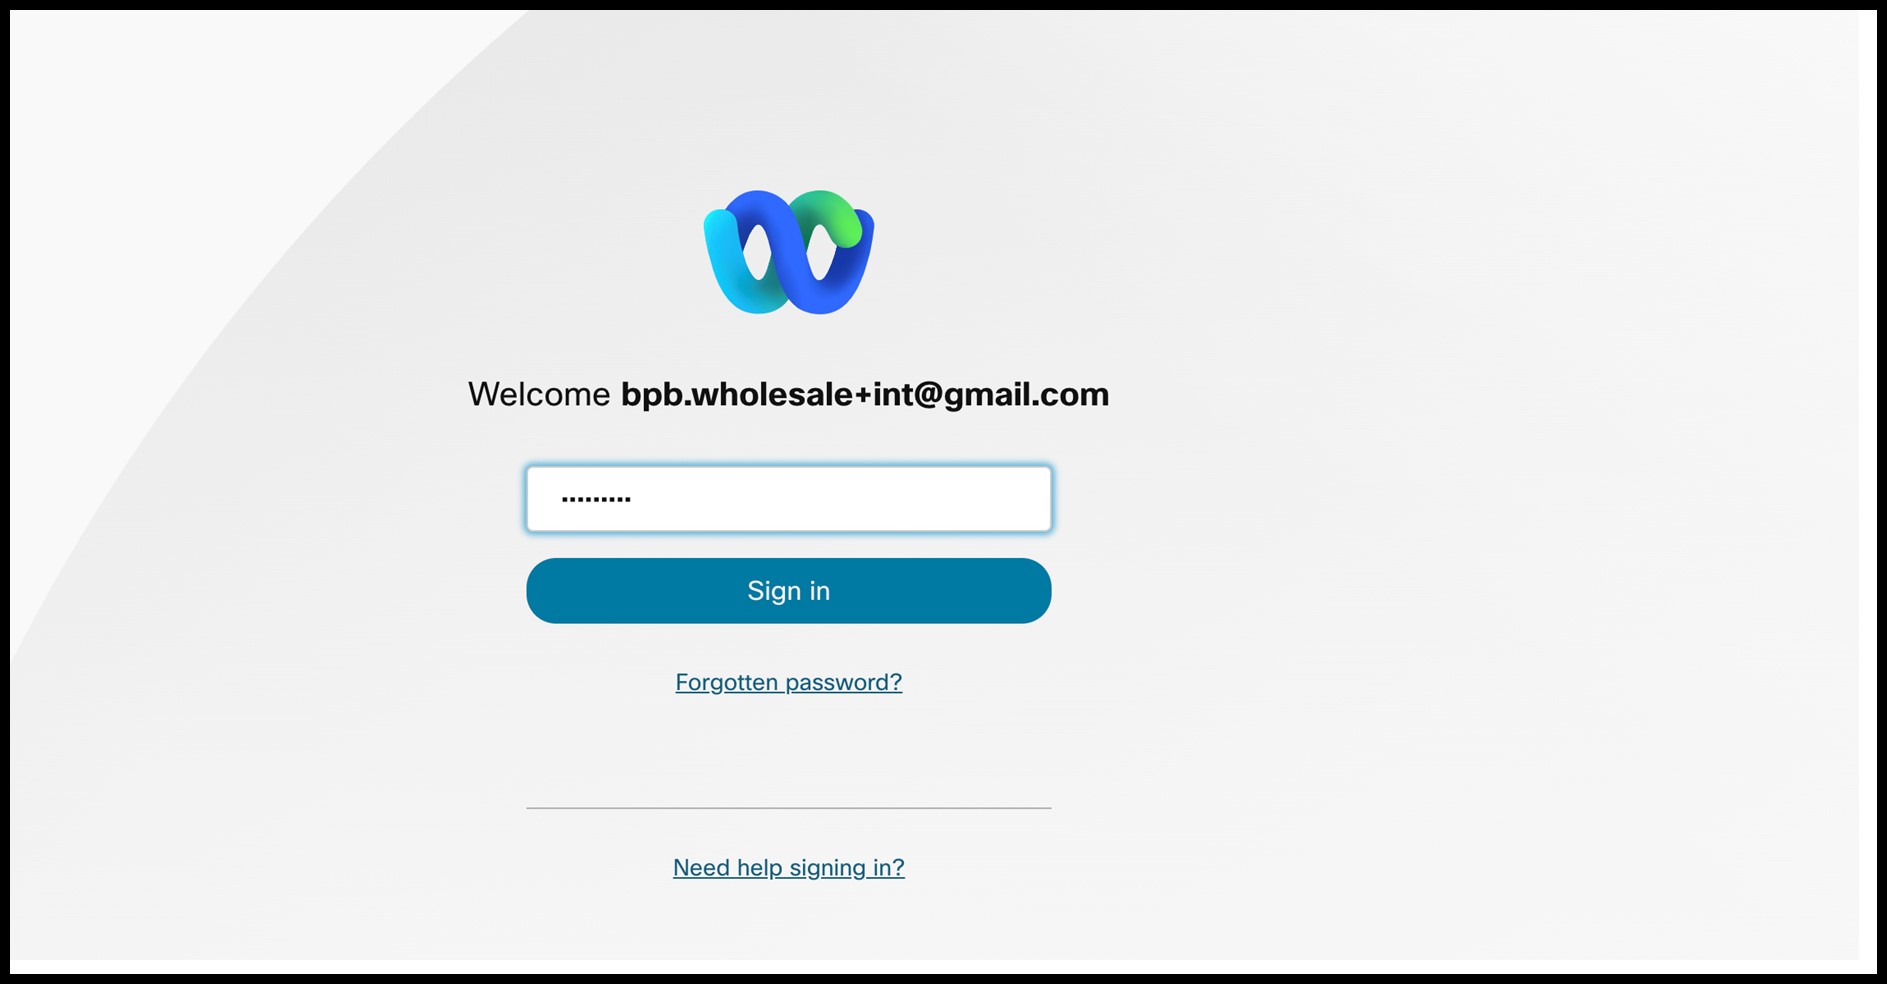
Slika 4: Prozor akreditiva
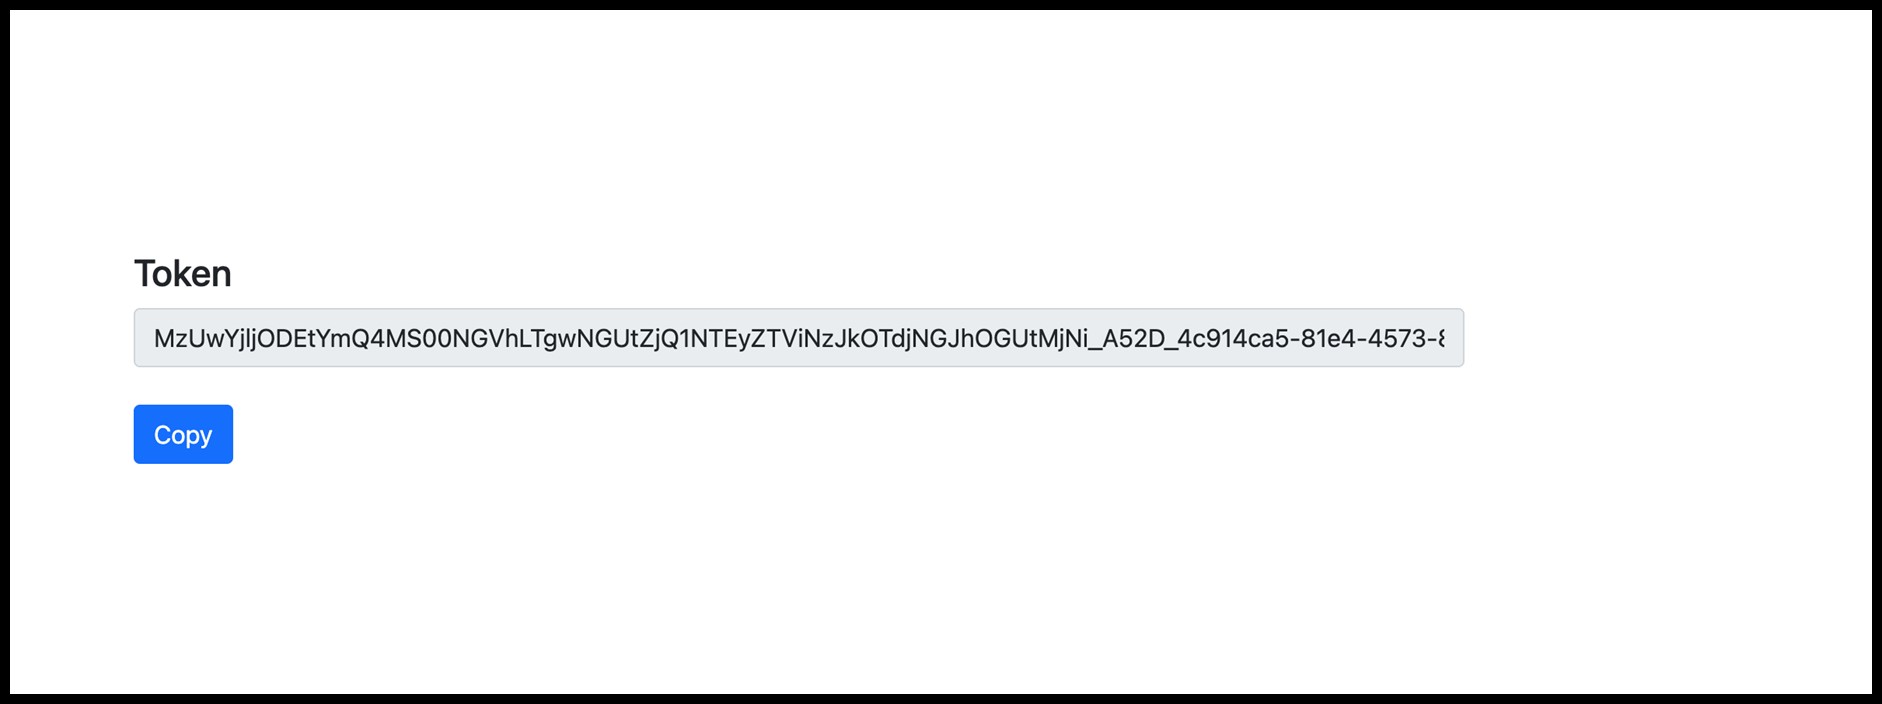
Slika 5: Generisanje tokena
Zadaci podešavanja BroadVorks-a
Konfigurišite sledeće korake, pre nego što pokrenete alate za izvlačenje i pomeranje uređaja na sekundarnom BroadVorks serveru.
Omogućite OCI-P povezivanje
Alat za kretanje uređaja komunicira sa BroadVorks-om putem OCI-P komandi, da bi omogućio OCI-P povezivanje koristite korake ispod:
Korak 1: Koristite CLI da konfigurišete Opšta podešavanja.
Pokrenite sledeću komandu u CLI da biste promenili u direktorijum GeneralSettings:
AS_CLI> cd /Applications/OpenClientServer/GeneralSettings.Pokrenite sledeću komandu u CLI da biste dobili trenutnu GeneralSettings:
AS_CLI/Applications/OpenClientServer/GeneralSettings> get
clientPort = 2208
clientPortEnabled = true
secureClientPort = 2209
secureClientPortEnabled = true
systemDomain = <>
Ako se vaša podešavanja ne poklapaju sa gore navedenim, koristite komandu set da biste ponovo konfigurisali podešavanja.
Korak 2: Koristite CLI da biste konfigurisali OCI proki.
Promenite direktorijum u OCI Proki:
AS_CLI> cd /Applications/OpenClientServer/OCIProxyPokrenite sledeće CLI da biste dobili trenutna podešavanja. Trebalo bi da vidite sledeće:
AS_CLI/Applications/OpenClientServer/OCIProxy> get
enabled = true
enabledLoginLevelScreening = false
enableResponseCaching = false
responseCacheDurationHours = 24
responseCacheRenewPeriodMins = 30
messageQueueCapacity = 50
messageQueueTimeoutSeconds = 1800
Ako se vaša podešavanja ne poklapaju sa gore navedenim, koristite komandu set da biste ponovo konfigurisali podešavanja.
Korak 3: Koristite CLI da biste konfigurisali OCI Provisioning.
Promenite direktorijum za obezbeđivanje:
AS_CLI> cd /System/NetworkAccessLists/OCI/ProvisioningPokrenite sledeću komandu da biste dobili trenutne postavke OCI Provisioning:
AS_CLI/System/NetworkAccessLists/OCI/Provisioning> get
Address Description
========================
127.0.0.1 local as
Korak 4: Pokrenite naredbu ispod u CLI da biste proverili da li je vaša konfiguracija ispravna.
 AS_CLI/Maintenance/ManagedObjects> get broadworks and check
that your output looks OK.
See below for sample output:
AS_CLI/Maintenance/ManagedObjects> get broadworks
BroadWorks Managed Objects
==========================
* Server:
Identity..............: AS
Version...............: Rel_21.sp1_1.551
Administrative State..: Unlocked
* Applications:
Name Version Deployed Administrative State Effective State
=========================================================================================
ExecutionAndProvisioning 21.sp1_1.551 true Unlocked Unlocked
FlashPolicy 21.sp1_1.551 false Unlocked Stopped
OpenClientServer 21.sp1_1.551 true Unlocked Unlocked
WebContainer 21.sp1_1.551 true Unlocked Unlocked
4 entries found.
* Hosted Applications:
Name Version Context Path Deployed
==================================================================
CommPilot 21.sp1_1.551 / true
DeviceManagementFiles 21.sp1_1.551 /DeviceManagement true
JWSFiles 21.sp1_1.551 /FileRepos true
MediaFiles 21.sp1_1.551 /media true
OCIFiles 21.sp1_1.551 /ocifiles true
5 entries found.
Proverite otvoreni klijentski server raspoređen i aktivan
Koristite komande ispod da biste postavili i pokrenuli Open Client Server na sekundarnom aplikativnom serveru ako nije raspoređen ili već nije započeo.
Korak 1: Rasporedite server sa sledećom CLI komandom:
AS_CLI/Maintenance/ManagedObjects> deploy application OpenClientServerKorak 2: Pokrenite server sa ovom komandom:
AS_CLI/Maintenance/ManagedObjects> start application OpenClientServerOmogućite aktiviranje brojeva
Izvršite sledeće komande u CLI da biste omogućili aktiviranje brojeva:
Korak 1: Pokrenite komandu za aktiviranje broja:
AS_CLI> cd SubscriberMgmt/NumberActivationKorak 2: Pokrenite komandu za aktiviranje omogućeno:
AS_CLI> set dnMode groupAndUserActivationEnabledKorak 3: Na upit za potvrdu, unesite Y.
Cisco plan pozivanja
Cisco planovi za pozivanje pružaju rešenje u paketu dizajnirano da pojednostavi vaše iskustvo pozivanja u oblaku pomoću Vebek Calling-a.
Preduslovi
Tim Cisco naloga mora da pomogne administratoru partnera u postavljanju Cloud Connected PSTN prodavca na Sinch u šablonu za veleprodaju.
Transform Alat
Da biste omogućili Cisco plan pozivanja, dodajte sledeću konfiguraciju u datoteku partner.cfg:
- OMOGUĆI_CISCO_PLAN POZIVANJA_= Da
- Po defaultu, ova osobina je komentarisana. Administratori moraju da odkomentarišu i omoguće ga pre pokretanja alata za transformaciju.
- Nakon omogućavanja ove osobine i izvršavanja Transform Tool-a, odeljak Vholesale Package JSON datoteke kupca automatski će uključiti Cisco plan pozivanja.
Alat za obezbeđivanje
Za lokacije kupaca koje se odluče za Cisco plan pozivanja, aktiviramo povezane brojeve tokom faze obezbeđivanja brojeva. Međutim, kupci će početi da koriste brojeve tek nakon završetka procesa migracije.
Ekstrakt alat
Za BroadCloud
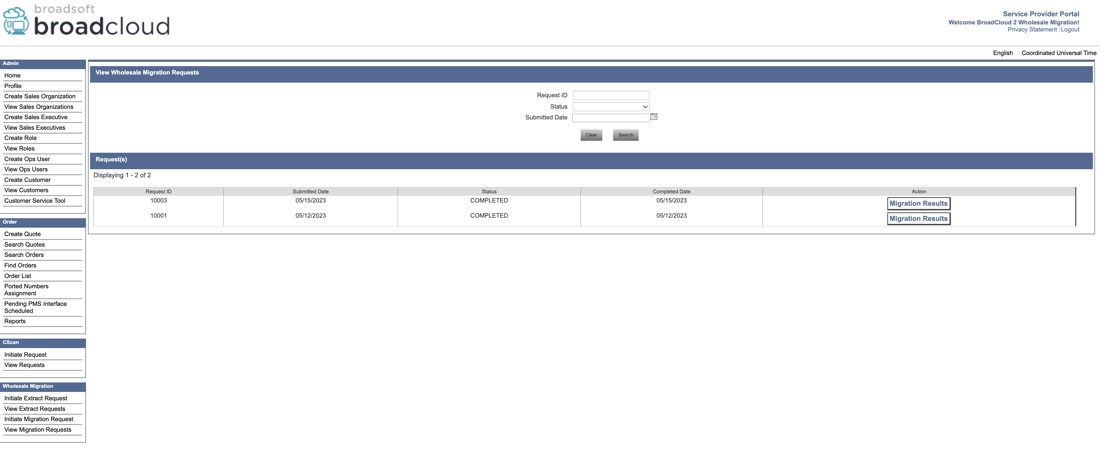
Alat za izvlačenje je integrisan u portal BroadCloud Service Provider. Administrator pružaoca usluga može:
- Podnesite zahteve za izvod do 50 kupaca po zahtevu.Zahtev za izvod ne može se podneti za istog kupca više od 10 puta dnevno.
- Preuzmite izdvojenu datoteku sa podacima, u ZIP formatu, do 28 dana od datuma podnošenja zahteva.
Sledeće slike prikazuju portal pružaoca usluga.
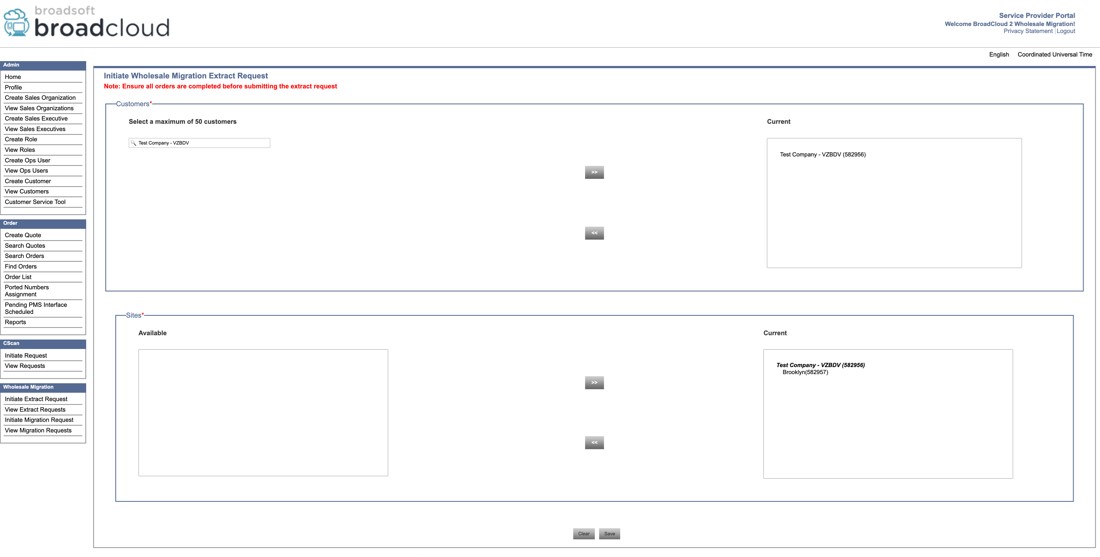
Slika 6: Portal pružaoca usluga
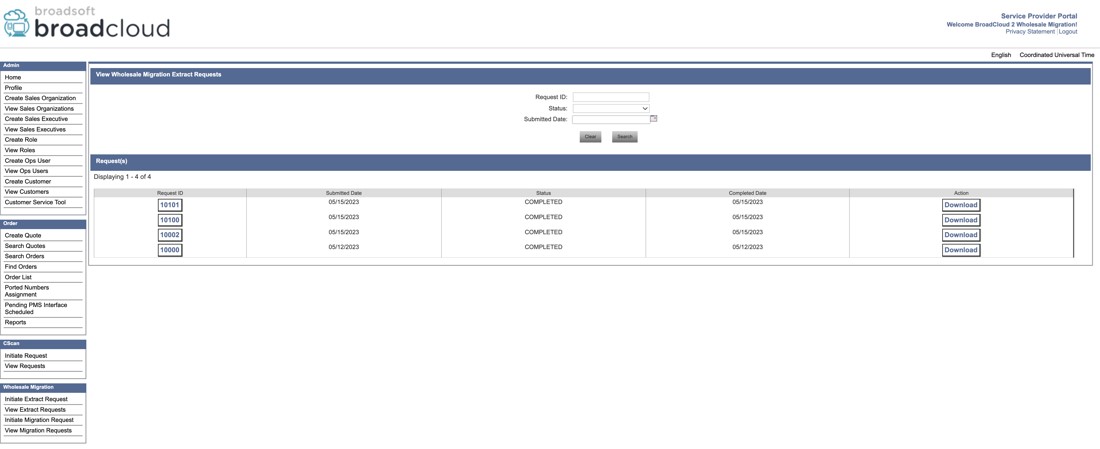
Slika 7: Portal pružaoca usluga
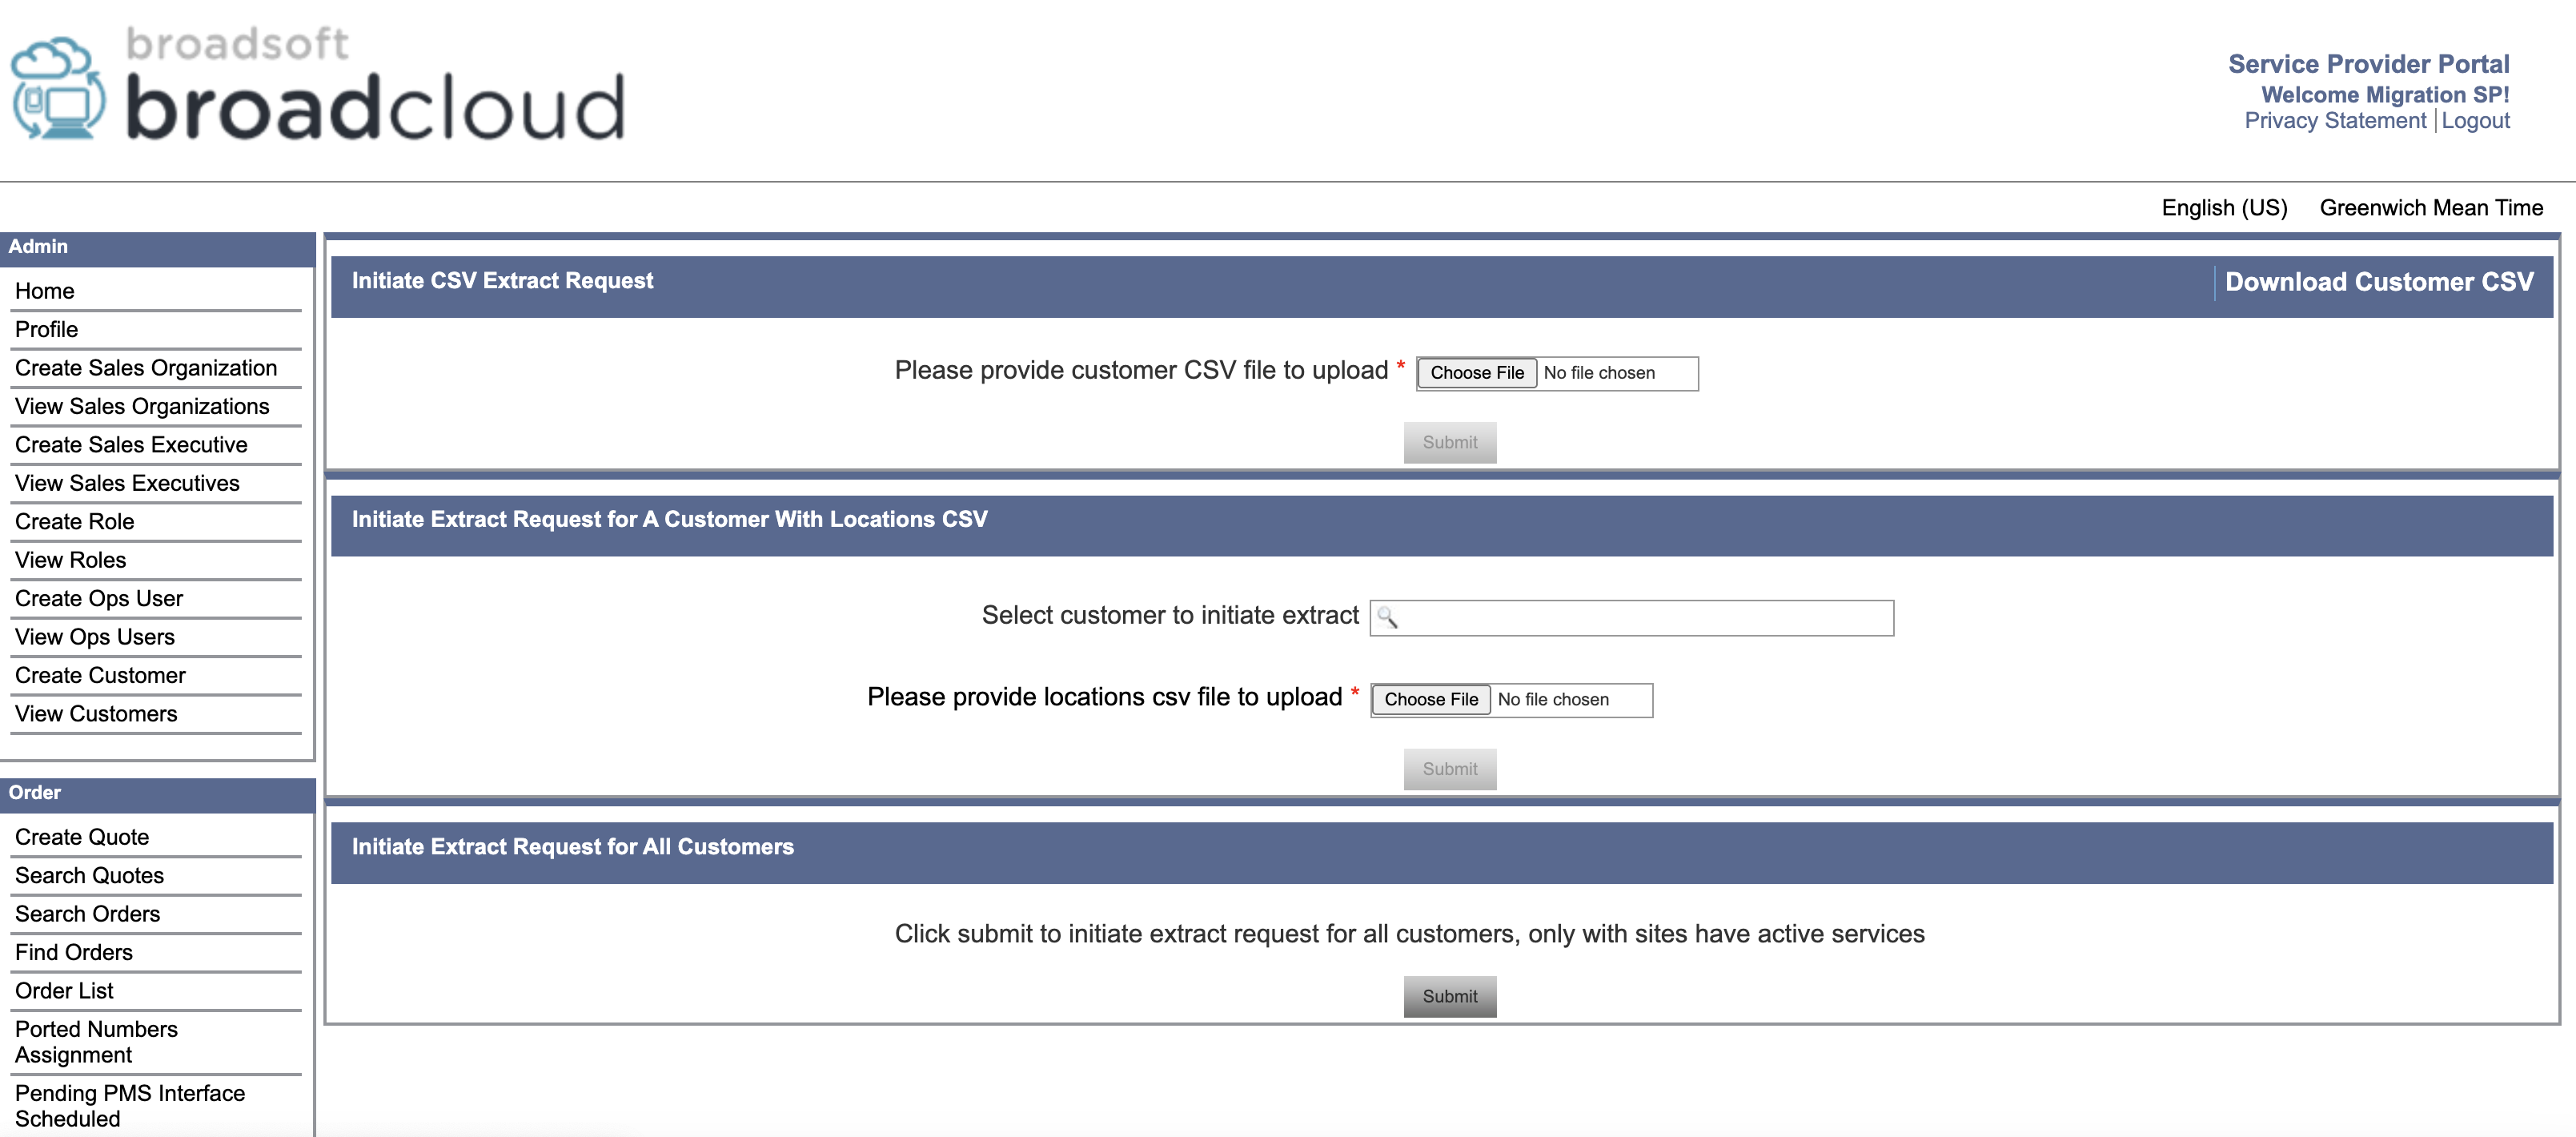
Zahtev za CSV ekstrakt
Pokrenite zahtev za CSV ekstrakt
-
Preuzmite CSV klijenta
Kliknite na link Preuzmi CSV klijenta u gornjem desnom uglu odeljka Pokrenite zahtev za CSV ekstrakt.
-
Izmenite listu klijenata
Administrator može da uređuje ovu CSV datoteku tako da uključi samo kupce za koje je potrebno izvršiti izvod.
-
Otpremite i pošalji
Nakon uređivanja, otpremite modifikovani CSV.
Kliknite na Pošalji da pokrenete zahtev za izvlačenje za navedene kupce i njihove povezane lokacije.
Pokrenite zahtev za izvlačenje za kupca sa lokacijama CSV
-
Izaberite lokacije kupaca i preuzimanja
Izaberite kupca iz padajućeg menija.
Preuzmite odgovarajući locations.csv sa kartice Pogledaj kupce→ Sajtovi → Izvoz lokacija kao CSV.
-
Izmenite datoteku lokacija
Administrator može da uređuje CSV tako da uključi samo lokacije koje žele da izdvoje.
-
Otpremite i pošalji
Otpremite uređeni locations.csv i kliknite na dugme Pošalji.
Samo navedene lokacije za izabranog kupca će biti uključene u zahtev za izvlačenje.
Pokrenuti Ekstrakt Zahtev za sve kupce
- Kliknite na Pošalji da pokrenete zahtev za izvlačenje za sve kupce i sve njihove lokacije pod trenutnim provajderom usluga.
Za Cisco BroadVorks i Vebek za BroadVorks
- Alat za izvlačenje radi na sekundarnom Cisco BroadVorks Application Serveru unutar partnerske mreže i povezuje se preko OCI-P-a.
- Alat povlači sirove podatke preduzeća, grupe, brojeve, korisnike, usluge, uređaje i meke klijente sa Cisco BroadVorks ili BroadCloud platforme i šalje ove podatke u KSML datoteke koje obezbeđuju ulaze za alat za transformaciju.
Sledeći odeljci objašnjavaju kako da instalirate i konfigurišete alat za izvlačenje.
Preduslovi
- SCP binarne datoteke alata za ekstrakt na sekundarni Cisco BroadVorks Application Server.
- SSH na sekundarni Cisco BroadVorks aplikativni server za konfigurisanje preduslova i pokretanje alata za izvlačenje.
- Konfigurišite provajdera usluga i ID grupe za izvlačenje iz Cisco BroadVorks-a u conf / exportTool.yml. Pogledajte sledeći uzorak IAML isečka:
ServiceProviderID-A: - GroupID-A1 - GroupID-A2 - GroupID-A3 ServiceProviderID-B: - ALL - Uverite se da su sekundarni korisnički ID, lozinka i ime domaćina Cisco Broadvorks Application Server-a tačni u datoteci conf / partner.cfg:
BROADWORKS_USER_ID = admin
BROADWORKS_PASSWORD = admin
BROADWORKS_HOST_NAME = localhost
REFRESH_TOKEN = Partner administrator’s refresh token copied from the Token Generator tool.
Imovina
REFRESH_TOKENje obavezna za Vebek za migraciju BroadVorks-a. - Izmenite putanju okruženja JDK / JRE u export.sh datoteci ako se sekundarna putanja okruženja Cisco BroadVorks Application Server JDK / JRE razlikuje od datoteke:
JAVA_HOME=/usr/local/java/java_base
Uputstva za pokretanje
Pokrenite sledeću komandu u sekundarnom Cisco Broadvorks Application Serveru iz direktorijuma alata za izvlačenje:
./export.shTerminalni dnevnici
Sledeći zapisi su dostupni u terminalu o uspešnom izvozu: Pokretanje BroadSoft alata za izvoz podataka:
 Running BroadSoft Data Export Tool
************************************************
Starting Export Tool v: 1.15.0
Export started for SP=collabmigrationtestSP_engg, Group=collabmigrationtestGRP_engg
Exporting users for SP=collabmigrationtestSP_engg, Group=collabmigrationtestGRP_engg
Export users completed for SP=collabmigrationtestSP_engg, Group=collabmigrationtestGRP_engg
Export completed for SP=collabmigrationtestSP_engg, Group=collabmigrationtestGRP_engg
Export completed
Export Dump Zip Directory : output/20221017223452_ExportTool
Export Dump Zip File name :extracted_data_1666060500618.zip
Zip file with the name extracted_data_1666060500618.zip has been created
ZIP file creation process completed
Exported files converted as ZIP file
**************************************************
Izlaz
Izlazna ZIP (extracted_data_<timestamp>.zip) datoteka je dostupna u istom direktorijumu alata za izvlačenje. Koristite sledeću komandu da vidite i koristite ZIP fajl za unos Transform Tool-a:
ls –ltr
drwxr-xr-x 2 bwadmin bwadmin   4096 Oct  4 11:53 lib/
-rwxr-xr-x 1 bwadmin bwadmin 956719 Oct  4 11:53 exportTool.jar
-rwxr-xr-x 1 bwadmin bwadmin   2635 Oct  4 11:53 export.sh
drwxr-xr-x 2 bwadmin bwadmin   4096 Oct  5 05:04 conf/
drwxrwxr-x 3 bwadmin bwadmin   4096 Oct 17 22:34 output/
drwxrwxr-x 2 bwadmin bwadmin   4096 Oct 17 22:34 logs/
-rw-rw-r-- 1 bwadmin bwadmin  46341 Oct 17 22:35 extracted_data_1666060500618.zip
Transform alat
Ovaj alat za transformaciju radi za sve migracije. Alat za transformaciju radi na bilo kom računaru, uključujući i administratorski laptop partnera, i koristi Vebek Public API-je. On čita izlaznu ZIP (extracted_data_<timestamp>.zip) datoteku alata za ekstrakciju kao ulaz i pretvara sirovi KSML u JSON format koji koristi alat za obezbeđivanje.
Preduslovi
Nakon preuzimanja i vađenja binarnih programa alata za migraciju, konfigurišite sledeće preduslove:
- Podesite REFRESH_TOKEN (Token kopiran iz Token Generator Tool) i ime__glavne_lokacije u conf / partner.cfg fajl:
REFRESH_TOKEN=MzUwYjljODEtYmQ4MS00NGVhLTgwNGUtZjQ1NTEyZTViNzJkOTdj NAME_OF_MAIN_LOCATION=Main - Opciono podesite PROVISIONING_ID (kopiran iz šablona u Partner Hub-u) u datoteki conf/partner.cfg:
PROVISIONING_ID=YmE4MjFkZGYtYTlkNy00NDdlLWIwODctYmNkOTM2NjUyYWQ1Da biste dobili potpuniju verifikaciju adrese e-pošte kupca, možete opciono podesiti PROVISIONING_ID. - Konfigurišite informacije koje nedostaju u ulaznoj/customers.csv datoteci (pogledajte sledeći odeljak) ako nedostaje.
- Dodajte adresu e-pošte krajnjeg korisnika u ulaznu / users.csv datoteku.
- Ako novi telefoni treba da budu obezbeđeni, dodajte mac adresu i adresu e-pošte novog telefona korisnika u ulaz / newphones.csv fajl. Ovo je potrebno samo ako administratori partnera žele da obezbede nove telefone u veleprodajnom pozivu.
- Pretvoriti BroadVorks pozivnih centara u CkEssentials pomoću ulaz / cxessentials.csv fajl.
- Opciono, omogućite UPGRADE_SVE_CALL_CENTRE_NA_CKS_ESSENTIALS imovinu da konvertujete sve pozivne centre u CKEssentials.
- Koristite ulaznu / locations.csv datoteku da biste podržali migraciju velikih preduzeća koja omogućava administratorima da migriraju lokacije svojih kupaca po lokaciji
- Opciono omogućite korišćenje MAC adresa iz zaglavlja User-Agent poruke SIP REGISTER kada MAC adresa nije dostupna u profilu Cisco BroadVorks uređaja. Uncomment liniju USE_MAC_ADDRESS_FROM_SIP_REGISTER= yes in file conf/partner.cfg
- Opciono omogućite osobine ANALOGNI_TIP_KORISNIKA_OMOGUĆI_POZIV_NA ČEKANJU, ANALOGNI_TIP_KORISNIKA_OMOGUĆI_MUZIKU_NA_ČEKANJU, i ANALOGNI_TIP_KORISNIKA_ONEMOGUĆI_T38 da biste konfigurisali poziv na čekanju, muziku na čekanju i onemogućili podešavanja T38 za sve korisnike analognog tipa.
-
Ako želite da podesite generičke gatevai uređaje, dodajte MAC adresu uređaja i korisnički ID u ulaznu / genericgateways.csv datoteku. Takođe, navedite da li je korisnik PRIMARNI vlasnik ili SHARED korisnik (za pojavljivanje zajedničkih poziva). Ovo je potrebno samo ako administratori partnera planiraju da koriste generičke gatevai uređaje u veleprodajnom pozivanju.
Ova funkcija nije dostupna za migracije BroadCloud u veleprodaju.
-
Za migracije BroadCloud-a, da biste pretvorili sve korisnike sa tipom stanice za razmenu poruka u voice_mail_group, ažurirajte datoteku conf /rialto_station_type_to_wholesale_package .csv zamenom vrednosti veleprodajnog paketa za voice_mail_group red u kojem se šalje poruka Rialto Station Tipe.
Opciono, omogućite osobinu COMMON_VOICE_MAIL_GROUP_PASSCODE u partner.cfg da biste konfigurisali podrazumevani PIN za grupe govorne pošte.
Ako ova osobina nije navedena u partner.cfg, mora biti obezbeđena po kupcu u customers.csv datoteci u koloni commonVoicemailGroupPassCode.
-
Za migraciju zajedničkih kontakata na Vebek pozive
To je poboljšanje za upravljanje zajedničkim kontaktima na nivou preduzeća i lokacije. Ovi kontakti se sada mogu migrirati ili kao kontakti organizacije (Org Contacts) ili kao virtuelne ekstenzije, na osnovu podešavanja konfiguracije. Ispod su detalji koji će vas voditi kroz ovaj proces migracije.
Ključna konfiguracija:
- ZAJEDNIČKA__TELEFONSKA LISTA_ZA_VIRTUELNI_POČETNI_OPSEG PROŠIRENJA_
Nova osobina, COMMON_PHONE_LIST_TO_VIRTUAL_EXTENSION_START_RANGE, UVEDENA JE U DATOTEKU PARTNER.CFG. Ova osobina određuje kako se uobičajeni kontakti migriraju sa Rialta na Vebek Calling.
- Bez zajedničke__telefonske liste_na_virtuelni_EKSTENZIJA_START_RANGE Konfigurisan
Uobičajeni kontakti će biti premešteni kao kontakti organizacije (Org Contacts).
Nije potrebna dodatna konfiguracija.
Kontakti ostaju dostupni na nivou organizacije.
- Sa ZAJEDNIČKIM PHONE__LIST-om_za_virtuelni_EKTENSION_START_RANGE konfigurisan
Uobičajeni kontakti će biti premešteni kao virtuelne ekstenzije.
Svaki kontakt će biti dodan sa brojem ekstenzije, a početni opseg ekstenzije je definisan u COMMON_PHONE_LIST_TO_VIRTUAL_EKTENSION_START_RANGE svojstva u partner.cfg.
Virtuelne ekstenzije su podržane i na nivou organizacije i na nivou lokacije, u zavisnosti od obima kontakta.
- ZAJEDNIČKA__TELEFONSKA LISTA_ZA_VIRTUELNI_POČETNI_OPSEG PROŠIRENJA_
- Omogućite podrazumevani poziv za snimanje prodavca na Vebek.
Ovaj korak je potreban samo kada migrirate postavke snimanja poziva za korisnike konfigurisane sa Dubberom na Cisco Native Call Recording u Vebek-u.
Da biste omogućili ovu opciju:
- U datoteki partner.cfg podesite sledeću osobinu,
DEFAULT_CALL_RECORDING_VENDOR=Webex. - Pored toga, koristite svojstvo
WEBEX_CALL_RECORDING_STORAGE_REGIONda biste konfigurisali region za skladištenje.Opcija snimanja na zahtev iz BroadCloud-a nije podržana u Vebek pozivima. Ove postavke za snimanje poziva neće migrirati i pojaviće se u izveštaju o izuzetku.
- U datoteki partner.cfg podesite sledeću osobinu,
-
Isključenje odabranih brojeva telefona iz migracije:
Da biste isključili određene telefonske brojeve iz procesa migracije, mora se pratiti sledeća procedura u dva koraka pomoću alata za transformaciju:
- U početku izvršite alat za transformaciju po prvi put. Po završetku, alat će generisati datoteku pod nazivom telephone_numbers_inventory.csv, koja se nalazi u direktorijumu output / timestamp / . Korisnik je dužan da pregleda ovu datoteku i navede "Da" u koloni "Drop Tn" za svaki telefonski broj koji treba isključiti iz predstojeće migracije.
- Nakon ažuriranja telephone_numbers_inventory.csv fajla sa odgovarajućim zastavicama isključenja, alat za transformaciju se izvršava drugi put. Ažurirani fajl treba da bude prosleđen kao argument u sledećem formatu.
./transform.sh -extract=input/extracted_data_1747640608219.zip -decommissionnumbers={filepath/telephone_numbers_inventory.csv}
- Opciono, podesite osobinu ALLOW_RESTRICT_BY_PARTNER_MODE na OFF da biste omogućili administratorima kupaca da modifikuju postavke definisane od strane partnera u Control Hub-u.
- Za migraciju mobilnih brojeva (BroadVorks Mobiliti) sa BroadCloud-a na Vebek pozive
Ovaj odeljak opisuje migraciju funkcije BroadVorks Mobiliti (mobilni brojevi korisnika) sa BroadCloud-a (integracija mobilne mreže) na Vholesale Vebek Calling (Vebek Go Mobile Netvork Operator).
Preduslovi - Pre početka procesa migracije, administratori partnera moraju da se obrate timu Cisco naloga kako bi izvršili konfiguraciju dobavljača Cloud Connected PSTN (CCP) i Custom Carrier List (CCL).
Nova osobina, DODELI_BROJEVE MOBILNIH TELEFONA___KORISNICIMA, dodaje se u datoteku partner.cfg. Omogućite ovu osobinu da biste omogućili da se brojevi mobilnih telefona dodeljuju i migriraju korisnicima.
- Ova funkcija je podržana samo za migracije BroadCloud-to-Veleprodaja .
- U veleprodaji Vebek-a, krajnji korisnici mogu imati ili broj mobilnog telefona ili PSTN broj (ne oboje), za razliku od BroadCloud-a.
- Kada je broj mobilnog telefona dodeljen korisniku, njihov primarni PSTN broj postaje njihov sekundarni (alternativni) broj.
- Brojevi mobilnih telefona ne mogu se migrirati za korisnike koji se pretvaraju u radne prostore ili virtuelne linije.
- Nakon što je broj mobilnog telefona dodeljen u veleprodaji Vebek-a, on će se prikazati kao aktivan u kontrolnom čvorištu. Ovaj status ne znači da je broj odmah spreman za primanje poziva. Mogućnost poziva će biti dostupna tek nakon što se migracija u potpunosti završi.
- Podešavanja integracije mobilnog telefona konfigurisana od strane krajnjih korisnika na portalu za pozivanje korisnika (CUP) se ne migriraju. Nakon migracije, kada se pozove telefonski broj, broj mobilnog telefona ili lokal, svi uređaji korisnika će zvoniti.
Popunjavanje ulaza / customers.csv
Ulaz / customers.csv datoteke pruža podatke koji možda nedostaju u Cisco BroadVorks-u ili BroadCloud-u. Ovaj fajl može da ostane prazan ako su sve obavezne informacije već dostupne. Ne morate da popunjavate sve kolone, samo su informacije koje nedostaju obavezne.
Donja tabela objašnjava najvažnije kolone u input/customers.csv.
|
Ime kolone |
Pravila |
|---|---|
|
ID |
U Cisco BroadVorks poslovnom režimu:
U režimu pružaoca usluga BroadVorks, ovo je Cisco BroadVorks groupId. U BroadCloud-u, ovo je Rialto customerId. |
|
ekshibicionist |
Ovo je identifikator koji odgovara internom identifikatoru partnera za ovog kupca. Ova kolona mora biti jedinstvena u okviru Vebek partnerske organizacije. Ova kolona je opciona, jedinstveni identifikator će biti generisan automatski od strane alata za transformaciju. Ova kolona se ne koristi za grupe unutar preduzeća. |
|
Korisničko ime |
Za preduzeće, ova kolona se koristi kao polje za ime Vebek kupca. Za grupu unutar preduzeća, ova kolona se koristi kao naziv lokacije. Imena lokacija moraju biti jedinstvena u okviru preduzeća. |
|
primarniE-pošta |
Ovo se koristi kao adresa e-pošte administratora Vebek korisnika. Ova kolona nije obavezna za grupe unutar preduzeća. |
|
Adresne kolone |
Za preduzeće, adresa se koristi kao adresa za naplatu i adresa prve lokacije. Za grupu unutar preduzeća, adresa se koristi kao adresa lokacije. |
|
Vremenska zona |
Pogledajte odeljak o vremenskoj zoni ovog članka. |
|
Jezik | Pogledajte Jezici koje Vebek podržava. |
|
DefaultVoicemailPin |
Pogledajte Podešavanje PIN govorne pošte. |
|
commonVoicemailGroupPassCode | Koristite ovu kolonu da biste odredili podrazumevani PIN koji će se primenjivati na sve grupe govorne pošte za odgovarajućeg kupca. Nakon migracije, administratori moraju ažurirati PIN za svaku grupu govorne pošte. Tokom procesa transformacije, zajednički PIN koji je odredio administrator dodeljuje se svim grupama govorne pošte. |
Popunjavanje ulaza / users.csv
Ulaz / users.csv datoteke pruža podatke koji možda nedostaju u Cisco BroadVorks-u ili BroadCloud-u. Ovaj fajl može da ostane prazan ako su sve obavezne informacije već dostupne. Ne morate da popunjavate sve kolone, samo su informacije koje nedostaju obavezne.
Sva ova polja su opciona.
|
Ime kolone |
Pravila |
|---|---|
|
sadržina |
Jedinstveni identifikator za korisnika. Ovo može biti BroadVorks ili BroadCloud korisnički ID. |
|
e-pošta | (Opciono) Adresa e-pošte korisnika. Ako je obezbeđeno, koristiće se u svrhu obezbeđivanja. |
|
Broj telefona |
(Opciono) Telefonski broj korisnika koji će biti obezbeđen. |
|
Pretraga |
(Opciono) Korisnički tip paketa. Dozvoljene vrednosti: glas, pozivanje, apartman, common_area, virtual_line, dont_migratecall_park_ext ili voice_mail_group. Vrednost dont_migrate se koristi kada partneri žele da isključe određene korisnike – zajedno sa njihovim uređajima i brojevima telefona – iz obezbeđivanja i migracije. Ovo je podržano i za BroadVorks i za BroadCloud. Kada se primenjuju, izabrani korisnici i njihovi povezani resursi neće biti migrirani ili obezbeđeni. Da bi koristili ovo, administratori treba da uđu dont_migrate u kolonu paketa users.csv fajla. |
|
proširenje |
(Opciono) Ekstenzija telefona koja će biti dodeljena korisniku. |
|
ime |
(Opciono) Puno ime korisnika. |
|
ata_settings |
(Opciono) Dozvoljene vrednosti: T38, analogni Da biste omogućili / onemogućili poziv na čekanju, muzika na čekanju, i T38 podešavanja T38: Ova opcija onemogućava poziv na čekanju i muziku na čekanju, i omogućava T38 podešavanja za ATA uređaje. Analogni:
|
|
do_not_move_phone |
Samo BroadVorks. Opciona zastavica za sprečavanje migracije uređaja na Vebek pozive. Ova opcija omogućava partnerima da obezbede korisnike zajedno sa svojim postavkama pozivanja, uređajima i telefonskim brojevima bez migracije uređaja na Vebek ili aktiviranja telefonskih brojeva u Vebek pozivima. Ova postavka je dostupna samo za BroadVorks, a ne za BroadCloud. Da bi ga koristili, administratori treba da navedu do_not_move_phone u do_not_move_phone koloni (samo BroadVorks) users.csv fajla. Ovo osigurava da se korisnici obezbeđuju bez aktiviranja brojeva ili pomeranja svojih telefona, tako da nastavljaju sa radom preko BroadCloud-a. |
Uputstva za pokretanje
Pokrenite Transform Tool u bilo kom operativnom sistemu. Koristite korake u nastavku da biste pokrenuli alat u operativnom sistemu Vindovs i macOS:
Windows
Izvršite naredbu ispod da biste pokrenuli Transform Tool u operativnom sistemu Vindovs:
transform.bat -extract= -customers= -users= -newphones=macOS
Izvršite sledeće korake da biste pokrenuli alat za transformaciju na macOS-u:
- Kreirajte virtuelno okruženje i instalirajte zavisnosti da biste pokrenuli alat za transformaciju koristeći Pithon:
python3 -m venv venv source venv/bin/activate python3 -m pip install requests python3 -m pip install requests-oauthlib python3 -m pip install phonenumbers - Pokrenite alat za transformaciju:
./transform.sh -extract= -customers= -users= -newphones=
Kupac / korisnik precheck
Alat za transformaciju vrši API pozive Vebek-u kako bi uhvatio potencijalne probleme sa obezbeđivanjem. Po defaultu, on će potvrditi adresu kupca i primarnu e-poštu. Ako je vrednost PROVISIONING_ID navedena u datoteki conf/partner.cfg, ona će takođe potvrditi informacije o lokaciji. Rezultati precheck su uključeni u izveštaju izuzetka.
Dodatno, sledeći opcioni parametri mogu biti dodani prilikom pokretanja alata za transformaciju:
Prethodna provera
Pored pokretanja API-ja za precheck za informacije o klijentima, Transform Tool će takođe pokrenuti API za precheck za pretplatničke e-poruke.
Precheckinfo
Po defaultu, samo greške u prethodnoj provjeri (tj. problemi koji će blokirati obezbeđivanje) su uključeni u izveštaj o izuzetku. Dodavanje ove zastave će uključivati i uspešne rezultate unapred provjere (npr. Ako već postoji Vebek organizacija koja se može automatski priložiti).
Precheckinfo traje dodatno vreme za pokretanje.
Terminalni dnevnici
Sledeći trupci u terminalu na uspešnom transformisati:
Summary Report
BroadWorks enterprises that can be successfully migrated: 1
BroadWorks enterprises that cannot be migrated: 0
BroadWorks users that can be successfully migrated: 4
BroadWorks users that cannot be migrated: 0
Phones that can be successfully migrated: 3
Phones that are not compatible with Webex Calling: 0
Izveštaj o izuzetku
Transform Tool generiše izveštaj o izuzetku unutar direktorijuma output/<timestamp>/exception_report.txt . Ovaj izveštaj možete koristiti da biste identifikovali probleme koji će uticati na migraciju i popraviti ih u Cisco BroadVorks sistemu.
Nakon izmene korisničkih podataka da biste rešili izuzetak, ponovo pokrenite Ekstrakt i Transform Tools sa novim podacima. Uzorak izveštaj o izuzetku fajl na sledeći način:
Exception Report
Tue Oct 18 08:12:09 2022

Enterprises with Communication Barring Feature
Recommendation: manually configure the Outgoing Calling Plan in Control Hub
________________________________________________________________________________
collabmigrationtestGRP_engg
Izlaz
Izlazni JSON (customer.json) fajl će biti dostupan u izlaznom<timestamp><groupid> direktorijumu. Uzorak customer.json fajl je sledeći:
{
    "customer": {
        "provisioningId": "!!!!!!!!!!REPLACE_WITH_PROVISIONINGID!!!!!!!!!!",
        "packages": [
            "webex_calling",
            "common_area_calling"
        ],
        "externalId": "external_id_engg_grp1",
        "address": {
            "addressLine1": "100 Main Street",
            "addressLine2": "",
            "city": "Gaithersburg",
            "stateOrProvince": "MD",
            "zipOrPostalCode": "20877",
            "country": "US"
        },
        "customerInfo": {
            "name": "Engineering Group - 1",
            "primaryEmail": "amareswaranvel+engineeringgroup1@gmail.com"
        },
        "provisioningParameters": {
            "calling": {
                "location": {
                    "name": "Main",
                    "address": {
                        "addressLine1": "100 Main Street",
                        "addressLine2": "",
                        "city": "Gaithersburg",
                        "stateOrProvince": "MD",
                        "zipOrPostalCode": "20877",
                        "country": "US"
                    },
                    "timezone": "America/New_York",
                    "language": "en_us",
                    "numbers": [
                        "+15205551101",
                        "+15205551102",
                        "+15205551103",
                        "+15205551104",
                        "+15205551105",
                        "+15205551106",
                        "+15205551107",
                        "+15205551108",
                        "+15205551109",
                        "+15205551110"
                    ],
                    "mainNumber": "+15205551101"
                }
            }
        }
    },
    "broadworks_info": {
        "service_provider_id": "collabmigrationtestSP_engg",
        "group_id": "collabmigrationtestGRP_engg"
    },
    "subscribers": [
        {
            "amareswaranvel+benjaminjack@gmail.com": {
                "subscriber": {
                    "customerId": "!!!!!!!!!!REPLACE_WITH_CUSTOMERID!!!!!!!!!!",
                    "email": "amareswaranvel+benjaminjack@gmail.com",
                    "package": "webex_calling",
                    "provisioningParameters": {
                        "firstName": "Benjamin",
                        "lastName": "Jack",
                        "primaryPhoneNumber": "+15205551102",
                        "extension": "1102"
                    }
                },
                "features": [
                    {
                        "/v1/people/{personId}/features/voicemail": {
                            "enabled": true,
                            "sendBusyCalls": {
                                "enabled": true,
                                "greeting": "DEFAULT"
                            },
                            "sendUnansweredCalls": {
                                "enabled": true,
                                "greeting": "DEFAULT",
                                "numberOfRings": 3
                            },
                            "messageStorage": {
                                "mwiEnabled": true,
                                "storageType": "EXTERNAL",
                                "externalEmail": "engineering17861@mailnator.com"
                            }
                        }
                    }
                ],
                "devices": [
                    {
                        "cisUuid": "!!!!!!!!!!REPLACE_WITH_PERSONID!!!!!!!!!!",
                        "product": "DMS Cisco 7861",
                        "mac": "CC98914EAAD7"
                    }
                ]
            }
        },
        {
            "amareswaranvel+lucasoliver@gmail.com": {
                "subscriber": {
                    "customerId": "!!!!!!!!!!REPLACE_WITH_CUSTOMERID!!!!!!!!!!",
                    "email": "amareswaranvel+lucasoliver@gmail.com",
                    "package": "webex_calling",
                    "provisioningParameters": {
                        "firstName": "Lucas",
                        "lastName": "Oliver",
                        "primaryPhoneNumber": "+15205551103",
                        "extension": "1103"
                    }
                },
                "features": [
                    {
                        "/v1/people/{personId}/features/voicemail": {
                            "enabled": true,
                            "sendBusyCalls": {
                                "enabled": true,
                                "greeting": "DEFAULT"
                            },
                            "sendUnansweredCalls": {
                                "enabled": true,
                                "greeting": "DEFAULT",
                                "numberOfRings": 3
                            },
                            "messageStorage": {
                                "mwiEnabled": true,
                                "storageType": "EXTERNAL",
                                "externalEmail": "engineering16821@mailnator.com"
                            }
                        }
                    }
                ],
                "devices": [
                    {
                        "cisUuid": "!!!!!!!!!!REPLACE_WITH_PERSONID!!!!!!!!!!",
                        "product": "DMS Cisco 6821",
                        "mac": "5486BCAE7E45"
                    }
                ]
            }
        },
        {
            "amareswaranvel+leojackson@gmail.com": {
                "subscriber": {
                    "customerId": "!!!!!!!!!!REPLACE_WITH_CUSTOMERID!!!!!!!!!!",
                    "email": "amareswaranvel+leojackson@gmail.com",
                    "package": "webex_calling",
                    "provisioningParameters": {
                        "firstName": "Leo",
                        "lastName": "Jackson",
                        "primaryPhoneNumber": "+15205551104",
                        "extension": "1104"
                    }
                },
                "features": [
                    {
                        "/v1/people/{personId}/features/voicemail": {
                            "enabled": true,
                            "sendBusyCalls": {
                                "enabled": true,
                                "greeting": "DEFAULT"
                            },
                            "sendUnansweredCalls": {
                                "enabled": true,
                                "greeting": "DEFAULT",
                                "numberOfRings": 3
                            },
                            "messageStorage": {
                                "mwiEnabled": true,
                                "storageType": "EXTERNAL",
                                "externalEmail": "engineeringmacpc@mailnator.com"
                            }
                        }
                    }
                ],
                "devices": []
            }
        },
        {
            "amareswaranvel+owenalex@gmail.com": {
                "subscriber": {
                    "customerId": "!!!!!!!!!!REPLACE_WITH_CUSTOMERID!!!!!!!!!!",
                    "email": "amareswaranvel+owenalex@gmail.com",
                    "package": "webex_calling",
                    "provisioningParameters": {
                        "firstName": "Owen",
                        "lastName": "Alexander",
                        "primaryPhoneNumber": "+15205551101",
                        "extension": "1101"
                    }
                },
                "features": [
                    {
                        "/v1/people/{personId}/features/voicemail": {
                            "enabled": true,
                            "sendBusyCalls": {
                                "enabled": true,
                                "greeting": "DEFAULT"
                            },
                            "sendUnansweredCalls": {
                                "enabled": true,
                                "greeting": "DEFAULT",
                                "numberOfRings": 3
                            },
                            "messageStorage": {
                                "mwiEnabled": true,
                                "storageType": "EXTERNAL",
                                "externalEmail": "engineering8811@mailnator.com"
                            }
                        }
                    }
                ],
                "devices": [
                    {
                        "cisUuid": "!!!!!!!!!!REPLACE_WITH_PERSONID!!!!!!!!!!",
                        "product": "DMS Cisco 8811",
                        "mac": "F87B204E4066"
                    }
                ]
            }
        }
    ],
    "auto_attendants": [],
    "call_queues": [],
    "hunt_groups": [],
    "schedules": [],
    "call_parks": [],
    "call_pickups": [],
    "paging_groups": [],
    "voice_portals": [
        {
            "name": "Automated Voice Portal",
            "firstName": "Automated",
            "lastName": "Voice Portal",
            "languageCode": "en_us",
            "phoneNumber": "+15205551105",
            "extension": "1105"
        }
    ],
    "shared_call_appearances": [],
    "business_communicator_desktop_to_upgrade_to_webex_app": [
        "PC Comm - Engg Device Profile"
    ],
    "connect_client_to_upgrade_to_webex_app": [],
    "locations": [],
"webex_for_broadworks_info": {
        "users": [
            {
                "id": "Y2lzY29zcGFyazovL3VzL1NVQlNDUklCRVIvY2QzNGViNWYtYTVmMi00OWQ1LTlkNWMtZTg1MDJiMDE4YTQ5"
            }
        ],
        "hydra_orgId": "Y2lzY29zcGFyazovL3VzL09SR0FOSVpBVElPTi9jMjJiYTMwNC1mODQ4LTRlOTktYWFmYy0zYWRlMjBmYTgzZTg",
        "hydra_customer_config_id": "Y2lzY29zcGFyazovL3VzL0VOVEVSUFJJU0UvYmIyMzA1MDEtMTUzMS00MzNiLTllM2QtODExY2FlYTExYmVk"
    }
}
Svojstvo 'webex_for_broadworks_info' JSON je prisutno samo za Vebek za migracije BroadVorks-a. Svojstvo 'broadcloud_info' JSON je prisutno samo za BroadCloud migracije.
Alat za obezbeđivanje
Alat za obezbeđivanje može da radi na bilo kojoj mašini - obično (administratorski laptop partnera) i koristi Vebek javne API-je. Čita izlaznu JSON (customer.json) datoteku alata za transformaciju kao ulaz i obezbeđivanje kupaca, lokacija, brojeva, korisnika, usluga i uređaja u Vebek Vholesale RTM rešenju.
Preduslovi
Konfigurišite sledeće preduslove unutar direktorijuma alata za obezbeđivanje:
- Instalirajte Java 8, 11, 17 ili 21 na računaru. Java je dostupna iz mnogih izvora, uključujući:
- Nakon preuzimanja i vađenja binarnih programa alata za migraciju, podesite promenljivu okruženja Java_HOME u provisioning_tool.sh za MAC i provisioning_tool.bat za Windows.
- Datoteka partner.cfg:
- Podesite Vholesale_Provisioning_ID i Refresh_Token (Token kopiran iz Token Generator Tool). Administratori partnera moraju kontaktirati svoj tim naloga da bi dobili ID PROVISIONING_:
WHOLESALE_PROVISIONING_ID = Y2U4YWQxYmQtMWZlNy00NjRiLWExMmItMGJkODMzN2U5NmU0 REFRESH_TOKEN=MzUwYjljODEtYmQ4MS00NGVhLTgwNGUtZjQ1NTEyZTViNzJkOTdj -
Podesite POŠALJI_PRETPLATNICIMA_DOBRODOŠLICU_E-MAIL na laž, ako partneri ne žele da pošalju e-poštu dobrodošlice korisnicima. Podrazumevana vrednost je true.
Vebek šalje e-poštu dobrodošlice samo krajnjim korisnicima. Administratori kupaca ne primaju e-poštu dobrodošlice.
Korisnici i administratori kupaca sa sedištem u SAD-u i Kanadi dobijaju posebno obaveštenje e-poštom od RedSky-a. Platforma RedSki E911 šalje ovu e-poštu kako bi potvrdila stvaranje korisničkog naloga za hitne službe. Ova RedSki e-pošta je odvojena od Vebek pozdravnih e-poruka i ne kontroliše je Vebek podešavanja e-pošte. Za veleprodajne organizacije u SAD-u i Kanadi, RedSki se automatski aktivira kao pružalac hitnih službi.
- Podesite Vholesale_Provisioning_ID i Refresh_Token (Token kopiran iz Token Generator Tool). Administratori partnera moraju kontaktirati svoj tim naloga da bi dobili ID PROVISIONING_:
- Koristite svojstvo WEBEX4BWKS_EMAIL_SUBJECT za Vebek za migracije BroadVorks-a da biste poslali predmet e-pošte sa zahtevom za promenu lozinke za Vebek za pretplatnike BroadVorks-a.
- Koristite svojstvo WEBEX4BWKS_EMAIL_BODI za Vebek za migracije BroadVorks-a da biste poslali telo e-pošte sa zahtevom za promenu lozinke za Vebek za pretplatnike BroadVorks-a.
- Koristite svojstvo
CUSTOM_TAGSda biste dodali oznake nakon kreiranja kupca. - Da bi primenili veleprodajne popuste, administratori partnera moraju kontaktirati Cisco tim pre nego što započnete migraciju.
Nova imovina, PRIMENI_VELEPRODAJNE_POPUSTE je dodat na partner.cfg. Omogućite ovu osobinu da biste primenili popuste korisnicima i radnim prostorima.
Uputstva za pokretanje
Koristite sledeće korake da biste pokrenuli alat u operativnom sistemu Vindovs i macOS:
Windows
Izvršite sledeće korake da biste pokrenuli alat na Vindovs OS:
To provision single customer:
provision.bat -input=
To provision multiple customers:
provision.bat -input=
macOS
Izvršite sledeće korake da biste pokrenuli alat na macOS-u:
To provision single customer:
./transform.sh -input=
To provision multiple customers:
./transform.sh -input=
Preduslovi za Vebek za migraciju Broadvorks-a
Administratori partnera moraju ažurirati svoj BroadVorks onboarding šablon za Vebek za BroadVorks funkcije koegzistencije. Pogledajte sledeću sliku:
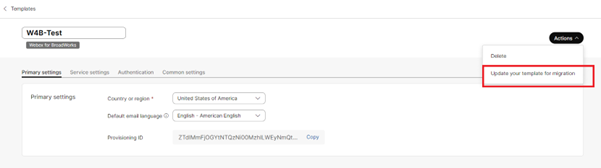
Kada se šablon Vebek za BroadVorks Onboarding ažurira kako bi podržao migraciju, zatražite od Cisco tima naloga da omogući prebacivanje funkcije "veleprodaja-partner-blending-enabled" na nivou partnera. Ovo će omogućiti da se veleprodajni paketi dodaju postojećim Vebek za BroadVorks korisničke organizacije tokom obezbeđivanja.
Pokrenite alat za obezbeđivanje sa dodatnim argumentom.
Faza pripreme: je podrazumevana faza u kojoj administratori mogu da obezbede korisnike BroadVorks-a kao veleprodajnog pretplatnika i nastave sa Vebeksom za korisnike BroadVorks-a.
Faza održavanja: je druga faza u kojoj administratori mogu dodijeliti veleprodajnu licencu postojećem Vebexu za korisnike BroadVorks-a. Morate pokrenuti alat za obezbeđivanje sa održavanjem argumenta.
Faza posle migracije: Da li je završna faza kada administratori mogu potpuno pretvoriti BroadVorks u veleprodaju. Morate pokrenuti alat za obezbeđivanje sa argumentom postmigracije.
Terminalni dnevnici
Slede evidencije u terminalu o uspešnom obezbeđivanju:
Tool Name: Provisioning
Version: 1.51.0
Customer(s) provisioning started...
Sending create customer provisioning request for the External ID: customer.id.1
Customer provisioning request sent for the customer with the External ID: customer.id.1
Checking customer status for the External ID: customer.id.1 and the status is: provisioning
Checking customer status for the External ID: customer.id.1 and the status is: provisioning
Checking customer status for the External ID: customer.id.1 and the status is: provisioned
Provisioning customer's calling settings with External ID: customer.id.1
Customer's settings are updated successfully for the External ID: customer.id.1
Provisioning secondary locations for the customer with the External ID: customer.id.1
Provisioning location's settings and features for the customer with the External ID: customer.id.1
Subscriber(s) provisioning will be started for the customer with the External ID: customer.id.1
Provisioning subscriber(s) and settings for the customer with External ID: customer.id.1
Subscriber(s) and settings provisioning completed for the customer with External ID: customer.id.1
Provisioning user agent settings for the customer with the External ID: customer.id.1

********** Completed File : input/customer.json ****************
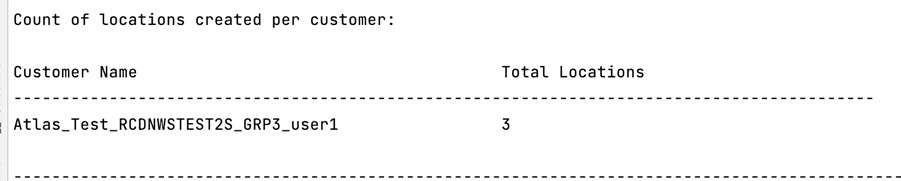
Tabela će biti odštampana sa brojem lokacija kreiranih za svaku vožnju:
Izlaz
Alat za obezbeđivanje generiše izveštaje o uspehu i greškama unutar izlaznih /<external_id>/*.success/error datoteka. Pregledajte izlazne dnevnike uspeha i grešaka da biste potvrdili uspešno obezbeđivanje.
Sistem će generisati datoteku Provisioning_Report_*.csv u direktorijumu output/consolidated_reports/ . Ova datoteka sadrži detalje o uspehu i neuspehu za svaki entitet i njegove postavke, pružajući sveobuhvatan izveštaj o rezervisanju.
Nakon uspešnog obezbeđivanja, krajnji korisnici dobijaju e-poštu od veleprodajnog RTM rešenja.
Administratori partnera mogu da potvrde pružanje usluga klijentima u portalu Partner Hub i Control Hub. Pogledajte sledeće ilustracije sa portala Partner Hub i Control Hub:
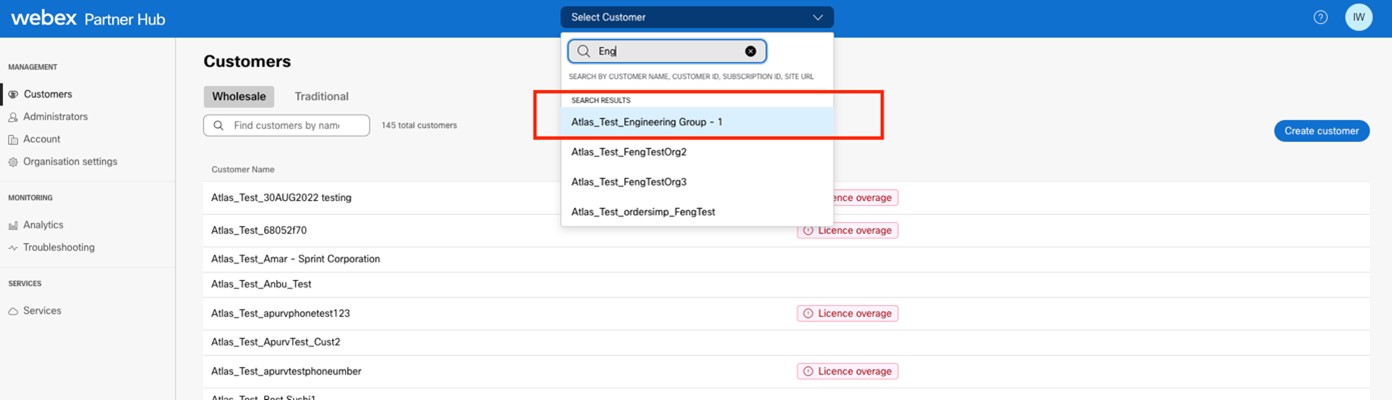
Slika 8: Partner Hub
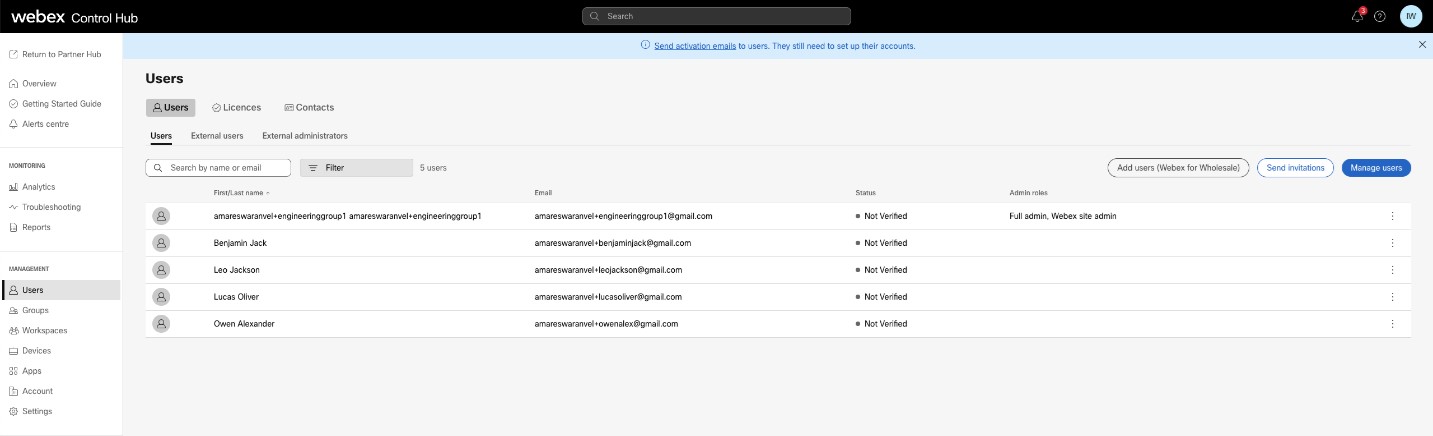
Slika 9: Control Hub

Slika 10: Uređaji
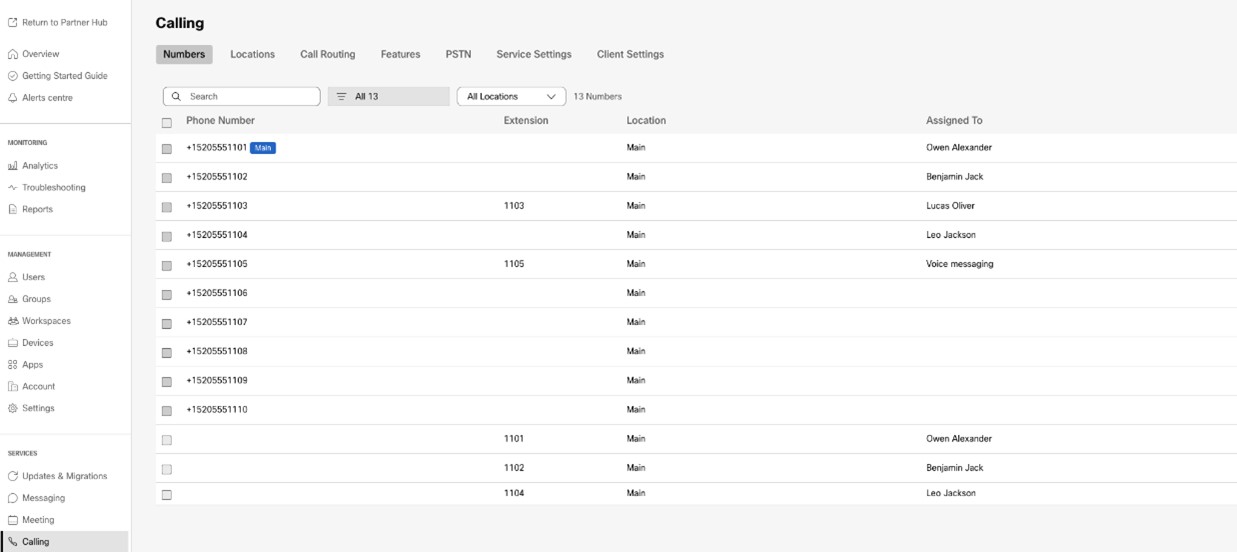
Slika 11: Pozivanje
Ograničenja nakon rezervisanja
Kada se obezbeđivanje završi za migraciju BroadCloud-a, sledeće akcije će biti blokirane:
- CAP Portal – Dodavanje korisnika ili portovanih uređaja.
- SP Portal – Kreiranje ADD naloga sa uređajima ili brojevima.
- RSB API – Kreiranje ADD naloga sa uređajima ili brojevima i kreiranje korisnika. RSB ADD nalozi napravljeni sa uređajima ili brojevima će biti odbijeni.
Alat za premeštanje uređaja
Za BroadCloud
Za partnere BroadCloud-a, koristite portal provajdera usluga da biste poslali zahtev za migraciju za brojeve, uređaje i migracije zajedničkih poziva (SCA).
U okviru portala pružaoca usluga, zahtev za migraciju može uključivati do 50 kupaca. Maksimalno 10 zahteva može se podneti u roku od jednog dana.
Administratori mogu omogućiti automatsko vraćanje podešavanjem ROLLBACK_TO_BROADCLOUD=true u conf/partner.cfg datoteci, koja vraća uređaje na BroadCloud nakon migracije. Podržava i iste i različite regionalne migracije sa NS Sync-om, ali samo za uspešne migracije. Za one koji nisu uspeli, administratori moraju podići Cisco TAC pre nego što zatraže povratak.
Postoje dve opcije za izbor tipa migracije na portalu:
- Migracija – Izaberite ovu opciju da biste pokrenuli zahtev za migraciju brojeva, uređaja i pojavljivanja zajedničkih poziva (SCA).
- Status uređaja – Izaberite ovu opciju da biste videli trenutni status uređaja na BroadCloud i Calling.
Sledeće slike prikazuju portal pružaoca usluga.
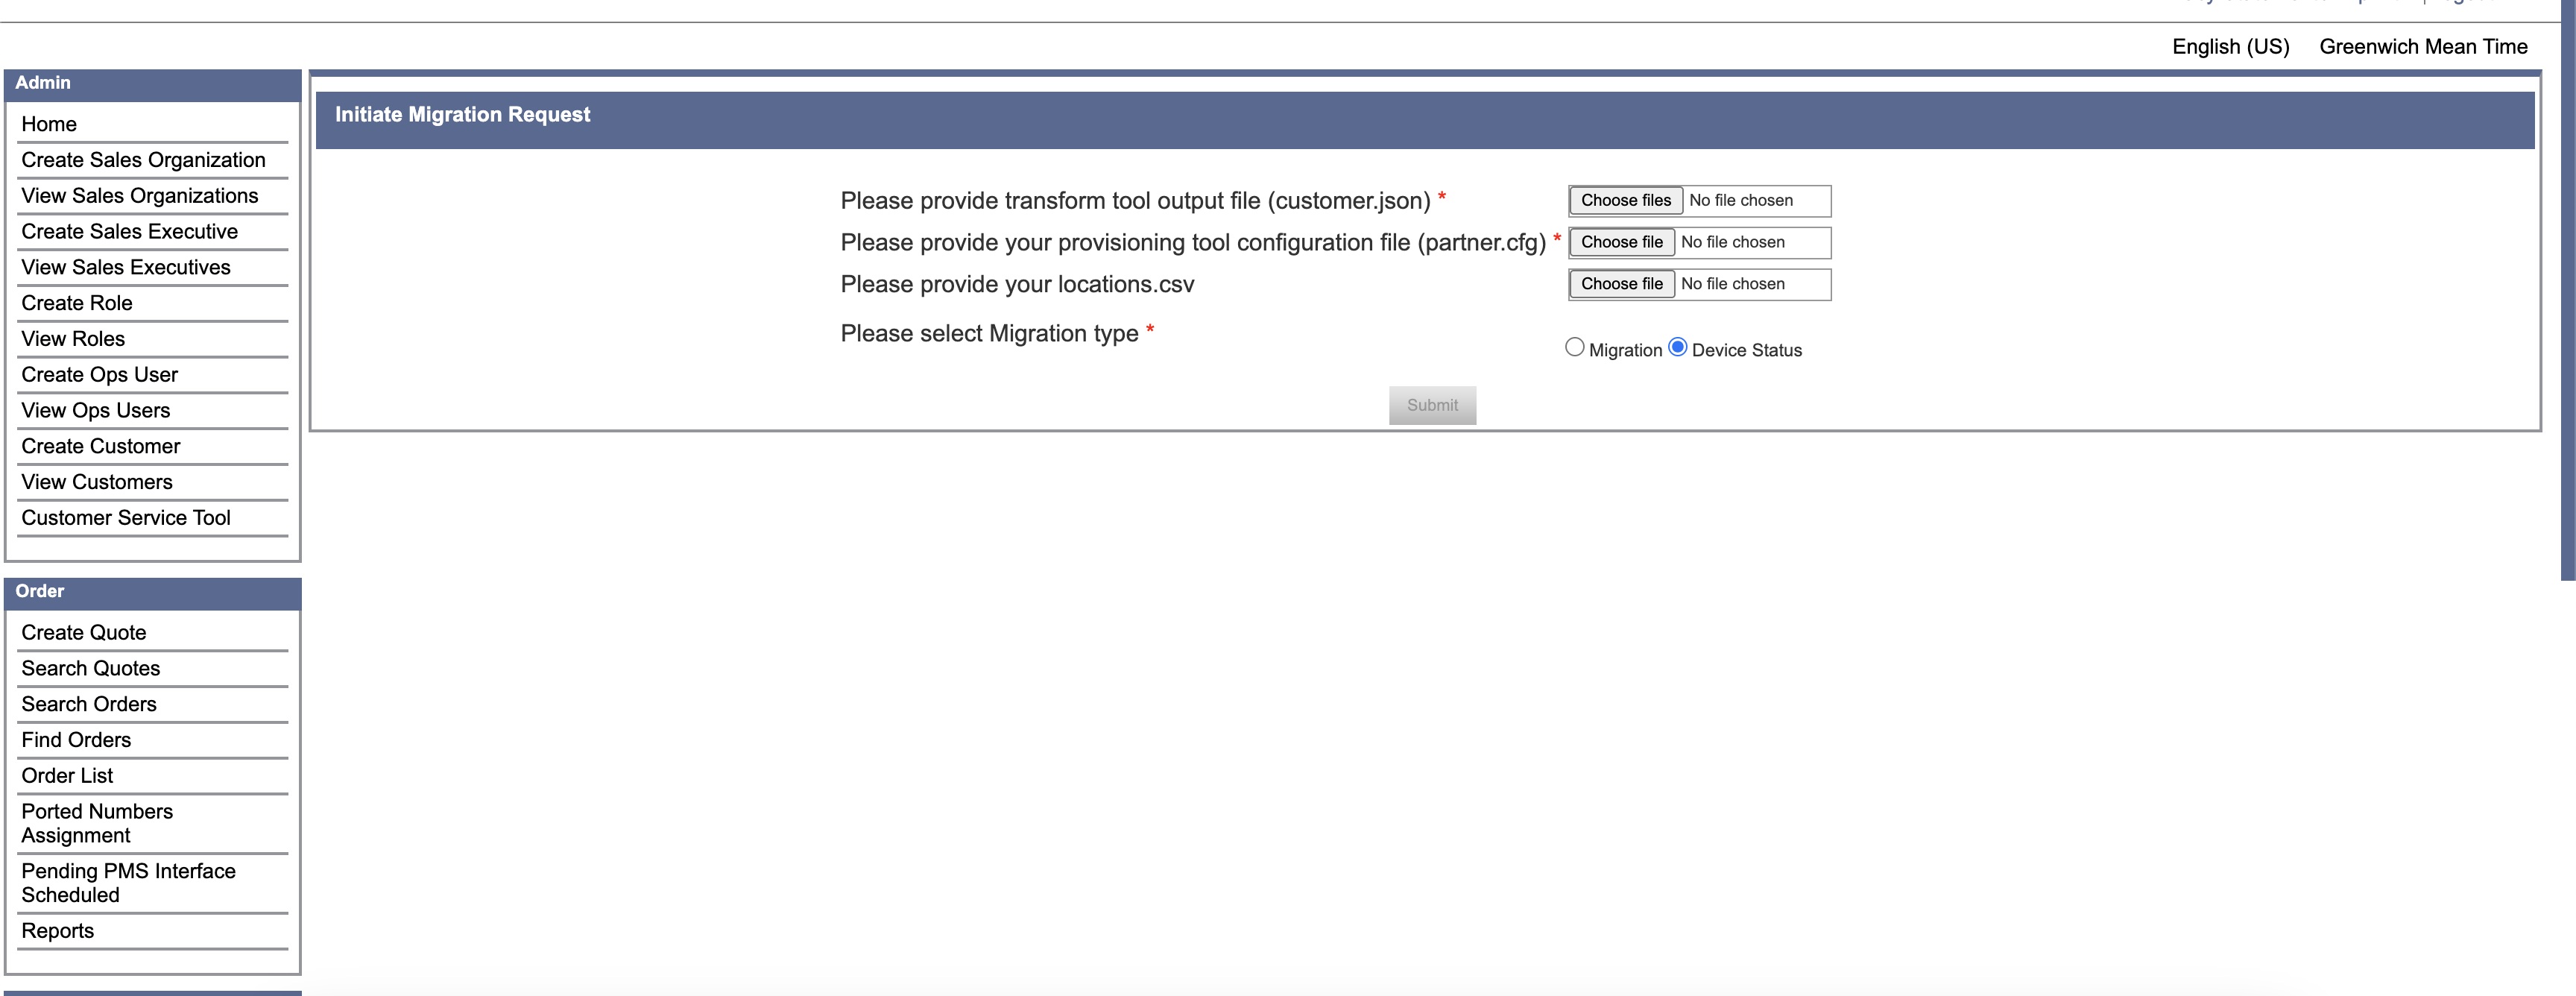
Slika 12: Portal pružaoca usluga
Slika 13: Portal pružaoca usluga
Migrirajte izabrane lokacije (opciono)
Da biste započeli migraciju za određeni podskup lokacija navedenih u fajlu customer.json , uključite locations.csv fajl sa vašim zahtevom. Ovaj CSV treba da navede samo lokacije koje nameravate da migrirate.
Kada locations.csv nije obezbeđen, sve lokacije u customer.json će biti prebačene.
| Pretraga | Definicija |
|---|---|
|
ID lokacije |
ID lokacije koja će se migrirati. |
|
Ime lokacije |
Naziv lokacije koja će se migrirati. |
Da biste preuzeli listu dostupnih aktivnih sajtova, idite na Pogledaj kupce → Izaberite kupca → Izvoz lokacija kao CSV.
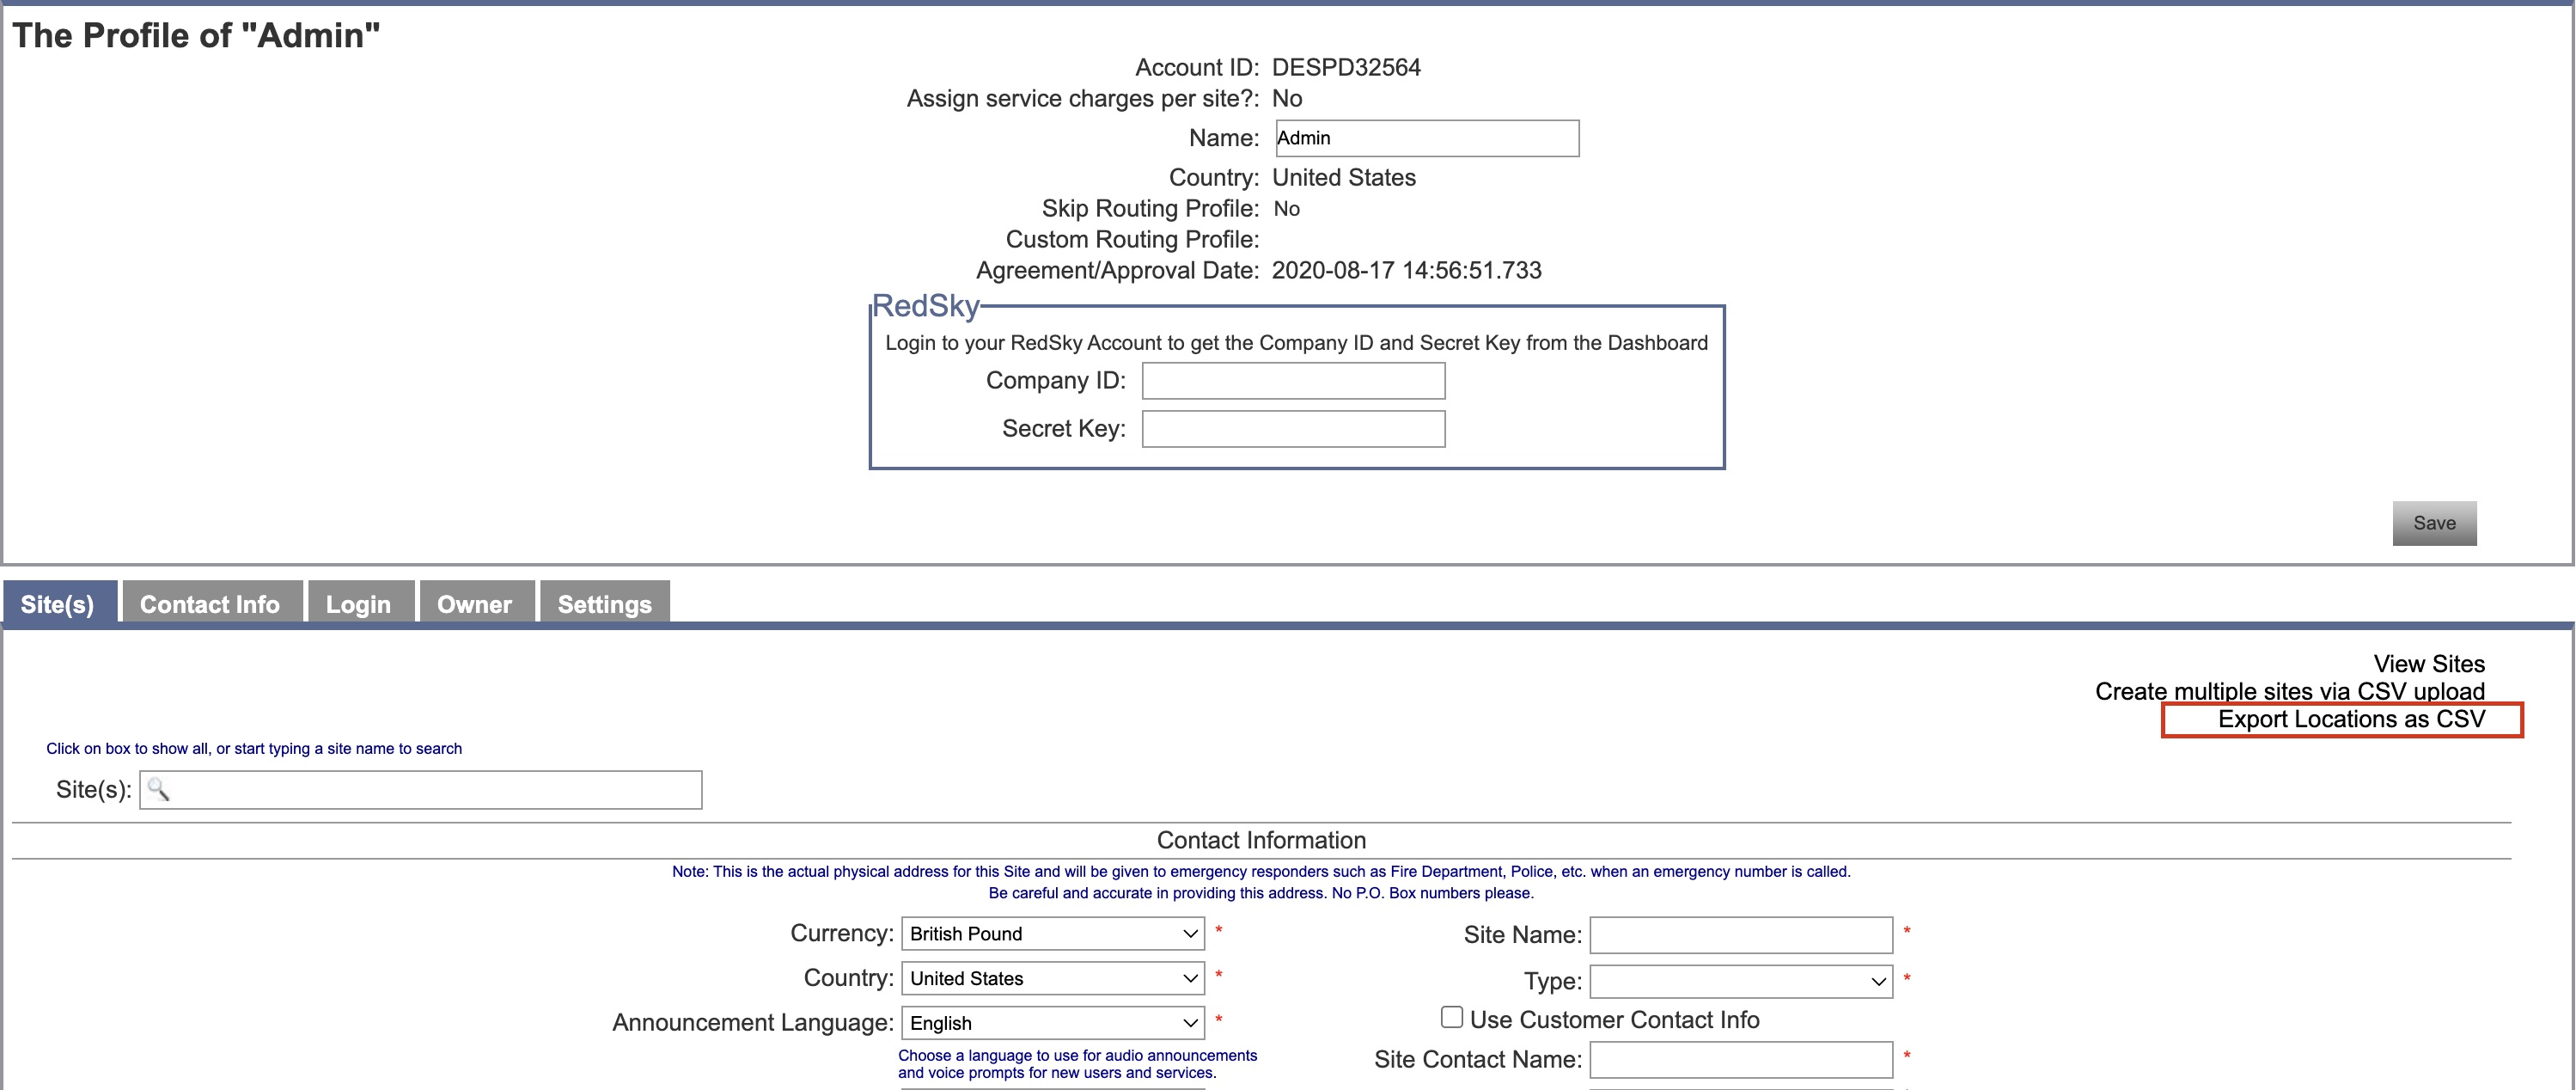
Slika 14: Izvoz lokacija kao CSV
Omogućite opciju za isključivanje brojeva
Kada koristite isti SIP prtljažnik za Vebek Calling i BroadCloud Carrier, administratori bi trebali koristiti opciju Disconnect Numbers . Ovo uklanja telefonske brojeve iz primanja dolaznih poziva nakon migracije u BroadCloud.
Ova opcija je potrebna samo kada migrirate u drugu region Vebek poziva. Ne primenjuje se ako ostanete u istom regionu.
- Ova akcija je nepovratna
-
Omogućite ovu opciju tek nakon potvrde:
- Migracija završena
- Svi uređaji se uspešno registruju u Vebek pozivima
- Brojevi su aktivni
Da biste omogućili ovu opciju,
- U datoteci partner.cfg , podesite DISCONNECT_NUMBERS_FROM_RIALTO = da.
- Ponovo pokrenite alat za migraciju koristeći istu datoteku customer.json i ažurirani partner.cfg.
Ako brojevi ne uspeju da se prekine, podignite zahtev Cisco TAC .
Za Cisco BroadVorks i Vebek za BroadVorks
Za Cisco BroadVorks i Vebek za BroadVorks migracije, alat radi na sekundarnom Cisco BroadVorks Application Serveru unutar partnerske mreže i povezuje se sa AS-om preko OCI-P. Koristi izlaznu JSON (customer.json) datoteku Transform Tool kao ulaz i pokreće OCI-P komande za migraciju uređaja i mekih klijenata.
Nakon uspešnog rada, alat za kretanje uređaja će:
- Odjavite uređaje iz Cisco BroadVorks-a i registrujte ih u veleprodaji.
- Korisnici koji koriste UC-One klijent će preusmeriti na Vebek aplikaciju prilikom prve prijave.
- Deaktivirajte telefonske brojeve iz Cisco BroadVorks-a ili uklonite telefonske brojeve iz BroadCloud-a.
- Aktivirajte brojeve u veleprodaji.
- Kreirajte zajedničke pozive u veleprodaji za BroadCloud migracije. [Ovaj korak je primenljiv samo za BroadCloud migracije].
SCP i SSH
- SCP alat za premeštanje uređaja na sekundarni Cisco BroadVorks Application Server.
- SSH na sekundarni Cisco BroadVorks aplikativni server za konfigurisanje preduslova i pokretanje alata za pomeranje uređaja.
Preduslovi
- Podesite REFRESH_TOKEN (Token kopiran iz Token Generator Tool) u conf / partner.cfg fajl:
REFRESH_TOKEN=MzUwYjljODEtYmQ4MS00NGVhLTgwNGUtZjQ1NTEyZTViNzJkOTdj - Uverite se da su sekundarni korisnički ID, lozinka i ime hosta Cisco BroadVorks Application Servera tačni u datoteci conf / deviceMoveTool.conf:
BROADWORKS_USER_ID = admin BROADWORKS_PASSWORD = admin BROADWORKS_HOST_NAME = localhost - Da biste ponovo poslali e-poštu za aktivaciju, potrebno je da podesite SEND_SUBSCRIBERS_WELCOME_EMAIL =true u fajlu conf / partner.cfg.
Ako administratori žele da pošalju pozivne e-poruke svojim korisnicima tokom migracije, oni bi trebalo da odkomentarišu "SEND_SUBSCRIBERS_WELCOME_EMAIL=true" osobinu u conf/partner.cfg fajlu. U suprotnom, imovina treba da ostane nepromenjena.
- Proverite da li je putanja JDK / JRE okruženja tačna u devicemove.sh
JAVA_HOME=/usr/local/java/java_base - Administratori mogu da koriste locations.csv fajl iz ulaznog direktorijuma da migriraju određene grupe umesto svih grupa pod preduzećem.
Polikom telefoni
Da biste premestili Policom telefone iz Cisco BroadVorks-a na veleprodaju poziva, administrator partnera mora kreirati novu datoteku tipa identiteta / profila uređaja na nivou sistema u Cisco BroadVorks-u svaki šablon Policom uređaja. Pogledajte sliku 14 i otpremite prilagođenu datoteku device-move-tool/conf/deviceProfile/{region}/polycom_vvx.cfg. Nakon otpremanja nove datoteke uređaja, uverite se da novokreirana datoteka postoji na nivou grupe. Takođe proverite da li fajl migration_%BWMAC ADDRESS%.cfg nije u sukobu sa bilo kojim postojećim fajlom u vašem sistemu).
Interno ga koristi alat za premeštanje uređaja.
Proces migracije za Policom telefone:
- Alat za kretanje uređaja zamenjuje datoteku %BWMACADDRESS%.cfg na nivou uređaja sa polycom_vvx2.cfg. Ovaj fajl se odnosi na migration_%BWMACADDRESS%.cfg.
- Obnovite profile uređaja na nivou grupe ili uređaja.Postupanje na nivou grupe ili uređaja zavisi od konfiguracije parametra deviceLevelRebuild u datoteci device-move-tool/conf/partner.cfg.
- Alat za kretanje uređaja traži od Cisco BroadVorks aplikativnog servera da ponovo pokrene telefone na nivou grupe ili na nivou uređaja.
- Nakon zahteva za ponovno pokretanje, Policom telefoni preuzimaju i process.cfg% BWMACADDRESS%, koji traži od Policom telefona da preuzmu i obrade migration_%BWMACADDRESS%.cfg, koji postavlja device.prov.serverName na https://plcm.sipflash.com.https://plcm.sipflash.com za američki region, drugi regioni imaju različite URL-ove.
- Policom telefon preuzima %BWMACADDRESS%.cfg iz https://plcm.sipflash.com i upravljaće njime Vebek Calling DMS.
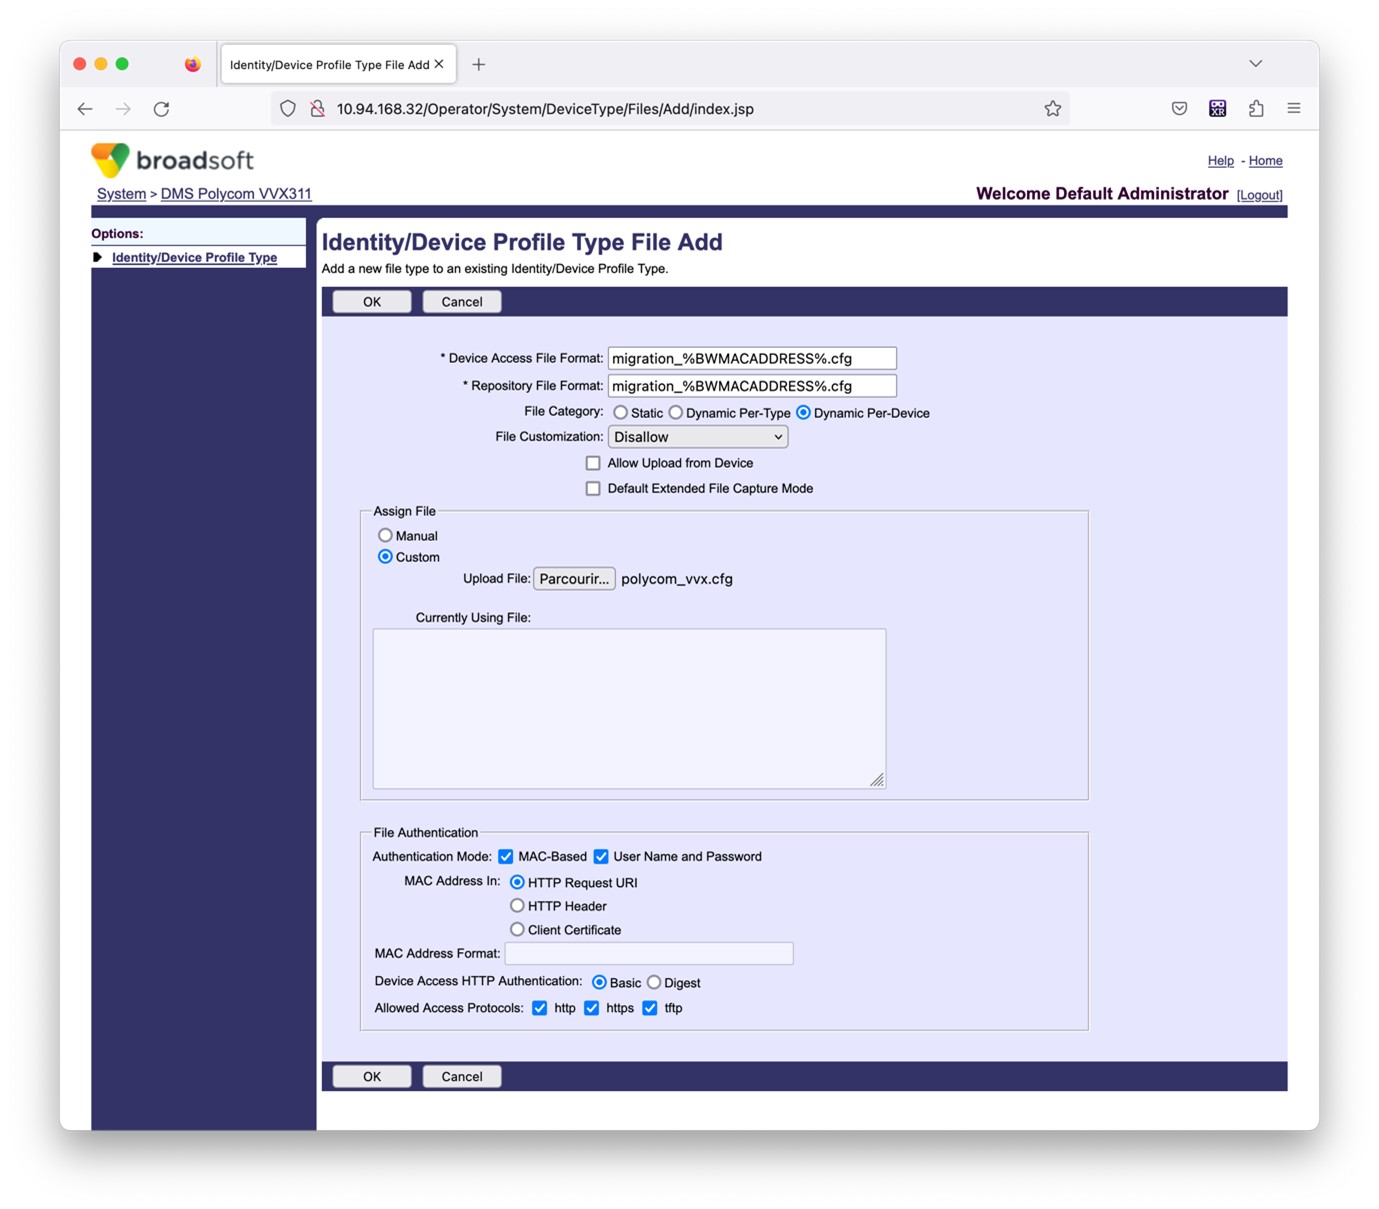
Slika 14: Identitet/tip profila uređaja fajl dodati
Uputstva za pokretanje
Postoje dva načina za pozivanje na DMT, prvi je da se pozove preko jednog kupca u isto vreme, a drugi je da radi kroz više kupaca istovremeno.
Alat za premeštanje uređaja se pokreće sa sekundarnog Cisco Broadvorks Application Servera unutar direktorijuma alata za premeštanje uređaja:
For device move single customer:
./devicemove.sh -input=
 ./devicemove.sh -input=/tmp/customername.json
 For device move multiple customers:
./devicemove.sh -input=
 ls -l /tmp/directoryofcustomers/
customer1.json
customer2.json
customer3.json
Additionally, the device move tool supports migrate single/specific phone(s) from 1.35.0 release.
Use the command below:
./devicemove.sh -integration -input=  -macaddress=4CBC4883A6F8,48256741CBE9
Terminalni dnevnici
Slede evidencije u terminalu o uspešnom pokretanju alata za kretanje uređaja za migraciju uređaja:
Tool Name: Device Move Tool
Version: 1.15.0
Device Tool Started...
Valid Devices for migration :
-------------------------------------------------------------------------------------------------------------------
|    Device Type |          Mac |                                 Version |                                 Email |
-------------------------------------------------------------------------------------------------------------------
| DMS Cisco 7861 | CC98914EAAD7 | Cisco-CP-7861-3PCC/11.3.7_cc98914eaad7_ | amareswaranvel+benjaminjack@gmail.com |
| DMS Cisco 6821 | 5486BCAE7E45 | Cisco-CP-6821-3PCC/11.3.7_5486bcae7e45_ |  amareswaranvel+lucasoliver@gmail.com |
| DMS Cisco 8811 | F87B204E4066 | Cisco-CP-8811-3PCC/11.3.7_f87b204e4066_ |     amareswaranvel+owenalex@gmail.com |
-------------------------------------------------------------------------------------------------------------------
Do you want to migrate all these devices? ([Y]es or [N]o)
yes
Uploading Device Profiles for DMS Cisco MPP LC
Rebuild Device Process Started
Rebuild Device Process Completed Successfully
Reboot Process Started
Reboot Process Completed Successfully
Modifying profiles for Business Communicator under group collabmigrationtestGRP_engg
Activate webex phone numbers process started for customer org Id : 85ea1d6f-ff9e-41a1-843f-7362aaf12b4c
Activate webex phone numbers process completed for customer org id : 85ea1d6f-ff9e-41a1-843f-7362aaf12b4c
Deactivate broadworks phone numbers process started for groupId : collabmigrationtestGRP_engg
Deactivate broadworks phone numbers process completed for groupId : collabmigrationtestGRP_engg
Device Migration Completed
Izlaz
Nakon migracije uređaja, uređaji su došli na mrežu i spremni za upućivanje / primanje poziva. Pogledajte sliku 15 da biste videli primer statusa uređaja:

Slika 15: Status uređaja
Nakon migracije uređaja, brojevi su postali aktivni. Pogledajte sliku 16 da biste videli primer koji su brojevi aktivni:
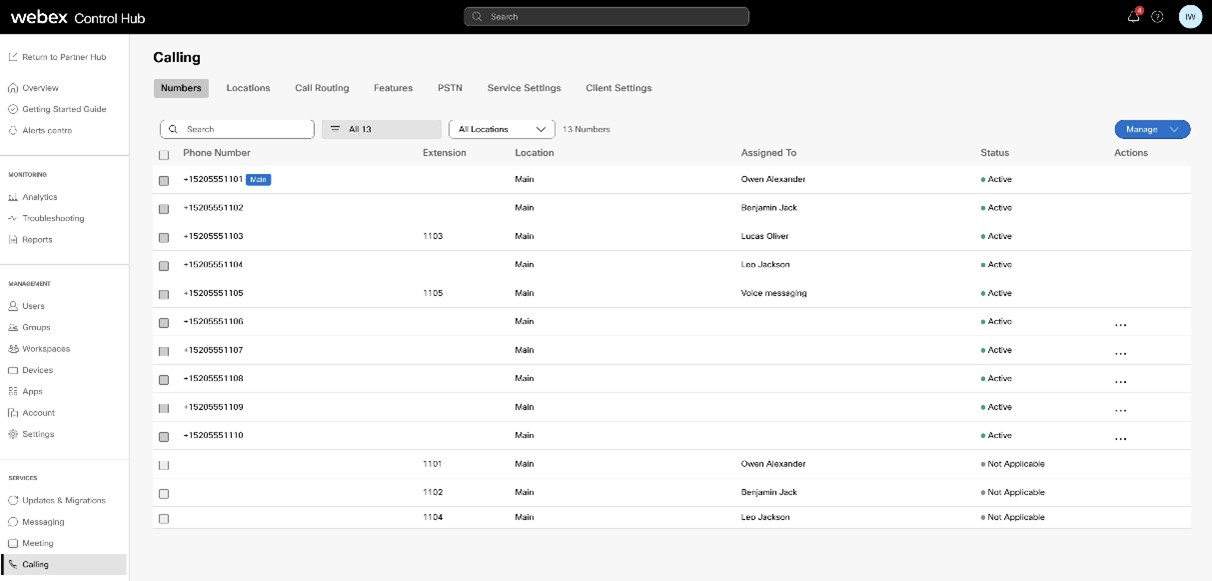
Slika 16: Brojevi aktivni
Dubber migracija
Sada možete da premestite snimke poziva sa BroadCloud-a na Vebek Calling. Ovo održava vaše postojeće Dubber naloge i sve vaše stare snimke dostupnim bez gubitka trenutnog pristupa Dubber platformi tokom migracije. Za više informacija o dubber migraciji, pogledajte Migrirajte Dubber sa BroadCloud-a na Vebek Calling.
Vrati migraciju
Operacija vraćanja mora biti izvršena za jedno preduzeće u isto vreme.
Za BroadCloud Carrier
Administratori mogu podesiti ROLLBACK_TO_BROADCLOUD=true da conf/partner.cfg omoguće automatsko vraćanje. Ovo vraća uređaje na BroadCloud nakon uspešne migracije u istom ili unakrsnom regionu sa NS Sinc. Za neuspele migracije, kontaktirajte Cisco TAC pre nego što zatražite vraćanje.
Za Cisco BroadVorks i Vebek za BroadVorks
Proces vraćanja za Cisco BroadVorks i Vebek za BroadVorks je sledeći:
- Otvorite kartu sa Cisco TAC-om da biste zatražili vraćanje uređaja.
- Pokrenite alat za kretanje uređaja u režimu vraćanja na sekundarnom BroadVorks Application Serveru da biste vratili migracije uređaja. Ovo će postaviti DMS URL nazad na DMS URL provajdera usluga za profile uređaja u Cisco BroadVorks-u i ponovo aktivirati telefonske brojeve.
- Tim za pozivanje Vebek postavlja DMS URL adresu nazad na DMS URL adresu provajdera usluga u profilima uređaja u Vebek pozivima.
- Administratori partnera moraju deaktivirati ili izbrisati telefonske brojeve u Vebek pozivima preko portala Control Hub.
- Administratori partnera moraju da premeste PSTN telefonske brojeve nazad u Cisco BroadVorks.
Uputstva za pokretanje alata za kretanje uređaja u režimu vraćanja
Pratite korake u nastavku da biste pokrenuli alat za premeštanje uređaja u režimu vraćanja:
Pokrenite naredbu ispod u sekundarnom Cisco BroadVorks Application Serveru unutar direktorijuma alata za premeštanje uređaja:
Vrati profile
./devicemove.sh -input= -revertProfilesVrati brojeve
./devicemove.sh -input= -revertNumbersTerminalni dnevnici
Dobićemo sledeće dnevnike u terminalu na uspešno pokretanje alata za kretanje uređaja za vraćanje operacije:
Vrati profile
Tool Name: Device Move Tool
Version: 1.15.0
Device Tool Started for Revert Process...
Devices that can be moved back from Webex Calling to BroadWorks:
- -------------------------------------------------------------------------------------------------------------------
|    Device Type |          Mac |                                 Version |                                 Email |
-------------------------------------------------------------------------------------------------------------------
| DMS Cisco 7861 | CC98914EAAD7 | Cisco-CP-7861-3PCC/11.3.7_cc98914eaad7_ | amareswaranvel+benjaminjack@gmail.com |
| DMS Cisco 6821 | 5486BCAE7E45 | Cisco-CP-6821-3PCC/11.3.7_5486bcae7e45_ |  amareswaranvel+lucasoliver@gmail.com |
| DMS Cisco 8811 | F87B204E4066 | Cisco-CP-8811-3PCC/11.3.7_f87b204e4066_ |     amareswaranvel+owenalex@gmail.com |
-------------------------------------------------------------------------------------------------------------------
Do you want to move back these devices from Webex Calling to BroadWorks? (Yes, Y, No, N):
yes
Uploading Device Profiles for DMS Cisco MPP LC
Rebuild Device Process Started
Rebuild Device Process Completed Successfully
Reboot Process Started
Reboot Process Completed Successfully
Device Migration Completed for Deprovision Process
Vrati brojeve
Tool Name: Device Move Tool
Version: 1.15.0
Do you want to continue reverting numbers to Broadworks ?  ([Y]es or [N]o):
Y
[+15205551101, +15205551102, +15205551103, +15205551104, +15205551105, +15205551106, +15205551107, +15205551108, +15205551109, +15205551110]
Starting revert
Activate broadworks phone numbers process started for groupId : collabmigrationtestGRP_engg
Activate broadworks phone numbers process completed for groupId : collabmigrationtestGRP_engg
Device Migration Revert process Completed Successfully
Dodatak
Migracija velikih preduzeća
Velika preduzeća koja imaju mnogo lokacija ne mogu migrirati sve lokacije u okviru jednog prozora održavanja. Funkcionalnost opisana u ovom odeljku omogućava partnerima da migriraju nekoliko lokacija istovremeno.
Koraci
Koristite sledeće korake da biste planirali fazne migracije za veliko preduzeće:
- Izvadite podatke o preduzeću iz BroadVorks-a ili BroadCloud-a.
- Pokreni Transform alat bez lokacije opcija na izdvojenim podacima.
- Potražite odeljak Preporučena lokacija za istovremeno kretanje .txt exception_reportda biste planirali faze migracije da biste dobili više informacija o zavisnosti lokacije, pregledajte datoteke liste agenata (pogledajte Transform alat ispod).
- Generišite ulaz / locations.csv modifikovanjem locations_to_be_edited.csv.
- Ponovo pokrenite alat Transform sa opcijom lokacija.
- Ispitajte exception_report.txt da biste identifikovali bilo kakve probleme zavisnosti od lokacije za trenutnu fazu.
- Popravite probleme zavisnosti od lokacije po potrebi (modifikovanjem locations.csv).
- Pokreni Transform alat za generisanje customers.json za trenutnu fazu.
- Pokrenite alat za obezbeđivanje za svaku customer.json.
- Tokom prozora održavanja, pokrenite Device Move Tool.
- Ponovite korak 4 - 10 za sledeću fazu.
Transform alat
Da bi se postigao cilj migracije lokacija u velikom preduzeću faza po faza, kao što je gore pomenuto, nova datoteka locations.csv se dodaje kao opcioni ulaz (-locations = input / locations.csv) prilikom pokretanja transform-alata.
locations.csv sadrži podatke koji su specifični za lokacije. On zamenjuje podatke koji se nalaze u ulazu / customers.csv, koji trenutno sadrži i podatke o preduzeću i lokaciji.
Sledeća tabela navodi detalje locations.csv:
|
Opis |
Vrednosti |
Podrazumevana vrednost |
Obavezan |
Mape u BroadVorks-u |
Mape u BroadCloud-u | |
|---|---|---|---|---|---|---|
|
Sortiraj |
Jedinstveni ID preduzeća |
Y |
serviceProviderId |
Rialto CustomerId | ||
|
Pretraga |
ID lokacije, jedinstven u okviru preduzeća |
Y |
Broj člana grupe |
Rialto SiteId | ||
|
Status migracije |
Da li je ova lokacija migrirana? |
migrirao, dont_migrate, migrirajući |
migracija |
N | ||
|
ime |
Ime ove lokacije. Ostavite ga prazno da biste koristili locationId. |
N | ||||
|
Vremenska zona |
N | |||||
|
Jezik |
N | |||||
|
address1 |
N | |||||
|
address2 |
N | |||||
|
grad |
N | |||||
|
država |
N | |||||
|
Poštenski kod |
Poštanski broj ili poštanski broj |
N | ||||
|
zemlja |
2-slovni kod |
N |
locations.csv se može sastaviti od unapred popunjenih locations_to_be_edited.csv kada se pokreće Transform alat na velikom preduzeću. Pročitajte dalje da biste videli primere.
locations.csv je opcioni ulaz kada se pokreće alat za transformaciju, stoga će se alat za transformaciju ponašati isto kao i ranije ako opcija -locations=input/locations.csv nije prisutna.
Novi izlazni fajlovi
Postoje 5 novih izlaznih fajlova iz transform alata:
- locations_to_be_edited.csv – ovo je unapred popunjeno sa svim informacijama o lokacijama za veliko preduzeće koje treba migrirati.
Primer:
locationId,enterpriseId,migration status,name,timezone,language,address1,address2,city,state,postal code,country

auto_mig_ent_grp1,auto_mig_ent,,auto_mig_ent_grp1,,,100 Main Street,,Gaithersburg,MD,20877,US

auto_mig_ent_grp2,auto_mig_ent,,auto_mig_ent_grp2,,,101 Main Street,,Gaithersburg,MD,20877,US

auto_mig_ent_grp3,auto_mig_ent,,auto_mig_ent_grp3,,,102 Main Street,,Gaithersburg,MD,20877,US
Partneri / kupci mogu da ga koriste za generisanje locations.csv za kontrolu lokacija koje će se migrirati za određenu fazu (i ažurirati informacije o lokacijama po potrebi).
Primer: locations.csv generisana iz gore locations_to_be_editednavedenih .csv
locationId,enterpriseId,migration status,name,timezone,language,address1,address2,city,state,postal code,country

auto_mig_ent_grp1,auto_mig_ent,migrated,auto_mig_ent_grp1,,,100 Main Street,,Gaithersburg,MD,20877,US

auto_mig_ent_grp2,auto_mig_ent,migrating,auto_mig_ent_grp2,,,101 Main Street,,Gaithersburg,MD,20877,US

auto_mig_ent_grp3,auto_mig_ent,dont_migrate,auto_mig_ent_grp3,,,102 Main Street,,Gaithersburg,MD,20877,US
To locations.csvznači: Za ovu fazu, lokacija auto_mig_ent_grp1 je migrirana, lokacija auto_mig_ent_grp2 migrira, i ne migriraju lokaciju auto_mig_ent_grp3.
- hunt_group_agents.csv, call_center_agents_supervisors.csv, paging_group_originators_targets.csv, blf_monitored_elements.csv – 4 fajlovi imaju istu svrhu: Generišite kompletne liste odgovarajućih funkcija agenata / supervizora / inicijatora / ciljeva /monitored_elements na lokacijama za migraciju ako lokacije za migraciju imaju zavisnosti od drugih lokacija.
Imaju skoro isti format (ime treće kolone varira u zavisnosti od funkcije), kao što je prikazano ispod (auto_mig_ent_grplista agenata lovačke grupe KSNUMKS-a za gornju fazu):
Primer: Sledeće je iz hunt_group_agents.csv
feature name,feature location,agent,location

Sarah Rodriguez,auto_mig_ent_grp2,agent_michael@domain.com,auto_mig_ent_grp1

Sarah Rodriguez,auto_mig_ent_grp2,agent_sally@domain.com,auto_mig_ent_grp1
Ako opcija lokacije nije prisutna prilikom pokretanja alata Transform, gore 4 datoteke će generisati kompletne liste agenata / supervizora / inicijatora / ciljeva / hunting-group / busi-lamp-field-a /monitored_elements za celo preduzeće, koji se mogu koristiti za planiranje faznih migracija.
Nove sekcije u exception_report
Prilikom obavljanja fazne migracije za velika preduzeća, biće nekih novih sekcija u exception_report.txt ako postoje zavisnosti lokacije koje nisu ispunjene.
Primer: Sledeći novi odeljak je za lokaciju auto_mig_ent_grp2 lovačke grupe Sarah Rodriguez agente na lokaciji auto_mig_ent_grp3 koja nije migrirala i ne migrira u ovoj fazi.
Dependencies between locations - Hunt groups

Name                          Location                        Agent                                            Agent's Location         Comment

________________________________________________________________________________________________________________

Sarah Rodriguez       auto_mig_ent_grp2    agent_william@domain.com    auto_mig_ent_grp3    Agent in different location not migrated yet

Sarah Rodriguez       auto_mig_ent_grp2   agent_melody@domain.com     auto_mig_ent_grp3    Agent in different location not migrated yet
Sledeći novi odeljak daje preporuku o tome kako grupisati lokacije u fazama migracije.
Preporučene lokacije za istovremeno kretanje:
Location auto_mig_ent_grp1 has dependency on location(s) auto_mig_ent_grp2, auto_mig_ent_grp3

Location auto_mig_ent_grp2 has dependency on location(s) auto_mig_ent_grp3
Ako opcija lokacija nije prisutna prilikom pokretanja alata Transform, odeljak preporučuje lokacije za istovremeno premeštanje navodi sve zavisnosti lokacija kako bi se obezbedila pogodnost za planiranje.
Dok pokrećete alat Transform sa opcijom lokacija (tj. Za fazu migracije), odeljak Preporučene lokacije za istovremeno kretanje navode samo zavisnosti lokacija za trenutnu fazu.
Alat za obezbeđivanje
Za velika preduzeća, alat za obezbeđivanje može se pokrenuti kao i obično.
Alat za premeštanje uređaja
Alat za premeštanje uređaja može da se pokrene za podskup lokacija iz customer.json.to da se postigne da se doda nova opciona locations.csv datoteka koja ima dve kolone.
|
External_id |
LokacijaImena |
|---|---|
|
Spoljna id vrednost |
Imena lokacija / imena grupa |
- Ovo je opcioni fajl, ako nije obezbeđen ili obezbeđen sa praznim vrednostima će migrirati sve lokacije.
- Ako se dobiju imena lokacija i external_njihovi ID-ovi, onda će se migrirati samo te lokacije.
Komanda je sledeća:
./devicemove.sh -input=/customer.json -locations=/Location_names.csvVremenske zone
Sjedinjene Američke Države:
"timeZones":["Amerika/Adak","Amerika/Ankoridž","Amerika/Čikago","Amerika/Denver","Amerika/Los_Anđeles","Amerika/Severniew_Jork","Amerika/Feniks","Pacifik/Honolulu"]
Kanada:
"timeZones":["Amerika/Dawson_Krik","Amerika/Edmonton","Amerika/Halifaks","Amerika/Montreal","Amerika/Regina","Amerika/St_Džons","Amerika/Vankuver","Amerika/Vinipeg"]
Australija:
"timeZones":["Australija / Adelaide","Australija / Brizbejn","Australija / Broken_Hil","Australija / Darvin","Australija / Hobart","Australija / Lord_Hove","Australija / Pert","Australija / Sidnej"]
Francuska:
"timeZones":["Evropa / Pariz"]
Portugalija:
"timeZones":["Atlantik/Azori","Evropa/Lisabon"]}
Ujedinjeno Kraljevstvo:
"timeZones":["Evropa / London"]
Italija:
"timeZones":["Evropa / Rim"]
Nemačka:
"timeZones":["Evropa / Berlin"]
Često postavljana pitanja
Poznate greške
Preduslovi
1. Kako da pronađem OrgID partnera?
Prijavite se u Partner Hub i idite na odeljak Računi. OrgID se pojavljuje tamo.
Izvod
1. Zašto kupac ili sajt nije naveden na stranici "Inicirajte ekstrakt"?
Pojavljuju se samo korisnici sa najmanje jednim sajtom sa aktivnim uslugama pozivanja u BroadCloud-u. Ako ne postoje aktivni sajtovi za pozivanje, kupac neće biti naveden.
Pretraživanje
1. Zašto u customer.json nedostaje funkcija korisnika ili grupe?
Da biste videli funkciju korisnika ili grupe, proverite exception_report.txt za povezane greške.
2. Zašto se customer.json ne generiše?
Ažurirajte customers.csv sa važećom adresom. Koristite parametar -customers tokom transformacije.
3. Koja je svrha fajla input/customers.csv ?
Svrha se koristi za pružanje obaveznih podataka o klijentima koji možda nedostaju iz Cisco BroadVorks-a ili BroadCloud-a tokom procesa ekstrakcije.
4. Koja je svrha fajla input/users.csv ?
Datoteka input/users.csv se koristi za pružanje podataka na nivou korisnika koji mogu propustiti u Cisco BroadVorks ili BroadCloud.
5. Kako pretvoriti BroadVorks Call Centri na CKS Essentials?
Koristi se input/cxessentials.csv za pretvaranje BroadVorks Call Centri na Ck Essentials.
6. Da li postoji način da se automatski pretvoriti sve pozivne centre u CK Essentials?
Da, možete da omogućite svojstvo UPGRADE_ALL_CALL_CENTERS_TO_CX_ESSENTIALS da automatski pretvoriti sve pozivne centre u CKS Essentials bez upotrebe CSV datoteku.
7. Kako da obezbedim nove telefone za korisnike?
Da biste obezbedili nove telefone, dodajte MAC adresu i adresu e-pošte korisnika u datoteku input/newphones.csv . Ovaj korak je neophodan samo ako administratori partnera nameravaju da postave nove telefone u okruženju za veleprodajne pozive.
8. Kako da podesim generičke gatevai uređaje?
Da biste podesili generičke gatevai uređaje, dodajte MAC adresu uređaja i pridruženi korisnički ID u datoteku input/genericgateways.csv . Takođe morate navesti da li je korisnik PRIMARNI vlasnik ili SHARED korisnik (za pojavljivanje zajedničkih poziva).
9. Da li je generičko podešavanje gatevai uređaja dostupno za BroadCloud na veleprodajne migracije?
Ne, ova funkcija nije podržana za migracije BroadCloud u veleprodaju.
Dodela privilegija
1. Kako partneri mogu konfigurisati za više od 100 JSON datoteka za kupce u isto vreme, kao što je konfigurisano u osobini maxCustomersProvisioning u conf / app.cfg?
Podesite makCustomersProvisioning =<no.of.customers> u app.cfg i pokrenite obezbeđivanje.
2. Obezbeđivanje blokirano jer je org u "pending_rpl_review"?
Cisco finansije razmatraju kupca. Ovo može da traje najviše 72 sata. Pokušajte ponovo nakon odobrenja.
3. Kako da rešim problem gde su veleprodajni paket, njegove karakteristike i korisnici dodeljeni pogrešnoj organizaciji zbog netačnog spoljnog ID-a tokom procesa migracije?
Korak 1: Izbrišite sve korisnike / funkcije koje je obezbedio alat za obezbeđivanje.
Korak 2: U Partner Hub-u izaberite kupca, idite na odeljak 'Paketi', onemogućite sve veleprodajne pakete i sačuvajte promene.
4. Kako da rešim problem kada naiđete na poruku "OrgId je obavezan parametar prilikom obezbeđivanja već postojećeg kupca sa veleprodajnim uslugama", dok pokrećete alat za obezbeđivanje?
Pokušajte da pokrenete alat koristeći drugu adresu e-pošte ažuriranjem customer.json datoteke. Pored toga, proverite da li domen e-pošte tvrdi druga organizacija. Ako je tako, pokušajte da oslobodite potraživani domen iz te organizacije ili pokušajte da koristite drugi nepotvrđeni domen.
DeviceMove (BroadVorks) / Migracija (Broadcloud)
1. U customer.json od svih uređaja jedan ili dva nisu došli na mrežu? Kako ovo popraviti?
Ako samo nekoliko uređaja ne dolazi na mrežu, pokušajte da ih ručno ponovo pokrenete.
2. Da li je rialtoIdentifier potreban u customer.json za migraciju Broadcloud-a?
Da.
3. Kako pokrenuti alat za kretanje uređaja u režimu vraćanja za Broadcloud?
Dodajte ROLLBACK_TO_BROADCLOUD =true u partner.cfg, a zatim otpremite datoteku customer.json i partner.cfg i ponovo pokrenite migraciju.
4. Šta da radim ako alat za obezbeđivanje ne uspe da doda uređaje zbog greške (obično zato što je uređaj već u EDOS-u), a migracija za sajt se ionako nastavlja?
Obično preporučujemo administratoru da reši greške u obezbeđivanju pre migracije, ali u ovom slučaju sajt je premešten na Vholesale Vebek Calling Platform pre nego što je uređaj uspešno obezbeđen u Vebek pozivima.
Zaobilazno rešenje za dodavanje MAC adrese u Vebek pozive:
Korak 1: Rešite problem koji je izazvao uređaj da se ne doda (Obično njegovo uklanjanje MAC iz EDOS-a).
2. korak: Postoje dve opcije.
Opcija 1: Vraćanje i pokušaj ponovo
- Vratite sajt na BroadCloud.
- Dodajte uređaj u Vebek pozive ručno preko kontrolnog čvorišta ili ponovo pokrenite alat za obezbeđivanje.
- Kada se uređaj doda, nastavite sa migracijom ponovo.
Opcija 2: Nastavite na Vebek-u
Ako vraćanje nije poželjno:
- Javite nam (veleprodajni tim za migraciju) kako bismo mogli podesiti status BroadCloud NS Sinc na LOCAL.
- Administrator tada može:
- Poništite dodelu MAC adresu od korisnika iz Rialto.
- Uklonite MAC sa sajta u Rialto.
- Nakon čišćenja, uređaj se ručno dodaje u Vebek Calling koristeći portal Control Hub.
- Nakon dodavanja uređaja u Vebek pozive, ručno ponovo pokrenite uređaj.


