- Accueil
- /
- Article

Merci pour votre commentaire.

Outils de migration pour le passage aux solutions Wholesale RTM
 Dans cet article
 Un commentaire ?
Exécutez la migration avec une préconfiguration minimale. Commandes faciles à exécuter. Les administrateurs peuvent consulter leurs données après la mise en service et passer et recevoir des appels immédiatement après la migration. Il prend en charge la mise à niveau automatique vers l'application Webex pour les clients UC-One.
Aperçu
Le but de ce document est de fournir des instructions détaillées sur l'utilisation des outils pour migrer de Cisco BroadWorks, Webex for BroadWorks et BroadCloud vers Wholesale et Webex Calling. Ce document décrit un ensemble d'outils de migration conçus pour aider les clients existants de Cisco BroadWorks, Webex for BroadWorks et BroadCloud à migrer vers la solution Wholesale Route-to-Market.
Les outils de migration sont destinés à faciliter une transition complète des services BroadWorks vers les services de vente en gros. Ils ne sont pas conçus pour la coexistence à long terme des deux services au sein d'une même organisation cliente.
Impact des migrations
Les impacts post-migration sont les suivants :
Administrateurs
Après la migration, les administrateurs doivent :
- Utilisez plutôt Partner Hub et Control Hub que CommPilot pour configurer les fonctionnalités.
- Reconfigurez toutes les fonctionnalités qui ne font pas partie de la migration.
Vous devrez migrer manuellement les fonctionnalités qui ne sont pas migrées automatiquement une fois que les outils de migration auront terminé leur exécution.
Utilisateurs
Les fonctionnalités prises en charge devraient fonctionner après la migration de la même manière qu'avant la migration. Les fonctionnalités d'appel Webex non prises en charge par la migration doivent être reconfigurées sur Webex après la migration :
- Les utilisateurs perdront l'historique de leurs appels et de leurs messages.
- Les utilisateurs perdront tous leurs paramètres et personnalisations personnels et devront les reconfigurer après la migration. Par exemple, les numéros abrégés.
- Les utilisateurs doivent réinitialiser leurs codes d'accès et leurs mots de passe lors de leur première connexion.
- Les utilisateurs du client UC-One doivent, lors de leur première connexion, passer à l'application Webex.
Architecture des outils de migration
L'architecture des outils de migration se compose de quatre outils différents :
- Outil d'extraction—Extrait les entreprises, les groupes, les numéros, les utilisateurs, les services, les téléphones et les clients logiciels de Cisco BroadWorks. Les partenaires de BroadCloud doivent soumettre une demande d'extraction via le portail des fournisseurs de services.
- Outil de transformation— Transforme les informations extraites par l'outil d'extraction en un fichier JSON modifiable.
- Outil de provisionnement— Utilise le fichier de sortie JSON de l'outil de transformation pour provisionner les clients, les emplacements, les numéros, les utilisateurs, les services et les téléphones à l'aide des API publiques Webex.
- Outil de déplacement de périphérique— Utilise le fichier de sortie JSON de l'outil de transformation pour reconstruire les profils et redémarrer les téléphones, activer les numéros dans la solution Wholesale RTM et désactiver les numéros de téléphone dans Cisco BroadWorks.
- Cet outil permet de rétablir les profils téléphoniques et logiciels clients ainsi que l'activation des numéros dans Cisco BroadWorks.
- Les partenaires de BroadCloud doivent soumettre une demande de migration via le portail des fournisseurs de services.
L'illustration suivante représente le fonctionnement séquentiel des quatre outils, qui communiquent avec Cisco BroadWorks, les API publiques et téléchargent les métriques sur les services Webex pour des analyses ultérieures après le lancement des tâches de migration par l'administrateur.
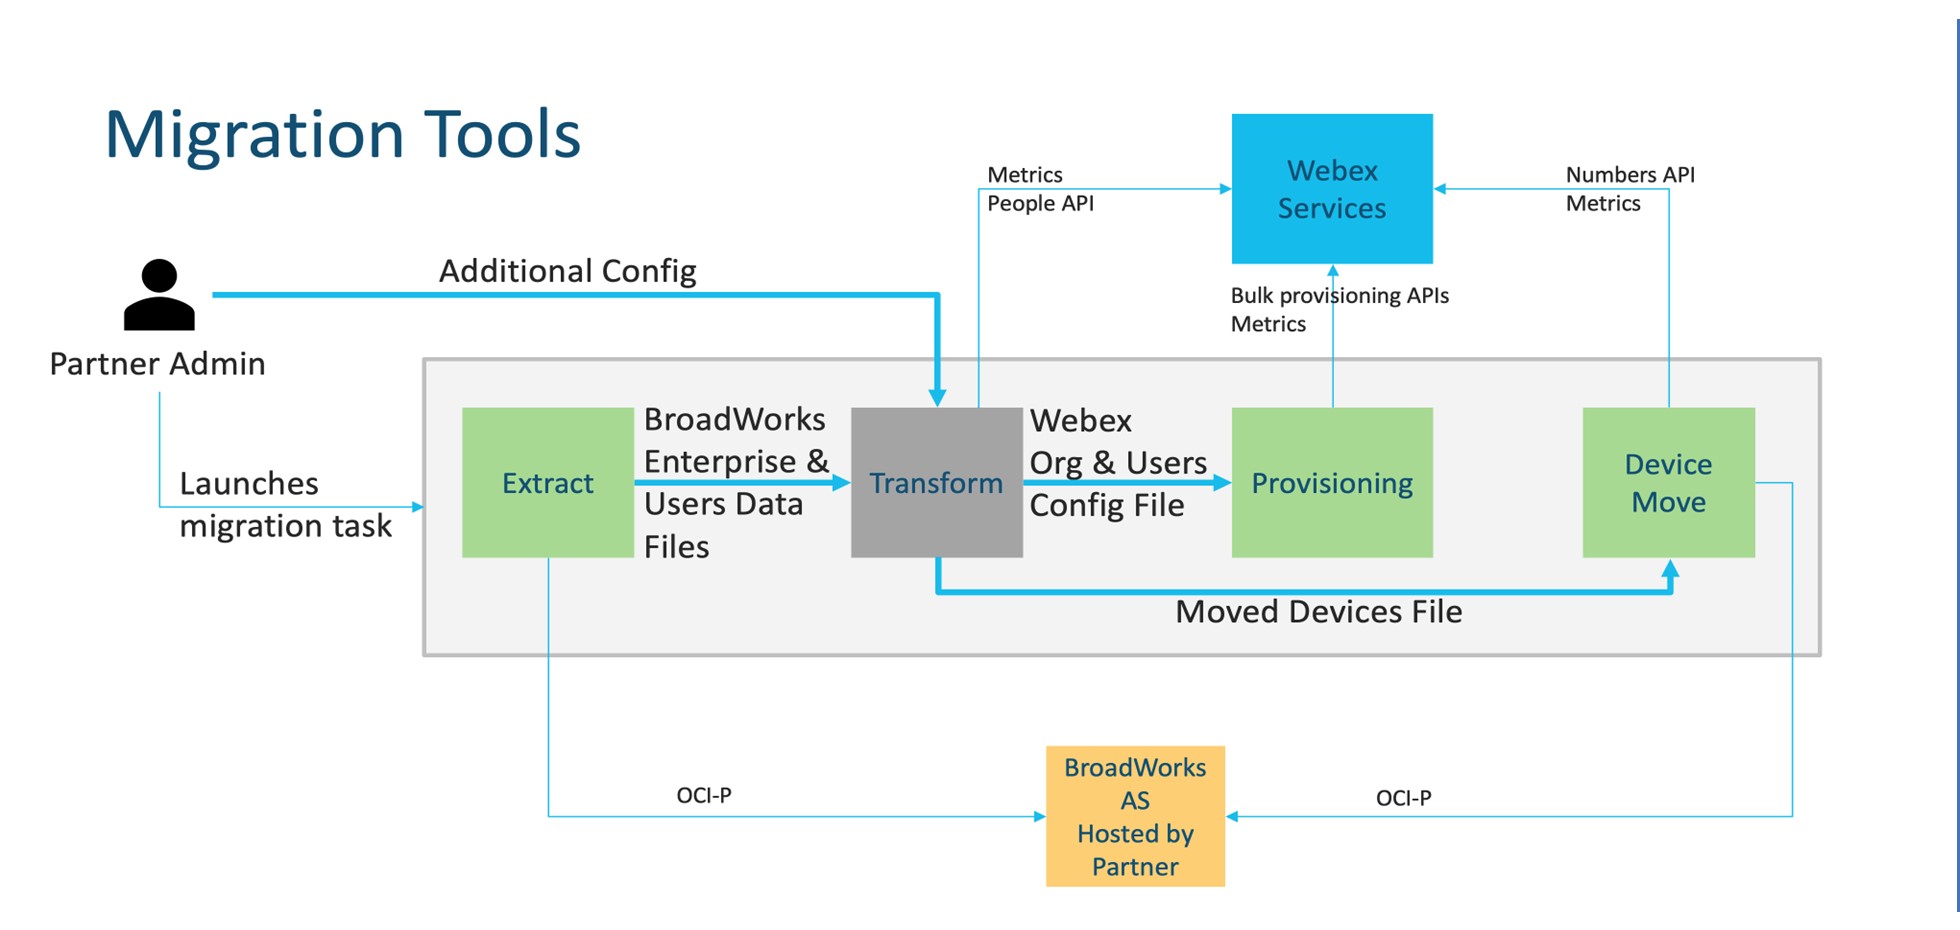
Figure 1. Outils de migration
Exigences
Avant d'exécuter les outils de migration, le partenaire doit satisfaire aux exigences suivantes :
- Le compte partenaire et le compte administrateur partenaire doivent être intégrés à la solution Wholesale RTM. Durant la phase de prévente, les partenaires ne sont pas tenus d'être intégrés à la solution Wholesale RTM pour exécuter l'outil d'extraction.
- Le partenaire doit consulter la liste de contrôle préalable à la migration pour s'assurer que toutes les exigences sont respectées.
- Les identifiants d'administrateur système Cisco BroadWorks sont requis pour exécuter les outils d'extraction et de déplacement de périphériques. Ceci ne s'applique pas aux partenaires de BroadCloud.
- Les outils d'extraction et de déplacement de périphériques doivent être exécutés à partir du serveur d'applications Cisco BroadWorks secondaire pendant une fenêtre de maintenance afin de minimiser les risques. Les partenaires de BroadCloud exécuteront l'outil de déplacement d'appareils depuis le portail des fournisseurs de services.
- Consultez la liste des appareils Webex Calling compatibles.
- Consultez la liste des appareils Webex Calling non pris en charge.
- Les partenaires doivent demander à leur équipe commerciale chez Cisco d'obtenir la version de firmware prise en charge pour les téléphones et les appareils.
- Les clients UC-One doivent effectuer une mise à niveau vers les versions suivantes :
- Les clients Desktop Communicator doivent être en version 22.9.12 ou supérieure.
- Les clients Mobile Connect doivent être en version 3.9.14 ou supérieure.
- La machine de l'administrateur doit avoir :
- JDK/JRE La version 1.8 est requise pour l'outil de provisionnement.
- Les machines MAC et Linux nécessitent Python 3.10.5 ou une version supérieure pour l'outil de transformation.
- Les clients doivent disposer d'une adresse de facturation valide et les utilisateurs finaux doivent avoir une adresse e-mail professionnelle configurée dans Cisco BroadWorks. Si les valeurs ne sont pas définies, les administrateurs partenaires doivent contacter leurs clients pour les obtenir. Ces informations doivent être ajoutées aux fichiers CSV (valeurs séparées par des virgules) avant d'exécuter l'outil de transformation. Des exemples de fichiers CSV sont fournis avec l'outil de transformation.
Plan de transfert
Le plan de migration comporte 3 étapes :
- Préparation
- Obtenez une copie des données utilisateur avec l'outil d'extraction.
- Générez un jeton à l'aide de l'outil de génération de jetons.
- Utilisez l'outil Transformation pour formater les données utilisateur
- Approvisionnement
- Obtenez les données utilisateur les plus récentes grâce à l'outil d'extraction.
- Utilisez l'outil Transformation pour formater les données utilisateur
- Provisionner les utilisateurs avec l'outil de provisionnement
- Migration
- Migrez les appareils avec l'outil de déplacement d'appareils
- Migrations sans appareils [ Activation des numéros de téléphone via le Centre de contrôle ]
Si les administrateurs partenaires ne disposent pas de périphériques à déplacer de Cisco BroadWorks vers Wholesale, l'exécution de l'outil de déplacement de périphériques n'est pas nécessaire. Les administrateurs partenaires peuvent utiliser le lien public ci-dessous pour activer les numéros de téléphone directement via le portail Control Hub. Pour plus d’informations, voir Gérer les numéros de téléphone dans Control Hub.
La désactivation des numéros de téléphone dans Cisco BroadWorks est facultative si les administrateurs partenaires activent leurs numéros de téléphone via Control Hub.
Les fonctionnalités ont été automatiquement transférées vers Wholesale Calling.
Ces fonctionnalités utilisateur sont automatiquement migrées par les outils de migration :
- Les paramètres de messagerie vocale et les messages d'accueil personnalisés (les messages vocaux, l'audio du nom personnalisé et le code PIN des utilisateurs ne sont pas transférés)
- Numéros alternatifs
- BroadWorks Anywhere
- Champ de lampadaires animé
- Identification de l'appelant (nom et numéro de téléphone personnalisés)
- Appel en attente
- Paramètres de renvoi d'appel (renvoi d'appel) always/busy/no answer/not accessible)
- Interception d’appel
- Ne pas déranger
- Paramètres de télécopie
- Bureau à distance
- Apparence d’appel partagé
- Personnel de l'anneau simultané (y compris le calendrier et les critères de sélection)
- Notification d'appel (y compris la planification et les critères de sélection)
- Rejet des appels anonymes
- Rejet sélectif des appels
- Renvoi d'appel sélectif
- Acceptation sélective des appels
- Sonnerie séquentielle
- Prise d'appel dirigée et intrusion
- Exemption pour intrusion
- Appuyer pour parler
- Confidentialité
- Musique d’attente
- Service de vacances
- Service de nuit
- forfait d'appels sortants
- Forfait d'appels sortants - Codes d'autorisation
- Forfait appels sortants - Numéros de transfert
- forfait d'appels entrants
- Client réceptionniste
- Enregistrement d’appel
Ces fonctionnalités de groupe sont automatiquement migrées par les outils de migration :
- Standard automatique
- Salutations personnalisées
- Paramètres de renvoi d'appel (toujours, occupé, sélectif)
- Numéros alternatifs
- Le menu des fêtes n'est pas disponible sur Webex.
- Rejet sélectif des appels
- Cisco BroadWorks Call Center Standard et file d'attente d'appels BroadCloud :
- configuration de base
- Salutations personnalisées
- Agents et superviseurs
- Paramètres de renvoi d'appel (toujours, occupé, sélectif)
- Numéros alternatifs
- Musique en attente
- envoi forcé
- contournement du message de confort
- Espace de travail commun :
- Transfert d’appel
- Ne pas déranger
- Appel en attente
- Interception d’appel
- Musique en attente
- Champ de lampes très actif (Surveillance)
- ID de l'appelant
- Numéros alternatifs
- forfait d'appels entrants
- forfait d'appels sortants
- Forfait d'appels sortants - Codes d'autorisation
- Forfait appels sortants - Numéros de transfert
- Espace de travail professionnel :
- Transfert d’appel
- Messagerie vocale
- Messagerie vocale - Message d'accueil occupé
- Messagerie vocale - Message d'accueil sans réponse
- Ne pas déranger
- Appel en attente
- Interception d’appel
- Musique en attente
- Champ de lampes très actif (Surveillance)
- Appuyer pour parler
- Sonnerie simultanée
- Rejet des appels anonymes
- Renvoi d'appel sélectif
- Rejet sélectif des appels
- Acceptation sélective des appels
- Sonnerie séquentielle
- Intervention
- Paramètres de confidentialité
- ID de l'appelant
- Numéros alternatifs
- forfait d'appels entrants
- forfait d'appels sortants
- Forfait d'appels sortants - Codes d'autorisation
- Forfait appels sortants - Numéros de transfert
- Enregistrement d’appel
- Ligne virtuelle :
- Transfert d’appel
- Messagerie vocale
- Messagerie vocale - Message d'accueil occupé
- Messagerie vocale - Message d'accueil sans réponse
- Appel en attente
- Interception d’appel
- Musique en attente
- Appuyer pour parler
- Intervention
- Paramètres de confidentialité
- ID de l'appelant
- forfait d'appels entrants
- forfait d'appels sortants
- Forfait d'appels sortants - Codes d'autorisation
- Forfait appels sortants - Numéros de transfert
- Enregistrement d’appel
- Parcage d’appels
- Prise d’appel
- Groupe de recherche
- Paramètres de renvoi d'appel (toujours, occupé, sélectif, injoignable)
- Numéros alternatifs
- Code de localisation (un par emplacement ou groupe)
- Groupe de messagerie
- Planifications (les planifications d'entreprise ne sont pas migrées)
- Portail vocal
- Musique en attente
- Liste de numéros de téléphone courants
- Groupe de messagerie vocale
Périphériques pris en charge
Les téléphones compatibles seront automatiquement créés et attribués aux utilisateurs dans Webex Calling par l'outil de provisionnement. Les téléphones marqués « oui » dans la colonne « Pris en charge par l'outil de déplacement de périphérique » seront également automatiquement déplacés de Cisco BroadWorks ou BroadCloud vers Webex Calling lors de l'exécution de l'outil de déplacement de périphérique. Les téléphones marqués « Non » dans cette colonne nécessitent une intervention manuelle pour modifier l’URL DMS dans le modèle de périphérique Cisco BroadWorks ou dans le téléphone lui-même.
La dernière colonne indique la correspondance entre les modèles de téléphone et la colonne « Type d'appareil » du fichier. transform-tool/input/newphones.csv. (Voir la section Outil de transformation de cet article pour plus d'informations sur newphones.csv).
|
Modèle de téléphone |
Pris en charge par l'outil de déplacement d'appareil |
Type d'appareil dans newphones.csv |
|---|---|---|
|
Cisco MPP 6821 |
Oui |
DMS Cisco 6821 |
|
Cisco MPP 6841 |
Oui |
DMS Cisco 6841 |
|
Cisco MPP 6851 |
Oui |
DMS Cisco 6851 |
|
Cisco MPP 6861 |
Oui |
DMS Cisco 6861 |
|
Cisco MPP 6871 |
Oui |
DMS Cisco 6871 |
|
Cisco MPP 7811 |
Oui |
DMS Cisco 7811 |
|
Cisco MPP 7821 |
Oui |
DMS Cisco 7821 |
|
Cisco MPP 7832 |
Oui |
DMS Cisco 7832 |
|
Cisco MPP 7841 |
Oui |
DMS Cisco 7841 |
|
Cisco MPP 7861 |
Oui |
DMS Cisco 7861 |
|
Cisco MPP 8811 |
Oui |
DMS Cisco 8811 |
|
Cisco MPP 8832 |
Oui |
DMS Cisco 8832 |
|
Cisco MPP 8841 |
Oui |
DMS Cisco 8841 |
|
Cisco MPP 8845 |
Oui |
DMS Cisco 8845 |
|
Cisco MPP 8851 |
Oui |
DMS Cisco 8851 |
|
Cisco MPP 8861 |
Oui |
DMS Cisco 8861 |
|
Cisco MPP 8865 |
Oui |
DMS Cisco 8865 |
|
Cisco MPP 8875 |
Oui |
DMS Cisco 8875 |
|
Cisco ATA191 |
Oui |
DMS Cisco 191 |
|
Cisco ATA192 |
Oui |
DMS Cisco 192 |
|
Cisco DBS 110 |
Oui |
DMS Cisco DBS110 |
|
Polycom VVX101 |
Oui |
DMS Polycom VVX101 |
|
Polycom VVX150 |
Oui |
DMS Polycom VVX150 |
|
Polycom VVX201 |
Oui |
DMS Polycom VVX201 |
|
Polycom VVX250 |
Oui |
DMS Polycom VVX250 |
|
Polycom VVX301 |
Oui |
DMS Polycom VVX301 |
|
Polycom VVX311 |
Oui |
DMS Polycom VVX311 |
|
Polycom VVX350 |
Oui |
DMS Polycom VVX350 |
|
Polycom VVX401 |
Oui |
DMS Polycom VVX401 |
|
Polycom VVX411 |
Oui |
DMS Polycom VVX411 |
|
Polycom VVX450 |
Oui |
DMS Polycom VVX450 |
|
Polycom VVX501 |
Oui |
DMS Polycom VVX501 |
|
Polycom VVX601 |
Oui |
DMS Polycom VVX601 |
|
Polycom Trio 8300 |
Oui |
DMS Polycom Trio8300 |
|
Polycom Trio 8500 |
Oui |
DMS Polycom Trio8500 |
|
Polycom Trio 8800 |
Oui |
DMS Polycom Trio8800 |
|
Polycom SoundStation 5000 |
Oui |
DMS Polycom SSIP5000 |
|
Polycom SoundStation 6000 |
Oui |
DMS Polycom SSIP6000 |
|
Yealink T33G |
Oui |
DMS Yealink T33G |
|
Yealink T41S |
Oui |
DMS Yealink T41S |
|
Yealink T42S |
Oui |
DMS Yealink T42S |
|
Yealink T43U |
Oui |
DMS Yealink T43U |
|
Yealink T46U |
Oui |
DMS Yealink T46U |
|
Yealink T46S |
Oui |
DMS Yealink T46S |
|
Yealink T48S |
Oui |
DMS Yealink T48S |
|
Yealink T48U |
Oui |
DMS Yealink T48U |
|
Yealink T53W |
Oui |
DMS Yealink T53W |
|
Yealink T54W |
Oui |
DMS Yealink T54W |
|
Yealink T57W |
Oui |
DMS Yealink T57W |
|
Yealink T58V |
Oui |
DMS Yealink T58V |
|
Yealink CP920 |
Oui |
DMS Yealink CP920 |
|
Yealink CP960 |
Oui |
DMS Yealink CP960 |
|
Yealink W52B |
Oui |
DMS Yealink W52P |
|
Yealink W56B |
Oui |
DMS Yealink W56P |
|
Yealink W60B |
Oui |
DMS Yealink W60P |
|
Yealink W70B |
Oui |
DMS Yealink W70P |
|
Yealink CP925 |
Oui |
DMS Yealink CP925 |
|
Yealink CP965 |
Oui |
DMS Yealink CP965 |
|
AudioCodes MP204R |
Oui |
DMS AudioCodes MP204R |
|
AudioCodes MP202R |
Oui |
DMS AudioCodes MP202R |
|
AudioCodes MP204 |
Oui |
DMS AudioCodes MP204 |
|
AudioCodes MP202 |
Oui |
DMS AudioCodes MP202 |
Appareils non pris en charge
Si le client utilise des appareils non pris en charge par la solution Wholesale RTM, ces appareils ne sont pas éligibles à la migration. Dans ce cas, vous avez les options suivantes :
- Configurez les nouveaux téléphones sur Cisco BroadWorks avant la migration.
- Laissez les anciens téléphones dans Cisco BroadWorks, et les utilisateurs devront installer l'application Webex pour passer et recevoir des appels.
forfaits d'appels en gros
Les outils de migration disposent d'un ensemble de valeurs par défaut pour la sélection des forfaits d'appels en gros pour les abonnés. Si un autre forfait est souhaité ultérieurement, ces paramètres peuvent être modifiés dans Control Hub par un administrateur partenaire.
Configuration du package de migration Cisco BroadWorks
Tous les abonnés migrant depuis Cisco BroadWorks passeront par défaut au forfait d'appels Webex. Si le forfait Webex Voice est souhaité pour les abonnés qui n'ont pas l'option d'appel en attente ou de messagerie vocale, cela peut être activé dans le fichier partner.cfg de l'outil de transformation en décommentant la ligne USE_WEBEX_VOICE_PACKAGE.
Cartographie du package de migration Webex pour BroadWorks
La migration depuis Webex vers les forfaits Broadworks dépend du type de forfait Broadworks. Configurez le mappage par défaut dans le fichier de configuration de l'outil de transformation à l'emplacement conf/w4b_package_to_wholesale_package.csv.
|
Pack Webex pour BroadWorks |
Forfait d'appels en gros |
|---|---|
|
Softphone |
Webex Voice |
|
Basique |
Webex Calling |
|
Standard |
Webex Suite |
|
Premium |
Webex Suite |
mappage du package de migration BroadCloud
Migrations à partir des packages de cartes BroadCloud Carrier en fonction du type de station. Le mappage par défaut peut être configuré dans le fichier de configuration de l'outil de transformation conf/rialto_station_type_to_wholesale_package.csv.
|
Type de station porteuse BroadCloud |
Forfait d'appels en gros |
|---|---|
|
Basique |
Webex Voice |
|
Salle de conférence |
Webex Voice |
|
Messagerie |
Webex Voice |
|
Standard |
Webex Voice |
|
Exécutif |
Webex Suite |
|
Tous les autres types de gares |
Webex Voice |
Transformez un compte utilisateur BroadWorks ou BroadCloud en un espace de travail Webex Calling.
Un espace de travail Webex est un téléphone partagé entre plusieurs personnes, par exemple : Par exemple: téléphones dans une salle de conférence, un entrepôt ou un hall d'entrée. Ces téléphones peuvent être configurés dans Webex Calling en tant qu'espaces de travail Webex plutôt qu'en tant qu'utilisateurs Webex. Une option permet de transformer automatiquement les comptes utilisateurs de Cisco BroadWorks ou BroadCloud Carrier en espaces de travail lors du processus de migration.
Étapes :
- Dans le fichier transform_tool/input/users.csv, Attribuer le package «common_area» aux utilisateurs à transformer en espace de travail.
- Exemple : bwuser@domain,,,common_area
- (BroadCloud uniquement) Pour convertir tous les comptes utilisateurs d'un type de station spécifique en espaces de travail, ajoutez une entrée à transform-tool/conf/rialto_station_type_to_wholesale_package.csv et définissez le forfait de vente en gros sur «common_area_calling».
- Exemple : conference_room_v2,common_area_calling
- Exécutez l'outil de transformation.
- Exécutez l'outil de provisionnement.
- Ouvrez le Control Hub de l'organisation cliente nouvellement créée et définissez un domaine SIP (voir la figure 2, Configuration d'un domaine SIP dans Control Hub).
- Relancez l'outil de provisionnement. Cela crée les espaces de travail et y associe des téléphones.
Limites :
La configuration des fonctionnalités utilisateur (par exemple, le renvoi d'appel, le mode « Ne pas déranger ») n'est pas automatiquement transférée vers l'espace de travail.
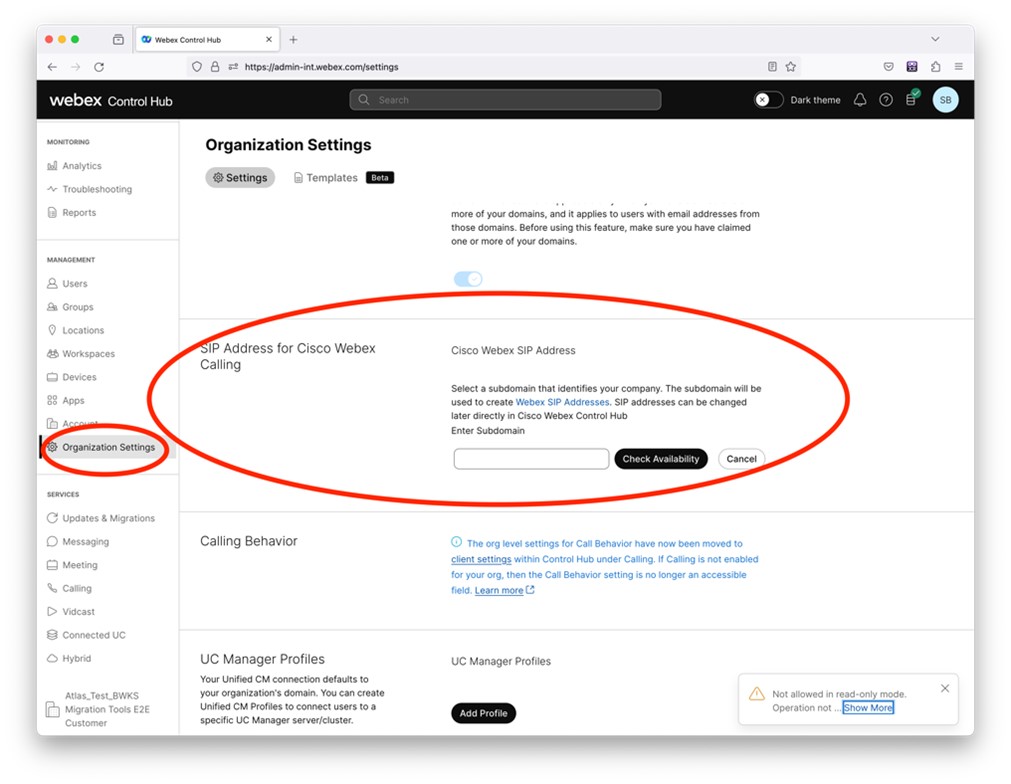
Figure 2 : Configuration d'un domaine SIP dans Control Hub
Outil de génération de jetons
Les administrateurs partenaires exécutent cet outil utilitaire de génération de jetons au moins une fois avant de lancer les outils de migration. L'exécution de cet outil est une activité ponctuelle qui intervient après l'intégration du compte partenaire dans la solution Wholesale RTM. Cet outil permet aux administrateurs partenaires de se connecter via un navigateur Web pour obtenir le jeton unique nécessaire à la mise à jour des fichiers de configuration partenaire pour les outils de migration.
Prérequis
Installez Java 8, 11, 17 ou 21 sur l'ordinateur. Java est disponible auprès de nombreuses sources, notamment :
- https://learn.microsoft.com/en-us/java/openjdk/download
- https://aws.amazon.com/corretto/
- https://www.oracle.com/java/technologies/downloads/#java21
Après le téléchargement, extrayez les fichiers binaires de l'outil de migration.
Cette étape est facultative.
Instructions d'exécution
Exécutez la commande suivante dans le terminal situé dans le répertoire du générateur de jetons :
-
Les ports suivants doivent être disponibles pour exécuter l'outil de génération de jetons. Ports : 8080, 50009, 50010, 50011, 50012 et 50013
-
Au moins un de ces ports mentionnés doit être ouvert à la connexion sur l'ordinateur de l'utilisateur.
Windows :
token_generator.batmacOS :
./token_generator.shSortir:
Tool Name: Token Generator Tool
Version: 1.13.0
Load the URL in your web browser: http://localhost:8080
Ouvrez l'URL dans le navigateur Web du terminal, connectez-vous avec les identifiants d'administrateur partenaire pour obtenir le TOKEN et copiez-le pour une utilisation ultérieure.
Les illustrations de l'interface utilisateur sont données ci-dessous à titre de référence :
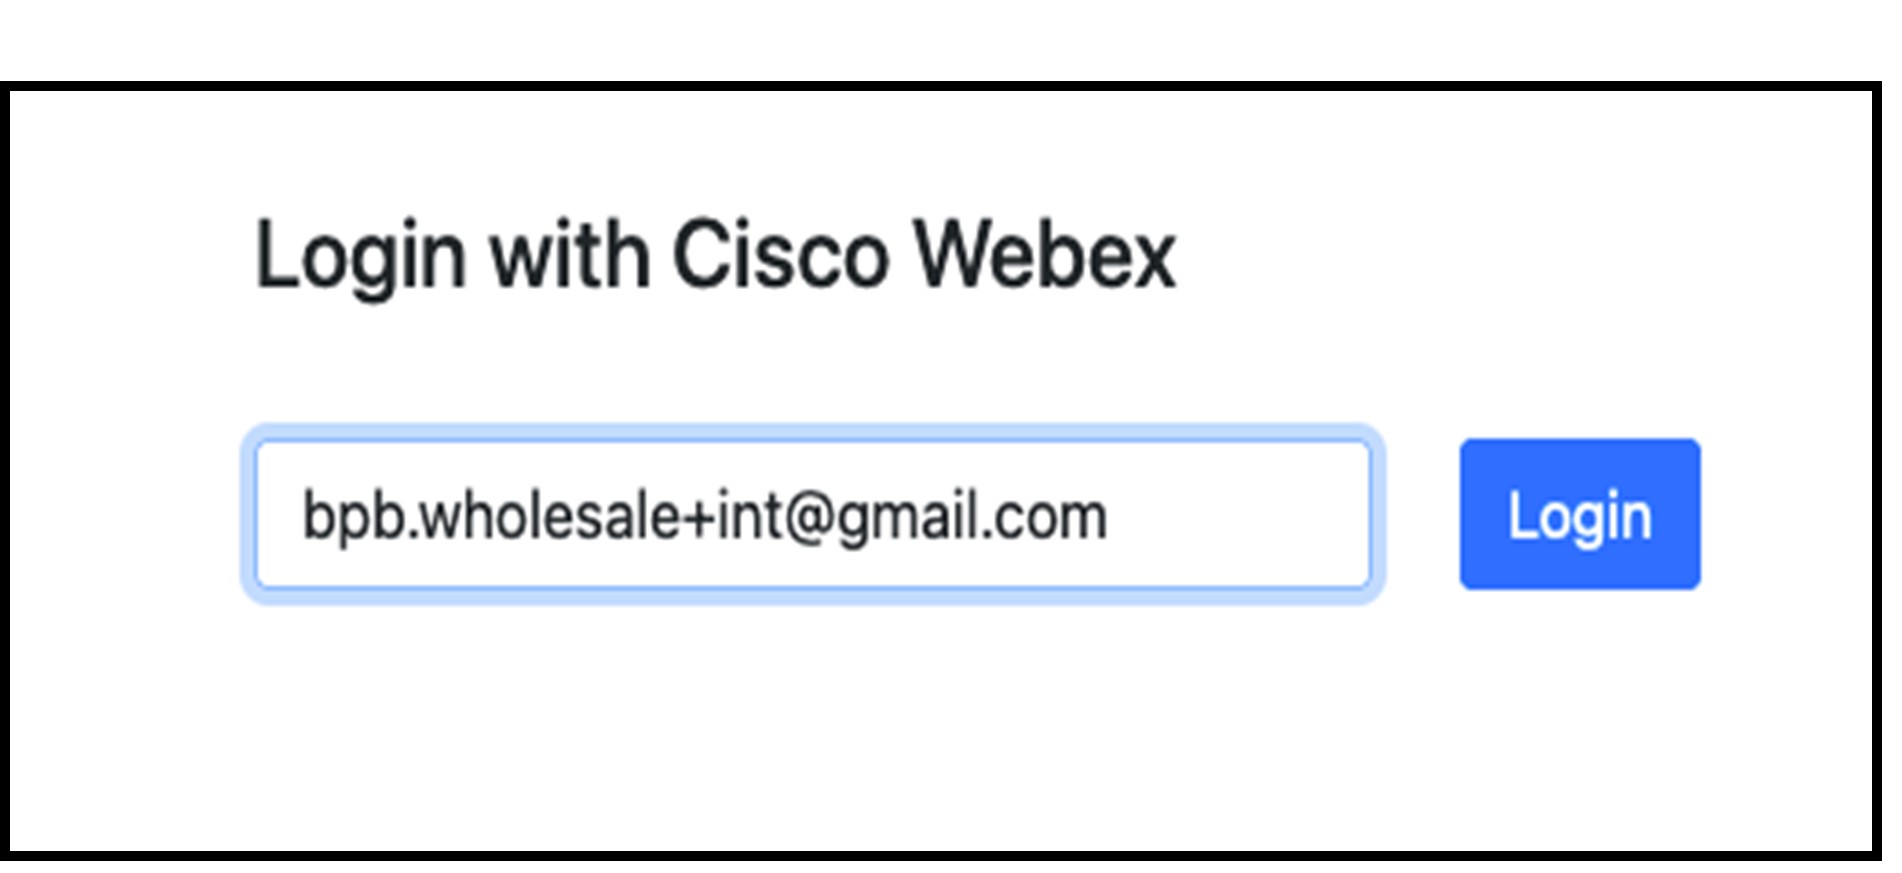
Figure 3 : Connectez-vous avec Cisco Webex
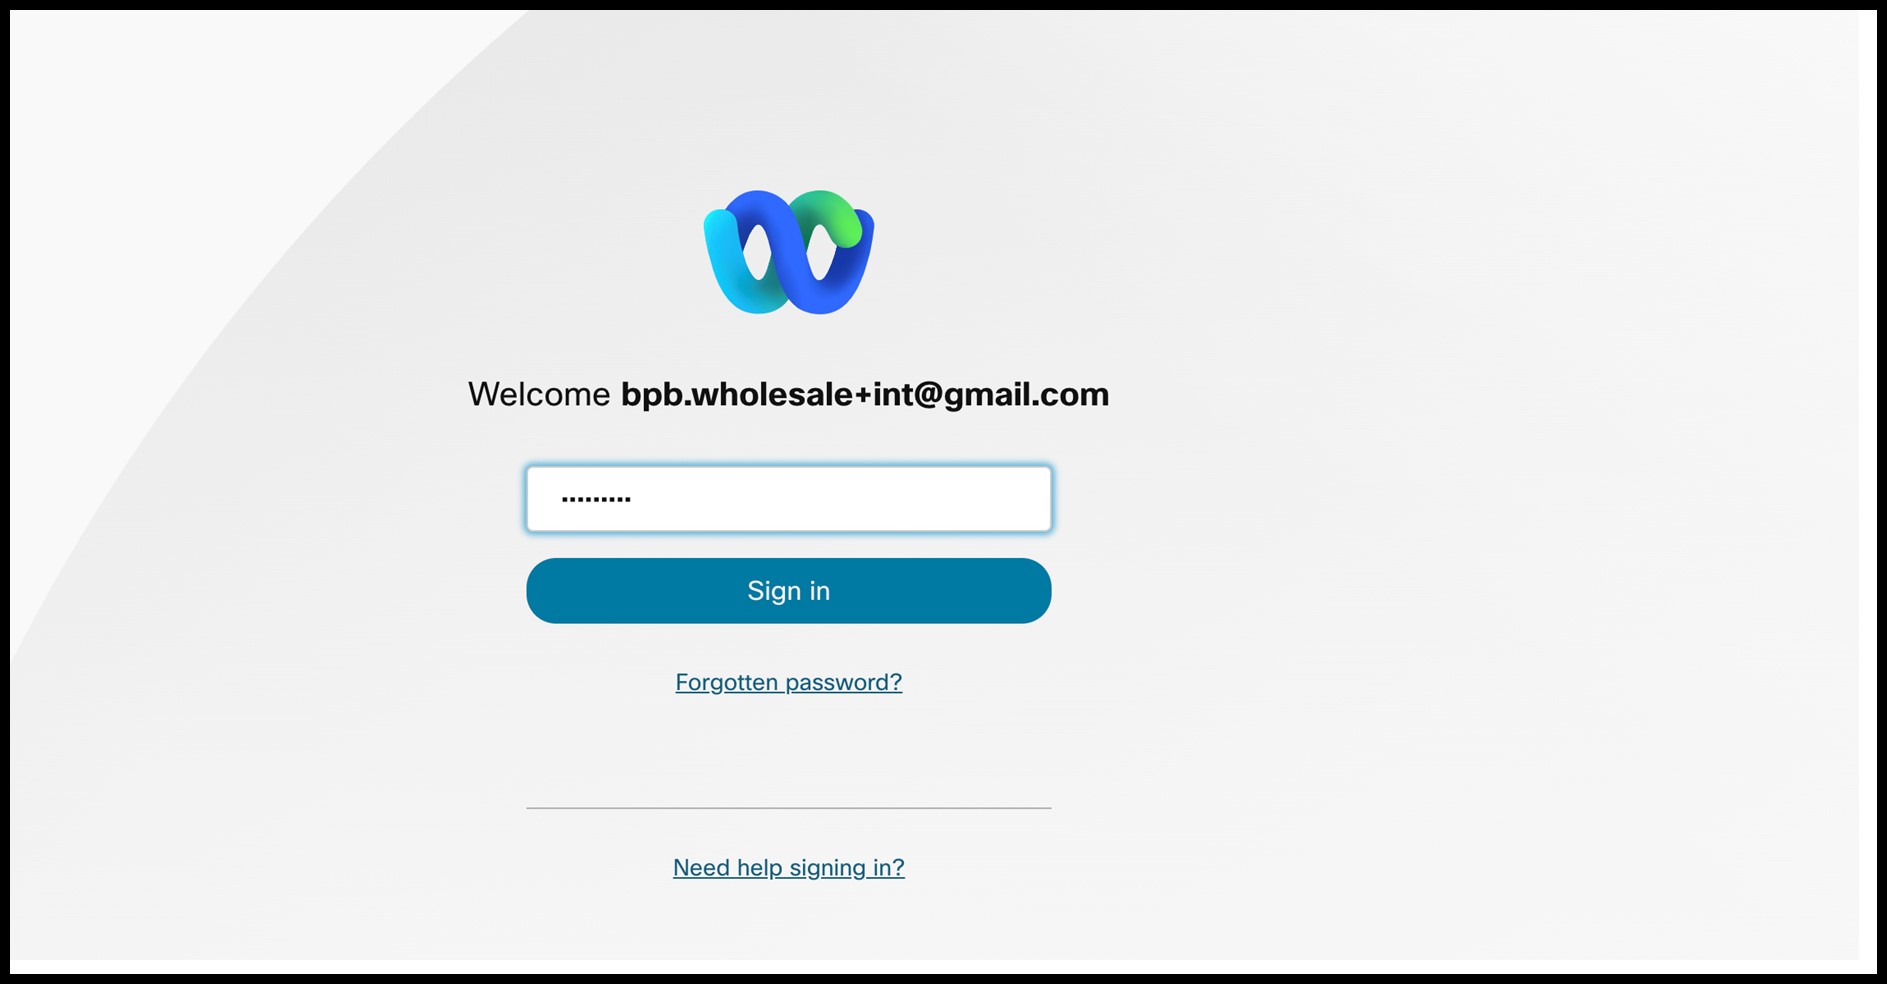
Figure 4 : Fenêtre d'identification
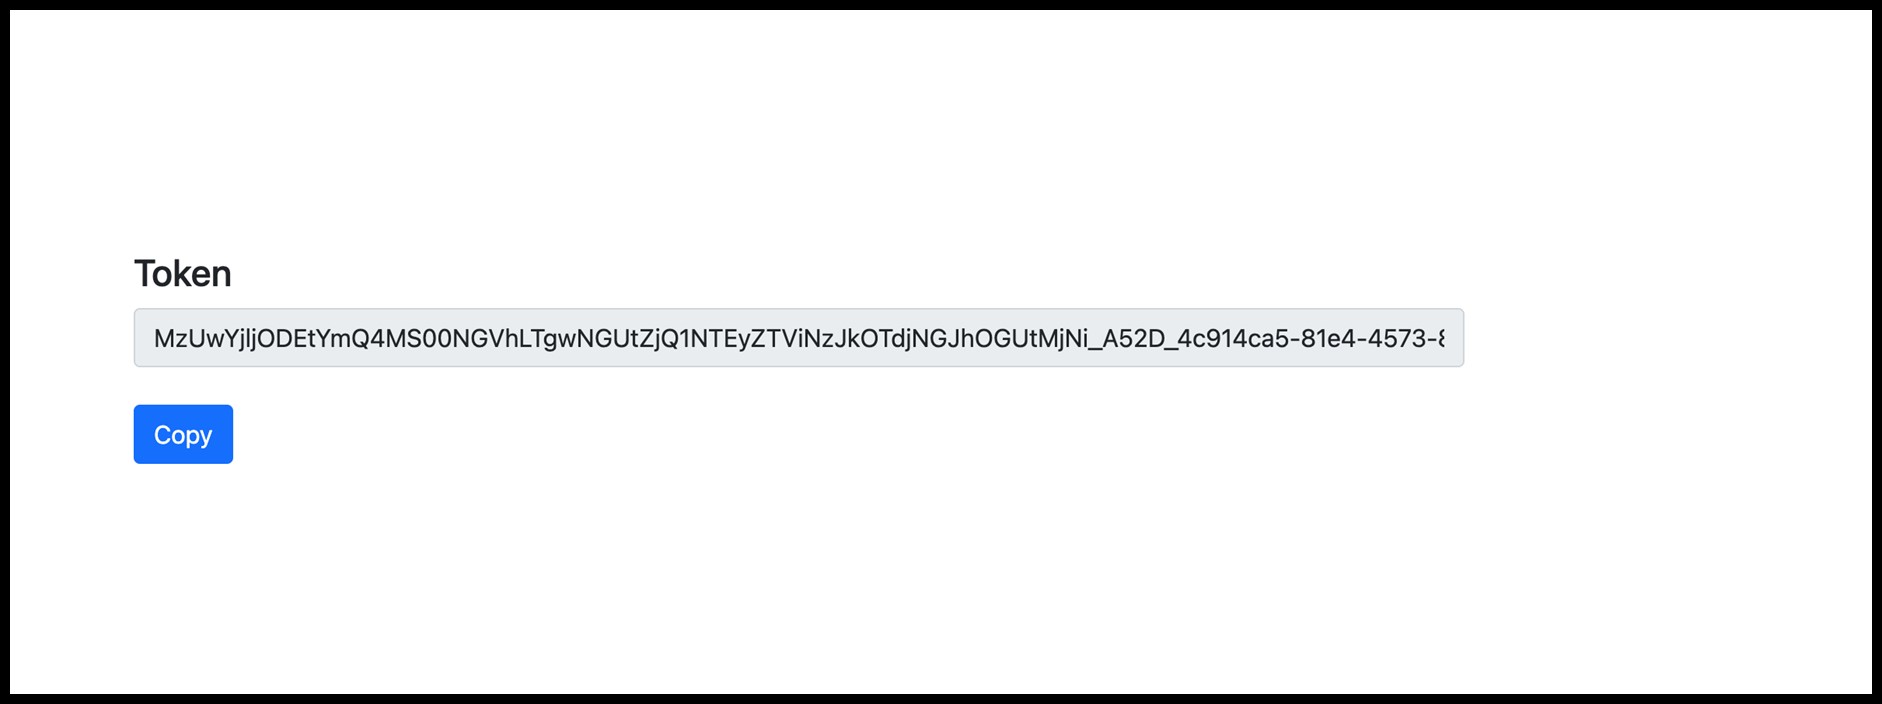
Figure 5 : Génération de jetons
tâches de configuration de BroadWorks
Configurez les étapes suivantes avant d'exécuter les outils d'extraction et de déplacement de périphérique sur le serveur BroadWorks secondaire.
Activer la connectivité OCI-P
L'outil de déplacement de périphérique communique avec BroadWorks via des commandes OCI-P. Pour activer la connectivité OCI-P, suivez les étapes ci-dessous :
Étape 1: Utilisez l'interface de ligne de commande (CLI) pour configurer les paramètres généraux.
Exécutez la commande suivante dans l'interface de ligne de commande pour accéder au répertoire GeneralSettings :
AS_CLI> cd /Applications/OpenClientServer/GeneralSettings.Exécutez la commande suivante dans l'interface de ligne de commande (CLI) pour obtenir les paramètres généraux actuels :
AS_CLI/Applications/OpenClientServer/GeneralSettings> get
clientPort = 2208
clientPortEnabled = true
secureClientPort = 2209
secureClientPortEnabled = true
systemDomain = <>
Si vos paramètres ne correspondent pas à ce qui précède, utilisez la commande set pour reconfigurer vos paramètres.
Étape 2: Utilisez l'interface de ligne de commande (CLI) pour configurer le proxy OCI.
Changez le répertoire pour accéder au proxy OCI :
AS_CLI> cd /Applications/OpenClientServer/OCIProxyExécutez la commande CLI suivante pour obtenir les paramètres actuels. Vous devriez voir ce qui suit :
AS_CLI/Applications/OpenClientServer/OCIProxy> get
enabled = true
enabledLoginLevelScreening = false
enableResponseCaching = false
responseCacheDurationHours = 24
responseCacheRenewPeriodMins = 30
messageQueueCapacity = 50
messageQueueTimeoutSeconds = 1800
Si vos paramètres ne correspondent pas à ce qui précède, utilisez la commande set pour reconfigurer vos paramètres.
Étape 3: Utilisez l'interface de ligne de commande (CLI) pour configurer le provisionnement OCI.
Accédez au répertoire de provisionnement :
AS_CLI> cd /System/NetworkAccessLists/OCI/ProvisioningExécutez la commande suivante pour obtenir les paramètres de provisionnement OCI actuels :
AS_CLI/System/NetworkAccessLists/OCI/Provisioning> get
Address Description
========================
127.0.0.1 local as
Étape 4: Exécutez la commande ci-dessous dans l'interface de ligne de commande (CLI) pour vérifier que votre configuration est correcte.
 AS_CLI/Maintenance/ManagedObjects> get broadworks and check
that your output looks OK.
See below for sample output:
AS_CLI/Maintenance/ManagedObjects> get broadworks
BroadWorks Managed Objects
==========================
* Server:
Identity..............: AS
Version...............: Rel_21.sp1_1.551
Administrative State..: Unlocked
* Applications:
Name Version Deployed Administrative State Effective State
=========================================================================================
ExecutionAndProvisioning 21.sp1_1.551 true Unlocked Unlocked
FlashPolicy 21.sp1_1.551 false Unlocked Stopped
OpenClientServer 21.sp1_1.551 true Unlocked Unlocked
WebContainer 21.sp1_1.551 true Unlocked Unlocked
4 entries found.
* Hosted Applications:
Name Version Context Path Deployed
==================================================================
CommPilot 21.sp1_1.551 / true
DeviceManagementFiles 21.sp1_1.551 /DeviceManagement true
JWSFiles 21.sp1_1.551 /FileRepos true
MediaFiles 21.sp1_1.551 /media true
OCIFiles 21.sp1_1.551 /ocifiles true
5 entries found.
Vérifiez que le serveur client ouvert est déployé et actif.
Utilisez les commandes ci-dessous pour déployer et démarrer le serveur Open Client sur le serveur d'applications secondaire s'il n'est pas déployé ou n'a pas déjà été démarré.
Étape 1: Déployez le serveur avec la commande CLI suivante :
AS_CLI/Maintenance/ManagedObjects> deploy application OpenClientServerÉtape 2: Démarrez le serveur avec cette commande :
AS_CLI/Maintenance/ManagedObjects> start application OpenClientServerActiver l'activation des numéros
Exécutez les commandes suivantes dans l'interface de ligne de commande (CLI) pour activer les numéros :
Étape 1: Exécutez la commande d'activation du numéro :
AS_CLI> cd SubscriberMgmt/NumberActivationÉtape 2: Exécutez la commande d'activation :
AS_CLI> set dnMode groupAndUserActivationEnabledÉtape 3: À l'invite de confirmation, saisissez O.
Abonnement d’appel Webex
Les forfaits d'appels Cisco offrent une solution intégrée conçue pour simplifier votre expérience d'appels dans le cloud avec Webex Calling.
Prérequis
L'équipe commerciale Cisco doit aider l'administrateur partenaire à configurer le fournisseur PSTN connecté au cloud sur Sinch dans le modèle de provisionnement en gros.
Outil de transformation
Pour activer le forfait d'appels Cisco, ajoutez la configuration suivante au fichier partner.cfg :
- ACTIVER_CISCO_APPEL_PLAN=Yes
- Par défaut, cette propriété est commentée. Les administrateurs doivent le décommenter et l'activer avant d'exécuter l'outil de transformation.
- Après avoir activé cette propriété et exécuté l'outil de transformation, la section Wholesale Package du fichier JSON du client inclura automatiquement le plan d'appel Cisco.
Outil de provisionnement
Pour les sites clients qui optent pour le forfait d'appels Cisco, nous activons les numéros associés lors de la phase de mise en service des numéros. Toutefois, les clients ne commenceront à utiliser ces numéros qu'une fois le processus de migration terminé.
Outil d'extraction
Pour BroadCloud
L'outil d'extraction est intégré au portail des fournisseurs de services BroadCloud. Un administrateur de fournisseur de services peut :
- Soumettez des demandes d'extraits pour un maximum de 50 clients par demande.Une demande d'extraction ne peut être soumise plus de 10 fois par jour pour un même client.
- Téléchargez le fichier de données extrait, au format ZIP, pendant une durée maximale de 28 jours à compter de la date de soumission de la demande.
Les figures suivantes présentent le portail du fournisseur de services.
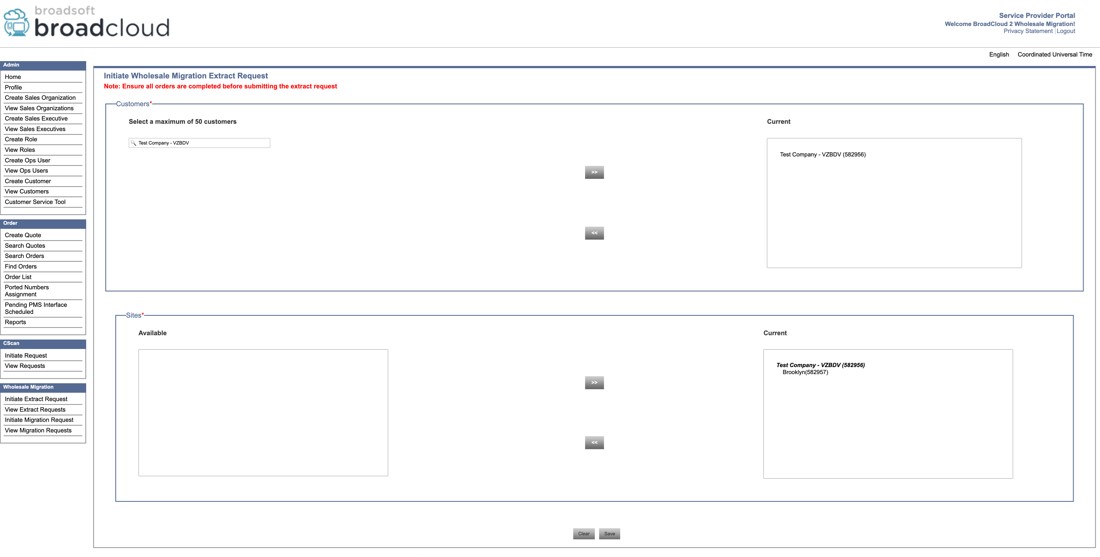
Figure 6 : Portail des fournisseurs de services
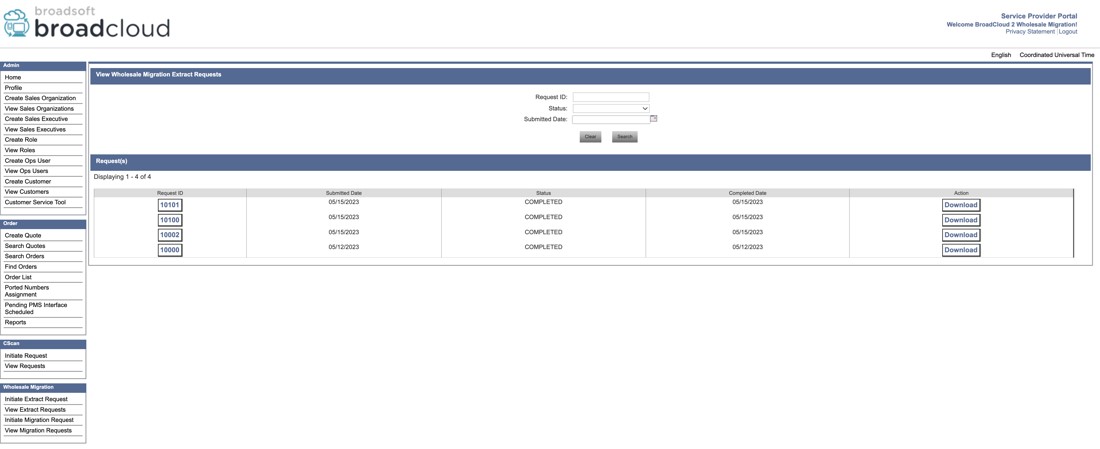
Figure 7 : Portail des fournisseurs de services
demande d'extraction CSV
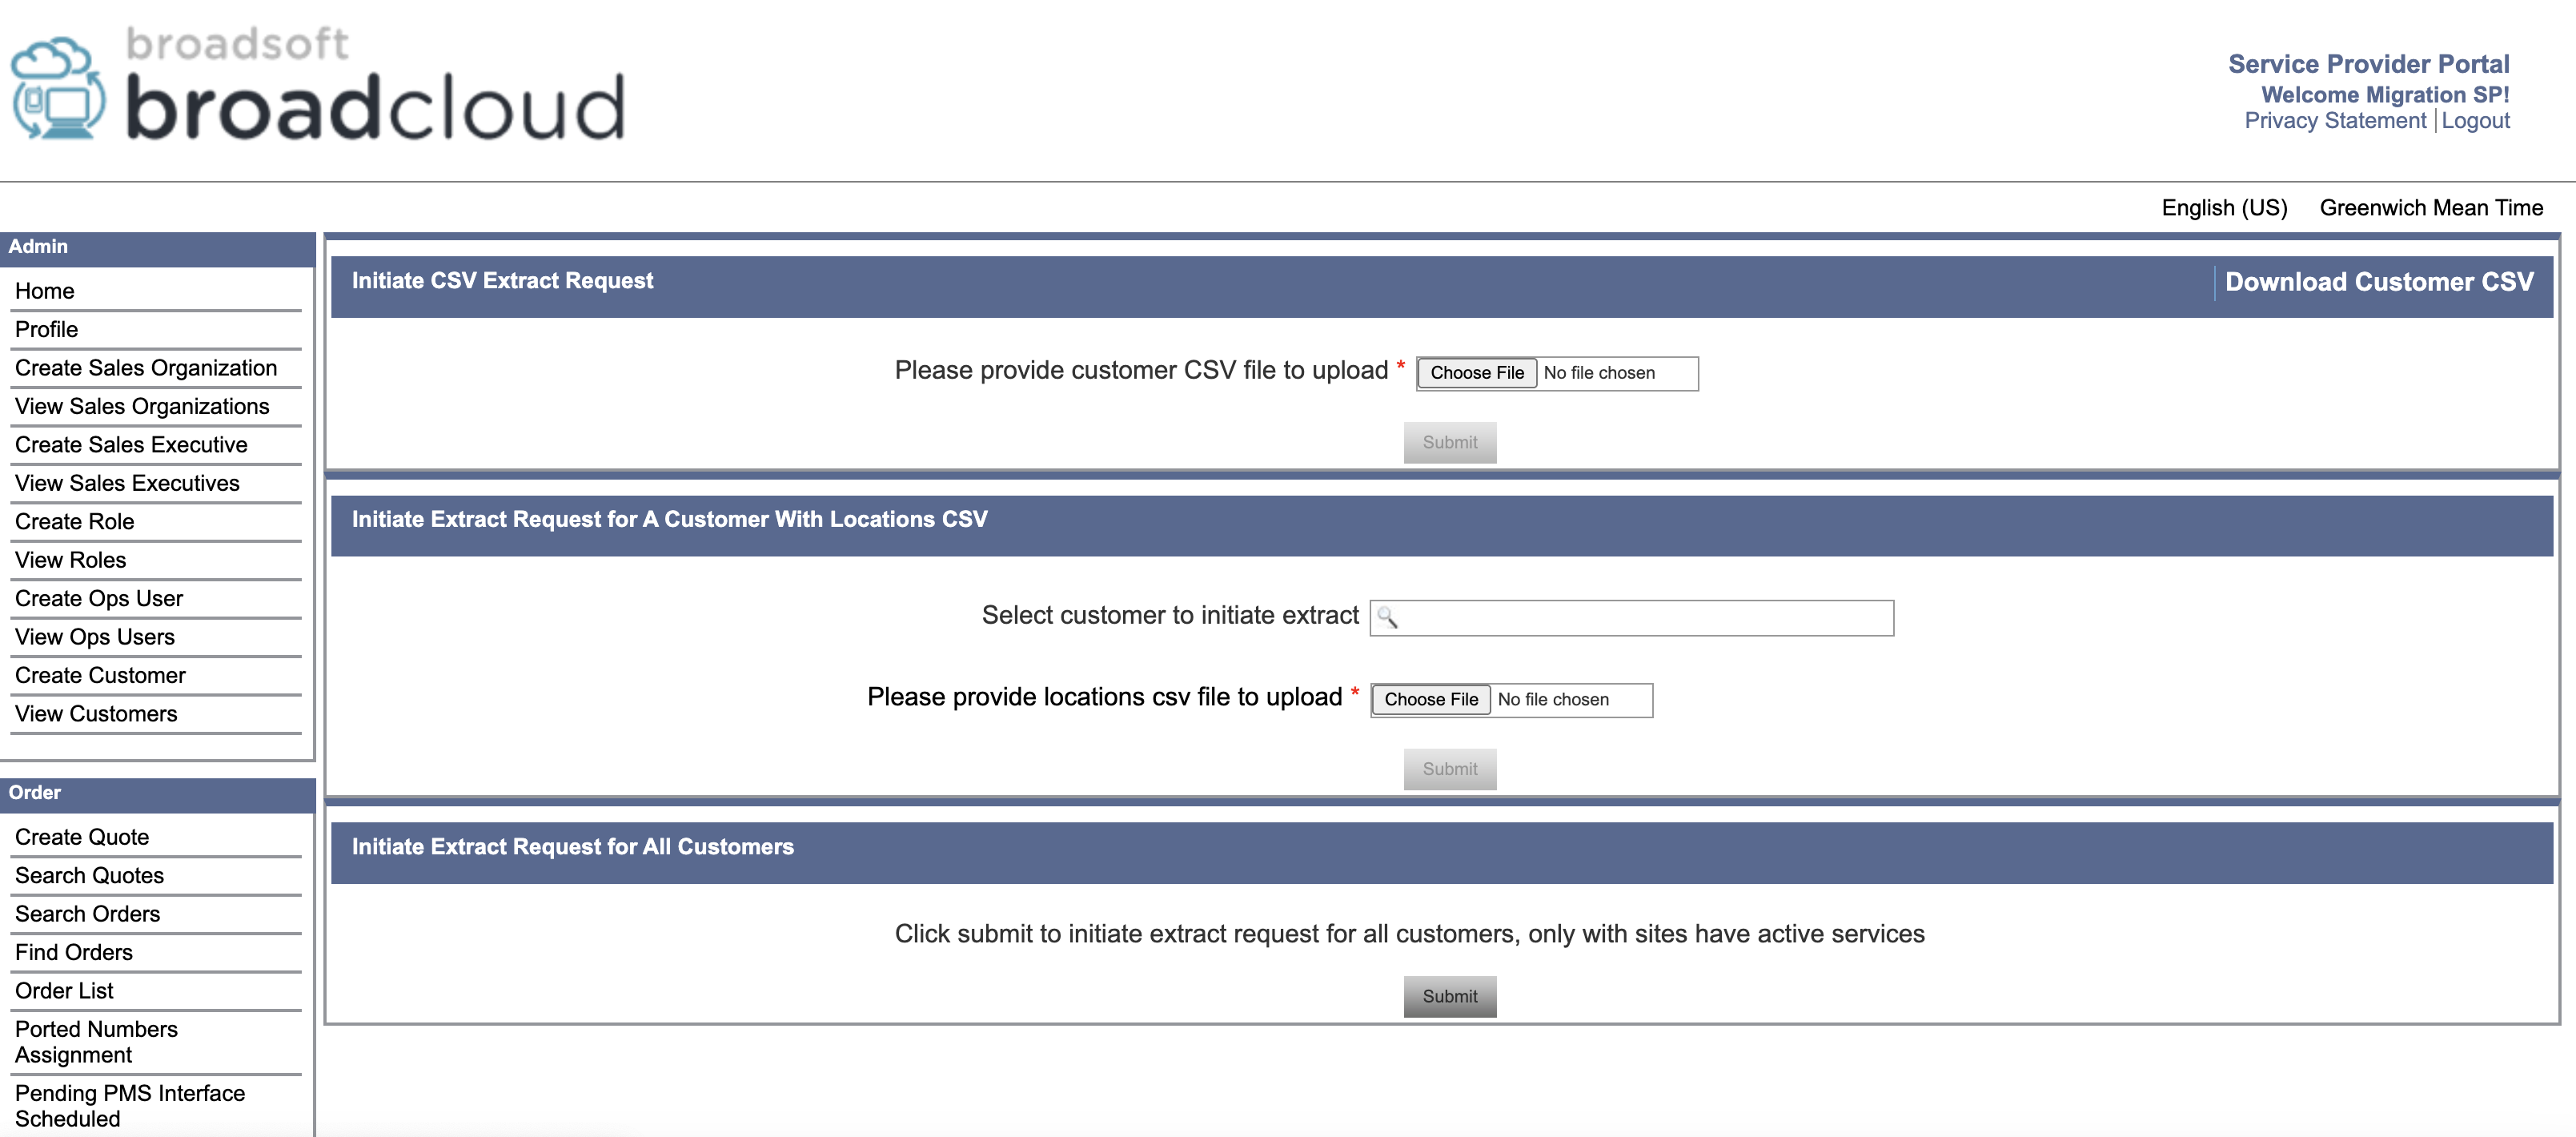
Lancer une requête d'extraction CSV
-
Télécharger le fichier CSV client
Cliquez sur le lien Télécharger le fichier CSV client dans le coin supérieur droit de la section Lancer une demande d'extraction CSV.
-
Modifier la liste des clients
L'administrateur peut modifier ce fichier CSV pour n'y inclure que les clients pour lesquels l'extraction doit être effectuée.
-
Téléverser et soumettre
Après modification, téléchargez le fichier CSV modifié.
Cliquez sur Soumettre pour lancer une demande d'extraction pour les clients listés et leurs emplacements associés.
Lancer une demande d'extraction pour un client avec les emplacements CSV
-
Sélectionnez le client et l'emplacement de téléchargement
Sélectionnez un client dans la liste déroulante.
Téléchargez le fichier correspondant locations.csv depuis Afficher les clients→ Onglet Sites → Exporter les emplacements au format CSV.
-
Modifier le fichier des emplacements
L'administrateur peut modifier le fichier CSV pour n'y inclure que les emplacements qu'il souhaite extraire.
-
Téléverser et soumettre
Téléchargez le fichier locations.csv modifié et cliquez sur Soumettre.
Seules les localisations spécifiées pour le client sélectionné seront incluses dans la demande d'extraction.
Lancer une demande d'extraction pour tous les clients
- Cliquez sur Soumettre pour lancer une demande d'extraction pour tous les clients et tous leurs emplacements sous le fournisseur de services actuel.
Pour Cisco BroadWorks et Webex pour BroadWorks
- L'outil d'extraction s'exécute sur le serveur d'applications Cisco BroadWorks secondaire au sein du réseau partenaire et se connecte via OCI-P.
- L'outil extrait les données brutes d'entreprise, de groupe, de numéros, d'utilisateurs, de services, de périphériques et de clients logiciels de la plateforme Cisco BroadWorks ou BroadCloud et exporte ces données vers des fichiers XML qui servent d'entrées à l'outil de transformation.
Les sections suivantes expliquent comment installer et configurer l'outil d'extraction.
Prérequis
- SCP extrait les fichiers binaires de l'outil vers le serveur d'applications secondaire Cisco BroadWorks.
- Connectez-vous en SSH au serveur d'applications Cisco BroadWorks secondaire pour configurer les prérequis et exécuter l'outil d'extraction.
- Configurez le fournisseur de services et l'ID de groupe à extraire de Cisco BroadWorks dans le conf/exportTool.yml. Veuillez vous référer à l'exemple d'extrait YAML suivant :
ServiceProviderID-A: - GroupID-A1 - GroupID-A2 - GroupID-A3 ServiceProviderID-B: - ALL - Vérifiez que l'identifiant utilisateur, le mot de passe et le nom d'hôte du serveur d'applications Cisco BroadWorks secondaire sont corrects. conf/partner.cfg déposer:
BROADWORKS_USER_ID = admin
BROADWORKS_PASSWORD = admin
BROADWORKS_HOST_NAME = localhost
REFRESH_TOKEN = Partner administrator’s refresh token copied from the Token Generator tool.
La propriété
REFRESH_TOKENest obligatoire pour une migration Webex vers BroadWorks. - Modifier le JDK/JRE chemin d'environnement dans le fichier export.sh si le serveur d'applications Cisco BroadWorks secondaire JDK/JRE Le chemin d'accès à l'environnement est différent de celui du fichier :
JAVA_HOME=/usr/local/java/java_base
Instructions d'exécution
Exécutez la commande suivante sur le serveur d'applications Cisco BroadWorks secondaire, à partir du répertoire de l'outil d'extraction :
./export.shJournaux du terminal
Les journaux suivants sont disponibles dans le terminal une fois l'exportation réussie : Exécution de l'outil d'exportation de données BroadSoft :
 Running BroadSoft Data Export Tool
************************************************
Starting Export Tool v: 1.15.0
Export started for SP=collabmigrationtestSP_engg, Group=collabmigrationtestGRP_engg
Exporting users for SP=collabmigrationtestSP_engg, Group=collabmigrationtestGRP_engg
Export users completed for SP=collabmigrationtestSP_engg, Group=collabmigrationtestGRP_engg
Export completed for SP=collabmigrationtestSP_engg, Group=collabmigrationtestGRP_engg
Export completed
Export Dump Zip Directory : output/20221017223452_ExportTool
Export Dump Zip File name :extracted_data_1666060500618.zip
Zip file with the name extracted_data_1666060500618.zip has been created
ZIP file creation process completed
Exported files converted as ZIP file
**************************************************
Sortie
Un fichier ZIP de sortie (extracted_data_<timestamp>.zip) est disponible dans le même répertoire d'outil d'extraction. Utilisez la commande suivante pour afficher et utiliser le fichier ZIP comme entrée de l'outil Transform :
ls –ltr
drwxr-xr-x 2 bwadmin bwadmin   4096 Oct  4 11:53 lib/
-rwxr-xr-x 1 bwadmin bwadmin 956719 Oct  4 11:53 exportTool.jar
-rwxr-xr-x 1 bwadmin bwadmin   2635 Oct  4 11:53 export.sh
drwxr-xr-x 2 bwadmin bwadmin   4096 Oct  5 05:04 conf/
drwxrwxr-x 3 bwadmin bwadmin   4096 Oct 17 22:34 output/
drwxrwxr-x 2 bwadmin bwadmin   4096 Oct 17 22:34 logs/
-rw-rw-r-- 1 bwadmin bwadmin  46341 Oct 17 22:35 extracted_data_1666060500618.zip
Outil de transformation
Cet outil de transformation s'exécute pour toutes les migrations. L'outil de transformation fonctionne sur n'importe quel ordinateur, y compris l'ordinateur portable de l'administrateur d'un partenaire, et utilise les API publiques de Webex. Il lit le fichier ZIP de sortie de l'outil d'extraction (extracted_data_<timestamp>.zip) comme une entrée et transforme le XML brut en un format JSON utilisé par l'outil de provisionnement.
Prérequis
Après avoir téléchargé et extrait les fichiers binaires des outils de migration, configurez les prérequis suivants :
- Définissez le jeton REFRESH_(jeton copié depuis l'outil de génération de jetons) et le nom_de_emplacement principal_dans le conf/partner.cfg déposer:
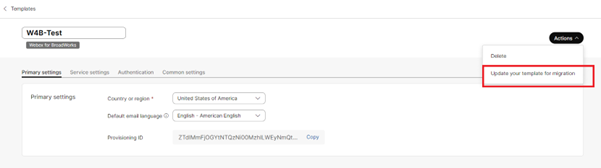
REFRESH_TOKEN=MzUwYjljODEtYmQ4MS00NGVhLTgwNGUtZjQ1NTEyZTViNzJkOTdj NAME_OF_MAIN_LOCATION=Main - Définissez éventuellement l'ID PROVISIONING_(copié du modèle dans Partner Hub) dans le conf/partner.cfg déposer:
PROVISIONING_ID=YmE4MjFkZGYtYTlkNy00NDdlLWIwODctYmNkOTM2NjUyYWQ1Pour obtenir une vérification plus complète de l'adresse e-mail du client, vous pouvez éventuellement définir l'ID DE PROVISIONING_. - Configurez les informations manquantes dans le input/customers.csv fichier (voir section suivante) s'il est manquant.
- Ajoutez l'adresse e-mail de l'utilisateur final dans le input/users.csv déposer.
- Si de nouveaux téléphones doivent être configurés, ajoutez l'adresse MAC et l'adresse e-mail du nouveau téléphone de l'utilisateur à input/newphones.csv déposer. Cela n'est nécessaire que si les administrateurs partenaires souhaitent configurer de nouveaux téléphones pour les appels en gros.
- Convertissez les centres d'appels BroadWorks en CxEssentials en utilisant input/cxessentials.csv déposer.
- Vous pouvez activer, en option, la propriété UPGRADE_ALL_CALL_CENTERS_TO_CX_ESSENTIALS pour convertir tous les centres d'appels en CxEssentials.
- Utilisez le input/locations.csv fichier destiné à prendre en charge la migration des grandes entreprises, permettant aux administrateurs de migrer les sites de leurs clients un par un.
- Activez éventuellement l'utilisation des adresses MAC de l'en-tête User-Agent du message SIP REGISTER lorsque l'adresse MAC n'est pas disponible dans le profil du périphérique Cisco BroadWorks. Décommentez la ligne USE_MAC_ADDRESS_FROM_SIP_REGISTER=yes dans le fichier conf/partner.cfg
- Activez éventuellement les propriétés ANALOG_USER_TYPE_ENABLE_CALL_WAITING, ANALOG_USER_TYPE_ENABLE_MUSIC_ON_HOLD et ANALOG_USER_TYPE_DISABLE_T38 pour configurer l'appel en attente, la musique d'attente et désactiver les paramètres T38 pour tous les utilisateurs de type analogique.
-
Si vous souhaitez configurer des passerelles génériques, ajoutez l'adresse MAC et l'identifiant utilisateur du périphérique à la liste suivante : input/genericgateways.csv déposer. Veuillez également préciser si l'utilisateur est le propriétaire PRINCIPAL ou un utilisateur PARTAGÉ (pour les apparitions d'appels partagés). Cela n'est nécessaire que si les administrateurs partenaires prévoient d'utiliser des passerelles génériques pour les appels en gros.
Cette fonctionnalité n'est pas disponible pour les migrations de BroadCloud vers Wholesale.
-
Pour les migrations BroadCloud, pour convertir tous les utilisateurs avec le type de station de messagerie en voice_mail_group, mettez à jour le fichier conf/rialto_station_type_to_wholesale_package.csv en remplaçant la valeur Wholesale Package par voice_mail_group pour la ligne où le Rialto Station Type est messaging.
Vous pouvez activer, en option, la propriété COMMON_VOICE_MAIL_GROUP_PASSCODE dans partner.cfg pour configurer le code PIN par défaut des groupes de messagerie vocale.
Si cette propriété n'est pas spécifiée dans partner.cfg, elle doit être fournie pour chaque client dans le fichier customers.csv sous la colonne commonVoicemailGroupPassCode.
-
Pour la migration des contacts communs vers Webex Calling
Il s'agit d'une amélioration pour la gestion des contacts communs au niveau de l'entreprise et du site. Ces contacts peuvent désormais être migrés soit en tant que contacts d'organisation (Contacts Org), soit en tant qu'extensions virtuelles, selon les paramètres de configuration. Vous trouverez ci-dessous les détails qui vous guideront tout au long de ce processus de migration.
Configuration des clés :
- COMMUN_TÉLÉPHONE_LISTE_VERS_VIRTUEL_EXTENSION_DÉBUT_PORTÉE
Une nouvelle propriété, COMMON_PHONE_LIST_TO_VIRTUAL_EXTENSION_START_RANGE, est introduite dans le fichier partner.cfg. Cette propriété détermine comment les contacts communs sont migrés de Rialto vers Webex Calling.
- Sans COMMON_PHONE_LIST_TO_VIRTUAL_EXTENSION_START_RANGE Configuré
Les contacts communs seront migrés en tant que contacts de l'organisation (Contacts Org).
Aucune configuration supplémentaire n'est requise.
Les contacts restent accessibles au niveau de l'organisation.
- Avec COMMON_PHONE_LIST_TO_VIRTUAL_EXTENSION_START_RANGE configuré
Les contacts communs seront migrés sous forme d'extensions virtuelles.
Chaque contact se verra ajouter un numéro de poste, et la plage de départ du poste est définie dans la propriété COMMON_PHONE_LIST_TO_VIRTUAL_EXTENSION_START_RANGE dans partner.cfg.
Les extensions virtuelles sont prises en charge à la fois au niveau de l'organisation et au niveau du site, en fonction de la portée du contrat.
- COMMUN_TÉLÉPHONE_LISTE_VERS_VIRTUEL_EXTENSION_DÉBUT_PORTÉE
- Activer le fournisseur d'enregistrement des appels par défaut sur Webex.
Cette étape est requise uniquement lors de la migration des paramètres d'enregistrement des appels pour les utilisateurs configurés avec Dubber vers Cisco Native Call Recording dans Webex.
Pour activer cette option:
- Dans le fichier partner.cfg, définissez la propriété suivante,
DEFAULT_CALL_RECORDING_VENDOR=Webex. - De plus, utilisez la propriété
WEBEX_CALL_RECORDING_STORAGE_REGIONpour configurer la région de stockage.L'option d'enregistrement à la demande de BroadCloud n'est pas prise en charge dans Webex Calling. Ces paramètres d'enregistrement des appels ne seront pas migrés et apparaîtront dans le rapport d'exceptions.
- Dans le fichier partner.cfg, définissez la propriété suivante,
-
Exclusion de certains numéros de téléphone de la migration :
Pour exclure certains numéros de téléphone du processus de migration, la procédure en deux étapes suivante utilisant l'outil de transformation doit être suivie :
- Exécutez d'abord l'outil de transformation pour la première fois. Une fois l'opération terminée, l'outil générera un fichier nommé telephone_numbers_inventory.csv, situé dans le répertoire output/timestamp/ annuaire. Le client est tenu de vérifier ce fichier et d'indiquer « Oui » dans la colonne « Supprimer les numéros de téléphone » pour chaque numéro de téléphone qui doit être exclu de la migration à venir.
- Après la mise à jour du fichier telephone_numbers_inventory.csv avec les indicateurs d'exclusion appropriés, l'outil de transformation est exécuté une seconde fois. Le fichier mis à jour doit être transmis en tant qu'argument au format suivant.
./transform.sh -extract=input/extracted_data_1747640608219.zip -decommissionnumbers={filepath/telephone_numbers_inventory.csv}
- Vous pouvez éventuellement définir la propriété ALLOW_RESTRICT_BY_PARTNER_MODE sur OFF pour permettre aux administrateurs clients de modifier les paramètres définis par le partenaire dans Control Hub.
- Pour la migration des numéros mobiles (BroadWorks Mobility) de BroadCloud vers Webex Calling
Cette section décrit la migration de la fonctionnalité BroadWorks Mobility(numéros de mobile client) de BroadCloud (intégration de réseau mobile) vers Wholesale Webex Calling (opérateur de réseau mobile Webex Go).
Prérequis- Avant de commencer le processus de migration, les administrateurs partenaires doivent contacter l'équipe du compte Cisco pour effectuer la configuration du fournisseur PSTN connecté au cloud (CCP) et de la liste personnalisée des opérateurs (CCL).
Une nouvelle propriété, ASSIGN_MOBILE_NUMBERS_TO_USERS, est ajoutée au fichier partner.cfg. Activez cette option pour permettre l'attribution et la migration des numéros de téléphone mobile vers les utilisateurs.
- Cette fonctionnalité est prise en charge uniquement pour les migrations BroadCloud-to-Wholesale.
- Dans Wholesale Webex, les utilisateurs finaux peuvent avoir soit un numéro de mobile, soit un numéro PSTN (mais pas les deux), contrairement à BroadCloud.
- Lorsqu'un numéro de téléphone mobile est attribué à un utilisateur, son numéro PSTN principal devient son numéro secondaire (alternatif).
- Les numéros de téléphone mobile ne peuvent pas être migrés pour les utilisateurs qui passent à un espace de travail ou à une ligne virtuelle.
- Une fois qu'un numéro de mobile a été attribué dans Wholesale Webex, il apparaîtra comme actif dans Control Hub. Ce statut ne signifie pas que le numéro est immédiatement disponible pour recevoir des appels. La fonctionnalité d'appel ne sera disponible qu'une fois la migration entièrement terminée.
- Les paramètres d'intégration des téléphones mobiles configurés par les utilisateurs finaux dans le portail utilisateur appelant (CUP) ne sont pas migrés. Après la migration, lorsqu'un numéro de téléphone fixe, un numéro de portable ou un poste sera appelé, tous les appareils de l'utilisateur sonneront.
Remplir le input/customers.csv
Le fichier input/customers.csv fournit des données qui peuvent être absentes de Cisco BroadWorks ou BroadCloud. Ce fichier peut rester vide si toutes les informations obligatoires sont déjà disponibles. Vous n'êtes pas obligé de remplir toutes les colonnes, seules les informations manquantes sont obligatoires.
Le tableau ci-dessous explique les colonnes les plus importantes. input/customers.csv.
|
Nom de la colonne |
Règles |
|---|---|
|
Id |
En mode entreprise Cisco BroadWorks :
En mode fournisseur de services BroadWorks, il s'agit de l'identifiant de groupe Cisco BroadWorks. Dans BroadCloud, il s'agit de l'identifiant client Rialto. |
|
id externe |
Il s'agit d'un identifiant qui correspond à l'identifiant interne du partenaire pour ce client. Cette colonne doit être unique au sein d'une organisation partenaire Webex. Cette colonne est facultative ; un identifiant unique sera généré automatiquement par l'outil de transformation. Cette colonne n'est pas utilisée pour les groupes au sein d'une entreprise. |
|
Nom du client |
Pour l'entreprise, cette colonne sert de champ « Nom du client Webex ». Pour un groupe au sein d'une entreprise, cette colonne sert de nom de lieu. Les noms de lieux doivent être uniques au sein d'une entreprise. |
|
Courriel principal |
Il s'agit de l'adresse e-mail de l'administrateur client Webex. Cette colonne est facultative pour les groupes au sein d'une entreprise. |
|
Colonnes d'adresse |
Pour une entreprise, cette adresse sert à la fois d'adresse de facturation et d'adresse principale. Pour un groupe au sein d'une entreprise, cette adresse sert d'adresse de localisation. |
|
Fuseau horaire |
Veuillez vous référer à la section relative aux fuseaux horaires de cet article. |
|
langue | Voir Langues prises en charge par Webex. |
|
code PIN de messagerie vocale par défaut | |
|
Code d'accès du groupe de messagerie vocale commun | Utilisez cette colonne pour spécifier le code PIN par défaut qui sera appliqué à tous les groupes de messagerie vocale du client concerné. Après la migration, les administrateurs doivent mettre à jour le code PIN de chaque groupe de messagerie vocale. Lors du processus de transformation, le code PIN commun spécifié par l'administrateur est attribué à tous les groupes de messagerie vocale. |
Remplir le input/users.csv
Le fichier input/users.csv fournit des données qui peuvent être absentes de Cisco BroadWorks ou BroadCloud. Ce fichier peut rester vide si toutes les informations obligatoires sont déjà disponibles. Vous n'êtes pas obligé de remplir toutes les colonnes, seules les informations manquantes sont obligatoires.
Tous ces champs sont facultatifs.
|
Nom de la colonne |
Règles |
|---|---|
|
ID de l'utilisateur |
Un identifiant unique pour l'utilisateur. Il peut s'agir d'un identifiant utilisateur BroadWorks ou BroadCloud. |
|
adresse électronique | (Facultatif) L'adresse e-mail de l'utilisateur. Le cas échéant, il sera utilisé à des fins d'approvisionnement. |
|
numéro de téléphone |
(Facultatif) Numéro de téléphone de l'utilisateur à configurer. |
|
solution |
(Facultatif) Type de forfait utilisateur. Valeurs autorisées : voix, appel, suite, common_area, virtual_line, dont_migrate, call_park_ext ou voice_mail_group. La valeur dont_migrate est utilisée lorsque les partenaires souhaitent exclure certains utilisateurs — ainsi que leurs appareils et numéros de téléphone — du provisionnement et de la migration. Ceci est pris en charge à la fois pour BroadWorks et BroadCloud. Lorsqu'elle est appliquée, cette option ne permet pas de migrer ni de provisionner les utilisateurs sélectionnés et leurs ressources associées. Pour utiliser cette fonction, les administrateurs doivent saisir dont_migrate dans la colonne package du fichier users.csv. |
|
extension |
(Facultatif) Le numéro de poste téléphonique à attribuer à l'utilisateur. |
|
nom |
(Facultatif) Le nom complet de l'utilisateur. |
|
ata_settings |
(Facultatif) Valeurs autorisées : t38, analogique À enable/disable Appel en attente, musique d'attente et paramètres T38 T38: Cette option désactive l'appel en attente et la musique d'attente, et active les paramètres T38 pour les appareils ATA. Analogique:
|
|
do_not_move_phone |
BroadWorks uniquement. Optionnel : paramètre permettant d’empêcher la migration de l’appareil vers Webex Calling. Cette option permet aux partenaires de configurer les utilisateurs ainsi que leurs paramètres d'appel, leurs appareils et leurs numéros de téléphone sans migrer les appareils vers Webex ou activer les numéros de téléphone dans Webex Calling. Ce paramètre est uniquement disponible pour BroadWorks, et non pour BroadCloud. Pour l'utiliser, les administrateurs doivent spécifier do_not_move_phone dans la colonne do_not_move_phone (BroadWorks uniquement) du fichier users.csv. Cela permet de garantir que les utilisateurs sont approvisionnés sans avoir à activer de numéros ni à déplacer leurs téléphones, afin qu'ils continuent à fonctionner via BroadCloud. |
Instructions d'exécution
Exécutez l'outil de transformation sur n'importe quel système d'exploitation. Suivez les étapes ci-dessous pour exécuter l'outil sous Windows et macOS :
Windows
Exécutez la commande ci-dessous pour lancer l'outil Transform sous Windows :
transform.bat -extract= -customers= -users= -newphones=macOS
Pour exécuter l'outil de transformation sur macOS, procédez comme suit :
- Créez un environnement virtuel et installez les dépendances pour exécuter l'outil de transformation à l'aide de Python :
python3 -m venv venv source venv/bin/activate python3 -m pip install requests python3 -m pip install requests-oauthlib python3 -m pip install phonenumbers - Exécutez l'outil de transformation :
./transform.sh -extract= -customers= -users= -newphones=
Customer/user pré-vérification
L'outil Transform effectue des appels API à Webex pour détecter les éventuels problèmes de provisionnement. Par défaut, il validera l'adresse et l'adresse électronique principale du client. Si la valeur de l'ID PROVISIONING_est spécifiée dans le conf/partner.cfg Le fichier permettra également de valider les informations de localisation. Les résultats de la vérification préalable sont inclus dans le rapport d'exception.
De plus, les paramètres optionnels suivants peuvent être ajoutés lors de l'exécution de l'outil de transformation :
pré-vérification
En plus d'exécuter l'API de pré-vérification pour les informations client, l'outil de transformation exécutera également l'API de pré-vérification pour les adresses e-mail des abonnés.
précheckinfo
Par défaut, seules les erreurs de pré-vérification (c'est-à-dire les problèmes qui bloqueront l'approvisionnement) sont incluses dans le rapport d'exceptions. L'ajout de cet indicateur inclura également les résultats de pré-vérification réussis (par exemple, si une organisation Webex existe déjà et peut être automatiquement rattachée).
precheckinfo prend plus de temps à exécuter.
Journaux du terminal
Voici les messages affichés dans le terminal lors d'une transformation réussie :
Summary Report
BroadWorks enterprises that can be successfully migrated: 1
BroadWorks enterprises that cannot be migrated: 0
BroadWorks users that can be successfully migrated: 4
BroadWorks users that cannot be migrated: 0
Phones that can be successfully migrated: 3
Phones that are not compatible with Webex Calling: 0
Rapport d'exception
L'outil Transform génère le rapport d'exceptions dans le répertoire de sortie /<timestamp>/exception_report.txt répertoire. Vous pouvez utiliser ce rapport pour identifier les problèmes qui affecteront la migration et les corriger dans le système Cisco BroadWorks.
Après avoir modifié les données utilisateur pour résoudre l'exception, relancez les outils d'extraction et de transformation avec les nouvelles données. Voici un exemple de fichier de rapport d'exceptions :
Exception Report
Tue Oct 18 08:12:09 2022

Enterprises with Communication Barring Feature
Recommendation: manually configure the Outgoing Calling Plan in Control Hub
________________________________________________________________________________
collabmigrationtestGRP_engg
Sortie
Un fichier JSON de sortie (customer.json) sera disponible dans output/<timestamp>/<groupid> répertoire. Voici un exemple de fichier customer.json :
{
    "customer": {
        "provisioningId": "!!!!!!!!!!REPLACE_WITH_PROVISIONINGID!!!!!!!!!!",
        "packages": [
            "webex_calling",
            "common_area_calling"
        ],
        "externalId": "external_id_engg_grp1",
        "address": {
            "addressLine1": "100 Main Street",
            "addressLine2": "",
            "city": "Gaithersburg",
            "stateOrProvince": "MD",
            "zipOrPostalCode": "20877",
            "country": "US"
        },
        "customerInfo": {
            "name": "Engineering Group - 1",
            "primaryEmail": "amareswaranvel+engineeringgroup1@gmail.com"
        },
        "provisioningParameters": {
            "calling": {
                "location": {
                    "name": "Main",
                    "address": {
                        "addressLine1": "100 Main Street",
                        "addressLine2": "",
                        "city": "Gaithersburg",
                        "stateOrProvince": "MD",
                        "zipOrPostalCode": "20877",
                        "country": "US"
                    },
                    "timezone": "America/New_York",
                    "language": "en_us",
                    "numbers": [
                        "+15205551101",
                        "+15205551102",
                        "+15205551103",
                        "+15205551104",
                        "+15205551105",
                        "+15205551106",
                        "+15205551107",
                        "+15205551108",
                        "+15205551109",
                        "+15205551110"
                    ],
                    "mainNumber": "+15205551101"
                }
            }
        }
    },
    "broadworks_info": {
        "service_provider_id": "collabmigrationtestSP_engg",
        "group_id": "collabmigrationtestGRP_engg"
    },
    "subscribers": [
        {
            "amareswaranvel+benjaminjack@gmail.com": {
                "subscriber": {
                    "customerId": "!!!!!!!!!!REPLACE_WITH_CUSTOMERID!!!!!!!!!!",
                    "email": "amareswaranvel+benjaminjack@gmail.com",
                    "package": "webex_calling",
                    "provisioningParameters": {
                        "firstName": "Benjamin",
                        "lastName": "Jack",
                        "primaryPhoneNumber": "+15205551102",
                        "extension": "1102"
                    }
                },
                "features": [
                    {
                        "/v1/people/{personId}/features/voicemail": {
                            "enabled": true,
                            "sendBusyCalls": {
                                "enabled": true,
                                "greeting": "DEFAULT"
                            },
                            "sendUnansweredCalls": {
                                "enabled": true,
                                "greeting": "DEFAULT",
                                "numberOfRings": 3
                            },
                            "messageStorage": {
                                "mwiEnabled": true,
                                "storageType": "EXTERNAL",
                                "externalEmail": "engineering17861@mailnator.com"
                            }
                        }
                    }
                ],
                "devices": [
                    {
                        "cisUuid": "!!!!!!!!!!REPLACE_WITH_PERSONID!!!!!!!!!!",
                        "product": "DMS Cisco 7861",
                        "mac": "CC98914EAAD7"
                    }
                ]
            }
        },
        {
            "amareswaranvel+lucasoliver@gmail.com": {
                "subscriber": {
                    "customerId": "!!!!!!!!!!REPLACE_WITH_CUSTOMERID!!!!!!!!!!",
                    "email": "amareswaranvel+lucasoliver@gmail.com",
                    "package": "webex_calling",
                    "provisioningParameters": {
                        "firstName": "Lucas",
                        "lastName": "Oliver",
                        "primaryPhoneNumber": "+15205551103",
                        "extension": "1103"
                    }
                },
                "features": [
                    {
                        "/v1/people/{personId}/features/voicemail": {
                            "enabled": true,
                            "sendBusyCalls": {
                                "enabled": true,
                                "greeting": "DEFAULT"
                            },
                            "sendUnansweredCalls": {
                                "enabled": true,
                                "greeting": "DEFAULT",
                                "numberOfRings": 3
                            },
                            "messageStorage": {
                                "mwiEnabled": true,
                                "storageType": "EXTERNAL",
                                "externalEmail": "engineering16821@mailnator.com"
                            }
                        }
                    }
                ],
                "devices": [
                    {
                        "cisUuid": "!!!!!!!!!!REPLACE_WITH_PERSONID!!!!!!!!!!",
                        "product": "DMS Cisco 6821",
                        "mac": "5486BCAE7E45"
                    }
                ]
            }
        },
        {
            "amareswaranvel+leojackson@gmail.com": {
                "subscriber": {
                    "customerId": "!!!!!!!!!!REPLACE_WITH_CUSTOMERID!!!!!!!!!!",
                    "email": "amareswaranvel+leojackson@gmail.com",
                    "package": "webex_calling",
                    "provisioningParameters": {
                        "firstName": "Leo",
                        "lastName": "Jackson",
                        "primaryPhoneNumber": "+15205551104",
                        "extension": "1104"
                    }
                },
                "features": [
                    {
                        "/v1/people/{personId}/features/voicemail": {
                            "enabled": true,
                            "sendBusyCalls": {
                                "enabled": true,
                                "greeting": "DEFAULT"
                            },
                            "sendUnansweredCalls": {
                                "enabled": true,
                                "greeting": "DEFAULT",
                                "numberOfRings": 3
                            },
                            "messageStorage": {
                                "mwiEnabled": true,
                                "storageType": "EXTERNAL",
                                "externalEmail": "engineeringmacpc@mailnator.com"
                            }
                        }
                    }
                ],
                "devices": []
            }
        },
        {
            "amareswaranvel+owenalex@gmail.com": {
                "subscriber": {
                    "customerId": "!!!!!!!!!!REPLACE_WITH_CUSTOMERID!!!!!!!!!!",
                    "email": "amareswaranvel+owenalex@gmail.com",
                    "package": "webex_calling",
                    "provisioningParameters": {
                        "firstName": "Owen",
                        "lastName": "Alexander",
                        "primaryPhoneNumber": "+15205551101",
                        "extension": "1101"
                    }
                },
                "features": [
                    {
                        "/v1/people/{personId}/features/voicemail": {
                            "enabled": true,
                            "sendBusyCalls": {
                                "enabled": true,
                                "greeting": "DEFAULT"
                            },
                            "sendUnansweredCalls": {
                                "enabled": true,
                                "greeting": "DEFAULT",
                                "numberOfRings": 3
                            },
                            "messageStorage": {
                                "mwiEnabled": true,
                                "storageType": "EXTERNAL",
                                "externalEmail": "engineering8811@mailnator.com"
                            }
                        }
                    }
                ],
                "devices": [
                    {
                        "cisUuid": "!!!!!!!!!!REPLACE_WITH_PERSONID!!!!!!!!!!",
                        "product": "DMS Cisco 8811",
                        "mac": "F87B204E4066"
                    }
                ]
            }
        }
    ],
    "auto_attendants": [],
    "call_queues": [],
    "hunt_groups": [],
    "schedules": [],
    "call_parks": [],
    "call_pickups": [],
    "paging_groups": [],
    "voice_portals": [
        {
            "name": "Automated Voice Portal",
            "firstName": "Automated",
            "lastName": "Voice Portal",
            "languageCode": "en_us",
            "phoneNumber": "+15205551105",
            "extension": "1105"
        }
    ],
    "shared_call_appearances": [],
    "business_communicator_desktop_to_upgrade_to_webex_app": [
        "PC Comm - Engg Device Profile"
    ],
    "connect_client_to_upgrade_to_webex_app": [],
    "locations": [],
"webex_for_broadworks_info": {
        "users": [
            {
                "id": "Y2lzY29zcGFyazovL3VzL1NVQlNDUklCRVIvY2QzNGViNWYtYTVmMi00OWQ1LTlkNWMtZTg1MDJiMDE4YTQ5"
            }
        ],
        "hydra_orgId": "Y2lzY29zcGFyazovL3VzL09SR0FOSVpBVElPTi9jMjJiYTMwNC1mODQ4LTRlOTktYWFmYy0zYWRlMjBmYTgzZTg",
        "hydra_customer_config_id": "Y2lzY29zcGFyazovL3VzL0VOVEVSUFJJU0UvYmIyMzA1MDEtMTUzMS00MzNiLTllM2QtODExY2FlYTExYmVk"
    }
}
Le `webex_for_broadworks_info` La propriété JSON est présente uniquement pour les migrations Webex vers BroadWorks. Le `broadcloud_info` La propriété JSON est présente uniquement pour les migrations BroadCloud.
Outil de provisionnement
L'outil de provisionnement peut s'exécuter sur n'importe quelle machine (généralement l'ordinateur portable de l'administrateur du partenaire) et utilise les API publiques de Webex. Il lit le fichier JSON de sortie de l'outil de transformation (customer.json) comme une entrée et provisionne les clients, les emplacements, les numéros, les utilisateurs, les services et les appareils dans la solution Webex Wholesale RTM.
Prérequis
Configurez les prérequis suivants dans le répertoire de l'outil de provisionnement :
- Installez Java 8, 11, 17 ou 21 sur l'ordinateur. Java est disponible auprès de nombreuses sources, notamment :
- Après avoir téléchargé et extrait les fichiers binaires des outils de migration, définissez la variable d'environnement JAVA_HOME dans le provisioning_tool.sh pour MAC et provisioning_toolle .bat pour Windows.
- Le fichier partner.cfg :
- Définissez l'ID WHOLESALE_PROVISIONING_et le jeton REFRESH_(jeton copié à partir de l'outil de génération de jetons). Les administrateurs partenaires doivent contacter leur équipe de compte pour obtenir l'ID DE PROVISIONNEMENT_ :
WHOLESALE_PROVISIONING_ID = Y2U4YWQxYmQtMWZlNy00NjRiLWExMmItMGJkODMzN2U5NmU0 REFRESH_TOKEN=MzUwYjljODEtYmQ4MS00NGVhLTgwNGUtZjQ1NTEyZTViNzJkOTdj -
Définissez SEND_SUBSCRIBERS_WELCOME_EMAIL sur false si les partenaires ne souhaitent pas envoyer d'e-mail de bienvenue aux utilisateurs. La valeur par défaut est vraie.
Webex n'envoie d'e-mails de bienvenue qu'aux utilisateurs finaux. Les administrateurs clients ne reçoivent pas d'e-mails de bienvenue.
Les utilisateurs et les administrateurs clients situés aux États-Unis et au Canada reçoivent une notification par e-mail distincte de la part de RedSky. La plateforme RedSky E911 envoie ce courriel pour confirmer la création du compte client pour les services d'urgence. Cet e-mail RedSky est distinct des e-mails de bienvenue Webex et n'est pas contrôlé par les paramètres de messagerie Webex. Pour les entreprises de vente en gros aux États-Unis et au Canada, RedSky est automatiquement activé en tant que fournisseur de services d'urgence.
- Définissez l'ID WHOLESALE_PROVISIONING_et le jeton REFRESH_(jeton copié à partir de l'outil de génération de jetons). Les administrateurs partenaires doivent contacter leur équipe de compte pour obtenir l'ID DE PROVISIONNEMENT_ :
- Utilisez la propriété WEBEX4BWKS_EMAIL_SUBJECT pour les migrations Webex for BroadWorks afin d'envoyer l'objet de l'e-mail de demande de changement de mot de passe aux abonnés Webex for BroadWorks.
- Utilisez la propriété WEBEX4BWKS_EMAIL_BODY pour les migrations Webex for BroadWorks afin d'envoyer le corps de l'e-mail de demande de changement de mot de passe aux abonnés Webex for BroadWorks.
- Utilisez la propriété
CUSTOM_TAGSpour ajouter des balises après la création du client. - Pour appliquer les remises de gros, les administrateurs partenaires doivent contacter l'équipe de compte Cisco avant de commencer la migration.
Une nouvelle propriété, APPLY_WHOLESALE_DISCOUNTS est ajoutée à partner.cfg. Activez cette fonctionnalité pour appliquer des réductions aux utilisateurs et aux espaces de travail.
Instructions d'exécution
Suivez les étapes ci-dessous pour exécuter l'outil sous Windows et macOS :
Windows
Pour exécuter l'outil sous Windows, procédez comme suit :
To provision single customer:
provision.bat -input=
To provision multiple customers:
provision.bat -input=
macOS
Pour exécuter l'outil sur macOS, procédez comme suit :
To provision single customer:
./transform.sh -input=
To provision multiple customers:
./transform.sh -input=
Prérequis pour la migration de Webex vers BroadWorks
Les administrateurs partenaires doivent mettre à jour leur modèle d'intégration BroadWorks pour Webex afin de bénéficier des fonctionnalités de coexistence BroadWorks. Veuillez vous référer à l'image suivante :
Une fois le modèle d'intégration Webex pour BroadWorks mis à jour pour prendre en charge la migration, demandez à l'équipe commerciale Cisco d'activer l'option « wholesale-partner-blending-enabled » au niveau du partenaire. Cela permettra d'ajouter des forfaits Wholesale aux organisations clientes Webex for BroadWorks existantes lors de la mise en service.
Exécutez l'outil de provisionnement avec un argument supplémentaire.
Phase de préparation : Il s'agit de la phase par défaut où les administrateurs peuvent configurer les utilisateurs de BroadWorks en tant qu'abonnés Wholesale et poursuivre l'utilisation de Webex pour les utilisateurs de BroadWorks.
Phase de maintenance : Il s'agit de la deuxième phase où les administrateurs peuvent attribuer la licence Wholesale aux utilisateurs Webex for BroadWorks existants. Vous devez exécuter l'outil de provisionnement avec un argument maintenance.
Phase post-migration : La phase finale est celle où les administrateurs peuvent convertir complètement BroadWorks en vente en gros. Vous devez exécuter l'outil de provisionnement avec un argument postmigration.
Journaux du terminal
Voici les journaux du terminal après un provisionnement réussi :
Tool Name: Provisioning
Version: 1.51.0
Customer(s) provisioning started...
Sending create customer provisioning request for the External ID: customer.id.1
Customer provisioning request sent for the customer with the External ID: customer.id.1
Checking customer status for the External ID: customer.id.1 and the status is: provisioning
Checking customer status for the External ID: customer.id.1 and the status is: provisioning
Checking customer status for the External ID: customer.id.1 and the status is: provisioned
Provisioning customer's calling settings with External ID: customer.id.1
Customer's settings are updated successfully for the External ID: customer.id.1
Provisioning secondary locations for the customer with the External ID: customer.id.1
Provisioning location's settings and features for the customer with the External ID: customer.id.1
Subscriber(s) provisioning will be started for the customer with the External ID: customer.id.1
Provisioning subscriber(s) and settings for the customer with External ID: customer.id.1
Subscriber(s) and settings provisioning completed for the customer with External ID: customer.id.1
Provisioning user agent settings for the customer with the External ID: customer.id.1

********** Completed File : input/customer.json ****************
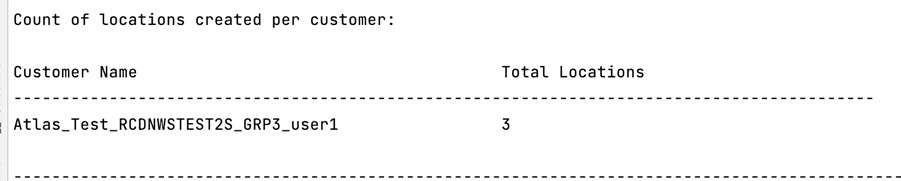
Un tableau sera imprimé indiquant le nombre d'emplacements créés pour chaque exécution :
Sortie
L'outil de provisionnement génère des rapports de succès et d'erreur dans le répertoire output/<external_id>/*.success/error fichiers. Consultez les journaux de réussite et d'erreur pour vérifier que l'approvisionnement a réussi.
Le système générera un fichier Provisioning_Report_*.csv dans le répertoire output/consolidated_reports/. Ce fichier contient les détails des succès et des échecs pour chaque entité et ses paramètres, fournissant ainsi un rapport de provisionnement complet.
Après une mise en service réussie, les utilisateurs finaux reçoivent un e-mail de la solution Wholesale RTM.
Les administrateurs partenaires peuvent vérifier le provisionnement client dans le portail Partner Hub et Control Hub. Veuillez vous référer aux illustrations suivantes issues du portail Partner Hub et Control Hub :
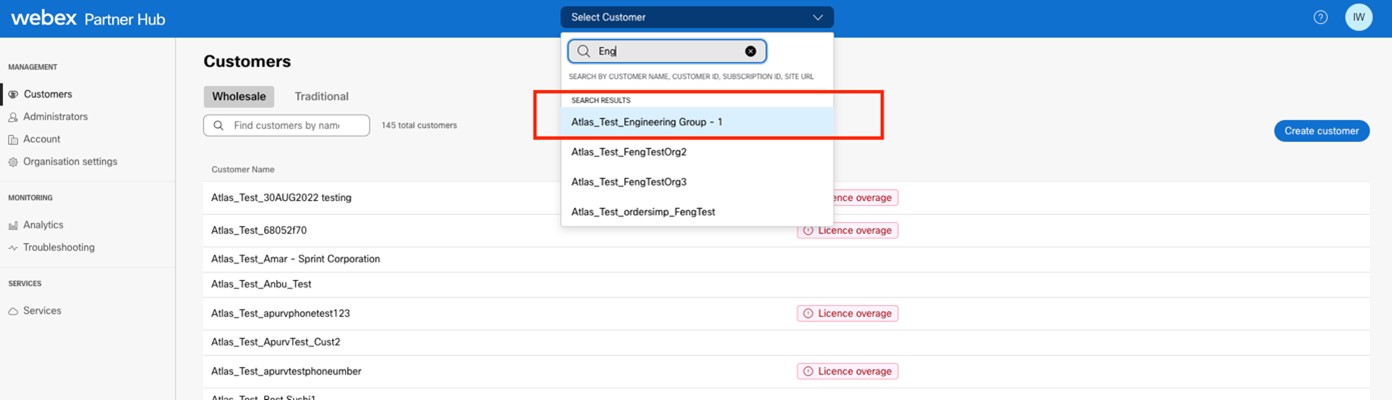
Figure 8 : Hub partenaire
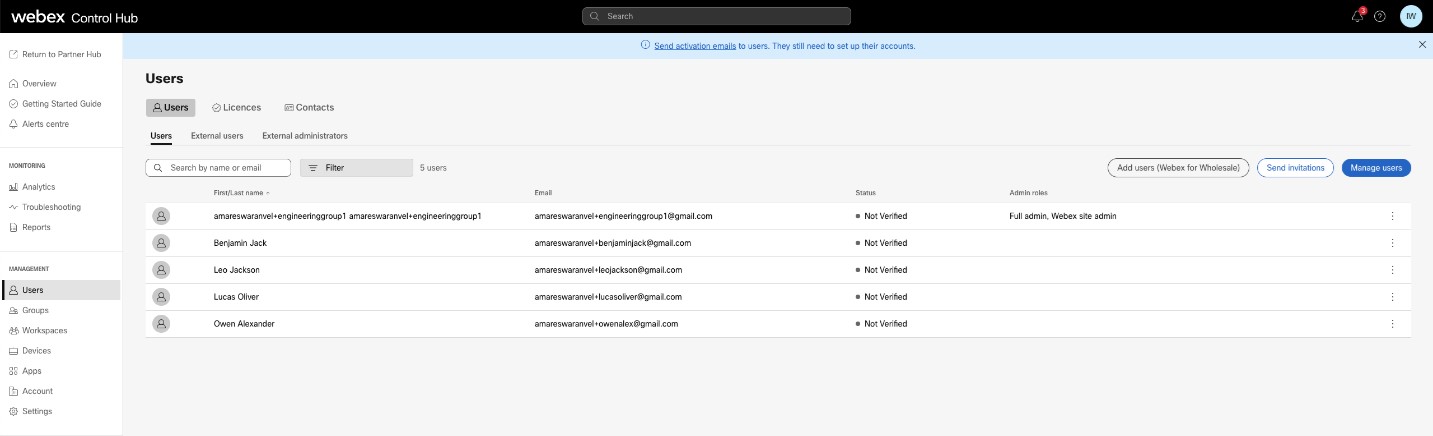
Figure 9 : Control Hub

Figure 10 : Appareils
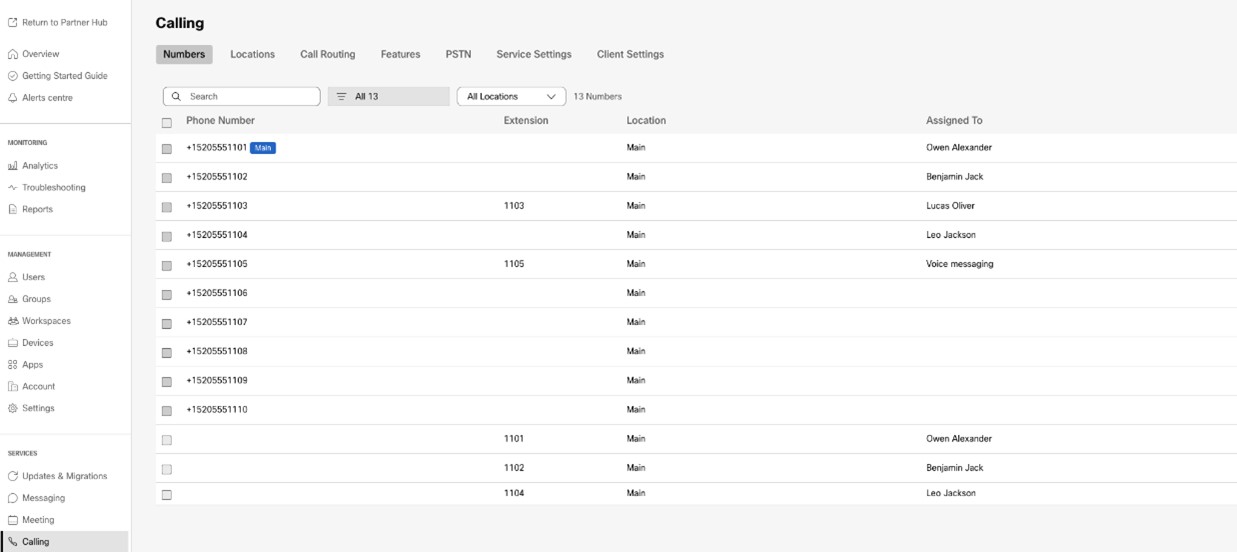
Figure 11 : Calling
Restrictions post-provisionnement
Une fois le provisionnement terminé pour une migration BroadCloud, les actions suivantes seront bloquées:
- Portail CAP – Ajout d'utilisateurs ou d'appareils portés.
- Portail SP – Création de commandes ADD avec des appareils ou des numéros.
- API RSB – Création de commandes ADD avec des appareils ou des numéros et création d'utilisateurs. Les commandes RSB ADD effectuées avec des appareils ou des numéros seront rejetées.
Outil de déplacement d'appareil
Pour BroadCloud
Pour les partenaires BroadCloud, utilisez le portail des fournisseurs de services pour soumettre une demande de migration pour les numéros, les appareils et les migrations d'apparitions d'appels partagés (SCA).
Sur le portail des fournisseurs de services, une demande de migration peut inclure jusqu'à 50 clients. Un maximum de 10 demandes peuvent être soumises par jour.
Les administrateurs peuvent activer la restauration automatique en définissant ROLLBACK_TO_BROADCLOUD=true dans le fichier conf/partner.cfg, ce qui ramène les appareils vers BroadCloud après la migration. Il prend en charge les migrations au sein d'une même région et entre régions différentes avec NS Sync, mais uniquement pour les migrations réussies. En cas d'échec, les administrateurs doivent ouvrir un ticket auprès du support technique Cisco (TAC) avant de demander une restauration.
Deux options sont disponibles pour sélectionner le type de migration dans le portail :
- Migration – Sélectionnez cette option pour lancer une demande de migration des numéros, des appareils et des apparitions d'appels partagés (SCA).
- État du périphérique – Sélectionnez cette option pour afficher l'état actuel d'un périphérique sur BroadCloud et Calling.
Les figures suivantes présentent le portail du fournisseur de services.
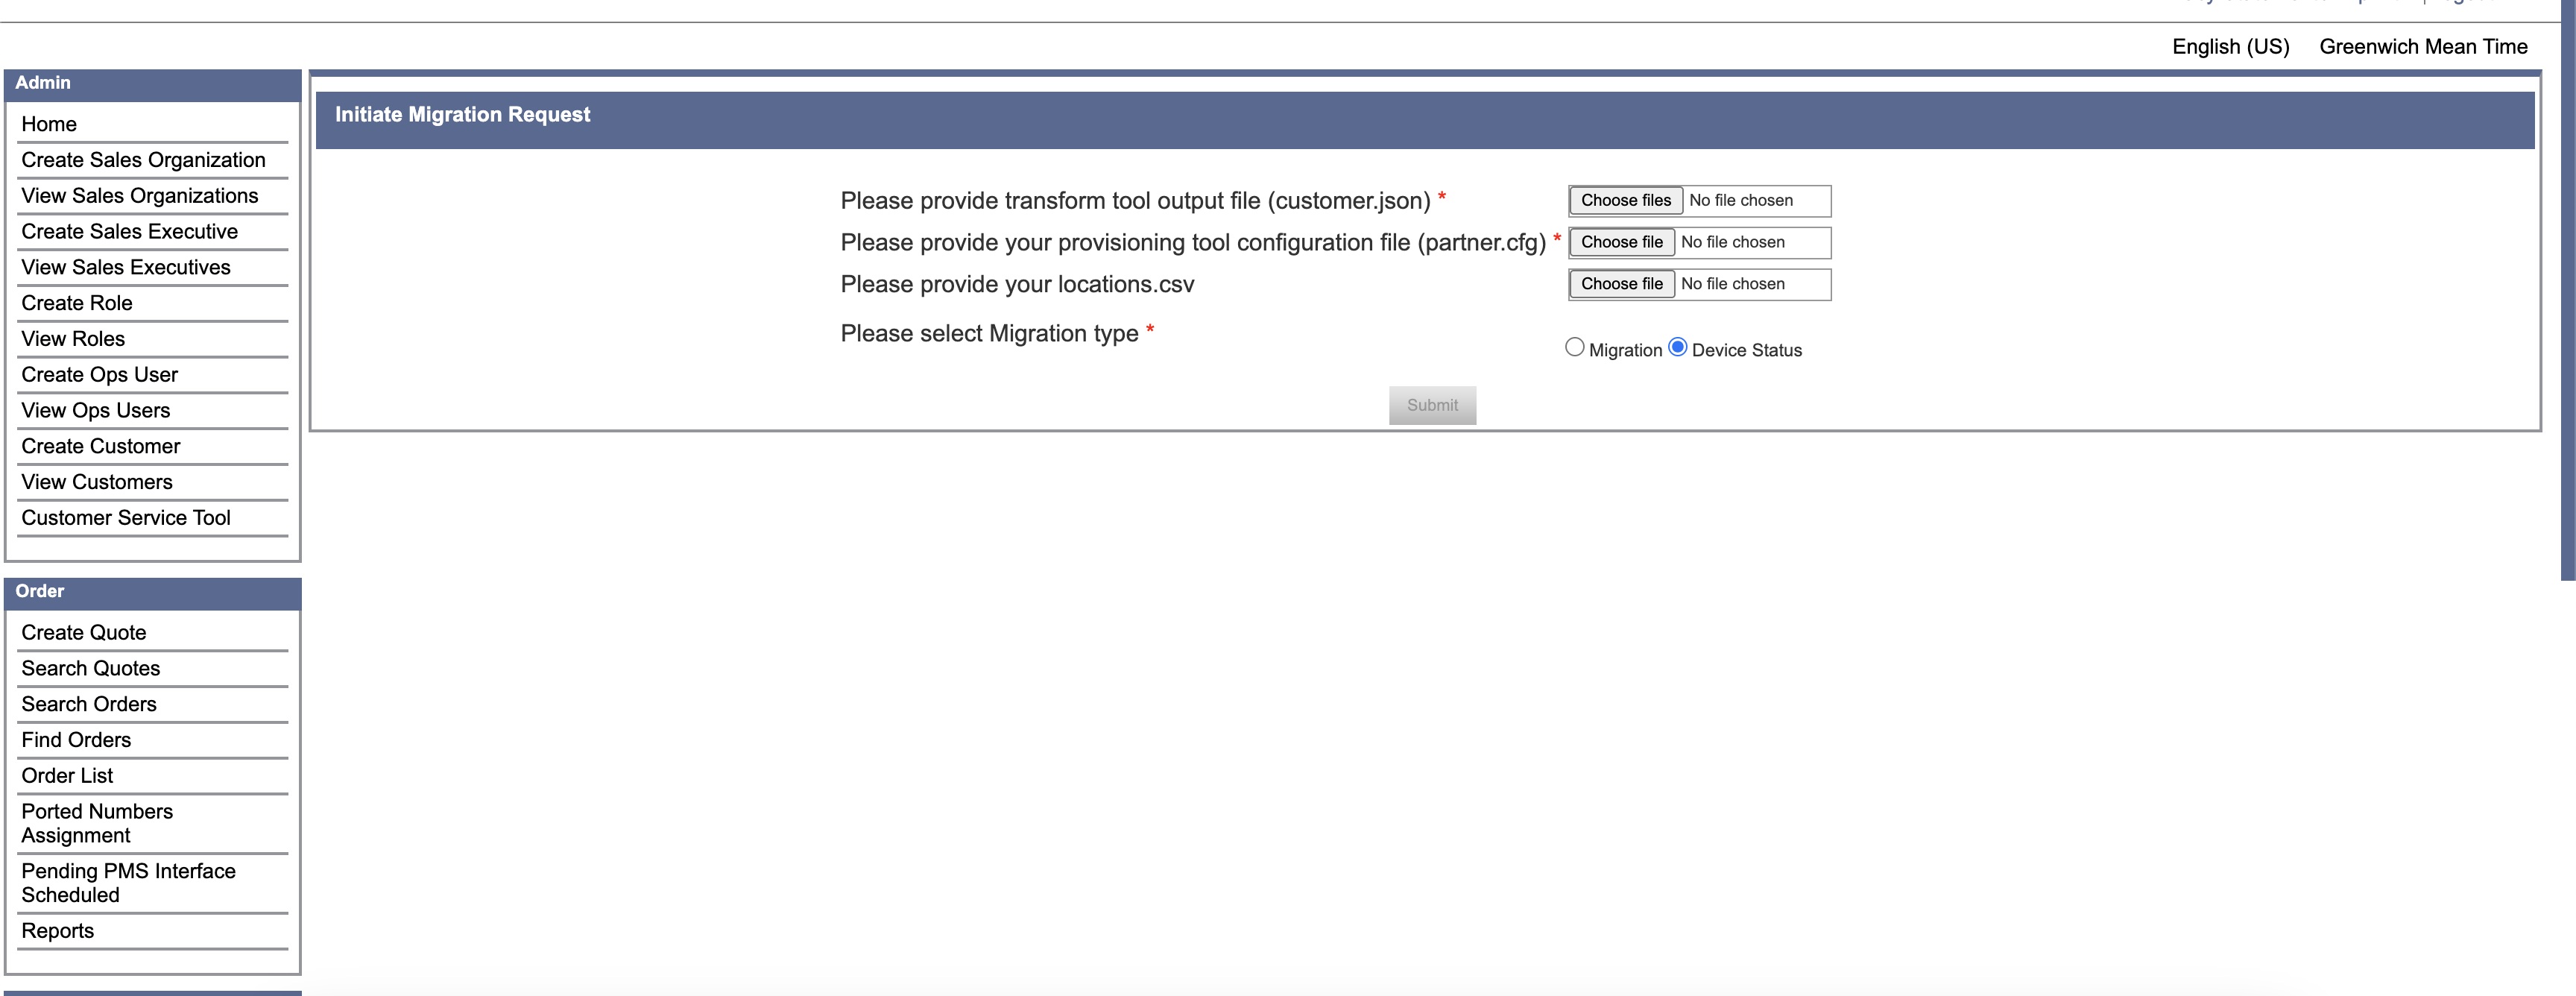
Figure 12 : Portail des fournisseurs de services
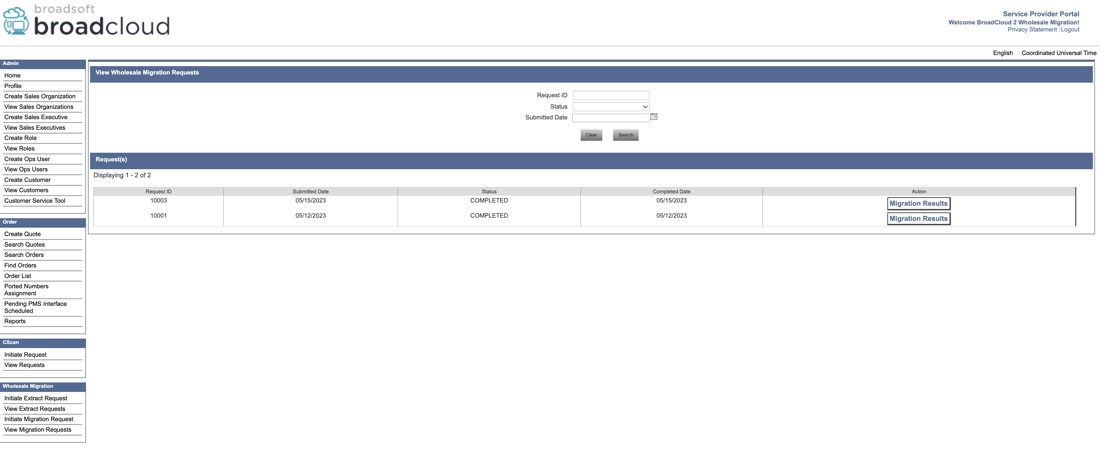
Figure 13 : Portail des fournisseurs de services
Migrer les emplacements sélectionnés (facultatif)
Pour démarrer la migration pour un sous-ensemble spécifique d'emplacements listés dans le fichier customer.json, incluez un fichier locations.csv avec votre requête. Ce fichier CSV ne doit lister que les emplacements que vous prévoyez de migrer.
Si le fichier locations.csv n'est pas fourni, toutes les localisations du fichier customer.json seront migrées.
| Terme | Définition |
|---|---|
|
ID du site |
L'identifiant du site à migrer. |
|
Nom du site |
Le nom de l'emplacement à migrer. |
Pour télécharger la liste des sites actifs disponibles, accédez à Afficher les clients → Sélectionner un client → Exporter les emplacements au format CSV.
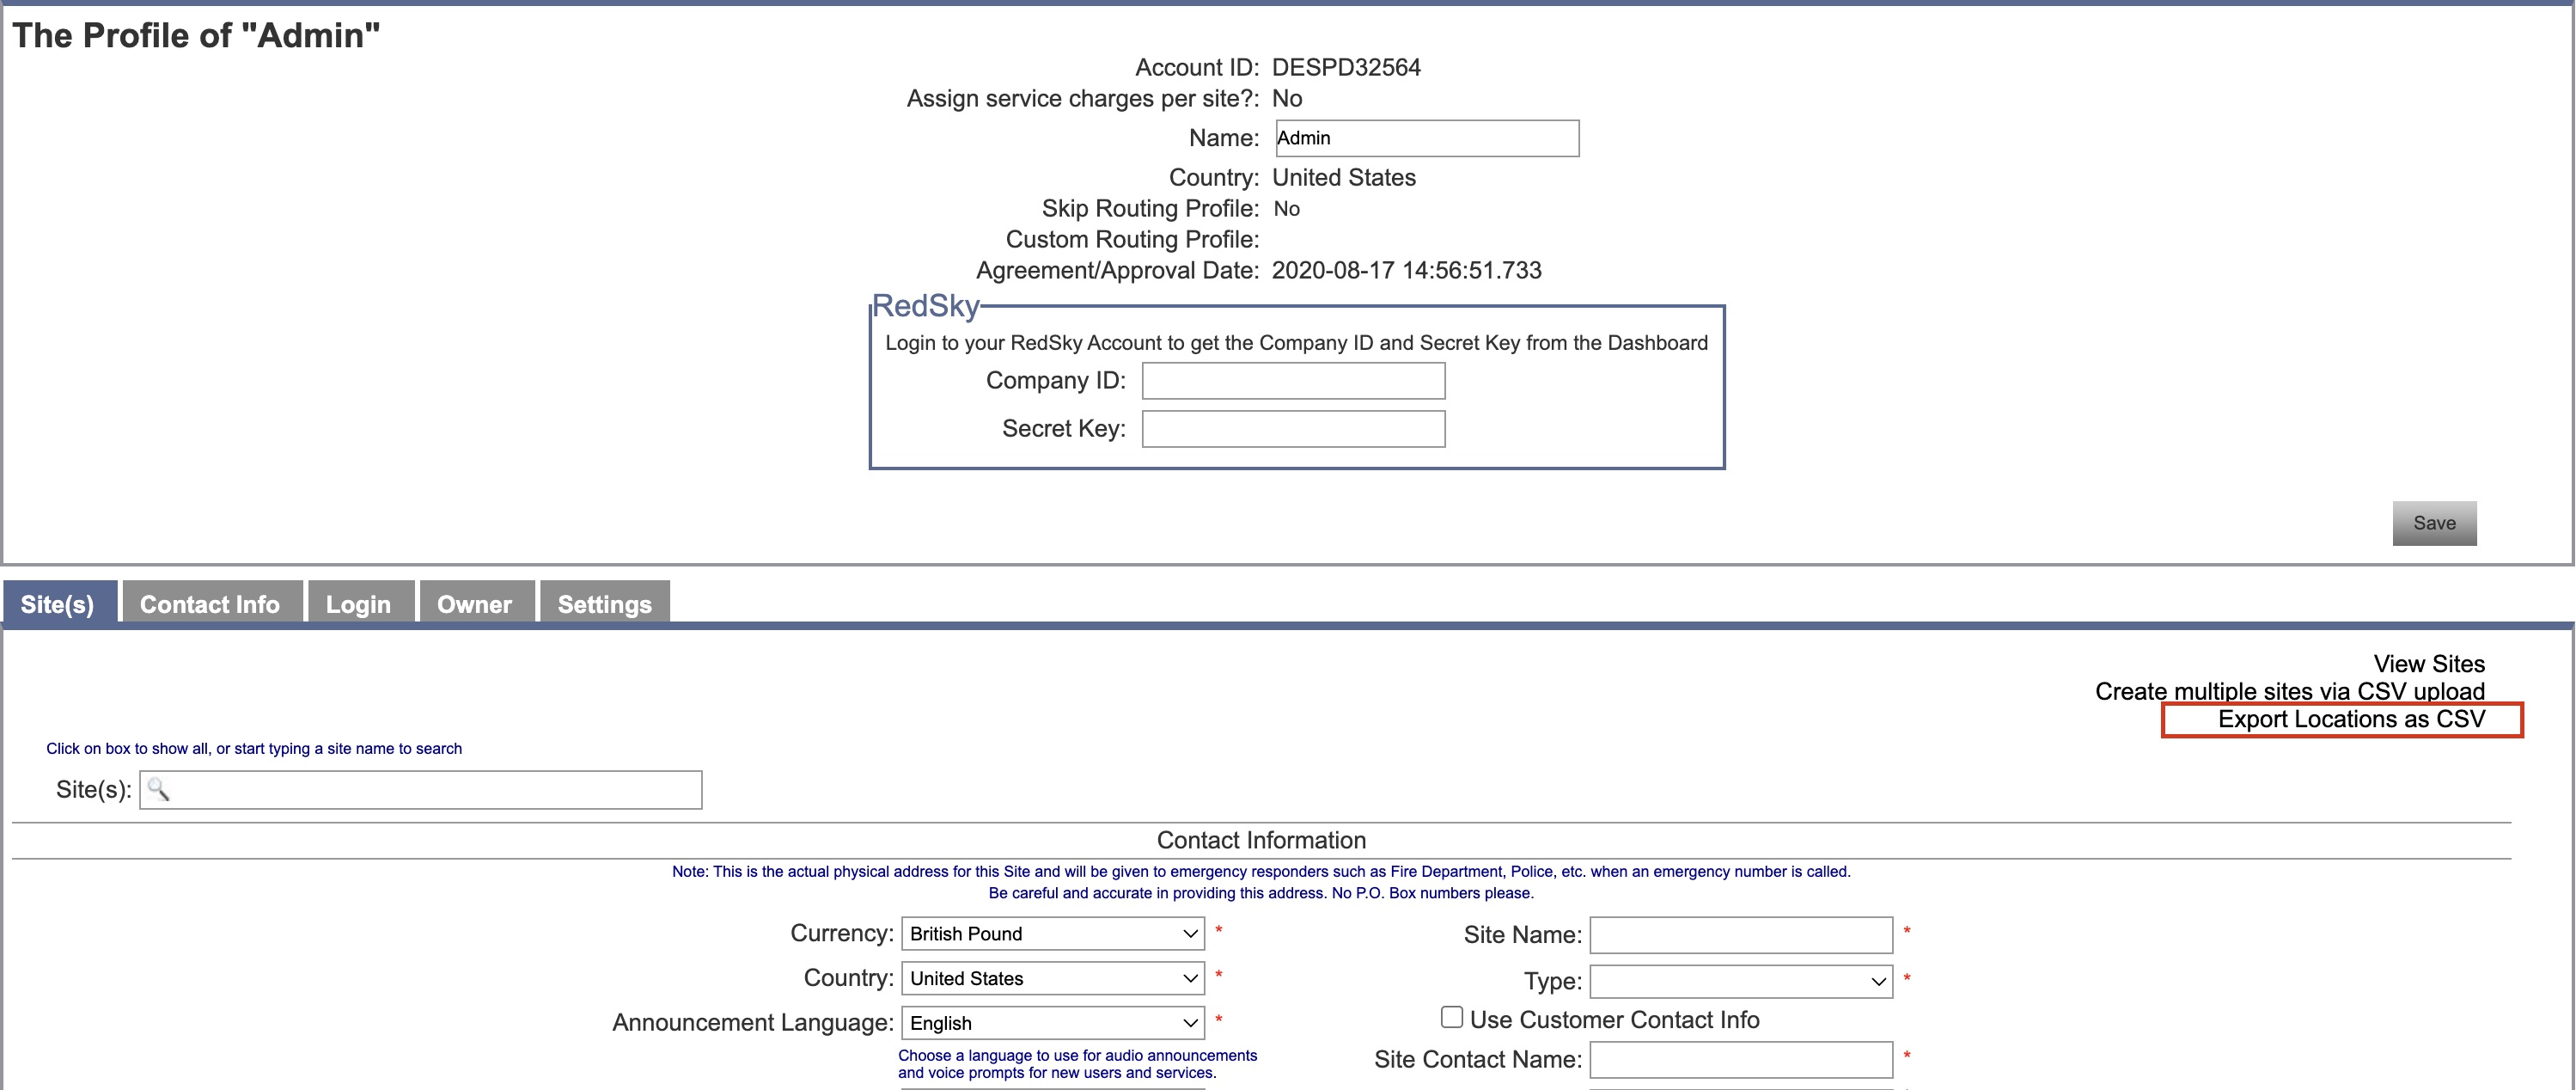
Figure 14 : Exporter les emplacements au format CSV
Activer l'option des numéros de déconnexion
Lorsque vous utilisez le même trunk SIP pour Webex Calling et BroadCloud Carrier, les administrateurs doivent utiliser l'option Déconnecter les numéros. Cela empêche les numéros de téléphone de recevoir des appels entrants après la migration vers BroadCloud.
Cette option est requise uniquement lors de la migration vers une autre région d'appel Webex. Cela ne s'applique pas si vous restez dans la même région.
- Cette action est irréversible
-
N'activez cette option qu'après confirmation :
- La migration est terminée.
- Tous les appareils s'enregistrent correctement dans Webex Calling
- Les numéros sont actifs
Pour activer cette option,
- Dans le fichier partner.cfg, définissez DISCONNECT_NUMBERS_FROM_RIALTO = Oui.
- Réexécutez l'outil de migration en utilisant le même fichier customer.json et le fichier partner.cfgmis à jour.
Si les numéros ne parviennent pas à se déconnecter, veuillez soumettre une demande auprès du TAC Cisco .
Pour Cisco BroadWorks et Webex pour BroadWorks
Pour les migrations Cisco BroadWorks et Webex pour BroadWorks, l'outil s'exécute sur le serveur d'applications Cisco BroadWorks secondaire au sein du réseau partenaire et se connecte au serveur d'applications via OCI-P. Il utilise le fichier JSON de sortie de l'outil de transformation (customer.json) comme entrée et exécute les commandes OCI-P pour migrer les appareils et les clients logiciels.
En cas de fonctionnement réussi, l'outil de déplacement d'appareil permettra de :
- Désenregistrez les périphériques de Cisco BroadWorks et enregistrez-les dans la section Vente en gros.
- Les utilisateurs du client UC-One seront redirigés vers l'application Webex lors de leur première connexion.
- Désactivez les numéros de téléphone de Cisco BroadWorks ou supprimez-les de BroadCloud.
- Activer les numéros en vente en gros.
- Créer des apparitions d'appels partagés dans Wholesale pour les migrations BroadCloud. [This Cette étape s'applique uniquement à BroadCloud. migrations].
SCP et SSH
- Utilisez l'outil de déplacement de périphérique SCP vers le serveur d'applications Cisco BroadWorks secondaire.
- Connectez-vous en SSH au serveur d'applications Cisco BroadWorks secondaire pour configurer les prérequis et exécuter l'outil de déplacement de périphérique.
Prérequis
- Définissez le jeton REFRESH_(jeton copié depuis l'outil de génération de jetons) dans le conf/partner.cfg déposer:
REFRESH_TOKEN=MzUwYjljODEtYmQ4MS00NGVhLTgwNGUtZjQ1NTEyZTViNzJkOTdj - Vérifiez que l'identifiant utilisateur, le mot de passe et le nom d'hôte du serveur d'applications Cisco BroadWorks secondaire sont corrects. conf/deviceMoveTool.conf déposer:
BROADWORKS_USER_ID = admin BROADWORKS_PASSWORD = admin BROADWORKS_HOST_NAME = localhost - Pour renvoyer les e-mails d'activation, vous devez configurer SEND_SUBSCRIBERS_WELCOME_EMAIL=true dans le conf/partner.cfg déposer.
Si les administrateurs souhaitent envoyer des e-mails d'invitation à leurs utilisateurs pendant la migration, ils doivent décommenter la ligne « SEND_SUBSCRIBERS_WELCOME_ ». EMAIL=true" la propriété dans le conf/partner.cfg déposer. Autrement, la propriété devrait rester inchangée.
- Vérifiez le JDK/JRE Le chemin d'environnement est correct dans devicemove.sh
JAVA_HOME=/usr/local/java/java_base - Les administrateurs peuvent utiliser le fichier locations.csv du répertoire d'entrée pour migrer des groupes spécifiques au lieu de tous les groupes d'une entreprise.
Téléphones Polycom
Pour transférer les téléphones Polycom de Cisco BroadWorks vers Wholesale Calling, un administrateur partenaire doit créer un nouveau Identity/Device Fichier de type de profil au niveau du système dans Cisco BroadWorks chaque modèle de périphérique Polycom. Reportez-vous à la figure 14 et téléchargez le fichier personnalisé device-move-tool/conf/deviceProfile/{region}/polycom_vvx.cfg. Après avoir téléchargé le nouveau fichier de périphérique, assurez-vous que le fichier nouvellement créé existe au niveau du groupe. Assurez-vous également que le fichier migration_%BWMAC ADDRESS%.cfg n'entre pas en conflit avec un fichier existant sur votre système.
Il est utilisé en interne par l'outil de déplacement de périphérique.
Le processus de migration pour les téléphones Polycom :
- L'outil de déplacement de périphérique remplace le fichier %BWMACADDRESS%.cfg au niveau du périphérique par polycom_vvx2.cfg. Ce fichier fait référence à migration_%BWMACADDRESS%.cfg.
- Recréez les profils de périphériques au niveau du groupe ou au niveau du périphérique.L'action au niveau du groupe ou du périphérique dépend de la configuration du paramètre deviceLevelRebuild dans le fichier device-move-tool/conf/partner.cfg.
- L'outil de déplacement de périphérique demande au serveur d'applications Cisco BroadWorks de redémarrer les téléphones au niveau du groupe ou au niveau du périphérique.
- Après la demande de redémarrage, les téléphones Polycom téléchargent et traitent le fichier% BWMACADDRESS%.cfg, qui leur demande de télécharger et de traiter le fichier migration_%BWMACADDRESS%.cfg, qui définit device.prov.serverName sur https://plcm.sipflash.com.https://plcm.sipflash.com Pour la région des États-Unis, les URL sont différentes pour les autres régions.
- Le téléphone Polycom télécharge %BWMACADDRESS%.cfg depuis https://plcm.sipflash.com et sera géré par le DMS Webex Calling.
Figure 14 : Identity/device fichier de type profil ajouter
Instructions d'exécution
Il existe deux méthodes pour invoquer le DMT : la première consiste à l’invoquer via un seul client à la fois et la seconde à l’exécuter simultanément sur plusieurs clients.
L'outil de déplacement de périphérique est exécuté à partir du serveur d'applications Cisco BroadWorks secondaire situé dans le répertoire de l'outil de déplacement de périphérique :
For device move single customer:
./devicemove.sh -input=
 ./devicemove.sh -input=/tmp/customername.json
 For device move multiple customers:
./devicemove.sh -input=
 ls -l /tmp/directoryofcustomers/
customer1.json
customer2.json
customer3.json
Additionally, the device move tool supports migrate single/specific phone(s) from 1.35.0 release.
Use the command below:
./devicemove.sh -integration -input=  -macaddress=4CBC4883A6F8,48256741CBE9
Journaux du terminal
Voici les journaux du terminal lors de l'exécution réussie de l'outil de déplacement de périphérique pour la migration de périphérique :
Tool Name: Device Move Tool
Version: 1.15.0
Device Tool Started...
Valid Devices for migration :
-------------------------------------------------------------------------------------------------------------------
|    Device Type |          Mac |                                 Version |                                 Email |
-------------------------------------------------------------------------------------------------------------------
| DMS Cisco 7861 | CC98914EAAD7 | Cisco-CP-7861-3PCC/11.3.7_cc98914eaad7_ | amareswaranvel+benjaminjack@gmail.com |
| DMS Cisco 6821 | 5486BCAE7E45 | Cisco-CP-6821-3PCC/11.3.7_5486bcae7e45_ |  amareswaranvel+lucasoliver@gmail.com |
| DMS Cisco 8811 | F87B204E4066 | Cisco-CP-8811-3PCC/11.3.7_f87b204e4066_ |     amareswaranvel+owenalex@gmail.com |
-------------------------------------------------------------------------------------------------------------------
Do you want to migrate all these devices? ([Y]es or [N]o)
yes
Uploading Device Profiles for DMS Cisco MPP LC
Rebuild Device Process Started
Rebuild Device Process Completed Successfully
Reboot Process Started
Reboot Process Completed Successfully
Modifying profiles for Business Communicator under group collabmigrationtestGRP_engg
Activate webex phone numbers process started for customer org Id : 85ea1d6f-ff9e-41a1-843f-7362aaf12b4c
Activate webex phone numbers process completed for customer org id : 85ea1d6f-ff9e-41a1-843f-7362aaf12b4c
Deactivate broadworks phone numbers process started for groupId : collabmigrationtestGRP_engg
Deactivate broadworks phone numbers process completed for groupId : collabmigrationtestGRP_engg
Device Migration Completed
Sortie
Après la migration des appareils, les appareils sont désormais en ligne et prêts à l'emploi. make/receive appels. Reportez-vous à la figure 15 pour voir un exemple de l'état du périphérique :

Figure 15 : Statut du périphérique
Suite à la migration des appareils, les numéros sont devenus actifs. Reportez-vous à la figure 16 pour voir un exemple des numéros actifs :
Figure 16 : Numéros actifs
Migration de Dubber
Vous pouvez désormais transférer les enregistrements d'appels de BroadCloud vers Webex Calling. Cela vous permet de conserver l'accès à vos comptes Dubber existants et à tous vos anciens enregistrements sans perdre l'accès actuel à la plateforme Dubber pendant la migration. Pour plus d'informations sur la migration de Dubber, voir Migrer Dubber de BroadCloud vers Webex Calling.
Annuler la migration
L'opération de restauration doit être exécutée pour une entreprise à la fois.
Pour BroadCloud Carrier
Les administrateurs peuvent définir ROLLBACK_TO_BROADCLOUD=true dans conf/partner.cfg pour activer la restauration automatique. Cela permet de renvoyer les appareils vers BroadCloud après une migration réussie au sein de la même région ou entre régions avec NS Sync. En cas d'échec de migration, contactez le support technique Cisco (TAC) avant de demander une restauration.
Pour Cisco BroadWorks et Webex pour BroadWorks
La procédure de restauration pour Cisco BroadWorks et Webex pour BroadWorks est la suivante :
- Ouvrez un ticket auprès du support technique Cisco (TAC) pour demander la restauration du périphérique.
- Exécutez l'outil de déplacement de périphérique en mode restauration sur le serveur d'applications BroadWorks secondaire pour annuler les migrations de périphériques. Cela rétablira l'URL DMS à l'URL DMS du fournisseur de services pour les profils de périphériques dans Cisco BroadWorks et réactivera les numéros de téléphone.
- L'équipe Webex Calling rétablit l'URL DMS du fournisseur de services dans les profils d'appareils de Webex Calling.
- Les administrateurs partenaires doivent désactiver ou supprimer les numéros de téléphone dans Webex Calling via le portail Control Hub.
- Les administrateurs partenaires doivent transférer les numéros de téléphone PSTN vers Cisco BroadWorks.
Instructions pour exécuter l'outil de déplacement de périphérique en mode restauration
Suivez les étapes ci-dessous pour exécuter l'outil de déplacement de périphérique en mode restauration :
Exécutez la commande ci-dessous dans le serveur d'applications Cisco BroadWorks secondaire, à l'intérieur du répertoire de l'outil de déplacement de périphérique :
Rétablir les profils
./devicemove.sh -input= -revertProfilesRétablir les numéros
./devicemove.sh -input= -revertNumbersJournaux du terminal
Nous obtiendrons les journaux suivants dans le terminal une fois l'outil de déplacement de périphérique exécuté avec succès pour l'opération de restauration :
Rétablir les profils
Tool Name: Device Move Tool
Version: 1.15.0
Device Tool Started for Revert Process...
Devices that can be moved back from Webex Calling to BroadWorks:
- -------------------------------------------------------------------------------------------------------------------
|    Device Type |          Mac |                                 Version |                                 Email |
-------------------------------------------------------------------------------------------------------------------
| DMS Cisco 7861 | CC98914EAAD7 | Cisco-CP-7861-3PCC/11.3.7_cc98914eaad7_ | amareswaranvel+benjaminjack@gmail.com |
| DMS Cisco 6821 | 5486BCAE7E45 | Cisco-CP-6821-3PCC/11.3.7_5486bcae7e45_ |  amareswaranvel+lucasoliver@gmail.com |
| DMS Cisco 8811 | F87B204E4066 | Cisco-CP-8811-3PCC/11.3.7_f87b204e4066_ |     amareswaranvel+owenalex@gmail.com |
-------------------------------------------------------------------------------------------------------------------
Do you want to move back these devices from Webex Calling to BroadWorks? (Yes, Y, No, N):
yes
Uploading Device Profiles for DMS Cisco MPP LC
Rebuild Device Process Started
Rebuild Device Process Completed Successfully
Reboot Process Started
Reboot Process Completed Successfully
Device Migration Completed for Deprovision Process
Rétablir les numéros
Tool Name: Device Move Tool
Version: 1.15.0
Do you want to continue reverting numbers to Broadworks ?  ([Y]es or [N]o):
Y
[+15205551101, +15205551102, +15205551103, +15205551104, +15205551105, +15205551106, +15205551107, +15205551108, +15205551109, +15205551110]
Starting revert
Activate broadworks phone numbers process started for groupId : collabmigrationtestGRP_engg
Activate broadworks phone numbers process completed for groupId : collabmigrationtestGRP_engg
Device Migration Revert process Completed Successfully
Annexe
Migration à grande échelle
Les grandes entreprises possédant de nombreux sites ne peuvent pas migrer tous leurs sites au cours d'une seule fenêtre de maintenance. La fonctionnalité décrite dans cette section permet aux partenaires de migrer quelques sites à la fois.
Étapes
Utilisez les étapes suivantes pour planifier les migrations progressives d'une grande entreprise :
- Extraire les données d'entreprise de BroadWorks ou BroadCloud.
- Exécutez l'outil Transform sans l'option de localisation sur les données extraites.
- Recherchez la section Emplacement recommandé pour le déplacement simultané dans exception_report.txt pour planifier les phases de migration afin d'obtenir plus d'informations sur les dépendances d'emplacement, examinez les fichiers de liste des agents de fonctionnalités (reportez-vous à l'outil Transform ci-dessous).
- Générez le fichier input/locations.csv en modifiant locations_to_be_edited.csv.
- Exécutez à nouveau l'outil Transformation avec l'option emplacements.
- Examinez le fichier exception_report.txt pour identifier tout problème de dépendance d'emplacement pour la phase actuelle.
- Corrigez les problèmes de dépendance de localisation si nécessaire (en modifiant le fichier locations.csv).
- Réexécutez l'outil Transform pour générer le fichier customers.json pour la phase actuelle.
- Exécutez l'outil de provisionnement pour chaque fichier customer.json.
- Pendant la fenêtre de maintenance, exécutez l'outil de déplacement de périphérique.
- Répétez les étapes 4 à 10 pour la phase suivante.
Outil de transformation
Pour atteindre l'objectif de migration progressive des sites d'une grande entreprise, comme mentionné ci-dessus, un nouveau fichier locations.csv est ajouté comme entrée optionnelle (-locations=input/locations.csv) lors de l'exécution de l'outil de transformation.
Le fichier locations.csv contient des données spécifiques aux emplacements. Il remplace les données trouvées dans input/customers.csv, qui contient actuellement des données d'entreprise et de localisation.
Le tableau suivant répertorie les détails du fichier locations.csv:
|
Description |
Valeurs |
Valeur par défaut |
Obligatoire |
Cartes dans BroadWorks |
Cartes dans BroadCloud | |
|---|---|---|---|---|---|---|
|
identifiant d'entreprise |
Identifiant unique de l'entreprise |
Y |
ID du fournisseur de services |
Identifiant client Rialto | ||
|
locationId |
Identifiant de localisation, unique au sein de l'entreprise |
Y |
identifiant de groupe |
Rialto SiteId | ||
|
statut de migration |
Ce site a-t-il été migré ? |
migré, dont_migrate, migrant |
migration |
N | ||
|
nom |
Nom de ce lieu. Laissez ce champ vide pour utiliser locationId. |
N | ||||
|
Fuseau horaire |
N | |||||
|
langue |
N | |||||
|
address1 |
N | |||||
|
address2 |
N | |||||
|
Symbole Om |
N | |||||
|
État |
N | |||||
|
Code Postal |
Code postal |
N | ||||
|
pays |
Code à 2 lettres |
N |
Le fichier locations.csv peut être composé à partir du fichier .csv prérempli locations_to_be_editedlors de l'exécution de l'outil Transform sur une grande entreprise. Lisez la suite pour voir des exemples.
Le fichier locations.csv est une entrée facultative lors de l'exécution de l'outil de transformation ; par conséquent, l'outil de transformation se comportera de la même manière qu'auparavant si l'option est sélectionnée. -locations=input/locations.csv n'est pas présent.
Nouveaux fichiers de sortie
L'outil de transformation a généré 5 nouveaux fichiers de sortie :
- locations_to_be_edited.csv – ce fichier est prérempli avec les informations de tous les sites de la grande entreprise à migrer.
Exemple :
locationId,enterpriseId,migration status,name,timezone,language,address1,address2,city,state,postal code,country

auto_mig_ent_grp1,auto_mig_ent,,auto_mig_ent_grp1,,,100 Main Street,,Gaithersburg,MD,20877,US

auto_mig_ent_grp2,auto_mig_ent,,auto_mig_ent_grp2,,,101 Main Street,,Gaithersburg,MD,20877,US

auto_mig_ent_grp3,auto_mig_ent,,auto_mig_ent_grp3,,,102 Main Street,,Gaithersburg,MD,20877,US
Le partners/customers peut être utilisé pour générer un fichier locations.csv afin de contrôler les emplacements à migrer pour une phase spécifique (et mettre à jour les informations des emplacements selon les besoins).
Exemple : locations.csv généré à partir du fichier ci-dessus locations_to_be_edited.csv
locationId,enterpriseId,migration status,name,timezone,language,address1,address2,city,state,postal code,country

auto_mig_ent_grp1,auto_mig_ent,migrated,auto_mig_ent_grp1,,,100 Main Street,,Gaithersburg,MD,20877,US

auto_mig_ent_grp2,auto_mig_ent,migrating,auto_mig_ent_grp2,,,101 Main Street,,Gaithersburg,MD,20877,US

auto_mig_ent_grp3,auto_mig_ent,dont_migrate,auto_mig_ent_grp3,,,102 Main Street,,Gaithersburg,MD,20877,US
Ce fichier locations.csvsignifie : pour cette phase, l'emplacement auto_mig_ent_grp1 a été migré, l'emplacement auto_mig_ent_grp2 est en cours de migration, et ne migrez pas l'emplacement auto_mig_ent_grp3.
- hunt_group_agents.csv, call_center_agents_supervisors.csv, paging_group_originators_targets.csv, blf_monitored_elements.csv – 4 fichiers ont le même objectif : générer les listes complètes des fonctionnalités correspondantes agents/supervisors/originators/targets/monitored_elements dans les emplacements de migration si les emplacements de migration ont des dépendances sur d'autres emplacements.
Leur format est quasiment identique (le nom de la 3e colonne varie en fonction de la fonctionnalité), comme ci-dessous (liste des agents du groupe de chasseauto_mig_ent_grp2 pour la phase ci-dessus) :
Exemple : Ce qui suit provient de hunt_group_agents.csv
feature name,feature location,agent,location

Sarah Rodriguez,auto_mig_ent_grp2,agent_michael@domain.com,auto_mig_ent_grp1

Sarah Rodriguez,auto_mig_ent_grp2,agent_sally@domain.com,auto_mig_ent_grp1
Si l'option « Emplacements » n'est pas présente lors de l'exécution de l'outil Transform, les 4 fichiers ci-dessus généreront les listes complètes des hunt-group/call-center/paging-group/busy-lamp-field’s agents/supervisors/originators/targets/monitored_elements pour l'ensemble de l'entreprise, qui peut être utilisé pour planifier les migrations progressives.
Nouvelles sections dans exception_report
Lors de la réalisation d'une migration progressive pour une grande entreprise, de nouvelles sections apparaîtront dans exception_report.txt s'il existe des dépendances de localisation qui ne sont pas satisfaites.
Exemple : La nouvelle section suivante concerne l'emplacement auto_mig_ent_grp2, groupe de chasse des agents de Sarah Rodriguez dans l'emplacement auto_mig_ent_grp3, qui n'est pas migré et ne migre pas dans cette phase.
Dependencies between locations - Hunt groups

Name                          Location                        Agent                                            Agent's Location         Comment

________________________________________________________________________________________________________________

Sarah Rodriguez       auto_mig_ent_grp2    agent_william@domain.com    auto_mig_ent_grp3    Agent in different location not migrated yet

Sarah Rodriguez       auto_mig_ent_grp2   agent_melody@domain.com     auto_mig_ent_grp3    Agent in different location not migrated yet
La nouvelle section suivante formule des recommandations sur la manière de regrouper les emplacements dans les phases de migration.
Lieux recommandés pour se déplacer simultanément :
Location auto_mig_ent_grp1 has dependency on location(s) auto_mig_ent_grp2, auto_mig_ent_grp3

Location auto_mig_ent_grp2 has dependency on location(s) auto_mig_ent_grp3
Si l'option « Emplacements » n'est pas présente lors de l'exécution de l'outil Transform, la section « Emplacements recommandés pour le déplacement simultané » liste toutes les dépendances entre les emplacements afin de faciliter la planification.
Lors de l'exécution de l'outil Transform avec l'option emplacements (c'est-à-dire pour une phase de migration), la section Emplacements recommandés à déplacer simultanément ne liste que les dépendances des emplacements pour la phase actuelle.
Outil de provisionnement
Pour les grandes entreprises, l'outil de provisionnement peut être exécuté comme d'habitude.
Outil de déplacement d'appareil
L'outil de déplacement d'appareils peut s'exécuter pour un sous-ensemble d'emplacements du fichier customer.json. Pour ce faire, ajoutez un nouveau fichier facultatif locations.csv comportant deux colonnes.
|
External_id |
Noms des lieux |
|---|---|
|
valeur d'identification externe |
Noms des locations/group noms |
- Il s'agit d'un fichier facultatif ; s'il n'est pas fourni ou s'il contient des valeurs vides, la migration s'effectuera sur tous les emplacements.
- Si les noms des emplacements et leurs identifiants external_respectifs sont fournis, seuls ces emplacements seront migrés.
La commande est la suivante :
./devicemove.sh -input=/customer.json -locations=/Location_names.csvFuseaux horaires
États-Unis:
"timeZones":["America/Adak","America/Anchorage","America/Chicago","America/Denver","America/Los_Angeles","America/New_York","America/Phoenix","Pacific/Honolulu"]
Canada:
"timeZones":["America/Dawson_Creek","America/Edmonton","America/Halifax","America/Montreal","America/Regina","America/St_Johns","America/Vancouver","America/Winnipeg"]
Australie:
"timeZones":["Australia/Adelaide","Australia/Brisbane","Australia/Broken_Hill","Australia/Darwin","Australia/Hobart","Australia/Lord_Howe","Australia/Perth","Australia/Sydney"]
France:
"timeZones":["Europe/Paris"]
Portugal:
"timeZones":["Atlantic/Azores","Europe/Lisbon"]}
ROYAUME-UNI:
"timeZones":["Europe/London"]
Italie:
"timeZones":["Europe/Rome"]
Allemagne:
"timeZones":["Europe/Berlin"]
Foire aux questions
Erreurs connues
Prérequis
1. Comment trouver l'identifiant d'organisation (OrgID) du partenaire ?
Connectez-vous à Partner Hub et accédez à la section Comptes. L'identifiant de l'organisation (OrgID) apparaît ici.
Extrait
1. Pourquoi un client ou un site n'apparaît-il pas sur la page « Lancer l'extraction » ?
Seuls les clients possédant au moins un site avec des services d'appel actifs sur BroadCloud apparaissent. Si aucun site d'appel actif n'existe, le client ne sera pas répertorié.
Transformation
1. Pourquoi la fonctionnalité utilisateur ou groupe est-elle absente du fichier customer.json ?
Pour consulter les fonctionnalités de l'utilisateur ou du groupe, vérifiez exception_report.txt pour les erreurs associées.
2. Pourquoi le fichier customer.json n'est-il pas généré ?
Mettez à jour le fichier customers.csv avec une adresse valide. Utilisez le paramètre -customers lors de la transformation.
3. Quel est le but du fichier input/customers.csv ?
Son but est de fournir toutes les données client obligatoires qui pourraient manquer dans Cisco BroadWorks ou BroadCloud lors du processus d'extraction.
4. Quel est le but du fichier input/users.csv ?
Le fichier input/users.csv est utilisé pour fournir des données au niveau de l'utilisateur qui peuvent manquer dans Cisco BroadWorks ou BroadCloud.
5. Comment convertir les centres d'appels BroadWorks en Cx Essentials ?
Utilisez input/cxessentials.csv pour convertir BroadWorks Call Centers en Cx Essentials.
6. Existe-t-il un moyen de convertir automatiquement tous les centres d'appels vers Cx Essentials ?
Oui, vous pouvez activer la propriété UPGRADE_ALL_CALL_CENTERS_TO_CX_ESSENTIALS pour convertir automatiquement tous les centres d'appels en Cx Essentials sans utiliser de fichier CSV.
7. Comment puis-je attribuer de nouveaux téléphones aux utilisateurs ?
Pour configurer de nouveaux téléphones, ajoutez l'adresse MAC et l'adresse e-mail de l'utilisateur au fichier input/newphones.csv. Cette étape n'est nécessaire que si les administrateurs partenaires ont l'intention de configurer de nouveaux téléphones dans l'environnement d'appels en gros.
8. Comment configurer des passerelles génériques ?
Pour configurer des passerelles génériques, ajoutez l'adresse MAC du périphérique et l'identifiant utilisateur associé au fichier input/genericgateways.csv. Vous devez également préciser si l'utilisateur est le propriétaire PRINCIPAL ou un utilisateur PARTAGÉ (pour les apparitions d'appels partagés).
9. Existe-t-il une configuration de passerelle générique disponible pour les migrations de BroadCloud vers Wholesale ?
Non, cette fonctionnalité n'est pas prise en charge pour les migrations de BroadCloud vers Wholesale.
Approvisionnement
1. Comment les partenaires peuvent-ils configurer simultanément des fichiers JSON pour plus de 100 clients, comme configuré dans la propriété maxCustomersProvisioning du fichier conf/app.cfg ?
Définissez maxCustomersProvisioning=<no.of.customers> dans app.cfg et exécutez le provisionnement.
2. Provisionnement bloqué car l'organisation se trouve dans «pending_rpl_review » ?
Le service financier de Cisco examine le client. Cette vérification peut prendre jusqu’à 72 heures. Réessayer après approbation.
3. Comment résoudre un problème où le package de vente en gros, ses fonctionnalités et ses utilisateurs ont été attribués à la mauvaise organisation en raison d'un identifiant externe incorrect lors du processus de migration ?
Étape 1: Supprimer tous les utilisateurs / fonctionnalités fournies par l'outil de provisionnement.
Étape 2: Dans Partner Hub, sélectionnez le client, accédez à la section « Forfaits », désactivez tous les forfaits de vente en gros et enregistrez vos modifications.
4. Comment résoudre le problème qui se produit lorsque le message « OrgId est un paramètre obligatoire lors de la mise en service de services Wholesale pour un client préexistant » s’affiche lors de l’exécution de l’outil de mise en service ?
Essayez d'exécuter l'outil avec une adresse e-mail différente en mettant à jour le fichier customer.json. Vérifiez également si le domaine de messagerie est déjà utilisé par une autre organisation. Si c'est le cas, essayez de libérer ce domaine ou d'utiliser un autre domaine non utilisé.
DeviceMove (BroadWorks) / Migration (Broadcloud)
1. Dans le fichier customer.json, sur tous les appareils, un ou deux ne se sont pas connectés ? Comment corriger ceci ?
Si seuls quelques appareils ne se connectent pas, veuillez essayer de les redémarrer manuellement.
2. L'identifiant rialtoIdentifier est-il requis dans le fichier customer.json pour la migration vers Broadcloud ?
Oui.
3. Comment exécuter l'outil de déplacement de périphérique en mode restauration pour Broadcloud ?
Ajouter RETOURNER_À_BROADCLOUD=true dans partner.cfg, puis téléchargez les fichiers customer.json et partner.cfg, et relancez la migration.
4. Que dois-je faire si l'outil de provisionnement ne parvient pas à ajouter les périphériques en raison d'une erreur (généralement parce que le périphérique est déjà dans EDOS) et que la migration du site se poursuit malgré tout ?
Habituellement, nous recommandons à l'administrateur de résoudre les erreurs de provisionnement avant la migration, mais dans ce cas, le site a été migré vers la Wholesale Webex Calling Platform avant que l'appareil ne soit provisionné avec succès dans Webex Calling.
Solution de contournement pour ajouter l'adresse MAC aux appels Webex :
Étape 1 : Résolvez le problème qui a empêché l'ajout du périphérique (généralement, il s'agit de la suppression de l'adresse MAC d'EDOS).
Étape 2 : Il y a deux options.
Option 1 : Annuler et réessayer
- Restaurez le site sur BroadCloud.
- Ajoutez l'appareil dans Webex Calling soit manuellement via le Control Hub, soit en réexécutant l'outil de provisionnement.
- Une fois le périphérique ajouté, procédez à nouveau à la migration.
Option 2 : Continuez sur Webex
Si la restauration n'est pas souhaitée :
- Veuillez nous le faire savoir (équipe de migration en gros) afin que nous puissions définir l'état de la synchronisation BroadCloud NS sur LOCAL.
- L'administrateur peut alors :
- Supprimez l'adresse MAC de l'utilisateur depuis Rialto.
- Supprimez le MAC du site à Rialto.
- Après le nettoyage, l'appareil est ajouté manuellement à Webex Calling via le portail Control Hub.
- Après avoir ajouté l'appareil dans Webex Calling, redémarrez-le manuellement.


