- Home
- /
- Article

Thanks for your feedback.

Webex best practices for secure meetings: Site Administration
 In this article
 Feedback?
Follow these best practices to help ensure security for your Webex meetings, trainings, and events.
Overview of Webex security
The Webex Meetings Suite helps enable global employees and virtual teams to meet and collaborate in real time as though they were working in the same room. Businesses, institutions, and government agencies worldwide rely on Webex. Webex helps to simplify business processes and improve results for sales, marketing, training, project management, and support teams.
For all organizations and their users, security is a fundamental concern. Online collaboration must provide multiple levels of security, from scheduling meetings to authenticating participants to sharing content.
Webex provides a secure environment that you can configure as an open place to collaborate. Understanding the security features as site administrators and end users can allow you to tailor your Webex site to your business needs.
For additional information, see the Webex security technical paper.
Best practices for Webex administrators
Effective security begins with Webex site administration; which allows administrators to manage and enforce security policies for host and presenter privileges. For example, an authorized administrator can customize session configurations to disable a presenter’s ability to share applications, or to transfer files on a per-site or a per-user basis.
We absolutely recommend that you keep your number of administrators to a minimum. Fewer administrators means fewer opportunities for site setting errors.
After you review the best practices for site administrators, be sure to review the best practices for secure meetings for hosts.
We recommend using the following features for protection of your meetings:
Scheduled Webex Meetings
Scheduled Webex meetings are our recommended meeting type when security is important to you or your organization. Scheduled meetings are one-time meetings that are password protected and have a wide range of security features in meeting feature controls and attendee controls. As an administrator you can control the security features for all scheduled meetings on your Webex site. Hosts can also configure meeting security, meeting options and attendee privileges when they schedule their meeting.
Personal Room Meetings
Webex Meetings Personal Rooms are a form of Webex meeting that are continuously available to the meeting host. The meeting host activates their personal room when they join and deactivates the meeting room when they leave. Webex Meetings Personal Rooms are intended to provide a quick and convenient way for trusted participants to meet, and therefore have a limited set of configurable security features. If meeting security is your primary concern, we recommend using scheduled Webex meetings which have a comprehensive set of configurable security features.
Personal Room Meetings can be enabled or disabled for all users in your Webex site. If enabled for your Webex site, they can be enabled or disabled for individual users.
To enable Personal Room Meetings
| 1 |
Sign in to Site Administration, and go to |
| 2 |
In the Site Options section, check Enable Personal Room (When enabled, you can turn this on or off for individual users). |
| 3 |
Select Update. |
Locking Webex meetings affects the meeting entry behavior for all users. When the meeting starts, participants are placed into the lobby by default, until the host admits them.
Separate meeting lock settings are available for scheduled meetings and personal room meetings on your Webex site.
The meeting lock controls allow an administrator to do the following:
-
Automatically lock the meeting 0, 5, 10, 15, or 20 minutes after the meeting starts
-
Configure the meeting entry behavior when the meeting is locked:
-
Everyone waits in the lobby until the host admits them
-
No one can join the meeting
-
The default setting when a meeting is locked is Everyone waits in the lobby until the host admits them.
As an administrator, you can force meeting hosts to use the site-wide default meeting lock settings, or allow the host to set the number of minutes after the meeting starts when it gets locked. We recommend you enforce automatic locking of meetings after a set time. Meeting hosts can always use in-meeting controls to lock and unlock their meeting while it is in progress.
| 1 |
Sign in to Site Administration, and navigate to . |
| 2 |
In the Webex meetings security and Personal Room Security sections, toggle Enable ‘Automatically lock the meeting’ after the meeting starts on, and choose the number of minutes from the menu. If you set the number of minutes to 0, your meeting is locked when it starts. |
| 3 |
(Optional) Toggle Allow users to change these settings on to enable users to change the settings. |
| 4 |
Select Save. |
The lobby is enabled by default for all Webex meetings. With this default setting, when a meeting starts, and the meeting is unlocked, all guest users are placed into the lobby, until the host admits them.
A guest user is categorised into the following user groups:
-
Unverified Users — Users who have not signed in and whose identity is not authenticated.
-
Verified External Users — Users who have signed in, but belong to an external organization.
Each user group has separate and independent lobby controls. Distinguishing between Unverified and Verified External Users allows you to enhance meeting security by applying more stringent meeting entry controls for unverified users. For example, Unverified Users cannot join the meeting while Verified External Users are placed in the lobby, or Unverified Users are placed in the lobby while Verified External users can join the meeting directly.
With the default setting “They wait in the lobby until the host admits them”, when the meeting is unlocked, users in your organization who have signed in with a Webex account using a host or attendee license bypass the lobby and join the meeting directly.
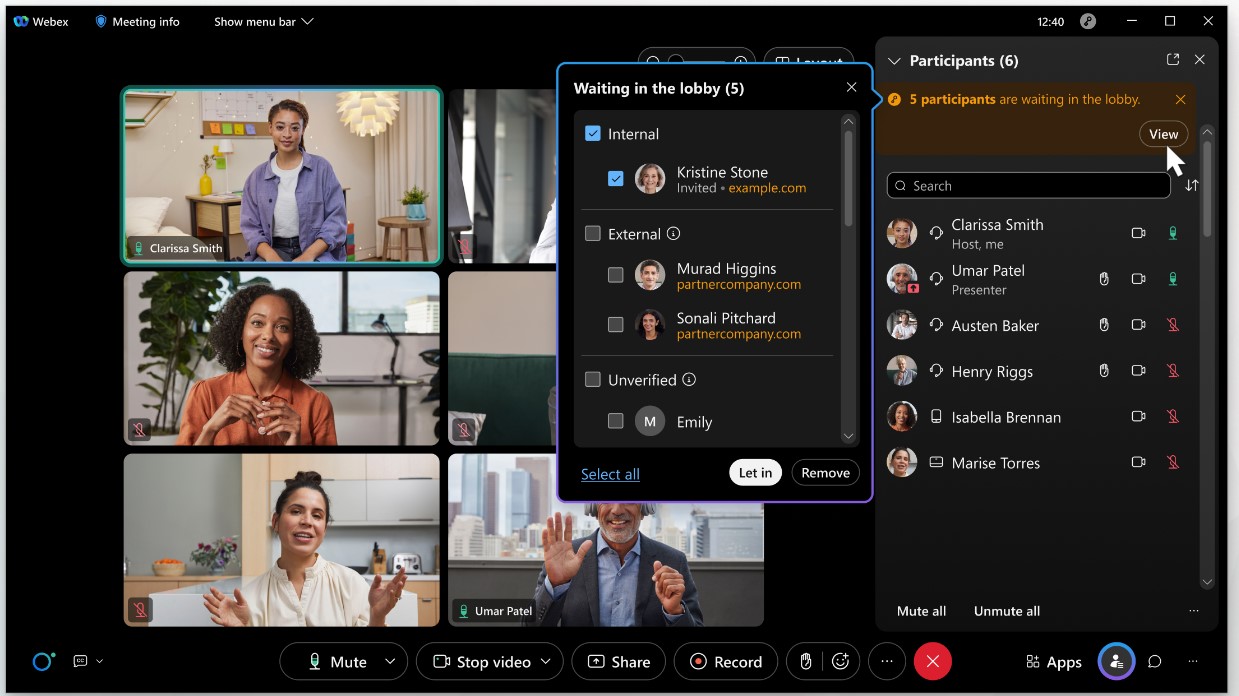
The meeting host can see a list of attendees waiting in the lobby. When users are placed into the lobby of a meeting, they are categorized into three groups to simplify user screening and meeting admission choices:
-
Internal users (authenticated users in your organization)
-
External users (authenticated users in external organizations)
-
Unverified users (users who have not signed in and are not authenticated)
Internal and external authenticated users have signed in and verified their identity. The identity of unverified users (users who have not signed in) can't be assumed to be true because they were not authenticated.
Users can be admitted to the meeting, or removed from the lobby individually or as a group.
For more information on lobby controls see Know who you're letting into your Webex meeting.
To change the lobby settings for scheduled meetings and personal room meetings
| 1 |
Sign in to Site Administration, and go to . |
| 2 |
In the Webex Meetings Security and Personal Room Security under the section When a meeting is unlocked, select one of the following options for Unverified Users and Verified External Users:
|
| 3 |
Select Update. |
We recommend that you enforce password requirement on users joining scheduled meetings from phone or video conferencing systems. The system automatically generates an eight-digit numeric password for phone and video conferencing system attendees and adds it to the meeting invitation. This measure ensures that only people with an invitation can join the meeting when using a phone or video conferencing system.
| 1 |
Sign in to Site Administration, and navigate to . |
| 2 |
In the Webex section:
If any of these options aren't available, contact Webex support to enable them. |
| 3 |
Select Update. |
We recommend that you prevent attendees from joining before the host, unless you fully understand the security risk and require this functionality.
Consider disabling the join before host options for your site, particularly for listed meetings. Otherwise, external attendees could leverage scheduled meetings for their own purposes, without the knowledge or consent of the host.
Similarly, if you allow attendees to join before host, consider not allowing them to join audio before host. If your meeting is listed on your site or is not password-protected, unauthorized users could potentially gain access and initiate expensive calls without the host's knowledge or consent.
For Personal Conference Meetings (PCN Meetings), we recommend disabling the join audio before host option. The host must dial the Webex access number for the audio bridge, and then enter the host access code and host PIN, before attendees can join the meeting.
| 1 |
Sign in to Site Administration, and navigate to . |
| 2 |
To prevent attendees from joining before the host, uncheck the following boxes:
|
| 3 |
Select Update. |
In addition to using the meeting lobby and meeting lock features for personal room meetings, you can use CAPTCHA to detect and block attackers using robots and scripts to fraudulently gain access to your personal room meetings. When enabled, CAPTCHA applies to guests joining your personal room meeting.
A guest user is defined as follows:
-
Not signed in (identity is not authenticated)
-
Signed in, but belongs to an external organization
| 1 |
Sign in to Site Administration, and go to . |
| 2 |
In the Personal Room Security section, check the box beside Show CAPTCHA when attendees enter a host's Personal Room. |
| 3 |
Select Update. |
Telephony callback fraud can happen when someone joins one of your meetings and uses callback to call suspicious phone numbers from different countries, which cost your organization money. These suspicious phone numbers can come from anywhere in the world. However, we've observed that a higher percentage of fraud originates from the following locations:
-
Belgium
-
Costa Rica
-
Ecuador
-
Egypt
-
Ethiopia
-
France
-
Moldova
-
Niger
-
Panama
-
Philippines
-
Portugal
-
Saudi Arabia
-
South Africa
-
Sri Lanka
-
Taiwan
-
Turkey
-
Ukraine
-
United Arab Emirates
-
United Kingdom
-
Vietnam
To help reduce fraud, we recommend that you disallow certain countries in the Webex Allowed Callback Countries list. For example, you can add countries that you don’t do business with, or from which you've received fraudulent or suspicious calls.
| 1 |
Sign in to Site Administration, and go to . |
| 2 |
In the Webex Allowed Callback Countries section, check or uncheck the corresponding check box for a country or region to enable or disable it. You must leave at least one country or region enabled for callback. |
| 3 |
After you finish making changes, click Save. Your changes can take up to 30 minutes to update in the app. |
Even meeting titles can reveal sensitive information. For example, a meeting entitled “Discuss acquisition of Company A” can have financial impacts, if revealed ahead of time. Creating unlisted meetings maintains the security of sensitive information.
For listed meetings, the meeting topic and other details appear on your Webex site for authenticated users, as well as unauthenticated users and guests to see. We recommend that you mark all meetings as unlisted, unless your organization has a specific business need to display meeting titles and information publicly.
| 1 |
Sign in to Site Administration, and navigate to . |
| 2 |
Under Security Options in the Webex section:
|
| 3 |
Select Update. |
You can customize session types to control content sharing and other Webex features, like file transfers. For more information, see Create custom session types for your Cisco Webex site, in Site Administration.
If you permit content sharing at the site level, meeting hosts can choose whether to allow all participants to share. If you don't enable the option, you can assign the Presenter role to select participants or attendees. For more information, see Allow participants to share during meetings.
If your organization works with sensitive information, we recommend that you require all users to have an account on your Webex site. When enabled, Webex prompts all hosts and attendees for their credentials when they join a meeting, event, or training session.
In addition, we recommend that you require attendees to sign in when dialing in from a phone. This requirement prevents anyone getting into the meeting or training session without proper credentials.
Participants who join using the Webex application must authenticate, so Webex doesn't prompt them to authenticate when they connect to audio. Thus, this restriction impacts users who join only by phone.
Also, consider restricting video conferencing systems from dialing into a meeting that requires attendees to sign in. For more information, see Scheduled meetings: Enforce meeting password when joining from phone or video conferencing systems.
Keep in mind, that using this option limits your meeting, event, or session to internal attendees (users with an account on your Webex site). This option is an excellent way to keep your meetings secure, but can be limiting if the host needs to have an external guest.
| 1 |
Sign in to Site Administration, and navigate to . |
| 2 |
In the Webex section, check Require login before site access (Webex Meetings, Webex Events, Webex Training). |
| 3 |
To require sign-in, when joining a meeting or training session by phone, check the following boxes:
When checked and the host requires sign-in, attendees must sign in from their phones. Attendees must have added a phone number and PIN to their profile settings to do so. |
| 4 |
Select Update. |
Hiding meeting and event links within meetings deters attendees from inviting unwanted guests by making the links less convenient to copy and share. It doesn’t prevent attendees from copying and sharing meeting links from their email invitations.
| 1 |
Sign in to Webex Administration, and go to . |
| 2 |
Scroll down to and check Hide meeting link from attendee view within meetings (Meetings and Events). This option is unchecked by default. When hidden, the Copy Meeting Link option appears dimmed for attendees in the Meeting Info window, the More Options menu, and the Meeting menu. Hosts can still share meeting links within meetings. |
By default, all MacOS users can use third-party virtual cameras. Third-party virtual cameras require Webex to load their libraries and permit access to the camera. This requirement ensures that virtual cameras inherit all permissions that you grant participants, such as microphone and screen capture. If you disable the use of third-party virtual cameras for your site, only Webex can access these permissions.
To increase security for meetings on your site, you can prevent third-party virtual cameras from loading in Webex Meetings.
You'll find the following settings in Webex Site Administration: .
The options marked with an asterisk (*) are available only for sites managed in Site Administration that don’t have single sign-on enabled.
Account management
-
*Lock out an account after a configurable number of failed login attempts
-
Deactivate an account after a configurable number of inactive days
Account signup
-
*Add a CAPTCHA security check in the signup form which requires new users to type the letters or digits of a distorted image that appears on the screen
-
*Require email confirmation of new accounts
User account password management
-
Require specific rules for password format, length, and reuse
-
Create a list of prohibited passwords (for example, “password”)
Password aging
-
*Force users to change password at regular intervals
-
Set a minimum time interval when users can change their password
Require strong passwords for meetings (Include registration and panelist passwords)
-
Require specific rules for password format, length, and reuse
-
Create a list of prohibited passwords (for example, “password”)


