- Home
- /
- Article

Edit a recording using the Webex Recording Editor
 In this article
 Feedback?
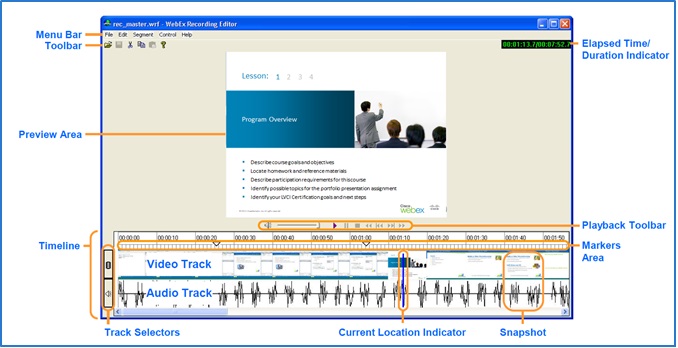
You can use the Webex Recording Editor on Windows to edit recordings created with the Webex Meetings Recorder. These recording files are saved in the Webex Recording Format (WRF), a proprietary Webex format.
Download the recording editor
You can't edit NBR (Network-Based Recording) files; however, hosts can truncate the start and end times of the recording and can also control which panels are displayed. You can export NBR files to WMV, MP4, or Flash format and then edit them with a third-party editor such as Windows Movie Maker.
Before you begin
| 1 |
Sign in to your Webex site and then go to . |
| 2 |
Scroll down to Recorders and Players, and then select Recording and Playback. |
| 3 |
Scroll down to Webex Recorder, select Download, and follow the prompts.
|
| 1 |
Go to . |
| 2 |
Select . |
| 3 |
Locate the file you want to edit, and then click Open. |
|
With the Webex Recording Editor, you can edit your recording as follows:
|
|
After you open the recording in the Webex Recording Editor, do the following:
|
| 1 |
After you open a recording in the Webex Recording Editor, click in the video or audio track. Drag your cursor across the frames that you want to add to or edit audio from. | ||||||
| 2 |
Go to . | ||||||
| 3 |
Verify the Start and End times. | ||||||
| 4 |
Do one of the following:
| ||||||
| 5 |
Click OK. | ||||||
| 6 |
Click Play to preview the audio. |
| 1 |
After you open a recording in the Webex Recording Editor, start playback. Use the Elapsed Time Indicator to identify the beginning and end of the content you want to delete. |
| 2 |
Stop playback. Click and drag in the video or audio track to select the approximate section you want to delete. |
| 3 |
Select . |
| 4 |
Adjust the beginning and ending time of your recording, if necessary, and then click OK. |
| 1 |
After you open a recording in the Webex Recording Editor, click and drag in the video or audio track to select the approximate segment that you want to define. |
| 2 |
Go to . |
| 3 |
Type a name for the segment. The name is visible in Webex Player by scrolling to . |
| 4 |
Adjust the beginning and ending time of your recording, if necessary. Before you can use the arrow buttons to adjust the time, click anywhere in the time box. |
| 5 |
Click OK. |
| 1 |
After you open a recording in the Webex Recording Editor, select the segment that you want to move somewhere else. |
| 2 |
Go to . |
| 3 |
Move the Current Location Indicator where you want to relocate the segment. |
| 4 |
Go to . |
| 1 |
In the Webex Recording Editor, do one of the following:
|
| 2 |
Go to . |
| 3 |
Adjust the insert time if necessary. Before you can use the arrow buttons to adjust the time, click anywhere in the time box. |
| 4 |
Select Select File, locate the Webex recording (WRF) file you want to insert into your recording, and then choose Open. |


