- Home
- /
- Article

Thanks for your feedback.

Configure single sign-on in Control Hub with F5 Big-IP
 In this article
 Feedback?
You can configure a single sign-on (SSO) integration between Control Hub and a deployment that uses F5 Big-IP as an identity provider (IdP).
Single sign-on and Control Hub
Single sign-on (SSO) is a session or user authentication process that permits a user to provide credentials to access one or more applications. The process authenticates users for all the applications that they are given rights to. It eliminates further prompts when users switch applications during a particular session.
The Security Assertion Markup Language (SAML 2.0) Federation Protocol is used to provide SSO authentication between the Webex cloud and your identity provider (IdP).
Profiles
Webex App only supports the web browser SSO profile. In the web browser SSO profile, Webex App supports the following bindings:
-
SP initiated POST -> POST binding
-
SP initiated REDIRECT -> POST binding
NameID format
The SAML 2.0 Protocol supports several NameID formats for communicating about a specific user. Webex App supports the following NameID formats.
-
urn:oasis:names:tc:SAML:2.0:nameid-format:transient -
urn:oasis:names:tc:SAML:1.1:nameid-format:unspecified -
urn:oasis:names:tc:SAML:1.1:nameid-format:emailAddress
In the metadata that you load from your IdP, the first entry is configured for use in Webex.
SingleLogout
Webex App supports the single logout profile. In Webex App, a user can sign out of the application, which uses the SAML single logout protocol to end the session and confirm that sign out with your IdP. Ensure your IdP is configured for SingleLogout.
Integrate Control Hub with F5 Big-IP
The configuration guides show a specific example for SSO integration but do not provide exhaustive configuration for all possibilities. For example, the integration steps for nameid-format urn:oasis:names:tc:SAML:2.0:nameid-format:transient are documented. Other formats such as urn:oasis:names:tc:SAML:1.1:nameid-format:unspecified or urn:oasis:names:tc:SAML:1.1:nameid-format:emailAddress will work for SSO integration but are outside the scope of our documentation.
Set up this integration for users in your Webex organization (including Webex App, Webex Meetings, and other services administered in Control Hub). If your Webex site is integrated in Control Hub, the Webex site inherits the user management. If you can't access Webex Meetings in this way and it is not managed in Control Hub, you must do a separate integration to enable SSO for Webex Meetings.
Before you begin
For SSO and Control Hub, IdPs must conform to the SAML 2.0 specification. In addition, IdPs must be configured in the following manner:
Download the Webex metadata to your local system
| 1 |
Sign in to Control Hub. |
| 2 |
Go to . |
| 3 |
Go to the Identity provider tab and click Activate SSO. |
| 4 |
Select an IdP. |
| 5 |
Choose the certificate type for your organization:
Trust anchors are public keys that act as an authority to verify a digital signature's certificate. For more information, refer to your IdP documentation. |
| 6 |
Download the metadata file. The Webex metadata filename is idb-meta-<org-ID>-SP.xml. |
Configure the external service provider and identity provider
| 1 |
From your BIG-IP F5 administration interface, go to . |
| 2 |
From External SP Connectors, select . |
| 3 |
Enter a meaningful name for the service provider name, such as <yourorganizationname>.ciscowebex.com. |
| 4 |
Under Security Settings, check the following checkboxes:
|
| 5 |
Return to , and then create a new identity provider (IdP) service. |
| 6 |
Enter a meaningful name for the IdP service name, such as CI. |
| 7 |
For the IdP Entity ID, use the FQDN of the Big-IP server with something in front—for example, https://bigip0a.uc8sevtlab13.com/CI. |
| 8 |
Under Assertion Settings, select Transient Identifier for Assertion Subject Type. |
| 9 |
For Assertion Subject Value, return the value of the email of the user %{session.ad.last.attr.mail}. |
| 10 |
Return the attributes mail and uid with the value %{session.ad.last.attr.mail}. |
| 11 |
Under Security Settings, pick a certificate to sign the assertion. |
| 12 |
Save your changes, and then bind the service provider and identity provider that you created. |
Download the F5 Big-IP metadata
| 1 |
Select Export IDP Service. |
| 2 |
Ensure that the Sign Metadata value is Yes. |
| 3 |
Download the metadata file to your desktop or a location that's easy for you to find. |
Add an access policy
| 1 |
Go to Access Policy > Access Profiles > SAML and create a SAML Resource for the IdP that you created. |
| 2 |
Go to your Access Profile and edit the access policy that you use for WebEx Messenger CAS. |
| 3 |
Add a new item in the Logon tab with the name Logon Page and leave the default values. |
| 4 |
Add a new item in the Authentication tab with the name AD Auth and specify your Active Directory as the server. |
| 5 |
On the successful branch, add AD Query from the Authentication tab |
| 6 |
Go to Branch Rules and changed it to AD Query is Passed. |
| 7 |
On the successful branch of AD Query, add Advanced Resource Assign from the Assignment tab. |
| 8 |
Click Add/Delete and add two resources SAML with all the SAML resources and the Webtop that you created. |
| 9 |
For Select Ending, select Allow. The access policy should look like this screenshot: 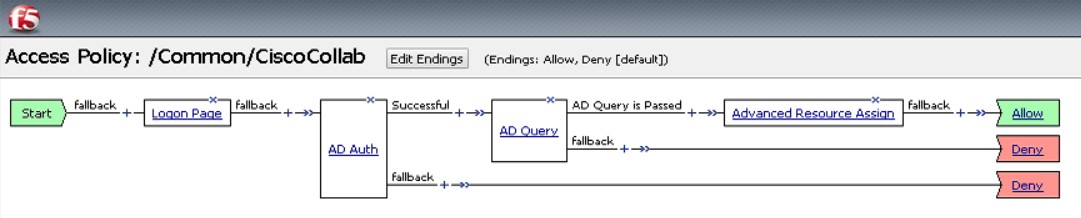
|
Associate the access profile with the virtual server
You must associate the access profile with the virtual server that you created.
| 1 |
Go to . |
| 2 |
Open Access Profiles to confirm that no virtual server is associated to the profile. |
| 3 |
Select Advanced Resource Assign. |
| 4 |
Select Add/delete to add the new SAML resource. |
| 5 |
Close the Access Policy design windows and apply the new access policy. |
Import the IdP metadata and enable single sign-on after a test
After you export the Webex metadata, configure your IdP, and download the IdP metadata to your local system, you are ready to import it into your Webex organization from Control Hub.
Before you begin
Do not test SSO integration from the identity provider (IdP) interface. We only support Service Provider-initiated (SP-initiated) flows, so you must use the Control Hub SSO test for this integration.
| 1 |
Choose one:
|
| 2 |
On the Import IdP metadata page, either drag and drop the IdP metadata file onto the page or use the file browser option to locate and upload the metadata file. Click Next.
You should use the More secure option, if you can. This is only possible if your IdP used a public CA to sign its metadata. In all other cases, you must use the Less secure option. This includes if the metadata is not signed, self-signed, or signed by a private CA. Okta does not sign the metadata, so you must choose Less secure for an Okta SSO integration. |
| 3 |
Select Test SSO setup, and when a new browser tab opens, authenticate with the IdP by signing in. If you receive an authentication error there may be a problem with the credentials. Check the username and password and try again. A Webex App error usually means an issue with the SSO setup. In this case, walk through the steps again, especially the steps where you copy and paste the Control Hub metadata into the IdP setup. To see the SSO sign-in experience directly, you can also click Copy URL to clipboard from this screen and paste it in a private browser window. From there, you can walk through signing in with SSO. This step stops false positives because of an access token that might be in an existing session from you being signed in. |
| 4 |
Return to the Control Hub browser tab.
The SSO configuration does not take effect in your organization unless you choose first radio button and activate SSO. |
What to do next
Use the procedures in Synchronize Okta Users into Cisco Webex Control Hub if you want to do user provisioning out of Okta into the Webex cloud.
Use the procedures in Synchronize Microsoft Entra ID users into Cisco Webex Control Hub if you want to do user provisioning out of Entra ID into the Webex cloud.
You can follow the procedure in Suppress Automated Emails to disable emails that are sent to new Webex App users in your organization. The document also contains best practices for sending out communications to users in your organization.


