- Home
- /
- Article

Thanks for your feedback.

Configure Webex Calling for your organization
 In this article
 Feedback?
Customize your organization for Webex Calling in Control Hub. After activating your first location through the First Time Setup Wizard, you can set up and manage the locations.
Set up calling settings in First Time Setup Wizard
The first step to get your Webex Calling services up and running is to complete the First Time Setup Wizard (FTSW). Once the FTSW is completed for your first location, it doesn’t need to be completed for additional locations.
| 1 |
Click the Getting Started link in the Welcome email you receive. Your administrator email address is automatically used to sign in to Control Hub, where you'll be prompted to create your administrator password. After you sign in, the setup wizard automatically starts. |
| 2 |
Review and accept the terms of service. |
| 3 |
Review your plan and then click Get Started. Your account manager is responsible for activating the first steps for FTSW. Contact your account manager if you receive a “Cannot Setup Your Call” notice, when you select Get Started. |
| 4 |
Select the country that your data center should map to, and enter the customer contact and customer address information. |
| 5 |
Click Next: Default Location. |
| 6 |
Choose from the following options:
|
| 7 |
Make the following selections to apply to this location:
|
| 8 |
Click Next. |
| 9 |
Enter an available Cisco Webex SIP address and click Next and select Finish. |
Add a location
Before you begin
To create a new location, prepare the following information:
-
Location address
-
Desired phone numbers (optional)
| 1 |
Log in to Control Hub at https://admin.webex.com, go to . A new location will be hosted in the regional data center that corresponds to the country you selected using the First Time Setup Wizard. |
| 2 |
Configure the settings of the location:
|
| 3 |
Click Save and then choose Yes/ No to add numbers to the location now or later. |
| 4 |
If you clicked Yes, choose one of the following options:
The choice of PSTN option is at each location level (each location has only one PSTN option). You can mix and match as many options as you’d like for your deployment, but each location will have one option. Once you’ve selected and provisioned a PSTN option, you can change it by clicking Manage in the location PSTN properties. Some options, such as Cisco PSTN, however, may not be available after another option has been assigned. Open a support case for guidance. |
| 5 |
Choose whether you want to activate the numbers now or later. |
| 6 |
If you selected non-integrated CCP or Premises-based PSTN, enter Phone Numbers as comma-separated values, and then click Validate. Numbers are added for the specific location. Valid entries move to the Validated Numbers field, and invalid entries remain in the Add Numbers field accompanied by an error message. Depending on the location's country, the numbers are formatted according to local dialing requirements. For example, if a country code is required, you can enter numbers with or without the code and the code is prepended. |
| 7 |
Click Save. |
What to do next
After you create a location, you can enable emergency 911 services for that location. See RedSky Emergency 911 Service for Webex Calling for more information.
Delete a location
Before you begin
You can delete a location that's either not in use or was configured incorrectly after deleting the users and Workspaces associated with it. When you delete a location, you delete all the assigned services and numbers.
Get a list of the users and workspaces associated with a location: Go to and from the drop-down menu, select the location to delete. You must delete those users and workspaces before you delete the location.
Keep in mind that any numbers associated with this location are released back to your PSTN provider; you'll no longer own those numbers.
| 1 |
Log in to the Control Hub at https://admin.webex.com, go to . |
| 2 |
Click in the Actions column beside the location that you'd like to delete. |
| 3 |
Choose Delete Location, and confirm that you want to delete that location. It typically takes a couple of minutes to permanently delete the location, but can take up to an hour. You can check the status by clicking beside the location name and selecting Deletion Status. |
Update an existing location
You can change your PSTN setup, the name, time zone, and language of a location after it's created. Keep in mind though that the new language only applies to new users and devices. Existing users and devices continue to use the old language.
For existing locations, you can enable emergency 911 services. See RedSky Emergency 911 Service for Webex Calling for more information.
| 1 |
Sign in to Control Hub. |
| 2 |
Go to . If you see a Caution symbol next to a location, it means that you haven't configured a telephone number for that location yet. You can't make or receive any calls until you configure that number. |
| 3 |
(Optional) Under PSTN Connection, select either Cloud Connected PSTN or Premises-based PSTN (local gateway), depending on which one you've already configured. Click Manage to change that configuration, and then acknowledge the associated risks by selecting Continue. Then, choose one of the following options and click Save:
To migrate, refer Migrate to Cisco Calling plans below. |
| 4 |
For the location, select the Main Number from the drop-down list. The main number can be assigned to an auto attendant or other destination within the location so external callers are routed to an appropriate destination. It’s mandatory to assign a main number to the location if it has any trunks or any extension-only entities, such as users, workspaces, virtual lines, or features. Without a main number, the trunks aren't usable and extension-only entities can't make or receive internal or external calls. Users in that location can also use this number as their external caller ID when making PSTN calls. If you choose a toll-free number as the main number for a location, we recommend updating the Emergency Callback Number for the location because a toll-free number doesn’t have an emergency services address. For more information, see Configure Emergency Callback Number for a Location. |
| 5 |
(Optional) Under Emergency Calling, you can select Emergency Location Identifier to assign to this location. This setting is optional and is only applicable for countries that require it. In some countries (Example: France), regulatory requirements exist for cellular radio systems to establish the identity of the cell when you make an emergency call and is made available to the emergency authorities. Other countries like the U.S and Canada implement location determination using other methods. For more information, see Enhanced Emergency Calling. Your emergency call provider may need information about the access network and this is achieved by defining a new private SIP extension header, P-Access-Network-Info. The header carries information relating to the access network. When you set the Emergency Location Identifier for a Location, the location value is sent to the provider as part of the SIP message. Contact your emergency call provider to see if you require this setting and use the value that is provided by your emergency call provider." |
| 6 |
Select the Voicemail Number that users can call to check their voicemail for this location. |
| 7 |
(Optional) Click the pencil icon at the top of the Location page to change the Location Name, Announcement Language, Email Language, Time Zone, or Address as needed, and then click Save. Changing the Announcement Language takes effect immediately for any new users and features added to this location. If existing users and/or features should also have their announcement language changed, when prompted, select Change for existing users and workspaces or Change for existing features. Click Apply. You can view progress on the Tasks page. You can't make any more changes until this is complete. Changing the Time Zone for a location doesn't update the time zones of the features associated with the location. To edit the time zones for features like auto attendant, hunt group, and call queue, go to the General Settings area of the specific feature you want to update the time zone for and edit and save there. |
Migrate to Cisco Calling plans
Prerequisite
Before you start the migration, review all Telephone Numbers (TNs) in the location. Delete or move any numbers you no longer own or don't wish to migrate. If those numbers are not removed before the migration, you will either need to cancel and restart the migration or contact the support team to resolve the issue.
You can change your PSTN connection for an existing location to Cisco PSTN. For example, you can change the locations for the premises-based PSTN (local gateway) or non integrated CCP connections to Cisco PSTN. Cisco PSTN provides a cloud PSTN solution from Cisco.
All portable numbers remain functional except for a small interruption during the scheduled porting completion time.
Also, you can’t make any number management change for a location that’s undergoing a PSTN connection transition. But the existing numbers remain functional and you can still assign or unassign numbers to the location. You can’t add, delete, and move in or out numbers for that location. During this process, the routing profile automatically updates, enabling Cisco PSTN.
Currently, the capability of changing PSTN connection for an existing location to Cisco PSTN isn’t supported for the Japan region.
While changing the PSTN connection, a subscription with a Calling license is applied, and the billing service receives a notification.
Limitations:
-
Migration from an integrated IntelePeer location to a Cisco PSTN location isn’t supported
-
Dedicated Instance location can’t be migrated into Cisco PSTN
-
Multiple port orders may be required for the PSTN connection change. If so, these orders are linked so they complete at the same time. Any date change or cancellation of one port order must be applied to all linked port orders for the connection change.
-
You need a customer administrator account to sign the Emergency Service Address (ESA) disclaimer when setting up a Cisco PSTN connection at a location for the first time. The system doesn’t allow partner administrators or cross-launched customer administrators to sign the disclaimer. Once the ESA disclaimer has been signed for a supported country, partner administrators can interact with the migration as usual.
How to initiate a PSTN connection change
Before you begin
Only customer administrators can initiate the PSTN connection change, as there is a requirement to sign E911 agreement.
| 1 |
Sign in to Control Hub. |
| 2 |
Go to . |
| 3 |
Select the location for that you want to change the PSTN connection to Cisco PSTN. |
| 4 |
Go to the Calling tab, click the Manage option next to the Premises-based PSTN or nonintegrated Cloud Connected PSTN. |
| 5 |
Edit next to Connection Type. |
| 6 |
Select the Cisco Calling Plans card and choose the subscription that allocates Cisco Calling Plan for users at this location. Click Next. |
| 7 |
A connection change page appears for your confirmation. Click Next and check port readiness for your numbers. 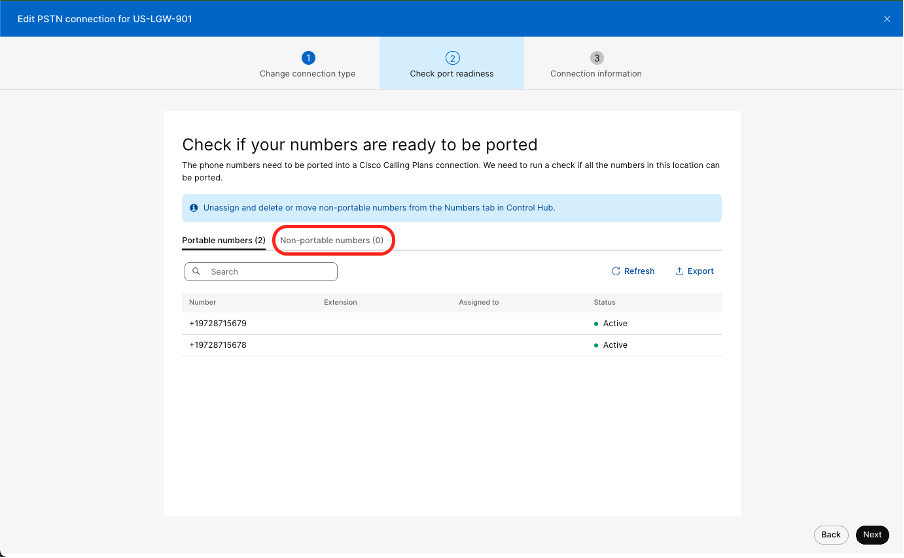
The Next button enables only if all numbers in the list are portable. Read these pointers:
|
| 8 |
Click Next and provide the contract information. 
This is the primary contract contact for all locations using Cisco Calling Plans (U.S.). Any changes to this contact apply to all other locations using Cisco Calling Plans (U.S.). |
| 9 |
Click Next. A notification displays asking for your confirmation to save your contract information for that location. Select Yes, change. |
| 10 |
Provide the emergency service address and click Save. 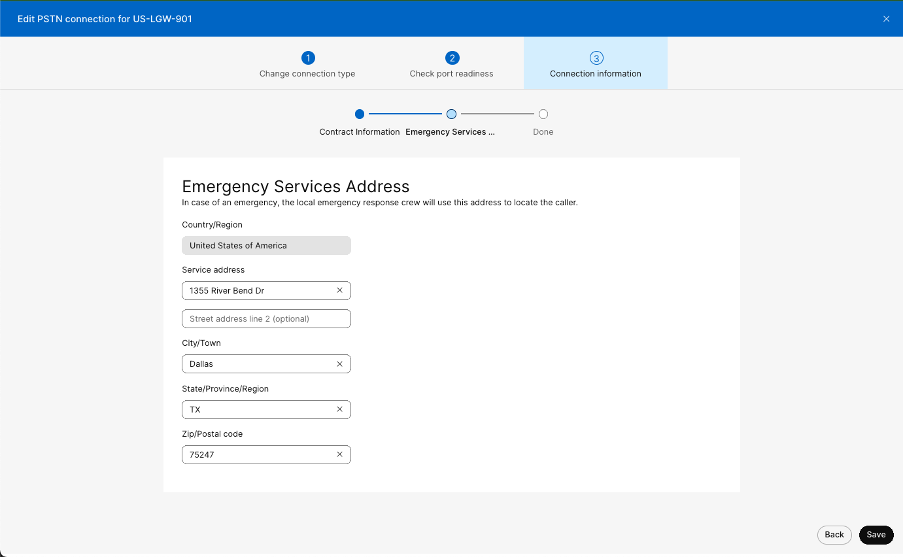
In an emergency, the local emergency response team uses this address to locate the caller. |
| 11 |
The summary page appears with the number of ports created. If there’s only one order, you can see an additional step called Provide additional information. For multiple orders, an order selector is available at the top to navigate between them. Click Next and enter the details to complete the port wizard. 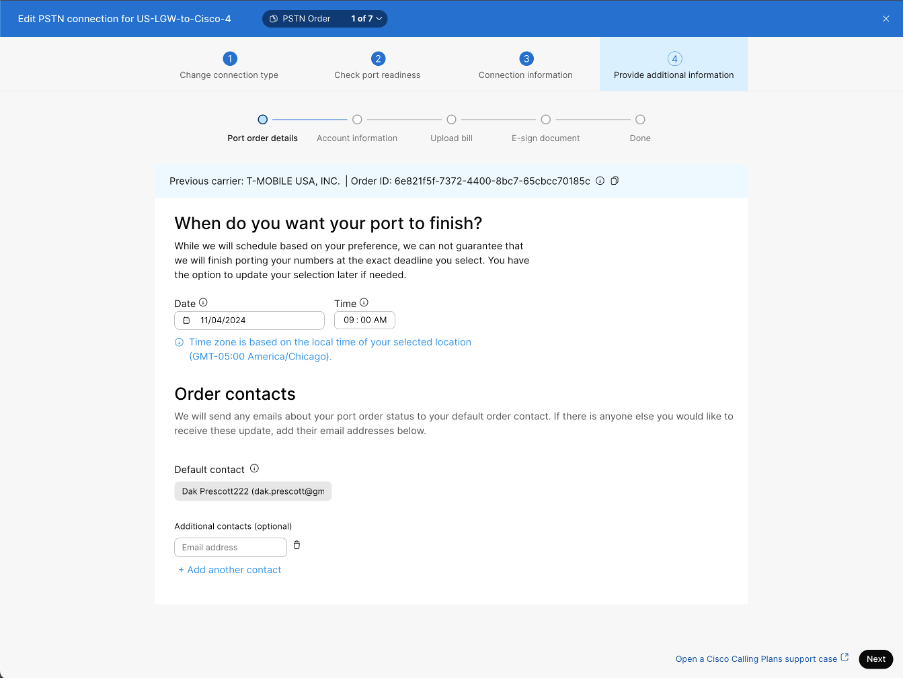
The orders are submitted at once when all information is provided for a single PSTN migration request. By default, the firm order commitment date is consistent across all orders. The PSTN connection change automatically applies after the last linked order is ported completely.
The migration details are available under the tab. Select the order ID to view the order details in a side-panel view. You can see the type as Change PSTN for the orders created from PSTN connection change. |
Cancel the PSTN connection change
An administrator can cancel the PSTN migration when the location is still in a transition state.
| 1 |
Sign in to Control Hub. |
| 2 |
Go to . |
| 3 |
Select the location for that you want to cancel the PSTN connection. |
| 4 |
Go to the Calling tab, click the Cancel PSTN connection change button. |
| 5 |
Click Yes, continue to confirm the cancellation. |
Configure Webex Calling dial plan
You can control the dial plan for your Webex Calling deployment with outbound dialing codes. Customize extension lengths, routing prefixes, and dialing preferences (internal and external) to be compatible with the dialing habits of your users.
These settings are for internal dialing and are also available in the first-time setup wizard. As you change your dial plan, the example numbers in the Control Hub update to show these changes.
You can configure outgoing Calling permissions for a location. See these steps to configure outgoing Calling permissions.
| 1 |
Sign in to Control Hub, go to , and then scroll to Internal Dialing. |
| 2 |
Configure the following optional dialing preferences, as needed:
|
| 3 |
Specify internal dialing for specific locations. Go to , select a location from the list, and click Calling. Scroll to Dialing, and then change internal dialing as needed:
|
| 4 |
Specify external dialing for specific locations. Go to , select a location from the list, and click Calling. Scroll to Dialing, and then change external dialing as needed:
Impact to users:
|
Configure premises-based PSTN (Local Gateway) in Control Hub
If you're a value added reseller, you can use these steps to start local gateway configuration in Control Hub. When this gateway is registered to the cloud, you can use it on one or more of your Webex Calling locations to provide routing toward an enterprise PSTN service provider.
A location that has a local gateway can't be deleted when the local gateway is being used for other locations.
Create a trunk
Before you begin
-
Once a location is added, and before configuring premises-based PSTN for a location, you must create a trunk.
-
Create any locations and specific settings and numbers to each one. Locations must exist before you can add a premises-based PSTN.
-
Understand the Premises-based PSTN (local gateway) requirements for Webex Calling.
-
You can't choose more than one trunk for a location with premises-based PSTN, but you can choose the same trunk for multiple locations.
| 1 |
Sign in to Control Hub. |
| 2 |
Click Add Trunk and select a location. |
| 3 |
Name the trunk and click Save. The name can't be longer than 24 characters. |
What to do next
Trunk information appears on the screen Register Domain, Trunk Group OTG/DTG, Line/Port, and Outbound Proxy Address.
We recommend that you copy this information from Control Hub and paste it into a local text file or document so you can refer to it when you're ready to configure the premises-based PSTN.
If you lose the credentials, you must generate them from the trunk information screen in Control Hub. Click Retrieve Username and Reset Password to generate a new set of authentication credentials to use on the trunk.
Select a trunk for Premises-based PSTN
| 1 |
Log in to Control Hub at https://admin.webex.com, go to . |
| 2 |
Select a location to modify and click Manage. |
| 3 |
Select Premises-based PSTN and click Next. |
| 4 |
Choose a trunk from the drop-down menu. Visit the trunk page to manage your trunk group choices. |
| 5 |
Click the confirmation notice, then click Save. |
What to do next
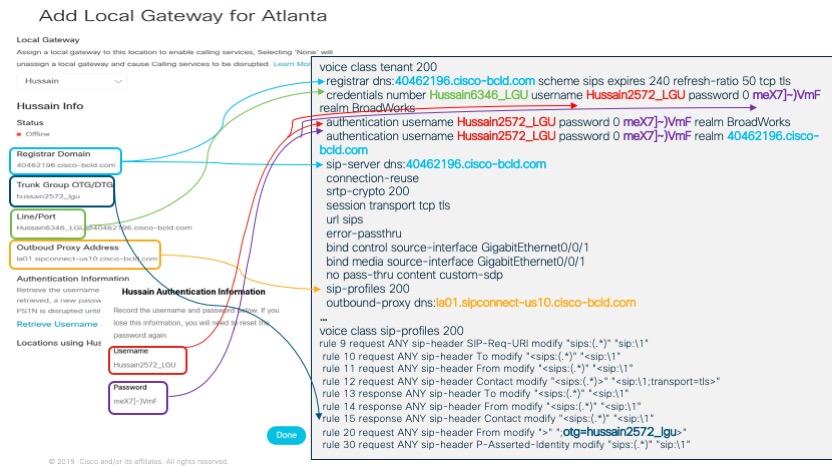
You must take the configuration information that Control Hub generated and map the parameters into the local gateway (for example, on a Cisco CUBE that sits on the premises). This article walks you through this process. As a reference, see the following diagram for an example of how the Control Hub configuration information (on the left) maps onto parameters in the CUBE (on the right):
After you successfully complete the configuration on the gateway itself, you can return to in Control Hub and the gateway that you created will be listed in the location card that you assigned it to with a green dot to the left of the name. This status indicates that the gateway is securely registered to the calling cloud and is serving as the active PSTN gateway for the location.
Manage phone numbers
You can easily view, activate, remove and add phone numbers for your organization in Control Hub. For more information, see Manage phone numbers in Control Hub.
Request a Webex services purchase from a trial in Control Hub
If you're trying out Webex services and you'd like to convert your trial to a paid subscription, you can submit an email request to your partner.
| 1 |
Log in to Control Hub at https://admin.webex.com, select the building icon |
| 2 |
Select the Subscriptions tab, and then click Purchase Now. An email is sent to your partner letting them know that you're interested in converting to a paid subscription. |
 .
. Set calling options
You can use Control Hub to set the priority of available calling options that users see in Webex App. You can also enable them for single click-to-call. For more information, see: Set calling options for Webex App users.
Set up calling behavior
You can control what calling application opens when users make calls. You can configure the calling client settings, including mixed-mode deployment for organizations with users entitled with Unified CM or Webex Calling and users without paid calling services from Cisco. For more information, see: Set up calling behavior.


