- Home
- /
- Article

Thanks for your feedback.

Optimize meeting rooms with workspace advisor in Control Hub
 In this article
 Feedback?
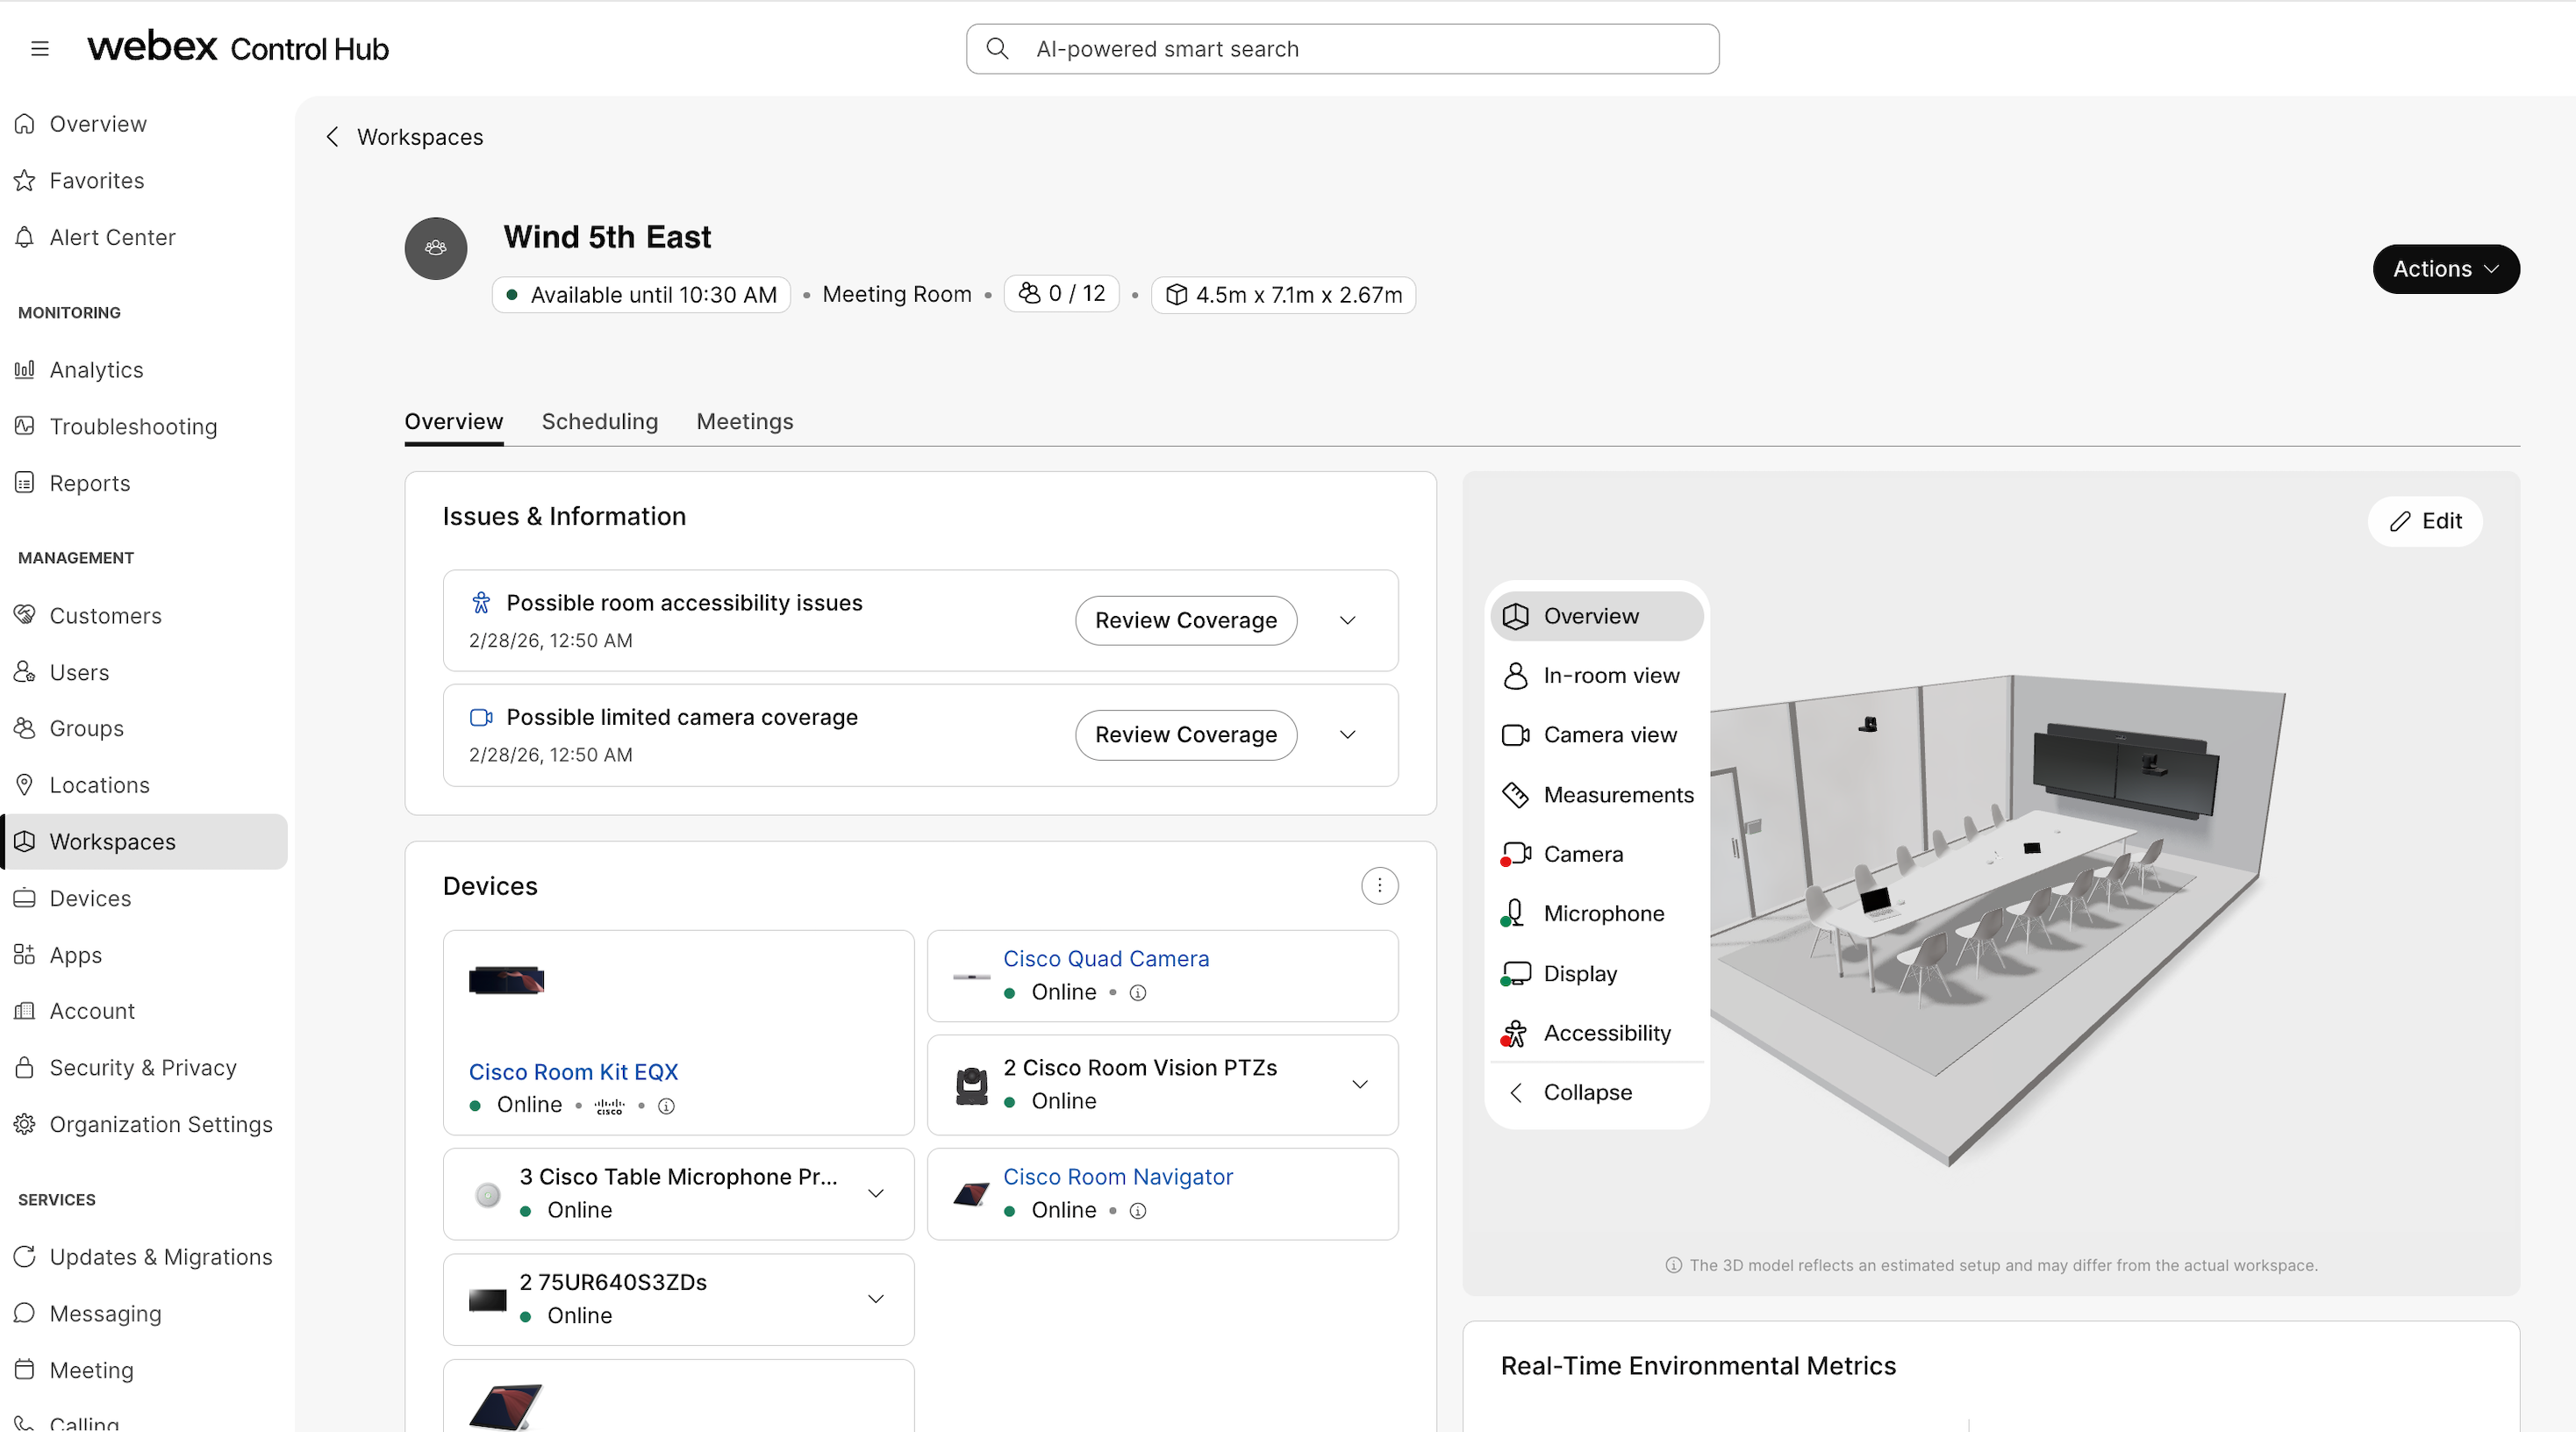
Workspace advisor provides a digital 3D representation of physical meeting spaces in Control Hub, enhancing visibility and control over room setups.
Workspace advisor integrates with Workspace Designer to create models of physical rooms, suggesting optimized collaboration environments and efficient infrastructure management. It gives you recommendations that reduce manual troubleshooting efforts and enables you to proactively address gaps in meeting room setups. The enhanced visibility that workspace advisor provides ensures that meeting spaces are configured for their intended purpose.
The room model in Control Hub is based on the available device and room information. It is based on templates from Workspace Designer and may not be an accurate representation of the physical room.
You can use the workspace advisor to:
-
Gain knowledge of room shape, dimensions, and seating layout.
-
Visualize and validate the ideal placement of hardware to ensure optimal coverage.
-
Confirm that all participants are visible and audible, with screen content accessible throughout the room.
-
Validate that remote attendees have clear audio and visual access to in-room participants.
-
Optimize meeting zones for improved collaboration and communication.
Control Hub generates a 3D model of each workspace, using information such as room capacity, dimensions, and furniture placement. You can add and edit parameters, such as room dimensions, distance to table, table size, and shape, to make the model more like the actual physical room.
Existing device data, video devices, microphones, displays, and peripherals, is auto-populated and visualized within the model. This information is sourced directly from the workspace inventory and can’t be edited. The placement of these devices in the model is based on Workspace Designer templates and may not reflect the setup in the actual room.
Workspace advisor illustrates the coverage zones of microphones, cameras, and screens, highlighting areas where meeting participants can be seen and heard clearly, both locally and remotely. If coverage is insufficient, it is indicated in the model and in the issues list for the workspace.
The workspace advisor also automatically suggests a meeting zone configuration based on the room size and position of the device. You can edit your meeting zone directly in the tool with visual feedback of what area the zone covers.
Set up and edit workspaces
You can view, set up, and edit workspace in Workspace advisor in the workspace’s details page in Control Hub. It is available by default but requires that capacity is set for the workspace. All advisor views are based on standard template meeting rooms apart from when the workspace type is set to Auditorium.
Currently you can setup and edit individual workspaces. You can either set up a workspace manually or import a room that has been set up in Workspace Designer.
If room occupancy is set and someone is in the room, you can see characters in the 3D model of the room.
Coverage tags:
-
Green: Camera, screen, and microphone coverage is good. The room is likely to be accessible to wheelchair users.
-
Blue: There may be an issue with accessibility for wheelchair users.
-
Yellow:Coverage is marginal. Participants in these areas may be visible or audible, but quality may be reduced compared to optimal zones.
-
Red: Camera, screen, and microphone coverage is not sufficient. The room is unlikely to be accessible to wheelchair users.
| Icon | Name | Description |
|---|---|---|

| Overview | Shows the overview of the room. |

| In-room view | Shows how the view from the table looks like. |

| Camera view | Shows what the camera sees from the room. If the device has several cameras, you can choose which camera to view. |

| Measurements | Shows a floor plan of the room with the room and table measurements. |
|
| Camera | Shows the floor plan with camera coverage of the room. If there are several cameras, you can select which camera’s coverage is shown. |

| Microphone | Shows the floor plan with microphone coverage. If there are several microphones, you can choose which microphone’s coverage is shown. |

| Display | Show the floor plan with display coverage to show where the display is properly visible in the room. |

| Accessibility | Shows the floor plan with areas that are wheelchair accessible. |

| Meeting zone | Shows the floor plan with the area covered by the meeting zone configuration. |
You can see issues detected by workspace advisor in the Issues & Information panel. You can review and fix the issues or dismiss them if no fix is necessary. The advisor issues are also visible on the workspace insights page.
Set up manually
| 1 |
Sign in to Control Hub and go to Workspaces. Then select the workspace you’re interested in. |
| 2 |
Under Improve Advisor accuracy, select Finish setup. In the pop-up, select Complete setup manually and Continue. |
| 3 |
Set Type, Capacity, and Size for the room. Select Next. |
| 4 |
In the model editor you can edit the following:
|
| 5 |
Select Save to confirm the changes. |
Import from Workspace Designer
You need to be logged in on designer.cisco.com, and the room needs to be saved to get a share link you can use inControl Hub.
| 1 |
Sign in to Control Hub and go to Workspaces. Then select the workspace you’re interested in. |
| 2 |
Under Improve Advisor accuracy, select Finish setup. In the pop-up, select Import from Workspace Designer and Continue. |
| 3 |
Enter the share link from Workspace Designer and select Import. You can get the share link from http://designer.cisco.com/. Go to My Rooms and select the room. Select Share Room and Create sharable link. |
Edit a workspace
| 1 |
Sign in to Control Hub and go to Workspaces. Then select the workspace you’re interested in. |
| 2 |
Next to the 3D model, select Edit. |
| 3 |
Adjust the editable settings in the model editor and select Save to confirm the changes. |
Disable workspace advisor
Workspace advisor is on by default for all workspaces with supported devices. You can disable it for all of the worksapces in your organization.
Disabling and enabling workspace advisor does not take effect immediately. Workspaces are recomputed over the next 24 hours before the change is applied. When disabling workspace advisor, all existing spacial models will be permanently deleted. Any customizations done to the spacial models will be lost.
| 1 |
Sign in to Control Hub and go to Workspaces. |
| 2 |
Go to Settings and toggle off Workspace Advisor. |
Limitations
Cisco devices
-
Only collaboration devices running RoomOS 26 and later are fully supported.
Devices running RoomOS 11 are shown as placeholder 3D objects and workspace advisor will only offer information about any connected third-party display coverage and accessibility.
-
Network switches are not shown even when connected to Cisco Collaboration devices.
-
Workspaces with Desk Series devices or phones will not be shown.
Microphones
-
Analog microphones and third-party microphones are not shown.
Control Hub currently does not have knowledge that microphones, such as Table Microphone or Ceiling Microphone, are connected and thus cannot show audio tips for these. In this case, no microphone coverage tips will be given.
-
Mix of microphone types is not supported.
If there are both Ceiling Microphone Pros and Table Microphone Pros in the room, the 3D model will only show one of these types of microphones.
Deployments
-
No custom room support
Only standard template rooms from Workspace Designer are supported, not the custom room functionality.
-
Only setups that are supported by the standard designer templates are supported in workspace advisor. This means that the following setups, while otherwise supported, will not be shown:
-
Only 2 screens will be shown, even if more screens are connected to the device. The largest screens are prioritized.
-
Some cinematic meeting features not ready yet.
-
In companion mode rooms, the first device that is not a Board is shown as the sole device in the room.
-
Other
-
Third-party devices, such as Crestron controllers, are not shown in the room.
-
Cisco certified Samsungs screens that are connected to a Cisco device are presented accurately. Other third-party screens may not work if the correct data is not passed over CEC to the Cisco device.
-
Screens that are not connected to a Cisco collaboration device are not shown.


