- Home
- /
- Article

Thanks for your feedback.

 In this article
 Feedback?
The PresenterTrack feature enables the camera to follow a presenter that is moving about on stage. The tracking stops when the presenter leaves the stage. You can set up the feature from the local device web interface.
The following devices and cameras support PresenterTrack:
-
Board Pro G2 with Room Vision PTZ and PTZ 4K
-
Board Pro with PTZ 4K
-
Codec EQ and Room Kit EQX with Room Vision PTZ, PTZ 4K, or Precision 60 camera
-
Codec Pro with Room Vision PTZ
-
Codec Plus and Codec Pro with PTZ 4K, Precision 60, or SpeakerTrack 60 camera
-
Room Bar Pro with Room Vision PTZ and PTZ 4K
-
Room 55 Dual, Room 70, and Room 70 G2 with PTZ 4K or Precision 60 as external camera
Watch this video for a walkthrough of the PresenterTrack setup with Cross-view camera.
Considerations before placing the camera
When you set up PresenterTrack, you must define a stage area and a trigger zone. Consider the location and use of these areas when placing the camera that is tracking the presenter on stage.
Stage area: The stage area is the zoomed-out overview image.
-
Make it large enough so that the presenter can move about on stage. The tracking stops when the presenter leaves the stage area.
-
Allow the audience or meeting participants to move naturally in the room without triggering the tracking.
Trigger zone: Presenter tracking doesn't start before the camera detects a head in the trigger zone.
-
Choose a location where the presenter naturally enters the stage, for example by a presenter table or podium.
-
Make the zone large enough for the camera to detect the presenter's head.
-
To avoid a false head detection, make sure that the background of the trigger zone is neutral. Avoid having the trigger zone in front of a screen.

Room Vision PTZ PresenterTrack
The PresenterTrack feature for Room Vision PTZ offers a high quality production experience designed for larger stages. It uses built in AI along with motorized pan, tilt and optical zoom to deliver great image quality.
Zoom capabilities: 12x optical zoom and 2x digital zoom.
Supported collaboration devices:
- Cisco Codec EQ: HDMI or Video over IP
- Cisco Codec Pro: HDMI *
- Cisco Room Bar Pro: HDMI or Video over IP *
- Cisco Board Pro G2: HDMI or Video over IP *
* Note: Requires additional PoE+ switch or PoE+ injector
Required Peripherals:
- Cisco Room Navigator
- Cisco Room Vision PTZ
Room considerations
Mount the camera high enough to maintain a clear line of sight to the stage.
Software setup
On the Room navigator, navigate to Device settings > Camera > Room Vision PTZ PresenterTrack setup and follow the on-screen instructions.
Camera default view
During setup, you will be prompted to set a default camera view, which is used when the stage is empty. Ensure this view fully covers the intended stage area.
Stage zone
Define the stage zone in the setup. The camera tracks people within this zone. Make sure presenters’ heads are within the stage zone when standing or sitting. Avoid making the stage zone too wide to prevent tracking people who leave the stage.
Stage zones larger than the default camera view are supported. To create this, first set the stage zone, then return to adjust the camera view and extend the previously created zone.
Trigger zone
The trigger zone specifies the area where people’s heads must enter to activate tracking. Ensure it covers the relevant stage area and does not overlap with content screens to avoid false detections.
When setting the trigger zone, allow the audience to move freely without accidentally triggering PresenterTrack. If no trigger zone is set, the stage zone will serve as the trigger zone.
The trigger zone must be within the default camera view. When the stage zone is empty, the camera detects people only within the default view.
Software experience
From the call menu or control panel, open camera controls and enable PresenterTrack from the camera modes list.
PresenterTrack operates in two states:
-
Empty stage: The camera views the entire stage and detects people immediately as they enter, highlighted in blue.
-
People on stage: The camera’s view is limited to the area near the presenter being tracked. The darkest areas in the view represent what the camera cannot see, lighter overlays show visible areas, and fully transparent areas are broadcasted.
SpeakerTrack 60, Precision 60 and Cisco PTZ 4K PresenterTrack
Before you begin
We recommend you to be in the same room as the device and camera while setting up PresenterTrack.
| 1 |
From the customer view in https://admin.webex.com, go to the Devices page, and click on your device in the list. Under Support, click Local Device Controls to launch the local device web interface. If you have set up an Admin or Integrator user locally on the device, you can access the device web interface directly. Just open a web browser and type in http(s)://<device ip or hostname>. |
| 2 |
Go to Settings and open the Configurations tab. For the connector (N) that you have connected the camera to, set to camera, and to On.
When configuring the Precision 60 over SDI for PresenterTrack, you need to disable camera control on Input 2 and instead enable it on Input 6. When using the Cisco PTZ 4K, make sure the output resolution for the camera is set to 4K by configuring to 3840_2160_30. Go in and out of standby for the configuration to work. When the Ciso PTZ 4K is set to 4K, you also need to set to Limited. Make sure to set on the connectors where the PTZ 4K are connected. |
| 3 |
Go to Settings, open the Audio and Video tab, and click Presenter Track. |
| 4 |
Turn on Enable PresenterTrack and click Configure to open the configuration page. Opening this page deactivates standby and presenter tracking, enables the self-view in full screen, and shows the trigger zone rectangle on the screen of the device. Don't leave this web page without clicking Done, otherwise the trigger zone rectangle stays visible on the screen of the device. (If you forget, you can remove the rectangle like this: For Board and Room Series, open the control panel on the device's user interface, tap Camera, and choose a new camera mode or preset. |
| 5 |
For Board and Room Series, on the device's user interface, open the control panel, tap Camera followed by Manual, and choose the correct camera from the drop down list. You see a notification if the camera does not support the PresenterTrack feature. |
| 6 |
A blue dashed rectangle, which represents the trigger zone, is shown on the device web interface. Move and resize the rectangle while watching the device's screen. You see the same rectangle overlaying the camera self-view. Place the rectangle where you want the trigger zone to be. If you want to set up a more advanced polygonal trigger zone, see the Set up a polygonal trigger zone section. |
| 7 |
Click Done. |
| 8 |
For Board and Room Series, open the control panel and choose Camera followed by Presenter. This activates presenter tracking.
|
| 9 |
Position yourself in the trigger zone and see that the camera zooms in on you. Walk about on the stage and check that the camera view follows you. Also check that presenter tracking stops when you leave the stage. If something fails, go back to step 4, 5, and 6 to adjust the size and location of the stage area and trigger zone. For more troubleshooting help, you can switch on PresenterTrack diagnostics mode, as described in the Diagnostics mode section. |
Set up a polygonal trigger zone
You can set up only rectangular trigger zones from the Presenter Track web page. If you want to define a more advanced polygonal trigger zone, you must set the configuration (read the Advanced Settings article for information how to access the configurations of the device).
The value of this setting is a string that contains the coordinate pairs of all the vertices of a polygon.
Example: Define the following trigger zone, which has 12 vertices. The diagram shows the coordinates of all the vertices. Such a trigger zone may be convenient if there is a screen, which you want to avoid, behind the presenter.
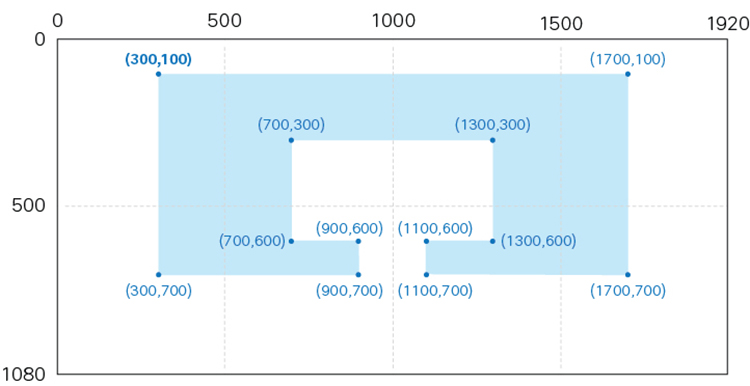
Starting from the upper left vertex and going clockwise, the corresponding value for is:
"300,100,1700,100,1700,700,1100,700,1100,600,1300,600,1300,300,700,300,700,600,900,600,900,700,300,700"Diagnostics mode
The PresenterTrack diagnostics mode may be a helpful tool when troubleshooting an issue. In order to set the device in diagnostics mode, you have to run an API command. Read the Access the API article for information how to use the API.
The following command sets the device in PresenterTrack diagnostics mode:
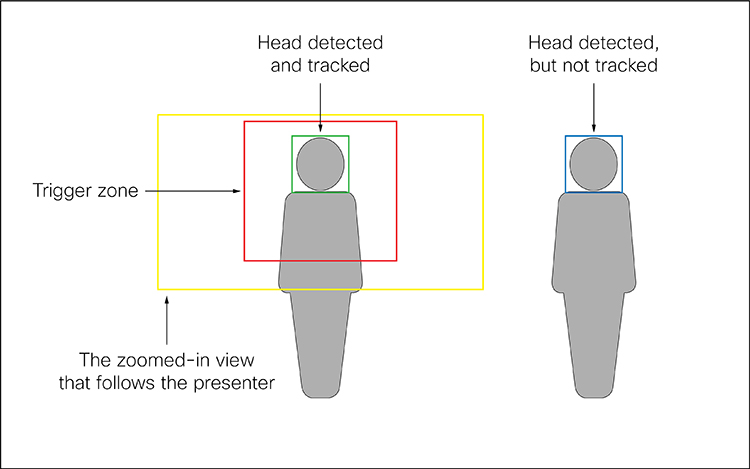
xCommand Cameras PresenterTrack Set Mode: DiagnosticIn this mode, you see the stage area (the zoomed-out overview image) on the screen, and an overlay with the following indicators:
-
RED frame: The trigger zone.
-
YELLOW frame: The zoomed-in view of the presenter.
-
GREEN frame: A head that is detected and tracked.
-
GREEN or RED blinking filled frame: Head detections. Green color indicates a high confidence, red color indicates a low confidence.
-
BLUE frame: A head that is detected, but not tracked.
Capabilities and limitations
-
Once set up, you activate and deactivate PresenterTrack from the camera panel on the touch controller.
-
The SpeakerTrack 60, Precision 60, and PTZ 4K cameras use digital pan, tilt, and zoom, so it doesn’t move physically while tracking the presenter.
-
PresenterTrack supports the tracking of one or more persons on stage. If they stand too far apart to fit within a zoomed view, the camera zooms out to show the full stage.
-
You can use PresenterTrack as a standalone feature, or as part of the presenter and audience, briefing room, and classroom setups.
-
You can set up a device to use one of the cameras in a SpeakerTrack 60 camera assembly for PresenterTrack.
-
You cannot use PresenterTrack and speaker tracking simultaneously. When you activate PresenterTrack, speaker tracking is disabled automatically; when you activate speaker tracking, PresenterTrack is disabled automatically.
There is one exception to this: In the presenter and audience, briefing room, and classroom setups both features are active simultaneously in the Q&A mode (when someone in the local audience asks a question while a local presenter is on stage).


