- Home
- /
- Article

Thanks for your feedback.

 In this article
 Feedback?
You may want to record the calls that are made and received by certain users or virtual lines for reasons such as quality assurance, security, or training.
Overview
Calls made to and received on a desk phone or Webex App are recorded using Webex or third-party call recording providers. As an administrator, you can allow call recording providers to record calls for specific users, workspaces, or virtual lines in your organization. We support On-demand recording, Always, and Always with Pause/Resume recording modes.
For the Always and Always with Pause/Resume recording modes, you can choose which calls to record by call direction and source. You can record incoming calls, outgoing calls, or both, and for each direction you can choose internal calls, PSTN calls, or both. All direction and source options are selected by default, so existing recording behavior is preserved unless you change the selections.
Webex call recording is set by default. You can configure third-party call recording provider using Control Hub.
You must meet the following requirements:
-
Partner must enable a call recording service for your organization. By default, this service is on, so you can configure it for certain users.
-
Users and workspace must have a Webex Calling Professional license when using a third-party call recording provider to record calls.
Users with a Webex Calling Standard license can use Webex as a call recording provider.
-
Consult your legal department about regulatory requirements for recording calls.
All Webex Calling customers have access to Webex Call Recording and Dubber Go. Webex Calling customers can record calls with these options at no additional cost.
Paid subscriptions are available, offering more options like compliance call recording, unlimited retention, AI analysis, and administrator access from multiple third-party providers.
-
Webex is by default available to all users and gives access to unlimited recordings. Webex recordings are currently configured with a retention period of one year, and the storage per organization is 100GB. Compliance officers can access and manage call recordings for a selected storage location. Administrators can configure and manage a user's access to their call recordings. Users can manage their recordings using User Hub and Webex App.
-
Dubber Go is available to all users and gives access to unlimited recordings. Each recording is stored for 30 days. Only users can access and manage their recordings from their Dubber portal.
-
Dubber teams and premier licenses require a contractual agreement with Dubber. With the paid license, an administrator has access to unlimited recordings, unlimited storage, and recordings. Dubber call recording licenses are available through Cisco Commerce Workspace (CCW) (Solutions Plus).
-
Imagicle is a full cloud-based voice recording solution and offers compliant voice recording with analytics, transcriptions, sentiment analysis, and screen recording. Imagicle offers unlimited storage space on Imagicle cloud, or the optional ability to move the recordings to the customer's on-premises local storage. This requires a contractual agreement with Imagicle. This can be ordered through Cisco Commerce Workspace (CCW). Search for
IMAGICLE-CLOUDorA-FLEX-S+-CALLINGand selectIMAGICLE. -
CallCabinet compliance call recording & AI solutions enable unrestricted business intelligence within any communications environment. CallCabinet’s cloud-native solutions are powered by next-generation AI and use specialized machine learning to deliver unparalleled business intelligence in real time. We help advance business success with future-proof regulatory compliance, next-gen conversation analytics with custom business intelligence reporting, and quality assurance automation tools. The CallCabinet Compliance cloud offers unlimited cloud storage space or the option to move the recordings to the customer's on-premises local storage. This recording solution can be ordered through Cisco Commerce Workspace (CCW). Search for
CALLCABINETPLATorA-FLEX-S +-CALLINGand selectCALLCABINET. -
Eleveo is a cloud-based, easy-to-use, powerful AI-powered solution for compliance, automated quality management, screen recording, transcription, and speech analytics. Eleveo provides a single platform for integrating Webex Calling and other Cisco collaboration and contact center solutions, both on-premise and in the cloud. Users can access all the Cisco voice recordings and replay through a single Eleveo screen. Whether you run a back office or a contact center, on-premise or in the cloud, Eleveo’s media capture tools, that are flexible and powerful, allow you to achieve your compliance and quality objectives.
-
MiaRec is a generative AI-powered conversation intelligence platform that offers call recording, automated quality management, screen recording, and voice analytics features. MiaRec provides a single platform for integrating Webex Calling and other Cisco collaboration and contact center solutions, both on-premise and in the cloud. Users can access all the Cisco voice recordings and replay them through a single MiaRec screen.
Account creation
For advanced or paid Dubber subscription, contact Dubber Support to upgrade your Dubber account. For more information about Dubber, go to Sales Connect.
Dubber Go is available to all users, and Control Hub integrates with Dubber to automatically provision a Dubber account. When users have call recording enabled, Dubber accounts are provisioned automatically, even if the organization doesn’t have a Dubber account. The users and the Dubber Go entitlements are also automatically provisioned in the Dubber account.
To get advanced features, you can update Dubber user entitlements from a free to a paid subscription. You can downgrade from a paid to a free subscription at any time. To do so, identify the users who require entitlement changes and contact your partner. A user who is an administrator in the Dubber account can also make these changes.
When migrating from a free to a paid subscription, automatic deletion stops and unlimited retention begins. When migrating from a paid to a free subscription, unlimited retention ends, and recordings are deleted after 30 days.
Imagicle offers a free trial account. Contact Imagicle Support to provision your new production account or to convert your trial account to a paid account once the Imagicle licenses are procured in Cisco Commerce Workspace (CCW) (Solution Plus). For more information about Imagicle, go to Sales Connect.
Control Hub doesn't create Imagicle account automatically when users are enabled for call recording.
Imagicle offers tools to sync users using Webex for Developers APIs into your Imagicle account. Contact Imagicle Support for more information.
CallCabinet offers a free trial account. Contact CallCabinet Support to provision your new production account or to convert your trial account to a paid account once you’ve ordered the CallCabinet licenses in Cisco Commerce Workspace (CCW) (Solution Plus). For more information about Call Cabinet, go to Sales Connect.
Control Hub doesn’t create a CallCabinet account automatically when users are enabled for call recording.
Contact CallCabinet Support for help with new account provisioning. CallCabinet's call recording solution is available for Webex Calling customers hosted in the U.S. region. CallCabinet Call Recording will be made available in other regions shortly.
Eleveo offers a customized demo on request. Contact Eleveo Support to provision your new production account once you’ve ordered the Eleveo licenses. For more information about Eleveo, go to Sales Connect.
Control Hub doesn’t create an Eleveo account automatically when users are enabled for call recording.
Eleveo call recording solution is available for Webex Calling customers hosted in the Europe and United States regions. To enable call recording features in Webex Calling, users must have at least one Webex Calling Professional license.
Create a MiaRec account at https://app.miarec.com to start recording your organization's calls with the MiaRec platform. Contact MiaRec Support for more information.
Control Hub doesn’t create a MiaRec account automatically when users are enabled for call recording.
The MiaRec call recording solution is available for Webex Calling customers hosted in the United States region.
Terms of Services
When you select Dubber as the call recording provider in the organization, the customer or partner administrator must accept the Dubber Terms of Service on behalf of the customer. On accepting the terms and conditions, the Dubber account is created for your Webex Calling organization.
Accepting the terms of service is a one-time activity. On accepting the agreement, Webex Calling shares Customer Name, User location’s Time Zone, First Name, Last Name, and Email ID with Dubber.
When you select Imagicle as the call recording provider in the organization, the customer or partner administrator must accept the Imagicle Terms of Service on behalf of the customer. On accepting the terms and conditions, the Imagicle account is created for your Webex Calling organization.
Accepting the terms of service is a one-time activity. On accepting the agreement, Imagicle can access the Customer Name, User location’s Time Zone, First Name, Last Name, and Email ID.
When you select CallCabinet as the call recording provider in the organization, the customer or partner administrator must accept the CallCabinet Terms of Service on behalf of the customer.
Accepting the terms of service is a one-time activity. On accepting the agreement, CallCabinet can access the Customer Name, User location’s Time Zone, First Name, Last Name, and Email ID from Webex Calling to record calls.
When you select Eleveo as the call recording provider for an organization, the customer or partner administrator must accept the Eleveo Terms of Service on behalf of the customer.
Accepting the terms of service is a one-time activity. On accepting the agreement, Eleveo can access the Customer Name, User location’s Time Zone, First Name, Last Name, and Email ID from Webex Calling to record calls.
When you select MiaRec as the call recording provider for an organization, the customer or partner administrator must accept the MiaRec Terms of Service on behalf of the customer.
Accepting the terms of service is a one-time activity. On accepting the agreement, MiaRec can access the Customer Name, User location’s Time Zone, First Name, Last Name, and Email ID from Webex Calling to record calls.
Select call recording provider
Enable call recording at organization level
| 1 |
Sign in to Control Hub. |
| 2 |
Go to . |
| 3 |
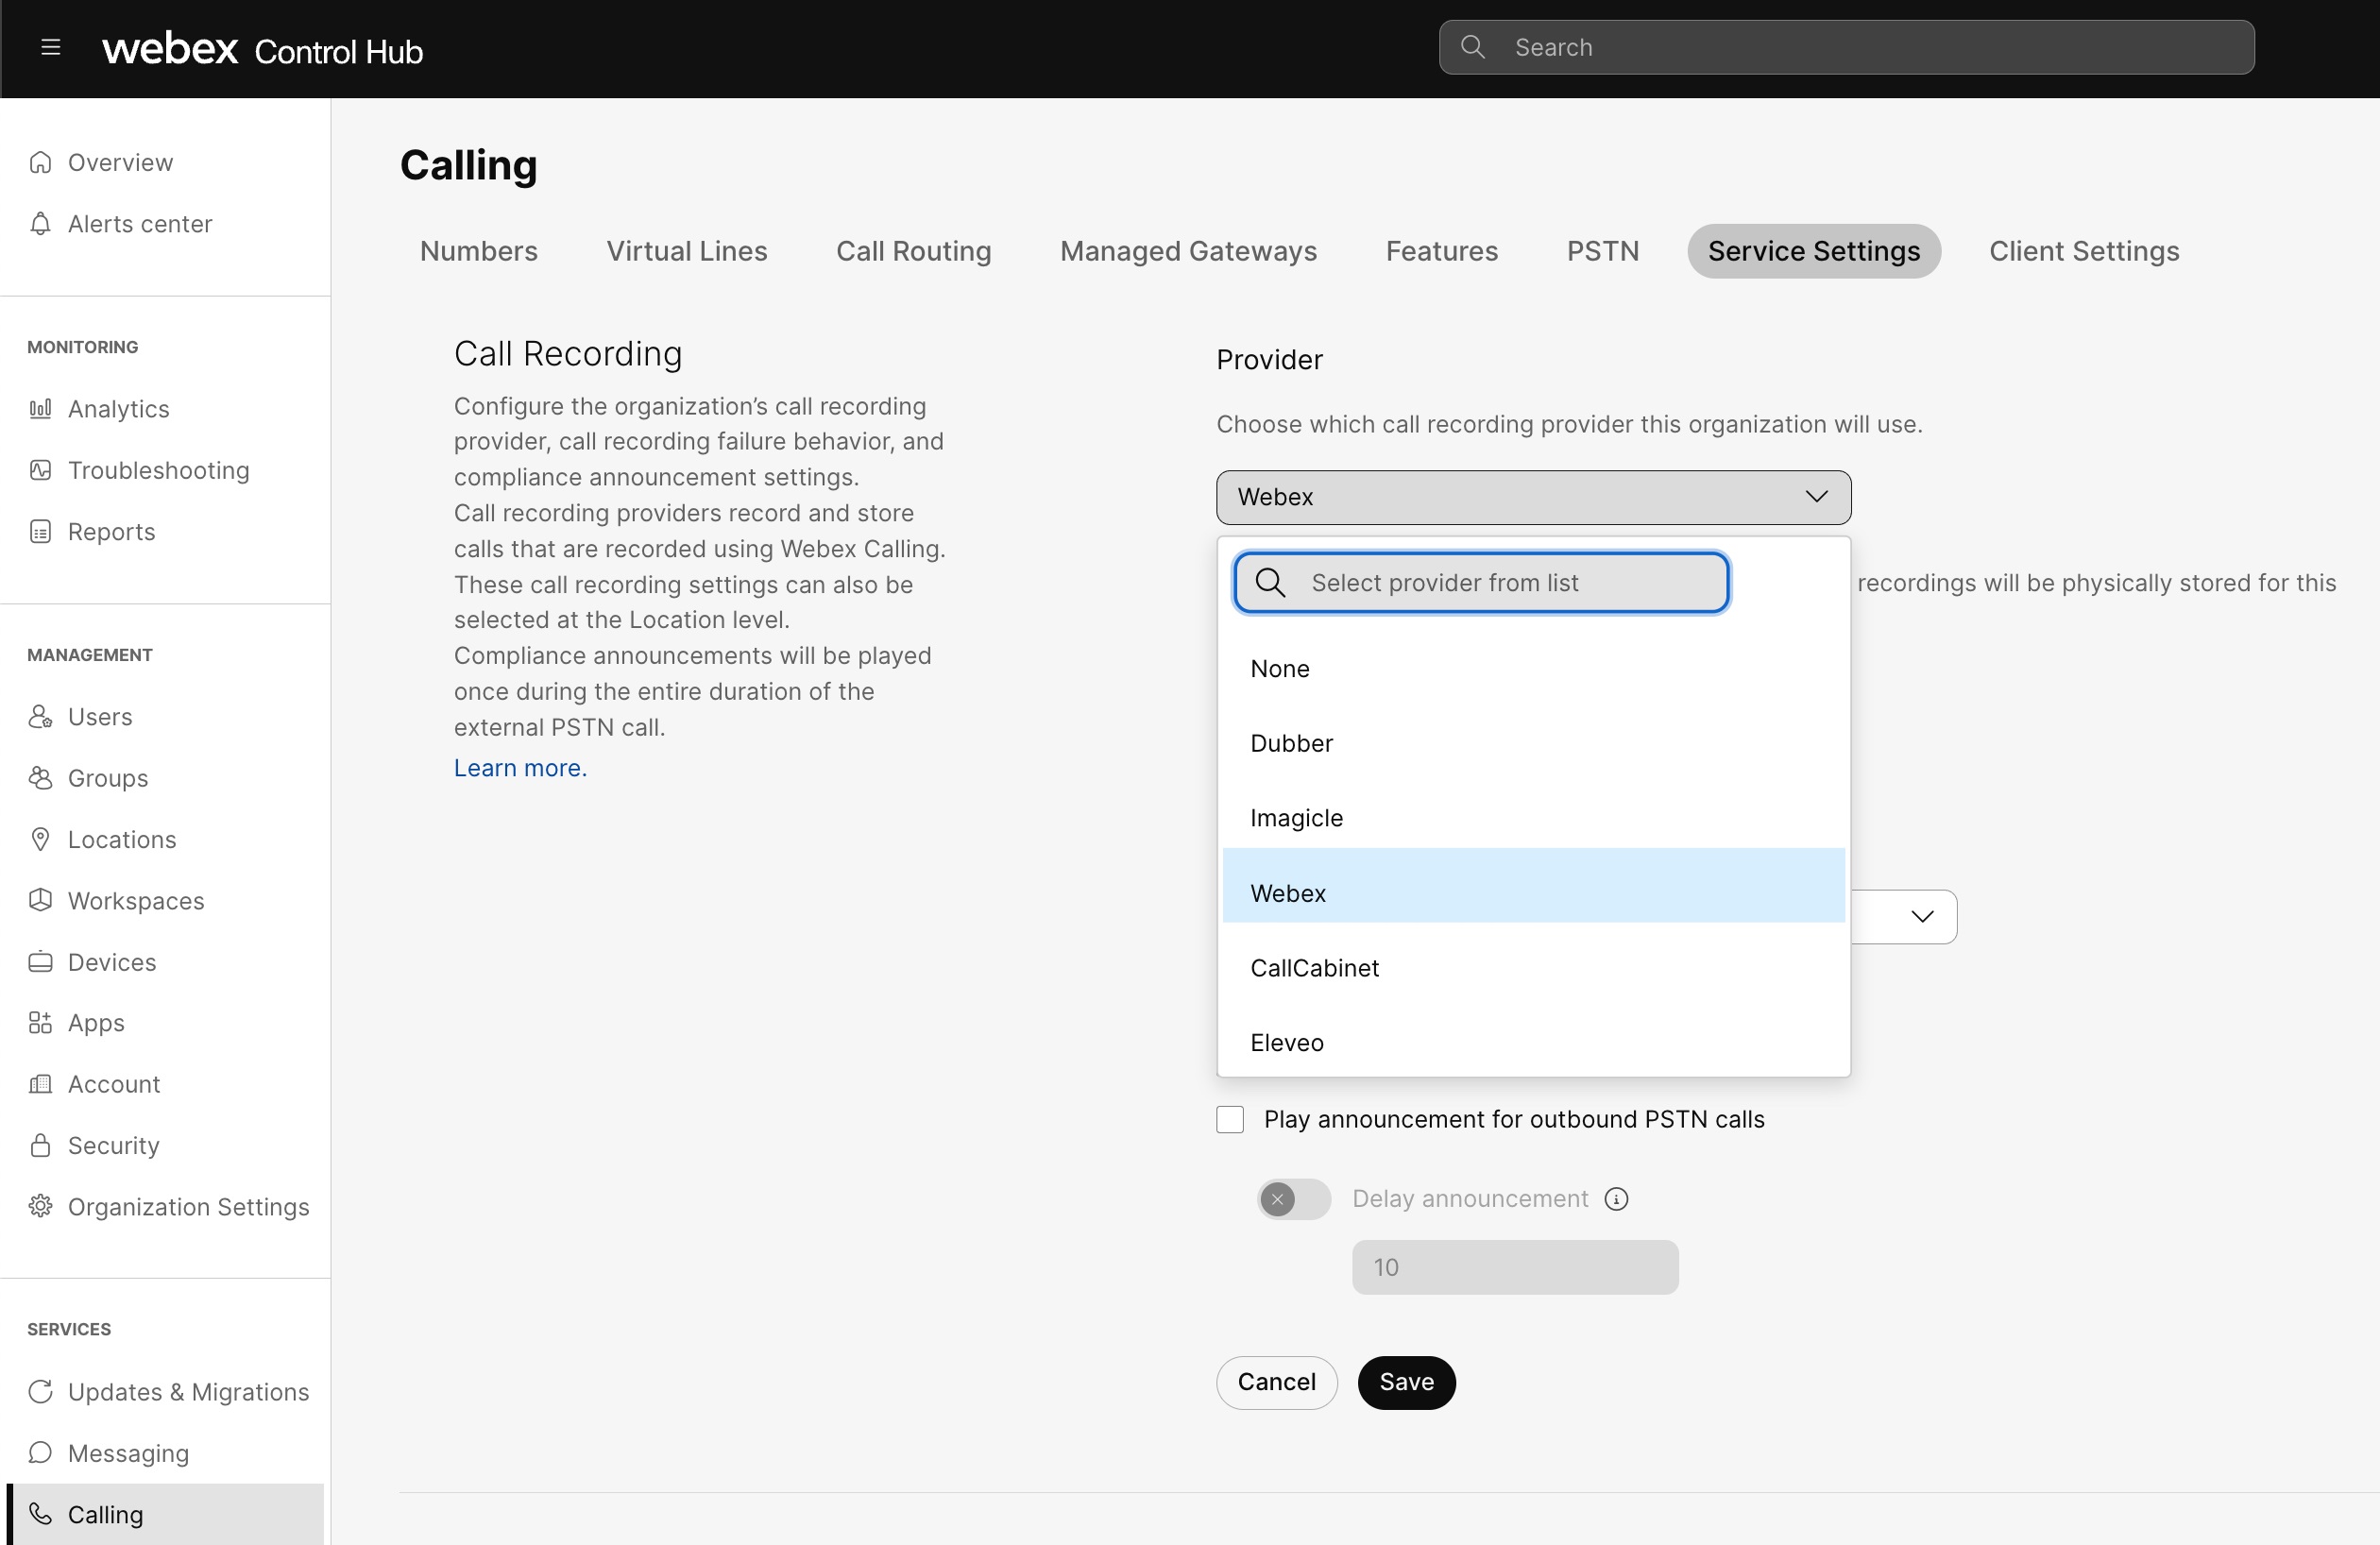
Under Call Recording , select the preferred call recording provider from the drop-down list for your organization. Webex call recording is selected by default for organization and all
locations.
|
| 4 |
Under the Provider, select the call recording provider from the drop-down list for your organization. 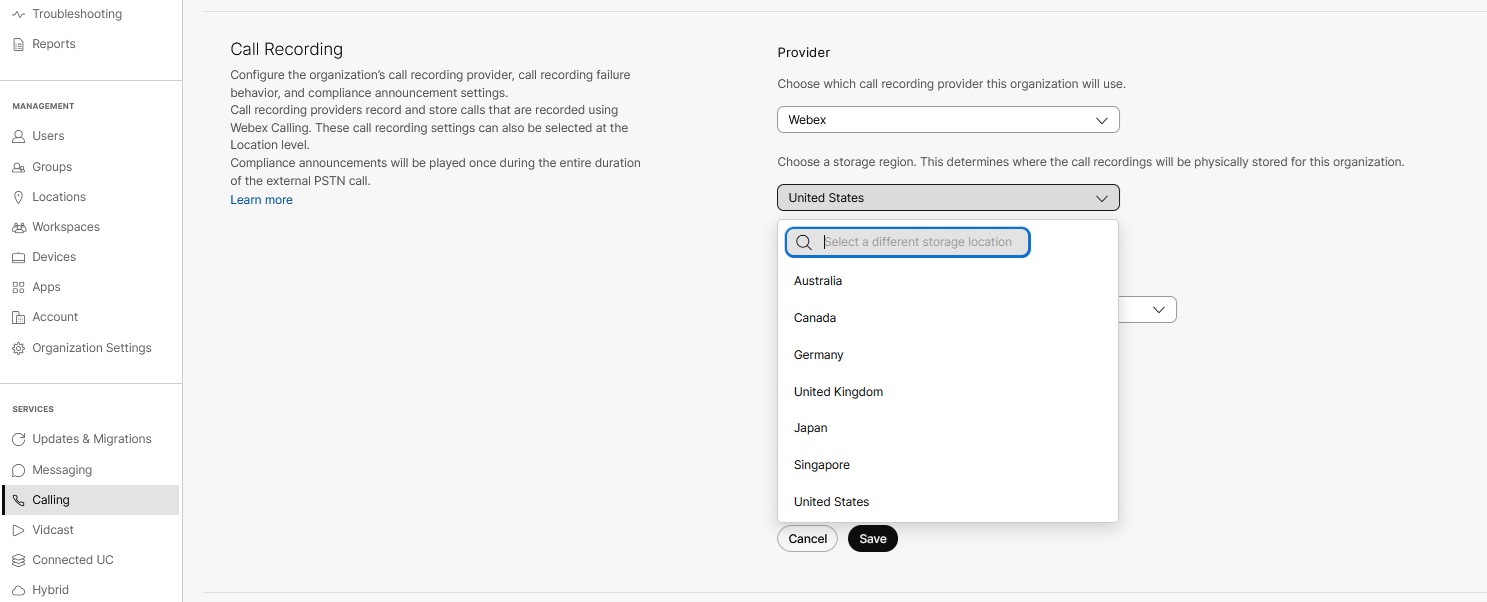
Only a compliance officer can access the call recordings in the storage location. As a compliance officer you can preserve data for legal proceedings. To access the recordings, use the APIs in Webex for Developers and navigate to Webex Calling > Reference> Guides> Converged Recordings. You can create Webhook notifications on Webex call recordings using Webhooks. Dubber is chosen by default, as there is no additional cost to include Dubber Go with your Webex Calling user entitlements. |
| 5 |
Under the Call Recording Failure, select the option to notify if the calls fail to record. Choose an option from the following:
|
| 6 |
Click Save.
|
Disable call recording at organization level
| 1 |
Sign in to Control Hub. |
| 2 |
Go to . |
| 3 |
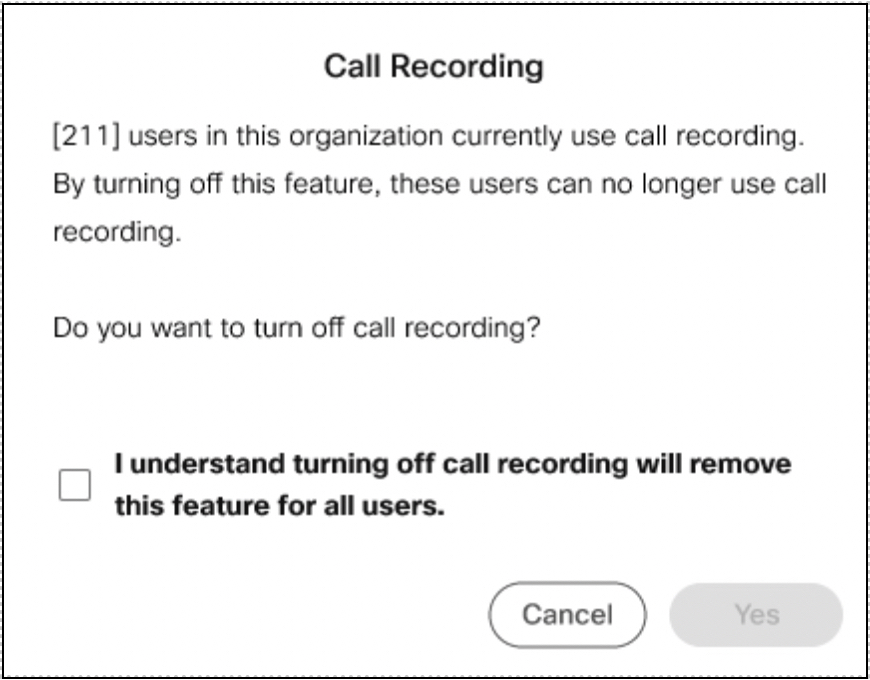
Under Call Recording Provider, select None from the drop-down list for the call recording provider for your organization. The Call Recording information window appears.
|
| 4 |
Check I understand turning off call recording will remove this feature for all users. |
| 5 |
Click Save. |
Override call recording at location level
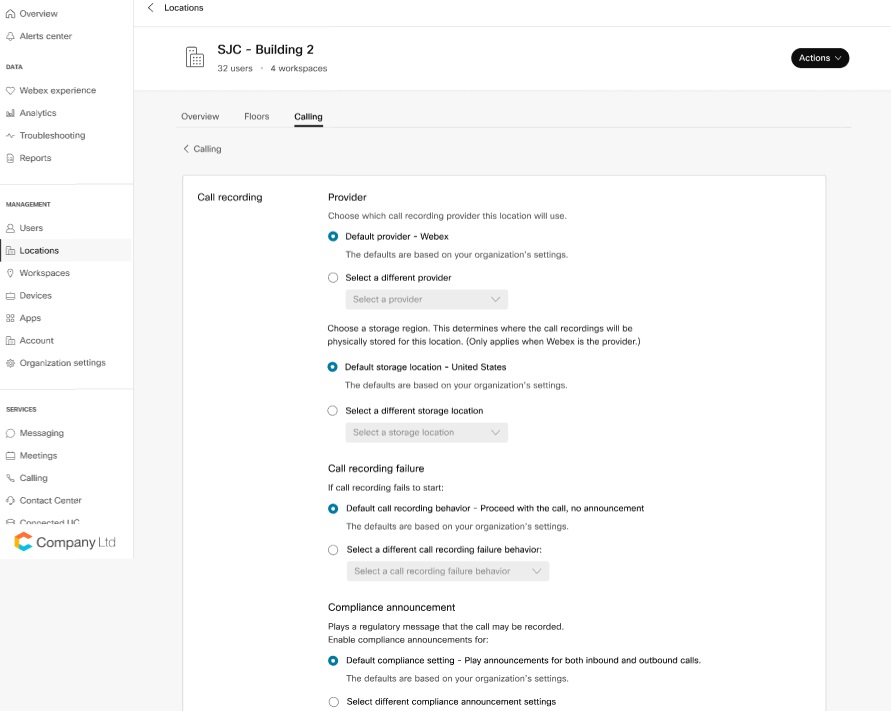
On creating a new location, the call recording provider by default is set to the organization level. The administrator can override the call recording provider at the location level.
| 1 |
Sign in to Control Hub. |
| 2 |
Go to . |
| 3 |
Select the location for which you want to modify the call recording settings. |
| 4 |
Go to . |
| 5 |
Click Call recording settings, and select one of the following:
|
| 6 |
Click Save. |
Verify call recording in Partner Hub
Webex Calling supports multiple third-party providers to record all incoming and outgoing calls for users. These third-party providers can store and manage all the recorded calls.
Call recording feature is enabled for an organization by default in Webex Calling and in Partner Hub.
If you don’t have a partner administrator for your organization, then you can’t manage call recording using Partner Hub.
Before you begin
Before you enable users for call recording, select the call recording provider for your organization in Control Hub. The partner or the user administrator can then enable or disable call recording for specific users.
However, a partner can’t enable the call recording option for their own account and must contact Cisco support.
| 1 |
From the Partner Hub view in https://admin.webex.com, go to Customers, and then select a customer. |
| 2 |
Go to Settings. |
| 3 |
Scroll to Calling and then make sure Call Recording is set to on. Call Recording is set to ON by default for your customers. In case, the customer doesn’t want Call Recording visible in their Control Hub, this feature can be set to off after all users are disabled to use the call recording feature. 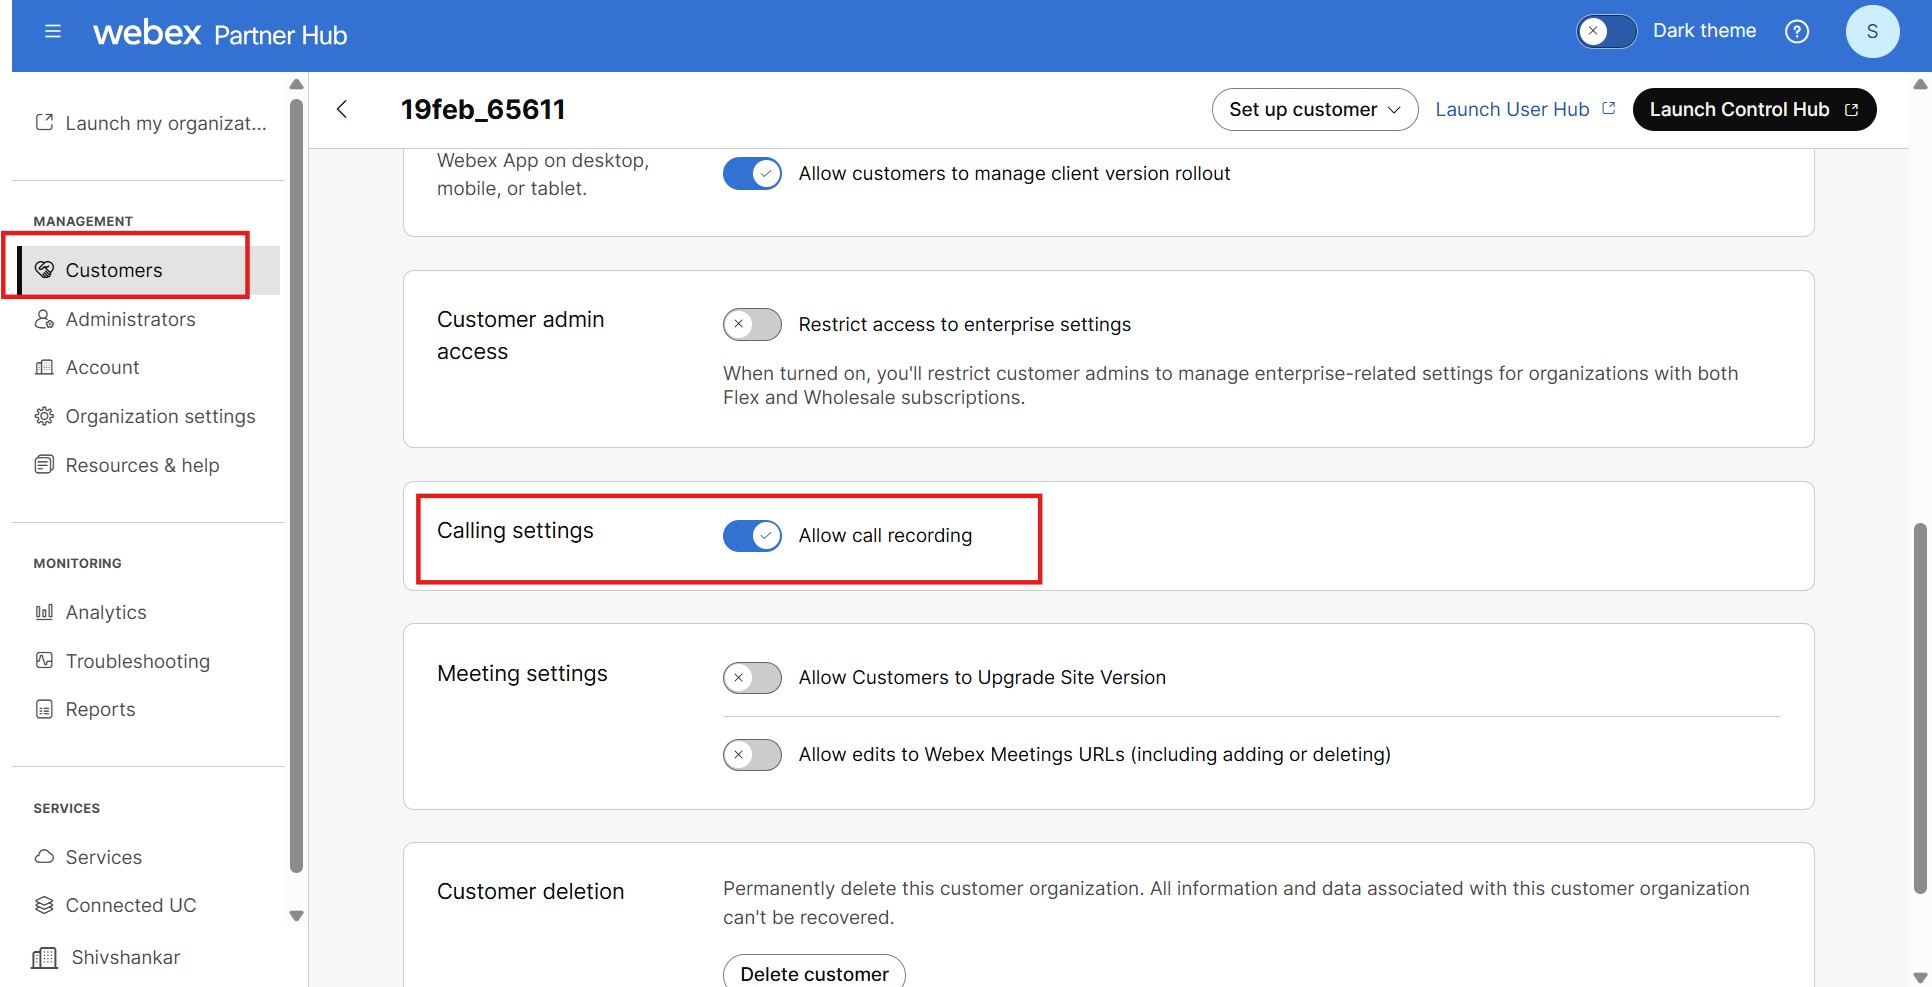
|
| 4 |
(Optional) Select Launch Control Hub and then follow the steps documented here. |
Enable compliance call recording announcement
You can enable the compliance announcement settings separately for inbound and outbound PSTN calls. On enabling the announcement, when the PSTN call is made or received, the caller (PSTN user) hears the announcement, “This call may be recorded” at the beginning of the call. The recording starts after the user with call recording enabled answers the call. Once the compliance announcement is played, the start/stop recording announcements are suppressed for the Webex Calling user. Even when the midcall operations such as transfer are initiated on that call, announcements aren’t played multiple times. The visual indicator displays in the Webex App or on supported phones to indicate that the call is recorded.
When a user receives a call directly, the compliance announcement is played in the language that is set for the user in .
When a workspace receives a call, the compliance announcement is played in the language that is set for the workspace in .
If an Auto Attendant, Call Queue, or Hunt Group feature receives a call directly, the compliance announcement is played in the language that is set for the Auto Attendant, Call Queue or Hunt Group in .
The list of supported languages is in the respective setting's drop-down menu. If a call comes directly to a virtual line, the compliance announcement is played in the language that is set for the virtual line in > select a virtual line > .
The compliance announcement audio doesn’t get recorded in the recording. However, if the call was recorded, the metadata sent to the call recording provider includes information about whether the compliance announcement or user/workspace announcements were played or not.
The user/workspace level announcement settings take precedence only if the compliance announcement isn’t played, and this applies only for the inbound calls. For more information, see Enable call recording for Webex Calling users and workspaces section.
We recommend that you enable user/workspace level announcement setting for all users/workspaces who have call recording enabled. This serves as a reliable alternative to play the regular announcements in case the compliance announcements fail to play for the inbound call.
You can enable the compliance announcement at the organization level and override it at the location level.
Enable compliance announcement at organization level
The compliance announcement is disabled by default at the organization level.
| 1 |
Sign in to Control Hub. |
| 2 |
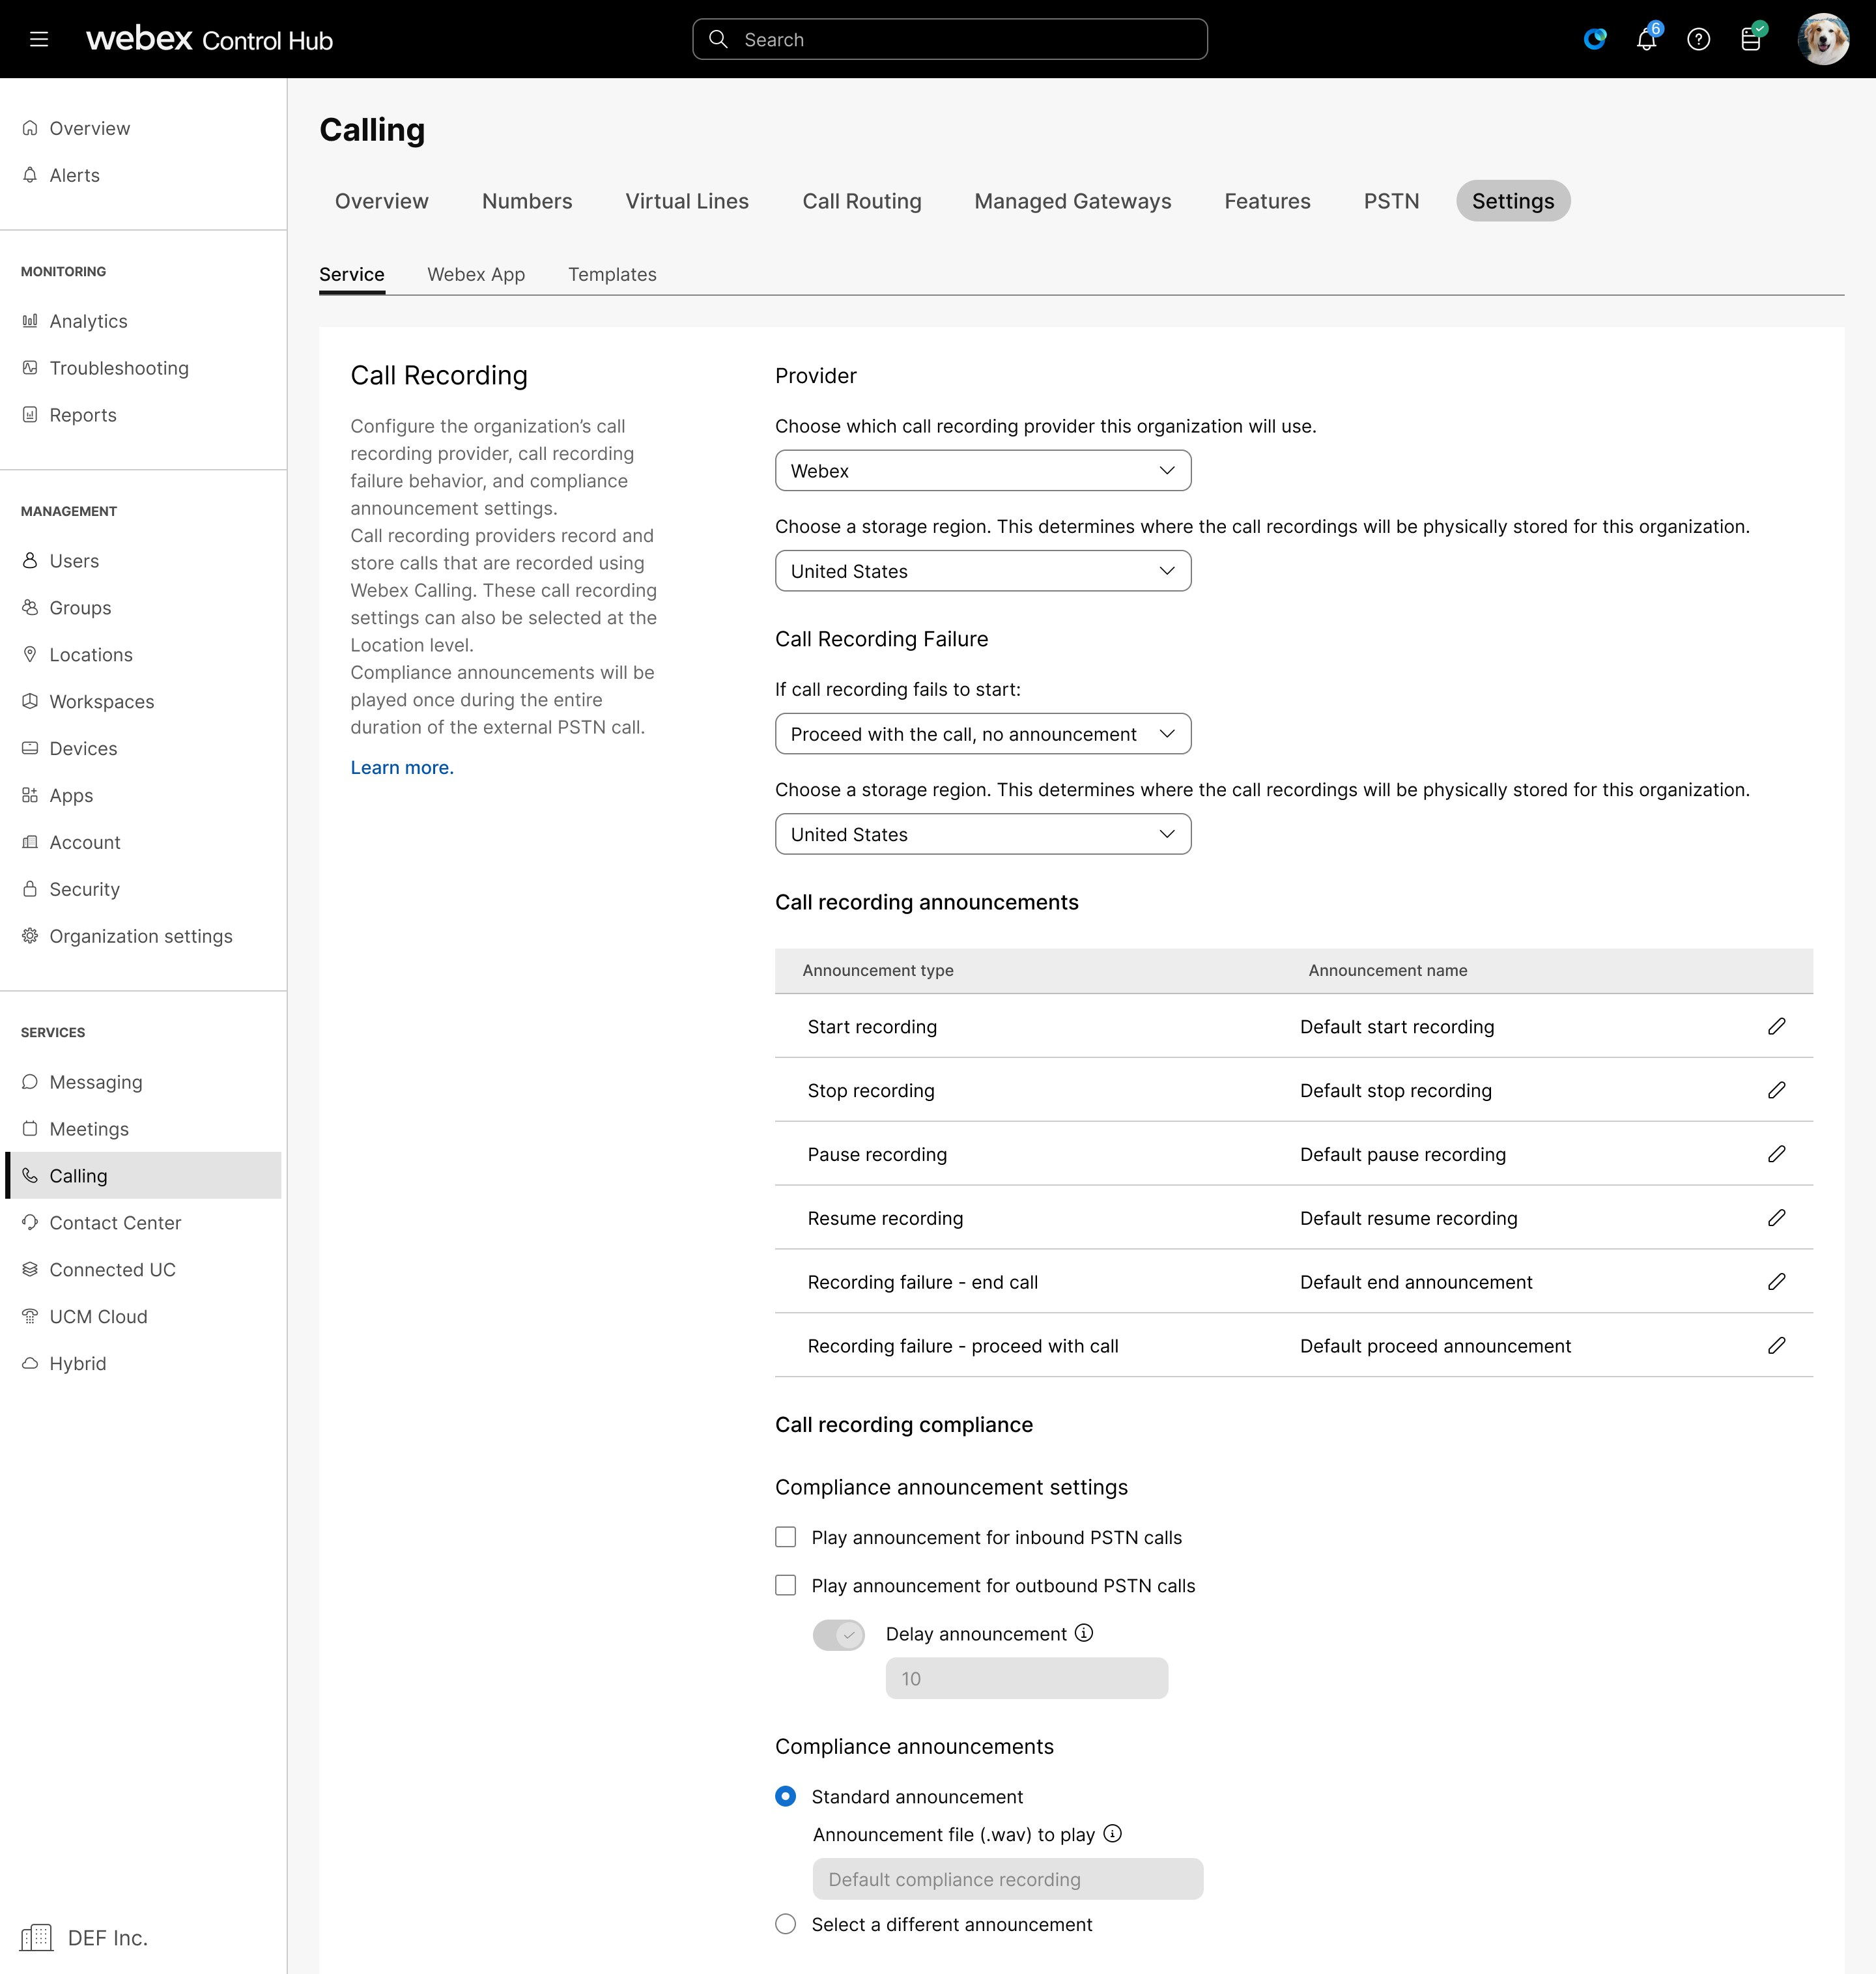
Go to , and scroll down to the Call Recording section.
|
| 3 |
Under Compliance announcement settings, enable any of the following options:
|
| 4 |
Under Call recording failure, you can choose the recording failure behavior.
This configuration applies to all the recording platforms. |
| 5 |
Under Call recording announcements, you can choose to play the standard Webex call recording announcement or a custom announcement for specific recording events (such as start, stop, pause, resume, and record failure). To customize an announcement:
|
| 6 |
Under Compliance announcements, you can choose to play the standard Webex compliance announcement or a custom announcement. |
| 7 |
Click Save. |
 next to an announcement type. Choose one of the options:
Override compliance announcement at location level
When a new location is created, the compliance announcement settings default to the organization level. You can override the settings at the location level.
| 1 |
Sign in to Control Hub. |
| 2 |
Go to . |
| 3 |
Select the location for which you want to modify the compliance announcement settings. |
| 4 |
Go to the section, and click Call recording. 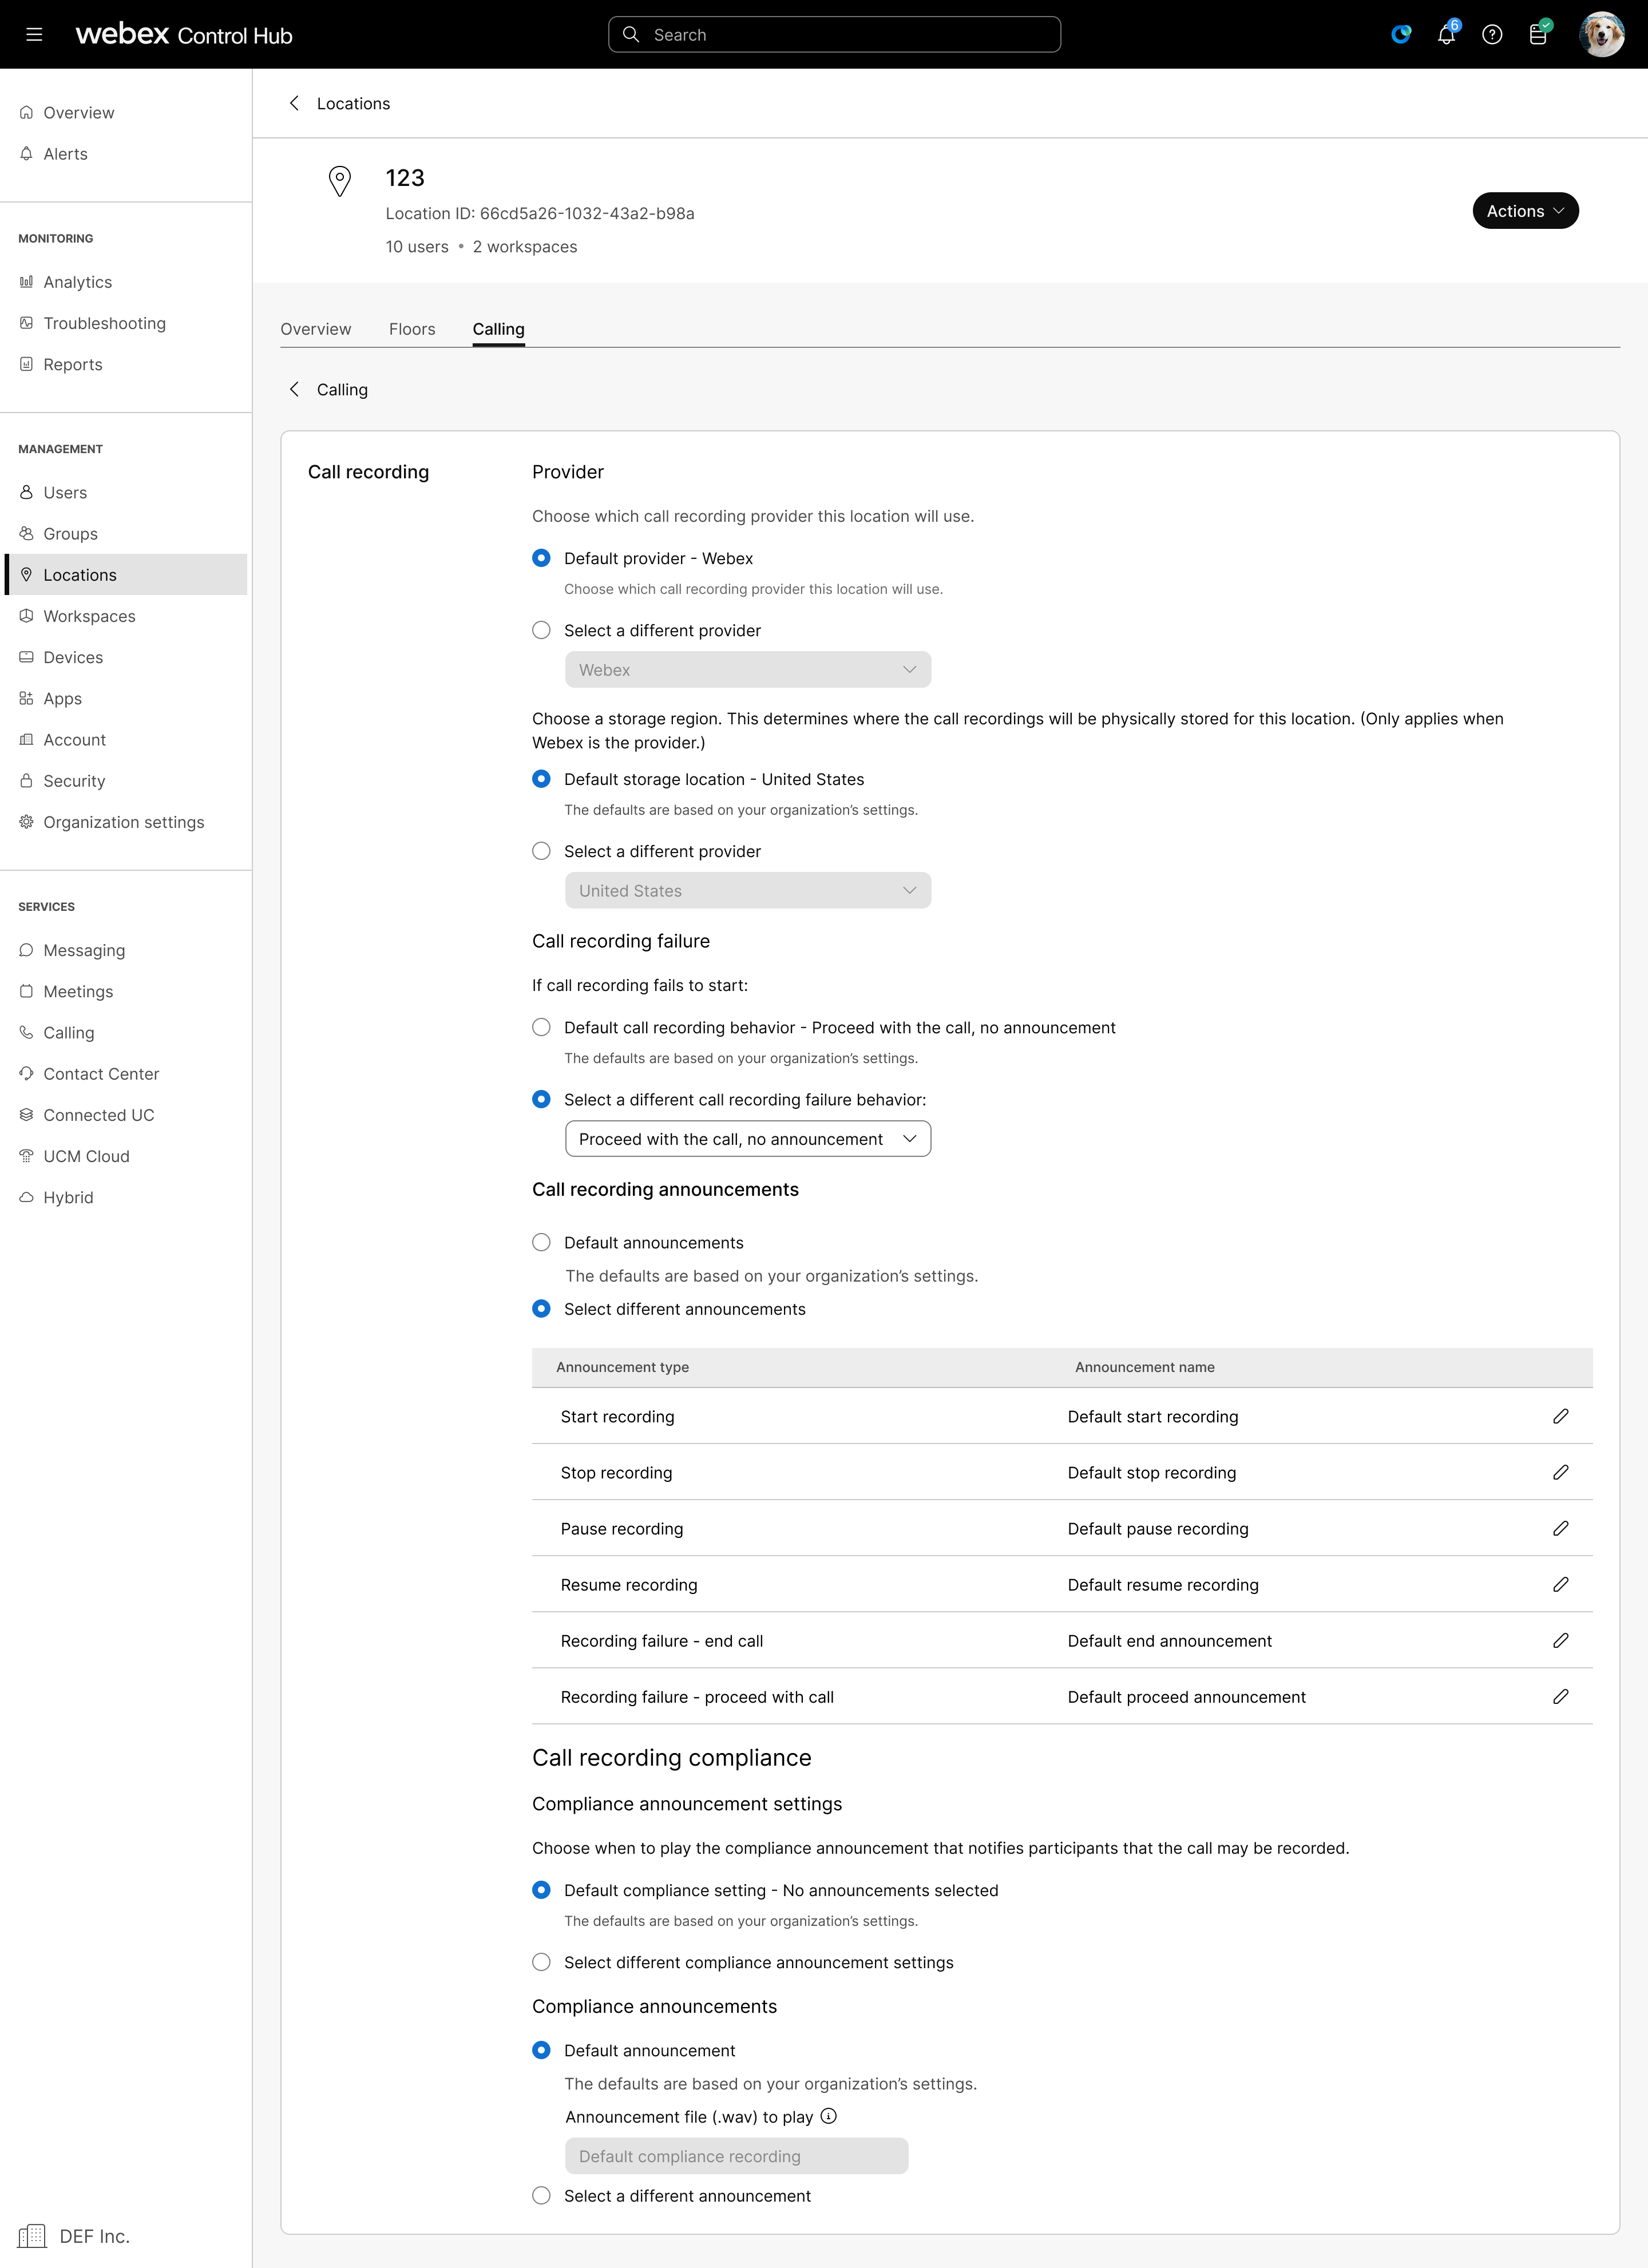
|
| 5 |
Under Compliance announcement settings enable any of the following options:
|
| 6 |
Under Call recording announcements, choose how this location handles recording event audio:
|
| 7 |
Under Compliance announcements, you can choose one of the options:
|
| 8 |
Click Save. |
Enable call recording for Webex Calling users and workspaces
Before you begin
-
Ensure that users have a Professional or Standard Webex Calling user license assigned.
-
Ensure that workspaces have a Professional Webex Calling license assigned.
-
The administrator who enables call recording in Control Hub is also assigned the role of the administrator in the Dubber account. This administrator can use the Dubber portal to add other administrators or reassign Dubber licenses.
| 1 |
Sign in to Control Hub. |
| 2 |
Go to the respective path:
|
| 3 |
Turn on Call Recording. The user's call recording settings are cleared. Any calls that were recorded before this change are still maintained on the call recording provider platform. For Dubber account, the user provisioning is automated. The administrator who enabled the user for call recording is also added to the Dubber account as an administrator. This administrator can use the Dubber portal to add other administrators or reassign Dubber licenses. Control Hub doesn’t automatically provision users for call recording providers, except Dubber. Other providers may provide tools to sync users to your call recording provider account. If a partner administrator enables call recording for their customers, the same partner administrator user isn’t allowed in multiple customer accounts. For a user with a Standard license, Control Hub shows the call recording option when the location associated with the user has Webex as the call recording provider. The call recording option displays for the user only when the location call recording provider is set to default org call recording provider, and the org call recording provider is set to Webex call recording provider. |
| 4 |
After enabling call recording, if a user is still having issues with recording calls, you can contact the call recording support providers with the information available in the Show call recording platform information section. From the Users page, go to to find support. From the Workspaces page, go to to find support. |
| 5 |
Configure one of the following settings:
|
| 6 |
Click Save. |
What to do next
If an issue arises for users from the call recording administration portal, ensure that the following information is correct:
-
Product—Choose your product.
-
External Type—Enter BroadWorks.
-
Service Provider—Copy and paste the corresponding value from Control Hub.
-
External Group—Copy and paste the corresponding value from Control Hub.
-
External Identifier—Copy and paste the corresponding value from Control Hub.
Then click Save Changes.
For additional support, contact the support team for your call recording provider.
Access recordings for Webex call provider
To access the call recordings, complete these steps.
Before you begin
To view the Recordings tab under Calling, ensure that the organization is entitled with the Webex Calling license.
-
If the organization has Webex Calling entitlement but Recording is turned OFF, the Recording tab appears with a message that the Recording is OFF.
-
If a location has Call Recording, then no results display.
| 1 |
Sign in to Control Hub. |
| 2 |
Go to and then select Features. |
| 3 |
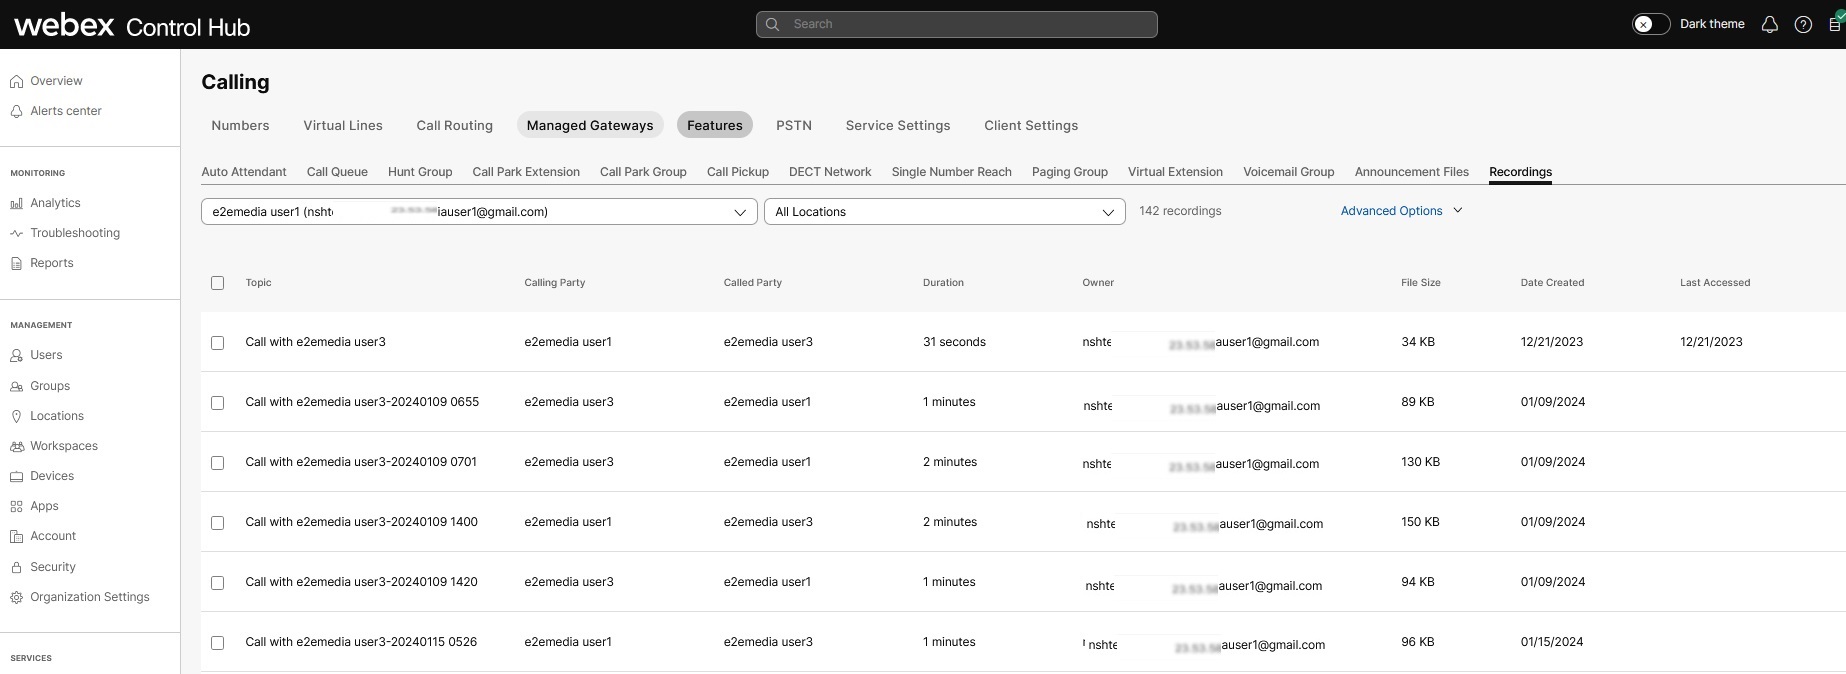
Select Recording tab, and the recording landing page displays. Use the search field to find the recording of your choice. The landing page initially doesn’t display any records until the administrator initiates the search. You can choose from the two search modes:
Use the simple search field to look up recordings that are associated with a user based on the name or email ID. This search retrieves all recordings for the owner, but only displays the first 100 records. Scroll down to view the remaining recordings. The generation time for recordings can take up to 24 hours to appear in the Recording tab, depending on the file size and bandwidth. Hover on the Calling Party to view the PSTN number or extension used for calling.
The Recordings page displays a list of calls with the following details:
|
| 4 |
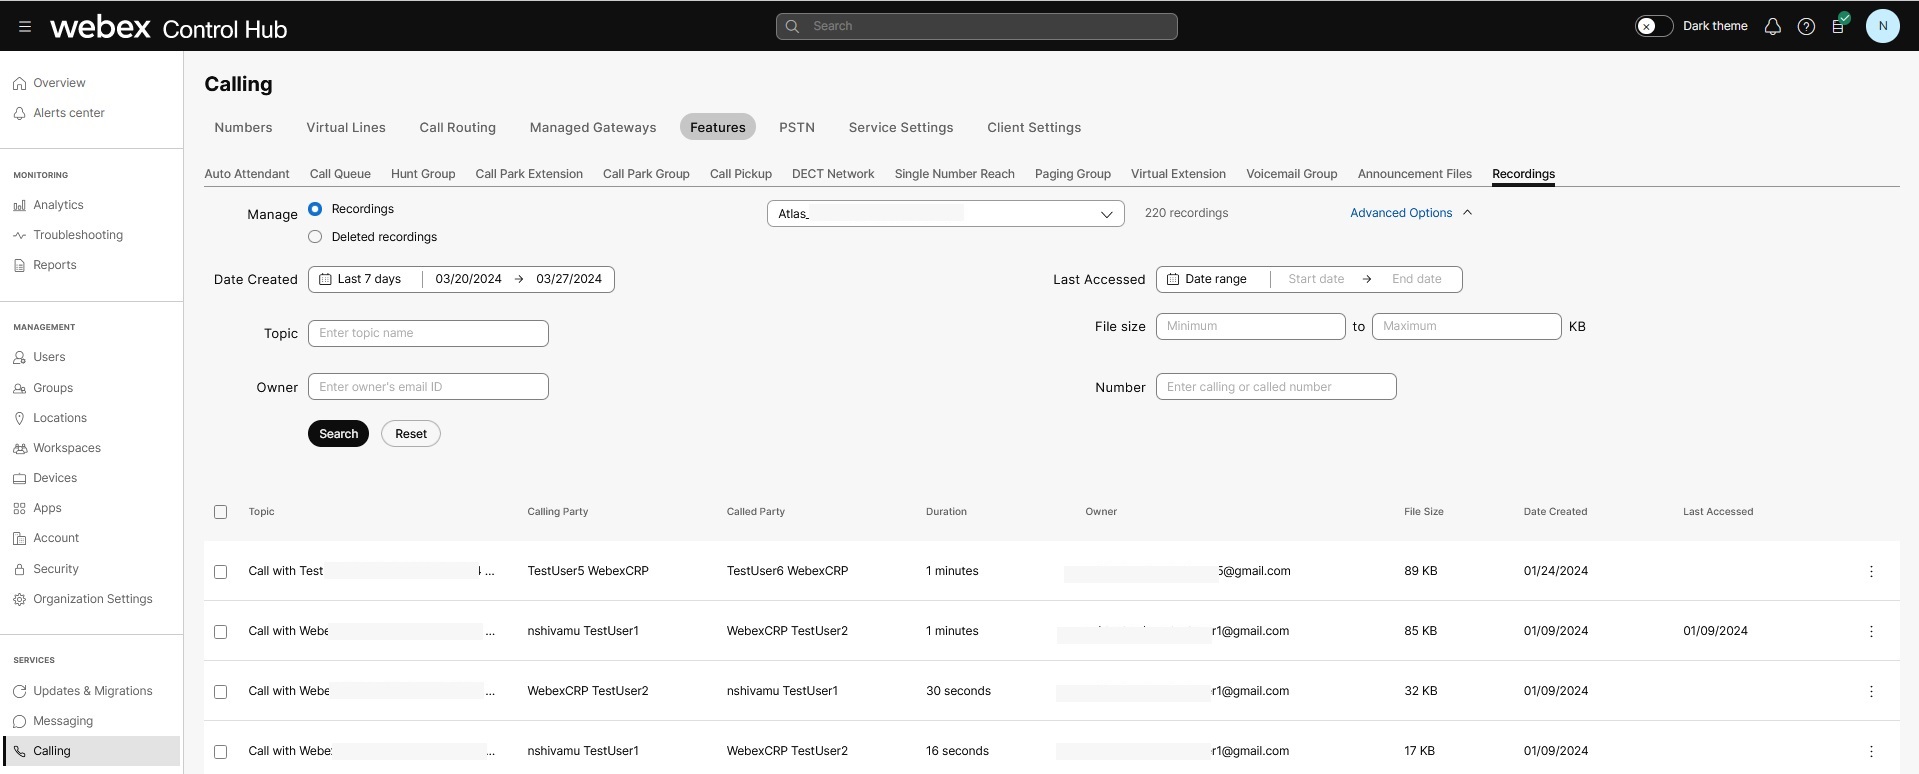
Click Advanced options to refine your search. Ensure that the Recordings repository is checked. Specify the following using the Advanced options:
By default, the call records stored in the last seven days display in the Advanced search option. The Webex call recordings are available for a year from the date it is recorded.
By default, the location field is set to All Locations. You can view the call recordings and filter by Recordings, Deleted Recordings,and Purged recordings. 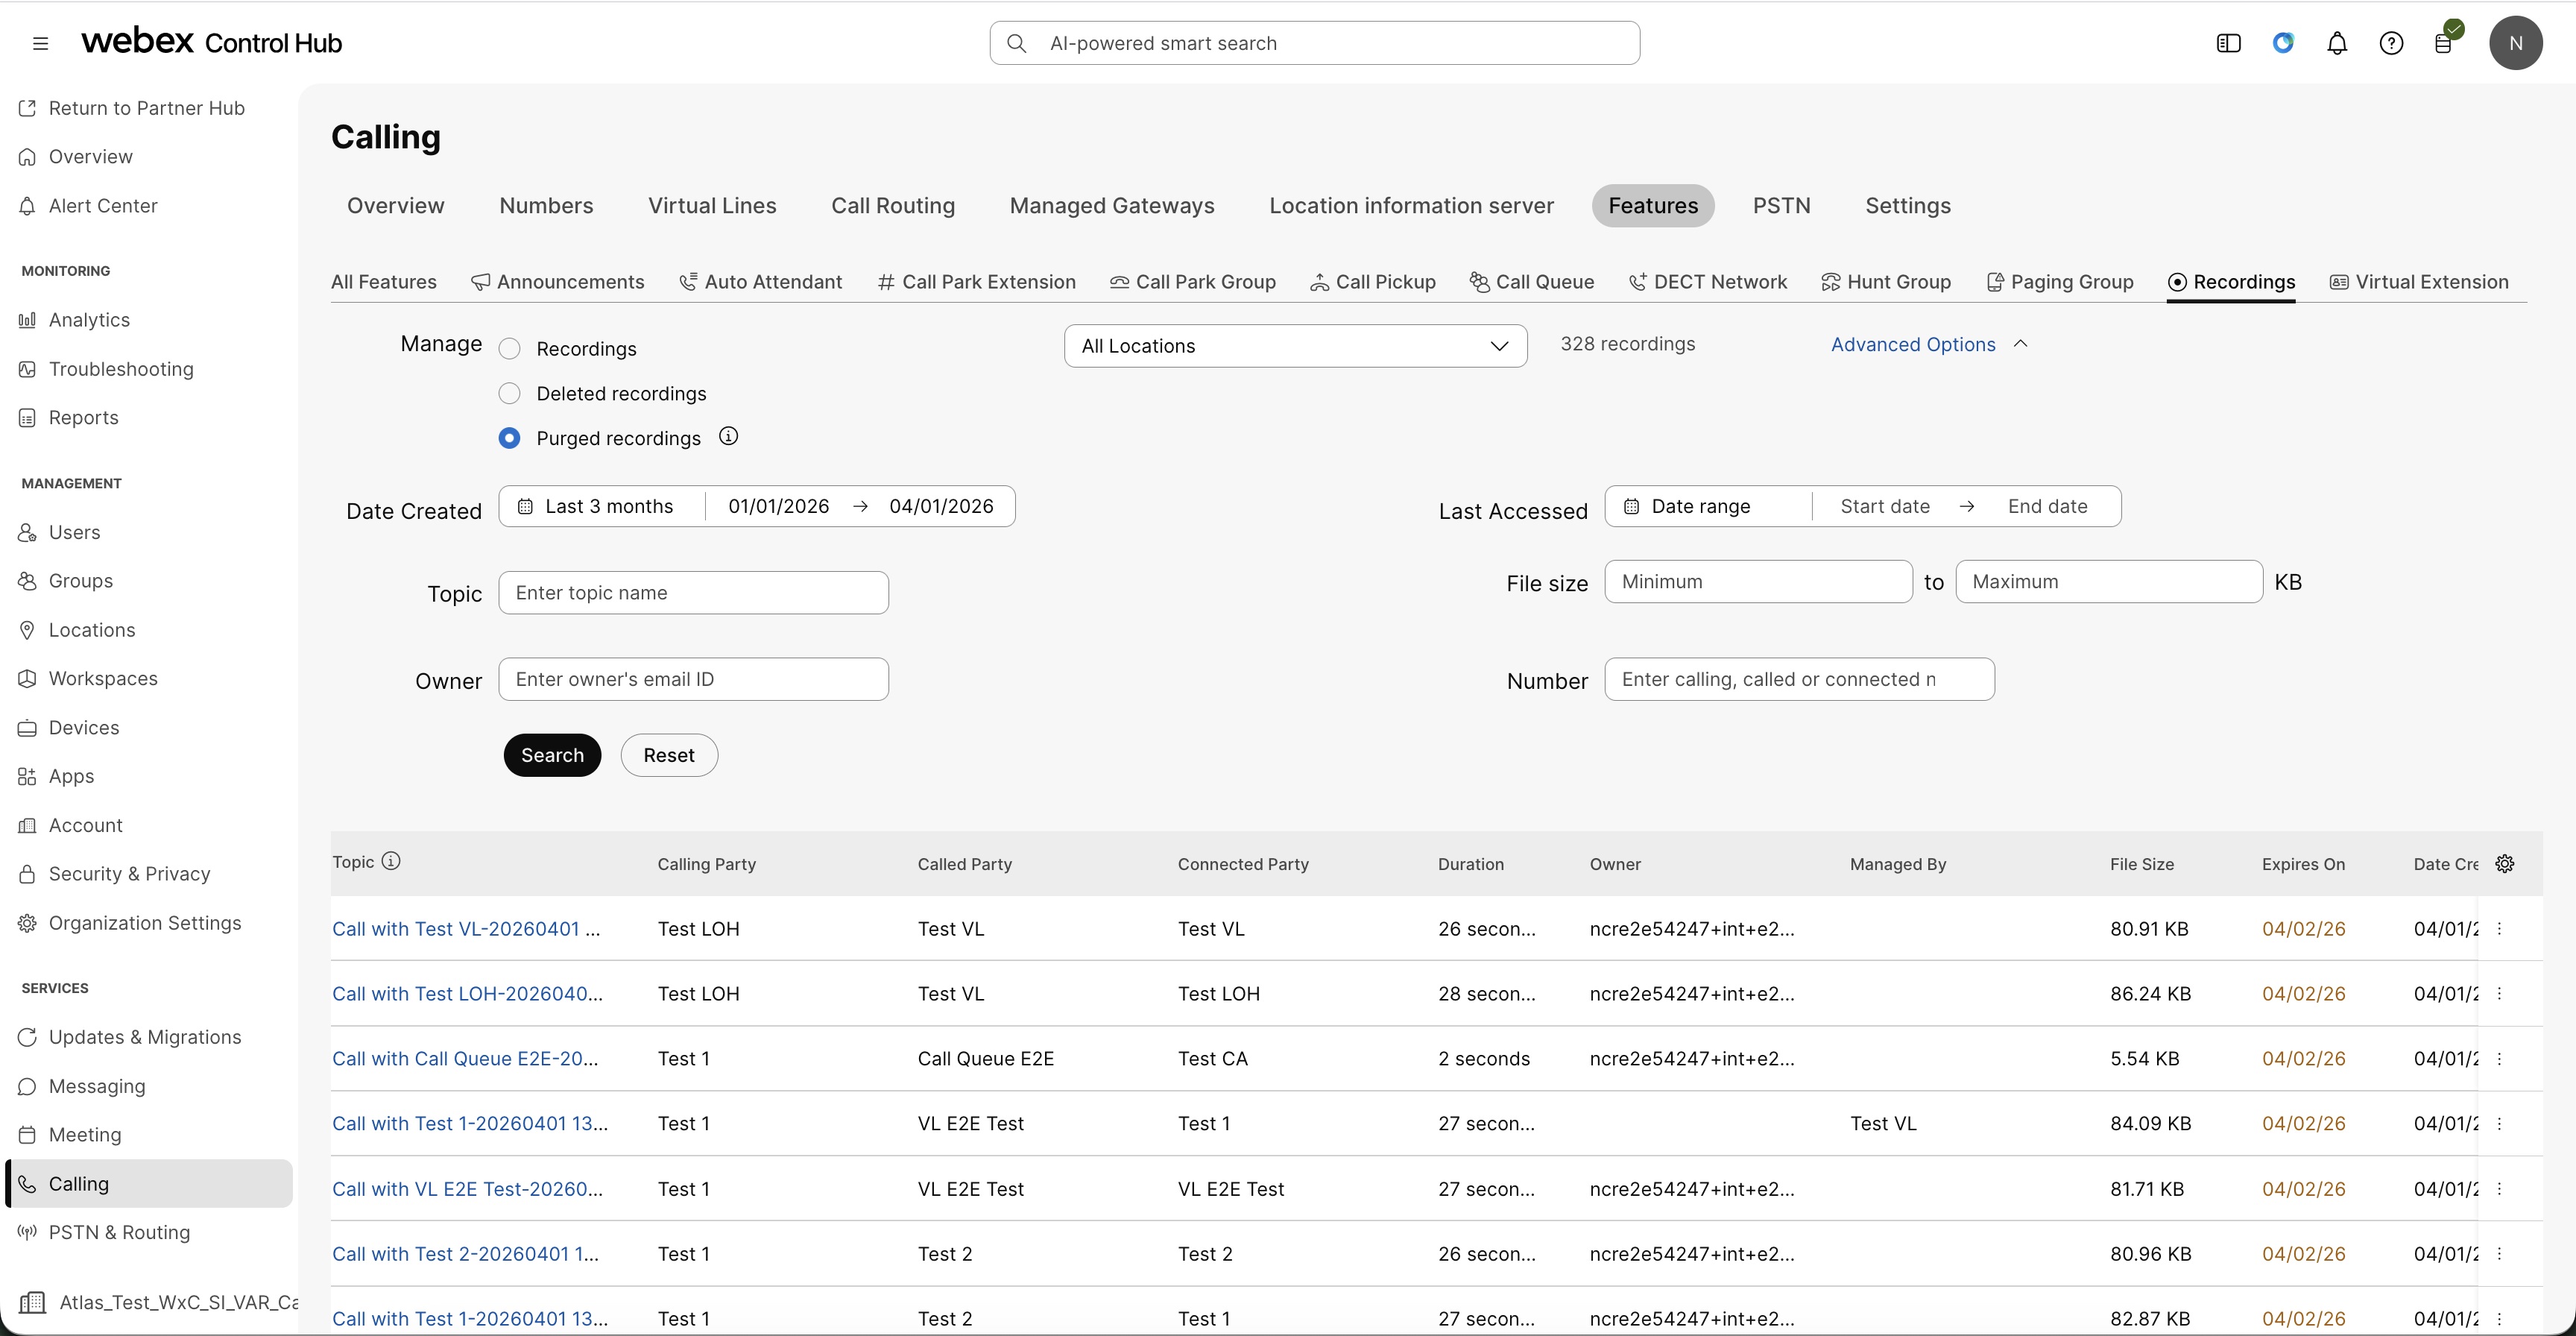 |
| 5 |
Click Search to search the recordings based on the selection. |
| 6 |
Select a recording from the list and the Actions bar displays. The supported actions are:
Use the Select all option to select multiple recordings. If there are more recordings, then the first 200 recordings are selected.
|
| 7 |
A warning message displays for the action. You can choose to delete or cancel the request. |
Record emergency calls
As an administrator, you can enable or disable emergency call recording to improve incident analysis and enhance training within your organization. Manage emergency call recording settings in Control Hub to meet your organizations policies and regulatory requirements.
For details, see Emergency call recording.
Manage call recordings as a compliance officer
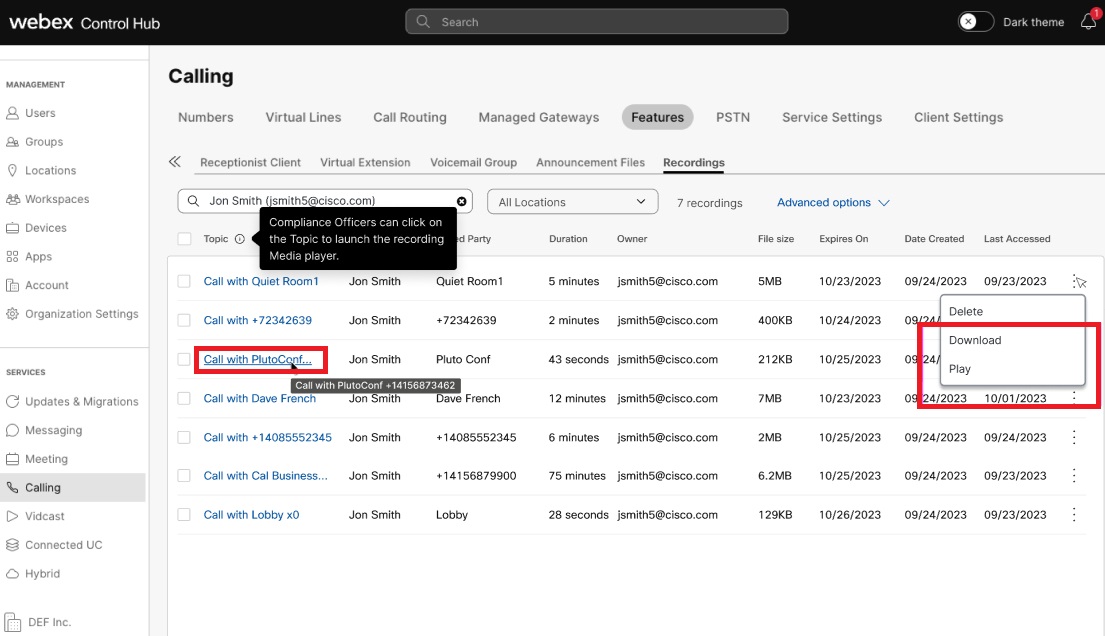
As a full administrator with Compliance officer access, you can Download and Play the recordings from the Call Recording screen. This capability is for Webex call recordings. You can cross-launch and use the Unified Player from the Control Hub to play the recordings.
To verify if a role has Full administrator with Compliance officer permission, follow these steps:
| 1 |
Sign in to Control Hub. |
| 2 |
Go to Users under Management. The Users window displays. Select a user from the list to view the access
details.
|
| 3 |
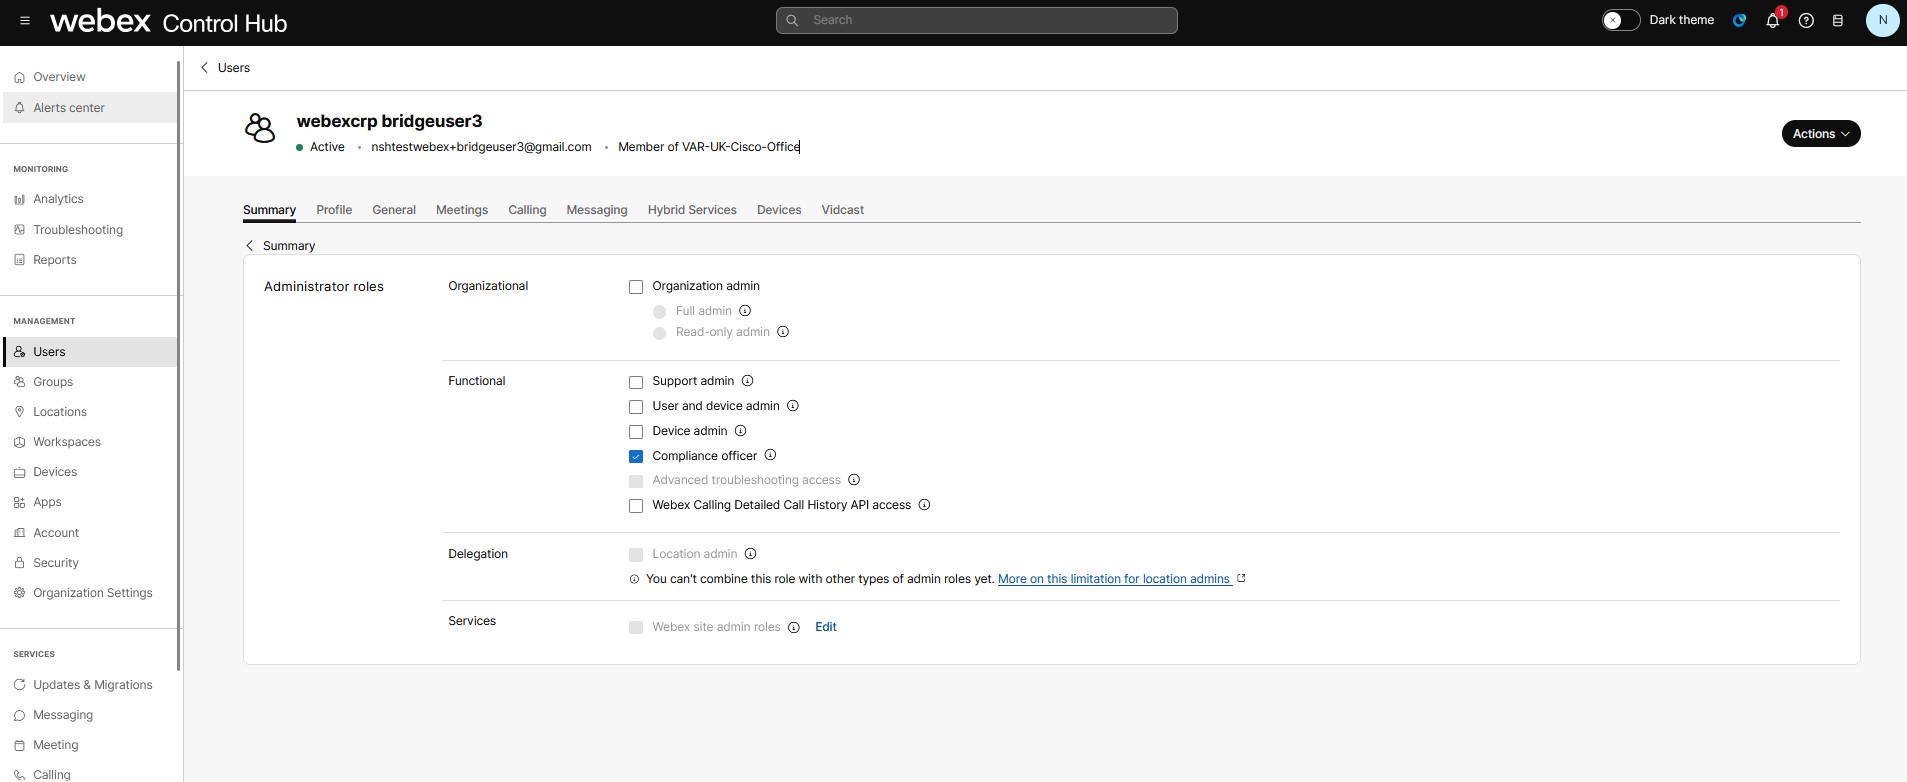
On the Summary tab, scroll to Administrator roles. Click on Administrator role to view the permission. Under Functions, if the Compliance officer option is checked then the user has permission to play and download the recordings.
Ensure that the user is a Full Administrator and then check the Compliance officer role. Else, select the Full admin and the Compliance officer options to manage the call recordings.
Partner Administrators can’t provision for the Compliance officer role. Hence, the experience as a Partner administrators isn’t the same as an Administrator. |
Download and play call recordings
As a Compliance officer, you can download and play the recordings.
| 1 |
Sign in to Control Hub. |
| 2 |
Go to Calling under Services. Click . The Recordings window displays the following information: the topic of the recording, calling and called party details, owner information, and the duration of the call recording. It also shows the data storage used for call recordings, the file size, and the expiry date when the data will be deleted. Expires on column indicates the expiry date based on the retention policy configuration. For more information, see Calling retention. When a recording’s expiry date is approaching, the date will appear in orange to alert organization administrators that the recording is nearing deletion and appropriate action must be taken. As a Compliance officer, you can click on the recording and play it using the Unified Player.
|
| 3 |
Click the As a Compliance officer, when you select Download from the menu or hyperlink, the recording is downloaded. Depending on the browser, the administrator is notified about the download. When you select the Play option, a new window in the browser opens with the call recording. When you select the Reassign option, the Reassign recording owner window appears where you can select a user whom you want to assign as owner of this recording. Administrators without the Compliance officer permission can only see the Delete and Reassign options. They can’t see that the Topic Name is hyperlinked, as they can’t play the recordings, nor can they see the information icon explaining the Play interaction. To reassign or delete multiple recordings, you can select the recordings and click Reassign or Delete. You can also use the Select all option to select multiple recordings. If there are more recordings, then the first 200 recordings are selected. |
 icon in the row corresponding to a recording to access the
Generate a transcript for calls recorded by Webex call provider
You can configure automatic transcription for recorded calls. Users can see the transcript in the player when they play the recording from Webex App or User Hub.
Speaker identification in a transcript is currently not supported for FedRAMP.
Before you begin
- Transcripts are available only for calls recorded by the Webex call recording provider.
- Transcripts are available only when the call is in English.
Enable transcripts at the organization level
| 1 |
Sign in to Control Hub. |
| 2 |
Go to . |
| 3 |
Go to the Cisco AI Assistant & AI features section, and click Customize AI Assistant & AI features. 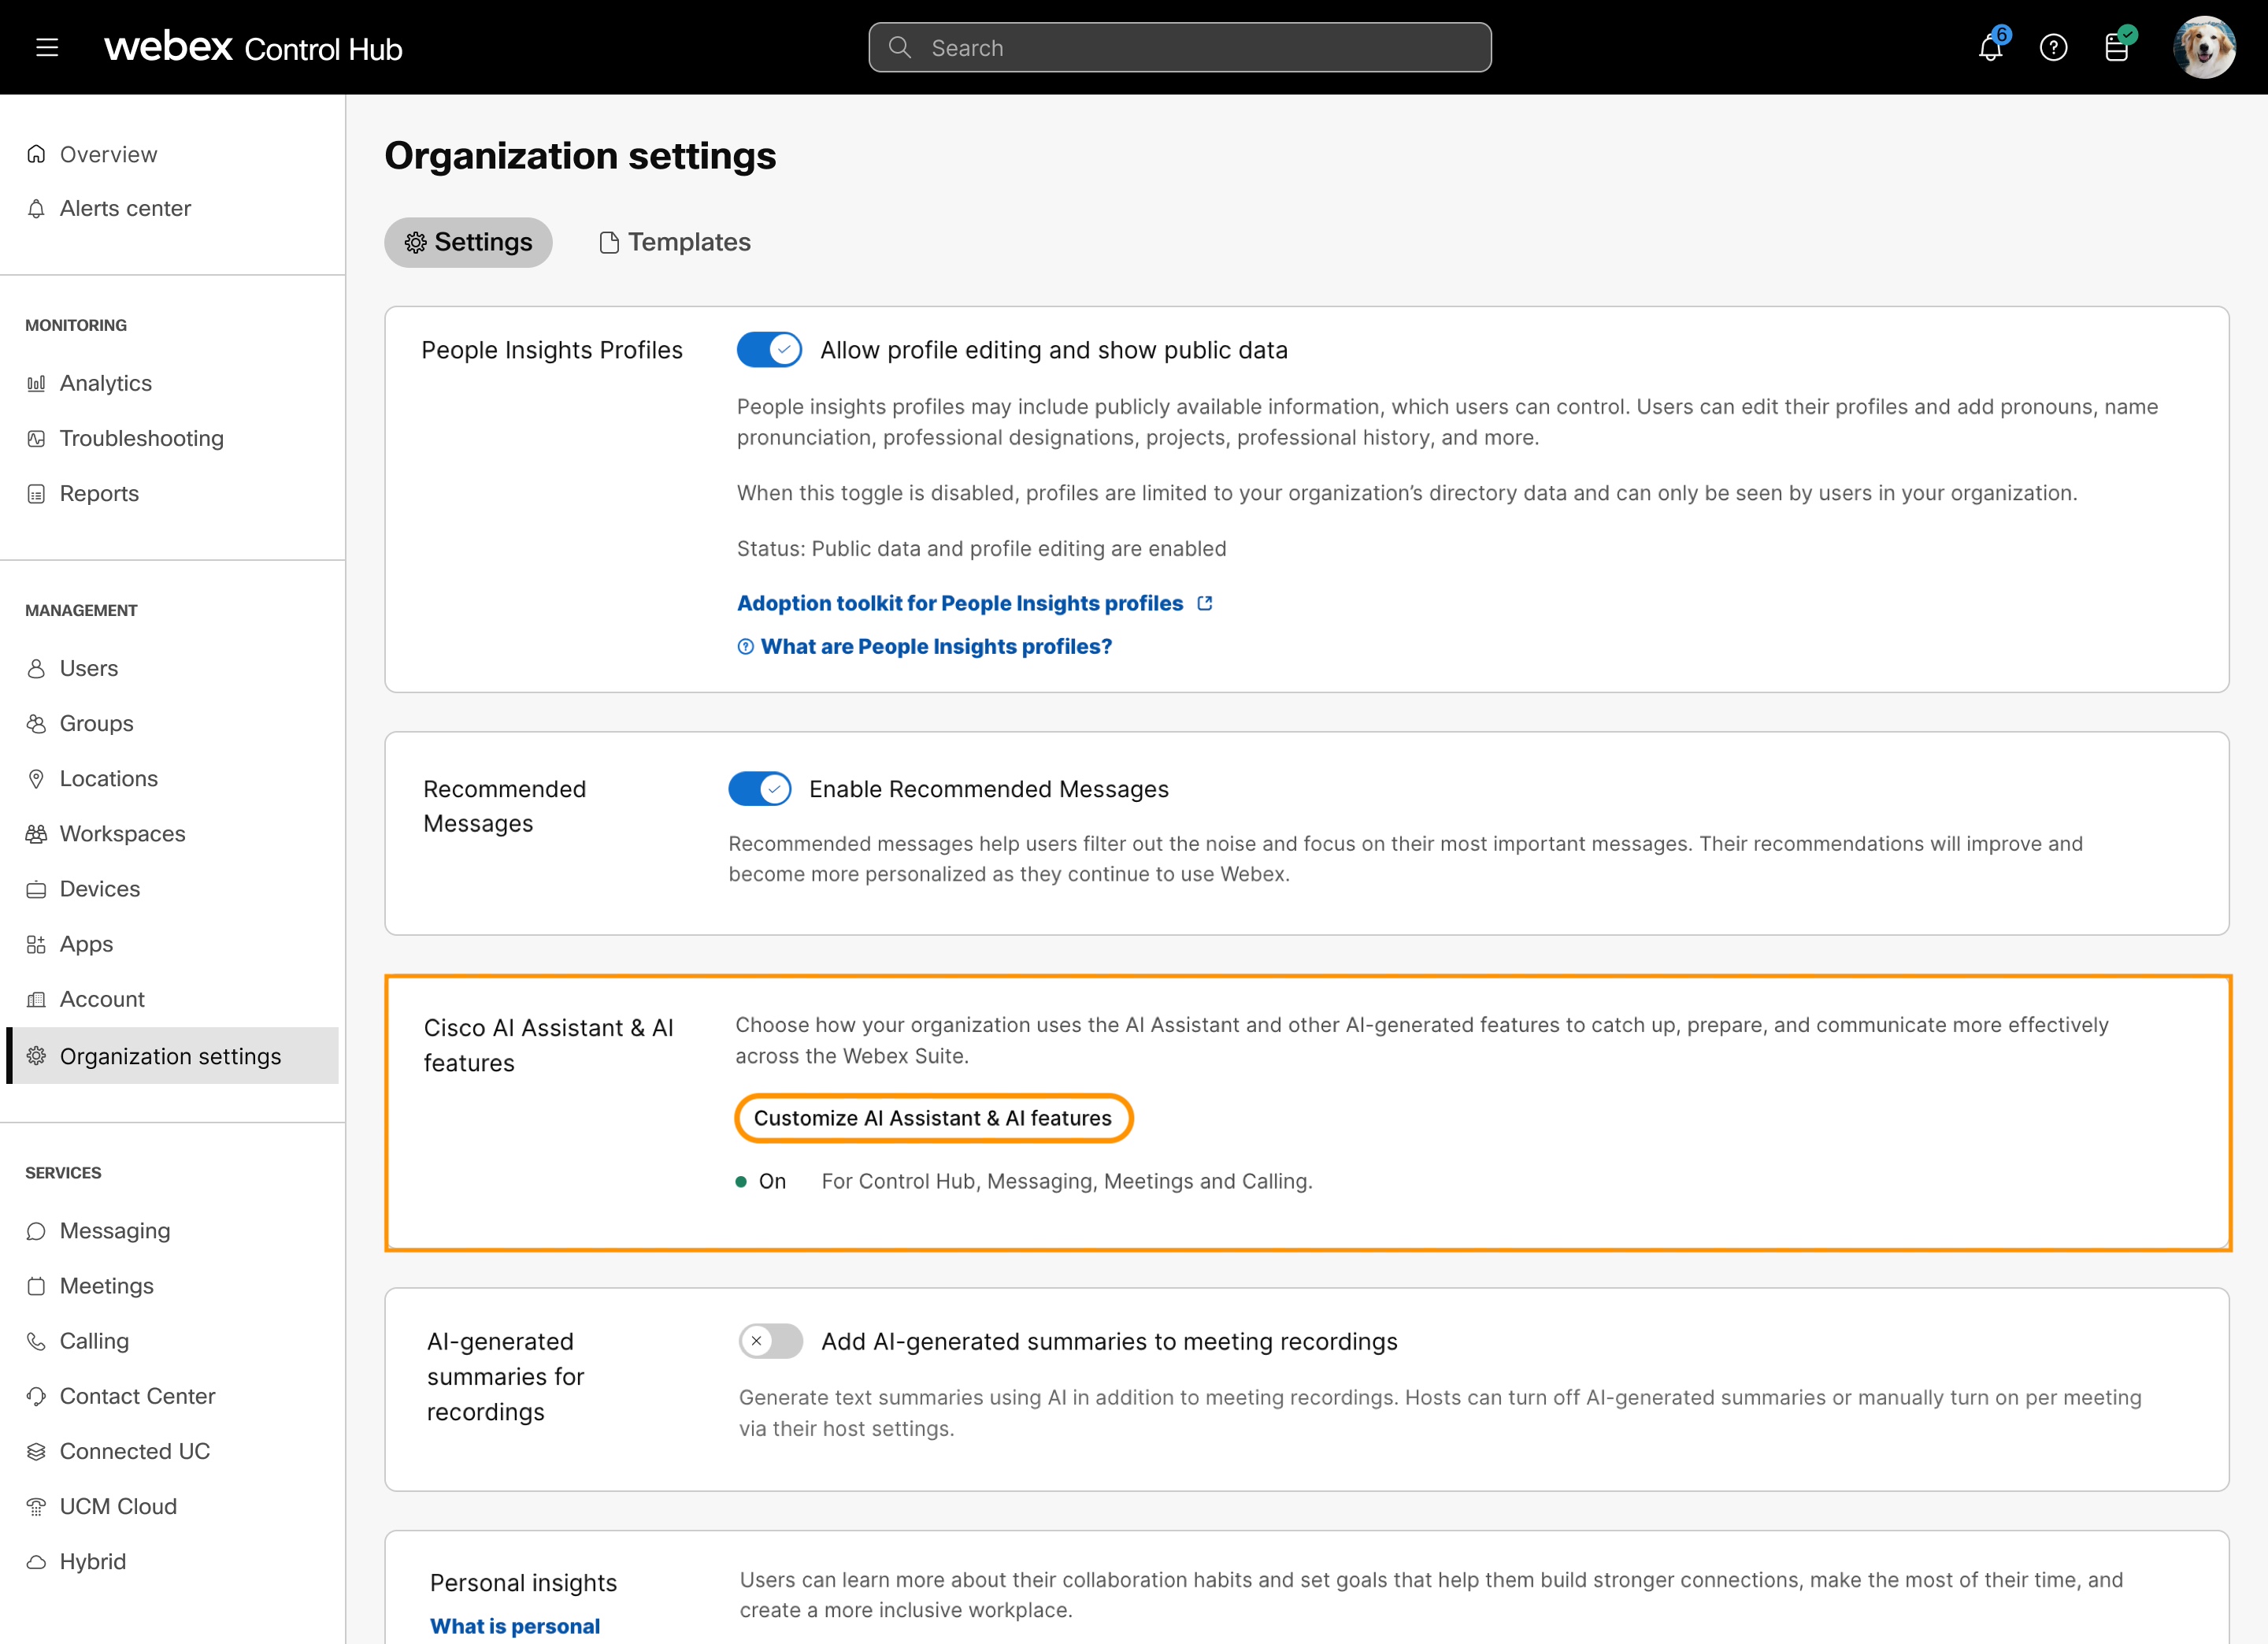
|
Enable transcripts at user, workspace, or virtual line level
The individual user, workspace, or virtual line level settings override the organization-level settings. On configuring these settings for user, workspace, or virtual line, you can make further modifications at those levels. These individual settings won’t automatically return to the organization’s default setting.
| 1 |
Sign in to Control Hub. |
| 2 |
Go to the respective path:
|
| 3 |
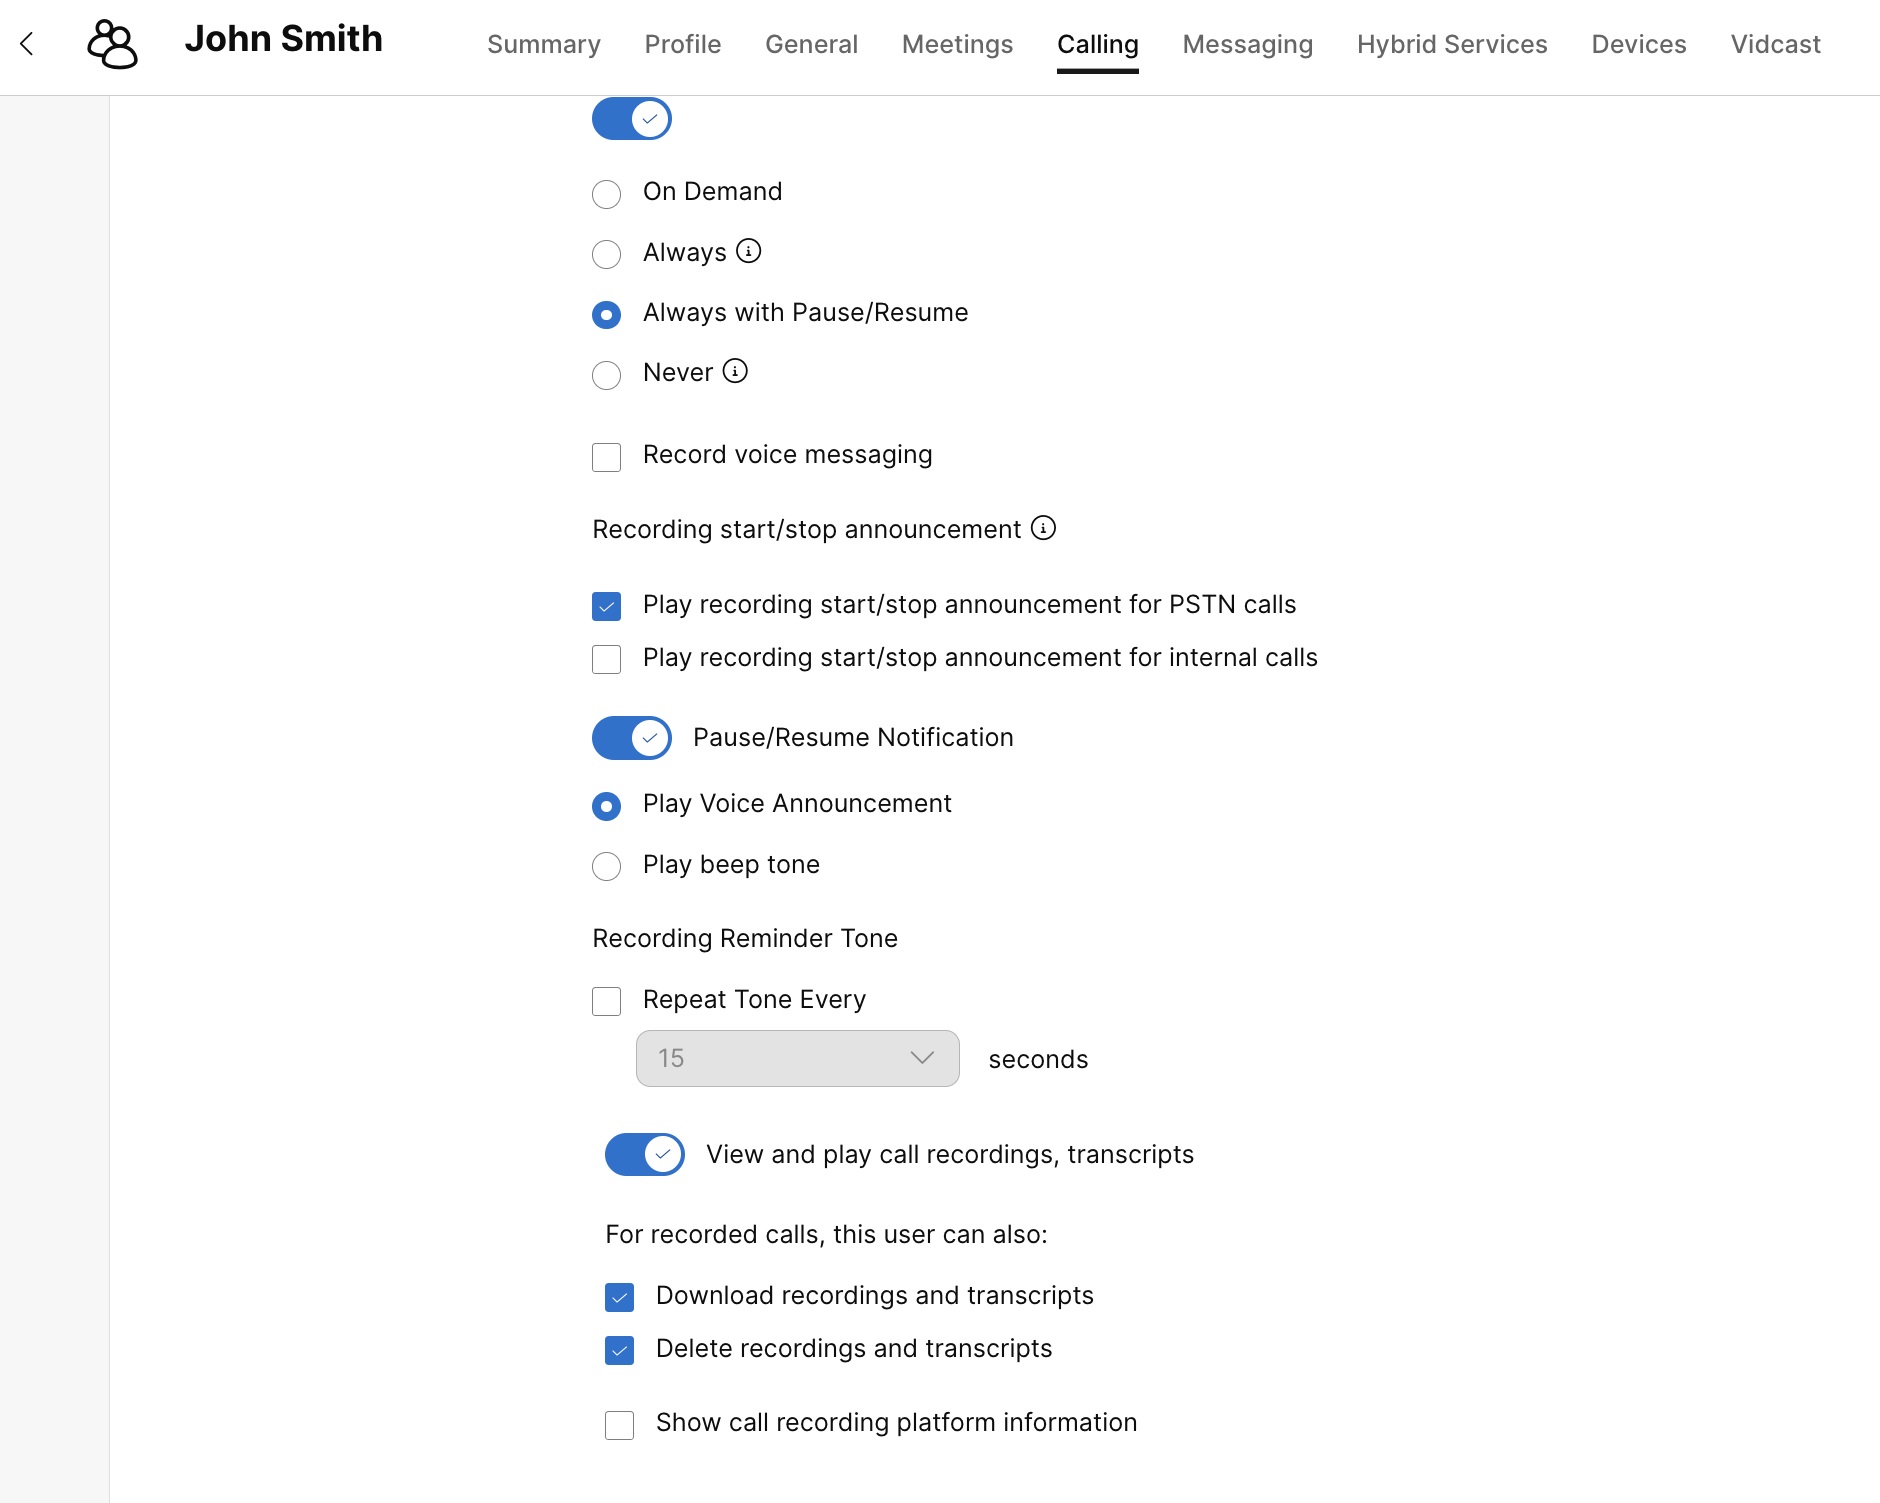
Slide the toggle, to enable Call recording. |
| 4 |
Slide the toggle, to enable Generate Transcript.
If the Generate Transcript toggle is not visible, change the announcement language to English for the user or location. To update the language:
|
| 5 |
To allow a user, workspace, or virtual line to view, download, and delete the transcript, enable View and play call recordings, transcripts, and then select Download recordings and transcripts and Delete recordings and transcripts. The options to view, download, and delete the transcript appear only if you enable Generate Transcript. If you disable View and play call recordings, transcripts, then the user can’t access the call recordings and transcripts. |
| 6 |
Click Save. 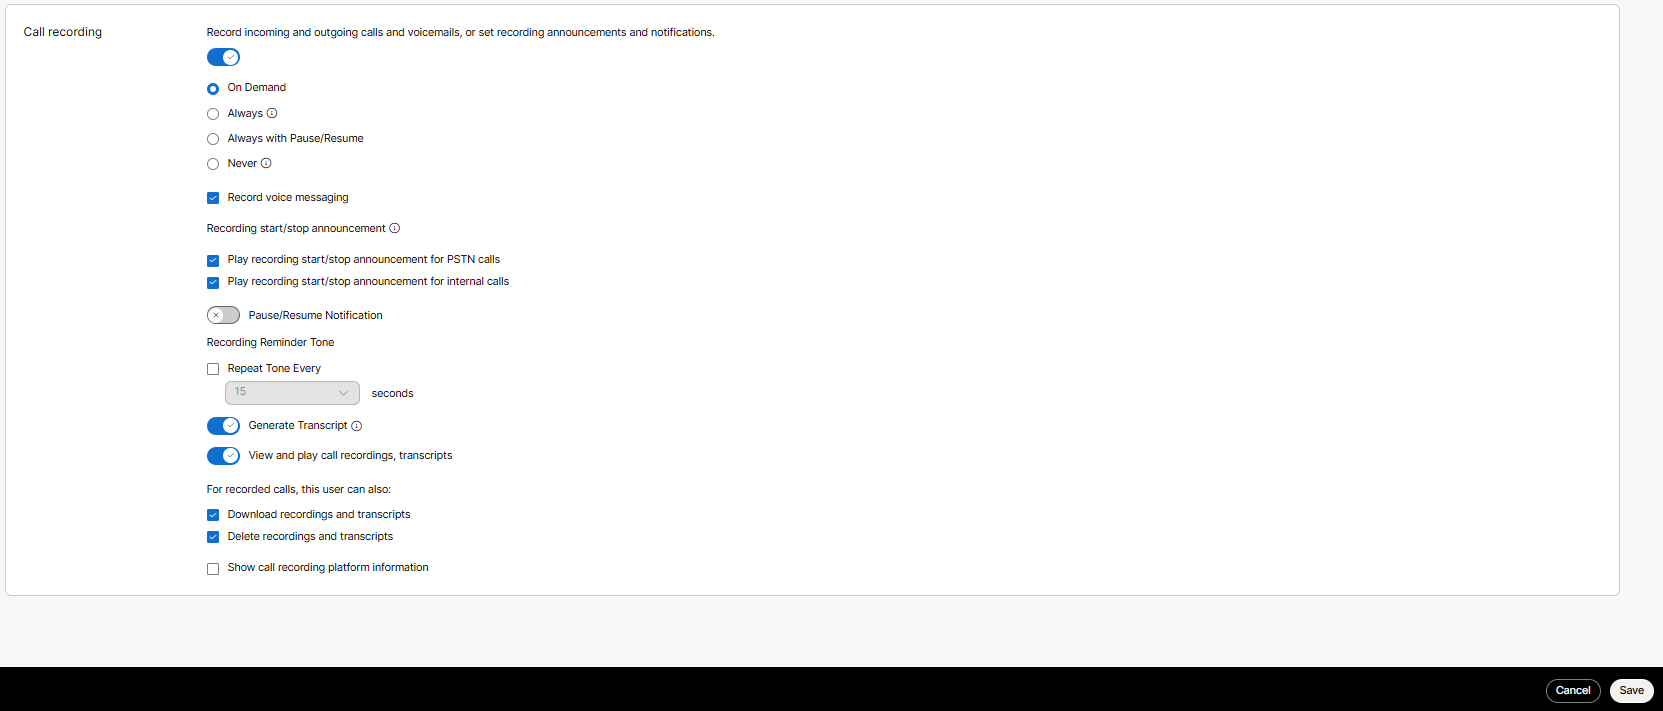
|
Call recording for virtual lines
As an administrator, you can enable call recording for the virtual lines. Virtual lines are added as additional lines on user or workspace devices, such as desk phones and the Webex App. Virtual lines support all the call recording options available on the primary line of users or workspaces, including visual and audio notification. Calls on the virtual lines are recorded using partner call recording services such as Dubber, Imagicle, and CallCabinet. You may need to purchase additional licenses from these call recording services to access calls recorded on virtual lines. Contact your call recording provider for more information.
Call recording is disabled by default on virtual lines. Make sure to select a call recording provider at either the organization level or the location level associated with the virtual line before enabling call recording on the virtual line.
For virtual lines configured with Always or Always with Pause/Resume recording mode, you can use selective recording controls to record incoming calls, outgoing calls, or both. For each direction, you can record internal calls, PSTN calls, or both.
Control Hub has integration with Dubber as a third-party call recording provider. If call recording is enabled for a virtual line and the assigned user doesn’t have call recording enabled, Dubber automatically creates an account for that user.
To access the call recordings for a virtual line, the administrator should create a Team in the Dubber administration portal. The Dub point associated with the virtual line should be configured as a contributor for the Team. Other users who need to listen to the recordings should be configured as Listeners in that team. For more information, contact Dubber Support.
If other call recording providers are used, then to access the recordings for a virtual line, refer to the appropriate call recording provider documentation or contact their Support teams.
If you’re using Imagicle as your third-party call recording service, Control Hub doesn’t automatically create accounts for call recording of virtual lines. Go to the Imagicle portal and create the account. Contact Imagicle Support for more information.
If you're using CallCabinet as your third-party call recording service, Control Hub doesn’t automatically create accounts for call recording of virtual lines. Go to the CallCabinet portal and create the account. Contact CallCabinet Support for more information.
The call recording solution by CallCabinet is available for Webex Calling customers hosted in the US region. It will be available in other regions shortly.
If you're using Eleveo as your third-party call recording service, Control Hub doesn’t automatically create accounts for call recording of virtual lines. Go to the Eleveo portal and create the account. Contact Eleveo Support for more information.
The call recording solution by Eleveo is available for Webex Calling customers hosted in the Europe and United States regions.
Create a MiaRec account at https://app.miarec.com to start recording your organization's calls with the MiaRec platform. Contact MiaRec Support for more information.
Control Hub doesn’t create a MiaRec account automatically when users are enabled for call recording.
The MiaRec call recording solution is available for Webex Calling customers hosted in the United States region.
Prerequisites
The following are some of the important points to note regarding call recording on virtual lines:
-
To access call recordings on virtual lines, you need additional licenses of the partner call recording services.
-
For the virtual line assigned to a Webex App user, currently call recording is supported in the Always recording mode. However, all the other recording modes will be available shortly.
Enable call recording for virtual lines
| 1 |
Sign in to Control Hub. |
| 2 |
Go to . |
| 3 |
Choose a virtual line. |
| 4 |
Click Calling, scroll to User Call Experience, and turn on Call Recording. Control Hub doesn’t automatically provision users or workspaces in the Call Recording Providers, except Dubber. Other providers may provide tools to sync users to your call recording provider account. When you turn off Call Recording, the call recording settings are cleared. Any calls that were recorded before this change of setting is still maintained in the call recording provider platform. |
| 5 |
If the user or workspace is having issues with recording calls after you enable call recording, contact the call provider's support. Support information is available in Show call recording platform information. |
| 6 |
Configure the call recording settings. For details, see the call recording settings listed in Enable call recording for Webex Calling users and workspaces. When you select Always or Always with pause/resume, you can choose which incoming and outgoing internal or PSTN calls are recorded. All selective recording options are selected by default. |
| 7 |
Click Save. |
What to do next
If you need further support, contact your call recording provider's support.
Call recording behavior
-
Users see an icon on their Multiplatform phone (MPP) and the Webex App showing that a call is being recorded.
-
Users and workspaces with On-demand recording mode see a Record soft key (button) to initiate the recording.
-
Users and workspaces with On-demand and Always with Pause/Resume dynamically see the soft key (button) to pause and resume the recording if the settings are enabled for the users.
-
For Always and Always with Pause/Resume recording modes, a call is recorded only when the selected call direction and source allow recording. If the selections don't allow recording, call recording is inhibited for that call.
-
Call direction is based on how the call starts for the recorded user or workspace. The direction doesn't change if a feature, such as transfer, changes the user's call role during the call. Call source is based on the actual remote party and can be rechecked when the remote party changes.
-
Voice messages are treated as incoming calls for selective recording. Emergency call recording takes precedence over selective recording controls.
-
Shared lines use the call recording settings of the primary user.
-
When a call is being recorded, dual streams are sent to Call recording provider.
-
When an announcement is played during start, stop, pause, or resume operations, Webex Calling sends information to the call recording provider that an announcement was played as a SIPREC meta-data message.
-
ICE (Media optimization) and Call Recording features independently introduce a small audio delay at the beginning of the call and, when used together, the audio delay is slightly longer and more noticeable to customers.
Compliance call recording for Webex from a certified recording provider
Webex provides a built-in call recording feature along with the options for selected Cisco-certified third-party call recording solutions. The built-in call recording feature allows APIs for any third-party to build integration applications which can retrieve the recordings from Webex cloud to their platform. These apps aren’t always certified by Cisco.
The Cisco-certified call recording solutions are specially designed to offer a range of compliance recording capabilities. These solutions are tested and verified by both the recording provider and by Cisco, giving Webex customers a quality recording solution to meet specific compliance needs. In this solution, the recordings are directly managed and stored in the recording provider's cloud. This solution offers a direct connection between Webex cloud and the recording provider's cloud, ensuring secure transmission of recordings.
The following recording providers are verified with Webex Calling:
|
Provider |
Website |
|---|---|
|
Call Cabinet |
|
|
Dubber |
|
|
Eleveo |
|
|
Imagicle |
|
|
MiaRec |


