
Thanks for your feedback.
Call from laptop using your Cisco device as a web camera
 Feedback?
The setup and use of this feature varies because the different devices have different capabilities. Your device is in one of these categories:
-
Full USB-C support: Desk, Desk Pro, Desk Mini, Board Pro, Board Pro G2, Room Kit EQ, Room Kit EQX, Room Bar, Room Bar Pro
-
Limited USB-C support: Room Kit Mini
-
No USB-C support: Codec Plus, Codec Pro, Room Kit, Room 55, Room 70 Single, and Room 70 G2 Single and Dual
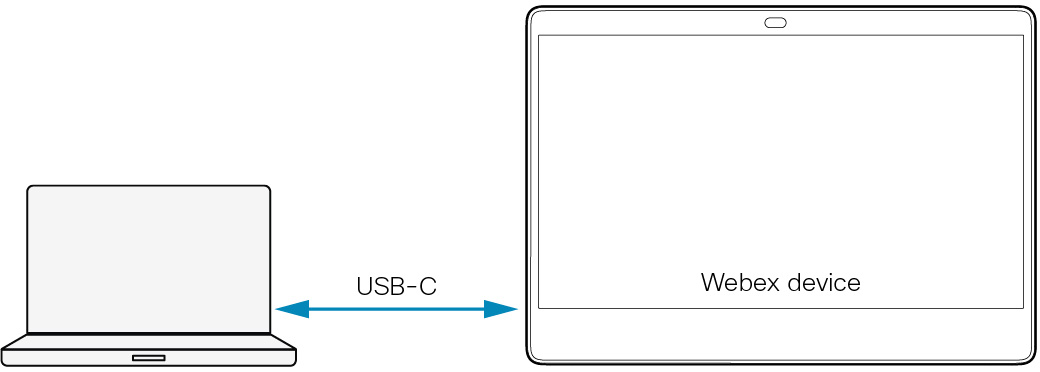
Devices in this category have a USB-C connector, and you can share content from a laptop to the device on the USB-C connection. Desk Hub supports up to 720p video when used as an advanced web camera; the other devices support up to 1080p video in this mode.
Connect your laptop and select input sources
-
(Optional, and only for devices with a touch controller) Tap Call from laptop on the touch controller, and it guides you what to do next. If you skip this step, the Call from laptop app opens automatically on the device when you select the device as camera source in step 3.
-
Connect your laptop to the device's USB-C socket.
-
Open your laptop meeting app and select the device as source for camera, microphone, and loudspeaker.
Now you are ready to call or join a meeting from your laptop.
If there's no display connected to the Room Bar or if the Room Bar's Video Input Connector 2 PresentationSelection is set to Manual, selecting the Room Bar as a loudspeaker output won't allow the laptop audio to be heard through the Room Bar's loudspeakers. This is because the laptop's audio, delivered via USB-C, is integrated into the DisplayPort Alt-Mode video output. As a result, audio plays through the Room Bar's loudspeakers when the laptop screen is being shared on the connected display of the Room Bar. Make sure that an HDMI display is connected to the Room Bar and share the laptop screen before joining the meeting on the laptop app.
In-call behavior
You can always mute your microphones from the laptop meeting app. Whether you can mute from the device depends on how your administrator has set up the device. The device and laptop mute indicators are not synchronized. For more details, read the For the administrator section.
The device is in Do not disturb mode when you are in a video meeting from your laptop. You won't receive any other incoming calls to your device when in this mode. The device is not in Do not disturb mode when in audio-only meetings.
You can control the camera, adjust the volume, remove background noise, and optimize the audio quality, from the device UI. The camera light indicator is on when the camera is in use. The laptop meeting app controls the rest, including disconnecting the call.
For the administrator
-
Mute audio from the device: People can always mute their microphones from the laptop meeting app. An administrator can decide whether people are allowed also to mute from the device (including a touch controller or microphones that are connected to the device). Set the configuration to:
-
Inactive: People can mute only from the laptop meeting app (default behavior for Desk series)
-
Active: People can mute from both the device and the laptop meeting app (default behavior for other products)
However, because the device and meeting app mute indicators are not synchronized, there are some side effects if you allow muting from the device:
-
If people mute themselves from the laptop meeting app, the microphone LEDs of the device don't change to the mute color.
-
If people mute themselves from the device, the other participants in the call will not be notified that they are muted.
-
If people forget to select the device as microphone source for the laptop meeting app, the app will use the laptop microphones. In such a case, the microphone LEDs of the device may be red (mute color), while the audio is not muted.
-
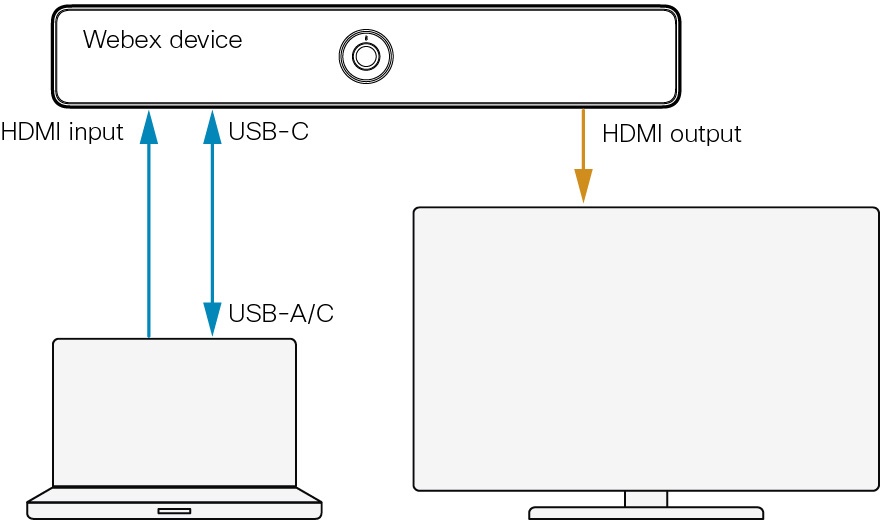
The device in this category has a USB-C connector, but you cannot share content from a laptop to the device on the USB-C connection. To support content sharing, you must also connect an HDMI cable. The device supports up to 1080p video when used as an advanced web camera.
Connect your laptop and select input sources
-
Connect your laptop to the device's USB-C socket.
-
Connect the presentation cable from the device's HDMI input to your laptop.
-
Open your laptop meeting app and select the device as source for camera, microphone, and loudspeaker.
The device appears as two loudspeaker options: one is the HDMI connection, the other is the USB-C connection.
Now you are ready to call or join a meeting from your laptop.
In-call behavior
You can always mute your microphones from the laptop meeting app. Whether you can mute from the device depends on how your administrator has set up the device. The device and laptop mute indicators are not synchronized. For more details, read the For the administrator section.
The device is always in Do not disturb mode when you are in a meeting from your laptop. Therefore, you won't receive any other incoming calls to your device.
You can control the camera, adjust the volume, remove background noise, and optimize the audio quality, from the device UI. The camera light indicator is on when the camera is in use. The laptop meeting app controls the rest, including disconnecting the call.
For the administrator
-
Mute audio from the device: By default, people can mute their microphones both from the meeting app and from the device. In both cases, no audio is sent to the other participants. However, because the device and meeting app mute indicators are not synchronized, there are some side effects:
-
If people mute themselves from the laptop meeting app, the microphone LEDs of the device don't change to the mute color.
-
If people mute themselves from the device, the other participants in the call will not be notified that they are muted.
-
If people forget to select the device as microphone source for the laptop meeting app, the app will use the laptop microphones. In such a case, the microphone LEDs of the device may be red (mute color), while the audio is not muted.
Set this configuration to Inactive to disable muting from the device, .
-
-
Call service registration: You don't have to register the device to a call service (cloud or on-premises) just to use it for laptop calling. If you skip registration at first-time setup, you can go back and register the device with Cisco later. Go to Settings and select Device Activation.
By default, you get the full UI if the device is registered to a call service. If the device is not registered, the UI is customized accordingly. Use the following configuration if you want to change the behavior, .
The devices in this category don't have a USB-C connector, so an HDMI-to-USB converter must be connected to one of the device's HDMI outputs. Connect both a USB and an HDMI cable to the laptop.
This feature isn't available on Board 55/55S/70/70S/85S, Room 55 Dual, Room 70 Dual, Room 70 Panorama, and Room Panorama as they don't have an available HDMI output.
Connect your laptop and select input sources

-
Tap Call from laptop on the device UI to open the Call from laptop app.
-
Connect your laptop to the USB socket of the HDMI-to-USB converter.
-
Connect the presentation cable from the device's HDMI input to your laptop.
-
Open your laptop meeting app and select the HDMI-to-USB converter as source for camera and microphone. Select the device as source for loudspeaker.
Note: If you don't select the HDMI-to-USB converter as microphone source, the meeting app uses the laptop microphone instead. In this case, the mute buttons on the device or external microphones don't have any effect.
Now you are ready to call or join a meeting from your laptop.
End the call
-
End the meeting on your laptop.
-
Also, tap Disconnect on the device to close the Call from laptop app.
If you don't close the Call from laptop app, the device doesn't return to regular mode. The device stays in Do not disturb mode, it can't receive any calls, it doesn't enter standby, and it doesn't receive software upgrades.
In-call behavior
You can always mute your microphones from the laptop meeting app. Whether you can mute from the device and external microphones, depends on how your administrator has set up the device. The device and laptop mute indicators are not synchronized. For more details, read the For the administrator and installer section.
You can control the camera, adjust the volume, remove background noise, and optimize the audio quality, from the device UI. The camera light indicator is on when the camera is in use. The laptop meeting app controls the rest.
The device is always in Do not disturb mode if the Call from laptop app is active on the device, even if minimized. Therefore, you won't receive any incoming calls to your device while in a meeting from the laptop.
For the administrator and installer
-
Add an HDMI-to-USB converter: Connect an HDMI-to-USB converter (also known as capture device) to one of the device's HDMI outputs (see illustration). We have tested and recommend the Inogeni 4KX-PLUS converter; you may use others.
-
Camera, screens, and other peripherals: If the device doesn't have an integrated camera or screens, connect them to the device as usual (yellow arrows). Also add the touch controller and other peripherals as usual.
-
Enable the feature: Set this configuration to True, . It adds a Call from laptop button on the UI. The feature requires the device to run the RoomOS 11 UI experience.
-
Mute audio from the device or external microphones: By default, people can mute their microphones both from the meeting app and from the device and external microphones. In both cases, no audio is sent to the other participants (provided that the HDMI-to-USB converter is the microphone source). However, because the device and meeting app mute indicators are not synchronized, there are some side effects:
-
If people mute themselves from the laptop meeting app, the microphone LEDs of the device and external microphones don't change to the mute color.
-
If people mute themselves from the device or external microphones, the other participants in the call will not be notified that they are muted.
-
If people forget to select the HDMI-to-USB converter as microphone source, they may find themselves in a situation where the microphone LEDs of the device and external microphones are red (mute color), while their audio is not muted. This is because the meeting app is using the laptop microphones.
Set this configuration to Inactive to disable muting from the device and its external microphones, .
-
-
Set the HDMI output for the HDMI-to-USB converter: By default, the device is set up to use the HDMI output with the highest number for the HDMI-to-USB converter. Use this configuration if you want to change to another HDMI output, . If so, check that the monitor roles are correct, .
-
Set the number of monitors: If you have an HDMI-to-USB converter with external power supply, and with no screen that is connected to it, manually set how many screens the device has with this configuration, . A mismatch gives layout issues when joining meetings from the device itself.
-
Choose whether to close the Call from laptop app automatically: By default the Call from laptop app closes automatically after 120 minutes. Use these configurations to change from the default behaviour:
-
: True (close automatically) / False (keep open until manually closed).
-
: The number of minutes before closing.
-
-
Advanced audio setups for Codec Pro and Room 70 G2: We recommend you keep the configuration at Auto. If your room setup requires it to be Manual, use the Audio Console (recommended) or API commands to set up microphone passthrough manually.


