
Thanks for your feedback.
Updating Cisco BroadWorks NPS to Use NPS Proxy: Configuration Guide
 Feedback?
This article describes how to configure a shared NPS to use NPS authentication proxy, so that it can also be used to push call notifications to Webex apps. If your NPS doesn’t support other apps, you can follow the simplified procedure in the Webex for BroadWorks Solution Guide.
NPS Proxy Overview
For compatibility with Webex for BroadWorks, your NPS must be patched to support the NPS Proxy feature, Push Server for VoIP in UCaaS.
The feature implements a new design in the Notification Push Server to resolve the security vulnerability of sharing push notification certificate private keys with service providers for mobile clients. Instead of sharing push notification certificates and keys with the service provider, the NPS uses a new API to obtain a short-lived push notification token from the UCaaS backend, and uses this token for authentication with the Apple APNs and Google FCM services.
The feature also enhances the capability of the Notification Push Server to push notifications to Android devices through the new Google Firebase Cloud Messaging (FCM) HTTPv1 API.
-
For more information, see the Push Server for VoIP in UCaaS Feature Description.
-
The BroadWorks patches for the feature are available on: https://software.cisco.com/download/home/286326302/type/286326345/release/RI.2022.04.
-
More information on the ADP server can be found at Cisco BroadWorks Application Delivery Platform.
The XSP (or Application Delivery Platform ADP) that hosts NPS must meet the following requirements:
Minimum Versions and Co-residency Restrictions
-
NPS must be activated on a dedicated XSP/ADP and NPS must be the only hosted application on the server. This is to eliminate interference with the delivery of Push notifications.
-
There should only be one NPS app in a deployment. If you're using mobile UC-One Collaborate/Connect and or UC-One SaaS, and are implementing Webex for BroadWorks, you must share this single NPS for all the apps.
-
NPS must be on version R22 or later XSP, or ADP.
R22/R23 XSP is compatible with an R21 stack if the XSP only runs NPS and the AS is R21.SP1. See the BroadWorks Compatibility Matrix for more information.
-
More information on the ADP server can be found at Cisco BroadWorks Application Delivery Platform.
Shared NPS
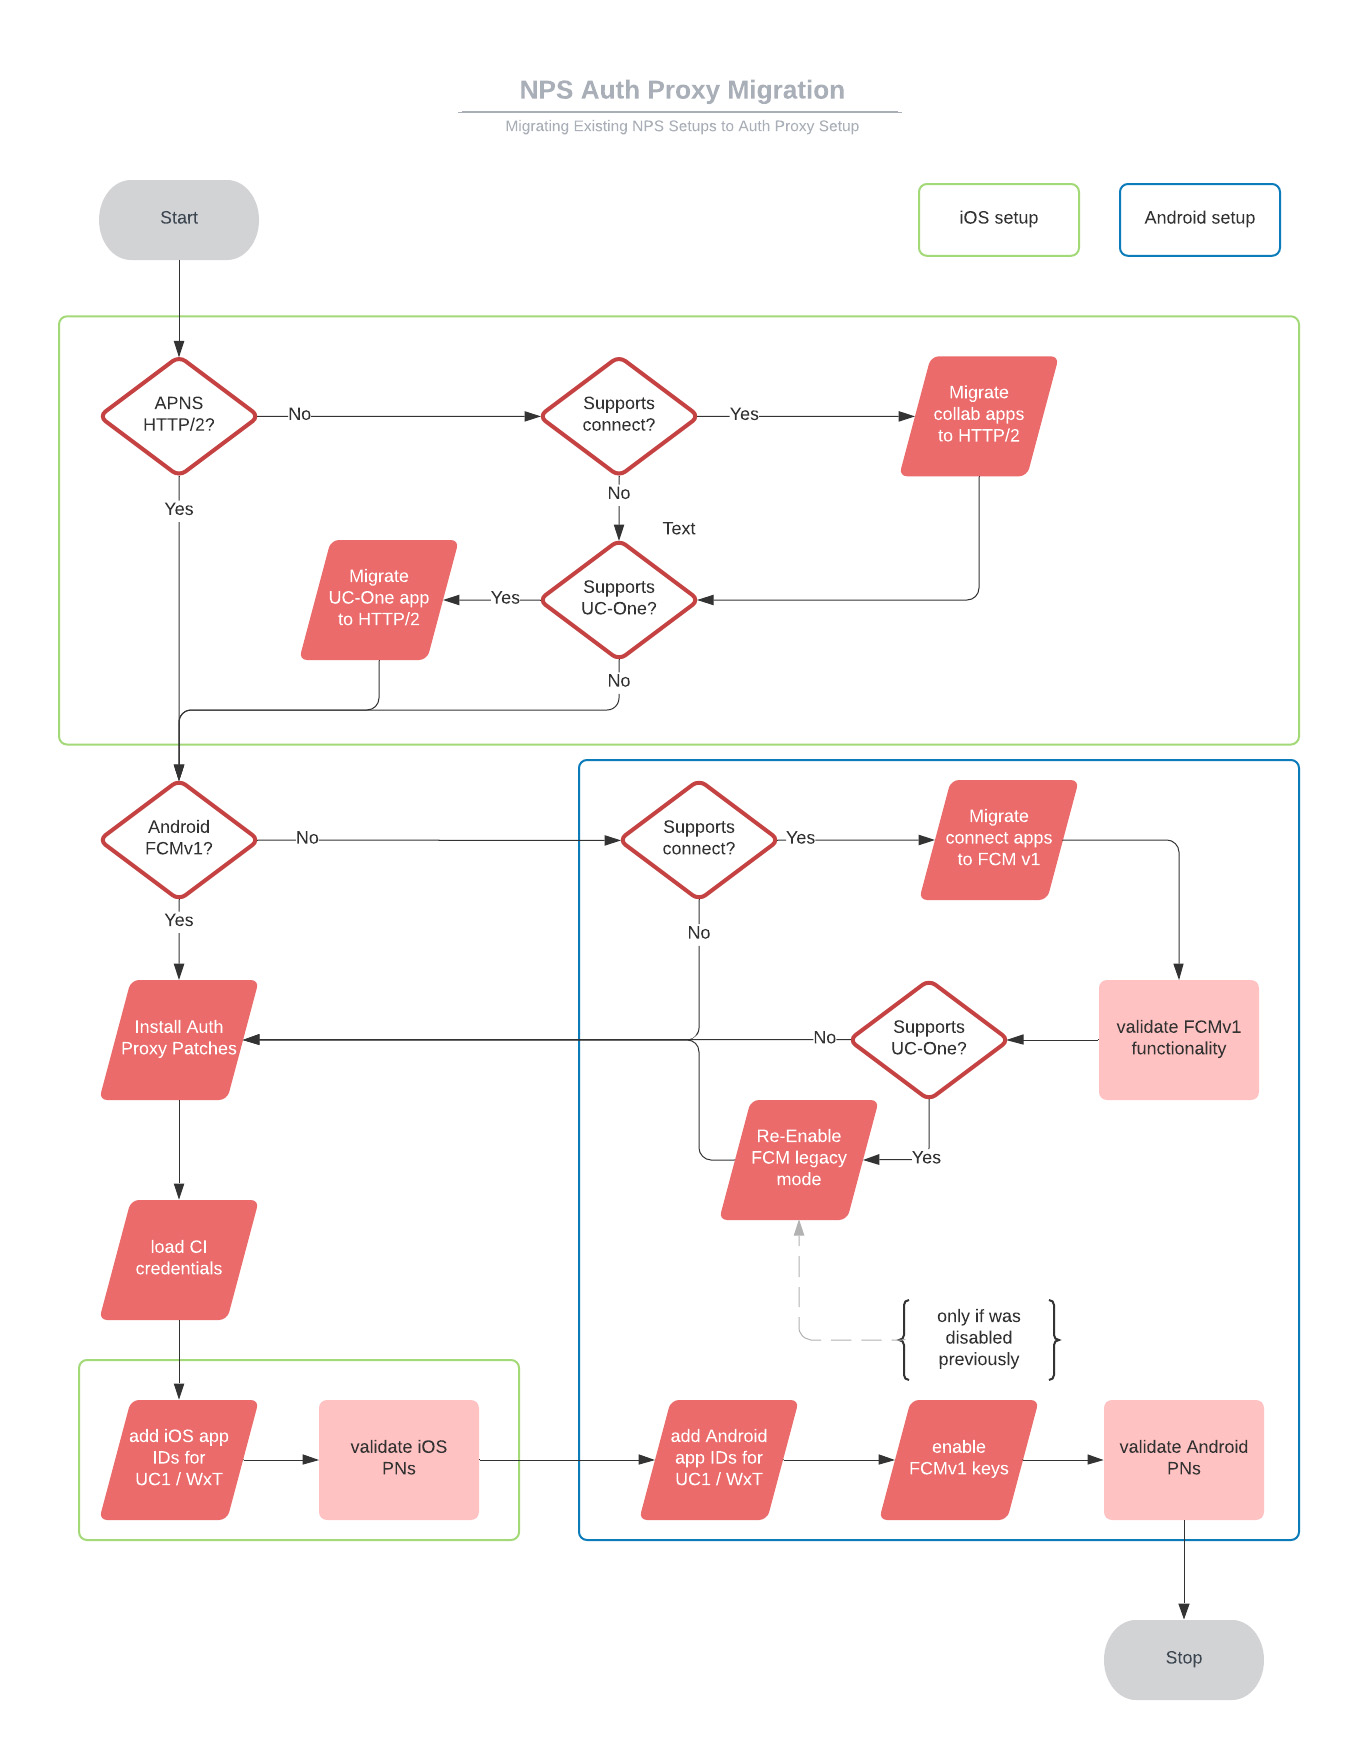
Read these notes before you configure your shared NPS to use the NPS Proxy:
-
If your NPS is used with other apps (not just the Webex App): First configure the NPS proxy, then change the NPS from using the FCM legacy API to using FCM HTTP v1 API.
-
After you’ve verified that notifications are working properly for older apps with the NPS proxy, then remove the FCM API key for the Android app, and the APNs auth key for the iOS app.
APNs HTTP/2
-
If you’ve deployed any iOS apps that aren’t from Cisco/BroadSoft, configure those apps to use the HTTP/2 APNS protocol before configuring NPS to use the NPS proxy.
-
XSP/ADPs that already support the Collaborate or SaaS BroadWorks app need to be migrated to HTTP/2. For detailed information on configuring HTTP/2, see HTTP/2 Support to Notification Push Server for APNS (migration of NPS to support these iOS apps is summarized in this article).
Android FCMv1
-
If you’ve deployed any Android apps that aren’t from Cisco/BroadSoft, configure those apps to use the FCMv1 keys before configuring NPS to use the NPS proxy.
-
If XSP/ADP currently supports the Connect or UC-One SaaS app, then enable FCMv1 keys after you configure the NPS proxy. We recommend that you migrate all additional apps to FCMv1 keys, enable, and test, then disable until you're ready to complete the setup instructions (the migration flow is documented in this article).
|
Sequence |
Task Title |
When/Why is Task Required? |
|---|---|---|
|
1 |
Migrate NPS to HTTP/2 for UC-One SaaS (or Connect) iOS apps. |
If the NPS supports those apps, and they are not yet configured for HTTP/2. |
|
2 |
Migrate NPS to FCMv1 for UC-One SaaS (or Connect) Android apps. |
If the NPS supports those apps, and they are not yet configured for FCMv1. |
|
3 |
Enable FCMv1 mode, and test push notifications. |
If the NPS is supporting UC-One Connect and/or other (non-Cisco) Android apps. |
|
4 |
Re-enable FCM legacy mode. |
If the NPS is supporting UC-One SaaS. If you leave FCMv1 enabled, before you configure the NPS proxy, then push notifications to UC-One SaaS start failing. |
|
5 |
Install NPS authentication proxy patches. |
If NPS is on XSP R22 or XSP R23. |
|
6 |
Configure NPS to use the NPS authentication proxy:
|
Always required. |
|
7 |
Remove FCM legacy mode keys. |
For apps that are successfully supported by NPS on FCMv1. |
This task is mandatory for push notifications to UC-One SaaS and Webex apps on iOS platforms.
Before you begin
If your XSP is running R22, you need to apply ap354313 before you can configure the NPS application to use HTTP/2 for APNS.
| 1 |
Set the production URL and connection parameters at
Note: Do not set the connection timeout below 1000. |
| 2 |
Add the application IDs to the APNS applications context, making sure to omit the Auth key – set it to empty. For UC-One SaaS: For Webex app: |
| 3 |
Check the auth keys with |
| 4 |
If the auth key is not empty for |
| 5 |
Enable HTTP/2:
|
| 6 |
For UC-One SaaS apps only: Sign in to the reseller portal and go to |
| 7 |
Scroll down to the Notification Push Server section, and select your release (e.g. Release 22), then follow the instructions provided in the portal. |
-
This task applies to NPS on XSP. Ignore it if your NPS is on ADP.
-
You can use this procedure for migrating to FCMv1 notifications for UC-One Connect or UC-One SaaS Android apps.
-
You must use FCMv1 if you want to use the NPS proxy to authenticate push notifications to UC-One or the Webex Android apps.
-
This task prepares the NPS for FCMv1 so that you can enable it as part of the configuration of NPS authentication proxy. Do not enable FCMv1 until you are ready to configure NPS authentication proxy, or notifications to SaaS clients will fail.
| 1 |
Get the project ID from Firebase console: | ||||||||||||||||
| 2 |
Get your service account’s private key from Firebase: | ||||||||||||||||
| 3 |
Copy the key to the XSP hosting your NPS. | ||||||||||||||||
| 4 |
Add the project ID and associated private key to the FCM projects context:
| ||||||||||||||||
| 5 |
Add the UC-One (Connect or SaaS) application and associated project ID to the FCM applications context:
| ||||||||||||||||
| 6 |
Check the configuration for FCM against the attributes and recommended values shown here. Use Run
|
-
This task applies to NPS on ADP. Ignore it if your NPS is on XSP.
-
You can use this procedure for migrating to FCMv1 notifications for UC-One Connect or UC-One SaaS Android apps.
-
You must use FCMv1 if you want to use the NPS proxy to authenticate push notifications to UC-One or the Webex Android apps.
-
This task prepares the NPS for FCMv1 so that you can enable it as part of the configuration of NPS authentication proxy. Do not enable FCMv1 until you are ready to configure NPS authentication proxy, or notifications to SaaS clients will fail.
| 1 |
Get the project ID from Firebase console: |
| 2 |
Get your service account’s private key from Firebase: |
| 3 |
Import the .json file to the ADP server |
| 4 |
Login to ADP CLI and add the project and API key to the FCM projects context:
|
| 5 |
Add the application and project ID to the FCM applications context:
|
| 6 |
Verify your configuration: |
You only need to do this (as part of the migration) if:
-
Your NPS is used for UC-One SaaS or BroadWorks Connect Android apps.
-
You already tested that call push notifications to other apps are working with FCMv1 API.
You are temporarily disabling FCMv1 because FCMv1 keys for these apps must only be enabled during the NPS authentication proxy configuration process.
| 1 |
Sign in to the XSP hosting your shared NPS. |
| 2 |
Navigate to the FCM context and disable FCM v1: |
Install the following patches to support the NPS authentication proxy feature:
R22 Patches
R23 Patches
| 1 |
Create a service request with your onboarding contact, or with TAC, to provision your (Webex Common Identity) OAuth client account. Title your service request NPS Configuration for Auth Proxy Setup. We give you an OAuth client ID, a client secret, and a refresh token that's valid for 60 days. If the token expires before you use it with your NPS, you can raise another request.
| |||||||||||||||||||
| 2 |
Create the client account on the NPS:
Run the command to verify that the values you entered match the ones provided to you. | |||||||||||||||||||
| 3 |
Enter the NPS Proxy URL, and set the token refresh interval (30 minutes recommended):
To enhance the DNS resolution speed, instead of the current FQDN nps.uc-one.broadsoft.com we recommend you to use the appropriate FQDN based on your region. Region-based FQDNs: US East:
US West:
Europe:
Saudi Arabia:
Australia:
If push notifications time out due to a delay in DNS resolution, increase the timeout value in the "/etc/resolv.conf" file on the BroadWorks server. | |||||||||||||||||||
| 4 |
(For Android notifications) Add the Android application IDs to the FCM applications context on the NPS. For Webex App on Android: For UC-One App on Android: | |||||||||||||||||||
| 5 |
(For Apple iOS notifications) Add the application ID to the APNS applications context, making sure to omit the Auth key – set it to empty. For Webex App on iOS: For UC-One app on iOS: | |||||||||||||||||||
| 6 |
Configure the following NPS URLs:
| |||||||||||||||||||
| 7 |
Configure the following NPS connection parameters to the recommended values shown:
| |||||||||||||||||||
| 8 |
Check if the Application Server is screening application IDs, because you may need to add the Webex apps to the allow list: |
| 1 |
Restart the XSP: bwrestart
|
| 2 |
Test call notifications to Android by making calls from a BroadWorks subscriber to the calling client on Android. Verify that call notification appears on the Android device. Note: If push notifications start failing for the UC-One android application, it is possible that there is a misconfiguration. If this is your situation, you can revert to the legacy FCM as follows:
|
| 3 |
Test call notifications to iOS by making calls from a BroadWorks subscriber to the calling client on iOS. Verify that call notification appears on the iOS device. Note: If push notifications start failing for the UC-One iOS application, it is possible that there is a misconfiguration. If this is your situation, you can revert to the legacy binary interface with |


