- Home
- /
- Article

Thanks for your feedback.

 In this article
 Feedback?
If you manage your users and groups in Microsoft Entra ID, use the Entra ID Wizard App in Control Hub to synchronize users and groups with Webex.
Enable Entra ID in Control Hub
In Webex for Government, the Entra ID Wizard App is available for both GCC Moderate Entra ID and GCC High Entra ID customers.
Some of the features that are described in this article aren’t yet available to all customers.
Before you begin
Ensure that you have access to an Entra ID account that has the authority to grant tenant-wide admin consent to an application.
You must be a full administrator in your Control Hub organization to set up the Entra ID Wizard App.
| 1 |
Sign in to Control Hub. |
| 2 |
Go to Organization Settings and then scroll down to Microsoft Entra ID Wizard App. |
| 3 |
Click Set up to start the configuration. |
| 4 |
(Optional) For Webex for Government administrators, select either Entra Worldwide or Entra GCC High and click Proceed.
Entra Worldwide sends the Wizard to the Entra AD for both GCC Moderate and Commercial. Entra GCC High sends the Wizard to the Entra AD for GCC High.
|
| 5 |
Authenticate your Entra ID admin account. If you are not a global or privileged-role administrator in Entra ID, you can request access to grant permission to the Entra ID Wizard App. If you have full administrator privileges in Entra ID, you can review and grant access to requests by going to . Under Activity, select Admin consent requests and click on Cisco Webex Identity Integration and select Review permissions and accept. This process grants general authentication to the Webex application. Finally, click on the All (preview) tab, select Cisco Webex Identity Integration and click Review Application. Under , click on Grant admin consent for Cisco to grant all the necessary permissions to enable Entra ID in Control Hub. See Microsoft support for more information on this process. |
| 6 |
Review the permissions and click Accept to grant the account authorization to access your Entra ID tenant. Cisco Webex Identity Integration is an Entra ID enterprise application in Entra ID. The Wizard App connects to this application to access Entra ID graph APIs. The permissions required to access it are the minimum permissions that are needed to support and use it. |
| 7 |
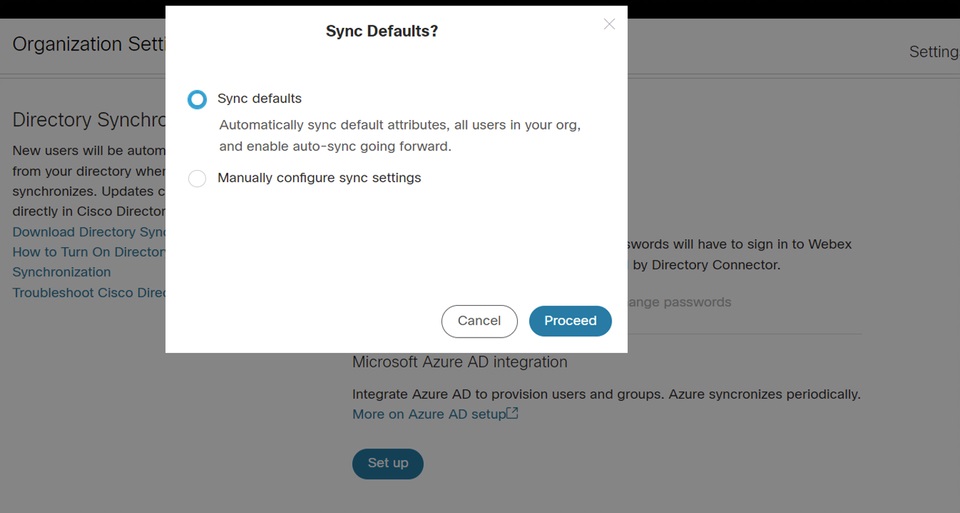
For SMB customers, accept the default settings by checking the Sync defaults check box and clicking Proceed. For enterprise customers, go to the next step and continue the configuration. If you accept the default settings, it means that you want to:
 |
| 8 |
For Enterprise customers (more than 1000 users), or the customers who want to configure the settings manually, click the Attributes tab, and map the attributes. Click Save. You can map other user attributes from Entra ID to Webex, or change existing user attribute mappings using the Attributes page. You can customize the mapping by ensuring that you configure it correctly. The value that you map as the username is important. Webex uses the user's email address as their username. By default, the userPrincipalName (UPN) in Entra ID maps to the email address (username) in Control Hub. You can’t edit the mapping during the first setup. At that point, the corresponding instance isn’t built completely and there’s no instance of the customized mapping attribute. However, you can click Edit to change it when the setup completes. |
| 9 |
Add users to the synchronization scope by clicking the Users tab. You can input the username to search and add the user in the synchronization scope. You can also remove a user from the sync scope by clicking the right side Recycle Bin icon. Click Save. If you want to select all users from Entra ID, select Select all users. If you select it, you don't need to select groups in the scope as this option synchronizes the groups at the same time. 
We don’t recommend using Select all users for significant enterprise customers with hundreds of thousands of users, as the initialization process requires a long time. If you accidentally synchronize a lot of users in Control Hub, it also takes longer to delete these users. Click Save. |
| 10 |
On the Groups tab, you can search for individual groups and add them to Webex.
|
| 11 |
(Optional) On the More tab, you have the option to configure some advanced synchronization options:
|
| 12 |
You can decide if you want to allow synchronization to take place immediately or at a later stage. If you select the Allow now option, it applies all settings to the upcoming synchronization. If you select the Save and allow later option, synchronization doesn’t start until you allow auto-sync. 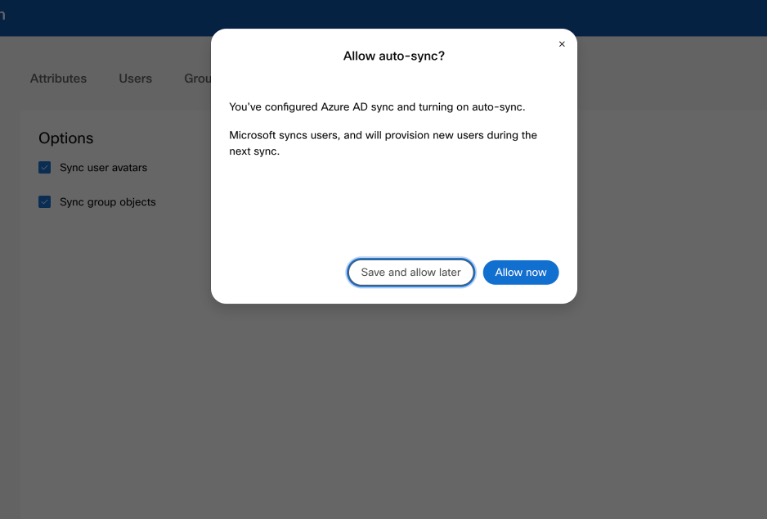
|
| 13 |
The application communicates with Entra ID to set up the configuration and schedules the synchronization. 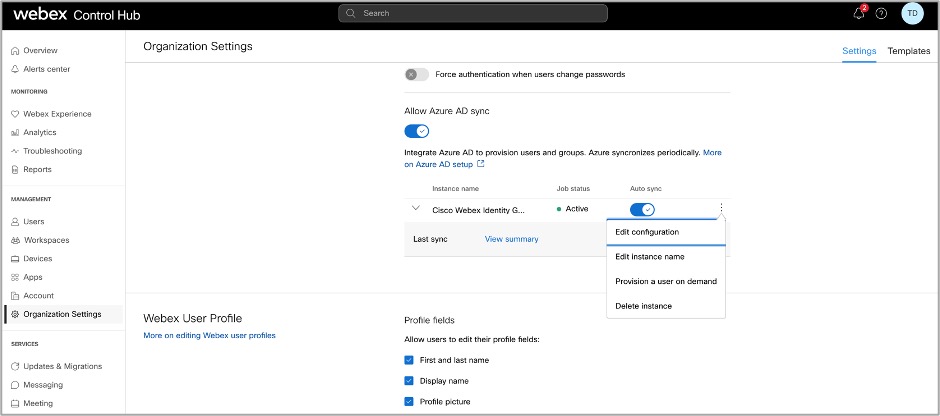
|
- Active: the synchronization was successful.
- Quarantine: the synchronization job was quarantined in Entra ID after multiple failures. See the Entra ID documentation for more information.
- NotRun: this status appears only after first setup. The service has not yet run after first setup.
You can also click View summary to see additional information such as the time and date of the last synchronization, and the number of users synced, skipped, or failed:
Users
- Synced: shows the number of users who are successfully synced to Webex.
- Skipped: shows the number of users that were skipped in the last synchronization. For example, new users in Entra ID that were not added to the Entra ID Wizard App sync scope. These users were not synced to Webex; add them in the sync scope to sync them to Webex.
- Failed: shows the number of users that failed to sync. Check the Entra ID application provision audit log for more information about why these users failed to sync. If you need to sync these users immediately, you can provision users on demand.
Groups
- Synced: shows the number of groups that are successfully synced to Webex and created in Control Hub.
- To Be Synced: this status indicates that all of the users in a group have not yet been added. The users must first be successfully synced to Webex.
Migrate existing Cisco Webex Enterprise App configurations to Entra ID Wizard App
If you already have set up a Cisco Webex Enterprise App in Entra ID, you can migrate all of your configurations over to the Entra ID Wizard App automatically. You can manage Entra ID all in Control Hub without losing any of your previous configurations.
| 1 |
Sign in to Control Hub with a full customer administrator account. |
| 2 |
Go to Organization Settings and then scroll down to the Microsoft Entra ID Wizard App section. |
| 3 |
Click Set up to start the configuration. |
| 4 |
Authenticate the Entra ID admin account with the Entra ID configuration. Ensure that you use an account that has the permissions described in the next step. |
| 5 |
Review the permissions and click Accept to grant the account authorization to access your Entra ID tenant. Cisco Webex Identity Synchronization is an Entra ID enterprise application in Entra ID. The Wizard App connects to this application to access Entra ID graph APIs. The permissions required to access it are the minimum permissions needed to support and use it. |
| 6 |
Select Migrate existing app. |
| 7 |
After accepting additional read-only permission requests, select the existing app that you want to migrate over to the Wizard App, and then select Proceed. If the selected existing app doesn't provision users to the same Control Hub, the migration will fail. |
| 8 |
After the migration completes, we recommend that you perform a dry run before enabling auto-sync to make sure there aren't any errors. |
Perform a dry run
Before enabling auto-sync, we recommend that you perform a dry run first to make sure that there aren't any errors. Once the dry run completes, you can download a dry-run report to see detailed information. The available columns in the report are:
| Column name | Description |
|---|---|
| Object Type | Type of object in Entra ID, such as user or group. |
| Action Type | Type of action that will be performed to the object during a synchronization. Possible action types are:
|
| Entra ID | ID of the object in Entra ID. |
| Entra Name | Name of the object in Entra ID. |
| Webex Name | Name of the object in Webex. |
| Reason | Reason for why an action type will occur during a synchronization. |
| 1 |
Sign in to Control Hub with a full administrator account. |
| 2 |
Go to Organization Settings and then scroll down to the Directory Synchronization section. |
| 3 |
Click on the three vertical dots next to the instance you want to sync, and then select Dry-run. |
| 4 |
Once the dry run completes, click on Download summary to download the report as a CSV file. |
Disable Entra ID synchronization
Pausing synchronization between Control Hub and Entra ID is simple and doesn't affect your existing configuration. You can resume synchronization at any time.
When synchronization is disabled, users and groups that were previously synchronized become manageable directly within Control Hub, just like manually added users or groups. If you reenable synchronization, these users and groups are resynchronized, and any changes you made while synchronization was paused are overwritten by Entra ID.
| 1 |
Sign in to Control Hub. |
| 2 |
Go to Organization settings and scroll down to Microsoft Entra ID Wizard App. |
| 3 |
Turn off the Entra ID synchronization toggle. |
Enable or disable auto-sync
The Entra ID Wizard App and its corresponding backend service checks if auto-sync is enabled to determine when to sync users or groups from Entra ID to Webex. Enable Auto Sync to allow the auto provision user and group synchronization. When you disable Auto Sync the Wizard App doesn't sync anything to Webex, but the existing configuration is preserved.
Typically, users are synced every 40 minutes per Microsoft policy.
You need to disable Entra ID synchronization and not just Auto Sync to make changes to synchronized users or groups.
| 1 |
Log in to Control Hub as a full customer administrator. |
| 2 |
Go to Organization Settings and then scroll down to the Directory Synchronization section. |
| 3 |
Switch the toggle to the right to enable Auto Sync. Disable it by switching the Auto Sync toggle to the left. |
Edit the Entra ID Wizard App configuration
| 1 |
Sign in to Control Hub with a full administrator account. |
| 2 |
Go to Organization Settings and then scroll down to the Directory Synchronization section. |
| 3 |
Click Edit configuration. 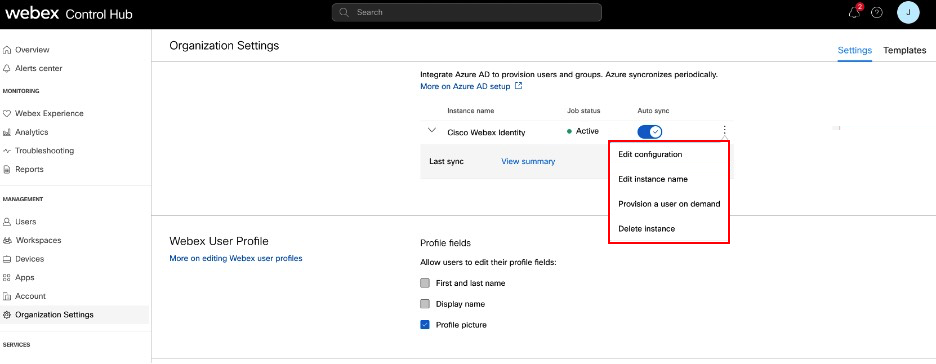
|
| 4 |
Customize the attribute mapping by selecting an attribute from the left column that originates from Entra ID. The destination attribute in Webex Cloud is in the right column. See Entra ID Wizard App attributes mapping for more information about mapping attributes. 
|
| 5 |
On the Users and Groups tabs, add or remove users and groups from the synchronization scope. Nested groups don't automatically synchronize to the cloud. Make sure to select any groups that are nested within the groups you want to synchronize. |
| 6 |
On the More tab change your preferences if required. |
| 7 |
Click Save to save the modified configuration. Your updates are applied in the next synchronization. The Entra ID automatic sync mechanism handles the synchronization of users and user's groups. |
Edit the Webex instance name
Change how the Cisco Webex Identity instance name appears in the Entra ID enterprise application list.
| 1 |
Sign in to Control Hub with a full administrator account. |
| 2 |
Go to Organization Settings and then scroll down to the Directory Synchronization section. |
| 3 |
Click Edit instance name.
|
| 4 |
Enter the new instance name and then click Save. |
Delete the Entra ID Wizard App configuration
When you delete the Entra ID Wizard App, it removes the configuration for Entra ID synchronization. Webex and Entra ID don't retain the deleted configuration. If you want to use Entra ID synchronization in the future, you need to do a full reconfiguration.
Don't delete the Cisco Webex application from within Entra ID.
If you do, you can still set up a new instance of the Entra ID Wizard App, but you must delete the instance from within Control Hub first.
| 1 |
Sign in to Control Hub with a full administrator account. |
| 2 |
Go to Organization Settings and then scroll down to the Directory Synchronization section. |
| 3 |
Click Delete instance. |
| 4 |
In the Delete Entra ID Instance? page, select Revoke Entra ID admin consent if you want to remove the consent agreement from Webex. When you select this option, you must enter your credentials and grant the permissions again. |
| 5 |
Click Delete. |
Provision a user to Webex on-demand
You can provision a user to Webex immediately, independently of an Entra ID synchronization, and instantly check the result. This helps when troubleshooting problems during setup.
| 1 |
Sign in to Control Hub with a full administrator account. |
| 2 |
Go to Organization Settings and scroll down to the Directory Synchronization section. |
| 3 |
Click Provision a user on demand.
|
| 4 |
Search for and select the user you want to provision, and click Provision. |
| 5 |
One of following results appear when it completes:
|
| 6 |
Click Re-try to provision the same user again, if it skipped or failed. |
| 7 |
Click Provision another user to return to the provisioning page. |
| 8 |
Click Done when you are finished. |
Import Entra ID verified domains to Control Hub
The customers may have hundreds of domains verified in Entra ID. While they integrate with Control hub, if they want to import the verified domains from Entra ID to Control Hub. This can save many efforts in the maintenance or setup process.
| 1 |
Go to the Domain secion in the Organization Settings tab in Control Hub. |
| 2 |
Click Add with Entra ID. 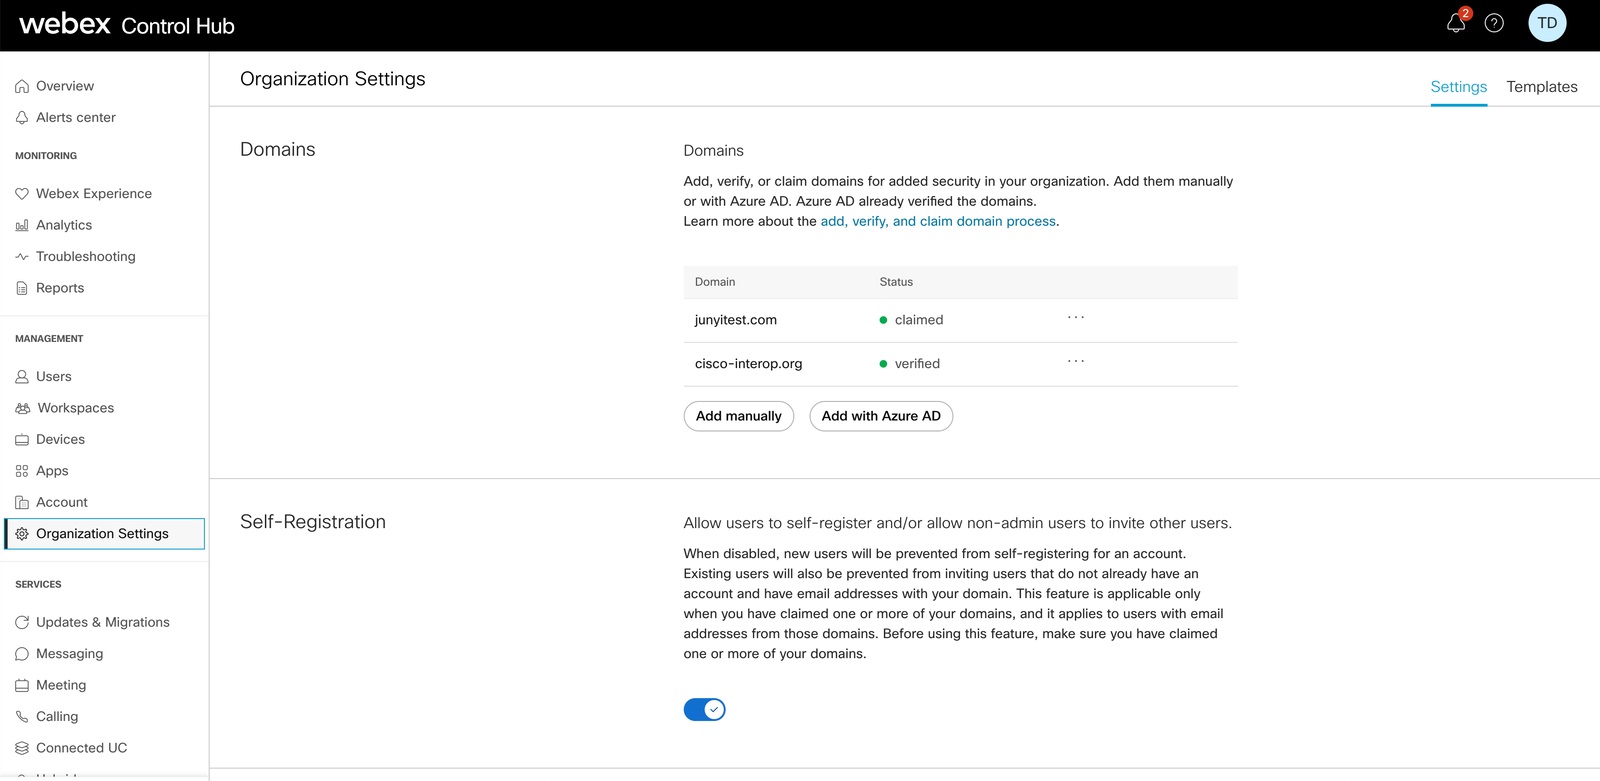
|
| 3 |
In the Add verified domains page, search and select the domains to add. |
| 4 |
Click Add. The verfied domains will appear in the verified domain list.
|
Entra ID Wizard App attributes mapping
The Entra ID Wizard App can support and synchronize any changes you make to your attribute expressions. For example, in Entra ID, you can map the displayName so that it displays both the surname and givenName attributes. These changes appear in the Wizard App.
You can find more information on mapping attribute expressions in Entra ID on the Microsoft help site.
Use the following table for information on specific Entra ID attributes.
Entra ID doesn't synchronize null values. If you set an attribute value to null in Entra ID, it isn't deleted or patched with a null value in Webex. See the limitations on the Microsoft help site for more information.
|
Entra ID Attribute (source) |
Webex User Attribute (target) | Description |
|---|---|---|
|
Attributes Populated by Default |
||
|
userPrincipalName |
userName |
It’s the unique ID of the user in Webex. It is an email formatted. |
|
displayName |
displayName |
User's name that displays on the Webex application. |
|
surname |
name.familyName |
|
|
givenName |
name.givenName |
|
|
objectId |
externalId |
It is the user's UID in Entra ID. Generally, it is a 16-Bytes string. We do not recommend that you change this mapping. |
|
Additional Available Attributes |
||
|
jobTitle |
title |
|
|
usageLocation |
addresses[type eq "work"].country |
We recommend using Usagelocation mapping to addresses [type eq "work"].country. If you choose another attribute, you should ensure the attribute values are in compliance with the standards. For example, USA should be US. China should be CN, and so on. |
|
city |
addresses[type eq "work"].locality |
|
|
streetAddress |
addresses[type eq "work"].streetAddress |
|
|
state |
addresses[type eq "work"].region |
|
|
postalCode |
addresses[type eq "work"].postalCode |
|
|
telephoneNumber |
phoneNumbers[type eq "work"].value |
|
|
mobile |
phoneNumbers[type eq "mobile"].value |
|
|
facsimileTelephoneNumber |
phoneNumbers[type eq "fax"].value |
|
|
manager |
manager |
Syncs manager information of users to Webex so that users can always see the correct manager information on a user's contact card. When a user is created, Entra ID checks if the user's manager object is in Webex Identity or not. If no, the user's manager attribute is ignored. If there is a manager attribute, two conditions must be met for the attribute to show on the user's contact card:
These conditions check the update to the user's manager attribute when a user's authentication token is expired. Manager attribute changes won't be reflected on the user's contact card until after the user signs in for the first time after the change. |
FAQ
How can I migrate to Entra ID Wizard App from Cisco Directory Connector provision?
During setup, the Wizard App detects whether your organization uses Directory Connector. If it is enabled, a dialog box where you can choose to use Entra ID and block Directory Connector. Click Block to confirm that you want to continue the Entra ID Wizard App configuration.
You can also choose to disable Directory Connector before configuring the Wizard App. After configuration, the Wizard App manages user profiles. However, the Wizard App only manages the users who were added to the synchronization scope; you cannot use the Wizard App to manage users synced by Directory Connector that were not part of the synchronization scope.
Can I configure single sign-on with Microsoft Entra?
You can configure a single sign-on (SSO) integration between a Control Hub customer organization and a deployment that uses Microsoft Entra ID as an identity provider.
When does the user avatar update in Webex?
The user avatars are synced to Webex when the user is created in Webex Identity. This update relies on the user's avatar being updated in Entra ID. The Wizard App then retrieves the new avatar from Entra ID. The user contact card updates when the user signs in for the first time after the change.
Why does a user not appear in a group in Control Hub immediately after synchronizing, and how can this be resolved?
User and group synchronizations are independent processes. While user synchronizations can occur separately, group synchronizations automatically take place every 12 hours. If a user is synchronized via a group but does not immediately appear in the group in Control Hub, this is still expected behavior. If a user appears only in the main user list but not in the group, no further action is required. Simply wait for the next group synchronization cycle to complete.
When a user is marked as inactive in Entra ID, what happens to that user in my Webex organization?
Users marked Inactive in Entra ID are also given that designation in Control Hub. Inactive users are skipped in synchronizations and won't be modified in any future changes in Control Hub. However, inactive users will continue to appear in your Control Hub organization until you directly remove them.


