- Home
- /
- Article

Thanks for your feedback.

Webex Whiteboards
 In this article
 Feedback?
Digital team collaboration has never been easier than with Webex Whiteboards. Store all your whiteboards in one place. Find the one you want quickly and share it in a call, or create a new one on the spot. Brainstorm and create with anyone, anywhere.
With Webex Whiteboards, you keep all your whiteboards — whiteboards you created yourself and whiteboards others have created and shared with you — in one place. You don't have to scroll through a list of Webex spaces and check the Content tab, looking for a whiteboard you've lost track of. In the Webex Whiteboards app, you can search for, select, and share any board to which you have access. You can also create new ones and share them instantly to start collaborating.
Get started
-
Go to whiteboard.webex.com.
-
Click Login.
-
Enter your credentials and click Sign In. All the whiteboards belonging to you or shared with you by others will appear. They're ordered by the last modified date and time.
-
When you're finished working, click your profile picture and select Log out to leave.
-
To find a particular whiteboard, type a keyword in the Search bar.
-
Click
 to view your whiteboards as icons or in a list.
 - Click the three dots on any listed whiteboard and you'll get a menu with options to Open, Rename, or Delete that whiteboard.
-
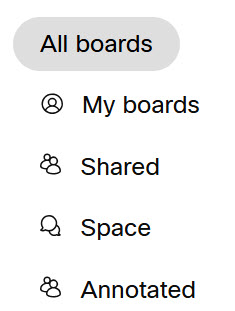
Click a filter to see all (available) whiteboards, your own private whiteboards, whiteboards others have shared with you, or whiteboards from your own Webex spaces:
Whiteboard basics
When you sign in to Webex Whiteboards, you can open and work on any whiteboard you see. You can also create new whiteboards or delete an existing one. To open a whiteboard, just click anywhere on it.
-
To create a new whiteboard, click
 .
.You'll get a new blank whiteboard which you can work on in the app, and manage a list of other users who can access it. You can also share the board into meetings and the participants will be able to work on it too, if the client or device they join the meeting from has whiteboarding capabilities.
- When you're finished working on your whiteboard, click the Back arrow to return to the main window. You'll see your new board in the list.
-
To name your whiteboard, click on the default title - the timestamp - either in the whiteboard itself or in the whiteboard list. You can name (or rename) any whiteboard that you created, or that someone else created here and shared with you. Whiteboards created in Webex spaces automatically take the name of the space and you can't change it.
-
To permanently delete a whiteboard, click the three dots in the board's upper right corner (or next to the board in list view) and select Delete. This removes the whiteboard from the list and also deletes it completely.
Create and collaborate
Creating content on a whiteboard is easy: select the pen tool and click and hold to draw with your mouse. Click the + - buttons on the bottom right to zoom in and out. If you're on a device with a trackpad or a touch screen, you can also zoom just by swiping with two fingers.
Once you've created some content on your whiteboard, you can move groups of objects around all at once. For example, you write or draw on top of a shape. When you grab and drag the shape around the whiteboard, your strokes will go with it. The same thing goes for objects on the whiteboard that overlap each other - like a couple of sticky notes. If you grab the sticky note at the back of the group and drag it, the notes on top will move with it, as long as they overlap each other by more than half.
Let's take a look at what you can do using the toolbar at the bottom of your screen:
|
Undo/Redo |
Undo/redo your last action(s). |
|
Move |
Click and hold to drag the whiteboard workspace in any direction. |
|
Selection |
Click an object — a sticky note, text area, picture, shape, or reaction — on your whiteboard to select it. Selecting an object also shows you options for moving, editing, copying, or deleting it. Click and drag across multiple objects on your board to select and move the objects as a group. When you have a group of objects selected you'll get options for moving, editing, grouping and sorting the objects. You can also select multiple text areas or stickies by pressing the Shift key and clicking on each object. |
|
Pen |
Click and hold to draw with your mouse. Click once to select the pen. Click on the button a second time to change the pen stroke or color. |
|
Magic pen |
The whiteboard can recognize basic shapes like squares, circles, triangles, rectangles, arrows, and curved lines as you draw them and will straighten edges and close small gaps in the outline for you. You find the magic pen by clicking the pen first. Then select the tool and draw a shape or draw your shape and hold the mouse button down for a second. The whiteboard detects your shape and adjusts it for you. |
|
Eraser |
Change the cursor to an eraser and rub out mistakes. |
|
|
Add emphasis to something important while you're talking about it. Click the button and draw attention to content on the board by, for example, circling or underlining it. Your marks will fade away after a couple of seconds. |
|
Shapes |
Click the button and select a ready-made shape. Click anywhere on your whiteboard to place it. A toolbar will come along with it and you can make the shape transparent, change its color, copy, or reposition it. To resize a shape, grab one of the corners and drag it. And, you can double-click inside of a shape to open the keyboard, start typing, and format your text. |
|
Text |
Select the tool and click anywhere on your whiteboard to get an editable area where you can type and format text. Click on text you've already added to edit and reformat it as you work. If you're collaborating with people on other devices, your text shows up in real time so everyone can follow as you write it. 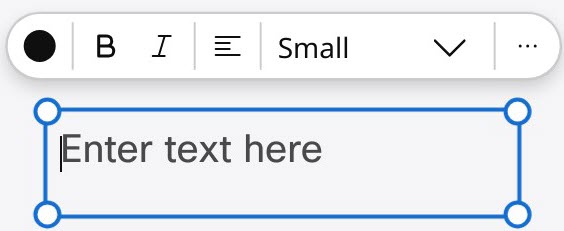
|
|
Sticky note |
Select the tool and click on the screen. You'll get a sticky note and can start typing on it or choose a different color. Double-click any note already on the whiteboard to edit the text. Click once on a note to change the color, copy, or delete it. Click on a note and hold the mouse button down to move the note around the whiteboard. 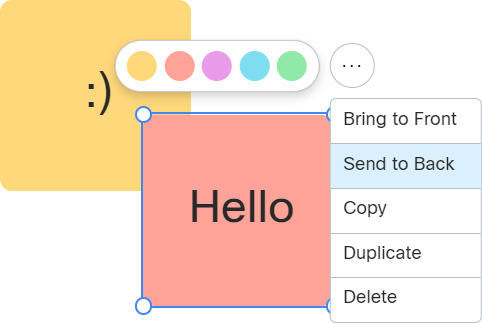
|
|
Images |
Click the button to browse to and select, or drag and drop an image onto the whiteboard. Like other objects on your canvas, you can move images around, draw over them, copy, and so on. Supported formats: JPEG, PNG, AVIF, BMP, GIF, ICO, SVG, and WEBP. |
|
Emojis |
Click the button to select an emoji. Click the whiteboard to place it. |
To send your ideas to other people who don't have access to Webex Whiteboards, click the three dots in the top right corner and select Export to PDF.
Sharing is easy within your organization. Simply click Share and add a list of coworkers who you want to access the board.
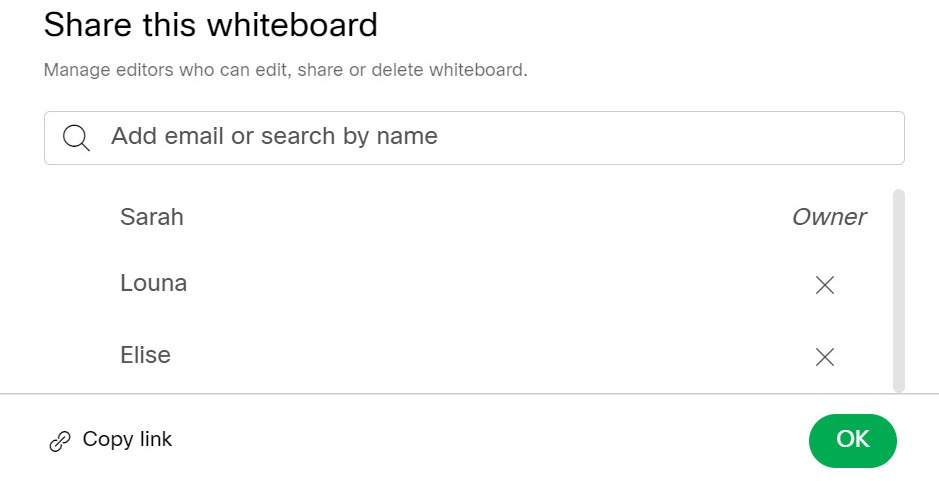
Names you add are automatically allowed to see, edit, share, and delete your board. If you toggle Enabled OFF, that person will be removed from the list. To let each person you've added know they've got access, copy the link to the board and send it to them.
And if you're already in a meeting, you'll see a Share button on the top right corner of your open whiteboard. Click it to share the whiteboard directly into your call.
Learn more
Working on a whiteboard in the web app is a little different than regular whiteboarding on your Webex device.
For more about working with whiteboards on a Webex device, see Use the whiteboard on Board and Desk Series.


