Si vous ne vous souvenez pas exactement de la date d’ouverture de votre compte gratuit, connectez-vous à votre compte et vérifiez l’URL du site dans la barre du navigateur. S’il s’agit d’une URL de quatre parties et qui ressemble à [name]. mon. WebEx. com, suivez les étapes contenues dans cet article.
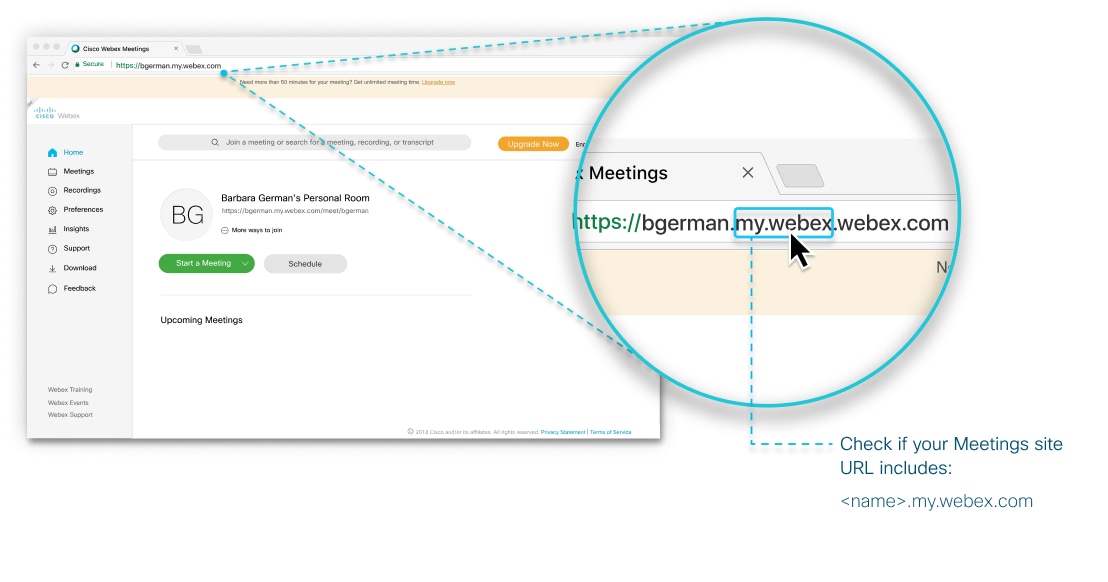
Si l’URL de votre site de réunions comporte trois parties et contient le mot meetingsgamer, meetingsapec, ou meetingsemea, cet article ne s’applique pas ; suivez les étapes dans passer à un abonnement WebEx payant (pour les comptes gratuits créés après le 17 mars 2020) à la place.
Pour passer à un forfait payant:
| 1 | Connectez-vous à votre site de réunions. |
| 2 | Dans le coin supérieur droit de la page d’accueil, cliquez sur acheter un abonnement Premium. |
| 3 | Sur la page des tarifs, choisissez le plan que vous souhaitez et cliquez sur acheter maintenant. |
| 4 | Personnalisez votre abonnement :
-
décidez du nombre de licences d’organisateur dont vous avez besoin.
Vous avez besoin d’une licence pour chaque utilisateur pour programmer ou démarrer des réunions. Cela inclut toute personne qui sera un organisateur suppléant. Les invités et les participants n’ont pas besoin de licence ou de compte Webex pour rejoindre une réunion. Si vous ne savez pas encore combien de licences vous avez besoin, aucun problème. Vous pourrez toujours en ajouter d’autres plus tard.
-
Décidez de la manière dont vous souhaitez être facturé, annuellement ou mensuellement.
Avec un abonnement annuel, vous payez une année entière à l’avance. Cette solution est généralement moins coûteuse que le paiement au mois, mais vous pouvez décider de ce qui fonctionne le mieux.
-
Si vous souhaitez offrir aux participants la possibilité de recevoir un appel téléphonique au début d’une réunion afin d’éviter d’éventuels frais d’appel, vous pouvez ajouter un module complémentaire Call Me pour les appels nationaux (si vous n’avez besoin d’un appel gratuit qu’aux États-Unis et au Canada) ou internationaux (si vous avez besoin d’un appel gratuit dans plus de 70 pays, dont les États-Unis et le Canada).
|
| 5 | Cliquez sur procéder au paiement. |
| 6 | Saisissez l’adresse électronique que vous avez utilisée avec votre compte gratuit. |
| 7 | Cliquez sur Continuer pour terminer la mise à jour vers un abonnement payant. |

 Un commentaire ?


