- 홈
- /
- 문서

피드백을 보내 주셔서 감사합니다.

 이 문서에서
 피드백이 있습니까?
조직 내 모든 사용자의 기본 통화 옵션으로 Cisco Call을 설치하십시오.
이 문서를 참조하여 Microsoft Teams 앱을 Cisco 통화 옵션과 연동하도록 구성하십시오. ![]() 아이콘이 왼쪽 탐색 메뉴와 메시지 확장 프로그램에 추가되었습니다. Teams 통화 옵션이 꺼진 경우, 조직에 있는 모든 사람은 동일한 플랫폼을 사용하여 전화를 걸고 받을 수 있습니다.
아이콘이 왼쪽 탐색 메뉴와 메시지 확장 프로그램에 추가되었습니다. Teams 통화 옵션이 꺼진 경우, 조직에 있는 모든 사람은 동일한 플랫폼을 사용하여 전화를 걸고 받을 수 있습니다.
전제 조건
-
Microsoft Teams 관리자인지 확인하세요.
-
컨트롤 허브에 접속할 수 있는지 확인하십시오.
-
사용자가 Control Hub에 라이선스를 할당받았고 통화를 위해 Cisco Unified Communications Manager 또는 Webex Calling에 등록되었는지 확인하십시오.
-
사용자는 Webex 앱과 Microsoft Teams를 설치해야 합니다.
-
Cisco Call for Microsoft Teams 통합이 Unified CM 통화 제어 백엔드(온프레미스, Webex Calling 전용 인스턴스 또는 UCM 클라우드)와 연동되려면 Unified CM 12.5 SU7 또는 14 SU3, Cisco Unity Connection(CUC) 12.5 또는 14 버전을 사용하고 있는지 확인하십시오.
-
온프레미스 Unified CM 고객의 경우 Unified CM을 확인하십시오. & CUC 클러스터가 Webex 클라우드 연결 UC(CCUC)에 온보딩됩니다.
-
사용자는 온-프레미스 Active Directory 또는 Azure와 같은 클라우드 AD에서 Control Hub 공통 ID(CI)로 동기화되어야 합니다.
-
온프레미스, Webex Calling Dedicated Instance 및 UCM Cloud 고객의 경우 Cisco Unified CM 구성—중앙화된 통화 기록에 사용자 이름이 표시되도록 하려면 Cisco Unified CM의 회선 번호를 사용자 ID와 연결해야 합니다. Cisco Unified CM 관리에서장치→전화를 사용하여 전화를 선택하고장치 이름(회선)을 클릭한 다음연결패널에서 필요한 회선을 클릭하여회선과 연결된 사용자에 액세스합니다.
-
Unified CM 메일 ID 가 UUID(범용 고유 식별자)를 얻는 데 사용되는 Control Hub 기본 이메일 과 일치하는지 확인하십시오.
-
가상 데스크톱 인프라(VDI): VDI 환경에서 Cisco Call과 Microsoft Teams 통합을 사용하는 경우 Cisco Call과 Microsoft Teams는 모두 동일한 가상 머신에서 실행되어야 합니다.
Microsoft Teams 구성
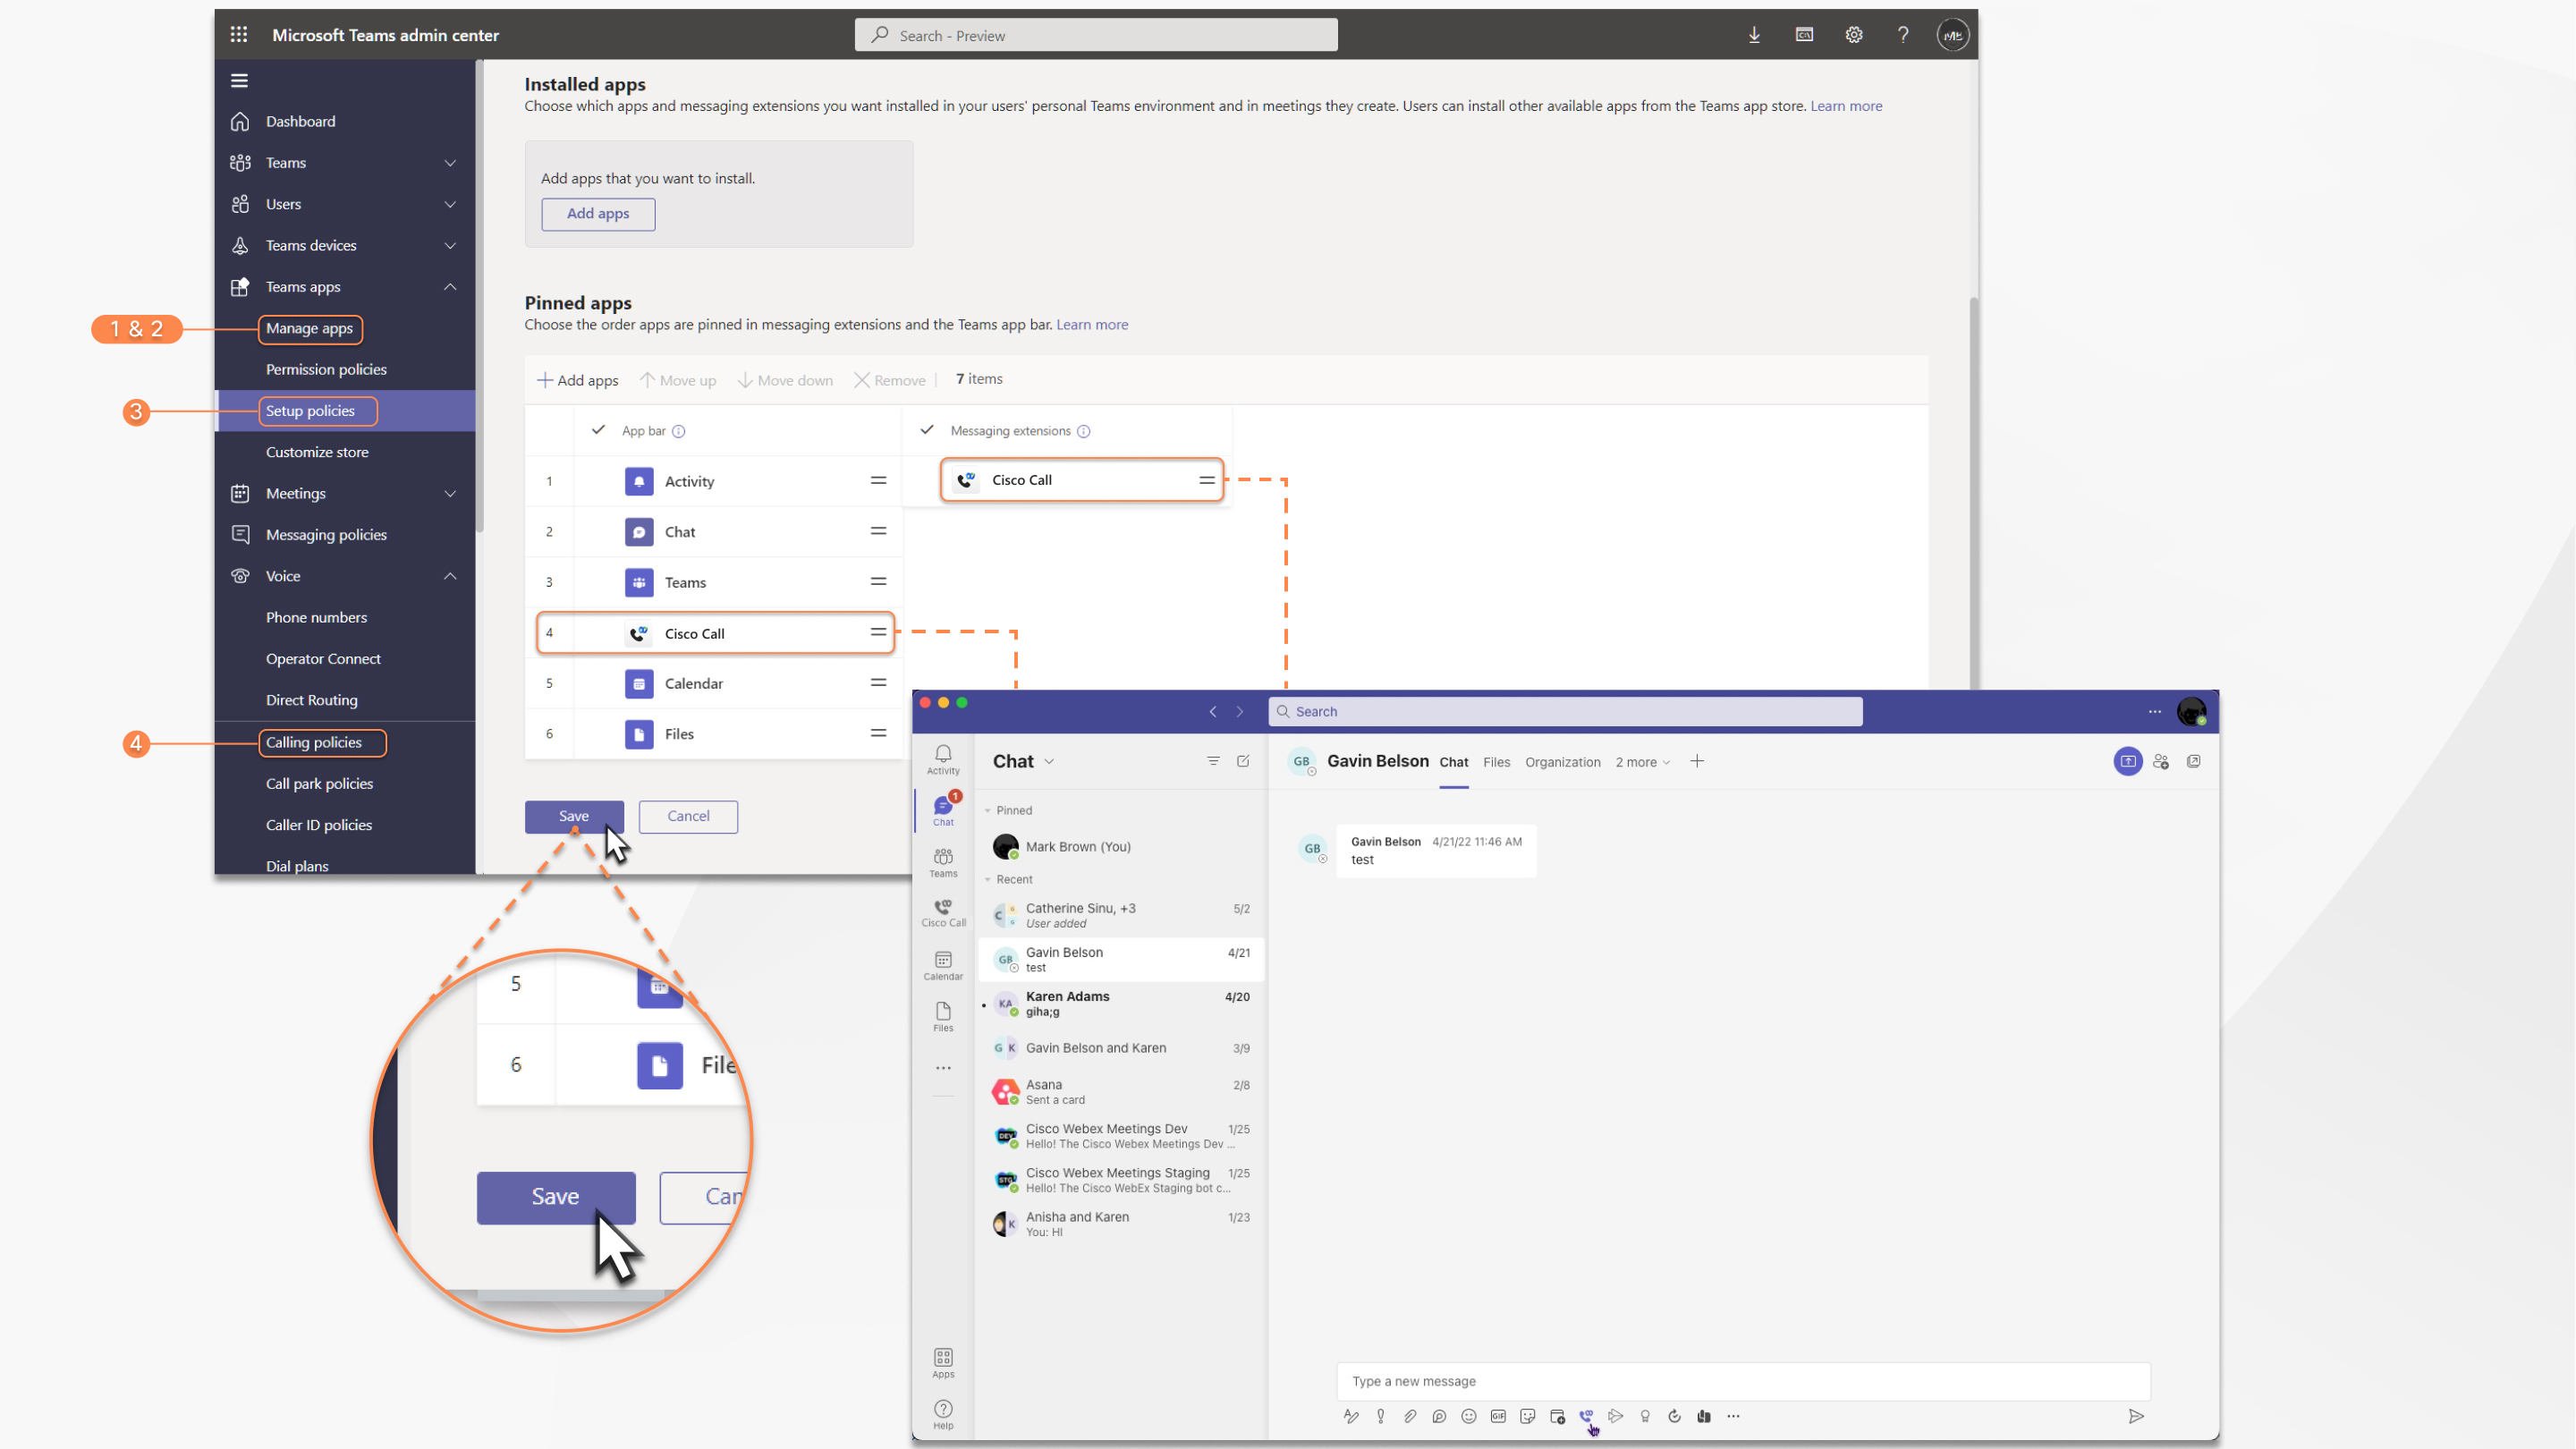
| 1 |
Teams 관리 센터 에 로그인하여 앱을 관리하고 Cisco Call을 허용하세요. |
| 2 |
Cisco Call 설치 권한을 관리하세요. |
| 3 |
Cisco Call을 설치한 다음 Webex 앱에 아이콘을 추가하고 내장 통화 옵션의 고정을 해제하세요. |
| 4 |
(선택 사항) - 조직 전체에서 내장 통화 옵션을 비활성화하고 Cisco Call만 유일한 통화 옵션으로 설정합니다.
|
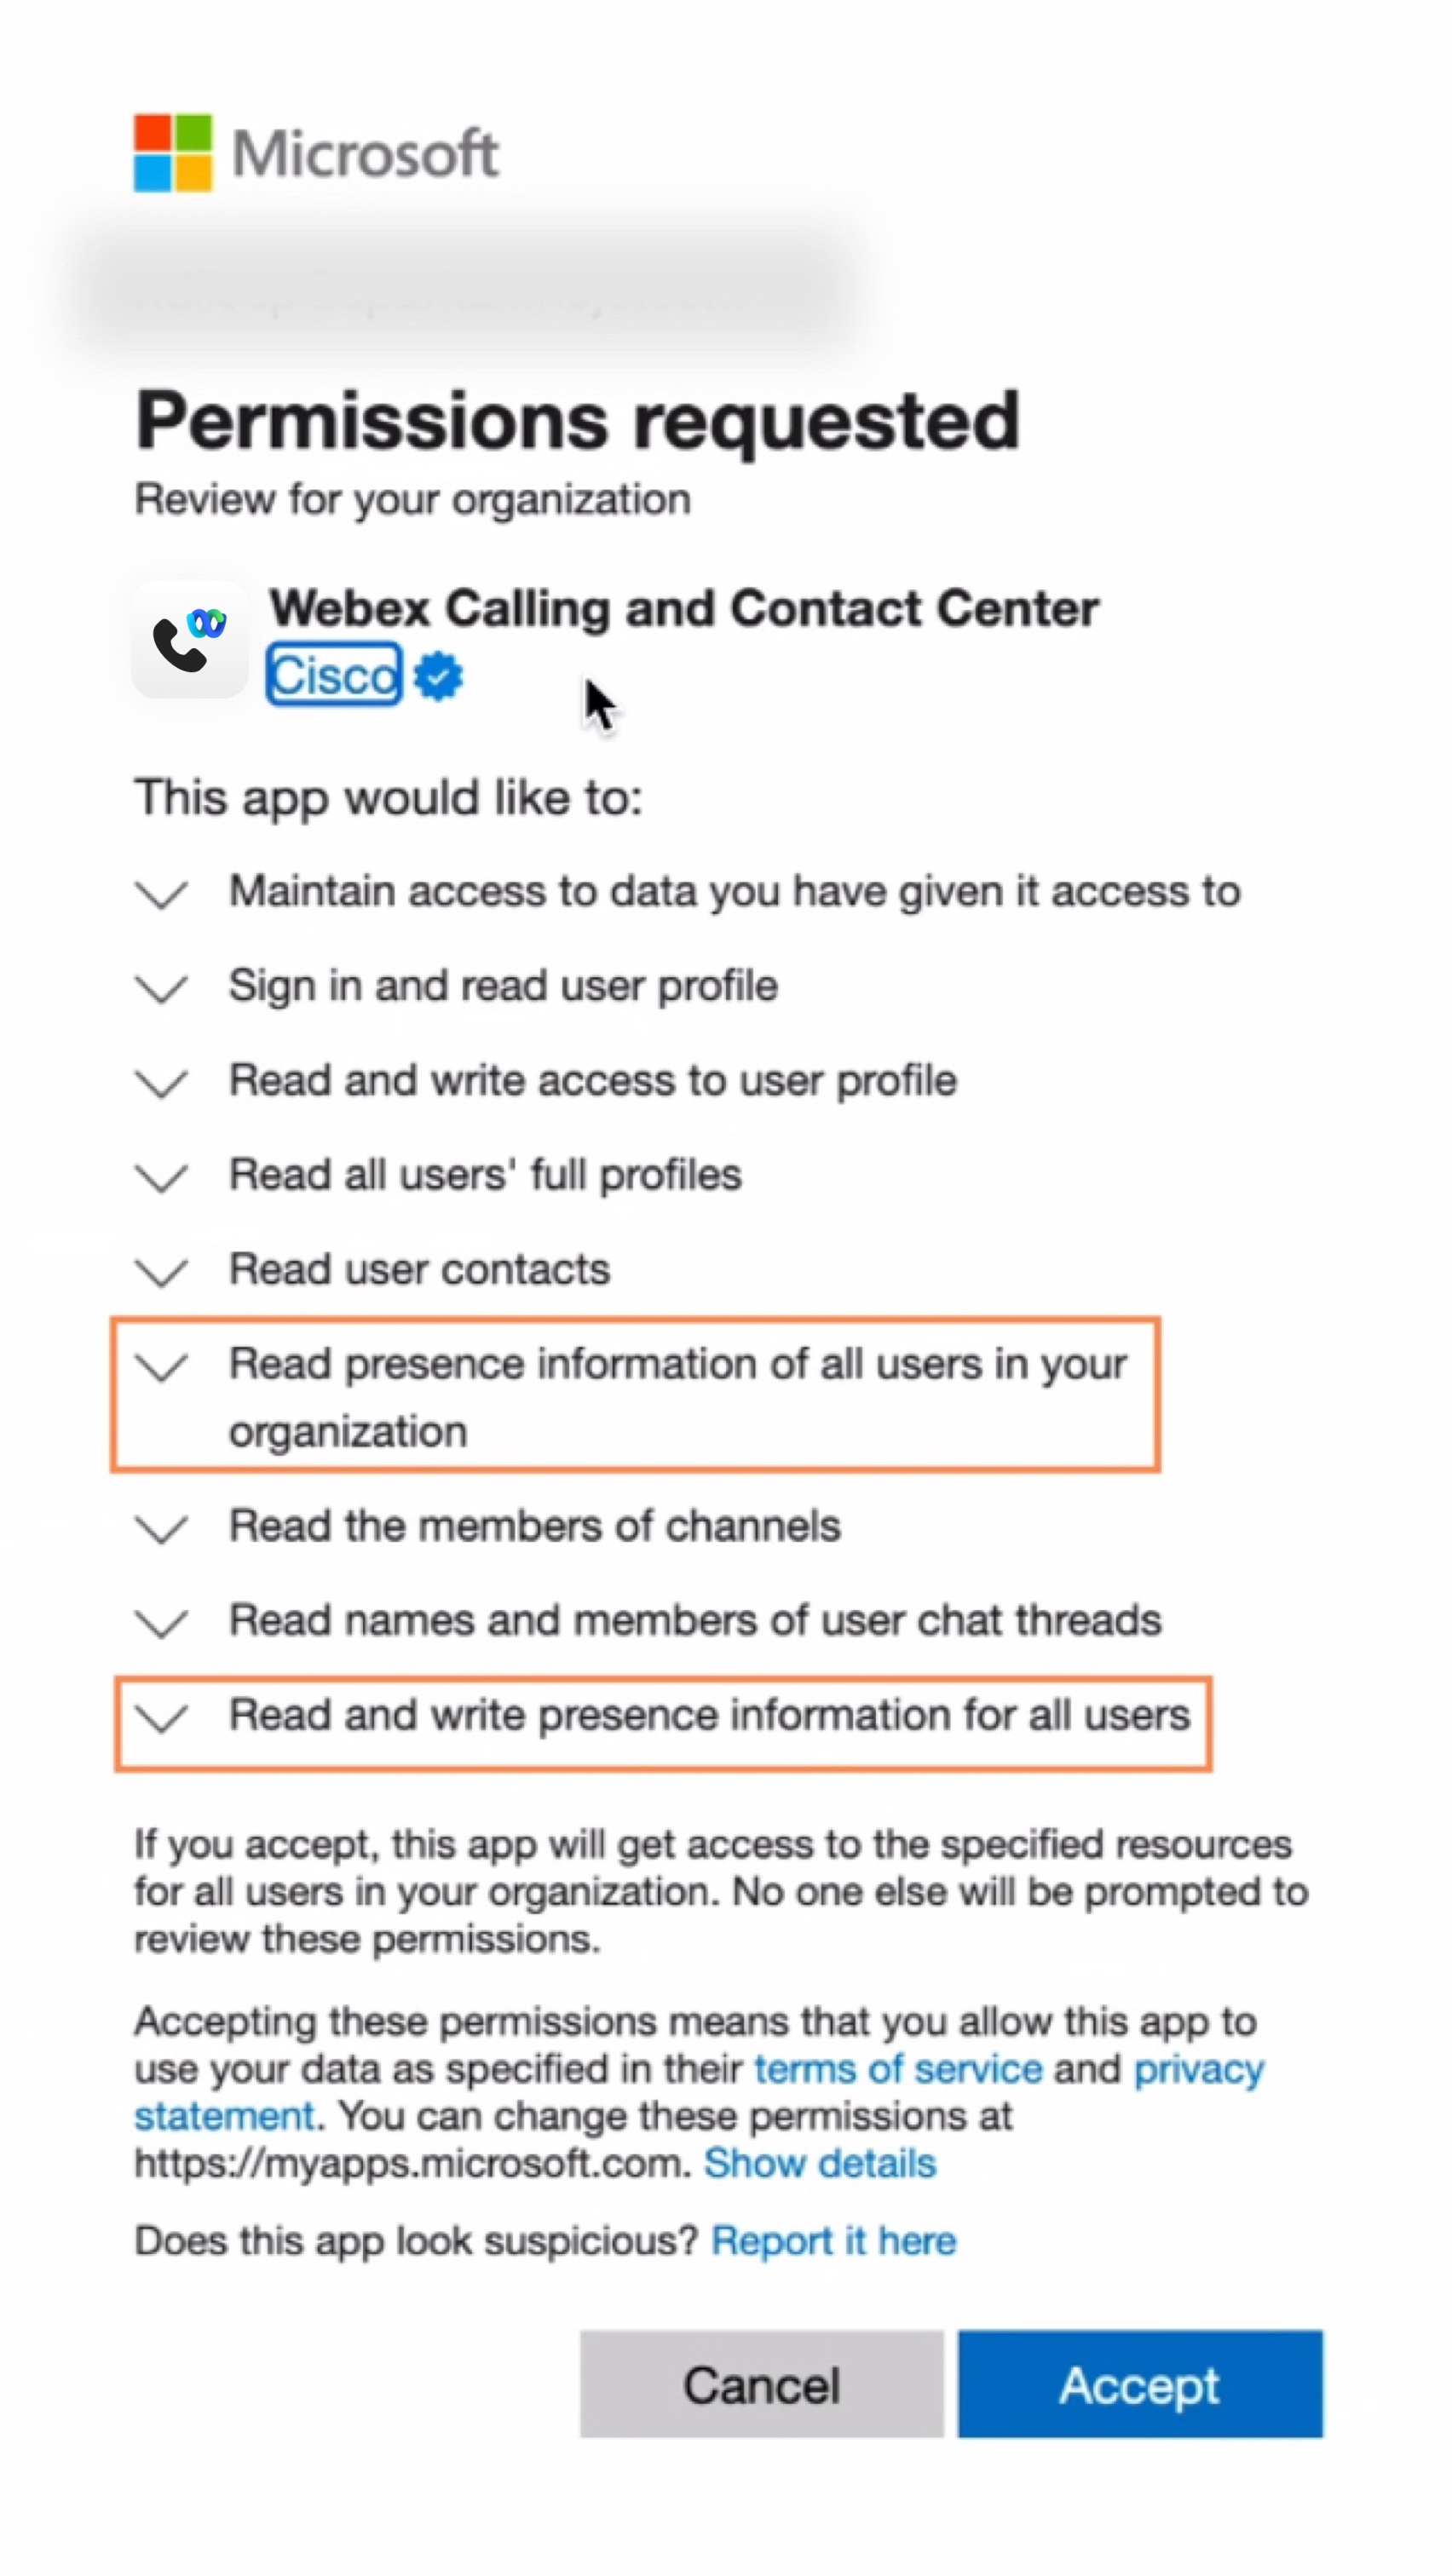
상태 동기화 권한을 수락합니다.
Microsoft Teams에서 현재 상태 동기화 권한을 검토하고 수락하여 Microsoft Teams와 Webex 간에 사용자 현재 상태를 양방향으로 동기화하십시오.
상태 동기화 기능을 유지하려면 사용자는 최소 90일에 한 번 이상 Cisco Call 통합 기능을 사용해야 합니다.
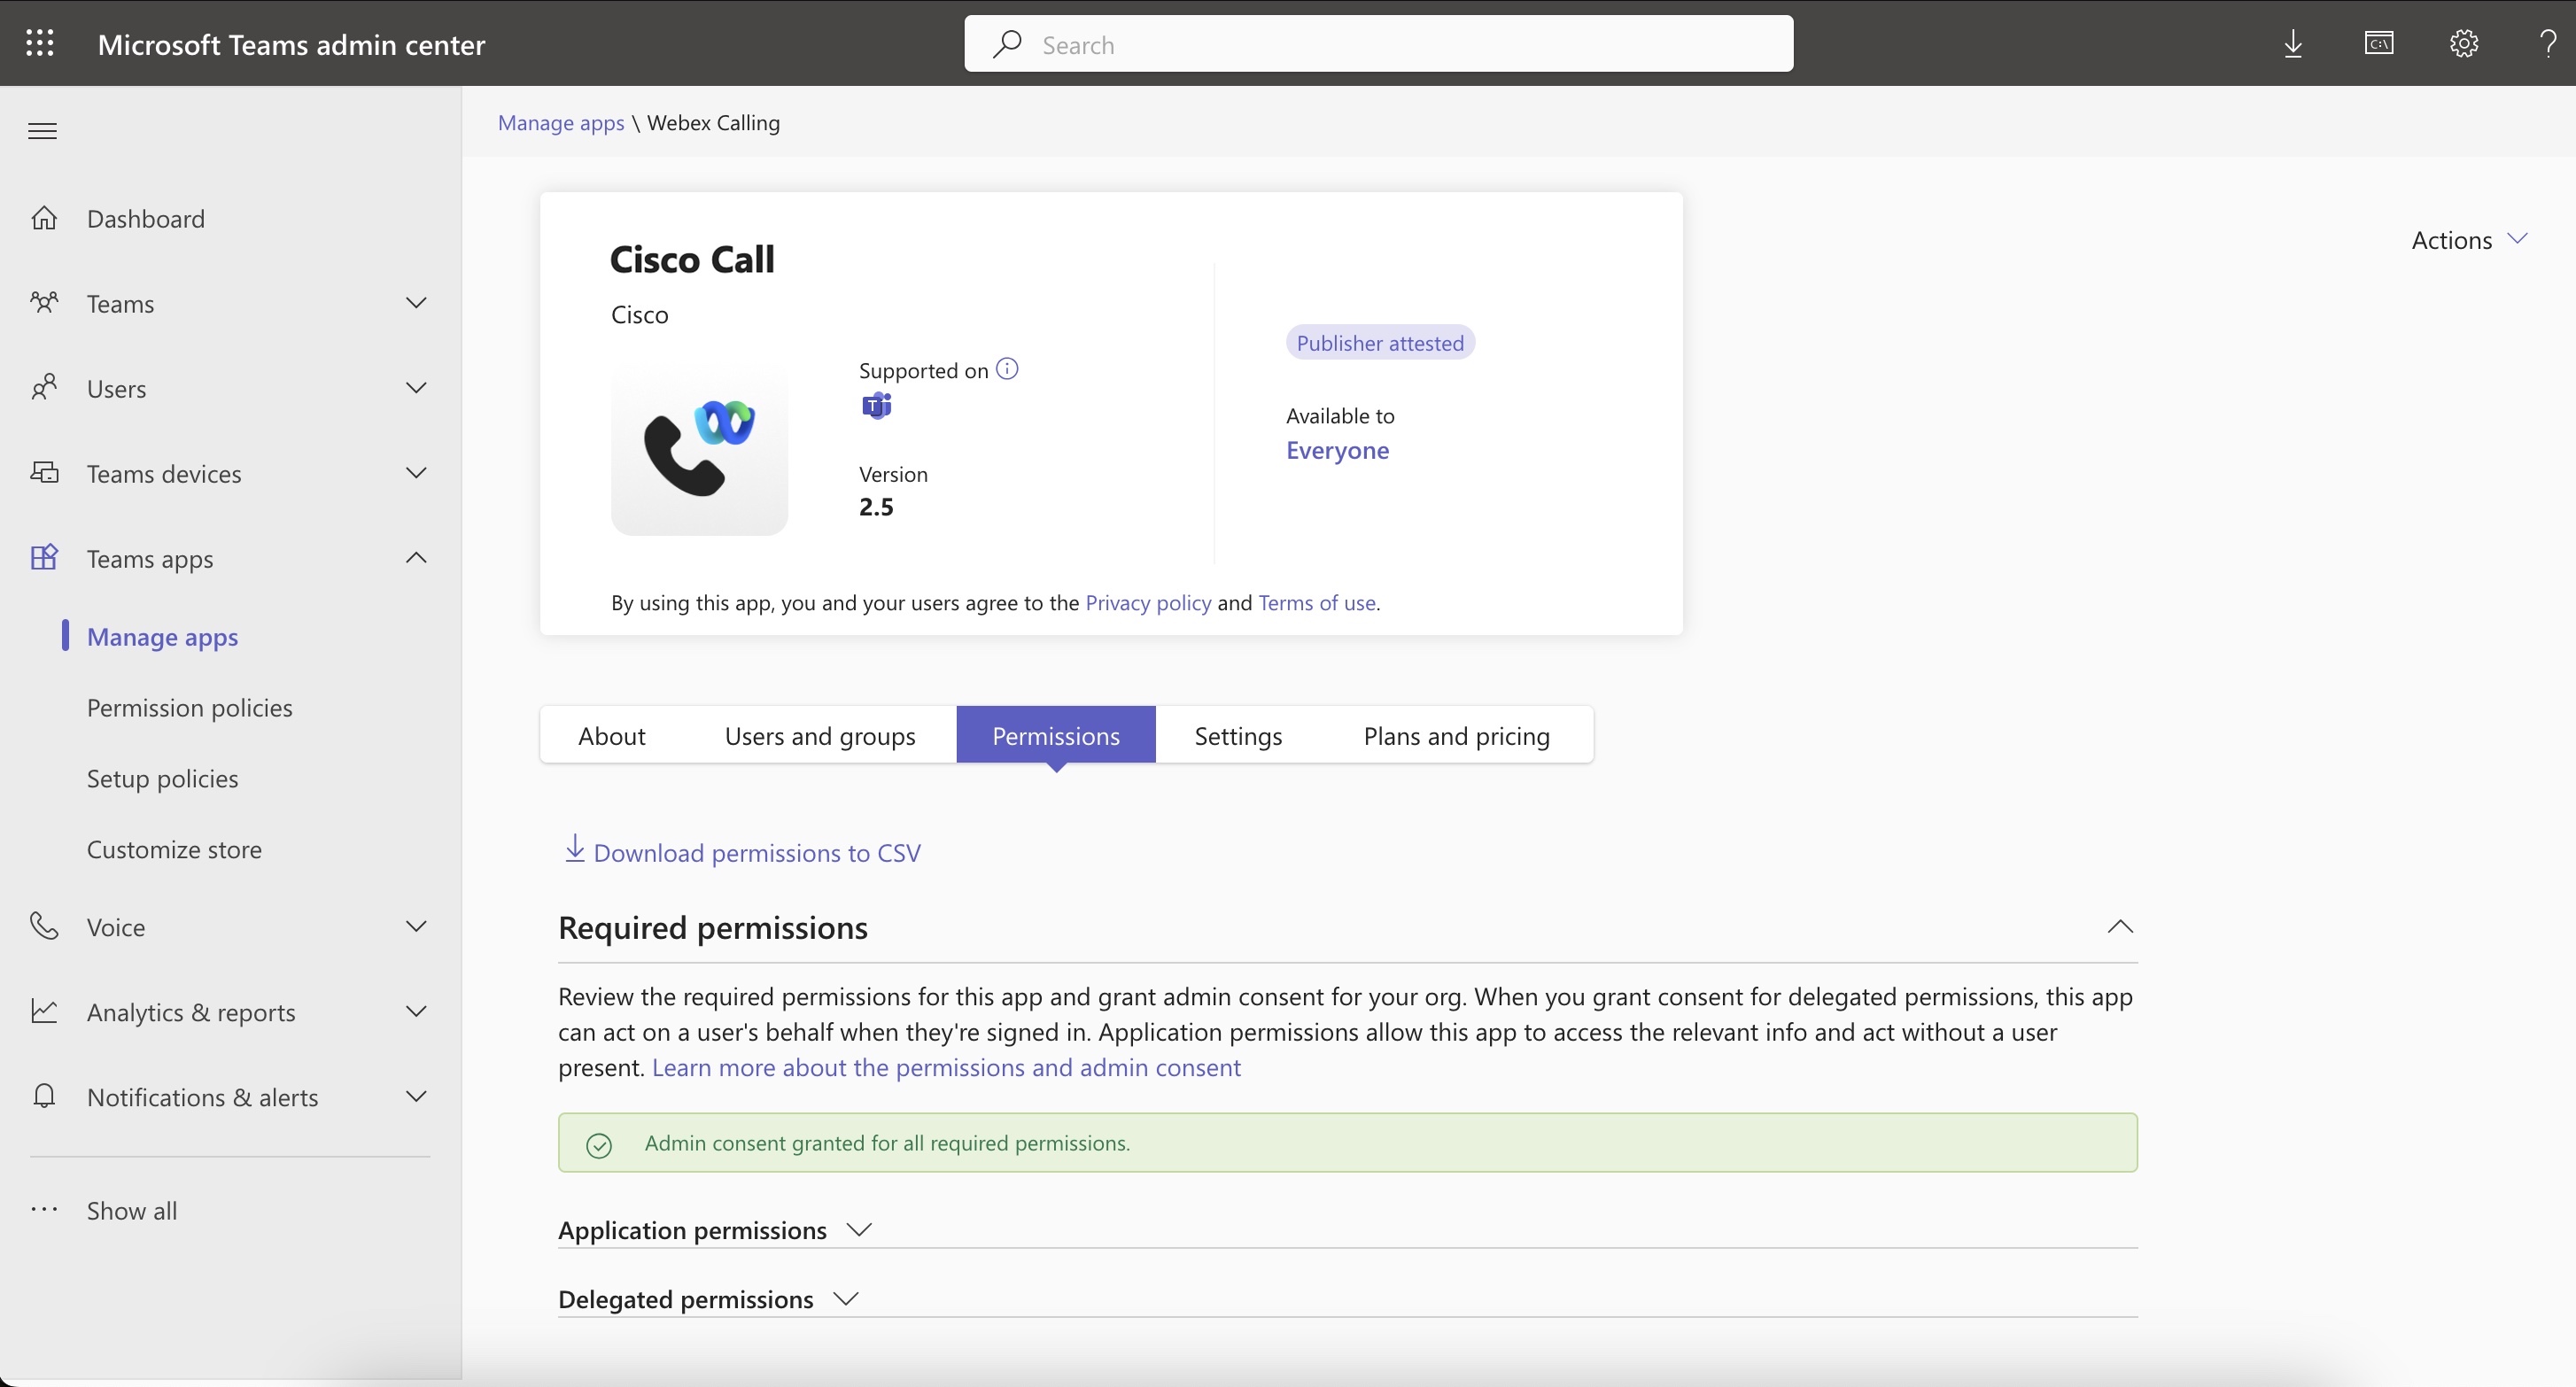
| 1 |
대시보드 메뉴에서 |
| 2 |
검색 상자에 |
| 3 |
권한 탭을 클릭한 다음 관리자 동의 부여를 클릭합니다. |
| 4 |
다음 권한이 포함되어 있는지 확인하십시오.
 |
| 5 |
권한을 수락하려면 수락 을 클릭하십시오. |
| 6 |
새로운 권한이 부여된 것으로 표시되는지 확인하십시오.
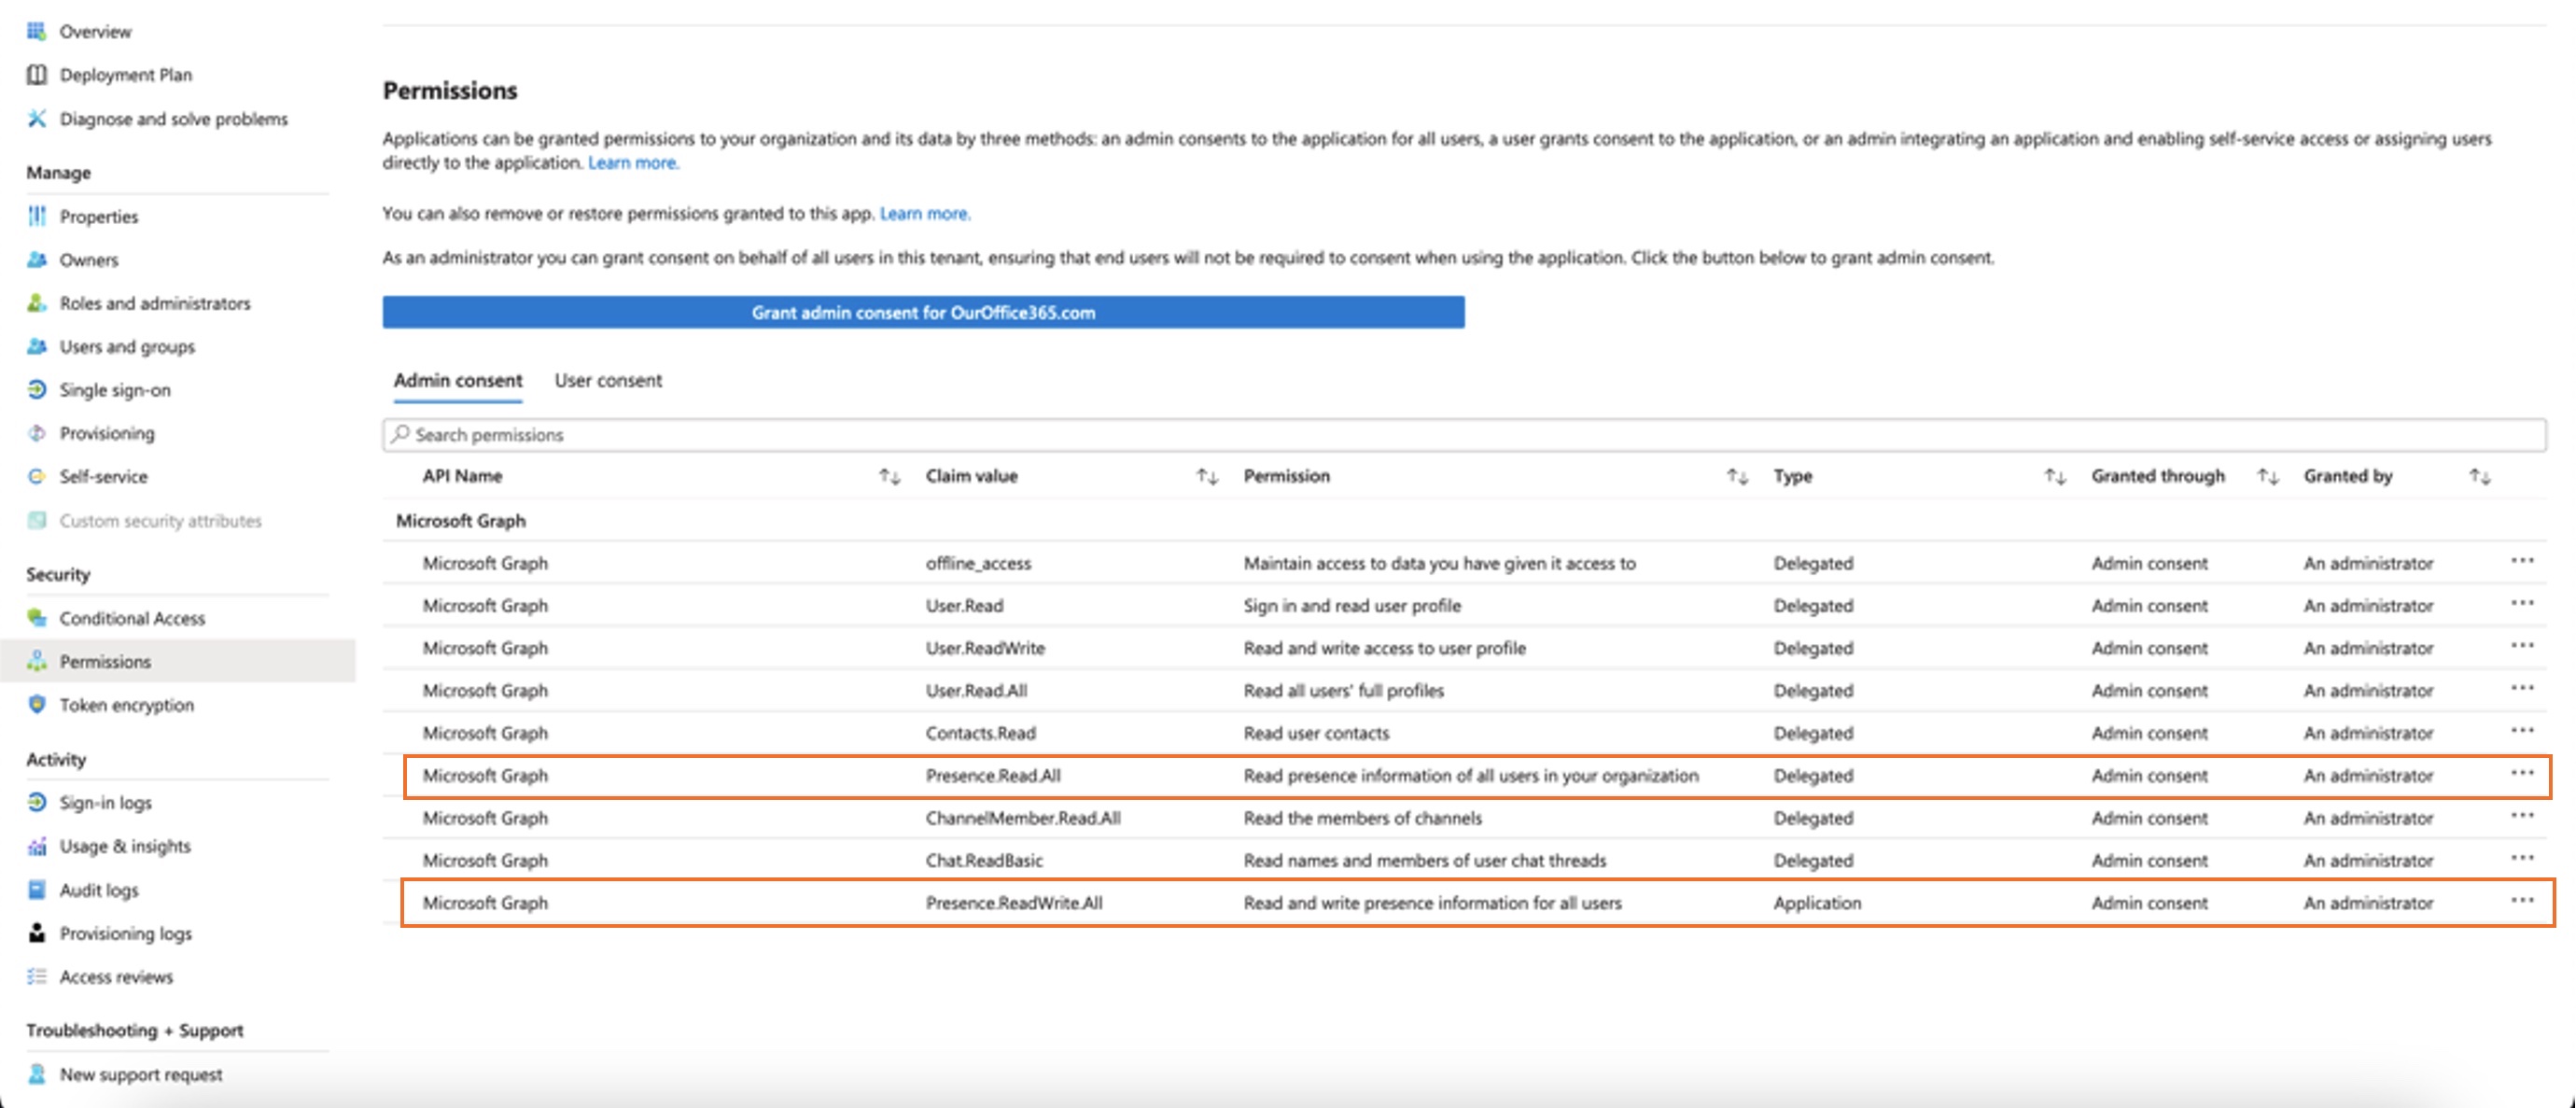
관리자 동의 시 다음 권한을 준수해야 합니다.
현재 조직에서 만약 권한을 확인했으면 Control Hub에서 현재 상태 동기화를 활성화하세요. 양방향 존재 동기화 활성화 섹션을 참조하십시오. Microsoft Teams와 Webex 간의 현재 상태 동기화 문제 발생을 방지하려면 할당 필요 설정을 아니요로 설정하는 것이 좋습니다. 설정을 업데이트하려면 Microsoft Entry 관리 센터 또는 Azure 포털로 이동하여 를 선택하고 아니요를 선택하세요. 어떤 이유로든 이 설정을 '예'로 유지해야 하는 경우, 다음 Microsoft 문서에 설명된 단계를 따라 사용자를 올바르게 할당했는지 확인하십시오. 애플리케이션에 앱 역할 할당 & 애플리케이션 에 대한 사용자 및 그룹 할당을 관리합니다. |
Cisco Call 앱을 사용자 지정하세요
조직의 요구 사항에 따라 Microsoft Teams 사용자를 위한 Cisco Call 앱에 대한 다양한 사용자 지정 설정을 만들 수 있습니다. 모든 사용자를 위한 기본 앱 맞춤 설정을 만들거나, 하나의 앱에 대해 10개의 추가 맞춤 설정을 만들어 특정 사용자 또는 그룹에 할당할 수 있습니다.
자세한 내용은 Microsoft Teams 사용자를 위한 Cisco Call 앱 사용자 지정을 참조하세요.
Cisco Call과 Microsoft Teams 통합을 위한 권한
이 통합 서비스는 Webex 및 Microsoft API를 사용하여 중앙 집중식 통화 기록과 같은 데이터에 액세스하고, 사용자 데이터를 저장하지 않고 음성 메일을 읽음으로 표시하는 등의 상태를 표시하고 업데이트합니다. 통합과 그 사이의 모든 데이터 전송 Webex/Microsoft 백엔드 작업은 암호화된 HTTPS 채널을 통해 이루어집니다. 따라서 이 서비스는 사용자 데이터가 클라우드에 저장되지 않도록 보장하여 데이터 개인정보 보호 및 보안을 강화합니다.
통합 기능을 활성화하기 위해 Microsoft API를 호출하는 데 필요한 최소한의 권한만 Microsoft에 요청합니다. 다음 표는 저희가 요청하는 각 권한과 그 필요성에 대해 설명합니다.
| 권한 | 이유 |
|---|---|
|
offline_access |
이 기능을 통해 통합 서비스는 사용자가 자주 재인증을 요청하지 않고도 새 액세스 토큰을 생성할 수 있습니다. |
|
User.Read |
통합 서비스가 사용자의 이메일 주소와 같은 기본 정보를 읽을 수 있도록 허용합니다. |
|
사용자.읽기쓰기 |
통합 서비스가 단축 다이얼을 사용자 프로필에 저장할 수 있도록 합니다. |
|
User.Read.All |
통합 서비스가 Active Directory에서 사용자를 검색하여 통화를 걸 수 있도록 합니다. |
|
연락처.읽어보세요 |
이 기능을 통해 통합 서비스는 사용자의 Outlook 연락처를 검색하여 전화를 걸 수 있습니다. |
|
채널멤버.읽기.모두 |
이 기능을 통해 통합 메시지 확장 프로그램은 채널 구성원을 읽을 수 있으므로 사용자는 특정 채널 구성원을 검색하여 통화할 수 있습니다. |
|
채팅.ReadBasic |
이 통합 메시지 확장 프로그램은 그룹 채팅의 구성원을 읽어 사용자가 특정 구성원을 검색하여 통화할 수 있도록 합니다. |
|
존재.읽기.모두 |
통합 서비스가 디렉터리에 있는 모든 사용자의 현재 상태 정보를 읽을 수 있도록 합니다. |
|
존재.읽기.모두 |
이 기능을 통해 통합 서비스는 디렉터리에 있는 모든 사용자의 현재 상태 정보를 읽고 활동 및 가용성 정보를 기록할 수 있습니다. |
|
존재.읽기쓰기 |
통합 서비스가 사용자의 현재 상태 정보를 읽고 활동 및 가용성 정보를 기록할 수 있도록 합니다. |
컨트롤 허브 구성
Microsoft Teams 사용자가 사용할 수 있도록 Control Hub에서 다음 기능을 구성하고 활성화할 수 있습니다.
Webex 앱 창 숨기기
Cisco Call과 Microsoft Teams의 통합 기능을 사용하기로 선택한 조직의 경우, 해당 통합 기능이 사용자가 Webex 서비스에 액세스하는 주요 인터페이스가 됩니다. 설정이 완료되면 Webex 앱은 사용자 컴퓨터에 계속 설치되어 실행되지만, 창은 기본적으로 닫혀 있게 됩니다. Cisco 통화 통합에서 수행되는 작업은 Webex 앱의 특정 기능을 실행할 수 있지만, 일반적으로 사용자는 Webex 앱과 상호 작용할 필요가 없습니다.
Control Hub를 통해 다음 수준에서 Webex 앱 창을 숨길 수 있습니다.
-
조직 수준
-
사용자 그룹 수준
-
사용자 수준
조직에서 Webex 앱 창을 숨기기
조직 수준에서 구성된 설정은 해당 조직에 속한 모든 사용자에게 자동으로 적용됩니다.
| 1 | |
| 2 |
. |
| 3 |
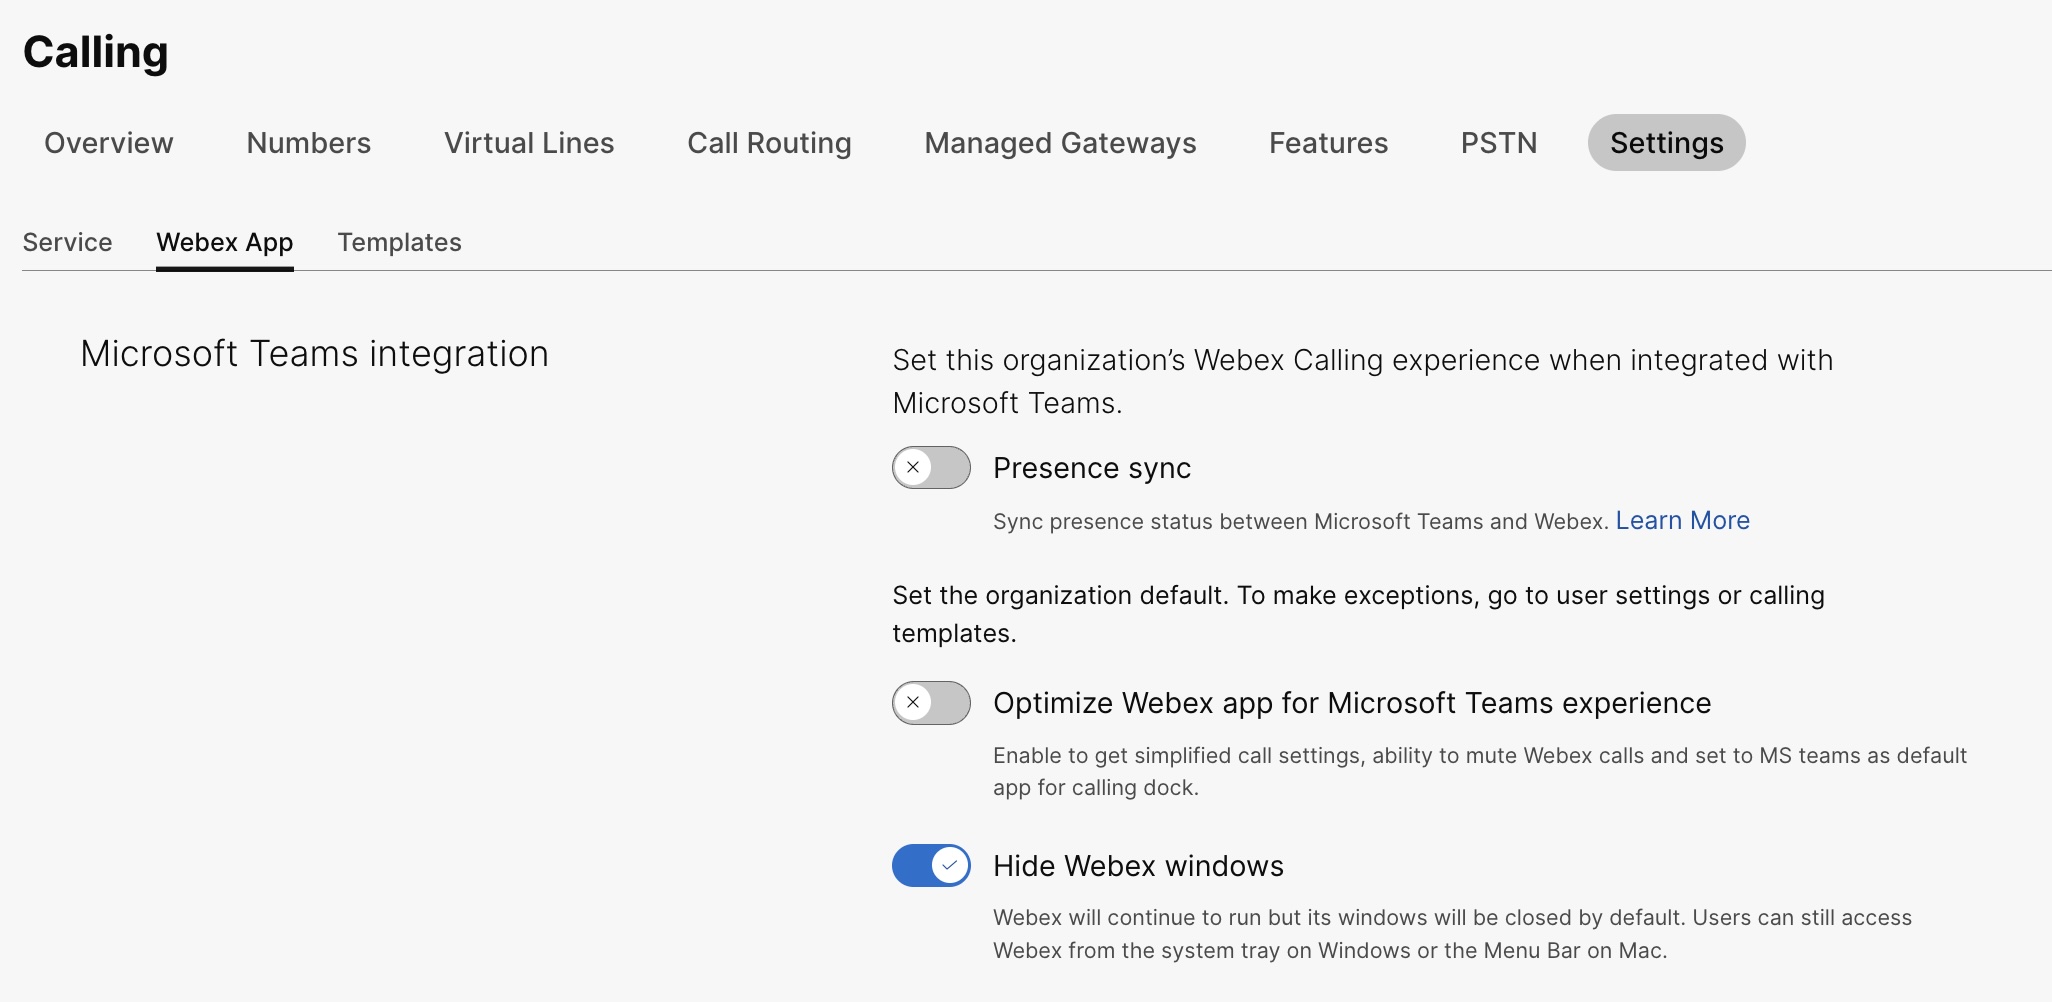
Webex 앱 탭을 클릭하고 Microsoft Teams 통합 섹션으로 이동한 다음 Webex 창 숨기기를 켜세요.
또한 공개 API를 사용하여 Microsoft Teams와 Cisco Call 통합을 사용하는 조직 내 모든 사용자에 대해 Webex 앱 창을 숨길 수 있습니다. 자세한 내용은 developer.webex.com 의 [ ] 조직의 MS Teams 설정 업데이트 를 참조하세요. |
특정 사용자 그룹에 대해 Webex 앱 창을 숨깁니다.
특정 사용자 그룹에 대해 Webex 앱 창을 숨기려면 통화 템플릿을 생성하고 해당 사용자 그룹에 할당하십시오. 템플릿의 설정은 그룹 내 모든 사용자에게 적용됩니다.
Webex 앱 창을 숨기는 새 템플릿을 만들려면 다음 단계를 따르세요.
| 1 | |
| 2 |
. |
| 3 |
템플릿 만들기를 클릭하고 템플릿 만들기 를 선택한 다음 다음을 클릭합니다. 교육이 귀사의 사업 분야라면 학생이나 교사를 위한 사용자 지정 설정이 포함된 사전 정의된 템플릿 을 적용할 수 있습니다. |
| 4 |
일반 섹션에서 템플릿 이름 및 설명을 입력합니다. |
| 5 |
Microsoft Teams 통합 섹션으로 이동하여 Webex 창 숨기기를 켜십시오. |
| 6 |
템플릿 만들기 및 다음을 클릭합니다. |
| 7 |
이 템플릿에 사용할 그룹을 검색하고 선택한 다음 완료를 클릭하세요. 템플릿을 수정하거나 삭제합니다.
템플릿을 수정하려면 템플릿을 클릭하고 토글을 수정한 다음 저장을 클릭합니다. 템플릿을 삭제하려면 템플릿을 클릭하고 작업 드롭다운 목록에서 삭제 를 선택하세요. 템플릿 삭제 페이지에서 템플릿 삭제가 영구적임을 알리는 확인란을 선택한 다음 삭제를 클릭합니다. |
사용자 그룹에 호출 템플릿을 적용할 때 고려 사항
-
사용자가 조직에보드된 경우, 해당 사용자는 조직 수준의 설정을 적용받습니다.
-
사용자가 사용자 그룹에 추가된 경우, 통화 템플릿의 설정이 적용됩니다.
-
사용자가 여러 사용자 그룹에 속하는 경우, 가장 높은 순위(순위 1)의 템플릿이 우선 적용되며 해당 템플릿의 설정이 적용됩니다.
-
사용자가 개별 사용자 설정을 가지고 있는 경우, 이러한 설정이 사용자 그룹 또는 조직 수준 설정보다 우선 적용됩니다.
템플릿 관리에 대한 자세한 내용은 설정 템플릿 구성 을 참조하세요.
기존 템플릿은 그룹 섹션 또는 호출 섹션에서 적용할 수 있습니다.
- 그룹 섹션의 템플릿을 적용하려면 설정 템플릿 구성을 참조하세요.
- 소명 섹션에서 지원하려면 다음 단계를 완료하십시오.
| 1 | |
| 2 |
. |
| 3 |
기존 템플릿 옆에 있는 |
| 4 |
템플릿을 적용할 그룹 이름을 입력한 다음 해당 그룹을 선택하세요. |
| 5 |
완료를 클릭합니다. |
 을 클릭하고
 사용자에게 Webex 앱 창을 숨깁니다.
개별 사용자 설정은 조직 수준 및 사용자 그룹 수준 설정을 재정의합니다.
| 1 | |
| 2 |
. |
| 3 |
사용자를 선택하고 통화] 를 클릭하세요. |
| 4 |
사용자 통화 환경 으로 이동하여 Microsoft Teams 통합을 클릭합니다. |
| 5 |
Webex 창 숨기기 를 켜세요. 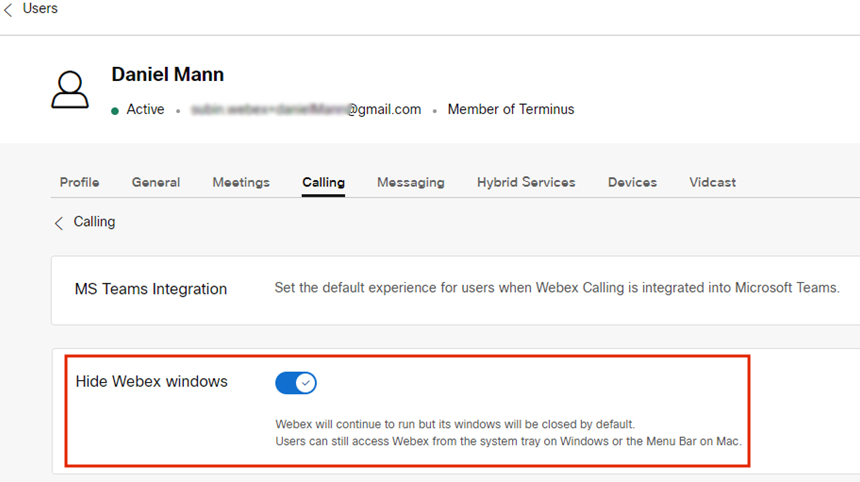 사용자 설정을 구성한 후에는 사용자 수준에서 설정을 추가로 수정할 수 있습니다. 사용자 설정은 조직의 기본 설정으로 자동으로 되돌아가지 않습니다. 공개 API를 사용하면 특정 사용자의 Microsoft Teams 클라이언트에서 Webex 앱 창을 숨길 수 있습니다. developer.webex.com 에서 [] 사용자의 MS Teams 설정 구성 및 사용자의 애플리케이션 서비스 설정 검색 을 참조하십시오. |
설정을 구성한 후에는 사용자가 Webex 앱을 다시 시작하고 로그인해야 변경 사항을 확인할 수 있습니다.
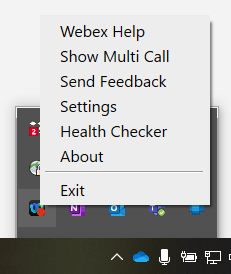
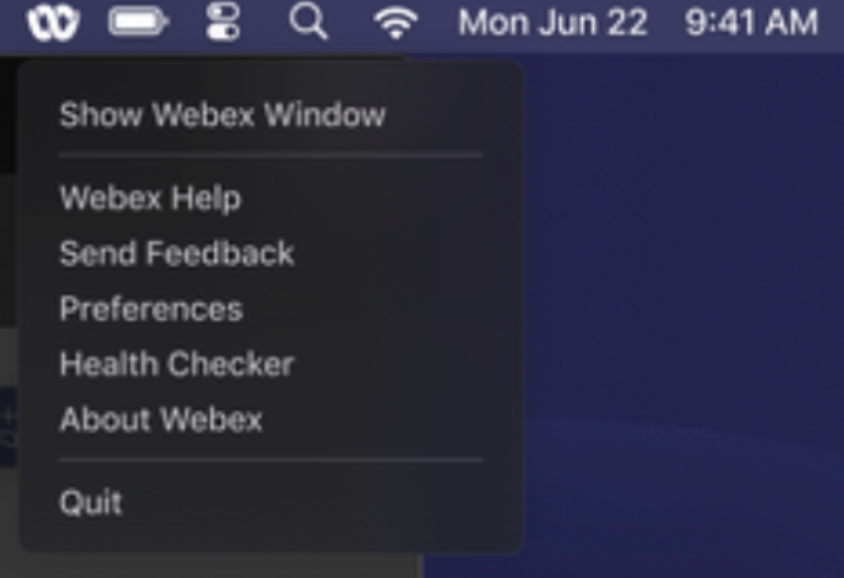
사용자가 Webex 앱 자체와 상호 작용하려면 Windows에서는 시스템 트레이에서, Mac에서는 메뉴 막대에서 접근할 수 있습니다. Webex 앱은 창이 활성화되어 사용 중일 때만 Windows 작업 표시줄 또는 macOS Dock에 표시됩니다.
|
Webex 앱 Windows 시스템 트레이 |
Mac 메뉴 막대의 Webex 앱 |
통화 도킹 창 활성화
통화 도크(다중 통화) 창은 사용자가 단일 창에서 여러 회선 또는 공유 회선을 관리할 수 있도록 도와주는 별도의 플로팅 창입니다. 사용자는 다른 창으로 전환하지 않고도 전화를 걸고 받을 수 있으며, 모든 회선의 상태를 확인하고, 통화 보류, 착신 전환, 통화 중 끼어들기 등의 기능에 더 쉽게 접근할 수 있습니다.
| 1 | |
| 2 |
. |
| 3 |
Webex 앱 탭을 클릭하고 통화 중 기능 액세스 섹션으로 이동한 다음 추가 기능아래에서 통화 도크 표시 를 켜고 다음 옵션 중 하나를 선택하십시오.
이 기능은 사용자 그룹 수준과 사용자 수준에서도 구성할 수 있습니다.
|
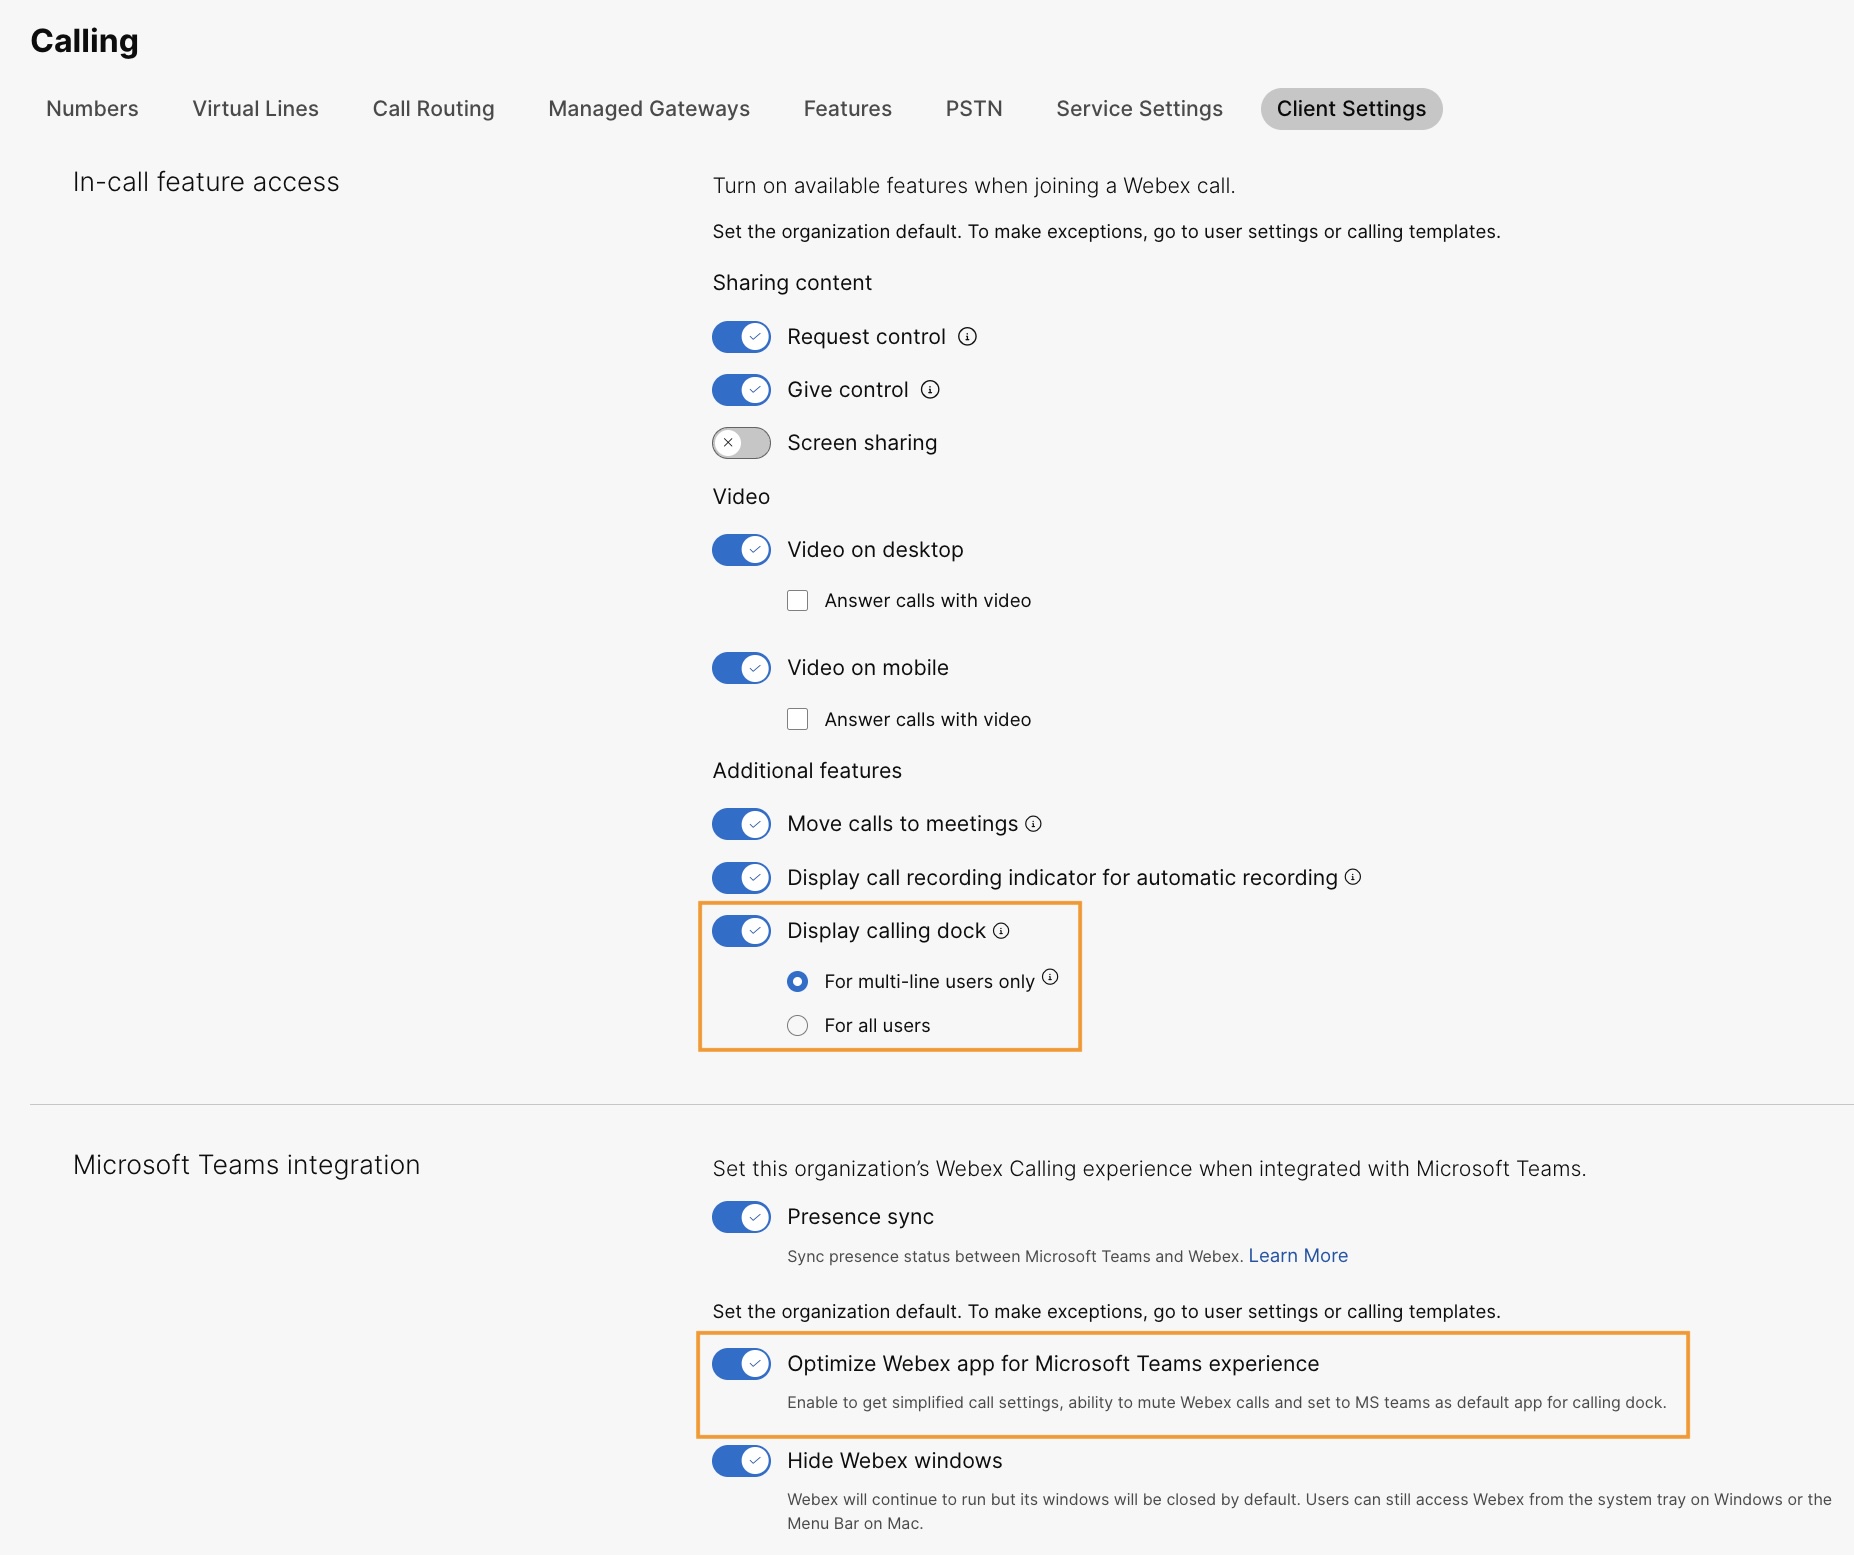
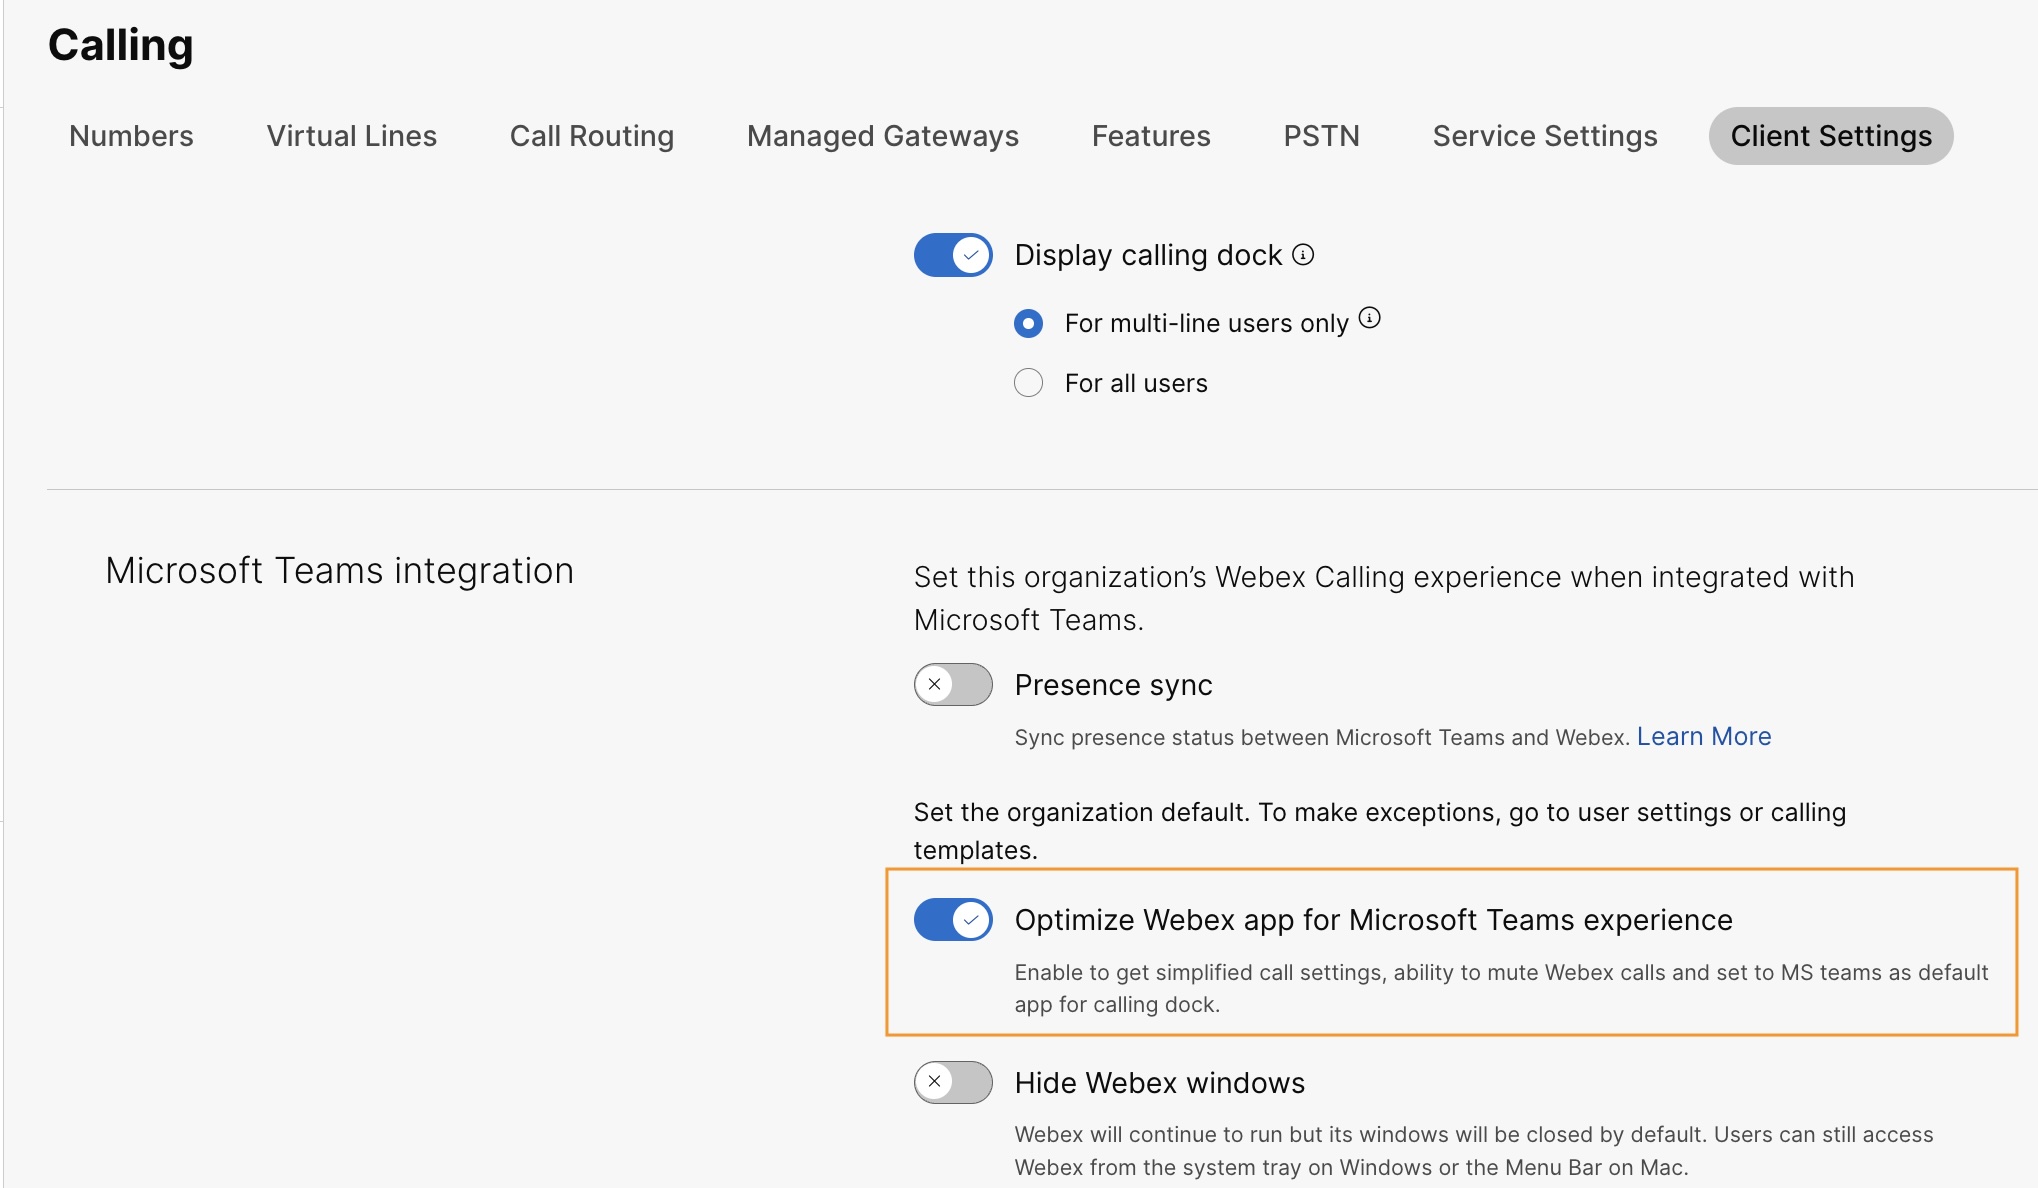
Microsoft Teams 환경에 맞게 Webex 앱을 최적화하세요.
이 기능은 사용자에게 다음과 같은 경험을 제공합니다.
-
간소화된 통화 설정 - 통화 설정에는 통합에 필요한 옵션만 표시됩니다. 이 기능을 활성화하면 통화 도크를 통해 접근할 수 있는 통화 설정만 간소화됩니다. Cisco Call 통합에서 접근 가능한 통화 설정은 기본적으로 간소화된 상태를 유지합니다.
-
Cisco 통화 음소거 - 사용자가 Microsoft Teams 통화 또는 회의 중일 때 수신되는 Cisco 통화가 음소거됩니다. 이 기능을 사용하려면 Control Hub에서 이 기능을 활성화해야 하며, 사용자는 Cisco Call 통합의 통화 설정에서 회의 또는 통화 중일 때만 알림을 음소거 옵션을 활성화해야 합니다.
Control Hub에서 이 기능을 비활성화하면 사용자 설정은 사용자가 Cisco 통화 또는 회의에 참여 중일 때만 작동합니다. 이 기능을 활성화하면 사용자가 Microsoft Teams 통화 또는 회의에 참여 중이거나 Cisco 통화 또는 회의에 참여 중일 때 사용자 설정이 적용됩니다.
-
단일 앱 환경 - 사용자가 통화 도크에서 음성 메일 및 중앙 집중식 통화 기록 아이콘을 클릭하면 Webex 앱 대신 Microsoft Teams Cisco 통화로 이동합니다.
Windows 사용자: 시스템 트레이에서 Webex 앱을 클릭하면 Webex 앱 대신 통화 도크가 열립니다.
| 1 | |
| 2 |
. |
| 3 |
Webex 앱 탭을 클릭하고 Microsoft Teams 통합 섹션으로 이동한 다음 Microsoft Teams 환경에 맞게 Webex 앱 최적화를 켜세요.
통화 중 기능 액세스 섹션에서 통화 도크 표시 토글을 활성화하지 않은 경우 이 토글은 비활성화됩니다. 이 기능은 사용자 그룹 수준과 사용자 수준에서도 구성할 수 있습니다.
|
음성 메일, 중앙 집중식 통화 기록 및 상태 동기화를 활성화합니다.
음성 메일 및 중앙 집중식 통화 기록
Webex Calling, Dedicated Instance 및 UCM Cloud 고객의 경우 음성 메일 및 중앙 집중식 통화 기록 기능이 기본적으로 활성화되어 있습니다.
Webex 통화 사용자를 위한 음성 메일 활성화에 대한 자세한 내용은 다음을 참조하십시오. Webex 통화 사용자의 음성 메일 설정을 구성하고 관리합니다.
BroadWorks 사용자를 위한 음성 메일 활성화에 대한 자세한 내용은 Microsoft Teams 통합을 위한 음성 메일 활성화를 참조하세요.
BroadWorks 관리자는 이 기능이 올바르게 작동하도록 통합 중앙 집중식 통화 기록을 활성화해야 합니다. 자세한 내용은 Cisco BroadWorks 구성 안내서의 Webex를 참조하십시오.
양방향 존재 동기화
이 기능은 Microsoft Teams와 Webex 간의 현재 상태 양방향 동기화를 지원하며, 동일한 Webex 조직 내의 여러 Microsoft Teams 테넌트를 지원합니다. 현재 상태에는 통화 중, 회의 중, 발표 중및 방해 금지가 포함됩니다.
이 기능을 활성화하면 사용자가 Webex 통화를 걸거나 받을 때 Microsoft Teams 상태가 통화 중으로 변경됩니다. Webex 앱이나 Webex 장치에서 방해 금지 모드 를 활성화하면 해당 상태가 Microsoft Teams에 자동으로 동기화됩니다. 마찬가지로 회의 중 및 발표 중 상태는 애플리케이션 간에 동기화됩니다.
사용자의 Webex 앱 또는 Webex 장치에서 방해 금지 모드가 활성화된 경우, Webex 앱, Webex 장치 또는 Microsoft Teams에서 수신 전화 및 메시지 알림을 받지 못합니다.
또한 공개 API를 사용하여 Webex의 현재 상태를 Microsoft Teams 클라이언트와 동기화할 수 있습니다. 자세한 내용은 developer.webex.com 의 [ ] 조직의 MS Teams 설정 업데이트 를 참조하세요.
다음 표는 Webex와 Microsoft Teams 간의 양방향 상태 동기화 표현을 보여줍니다.
|
Webex 상태 |
Microsoft Teams 상태 |
|---|---|
|
|
|
|
|
|
|
|
|
|
|
|
현재 이 기능은 조직 수준에서만 설정할 수 있습니다.
| 1 | |
| 2 |
. |
| 3 |
Webex 앱 탭을 클릭하고 Microsoft Teams 통합 섹션으로 이동한 다음 상태 동기화를 켜세요. 최상의 사용 환경을 위해 Webex 창 숨기기 토글을 켜두실 수 있지만, 이는 선택 사항입니다. |
| 4 |
방해금지(DND) 상태 동기화 섹션으로 이동하여 토글을 켜세요. 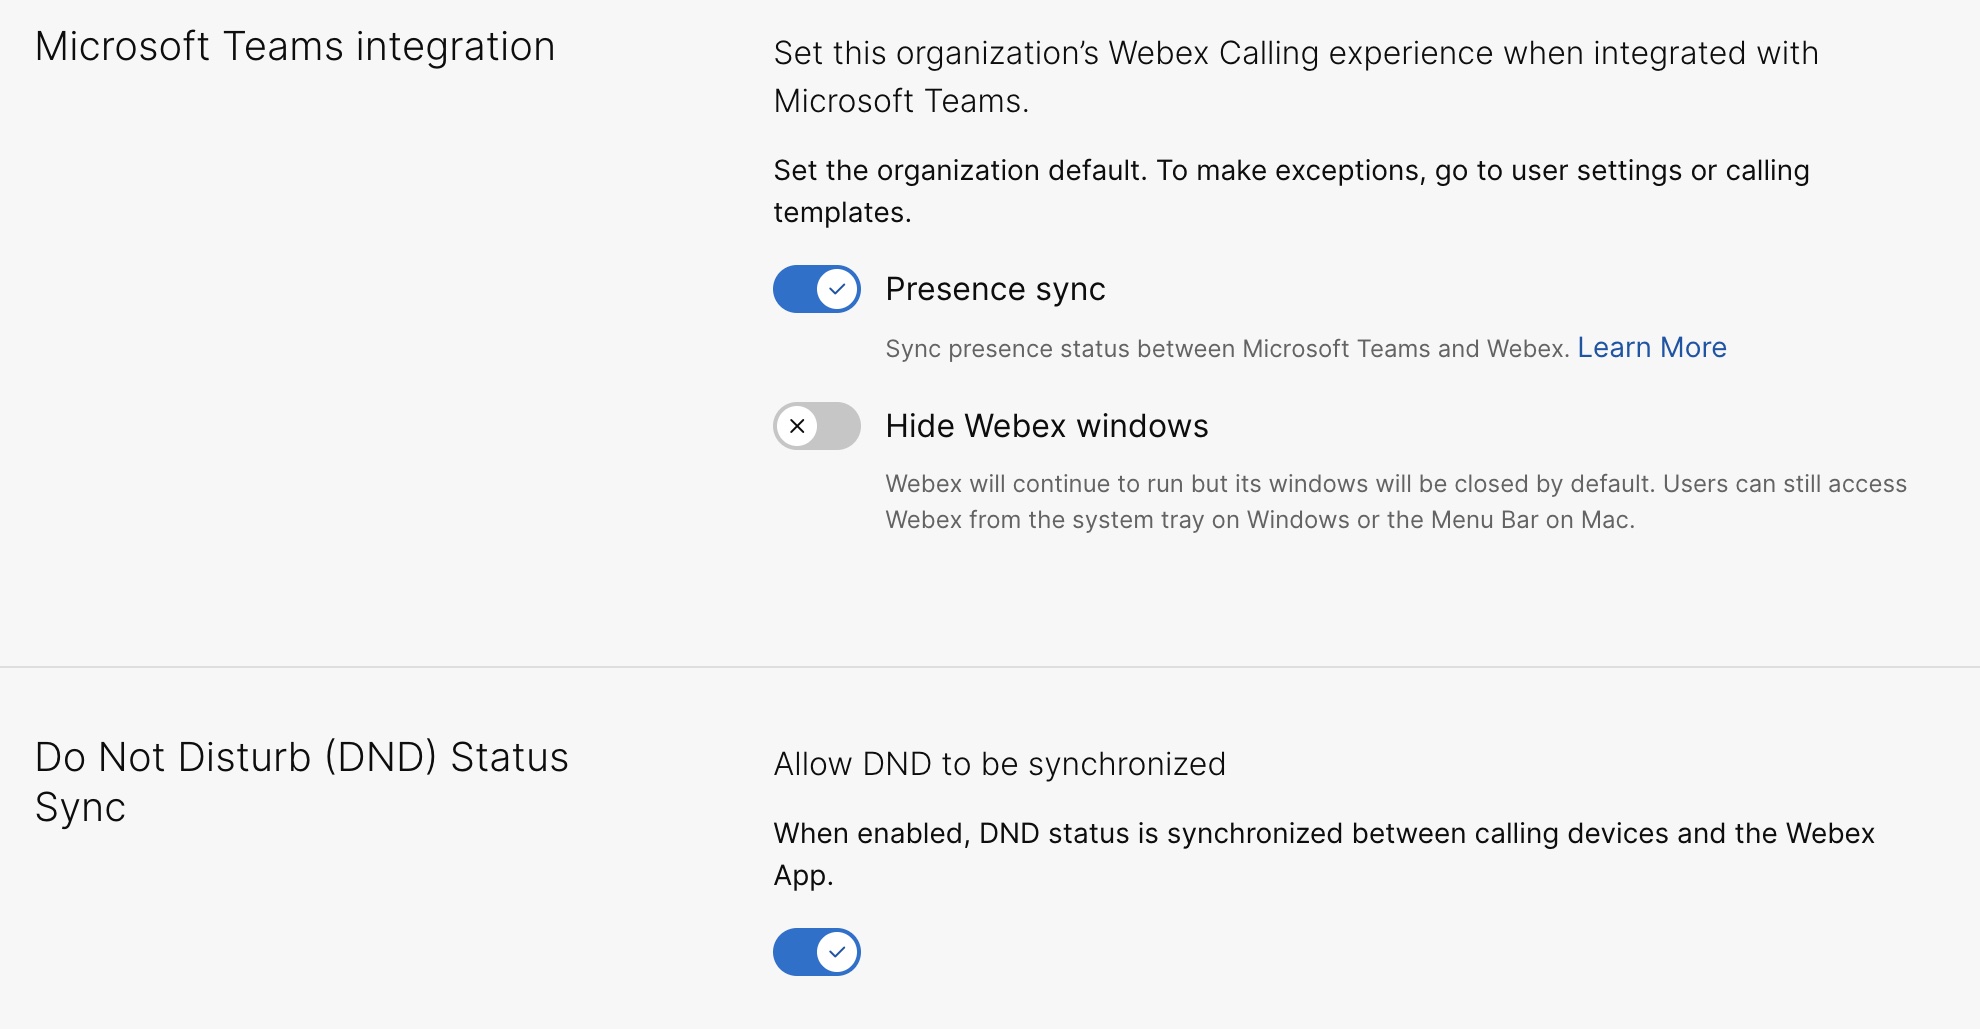 |
Unified CM 사용자를 위한 추가 구성
온프레미스 Unified CM 고객을 위해 음성 메일, 중앙 집중식 통화 기록 및 양방향 상태 동기화 서비스를 활성화하려면 다음 단계를 수행하십시오.
사내 고객을 위한 음성 메일 서비스 활성화에는 최대 12시간이 소요됩니다.
| 1 | |||||
| 2 |
. UC 관리 카드에서 인벤토리를 클릭합니다. 설명, 상태, 클러스터 및 노드가 포함된 클러스터 그룹의 목록이 나타납니다. | ||||
| 3 |
다음 조치를 취하십시오:
선택한 클러스터 그룹에 소속된 클러스터의 목록을 표시하는 인벤토리 페이지가 나타납니다. | ||||
| 4 |
특정 제품 노드가 소속된 클러스터 옆에 있는 세부 사항을 클릭합니다. 버전, 제품 및 상태가 포함된 노드 이름이 나타납니다. | ||||
| 5 |
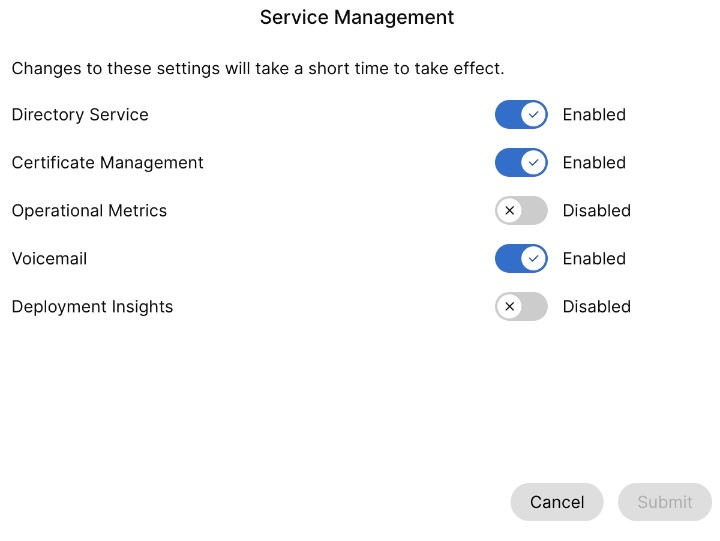
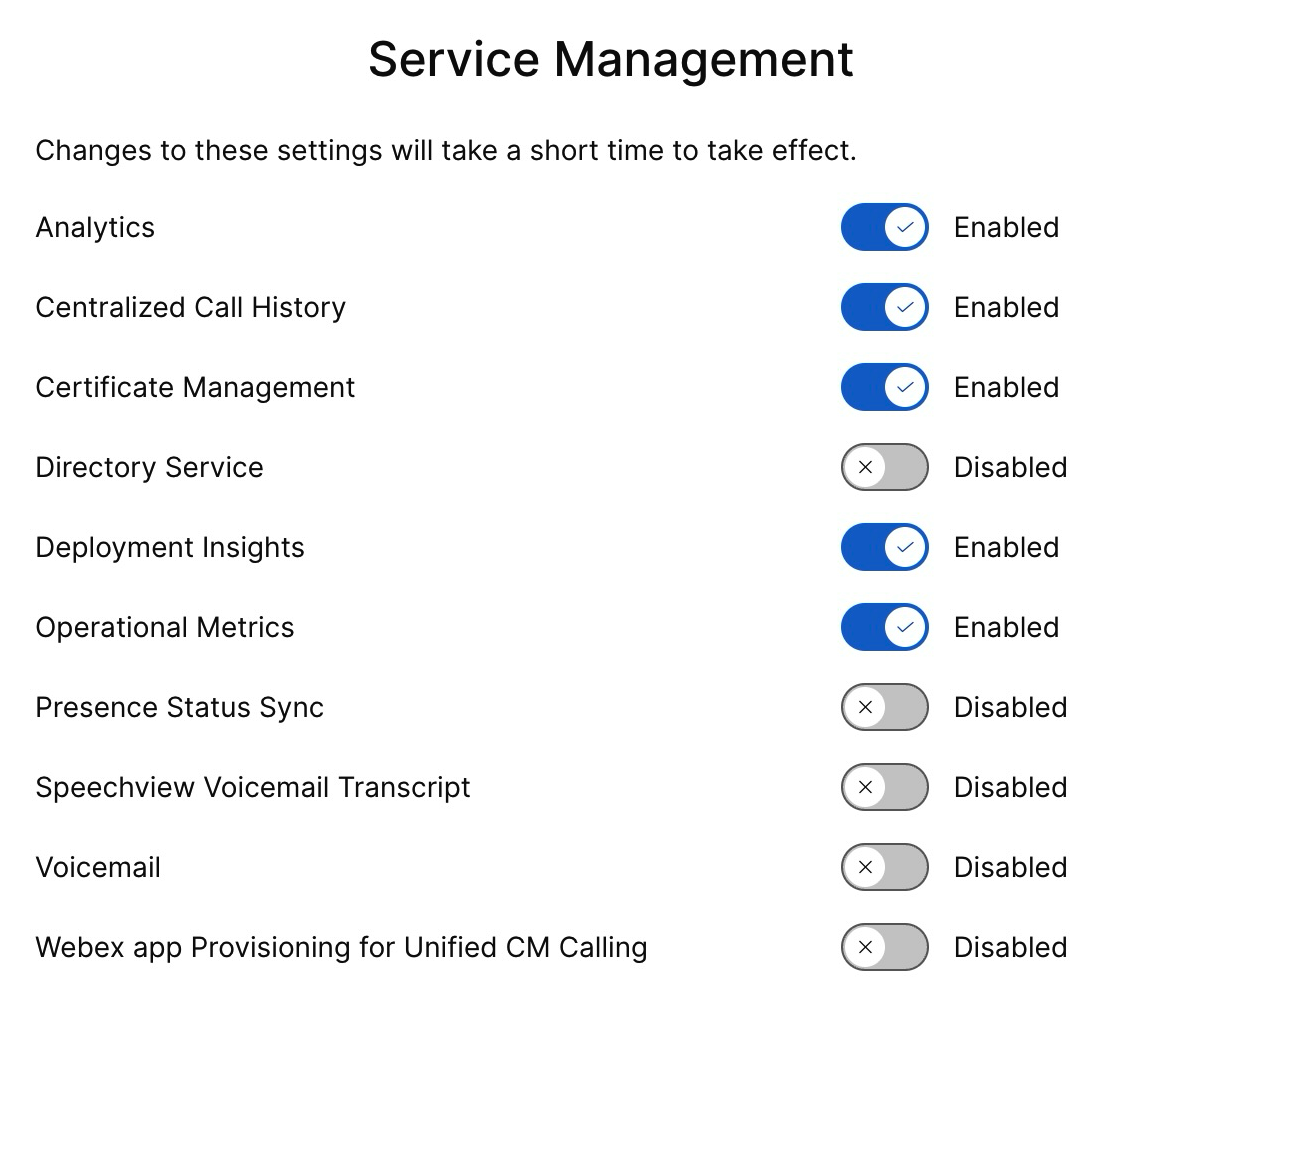
이벤트 히스토리 옆에 있는 줄임표 ⋮ 아이콘을 클릭하고 서비스 관리를 선택합니다. 서비스의 목록과 함께 서비스 관리 페이지가 나타납니다. | ||||
| 6 |
토글 버튼을 사용하여 음성 메일, 중앙 집중식 통화 기록 및 현재 상태 동기화를 활성화합니다.
| ||||
| 7 |
제출을 클릭합니다. | ||||
| 8 |
데이터 수집 확인 팝업이 표시되면 확인란을 선택하여 동의하고 제출을 클릭합니다. |
Cisco AI Assistant 활성화
이 기능은 Webex 통화 사용자에게만 적용됩니다.
시스코 AI 어시스턴트는 통화 녹음 여부와 관계없이 사용자가 상호 작용 중 및 후에 액세스할 수 있는 요약 정보를 생성합니다.
통화 중 AI 어시스턴트를 사용한 경우, 통화 후 요약 및 녹취록 기능을 활성화한 사용자는 통화 기록에서 통화 후 요약, 조치 사항 및 녹취록을 확인할 수 있습니다. 이러한 기능 이용 가능 여부는 통화 녹음 여부와 관계없이 적용되며, 관리자 및 사용자 설정 모두에 의해 제어됩니다. AI 어시스턴트 데이터는 365일 동안 고정된 기간 동안 저장됩니다.
조직, 사용자 및 템플릿 수준에서 통화 전환 및 회의 통화에 대한 AI 어시스턴트 통화 요약 설정을 활성화할 수 있습니다. 인도 외 지역 사용자는 AI 어시스턴트 기능을 이용할 수 없습니다.
Control Hub에서 Cisco AI Assistant를 활성화하는 방법에 대한 자세한 내용은 Webex 통화용 Cisco AI Assistant 관리를 참조하세요.


