- Strona główna
- /
- Artykuł

Dziękujemy za opinię.

 W tym artykule
 Opinia?
Zainstaluj usługę Cisco Call jako domyślną opcję połączeń dla wszystkich użytkowników w swojej organizacji.
W tym artykule dowiesz się, jak skonfigurować aplikację Microsoft Teams przy użyciu opcji Cisco Call. Ikona ![]() została dodana do nawigacji po lewej stronie i stanowi rozszerzenie funkcji Wiadomości. Gdy opcja połączeń w usłudze Teams jest wyłączona, wszyscy w organizacji używają tej samej platformy do nawiązywania i odbierania połączeń.
została dodana do nawigacji po lewej stronie i stanowi rozszerzenie funkcji Wiadomości. Gdy opcja połączeń w usłudze Teams jest wyłączona, wszyscy w organizacji używają tej samej platformy do nawiązywania i odbierania połączeń.
Wymagania wstępne
-
Upewnij się, że jesteś administratorem Microsoft Teams.
-
Upewnij się, że masz dostęp do Control Hub.
-
Sprawdź, czy użytkownicy mają przypisane licencjew Control Hub i zarejestrowali się w usłudze Cisco Unified Communications Manager lub Webex Calling w celu wykonywania połączeń.
-
Użytkownicy muszą mieć zainstalowaną aplikację Webex i Microsoft Teams.
-
Aby integracja Cisco Call for Microsoft Teams działała z zapleczem kontroli połączeń Unified CM (lokalnie, w dedykowanej instancji Webex Calling lub w chmurze UCM), upewnij się, że korzystasz z Unified CM 12.5 SU7 lub 14 SU3, Cisco Unity Connection (CUC) 12.5 lub 14.
-
W przypadku klientów korzystających z usługi Unified CM na miejscu należy upewnić się, że usługa Unified CM & Klastry CUC są zintegrowane z rozwiązaniem Webex Cloud-Connected UC (CCUC).
-
Użytkownicy muszą być zsynchronizowani z usługą Common Identity (CI) w Control Hub albo z lokalnej usługi Active Directory, albo z usługi AD w chmurze (takiej jak np. Azure).
-
W przypadku klientów lokalnych, klientów korzystających z dedykowanej instancji Webex Calling i klientów korzystających z chmury UCM Skonfiguruj Cisco Unified CM— Numer linii w Cisco Unified CM musi być skojarzony z identyfikatorem użytkownika, aby historia scentralizowanych połączeń została wypełniona nazwą użytkownika. W narzędziu Cisco Unified CM Administration wybierz kolejnoUrządzenie→Telefon, wybierz telefon i kliknijNazwa urządzenia (linia), a następnie kliknij wymaganą linię z paneluPowiązanie, aby przejść do opcjiUżytkownik powiązany z linią.
-
Upewnij się, że Unified CM Mail ID jest zgodny z adresem e-mail Control Hub Primary email, który służy do uzyskania uniwersalnego unikatowego identyfikatora (UUID).
-
Infrastruktura pulpitu wirtualnego (VDI): W przypadku korzystania z integracji Cisco Call dla Microsoft Teams w środowisku VDI zarówno Cisco Call, jak i Microsoft Teams muszą być uruchomione na tej samej maszynie wirtualnej.
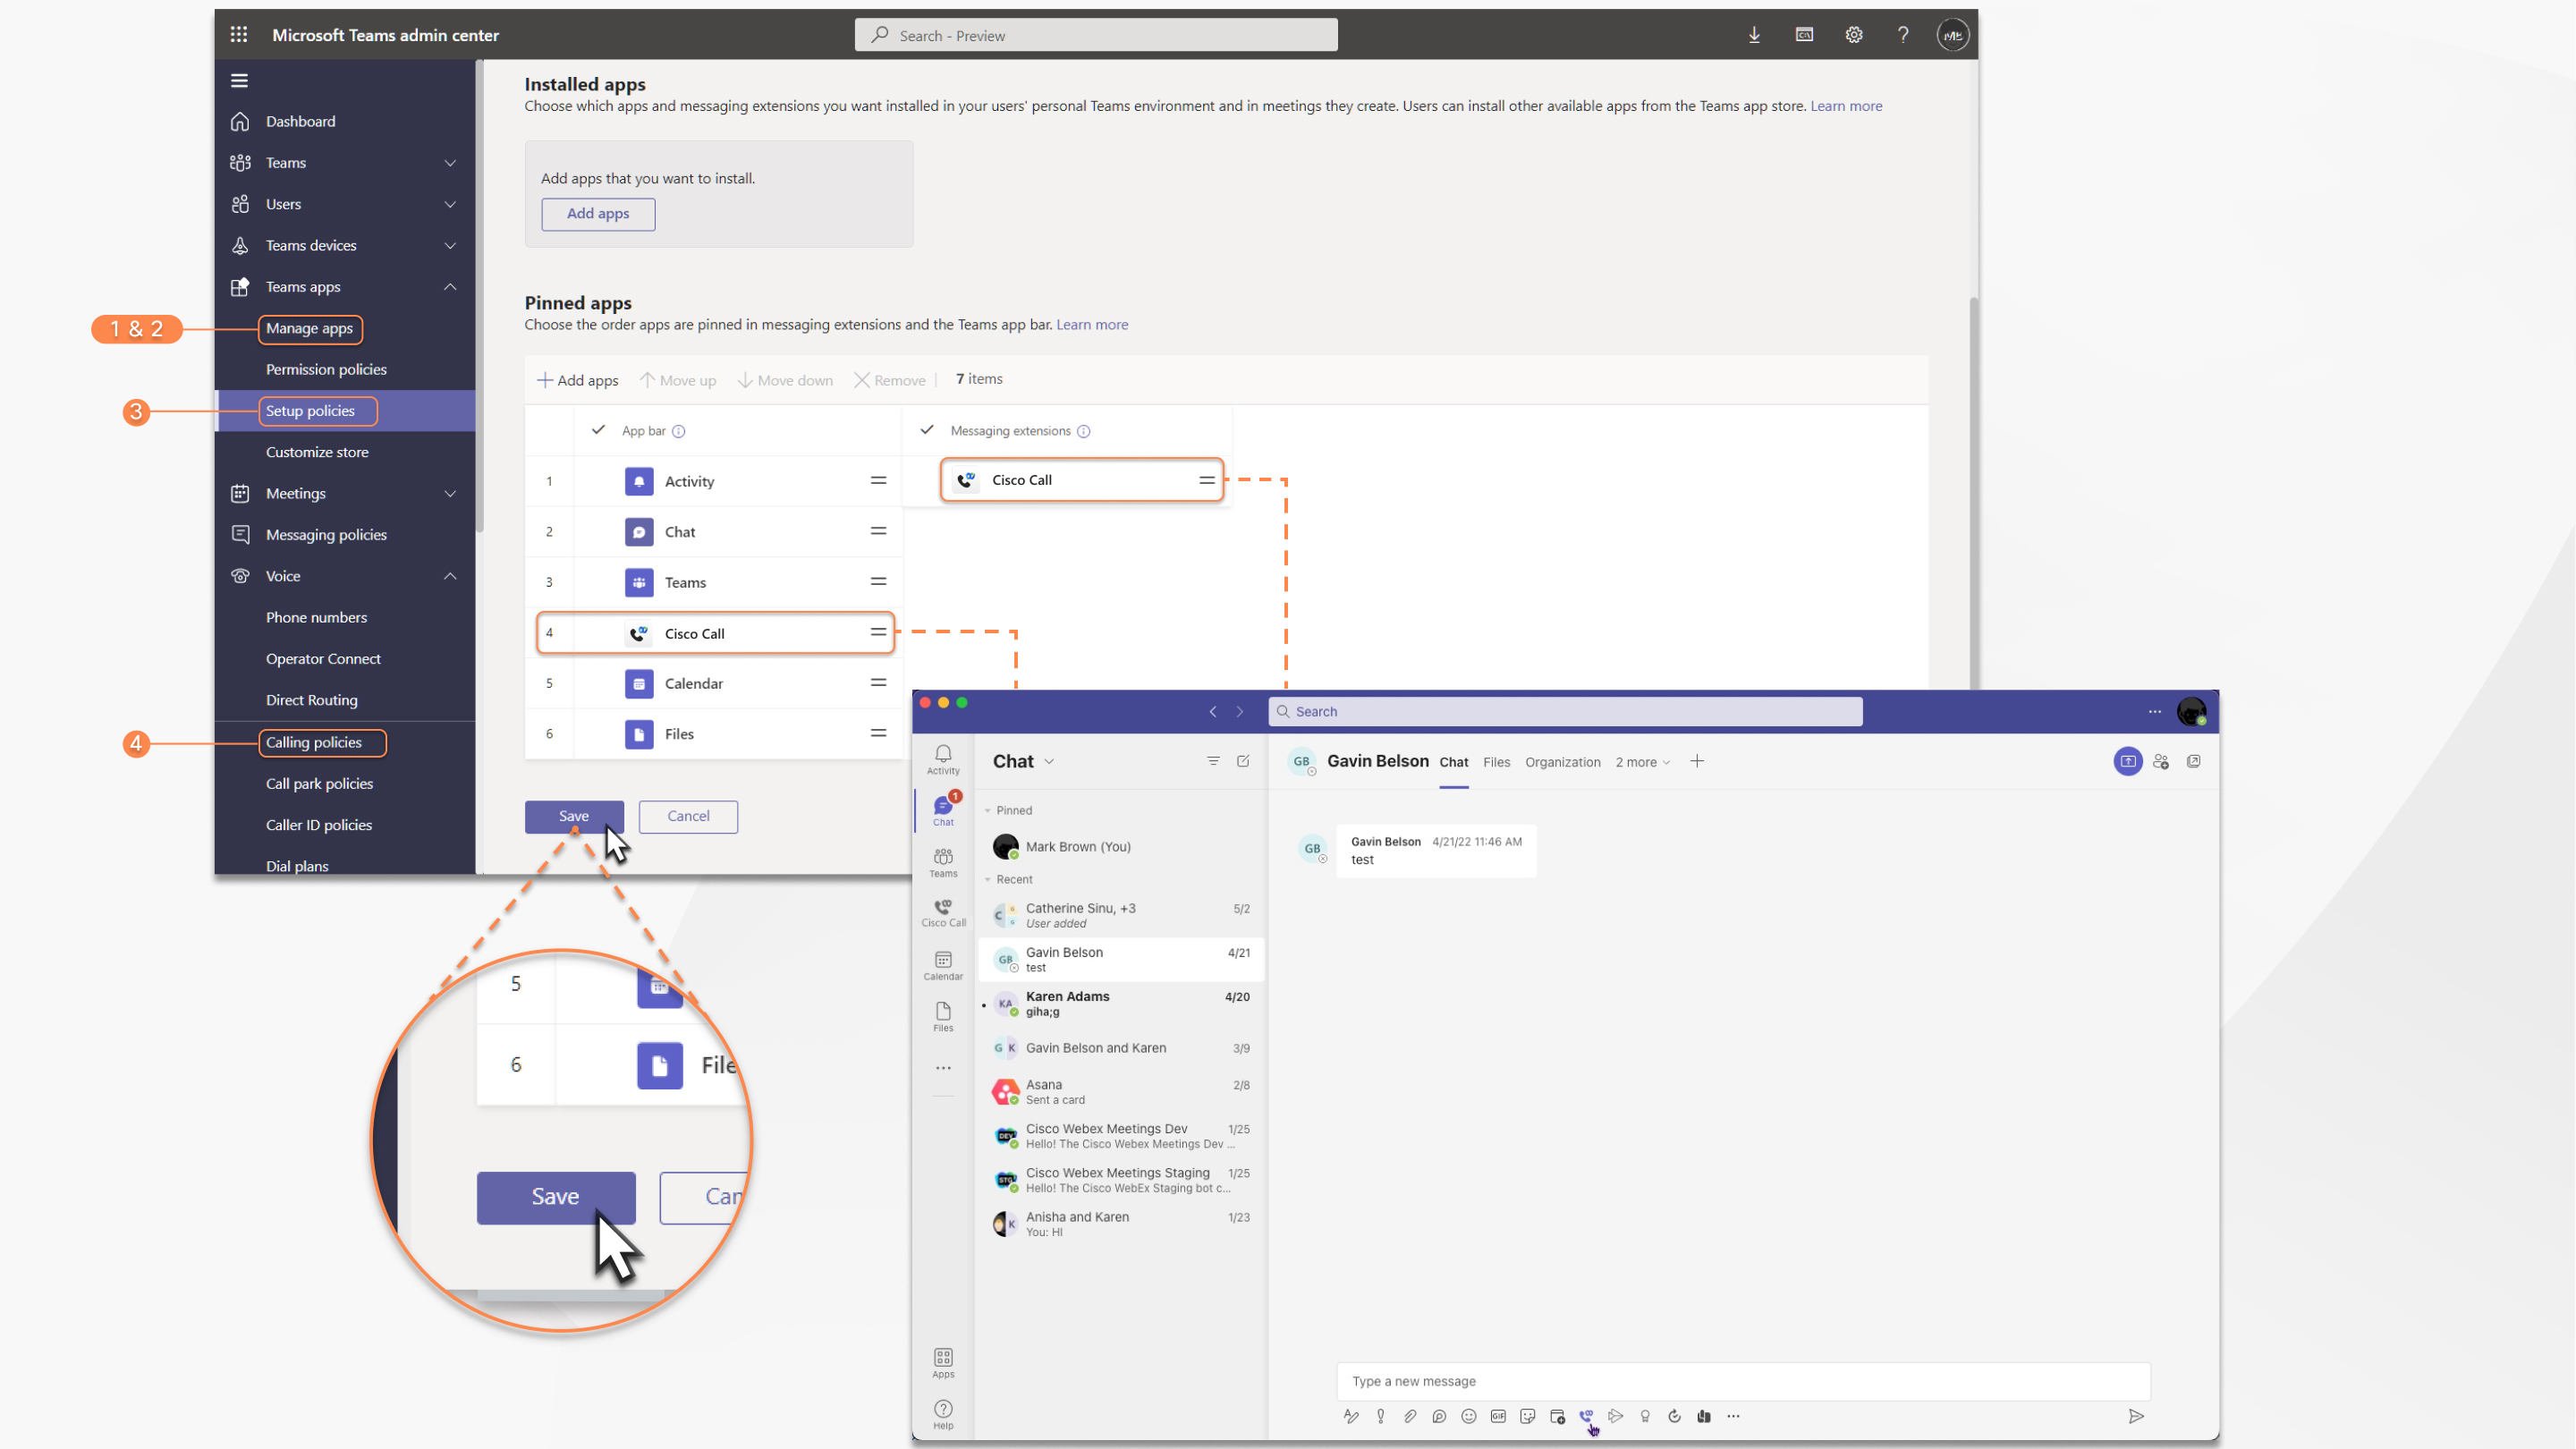
Konfiguracja Microsoft Teams
| 1 |
Zaloguj się do Centrum administracyjnego usługi Teams, aby zarządzać aplikacjami i zezwolić na korzystanie z usługi Cisco Call. |
| 2 |
Zarządzaj, kto może zainstalować Cisco Call. |
| 3 |
Zainstaluj aplikację Cisco Call, a następnie dodaj ikonę do aplikacji Webex i odepnij wbudowaną opcję połączeń. |
| 4 |
Opcjonalnie – wyłącz wbudowaną opcję połączeń w całej organizacji i ustaw Cisco Call jako jedyną opcję połączeń:
|
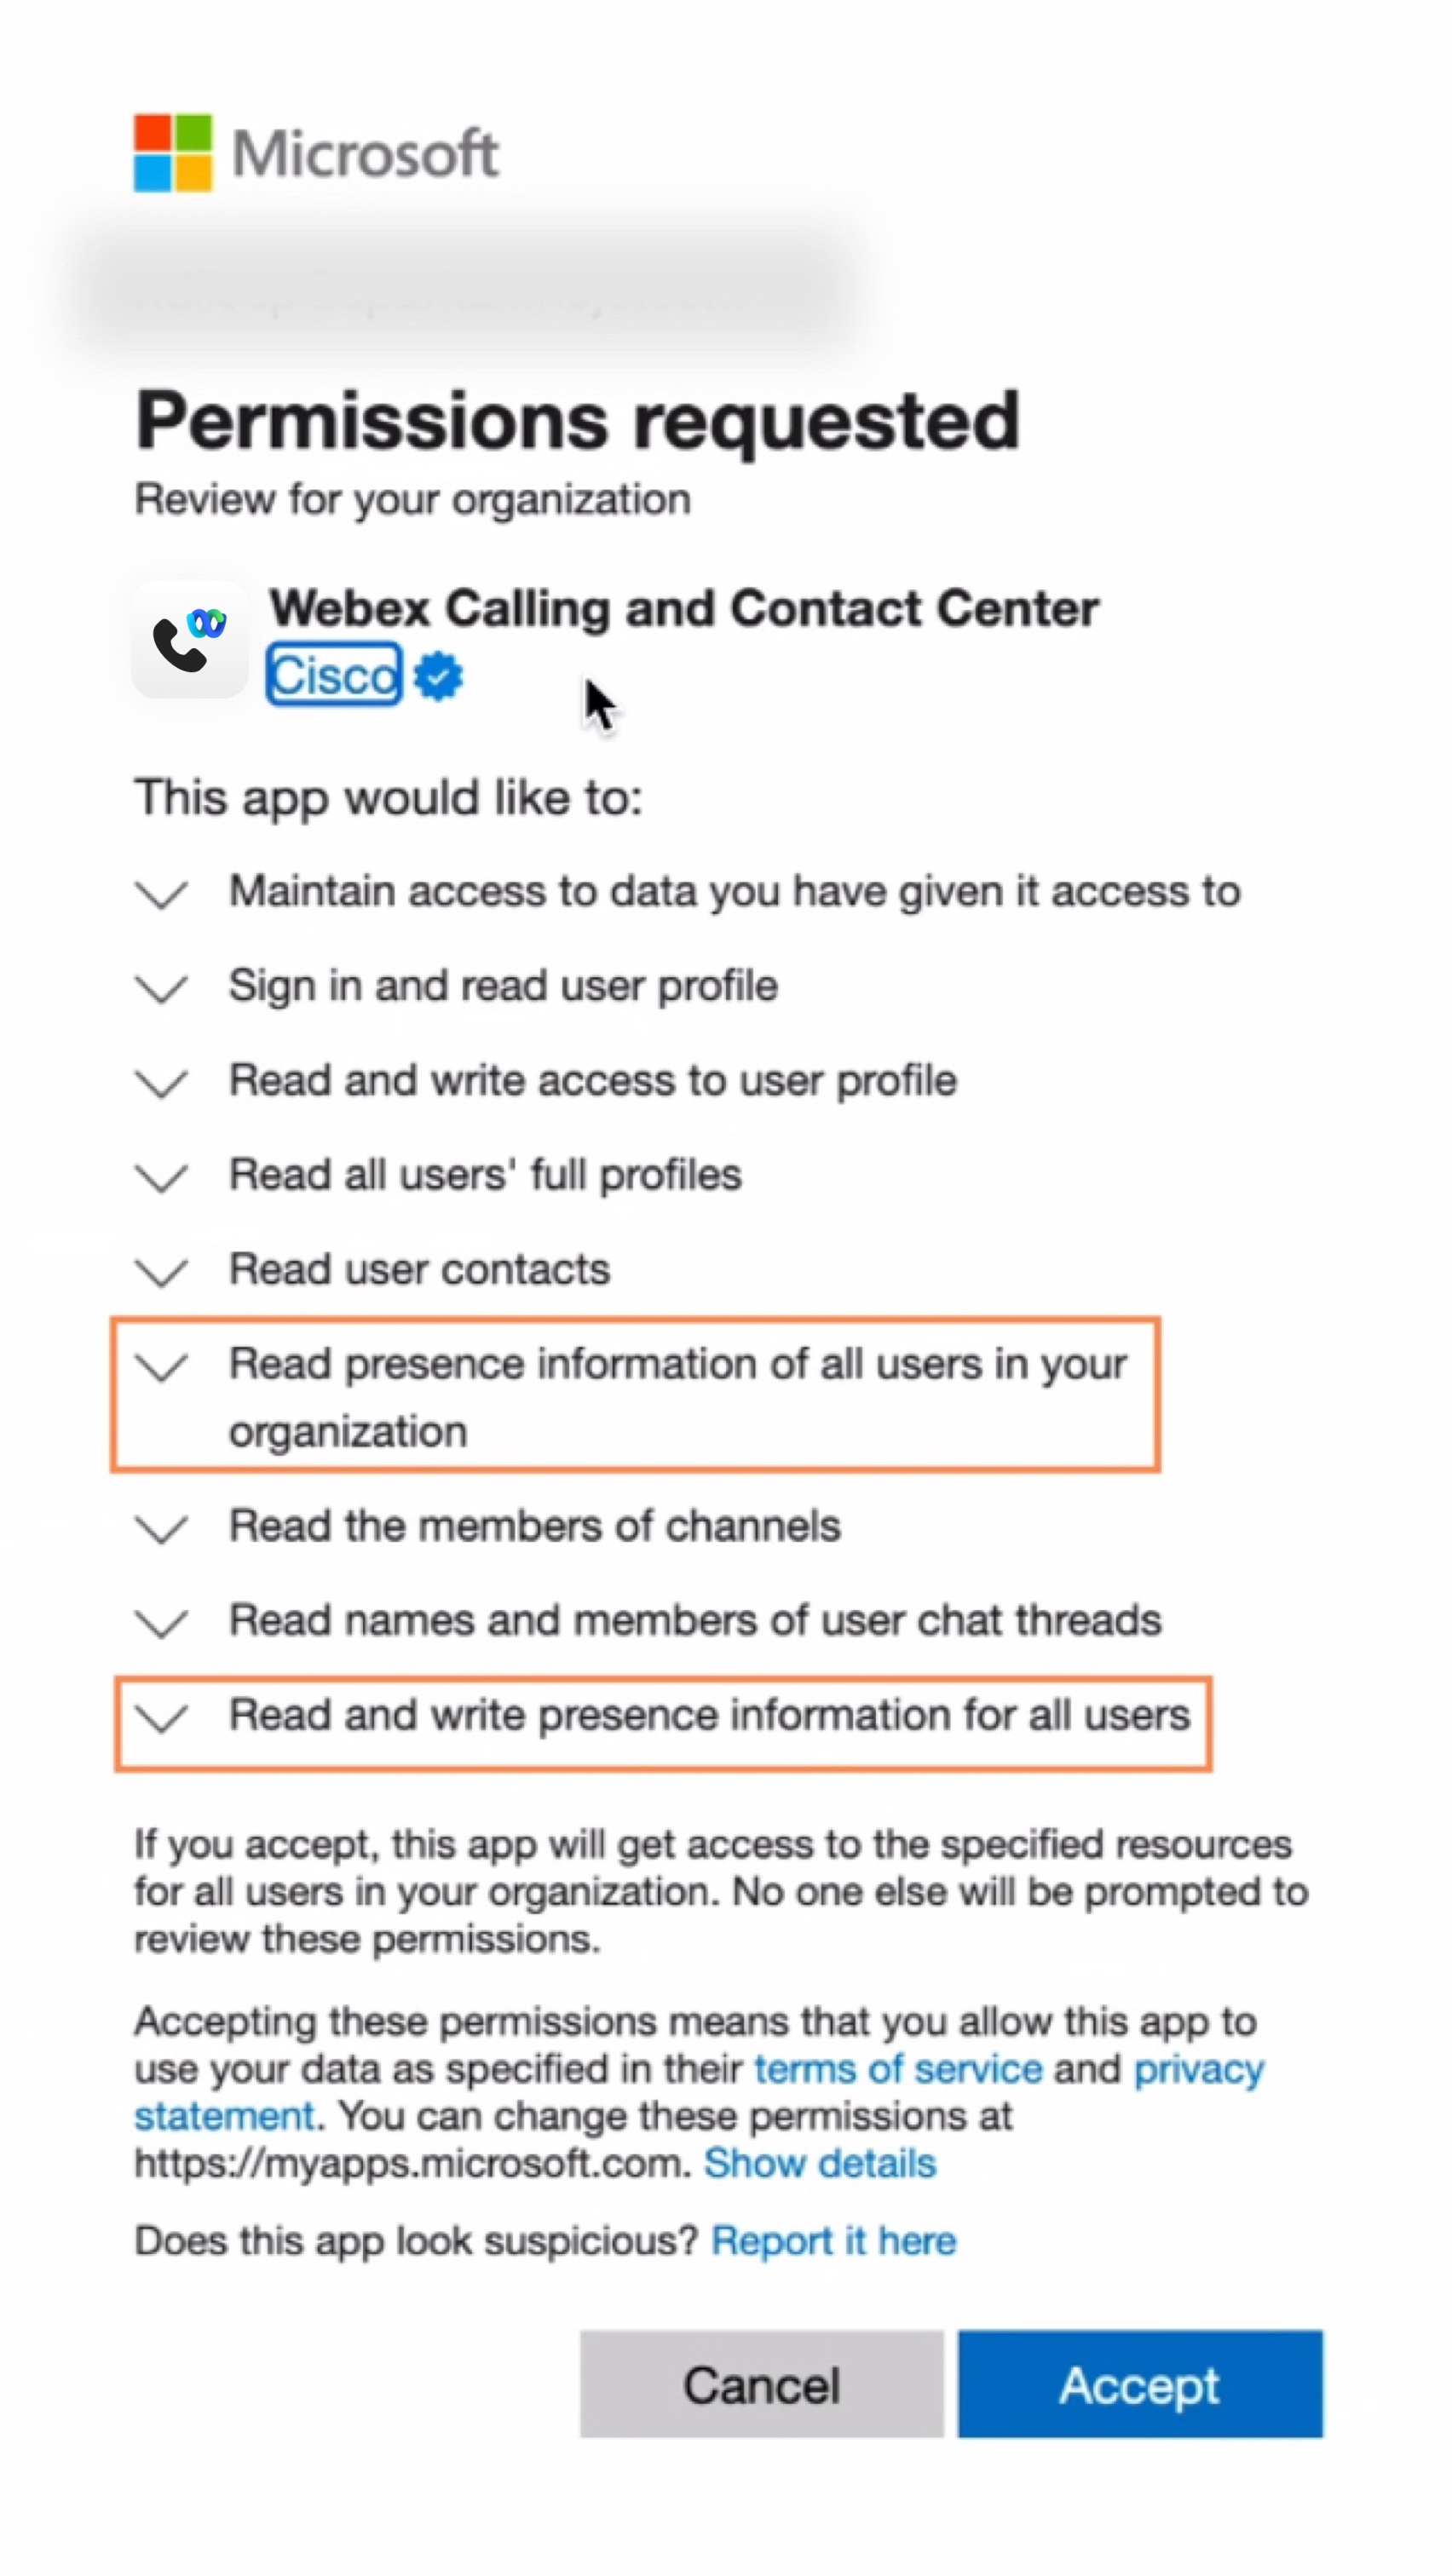
Zaakceptuj uprawnienia do synchronizacji obecności
Przejrzyj i zaakceptuj uprawnienia synchronizacji obecności w usłudze Microsoft Teams, aby dwukierunkowo synchronizować status obecności użytkownika między usługami Microsoft Teams i Webex.
Aby synchronizacja obecności działała, użytkownicy muszą korzystać z integracji Cisco Call co najmniej raz na 90 dni.
| 1 |
W menu Panel przejdź do |
| 2 |
W polu wyszukiwania wpisz |
| 3 |
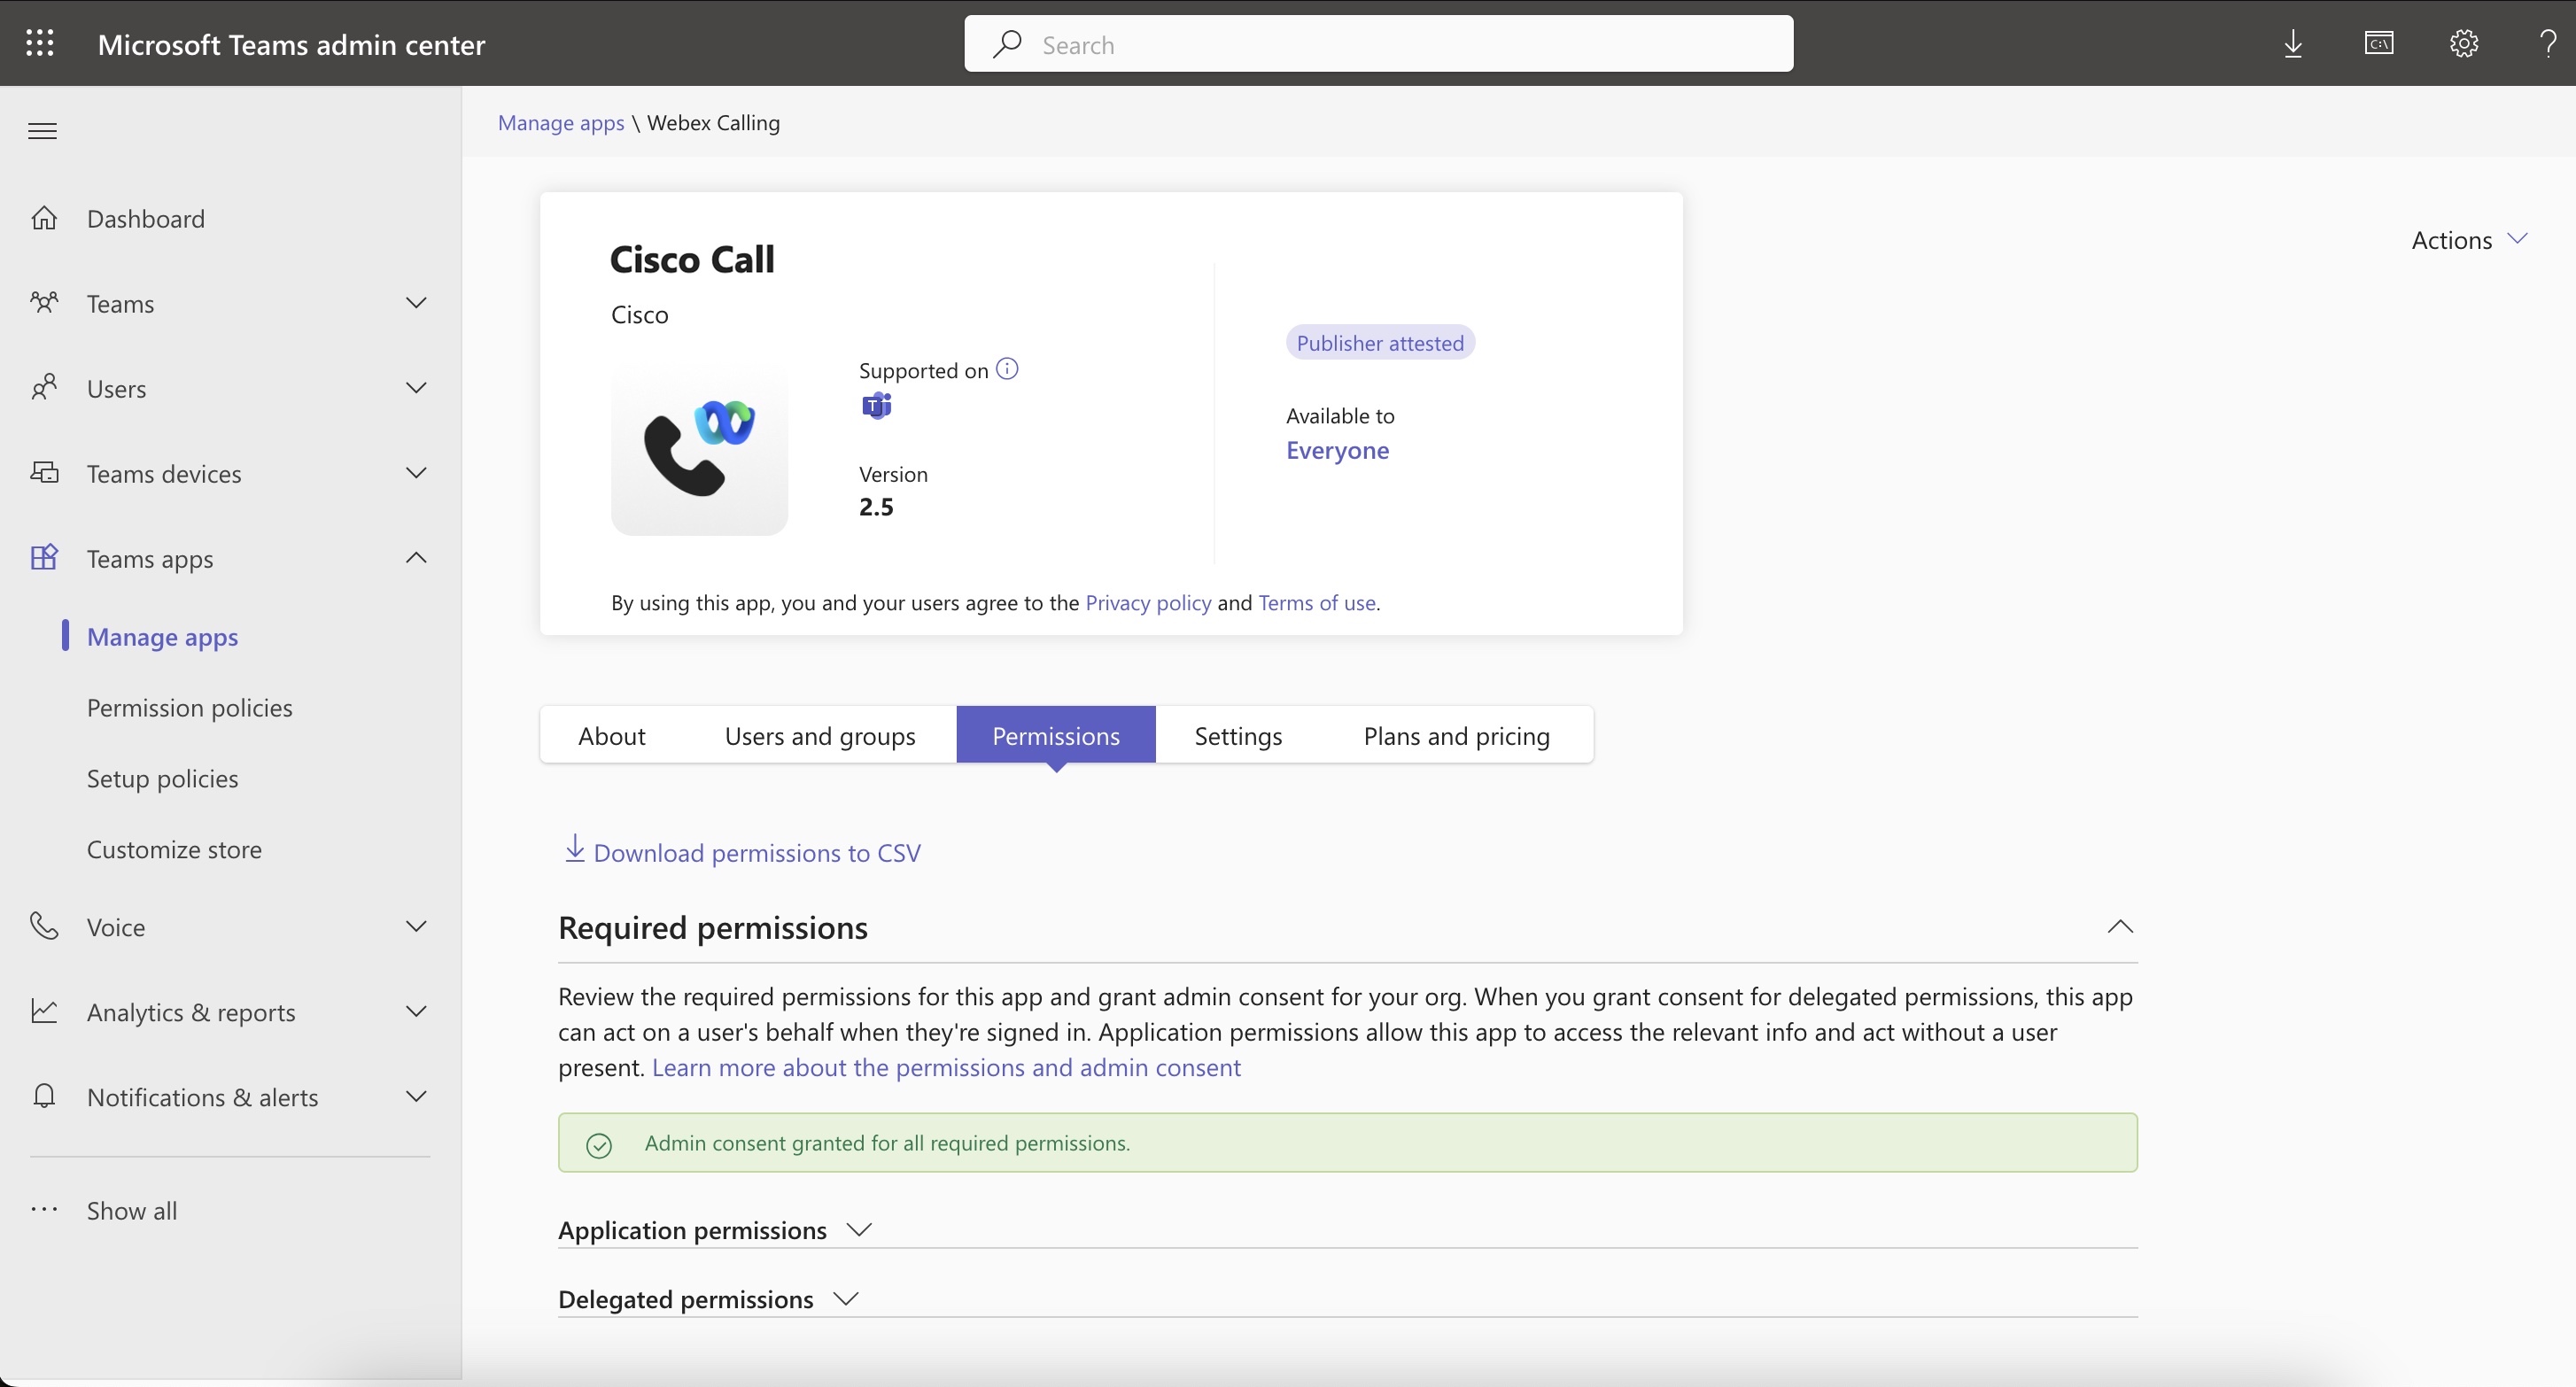
Kliknij kartę Uprawnienia, a następnie kliknij Udziel zgody administratora. |
| 4 |
Sprawdź, czy uwzględniono następujące uprawnienia.
 |
| 5 |
Kliknij Akceptuj, aby zaakceptować uprawnienia. |
| 6 |
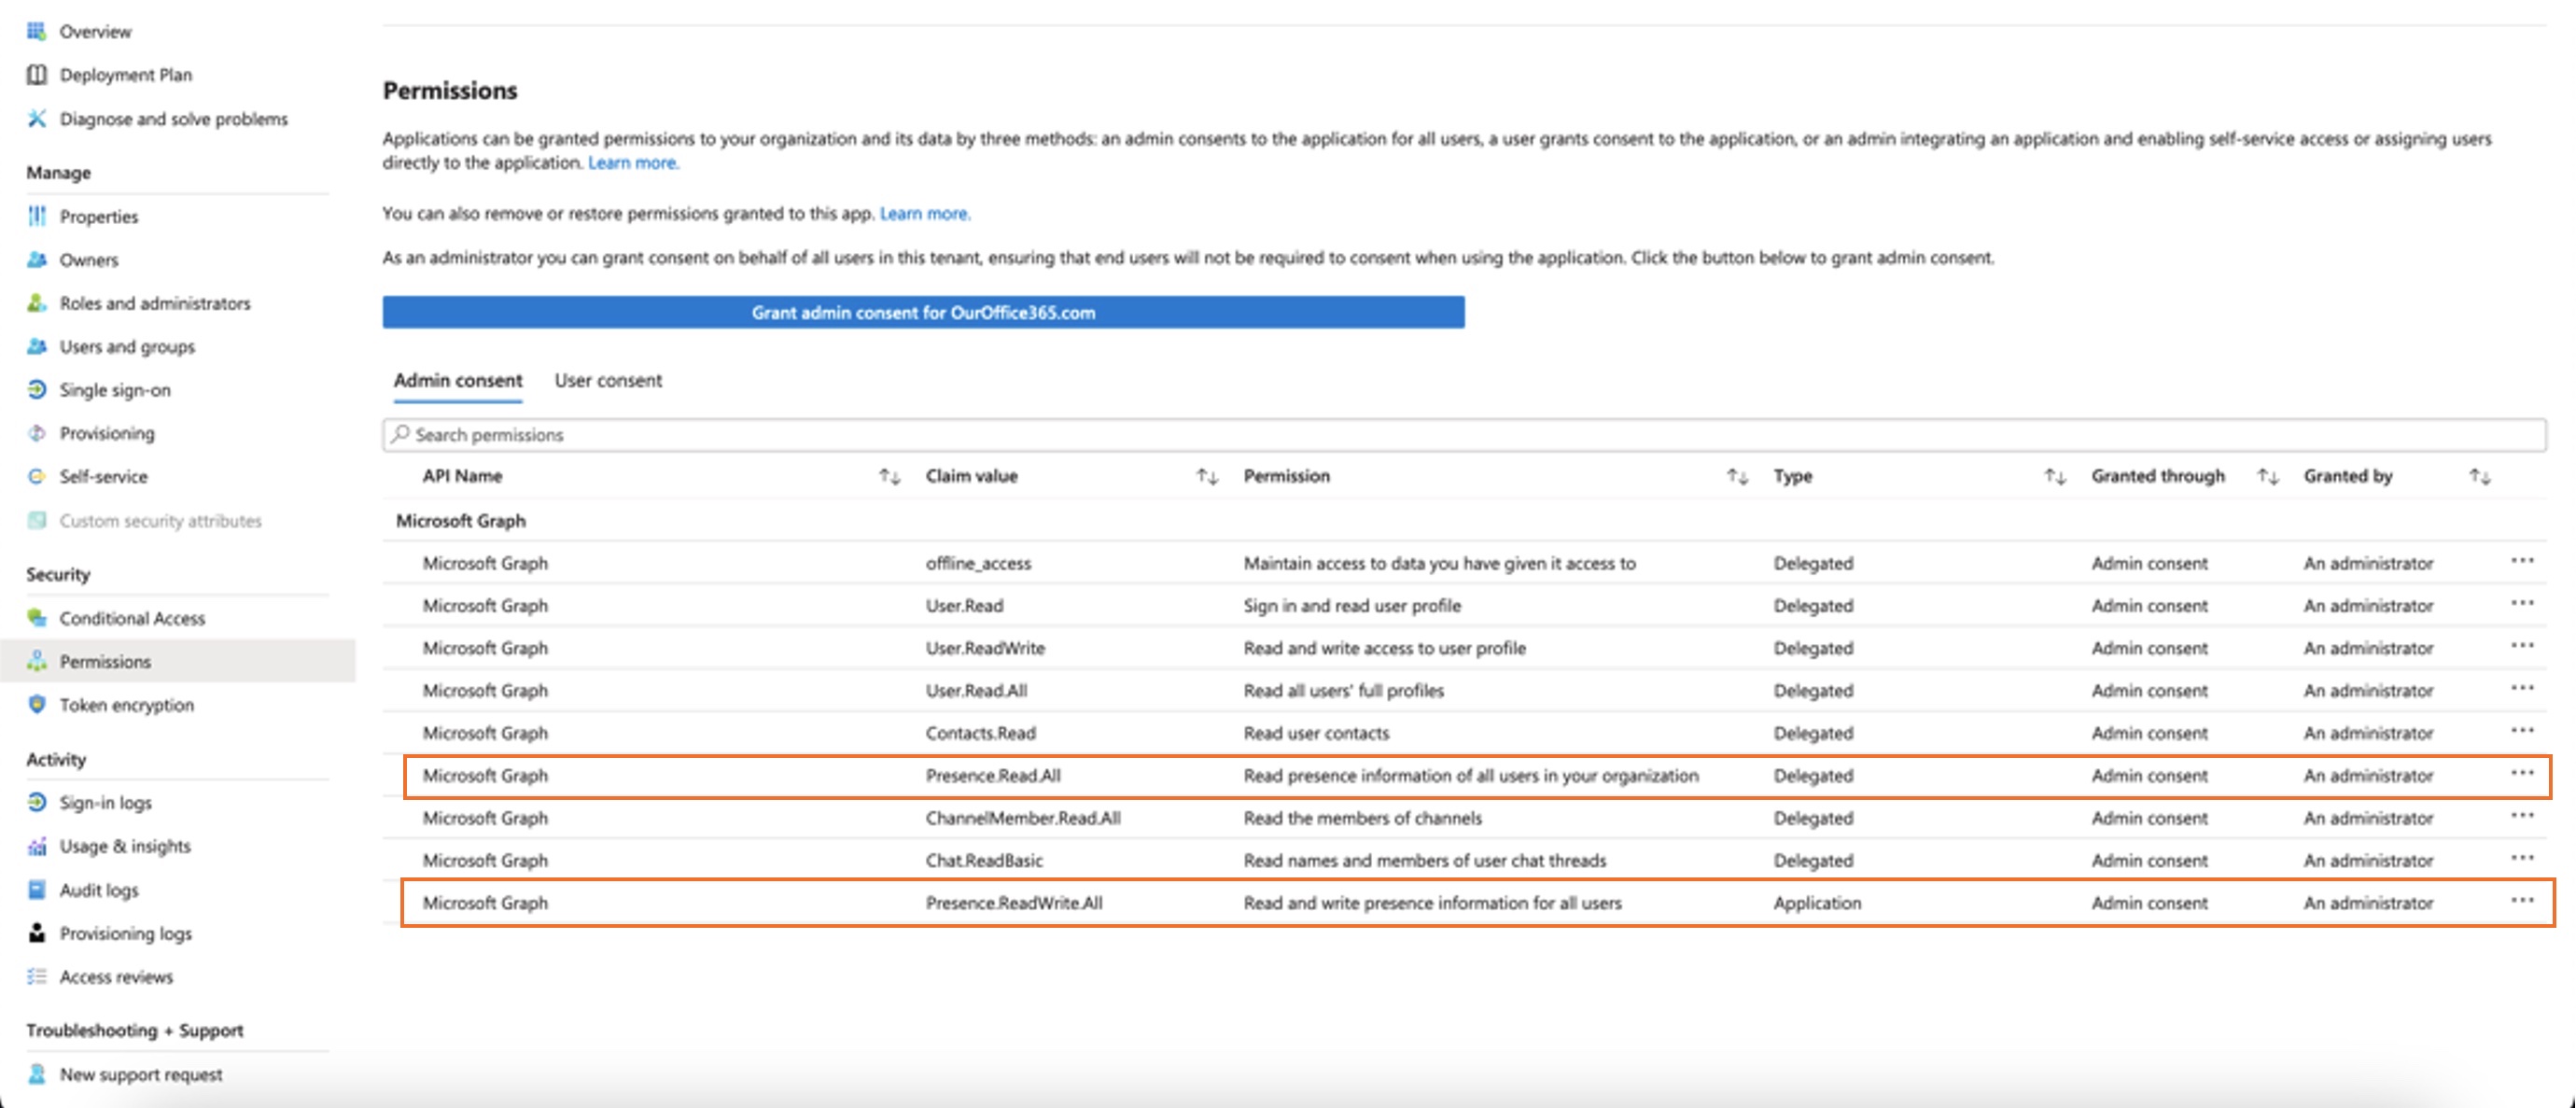
Upewnij się, że nowe uprawnienia wyświetlają się jako przyznane:
W zgodzie administratora należy uwzględnić następujące uprawnienia:
Zarówno uprawnienia
Jeśli Twoja organizacja korzysta obecnie z uprawnienia Jeśli chcesz przejść tylko z Po sprawdzeniu uprawnień włącz synchronizację obecności w Control Hub. Zobacz sekcję Włącz dwukierunkową synchronizację obecności. Aby uniknąć problemów z synchronizacją statusu obecności między Microsoft Teams i Webex, zalecamy ustawienie ustawienia Wymagane przypisanie na Nie. Aby zaktualizować ustawienie, przejdź do centrum administracyjnego Microsoft Entry lub portalu Azure i przejdź do pozycji i wybierz Nie. Jeśli z jakiegoś powodu musisz zachować to ustawienie jako Tak, upewnij się, że poprawnie przypisujesz użytkowników, postępując zgodnie z krokami opisanymi w następujących dokumentach firmy Microsoft: Przypisz role aplikacji do aplikacji & Zarządzaj przypisywaniem użytkowników i grup do aplikacji. |
Dostosuj aplikację Cisco Call
Możesz utworzyć wiele dostosowań aplikacji Cisco Call dla użytkowników Microsoft Teams w zależności od potrzeb Twojej organizacji. Możesz utworzyć domyślną personalizację aplikacji dla wszystkich użytkowników lub utworzyć 10 dodatkowych personalizacji pojedynczej aplikacji i przypisać je konkretnym użytkownikom lub grupom.
Aby uzyskać więcej informacji, zobacz Dostosowywanie aplikacji Cisco Call dla użytkowników usługi Microsoft Teams.
Uprawnienia do integracji Cisco Call i Microsoft Teams
Usługa integracji wykorzystuje interfejsy API Webex i Microsoft w celu uzyskania dostępu do danych, takich jak scentralizowana historia połączeń, wyświetlanie i aktualizowanie statusów, na przykład oznaczanie wiadomości głosowych jako przeczytanych, bez zapisywania danych użytkownika. Wszystkie transfery danych pomiędzy integracją a Webex/Microsoft back-endy odbywają się za pośrednictwem szyfrowanych kanałów HTTPS. Usługa ta gwarantuje, że dane użytkownika nie będą przechowywane w chmurze, co zwiększa prywatność i bezpieczeństwo danych.
Wymagamy od firmy Microsoft minimalnych uprawnień wymaganych do wywołania interfejsu API firmy Microsoft w celu włączenia funkcjonalności integracji. Poniższa tabela opisuje każde uprawnienie, o które prosimy i wyjaśnia, dlaczego jest ono wymagane.
| Pozwolenie | Przyczyna |
|---|---|
|
offline_access |
Umożliwia usłudze integracji wygenerowanie nowego tokena dostępu bez konieczności częstego proszenia użytkownika o ponowną autoryzację. |
|
Użytkownik.Odczyt |
Umożliwia usłudze integracji odczytanie podstawowych informacji o użytkowniku, takich jak adres e-mail. |
|
Użytkownik.OdczytZapis |
Umożliwia usłudze integracji przechowywanie numerów szybkiego wybierania w profilach użytkowników. |
|
Użytkownik.Czytaj.Wszystkie |
Umożliwia usłudze integracji wyszukiwanie użytkowników w katalogu aktywnym w celu wykonywania połączeń. |
|
Kontakty.Czytaj |
Umożliwia usłudze integracji wyszukiwanie kontaktów użytkownika w programie Outlook w celu wykonywania połączeń. |
|
ChannelMember.Read.All |
Umożliwia rozszerzeniu wiadomości integracyjnych odczytanie członków kanału, dzięki czemu użytkownik może wyszukać konkretnego członka kanału i zadzwonić do niego. |
|
Czat.CzytajPodstawowe |
Umożliwia rozszerzeniu wiadomości integracyjnych odczytywanie członków czatu grupowego, dzięki czemu użytkownik może wyszukać konkretnego członka i zadzwonić do niego. |
|
Obecność.Odczyt.Wszystko |
Umożliwia usłudze integracji odczytanie informacji o obecności wszystkich użytkowników w katalogu. |
|
Obecność.Odczyt.Zapis.Wszystko |
Umożliwia usłudze integracji odczytanie wszystkich informacji o obecności oraz zapisanie aktywności i dostępności wszystkich użytkowników w katalogu. |
|
Obecność.Odczyt.Zapis |
Umożliwia usłudze integracyjnej odczytanie informacji o obecności oraz zapisanie informacji o aktywności i dostępności użytkownika. |
Konfiguracja Control Hub
W Control Hub możesz skonfigurować i włączyć następujące funkcje, aby udostępnić je użytkownikom Microsoft Teams.
Ukryj okno aplikacji Webex
W przypadku organizacji, które zdecydowały się na integrację Cisco Call z Microsoft Teams, integracja ta stanowi podstawowy interfejs użytkownika do usług Webex. Po skonfigurowaniu aplikacja Webex będzie nadal zainstalowana i uruchomiona na komputerach użytkowników, ale jej okno będzie domyślnie zamknięte. Działania podejmowane w ramach integracji Cisco Call mogą uruchamiać określone funkcje w aplikacji Webex, ale ogólnie rzecz biorąc użytkownicy nie muszą wchodzić w interakcję z aplikacją Webex.
Za pomocą Control Hub możesz ukryć okno aplikacji Webex na następujących poziomach:
-
Poziom organizacji
-
Poziom grupy użytkowników
-
Poziom użytkownika
Ukryj okno aplikacji Webex dla organizacji
Ustawienia skonfigurowane na poziomie organizacji automatycznie dotyczą wszystkich użytkowników w danej organizacji.
| 1 |
Zaloguj się do centrum sterowania. |
| 2 |
Przejdź do . |
| 3 |
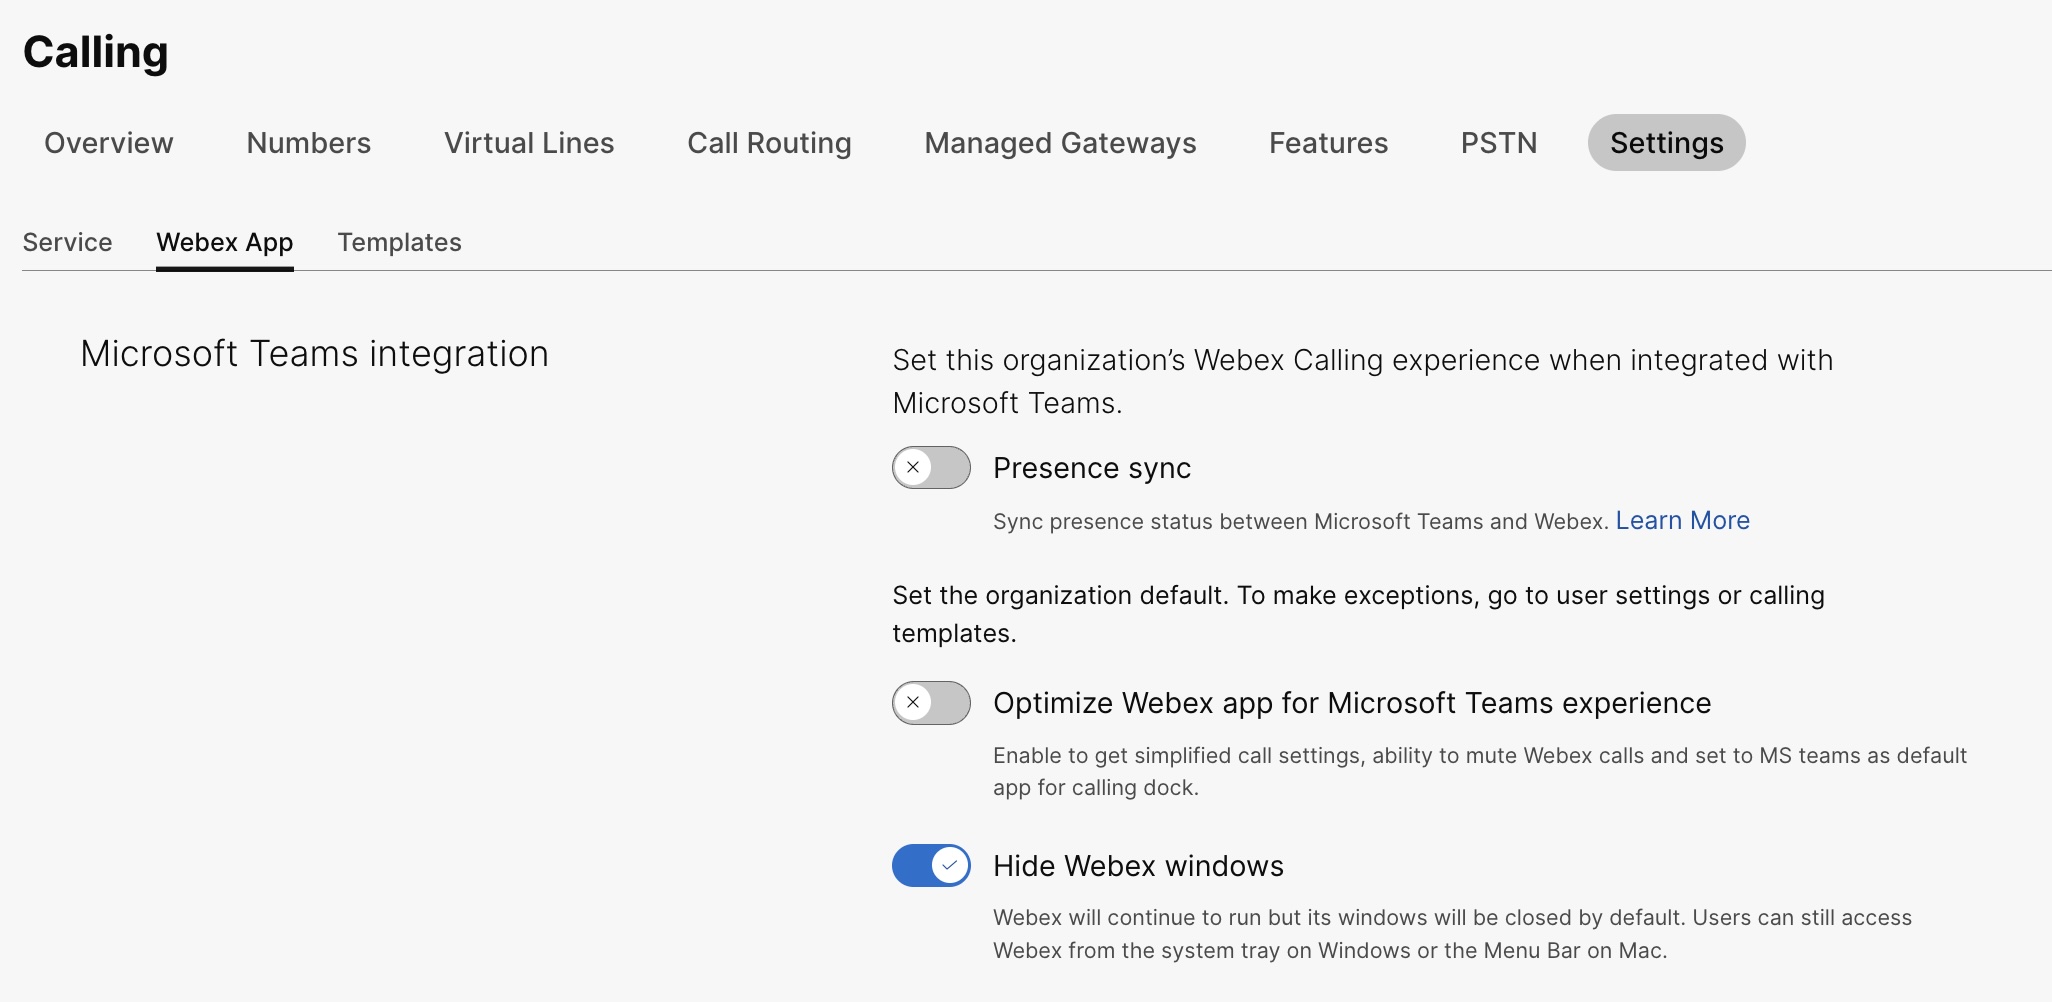
Kliknij kartę Aplikacja Webex, przejdź do sekcji Integracja z Microsoft Teams i włącz opcję Ukryj okna Webex.
Możesz również użyć publicznego interfejsu API, aby ukryć okno aplikacji Webex dla wszystkich użytkowników w organizacji korzystających z integracji Cisco Call z Microsoft Teams. Aby uzyskać szczegółowe informacje, zobacz Aktualizowanie ustawień usługi MS Teams w organizacji w witrynie developer.webex.com. |
Ukryj okno aplikacji Webex dla grupy użytkowników
Aby ukryć okno aplikacji Webex dla grupy użytkowników, utwórz szablon połączeń i przypisz go do grupy użytkowników. Konfiguracja w szablonie dotyczy wszystkich użytkowników w grupie.
Aby utworzyć nowy szablon ukrywający okno aplikacji Webex:
| 1 |
Zaloguj się do centrum sterowania. |
| 2 |
Przejdź do . |
| 3 |
Kliknij Utwórz szablon, wybierz Utwórz szablon i kliknij Dalej. Jeśli Twoją branżą jest edukacja, możesz zastosować predefiniowane szablony z niestandardowymi ustawieniami dla uczniów lub nauczycieli. |
| 4 |
W sekcji Ogólne wpisz Nazwę szablonu i Opis. |
| 5 |
Przejdź do sekcji Integracja z Microsoft Teams i włącz opcję Ukryj okna Webex. |
| 6 |
Kliknij Utwórz szablon i dalej. |
| 7 |
Wyszukaj i wybierz grupę dla tego szablonu i kliknij Gotowe. Modyfikuj lub usuń szablon:
Aby zmodyfikować szablon, kliknij go, zmień przełączniki i kliknij Zapisz. Aby usunąć szablon, kliknij go i wybierz opcję Usuń z listy rozwijanej Akcje. Na stronie Usuń szablon zaznacz pole informujące, że usunięcie szablonu jest trwałe, a następnie kliknij Usuń. |
Rozważania dotyczące stosowania szablonów wywołań do grupy użytkowników
-
Gdy użytkownik jest dołączany do organizacji, dziedziczy ustawienia z poziomu organizacji.
-
Jeśli użytkownik zostanie dodany do grupy użytkowników, zostaną zastosowane ustawienia z szablonu Wywoływanie.
-
Jeśli użytkownik należy do wielu grup użytkowników, wówczas szablon o najwyższej randze (Ranga 1) ma najwyższy priorytet i obowiązują ustawienia tego szablonu.
-
Jeśli użytkownik ma indywidualne ustawienia użytkownika, to ustawienia te mają pierwszeństwo przed ustawieniami na poziomie grupy użytkowników lub organizacji.
Więcej informacji na temat zarządzania szablonami można znaleźć w Konfigurowanie szablonów ustawień.
Istniejący szablon można zastosować z sekcji Grupa lub sekcji Wywołanie.
- Aby zastosować szablon z sekcji Grupa, zobacz Konfigurowanie szablonu ustawień.
- Aby złożyć wniosek w sekcji Połączenia, wykonaj następujące kroki.
| 1 |
Zaloguj się do centrum sterowania. |
| 2 |
Przejdź do . |
| 3 |
Kliknij |
| 4 |
Wpisz nazwę grupy, do której chcesz zastosować szablon, a następnie wybierz grupę. |
| 5 |
Kliknij przycisk Gotowe. |
 obok istniejącego szablonu i kliknij
 Ukryj okno aplikacji Webex dla użytkownika
Ustawienia poszczególnych użytkowników zastępują ustawienia na poziomie organizacji i grupy użytkowników.
| 1 |
Zaloguj się do centrum sterowania. |
| 2 |
Przejdź do . |
| 3 |
Wybierz użytkownika i kliknij Dzwonienie. |
| 4 |
Przejdź do Środowisko połączeń użytkownika i kliknij Integracja z Microsoft Teams. |
| 5 |
Włącz Ukryj okna Webex. 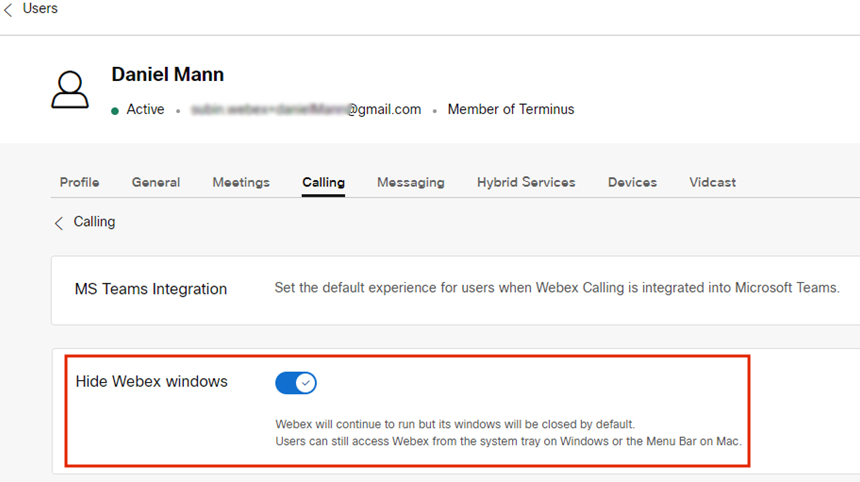 Po skonfigurowaniu ustawień dla użytkownika możesz dokonać dalszej modyfikacji ustawień na poziomie użytkownika. Ustawienia użytkownika nie powracają automatycznie do ustawień domyślnych organizacji. Za pomocą publicznego interfejsu API możesz ukryć okno aplikacji Webex przed klientem Microsoft Teams dla pojedynczego użytkownika. Zobacz Konfigurowanie ustawień usługi MS Teams danej osoby i Pobieranie ustawień usługi aplikacji danej osoby w developer.webex.com. |
Po skonfigurowaniu ustawień użytkownicy muszą ponownie uruchomić aplikację Webex i zalogować się, aby zobaczyć zmiany.
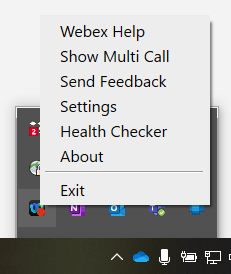
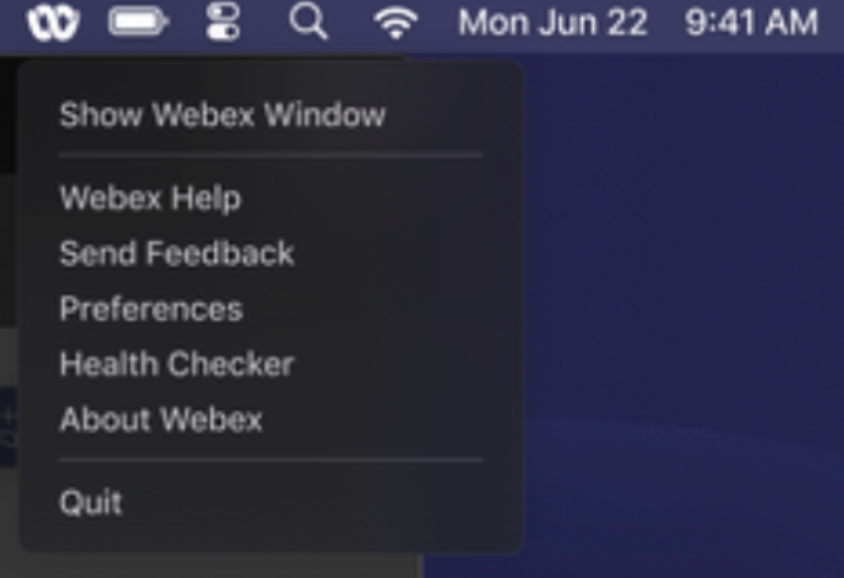
Jeśli użytkownicy chcą korzystać z samej aplikacji Webex, mogą uzyskać do niej dostęp z paska zadań w systemie Windows lub paska menu na komputerze Mac. Aplikacja Webex jest widoczna tylko na pasku zadań systemu Windows lub w stacji dokującej systemu macOS, gdy okno jest aktywne i używane.
|
Aplikacja Webex na pasku zadań systemu Windows |
Aplikacja Webex na pasku menu Mac |
Włącz okno dokowania wywołań
Okno dokowania połączeń (połączenia wielokrotne) to oddzielne, ruchome okno, które pomaga użytkownikom zarządzać wieloma liniami lub liniami współdzielonymi w jednym oknie. Użytkownicy mogą wykonywać i odbierać połączenia, sprawdzać status wszystkich linii, a także mieć lepszy dostęp do funkcji, takich jak wstrzymanie, przekierowanie i wtrącenie, bez konieczności przechodzenia do innego okna.
| 1 |
Zaloguj się do centrum sterowania. |
| 2 |
Przejdź do . |
| 3 |
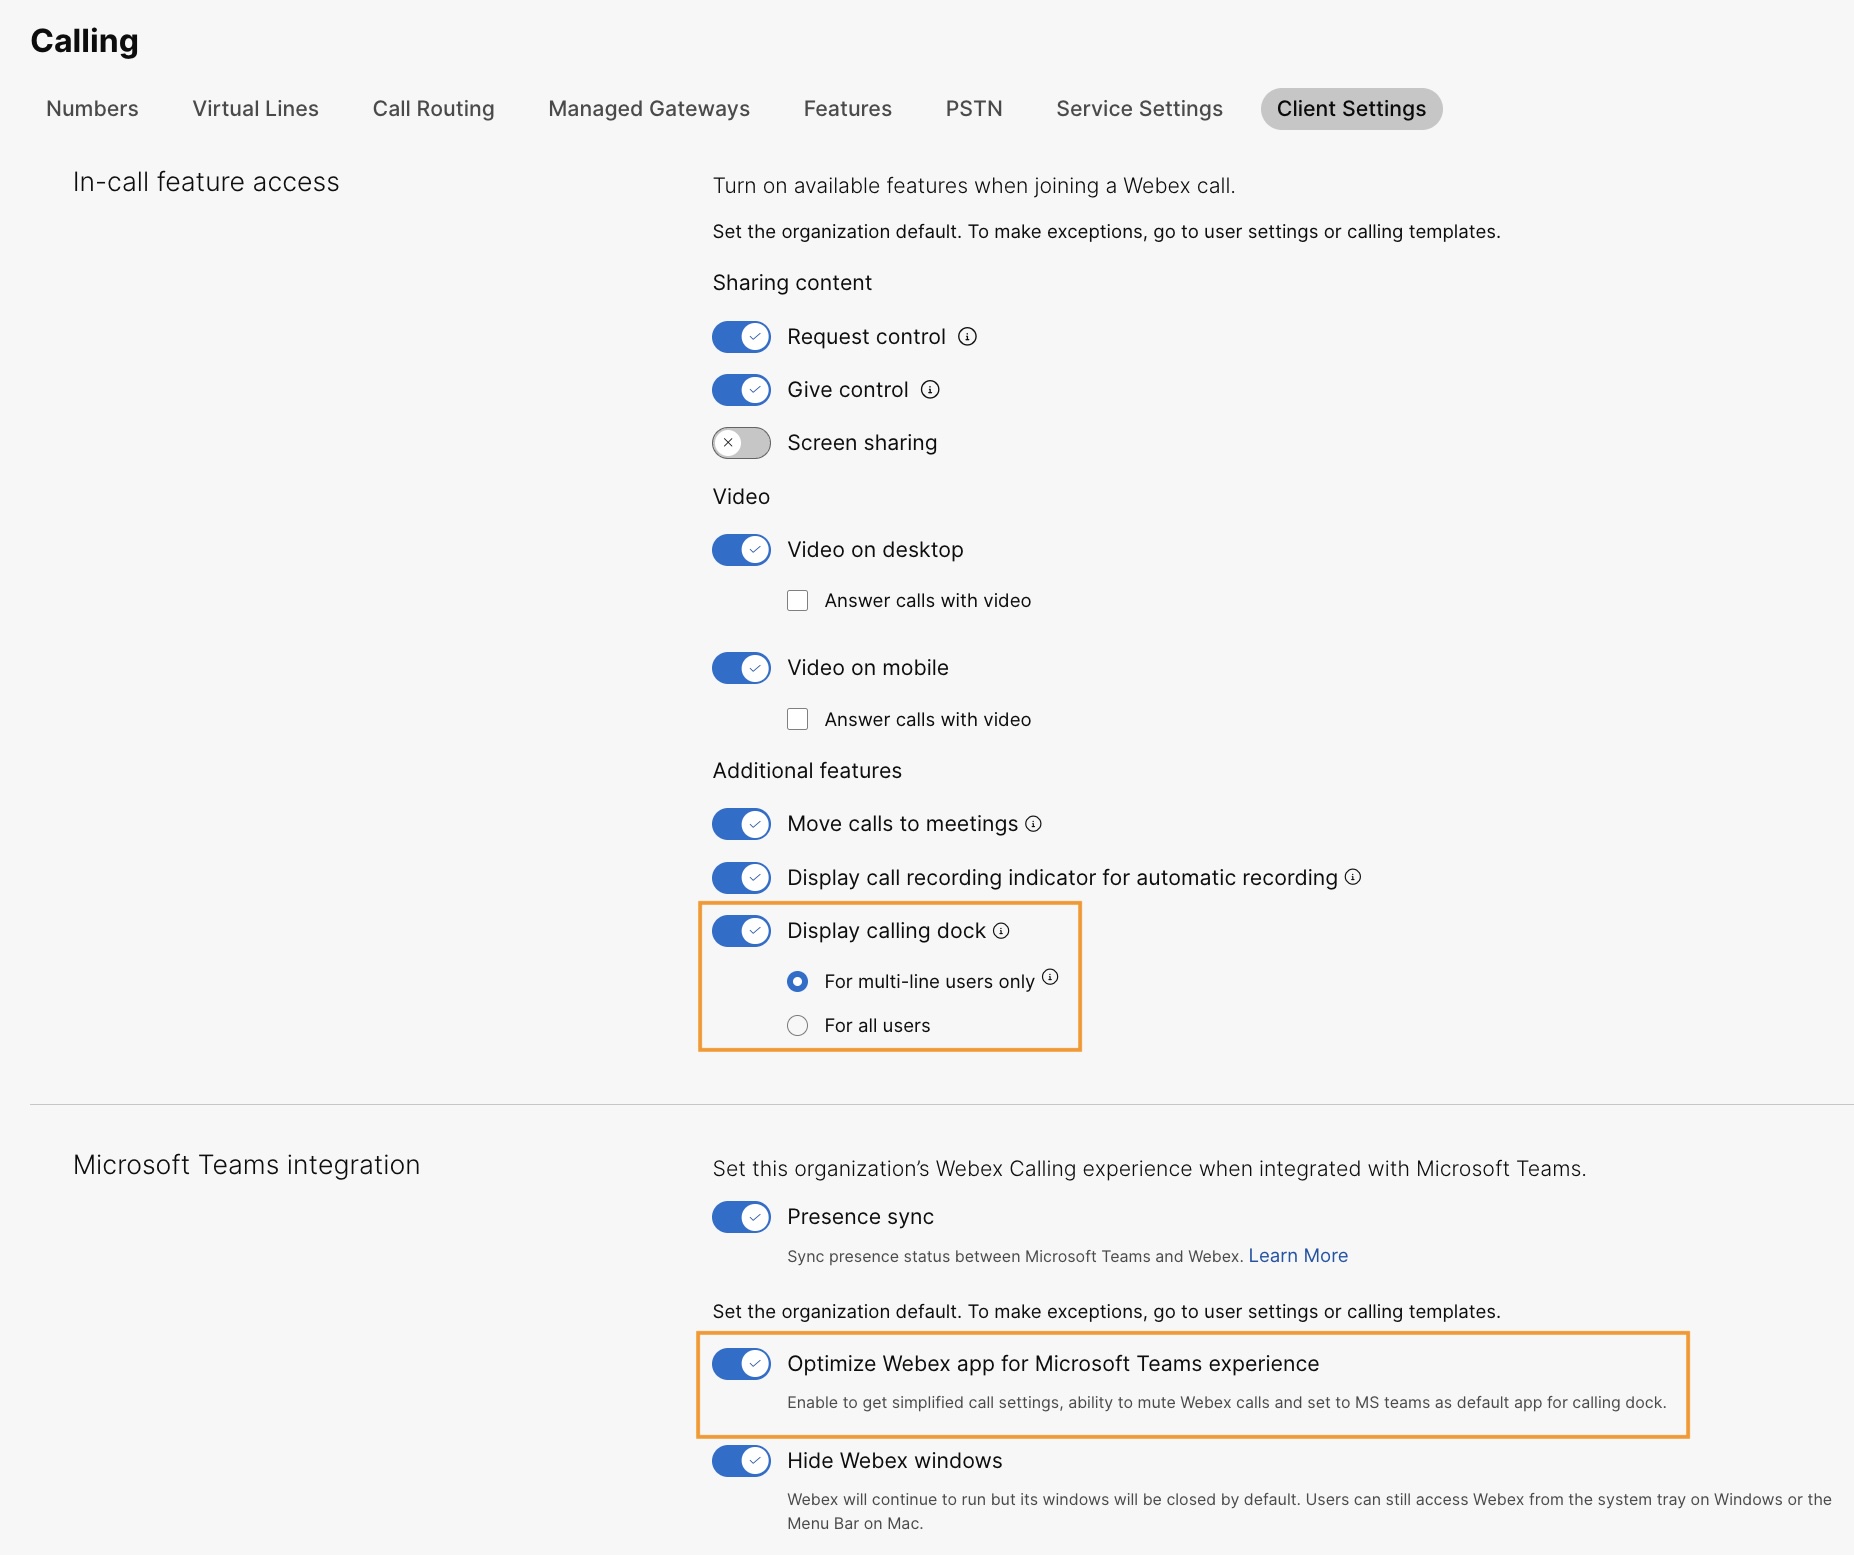
Kliknij kartę Aplikacja Webex, przejdź do sekcji Dostęp do funkcji połączeń i w obszarze Dodatkowe funkcjewłącz opcję Wyświetl dok połączeń i wybierz jedną z następujących opcji:
Funkcję tę można skonfigurować również na poziomie grupy użytkowników i na poziomie użytkownika.
|
Zoptymalizuj aplikację Webex pod kątem środowiska Microsoft Teams
Funkcja ta zapewnia użytkownikom następujące możliwości:
-
Uproszczone ustawienia połączeń — ustawienia połączeń wyświetlają tylko opcje niezbędne do integracji. Włączenie tej funkcji upraszcza tylko ustawienia połączeń dostępne poprzez Calling Dock. Ustawienia połączeń dostępne w ramach integracji Cisco Call pozostają domyślnie uproszczone.
-
Wycisz połączenia Cisco — połączenia przychodzące Cisco są wyciszane, gdy użytkownik bierze udział w rozmowie lub spotkaniu w aplikacji Microsoft Teams. Aby ta funkcja działała, należy ją włączyć w Control Hub, a użytkownik musi włączyć opcję Wycisz powiadomienia tylko wtedy, gdy jestem na spotkaniu lub w trakcie rozmowy w ustawieniach połączeń w integracji Cisco Call.
Jeśli wyłączysz tę funkcję w Control Hub, ustawienia użytkownika będą obowiązywały tylko wtedy, gdy użytkownik uczestniczy w rozmowie lub spotkaniu Cisco. Jeśli włączysz tę funkcję, ustawienia użytkownika będą obowiązywać, gdy użytkownik bierze udział w rozmowie lub spotkaniu w aplikacji Microsoft Teams albo w rozmowie lub spotkaniu w aplikacji Cisco.
-
Korzystanie z jednej aplikacji — gdy użytkownik kliknie ikonę poczty głosowej i scentralizowanej historii połączeń w pasku połączeń, zostanie przekierowany do aplikacji Microsoft Teams Cisco Call zamiast do aplikacji Webex.
Dla użytkowników systemu Windows: Kliknięcie aplikacji Webex na pasku zadań powoduje otwarcie obszaru dokującego do połączeń zamiast aplikacji Webex.
| 1 |
Zaloguj się do centrum sterowania. |
| 2 |
Przejdź do . |
| 3 |
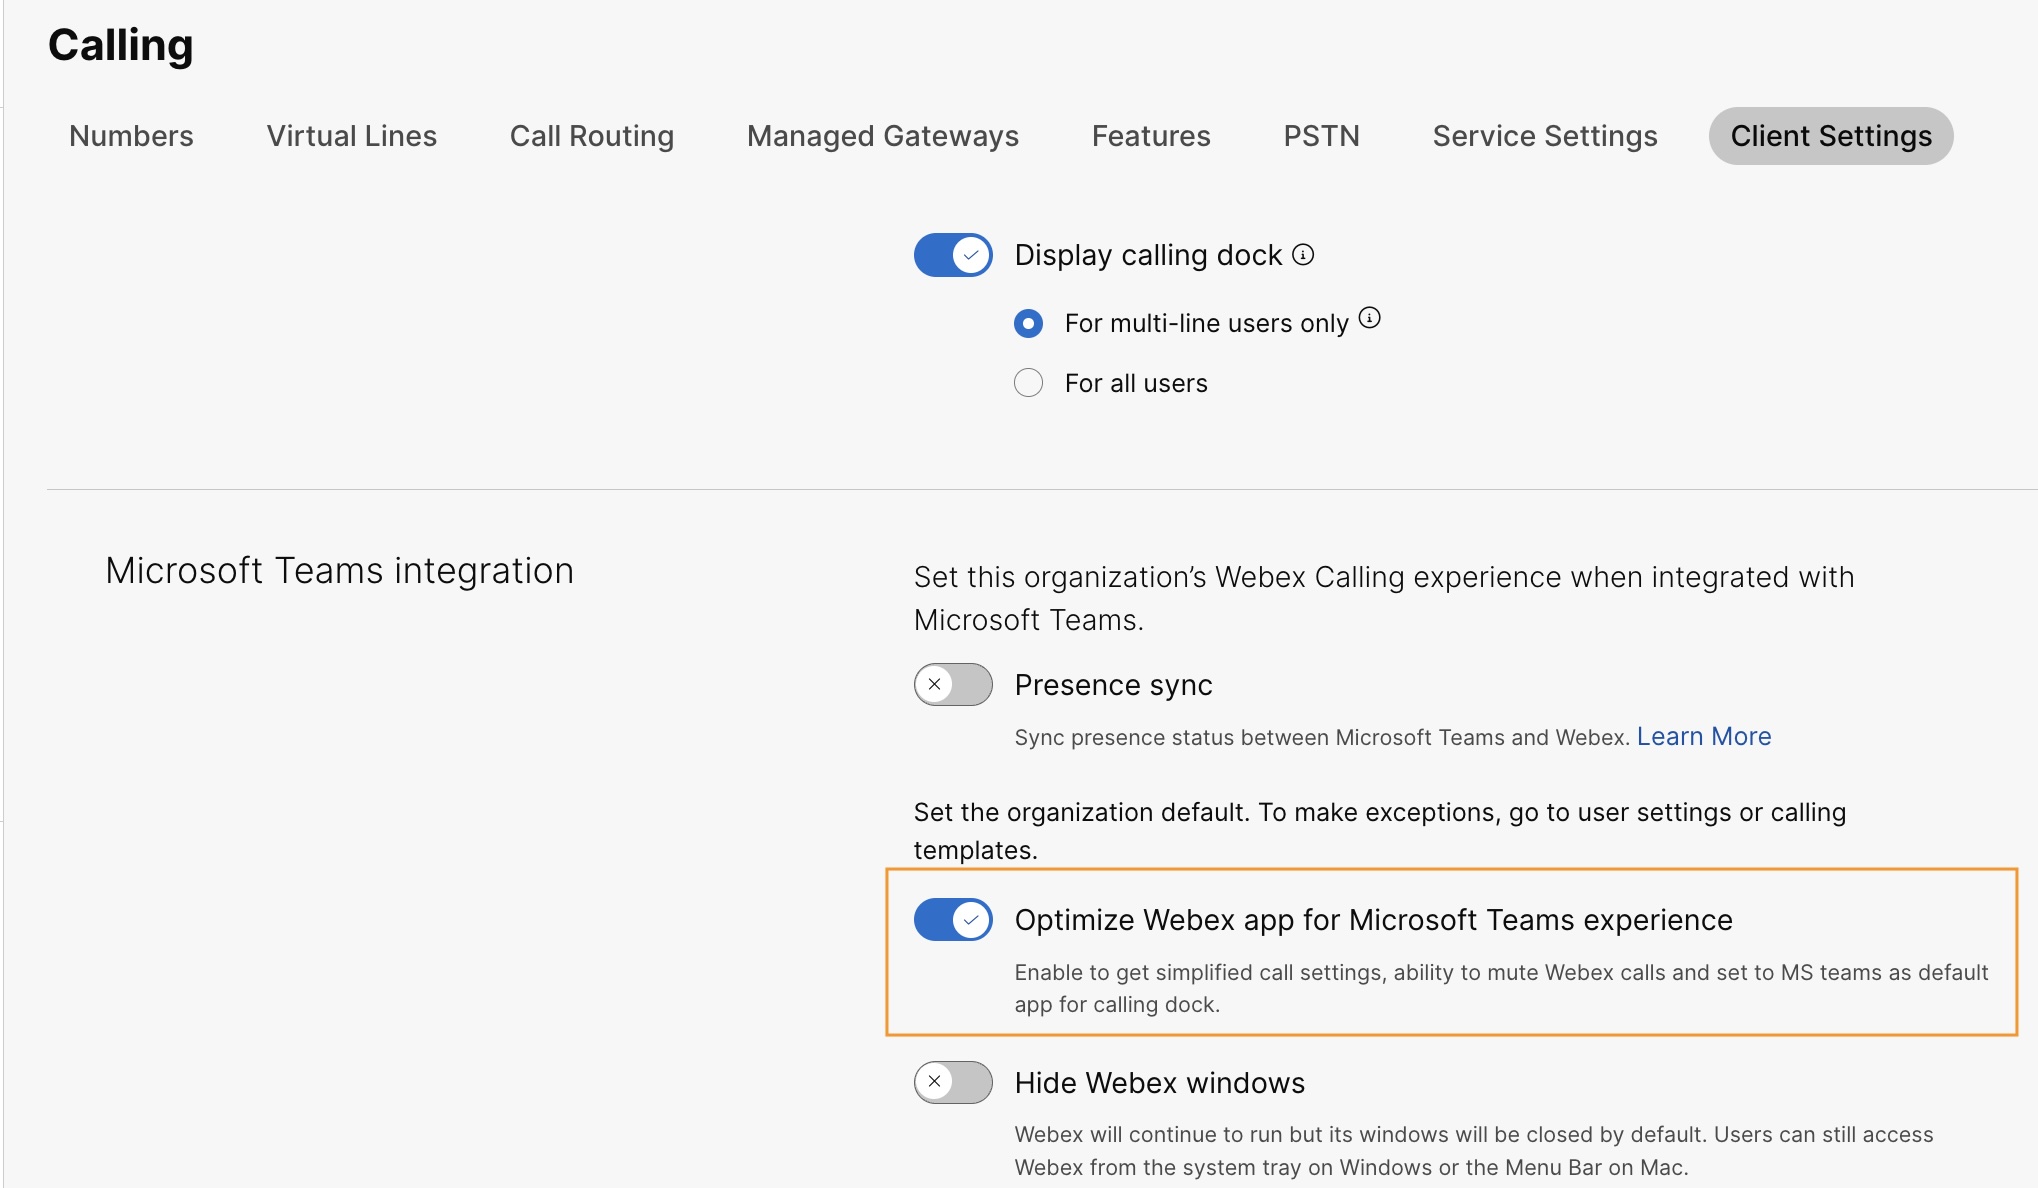
Kliknij kartę Aplikacja Webex, przejdź do sekcji Integracja z Microsoft Teams i włącz opcję Optymalizuj aplikację Webex pod kątem środowiska Microsoft Teams.
To przełączanie jest wyłączone, jeśli nie włączono przełącznika Wyświetl dok połączeń w sekcji Dostęp do funkcji w trakcie połączenia. Funkcję tę można skonfigurować również na poziomie grupy użytkowników i na poziomie użytkownika.
|
Włącz pocztę głosową, scentralizowaną historię połączeń i synchronizację obecności
Poczta głosowa i scentralizowana historia połączeń
Funkcje poczty głosowej i scentralizowanej historii połączeń są domyślnie włączone dla klientów korzystających z usług Webex Calling, Dedicated Instance i UCM Cloud.
Aby uzyskać więcej informacji na temat włączania poczty głosowej dla użytkowników usługi Webex Calling, zobacz: Konfiguruj i zarządzaj ustawieniami poczty głosowej dla użytkownika usługi Webex Calling.
Aby uzyskać więcej informacji na temat włączania poczty głosowej dla użytkowników BroadWorks, zobacz Włączanie poczty głosowej dla integracji z aplikacją Microsoft Teams.
Administratorzy BroadWorks muszą włączyć ujednoliconą, scentralizowaną historię połączeń, aby mieć pewność, że ta funkcja działa prawidłowo. Więcej informacji można znaleźć w Przewodniku konfiguracji Webex for Cisco BroadWorks.
Dwukierunkowa synchronizacja obecności
Ta funkcja umożliwia dwukierunkową synchronizację statusu obecności między Microsoft Teams i Webex, obsługując wiele dzierżaw Microsoft Teams w tej samej organizacji Webex. Status obecności obejmuje: W rozmowie, Na spotkaniu, Prezentacjai Nie przeszkadzać.
Po włączeniu tej funkcji, gdy użytkownik wykonuje lub odbiera połączenie Webex, jego status w usłudze Microsoft Teams zmienia się na W trakcie połączenia. Po włączeniu opcji Nie przeszkadzać w aplikacji Webex lub dowolnym urządzeniu Webex status zostanie automatycznie zsynchronizowany z usługą Microsoft Teams. Podobnie statusy Na spotkaniu i Prezentacja są synchronizowane między aplikacjami.
Jeśli opcja Nie przeszkadzać jest włączona w aplikacji Webex użytkownika lub dowolnym urządzeniu Webex, użytkownik nie otrzyma żadnych powiadomień o połączeniach przychodzących ani wiadomościach w aplikacji Webex, na urządzeniu Webex ani w usłudze Microsoft Teams.
Możesz również użyć publicznego interfejsu API, aby włączyć synchronizację obecności Webex z klientem Microsoft Teams. Aby uzyskać szczegółowe informacje, zobacz Aktualizowanie ustawień usługi MS Teams w organizacji w witrynie developer.webex.com.
Poniższa tabela przedstawia reprezentację dwukierunkowej synchronizacji statusu między Webex i Microsoft Teams.
|
Stan usługi Webex |
Status Microsoft Teams |
|---|---|
|
|
|
|
|
|
|
|
|
|
|
|
Obecnie tę funkcję można skonfigurować tylko na poziomie organizacji.
| 1 |
Zaloguj się do centrum sterowania. |
| 2 |
Przejdź do . |
| 3 |
Kliknij kartę Aplikacja Webex, przejdź do sekcji Integracja z Microsoft Teams i włącz opcję Synchronizacja obecności. Aby uzyskać najlepsze działanie, możesz włączyć przełącznik Ukryj okna Webex, ale jest to opcjonalne. |
| 4 |
Przejdź do sekcji Synchronizacja statusu Nie przeszkadzać (DND) i włącz przełącznik. 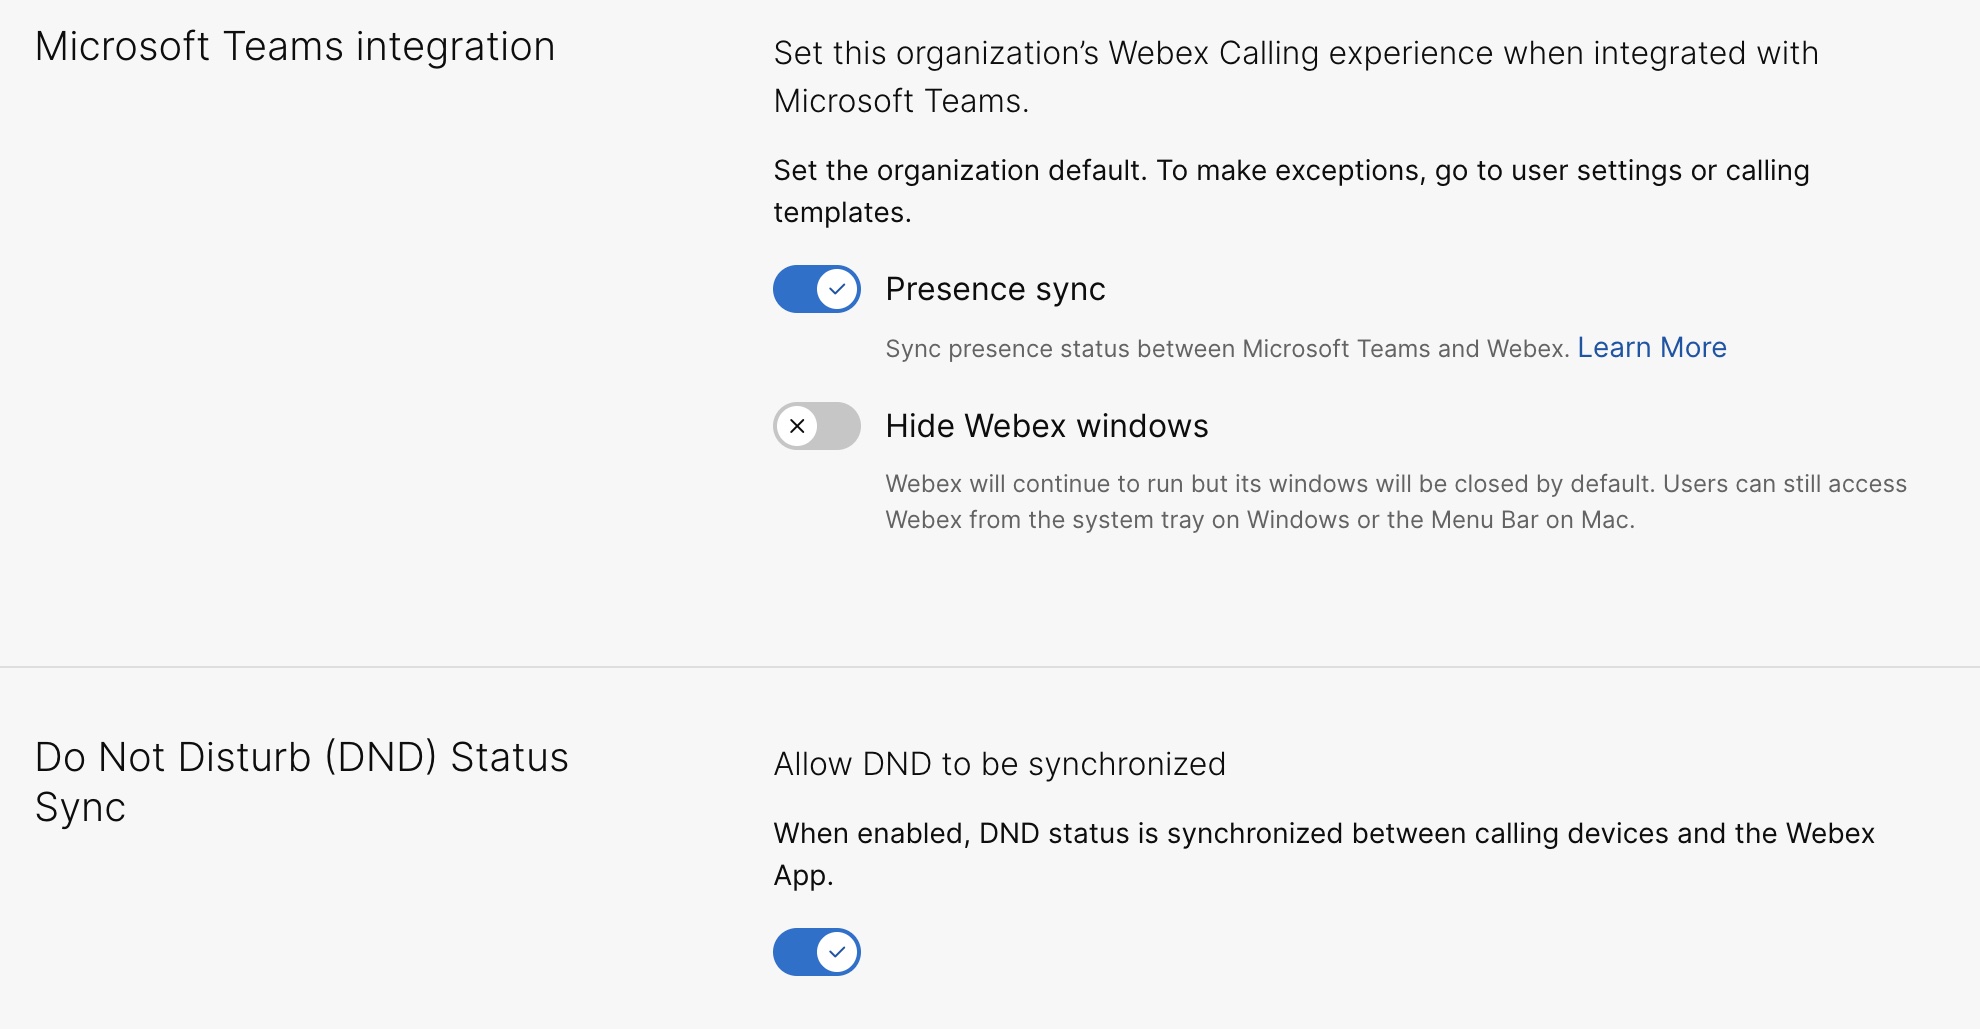 |
Dodatkowa konfiguracja dla użytkowników Unified CM
Aby włączyć pocztę głosową, scentralizowaną historię połączeń i usługę dwukierunkowej synchronizacji obecności dla klientów korzystających z lokalnej usługi Unified CM, wykonaj następujące kroki:
Aktywacja usługi poczty głosowej dla klientów lokalnych zajmuje maksymalnie 12 godzin.
| 1 |
Zaloguj się do centrum sterowania. | ||||
| 2 |
Przejdź do . Na karcie Zarządzanie UC kliknij pozycję Spis usługi. Zostanie wyświetlona lista grup klastrów z opisem, stanem, klastrami i węzłami. | ||||
| 3 |
Wykonaj następujące czynności:
Zostanie wyświetlona strona Spis usługi, a na niej lista klastrów należących do wybranej grupy klastrów. | ||||
| 4 |
Kliknij przycisk Szczegóły obok klastra, do którego należy węzeł określonego produktu. Zostanie wyświetlona nazwa węzła z wersją, produktem i stanem. | ||||
| 5 |
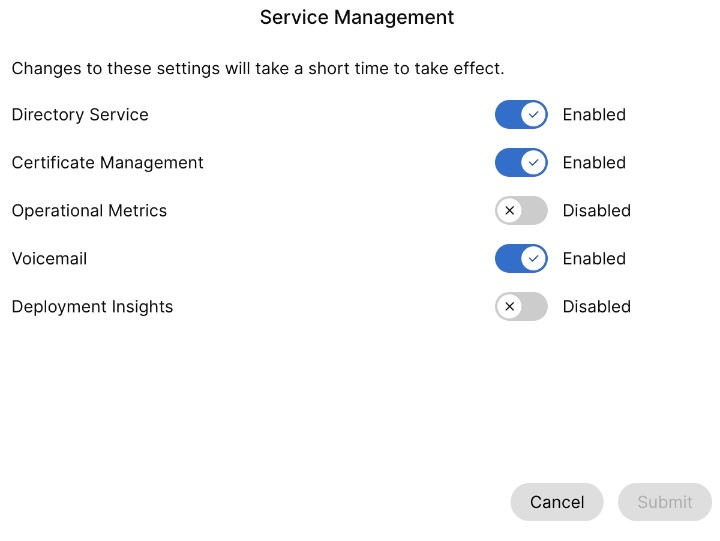
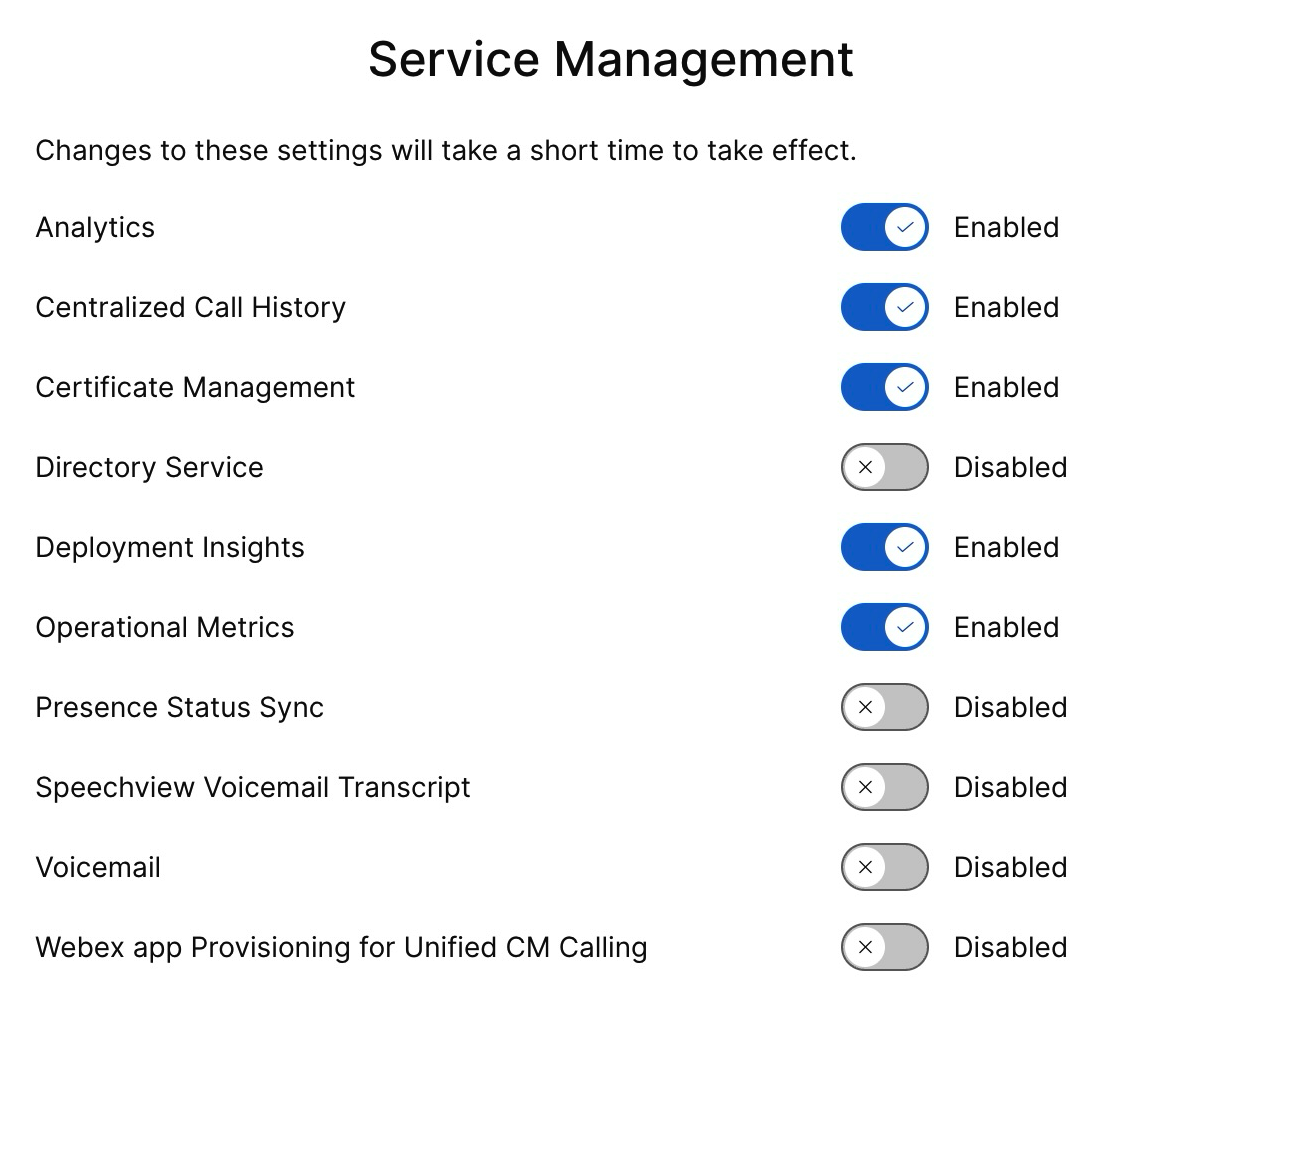
Kliknij ikonę trzech kropek ⋮ obok pozycji Historia zdarzeń i wybierz opcję Zarządzanie usługami. Zostanie wyświetlona strona Zarządzanie usługami, a na niej lista usług. | ||||
| 6 |
Użyj przycisku przełączającego, aby włączyć Pocztę głosową, Centralną historię połączeń i Synchronizację statusu obecności.
| ||||
| 7 |
Kliknij przycisk Przekaż. | ||||
| 8 |
Jeśli wyświetli się okno dialogowe Potwierdzenie zbierania danych, wyraź na nie zgodę, zaznaczając pole wyboru i kliknij Prześlij. |
Włączanie asystenta Cisco AI Assistant
Funkcja ta dotyczy wyłącznie użytkowników usługi Webex Calling.
Asystent Cisco AI generuje podsumowania, do których użytkownicy mają dostęp zarówno w trakcie, jak i po interakcji, niezależnie od tego, czy rozmowa jest nagrywana.
Jeśli w trakcie połączenia używana jest funkcja Asystenta AI, użytkownik, który włączył funkcję podsumowania i transkrypcji po połączeniu, ma dostęp do podsumowań, elementów działań i transkrypcji w historii połączeń. Dostępność ta obowiązuje niezależnie od tego, czy rozmowa została nagrana, i jest kontrolowana za pomocą ustawień administratora i użytkownika. Dane Asystenta AI są przechowywane przez stały okres 365 dni.
Możesz włączyć ustawienia podsumowania połączeń Asystenta AI w celu przekazywania połączeń i konferencji na poziomie organizacji, użytkownika i szablonu. Funkcje Asystenta AI nie są dostępne dla użytkowników mieszkających poza Indiami.
Aby uzyskać więcej informacji na temat włączania funkcji Cisco AI Assistant z poziomu Control Hub, zobacz Zarządzanie funkcją Cisco AI Assistant dla połączeń Webex.


