- 主页
- /
- 文章

感谢您的反馈。

 在此文章中
在此文章中 反馈?
反馈?将 Cisco Call 设置为组织内所有用户的默认呼叫选项。
本文将指导您如何配置 Microsoft Teams 应用以使用 Cisco Call 选项。 ![]() 图标已添加到左侧导航栏和消息扩展程序中。关闭 Teams 呼叫选项后,组织中的每个人都使用相同的平台拨打和接听电话。
图标已添加到左侧导航栏和消息扩展程序中。关闭 Teams 呼叫选项后,组织中的每个人都使用相同的平台拨打和接听电话。
必要条件
-
请确保您是 Microsoft Teams 管理员。
-
请确保您拥有控制中心的访问权限。
-
确认 用户已在 Control Hub 中分配许可证并已注册到 Cisco Unified Communications Manager 或 Webex Calling 以进行通话。
-
用户必须安装 Webex 应用和 Microsoft Teams。
-
要使 Cisco Call for Microsoft Teams 集成与 Unified CM 呼叫控制后端(本地、Webex Calling 专用实例或 UCM 云)配合使用,请确保您使用的是 Unified CM 12.5 SU7 或 14 SU3,Cisco Unity Connection (CUC) 12.5 或 14。
-
对于本地部署的统一配置管理 (Unified CM) 客户,请确保统一配置管理 (Unified CM) & CUC 集群已接入 Webex 云连接统一通信 (CCUC)。
-
需要将这些用户从本地 Active Directory 或从云 AD(如 Azure)同步到 Control Hub 通用标识 (CI)。
-
对于本地部署、Webex Calling 专用实例和 UCM 云客户, 配置 Cisco Unified CM— Cisco Unified CM 上的线路号需要与用户 ID 关联,以便集中式呼叫历史记录中能够填充用户名。从 Cisco Unified CM 管理界面,使用设备→电话,选择电话,然后单击设备名称(线路),再从关联面板中单击所需的线路,即可找到与线路关联的用户。
-
确保统一 CM 邮件 ID 与用于获取通用唯一标识符 (UUID) 的控制中心 主电子邮件 匹配。
-
虚拟桌面基础架构(VDI): 在 VDI 环境中使用 Cisco Call 与 Microsoft Teams 的集成时,Cisco Call 和 Microsoft Teams 必须在同一台虚拟机中运行。
Microsoft Teams 配置
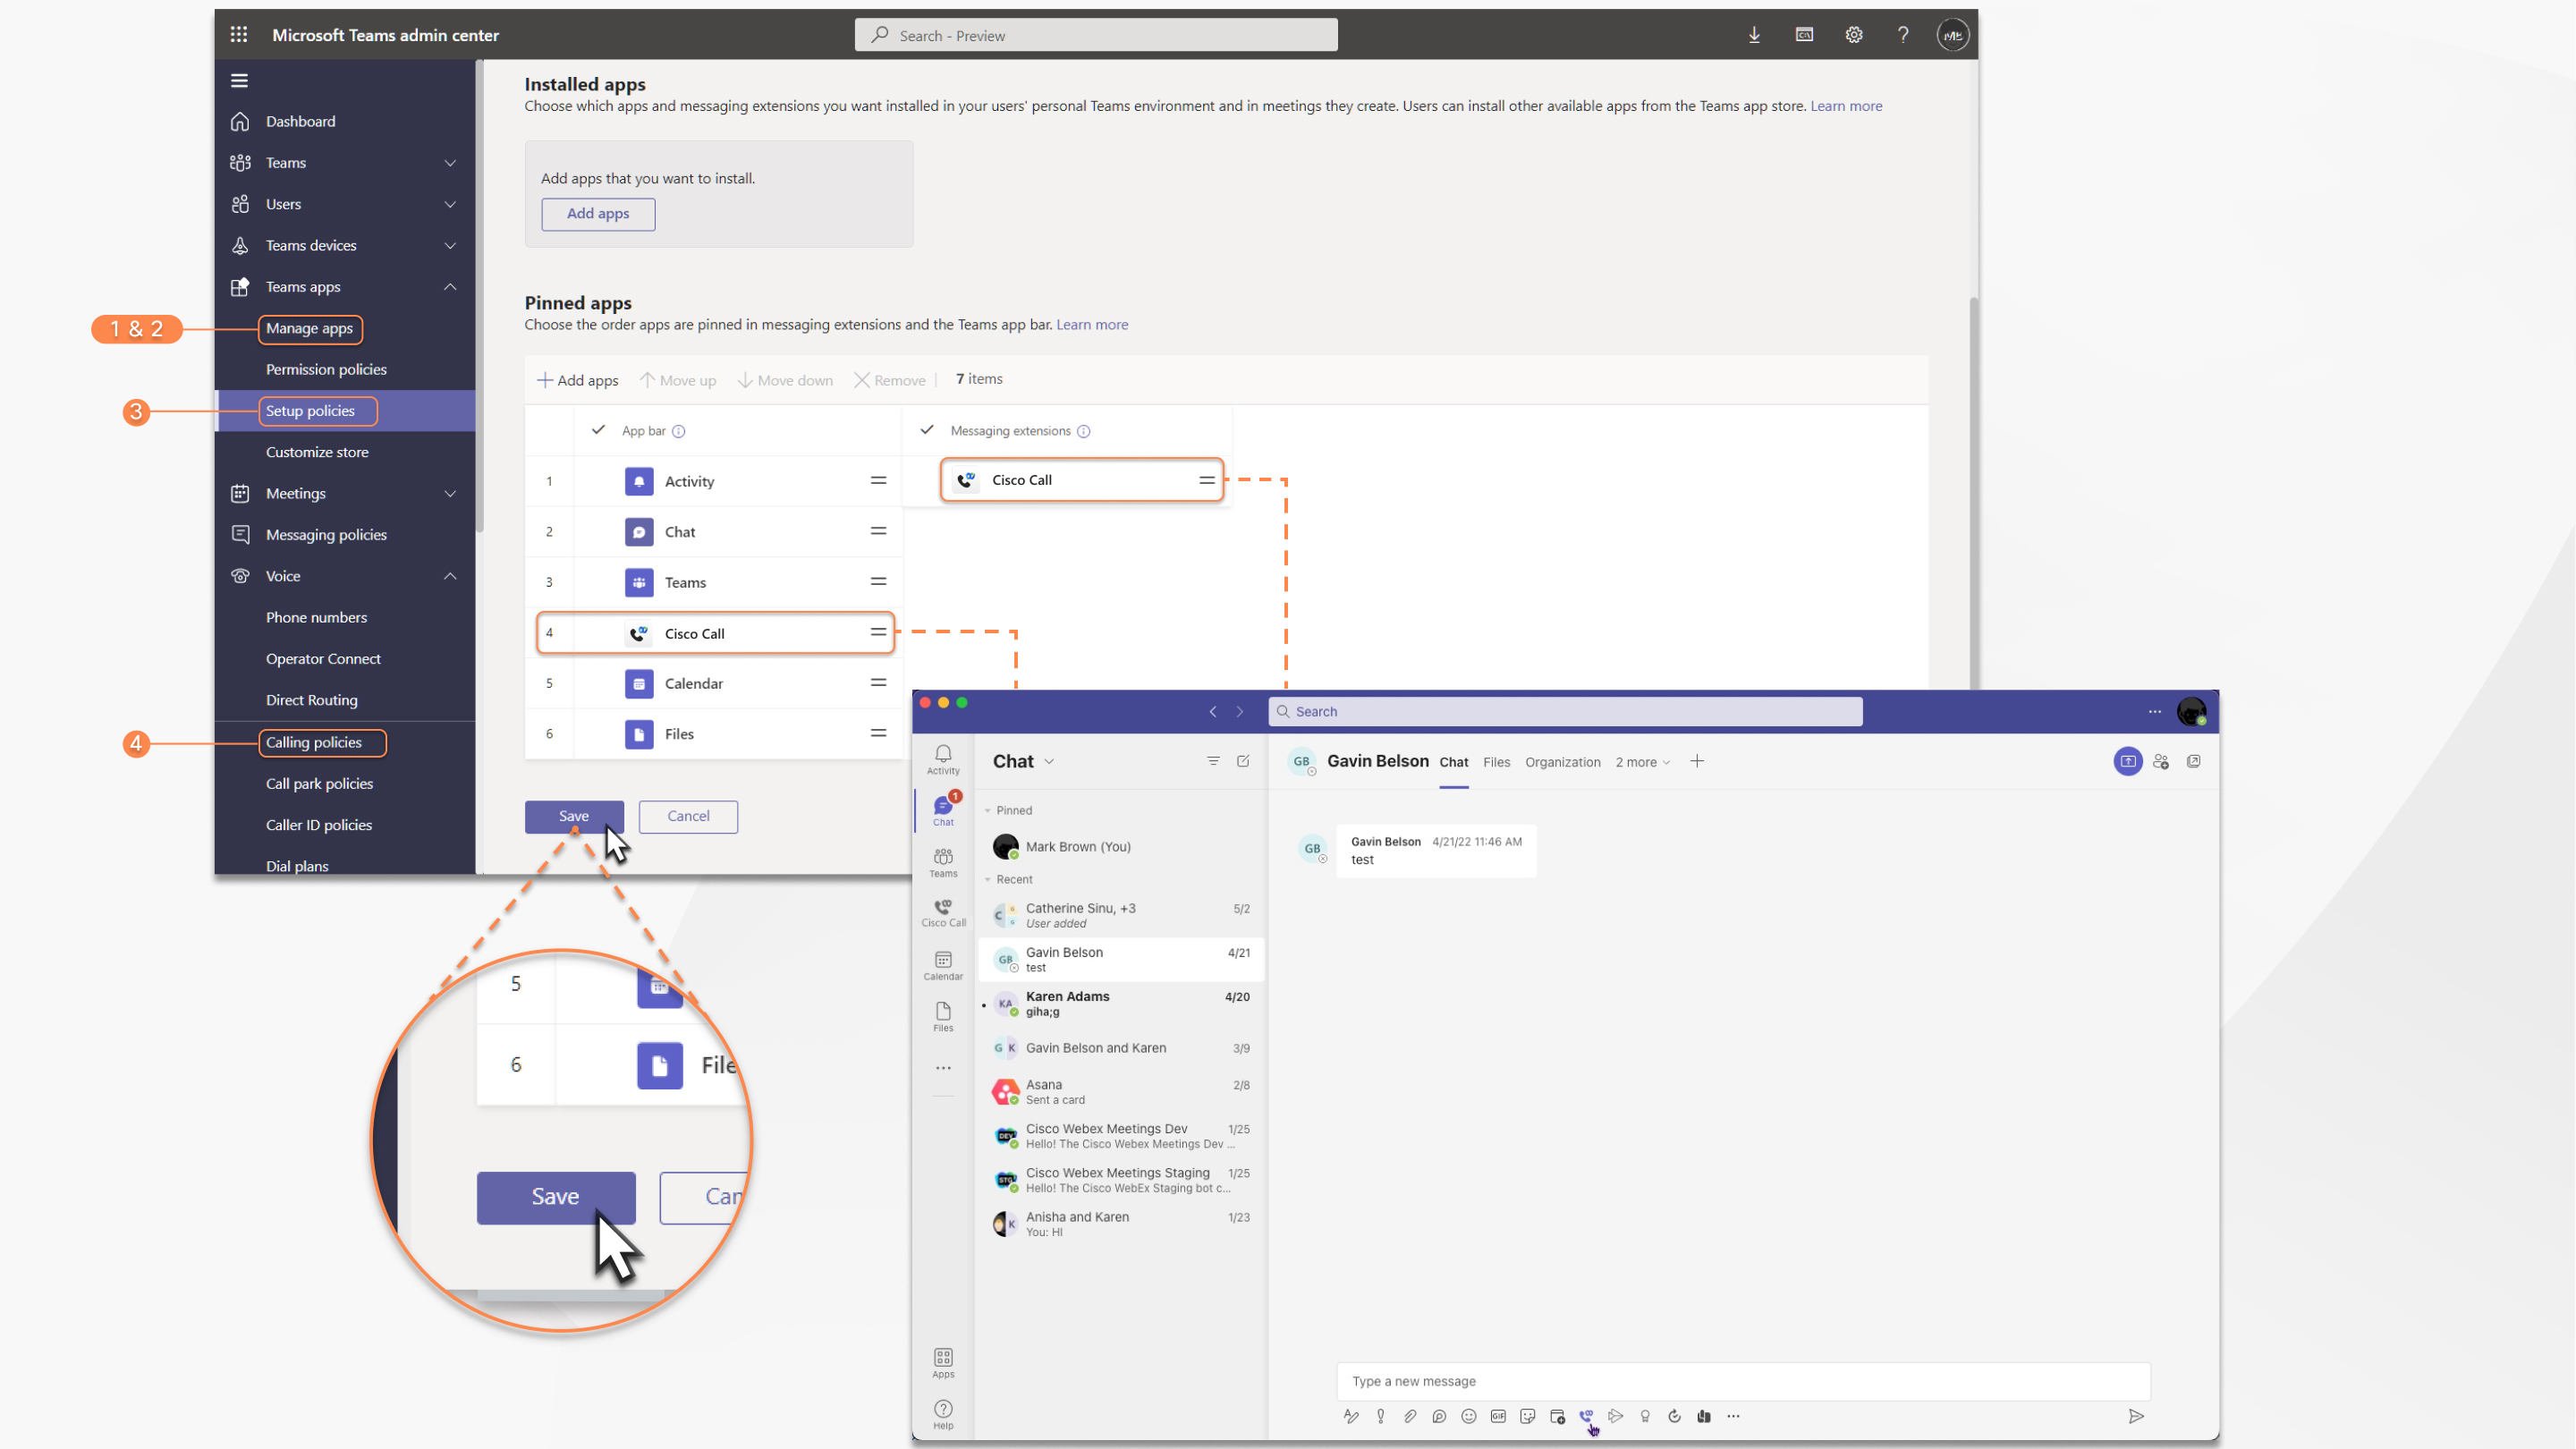
| 1 |
登录到 Teams 管理中心 以管理您的应用程序并允许 Cisco Call。 |
| 2 |
管理谁可以安装 Cisco Call。 |
| 3 |
安装 Cisco Call,然后将图标添加到 Webex 应用程序并取消固定内置呼叫选项。 |
| 4 |
可选——禁用组织范围内的内置呼叫选项,并将 Cisco Call 设置为唯一的呼叫选项:
|
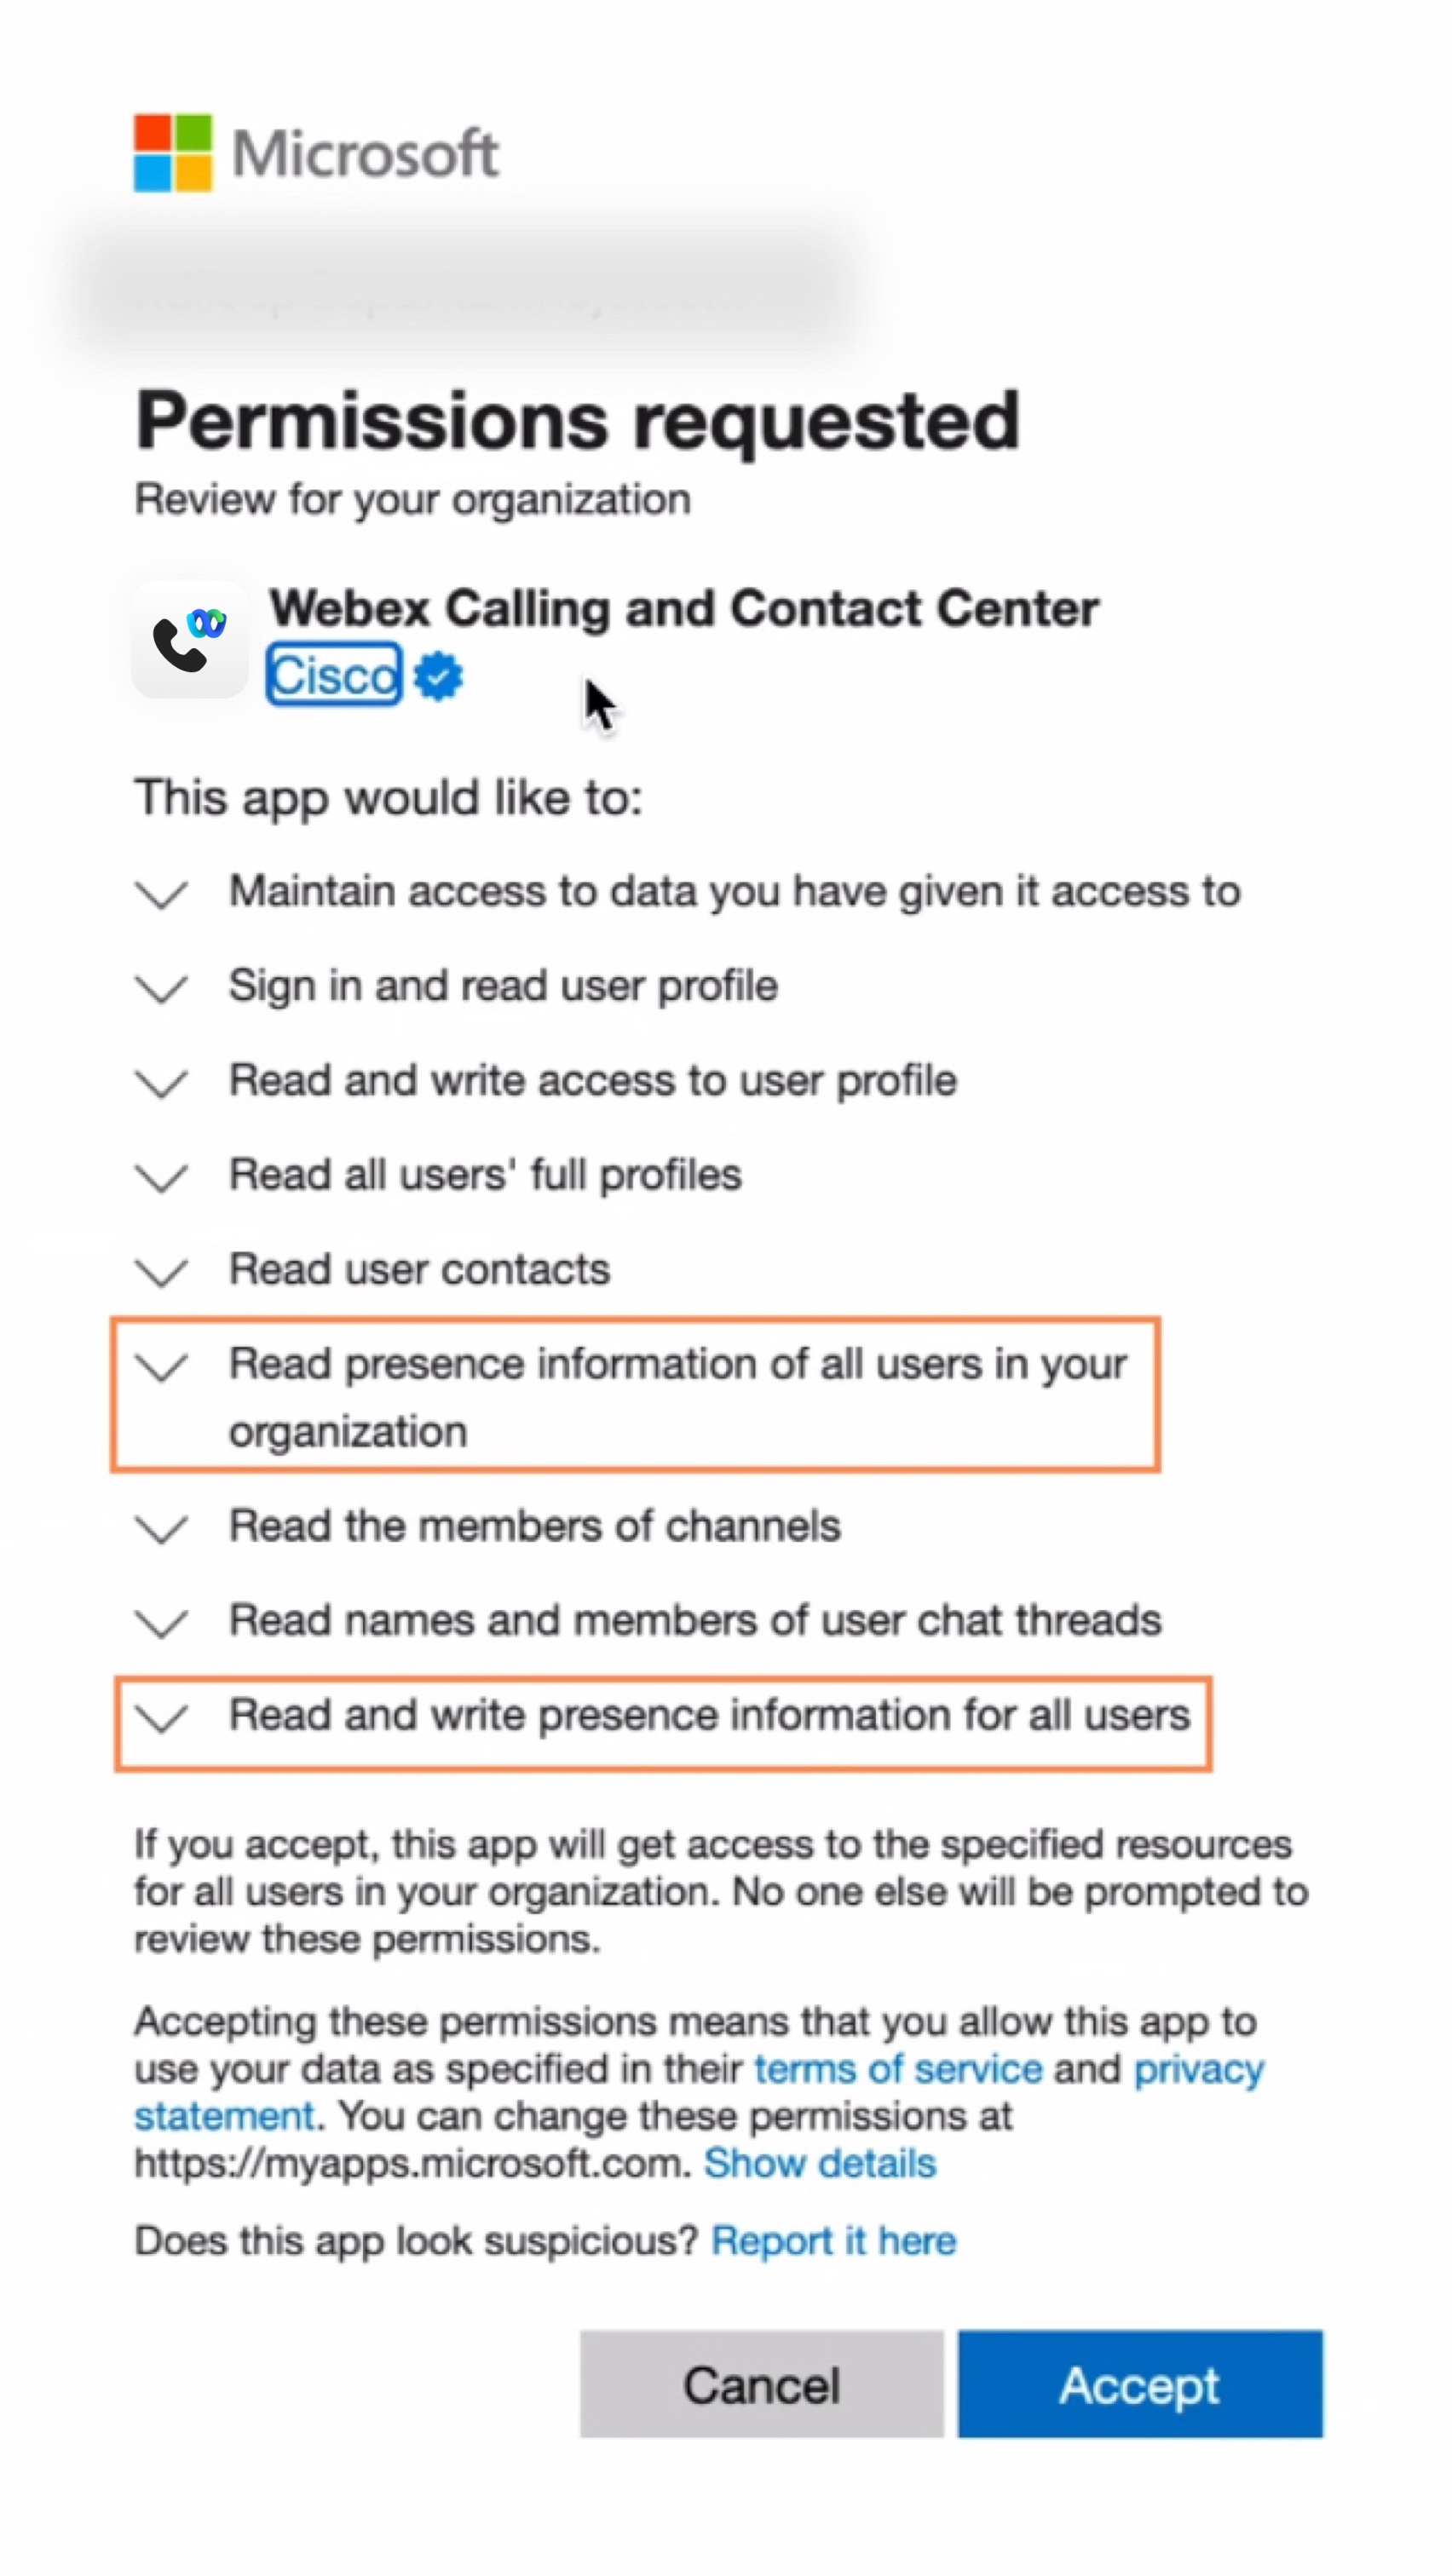
接受在线状态同步权限
查看并接受 Microsoft Teams 中的状态同步权限,以在 Microsoft Teams 和 Webex 之间双向同步用户的在线状态。
为保持状态同步功能正常工作,用户必须至少每 90 天使用一次 Cisco Call 集成。
| 1 |
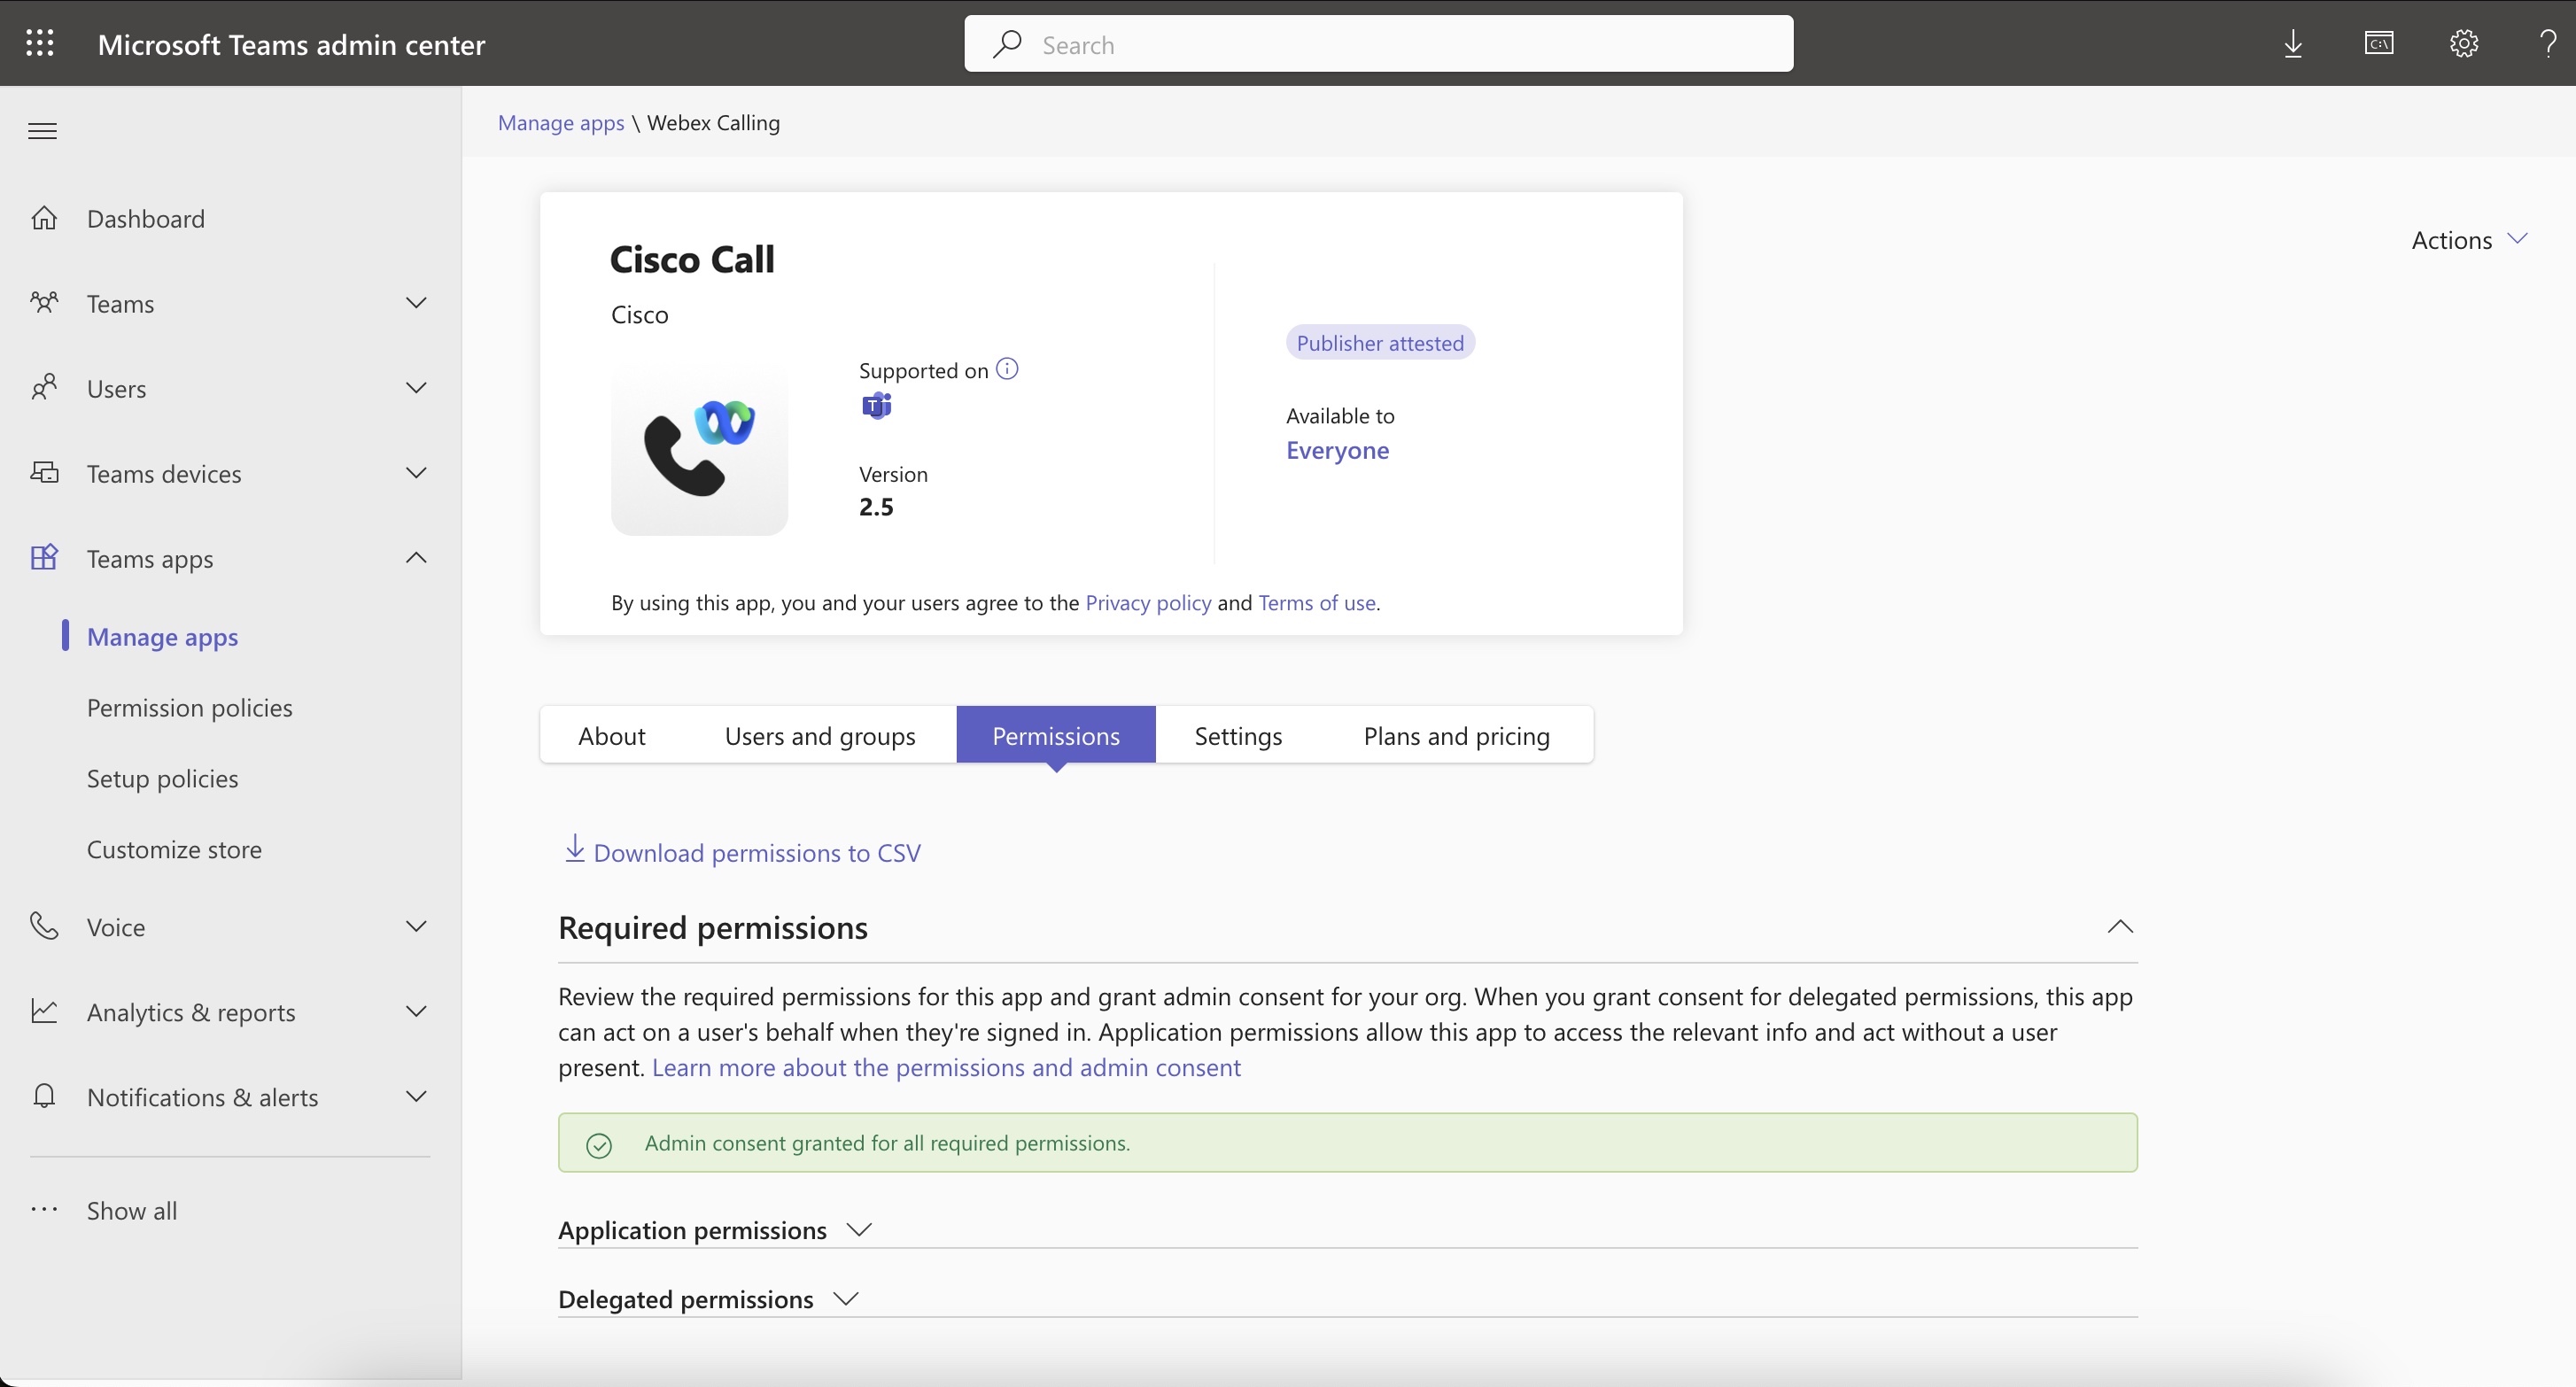
在 “控制面板 ”菜单中,转到 |
| 2 |
在搜索框中输入 |
| 3 |
点击 权限 选项卡,然后点击 授予管理员同意。 |
| 4 |
请检查是否已包含以下权限。
 |
| 5 |
点击 接受 以接受权限。 |
| 6 |
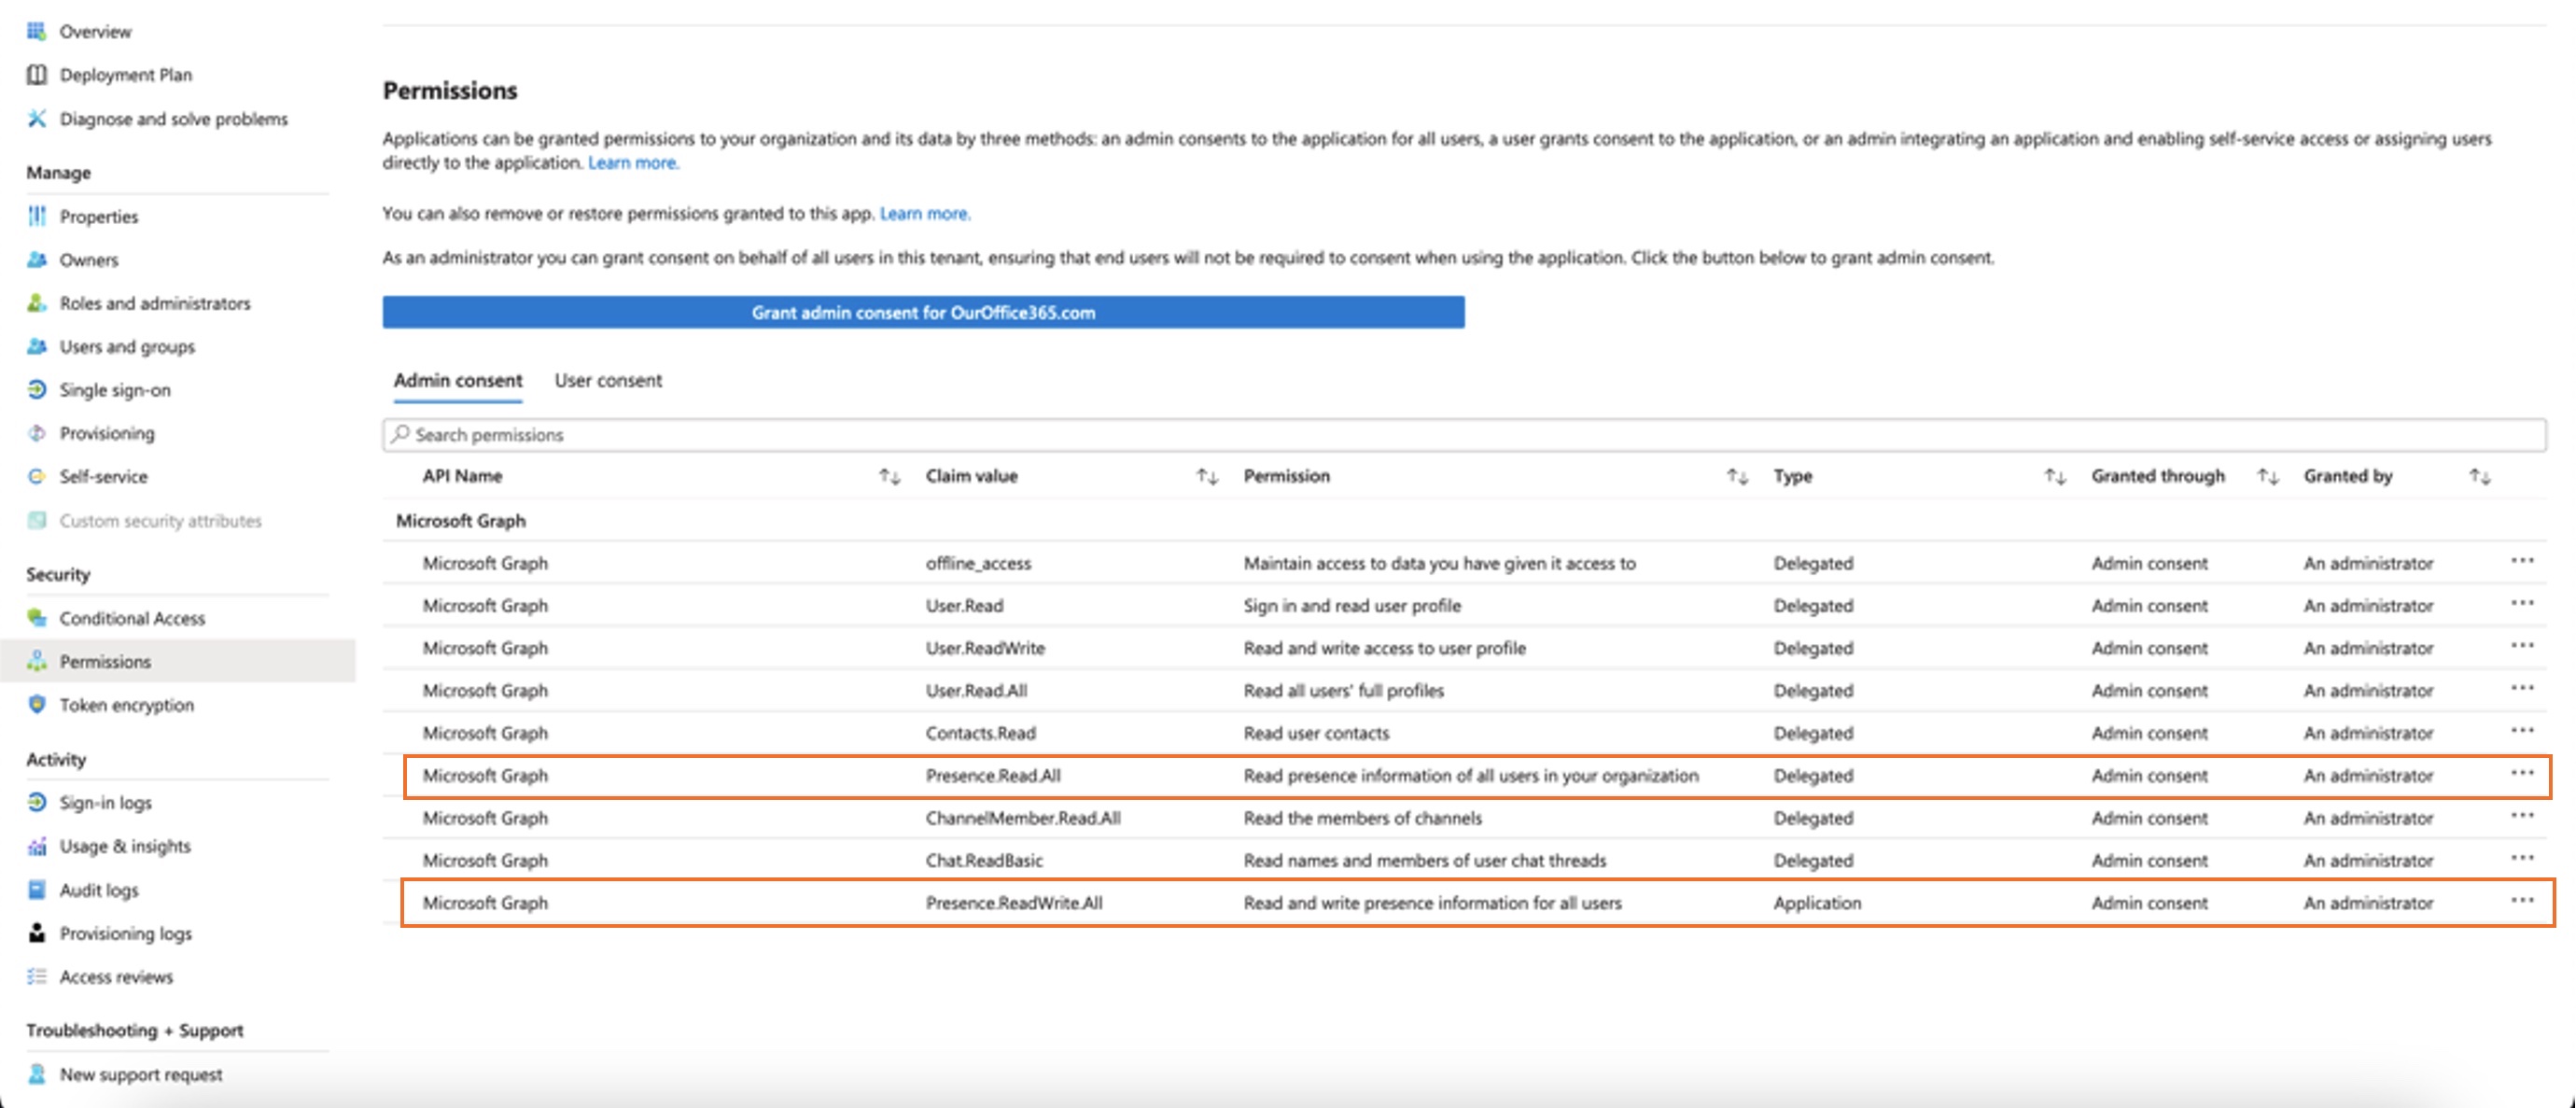
确保新授予的权限显示为已授予:
管理员同意书中应遵守以下权限规定:
如果您的组织目前正在使用 如果您只想从 验证权限后,在控制中心启用在线状态同步。请参阅 启用双向在线状态同步 部分。 为避免 Microsoft Teams 和 Webex 之间出现状态同步问题,我们建议您将 需要分配 设置设为 否。 要更新设置,请转到 Microsoft 入口管理中心或 Azure 门户,然后转到 并选择 否。 如果出于任何原因需要将此设置保留为“是”,请确保按照以下 Microsoft 文档中提到的步骤正确分配用户:为应用程序分配应用角色 & 管理用户和组分配到应用程序。 |
自定义 Cisco Call 应用
您可以根据组织的需求,为 Microsoft Teams 用户创建多个 Cisco Call 应用的自定义设置。您可以为所有用户创建应用程序的默认自定义设置,或者为单个应用程序创建 10 个额外的自定义设置,并将其分配给特定用户或用户组。
有关更多信息,请参阅 为 Microsoft Teams 用户自定义 Cisco Call 应用。
Cisco Call 和 Microsoft Teams 集成的权限
该集成服务使用 Webex 和 Microsoft API 来访问数据(例如集中式通话记录),以显示和更新状态(例如将语音邮件标记为已读),而不会存储任何用户数据。集成和之间所有数据传输 Webex/Microsoft 后端通信通过加密的HTTPS通道进行。因此,该服务确保用户数据不会存储在云端,从而加强了数据隐私和安全。
我们请求微软授予调用微软 API 以启用集成功能的最低必要权限。下表描述了我们请求的每项权限及其必要性。
| 权限 | 原因 |
|---|---|
|
offline_access |
允许集成服务生成新的访问令牌,而无需频繁地要求用户重新授权。 |
|
用户。读取 |
允许集成服务读取用户的基本信息,例如电子邮件地址。 |
|
用户.读写 |
允许集成服务将快速拨号存储在用户配置文件中。 |
|
用户。读取。全部 |
允许集成服务在活动目录中搜索用户以进行呼叫。 |
|
联系阅读 |
允许集成服务搜索用户的 Outlook 联系人以拨打电话。 |
|
ChannelMember.Read.All |
允许集成消息扩展读取频道成员,以便用户可以搜索特定频道成员进行呼叫。 |
|
聊天.阅读基础 |
允许集成消息扩展程序读取群聊成员,以便用户可以搜索特定成员进行呼叫。 |
|
存在.读取.全部 |
允许集成服务读取目录中所有用户的在线状态信息。 |
|
Presence.ReadWrite.All |
允许集成服务读取目录中所有用户的在线状态信息,并写入所有用户的活动和可用性信息。 |
|
Presence.ReadWrite |
允许集成服务读取用户的存在信息,并写入用户的活动和可用性信息。 |
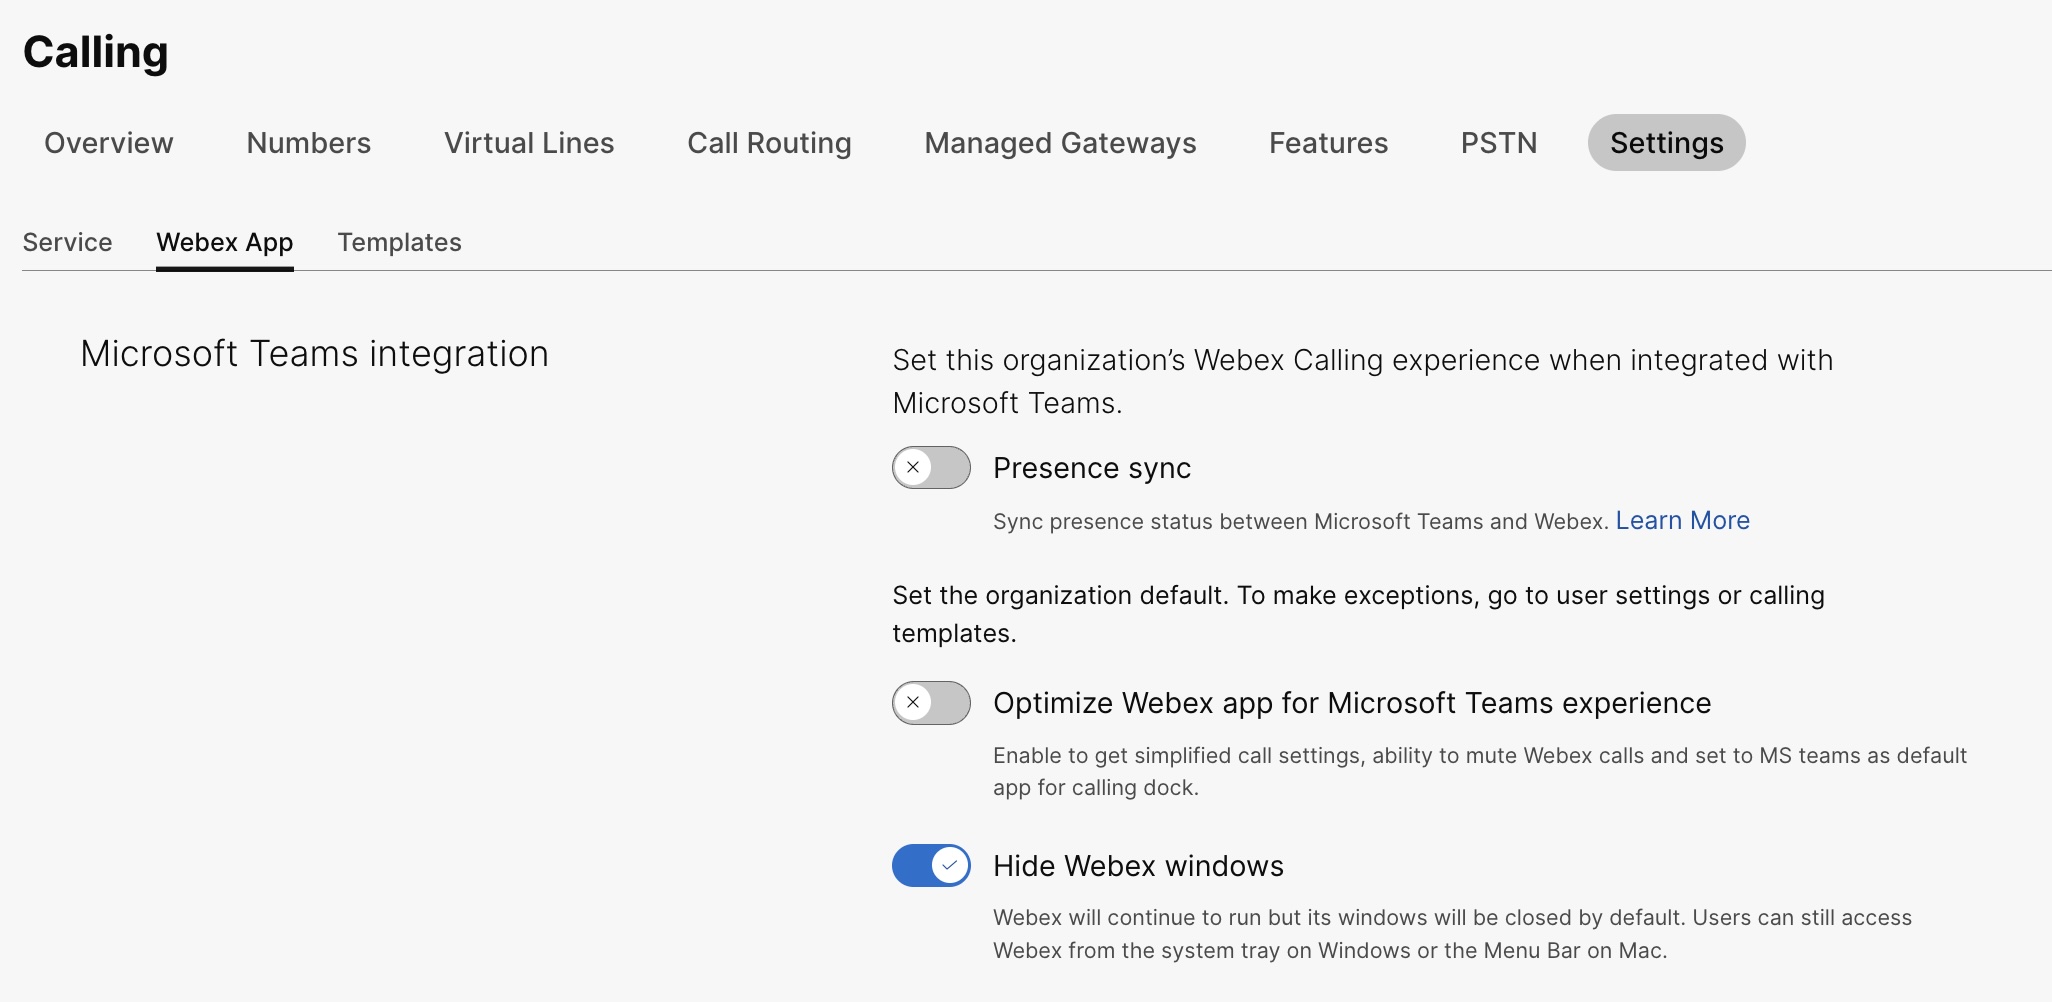
控制中心配置
您可以在控制中心配置和启用以下功能,使其可供 Microsoft Teams 用户使用。
隐藏 Webex 应用程序窗口
对于选择使用 Cisco Call 与 Microsoft Teams 集成的组织而言,该集成是用户访问 Webex 服务的主要界面。配置完成后,Webex App 仍会安装在用户的计算机上并运行,但其窗口默认会关闭。Cisco Call 集成中的操作可能会启动 Webex App 中的特定功能,但通常情况下,用户无需与 Webex App 进行交互。
通过控制中心,您可以隐藏以下级别的 Webex 应用程序窗口:
-
组织层级
-
用户组级别
-
用户级别
隐藏组织的 Webex 应用窗口
在组织级别配置的设置会自动应用于组织下的所有用户。
| 1 | |
| 2 |
前往 。 |
| 3 |
点击 Webex App 选项卡,转到 Microsoft Teams 集成 部分,然后启用 隐藏 Webex 窗口。
您还可以使用公共 API 为组织中所有使用 Cisco Call 与 Microsoft Teams 集成的用户隐藏 Webex 应用窗口。有关详细信息,请参阅 更新组织的 MS Teams 设置 在 developer.webex.com中。 |
为用户组隐藏 Webex 应用窗口
要对某个用户组隐藏 Webex 应用程序窗口,请创建一个呼叫模板并将其分配给该用户组。模板中的配置适用于组中的所有用户。
创建新模板以隐藏 Webex 应用程序窗口:
| 1 | |
| 2 |
前往 。 |
| 3 |
点击 创建模板,选择 创建模板 ,然后点击 下一步。 如果教育是您的业务领域,您可以应用 预定义的模板 ,并为学生或教师进行自定义设置。 |
| 4 |
在 常规 部分,输入 模板名称 和 描述。 |
| 5 |
转到 Microsoft Teams 集成 部分,然后启用 隐藏 Webex 窗口。 |
| 6 |
单击 创建模板,然后单击下一步。 |
| 7 |
搜索并选择一个组作为此模板,然后单击 完成。 修改或删除模板:
要修改模板,请单击模板,修改切换开关,然后单击 保存。 要删除模板,请单击该模板,然后从 “操作 ”下拉列表中选择 “删除 ” 。在 删除模板 页面中,选中提示您删除模板是永久性的复选框,然后单击 删除。 |
将呼叫模板应用于用户组时需要考虑的事项
-
当用户载入组织时,用户会从组织级别继承设置。
-
如果将用户添加到用户组,则呼叫模板中的设置会应用。
-
如果一个用户属于多个用户组,则排名最高的模板(排名 1)具有最高优先级,并应用该模板的设置。
-
如果用户有个人用户设置,则这些设置优先于用户组或组织级别的设置。
有关管理模板的更多信息,请参阅 配置设置模板 。
您可以从 组 部分或 调用 部分应用现有模板。
- 要应用“组”部分中的模板,请参阅 配置设置模板。
- 要从“致电”部分申请,请完成以下步骤。
| 1 | |
| 2 |
前往 。 |
| 3 |
单击现有模板旁边的 |
| 4 |
输入要应用模板的组名称,然后选择该组。 |
| 5 |
单击 完成. |
 ,然后单击
,然后单击 隐藏用户的 Webex 应用窗口
个人用户设置会覆盖组织级别和用户组级别的设置。
| 1 | |
| 2 |
前往 。 |
| 3 |
选择用户并单击 呼叫。 |
| 4 |
转到 用户通话体验 并单击 Microsoft Teams 集成。 |
| 5 |
开启 隐藏 Webex 窗口。 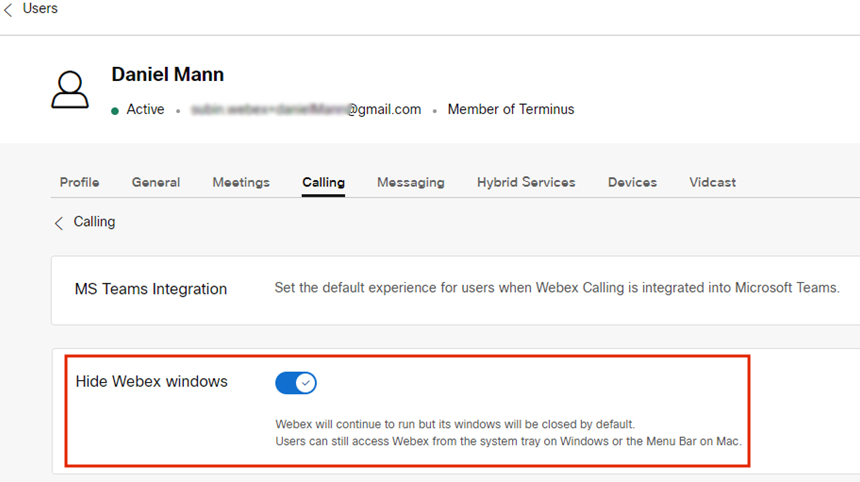 用户设置完成后,还可以进一步修改用户级别的设置。用户设置不会自动恢复为组织的默认设置。 您可以使用公共 API 为单个用户在 Microsoft Teams 客户端中隐藏 Webex 应用窗口。请参阅 配置人员的 MS Teams 设置 和 检索人员的应用程序服务设置 在 developer.webex.com中。 |
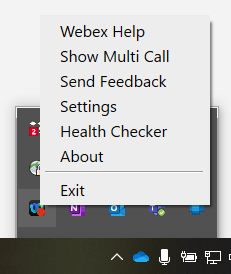
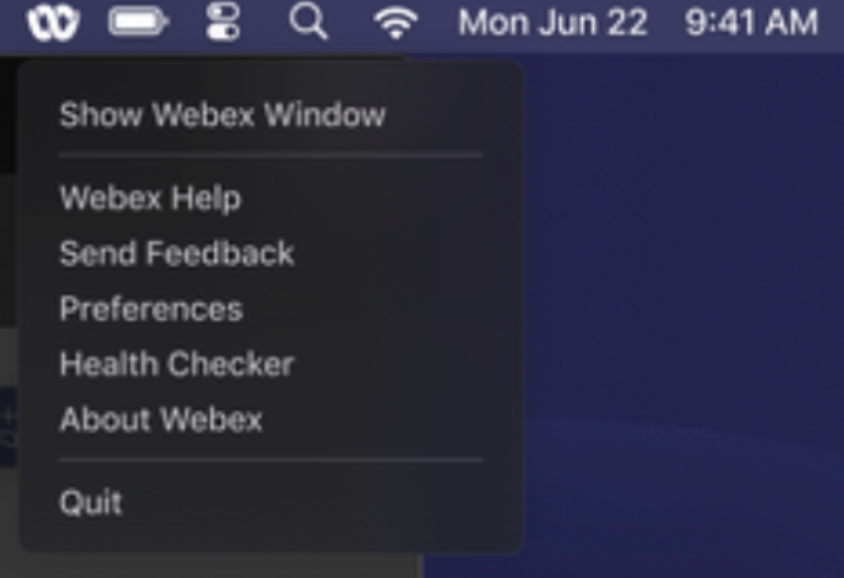
配置完成后,用户需要重启 Webex 应用并登录才能查看更改。
如果用户想要与 Webex 应用本身进行交互,他们可以通过 Windows 系统托盘或 Mac 系统菜单栏访问该应用。Webex App 仅在窗口处于活动状态并正在使用时才会显示在 Windows 任务栏或 macOS Dock 中。
|
Webex 应用 在 Windows 系统托盘中 |
Webex 应用 在 Mac 菜单栏中 |
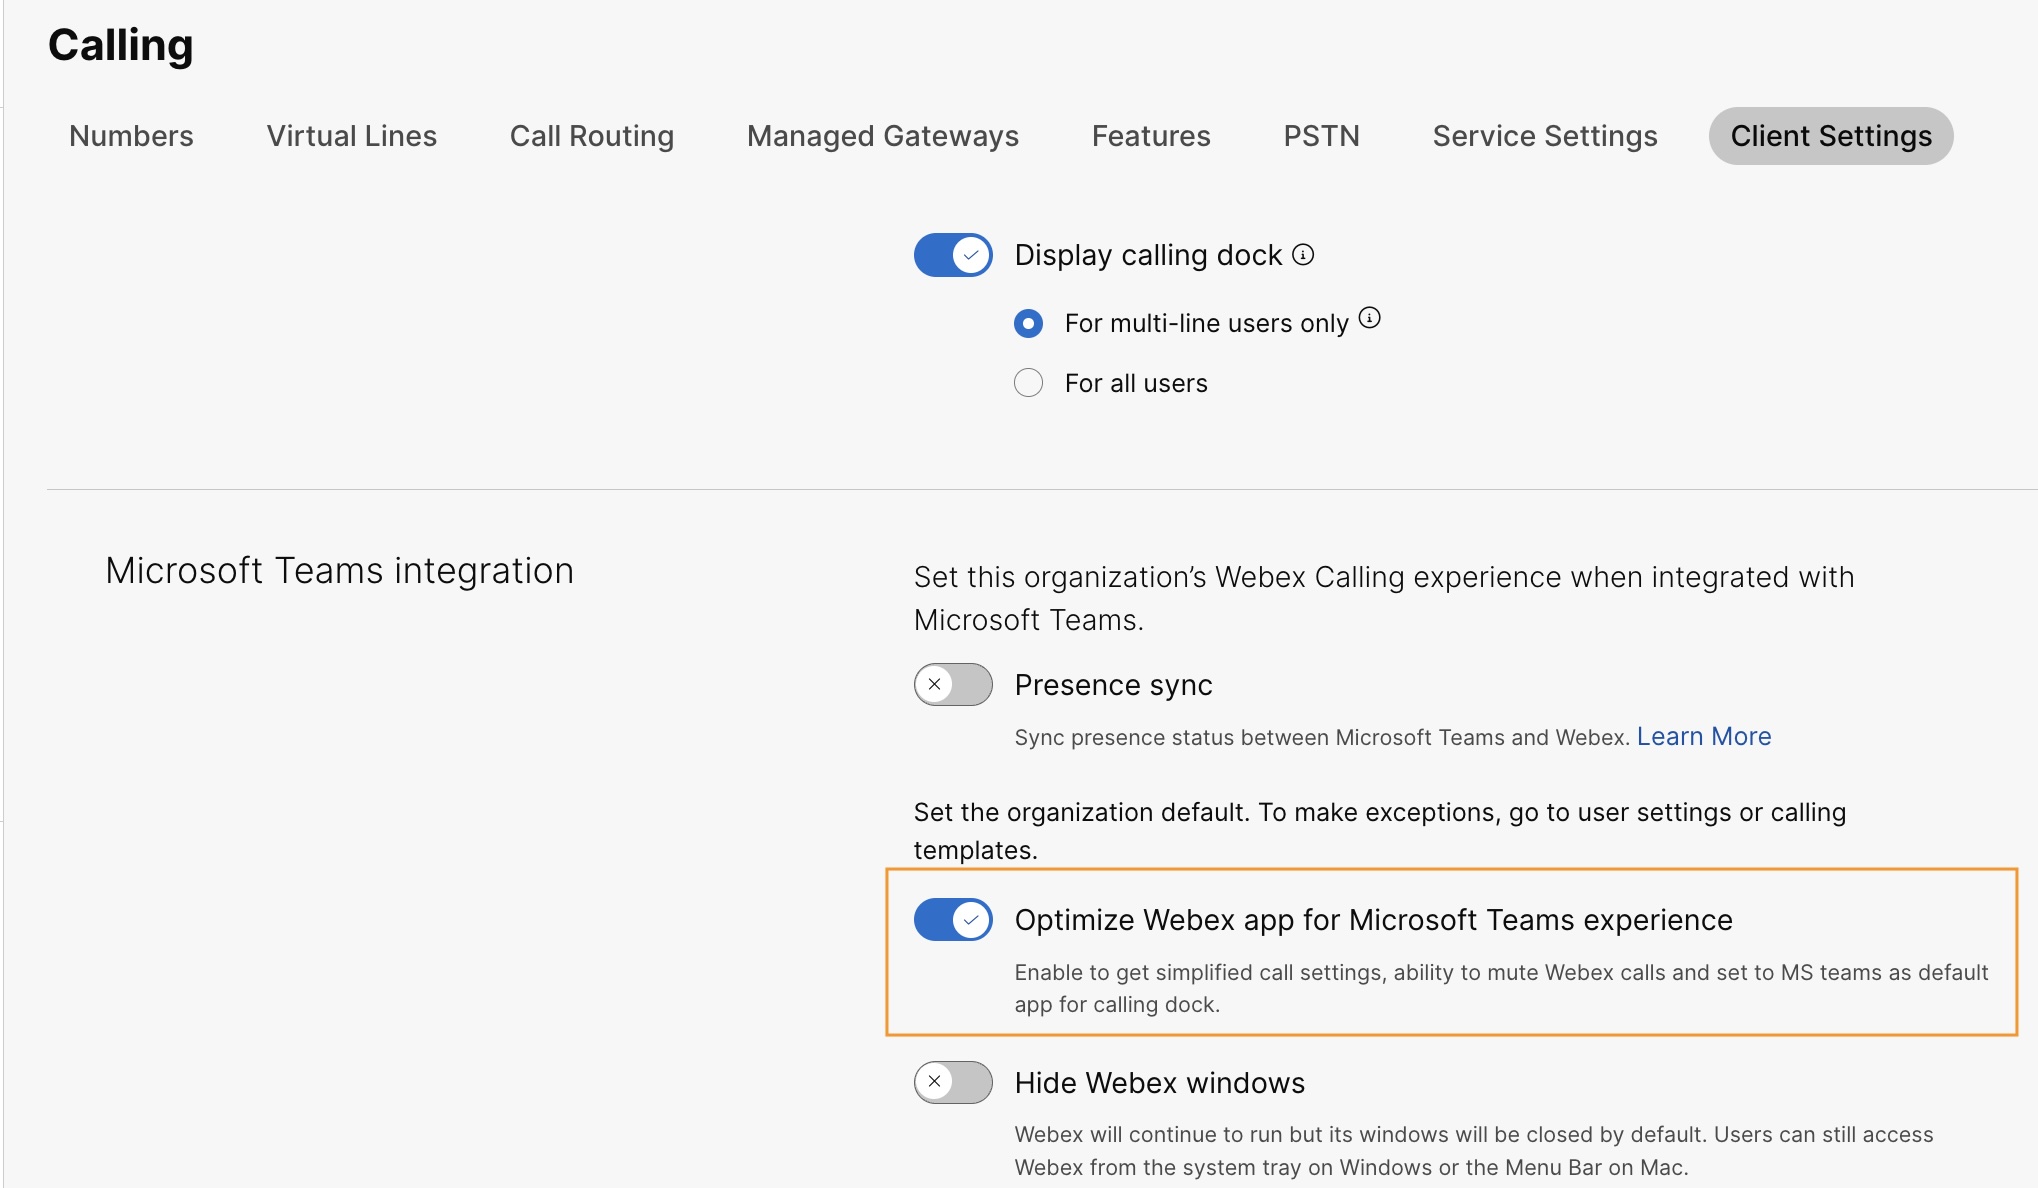
启用呼叫停靠窗口
通话停靠(多路通话)窗口是一个单独的浮动窗口,可帮助用户在单个窗口中管理多条或共享线路。用户无需切换到其他窗口即可拨打和接听电话、查看所有线路的状态,并更好地使用保持、转移和强插等功能。
| 1 | |
| 2 |
前往 。 |
| 3 |
点击 Webex 应用 选项卡,转到 通话中功能访问 部分,然后在 附加功能下,打开 显示通话底座 ,然后选择以下选项之一:
您还可以在用户组级别和用户级别配置此功能。
|
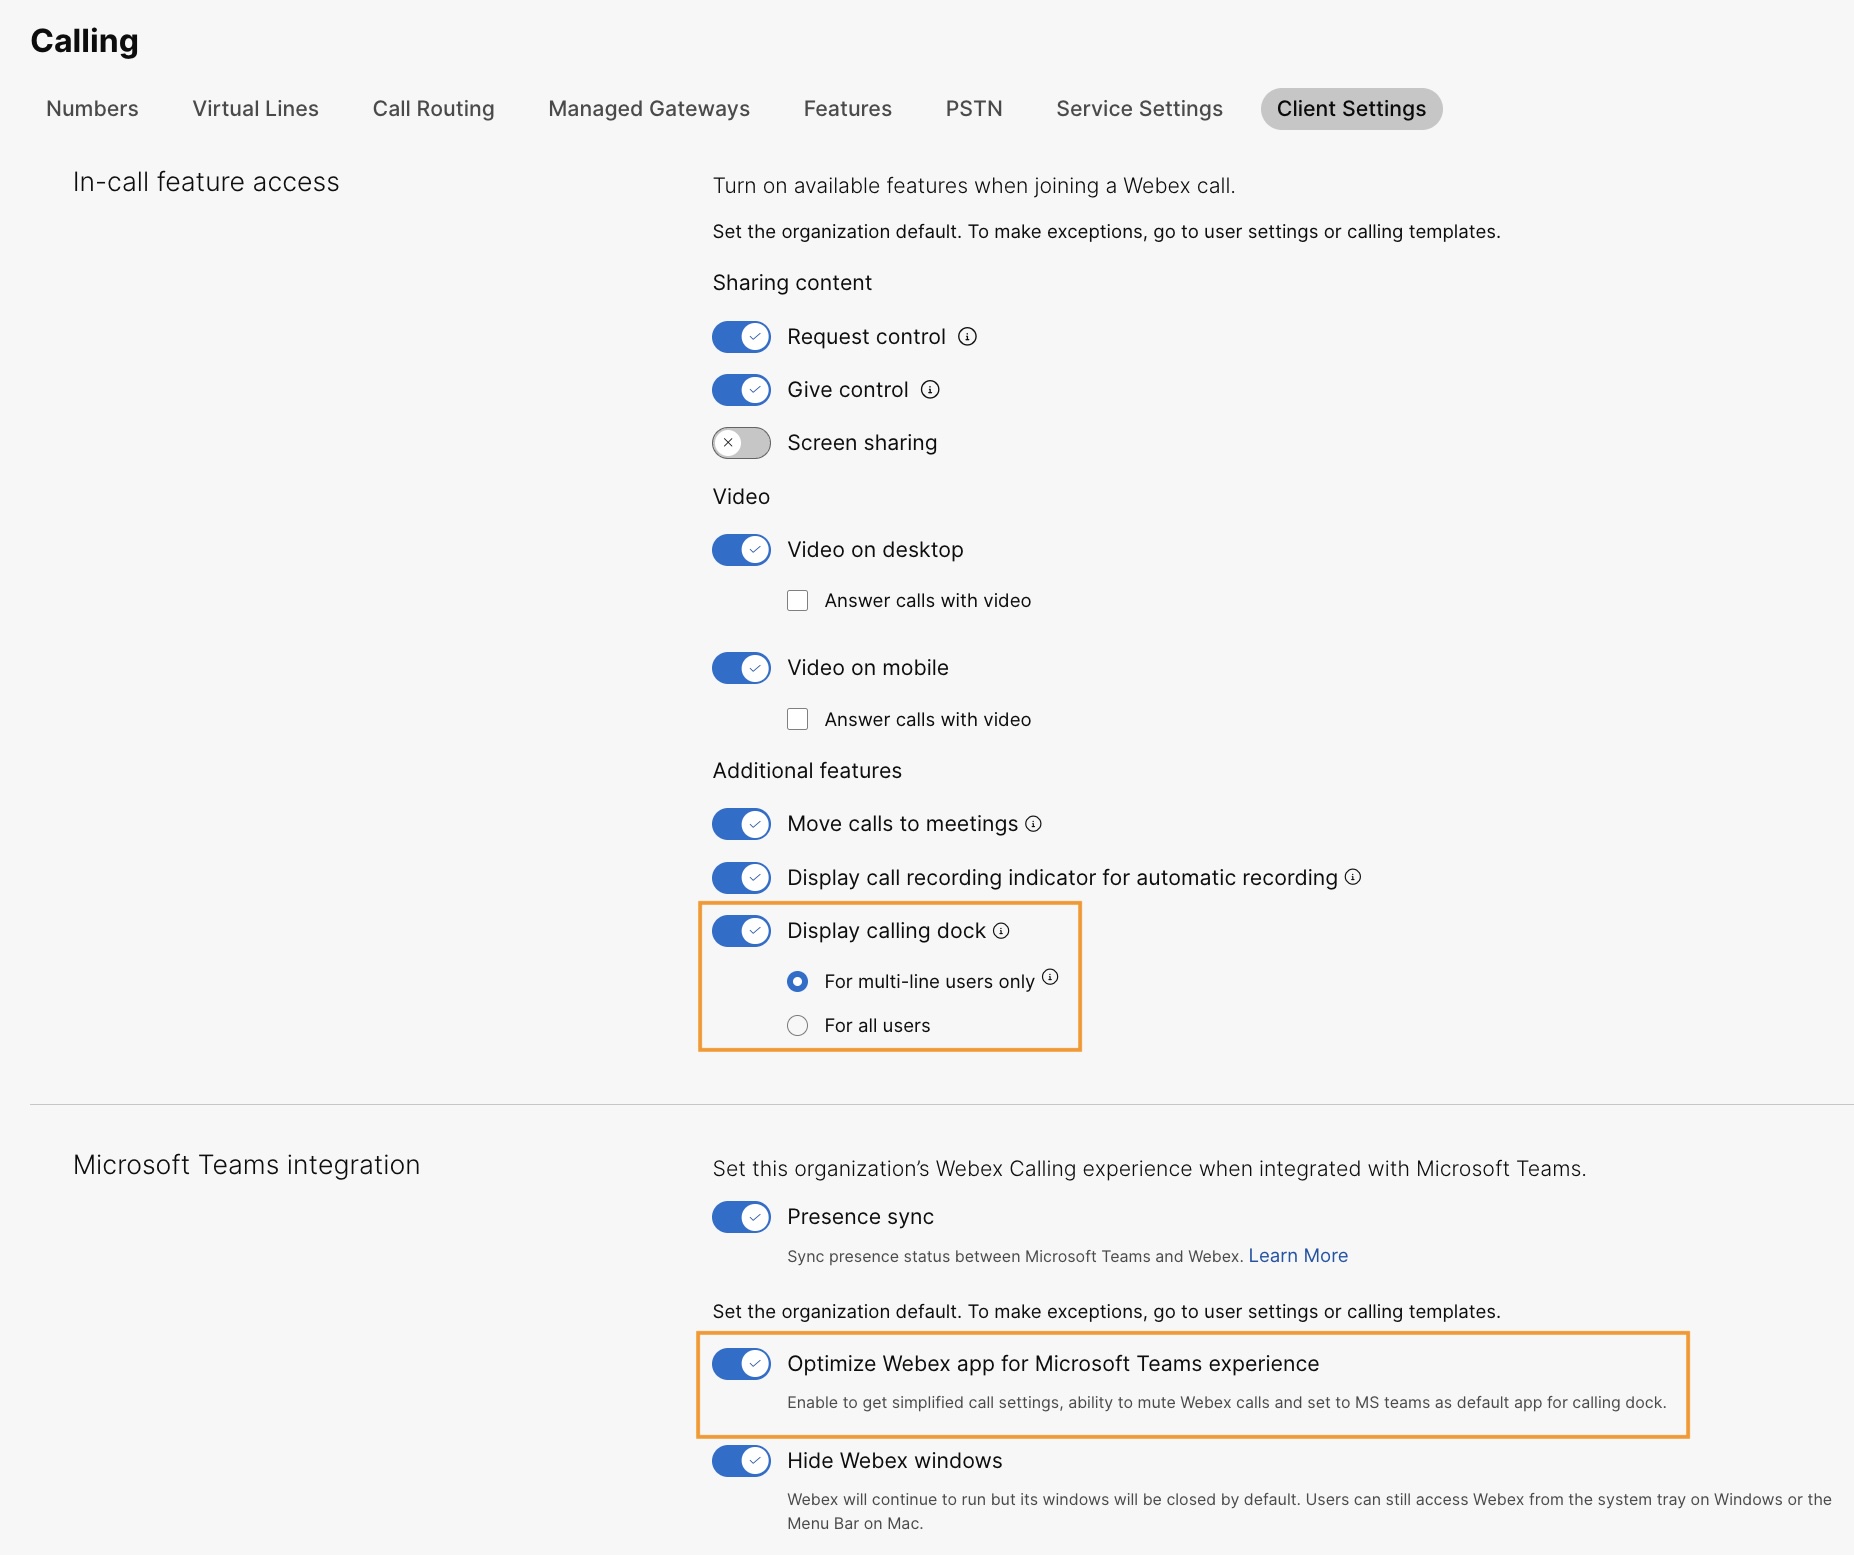
优化 Webex 应用,提升 Microsoft Teams 体验
此功能为用户提供以下体验:
-
简化的通话设置——通话设置仅显示集成所需的选项。启用此功能只会简化通过通话底座访问的通话设置。通过 Cisco Call 集成访问的呼叫设置默认情况下保持简化状态。
-
将 Cisco 来电静音——当用户在 Microsoft Teams 通话或会议中时,传入的 Cisco 来电将被静音。要使此功能生效,您必须在 Control Hub 中启用此功能,并且用户必须从 Cisco Call 集成的通话设置中启用 “仅在我在开会或通话时静音通知 ”选项。
如果在 Control Hub 中禁用此功能,则用户设置仅在用户进行 Cisco 通话或会议时有效。启用此功能后,用户设置在用户使用 Microsoft Teams 通话或会议或 Cisco 通话或会议时均有效。
-
单一应用体验——当用户从通话栏点击语音邮件和集中式通话记录图标时,它会将用户重定向到 Microsoft Teams Cisco Call,而不是 Webex App。
对于 Windows 用户:点击系统托盘中的 Webex 应用图标会打开通话程序坞,而不是 Webex 应用。
| 1 | |
| 2 |
前往 。 |
| 3 |
点击 Webex App 选项卡,转到 Microsoft Teams 集成 部分,然后启用 优化 Webex 应用以获得 Microsoft Teams 体验。
如果您尚未在 “通话功能访问 ”部分下启用 “显示通话底座 ”切换开关,则此切换开关将被禁用。 您还可以在用户组级别和用户级别配置此功能。
|
启用语音信箱、集中式通话记录和状态同步
语音信箱和集中式通话记录
Webex Calling、专用实例和 UCM Cloud 客户默认启用语音信箱和集中式通话记录功能。
如需了解有关为 Webex Calling 用户启用语音信箱的更多信息,请参阅:配置和管理 Webex Calling 用户的语音信箱设置。
有关为 BroadWorks 用户启用语音邮件的更多信息,请参阅 为 Microsoft Teams 集成启用语音邮件。
BroadWorks 管理员必须启用统一集中式通话记录,以确保此功能正常工作。有关 Webex,请参阅 Cisco BroadWorks 配置指南 。
双向存在同步
此功能支持 Microsoft Teams 和 Webex 之间双向同步在线状态,支持同一 Webex 组织中的多个 Microsoft Teams 租户。状态包括 通话中、 会议中、 演示中和 请勿打扰。
启用此功能后,当用户发起或接听 Webex 通话时,其 Microsoft Teams 状态将更改为 通话中。当用户在 Webex 应用或任何 Webex 设备中启用 “请勿打扰 ”时,该状态会自动同步到 Microsoft Teams。同样, 会议中 和 演示中 状态在应用程序之间同步。
当用户的 Webex 应用或任何 Webex 设备上启用 “请勿打扰 ”功能时,他们将不会在 Webex 应用、Webex 设备或 Microsoft Teams 中收到任何来电和消息通知。
您还可以使用公共 API 来实现 Webex 状态与 Microsoft Teams 客户端的同步。有关详细信息,请参阅 更新组织的 MS Teams 设置 在 developer.webex.com中。
下表显示了 Webex 和 Microsoft Teams 之间的双向状态同步表示。
|
Webex 状态 |
Microsoft Teams 状态 |
|---|---|
|
|
|
|
|
|
|
|
|
|
|
|
目前,此功能只能在组织级别进行配置。
| 1 | |
| 2 |
前往 。 |
| 3 |
点击 Webex App 选项卡,转到 Microsoft Teams 集成 部分,然后启用 Presence 同步。 您可以开启 隐藏 Webex 窗口 开关以获得最佳体验,但这并非强制要求。 |
| 4 |
前往 请勿打扰 (DND) 状态同步 部分,然后打开开关。 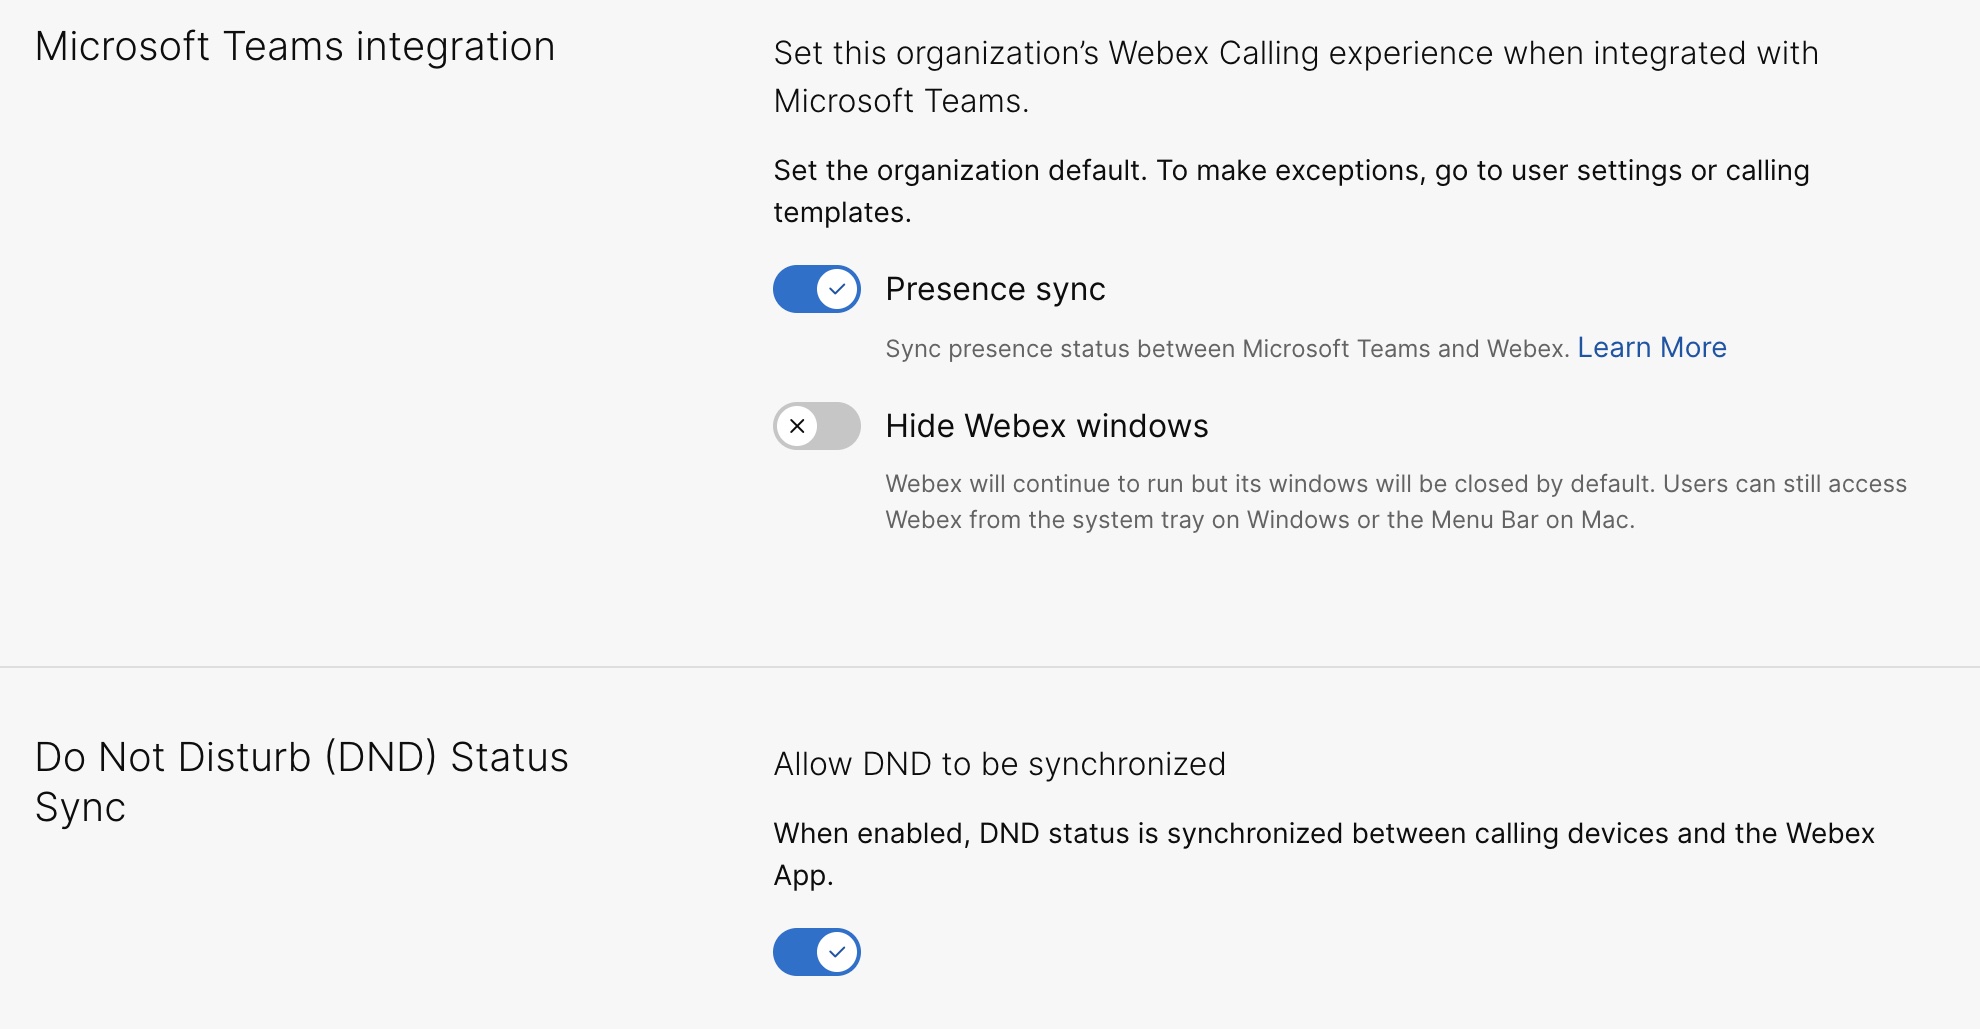 |
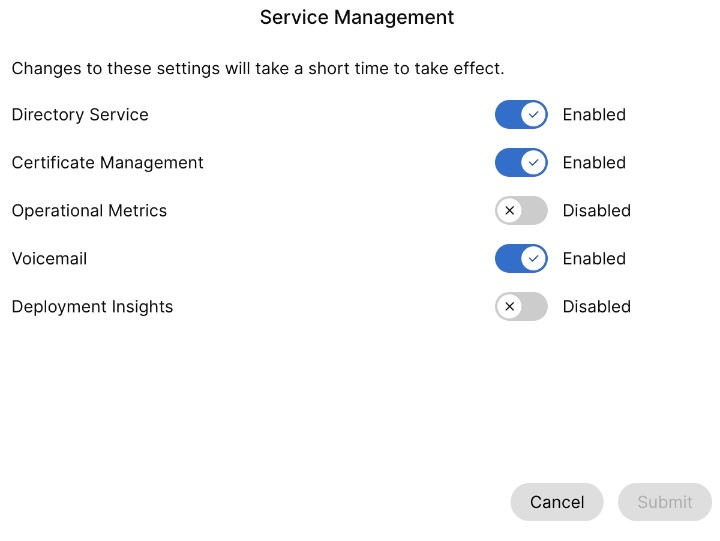
统一配置管理用户的其他配置
要为本地部署的 Unified CM 客户启用语音信箱、集中式通话记录和双向状态同步服务,请执行以下步骤:
为本地部署客户启用的语音信箱服务最多需要 12 小时才能激活。
| 1 | |||||
| 2 |
前往 。在 UC Management 卡片上,单击清单。 将显示集群组的列表,其中包含说明、状态、集群和节点。 | ||||
| 3 |
执行以下操作:
将显示清单页面,其中列出了属于所选集群组的集群的列表。 | ||||
| 4 |
单击特定产品节点所属的集群旁边的详细信息。 将显示节点名称以及版本、产品和状态。 | ||||
| 5 |
单击活动历史记录旁的省略号 ⋮ 图标,然后选择服务管理。 出现“服务管理”页面,提供服务列表。 | ||||
| 6 |
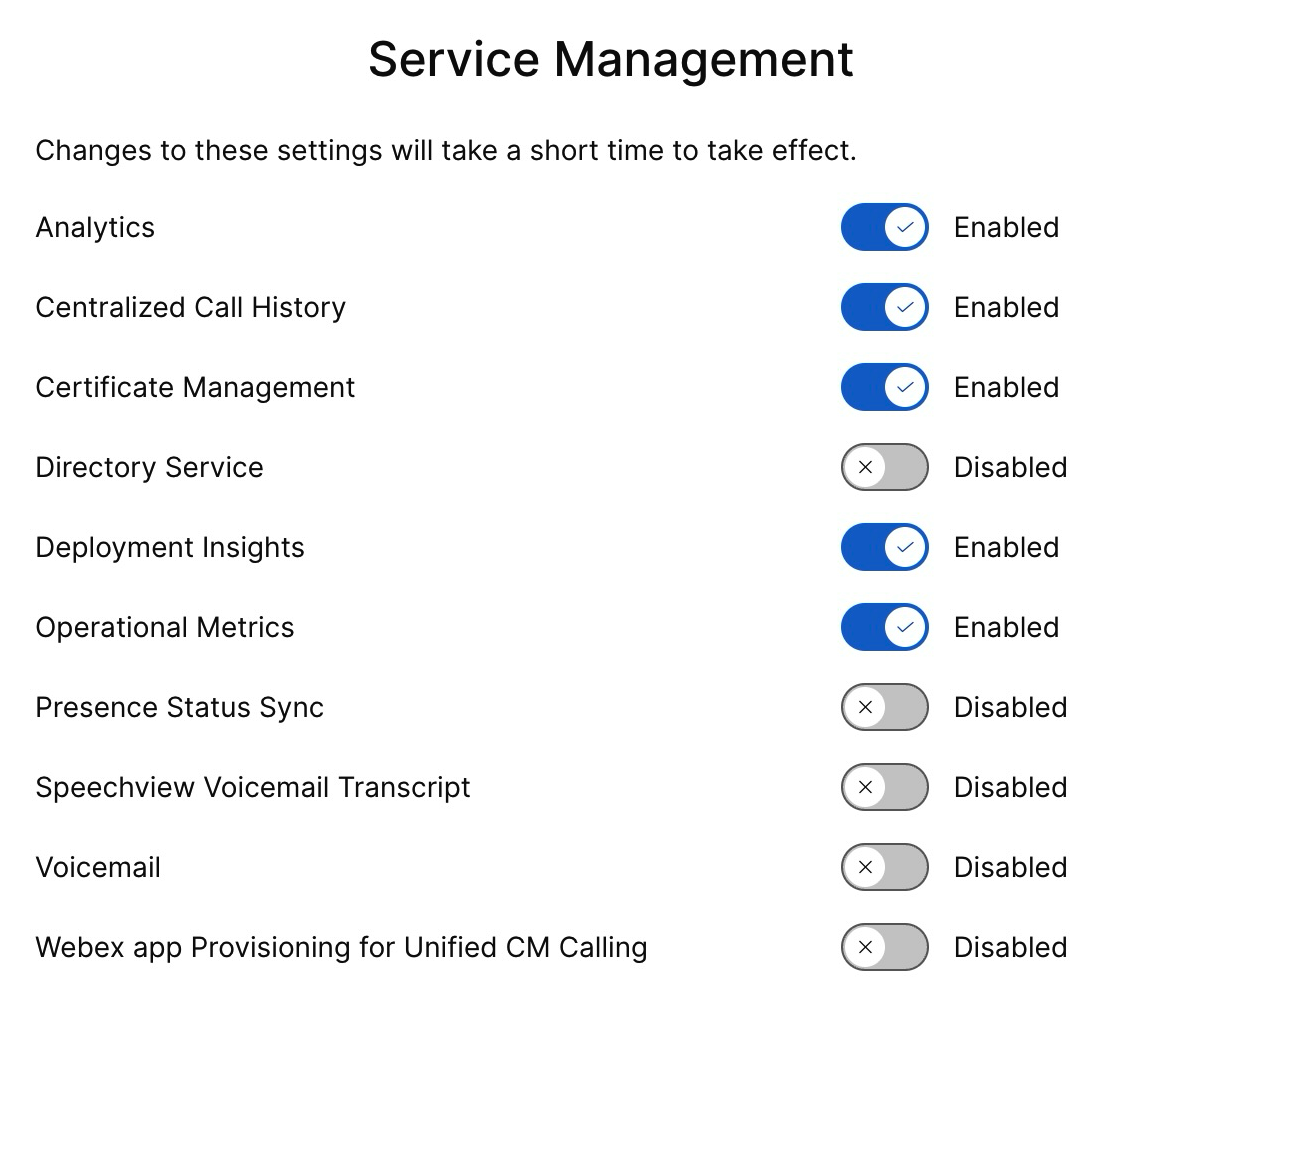
使用切换按钮启用 语音信箱、 集中式通话记录 和 状态同步。
| ||||
| 7 |
点击提交。 | ||||
| 8 |
如果显示 数据收集确认 弹出窗口,请勾选复选框表示同意,然后单击 提交。 |
启用 Cisco AI 助手
此功能仅适用于 Webex Calling 用户。
Cisco AI 助手会生成摘要,用户可以在交互过程中和交互结束后访问这些摘要,无论通话是否被录音。
如果在通话期间使用 AI 助手,则启用通话后摘要和文字记录的用户可以在其通话历史记录中访问通话后摘要、操作项和文字记录。无论通话是否被录音,此功能均适用,并且受管理员和用户设置控制。AI助手的数据将固定存储365天。
您可以为组织、用户和模板级别启用 AI 助手通话摘要设置,以进行通话转移和会议。AI助手功能不适用于印度以外的用户。
有关从 Control Hub 启用 Cisco AI Assistant 的更多详细信息,请参阅 管理 Webex Calling 的 Cisco AI Assistant。


