- Pagină de pornire
- /
- Articol

Mulțumim pentru feedback.

 În acest articol
 Feedback?
Instalați Cisco Call ca opțiune de apelare implicită pentru toți utilizatorii din organizația dvs.
Folosește acest articol pentru a configura aplicația Microsoft Teams cu opțiunile de apel Cisco. Pictograma ![]() este adăugată în meniul de navigare din stânga și ca extensie de mesagerie. Cu opțiunea de apelare Teams dezactivată, toată lumea din organizație utilizează aceeași platformă pentru a efectua și a primi apeluri.
este adăugată în meniul de navigare din stânga și ca extensie de mesagerie. Cu opțiunea de apelare Teams dezactivată, toată lumea din organizație utilizează aceeași platformă pentru a efectua și a primi apeluri.
Cerințe preliminare
-
Asigură-te că ești administrator Microsoft Teams.
-
Asigurați-vă că aveți acces la Centrul de control.
-
Verificați dacă utilizatorii au atribuit licențeîn Control Hub și s-au înregistrat în Cisco Unified Communications Manager sau Webex Calling pentru efectuarea de apeluri.
-
Utilizatorii trebuie să aibă instalate aplicația Webex și Microsoft Teams.
-
Pentru ca integrarea Cisco Call for Microsoft Teams să funcționeze cu backend-ul de control al apelurilor Unified CM (local, instanță dedicată Webex Calling sau UCM Cloud), asigurați-vă că utilizați Unified CM 12.5 SU7 sau 14 SU3, Cisco Unity Connection (CUC) 12.5 sau 14.
-
Pentru clienții Unified CM locali, asigurați-vă că Unified CM & Clusterele CUC sunt integrate în Webex Cloud-Connected UC (CCUC).
-
Utilizatorii trebuie să fie sincronizați fie din Active Directory local, fie din Cloud AD, cum ar fi Azure, cu Identitatea comună Control Hub (CI).
-
Pentru clienții locali, cu instanțe dedicate Webex Calling și UCM Cloud, Configurați Cisco Unified CM— Numărul liniei de pe Cisco Unified CM trebuie asociat cu ID-ul utilizatorului pentru ca Istoricul apelurilor centralizate să fie populat cu numele de utilizator. Din Cisco Unified CM Administration, utilizațiDispozitiv→Telefon, selectați telefonul și faceți clic peNume dispozitiv (linie), apoi faceți clic pe linia dorită din panoulAsocierepentru a accesaUtilizator asociat cu linia.
-
Asigurați-vă că ID-ul de e-maildin Unified CM corespunde cu adresa de e-mail principală din Control Hub [, care este utilizată pentru a obține identificatorul unic universal (UUID).
-
Infrastructură desktop virtuală (VDI): Când integrarea Cisco Call pentru Microsoft Teams este utilizată într-un mediu VDI, atât Cisco Call, cât și Microsoft Teams trebuie să ruleze pe aceeași mașină virtuală.
Configurarea Microsoft Teams
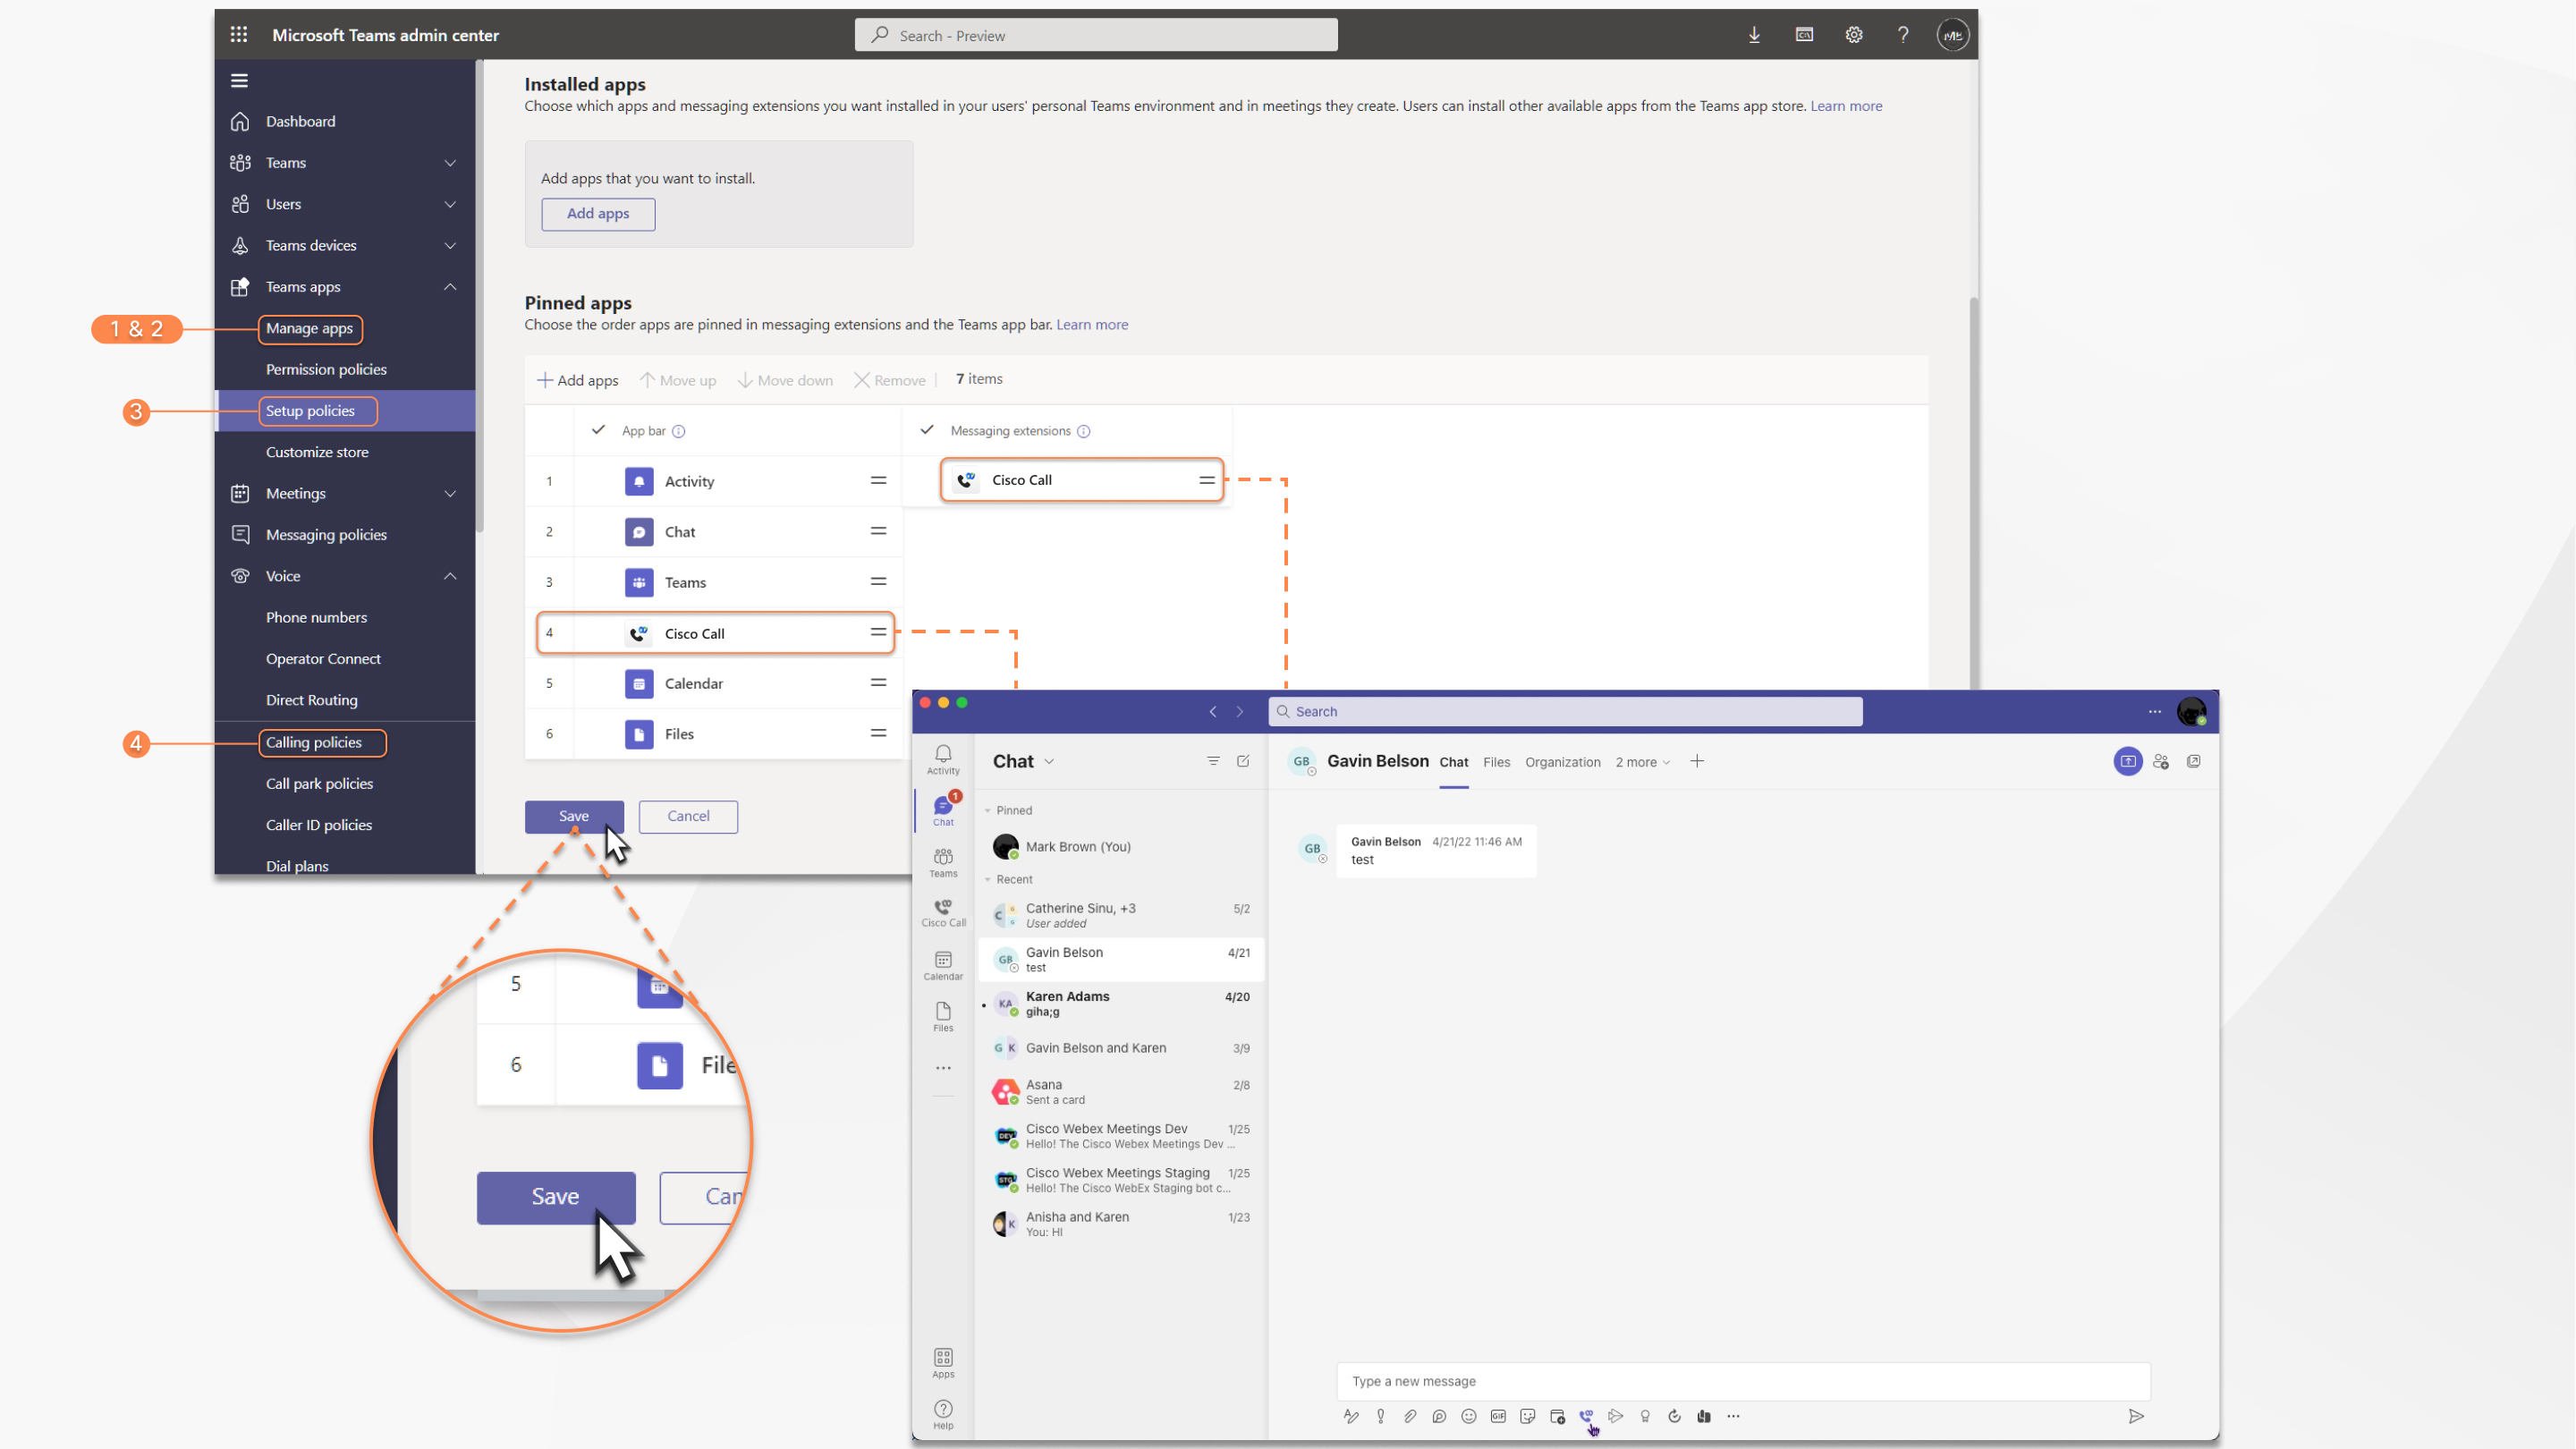
| 1 |
Conectați-vă la Centrul de administrare Teams pentru a gestiona aplicațiile și a permite apelurile Cisco. |
| 2 |
Gestionați cine poate instala Cisco Call. |
| 3 |
Instalați Cisco Call, apoi adăugați pictograma în aplicația Webex și anulați fixarea opțiunii de apelare încorporate. |
| 4 |
Opțional – dezactivați opțiunea de apelare încorporată la nivel de organizație și setați Cisco Call ca singura opțiune de apel:
|
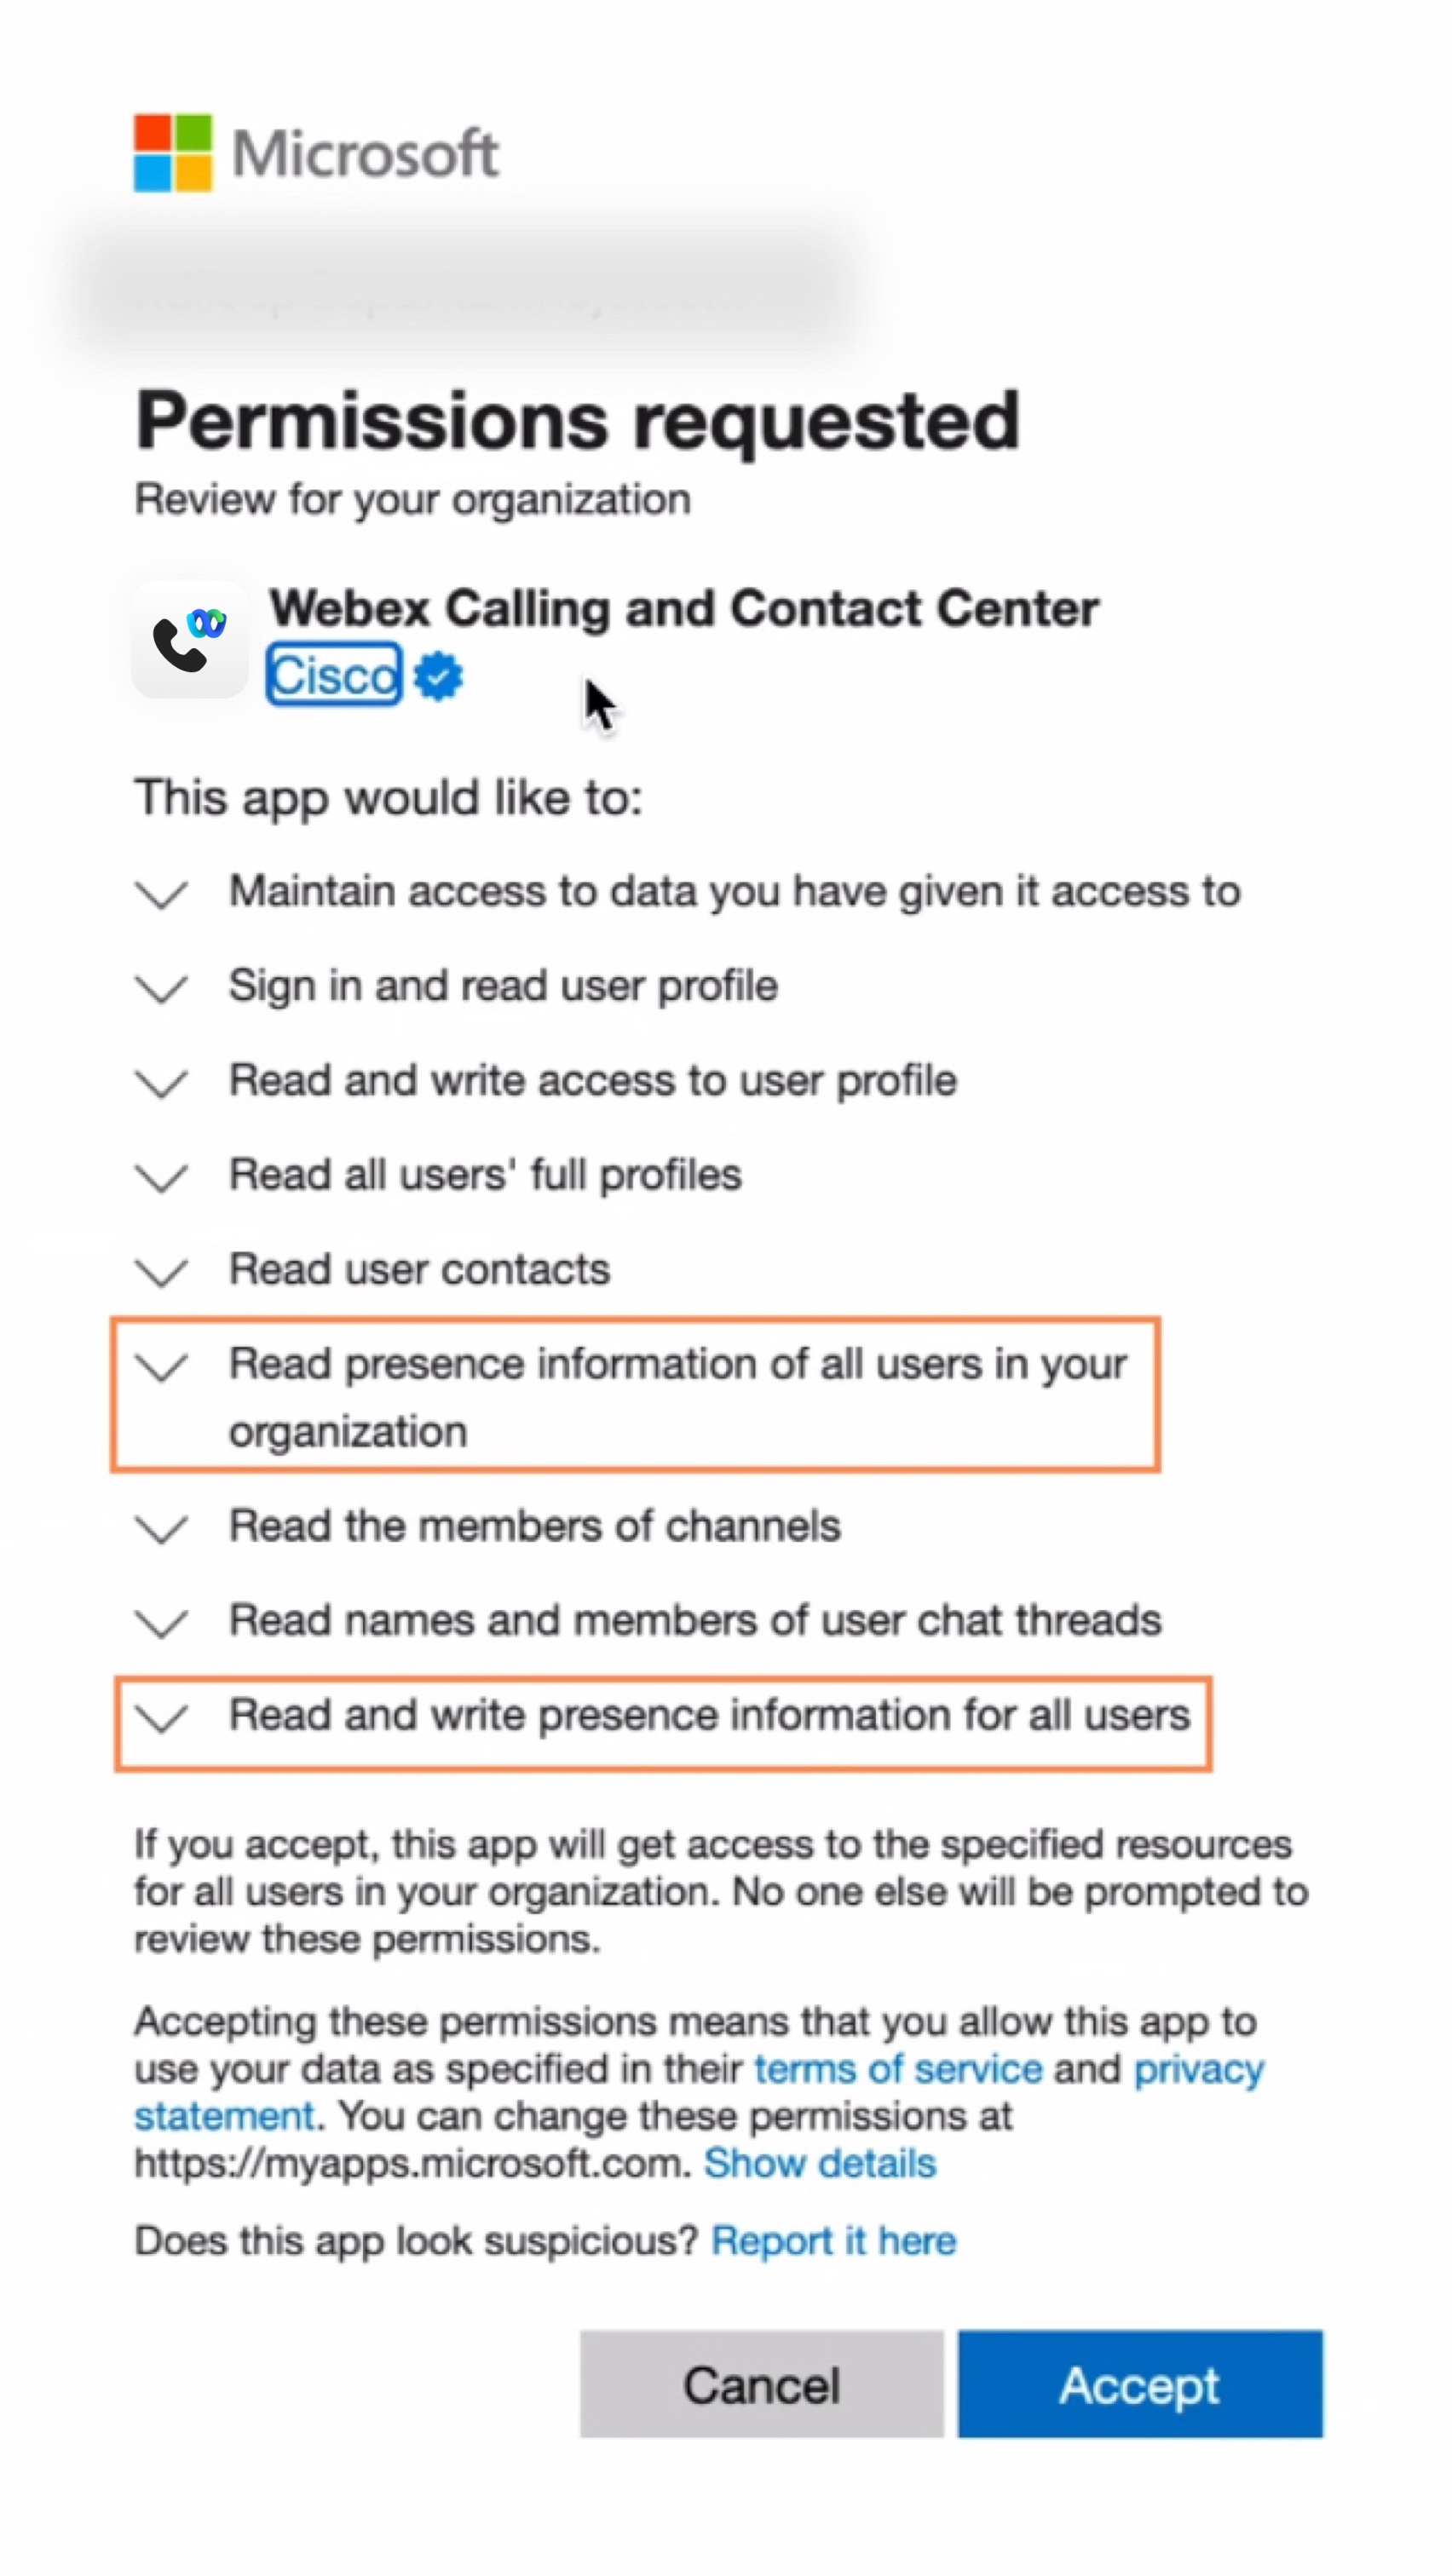
Acceptați permisiunile de sincronizare a prezenței
Examinați și acceptați permisiunile de sincronizare a prezenței în Microsoft Teams pentru a sincroniza bidirecțional starea prezenței utilizatorului între Microsoft Teams și Webex.
Pentru ca sincronizarea prezenței să funcționeze, utilizatorii trebuie să utilizeze integrarea Cisco Call cel puțin o dată la 90 de zile.
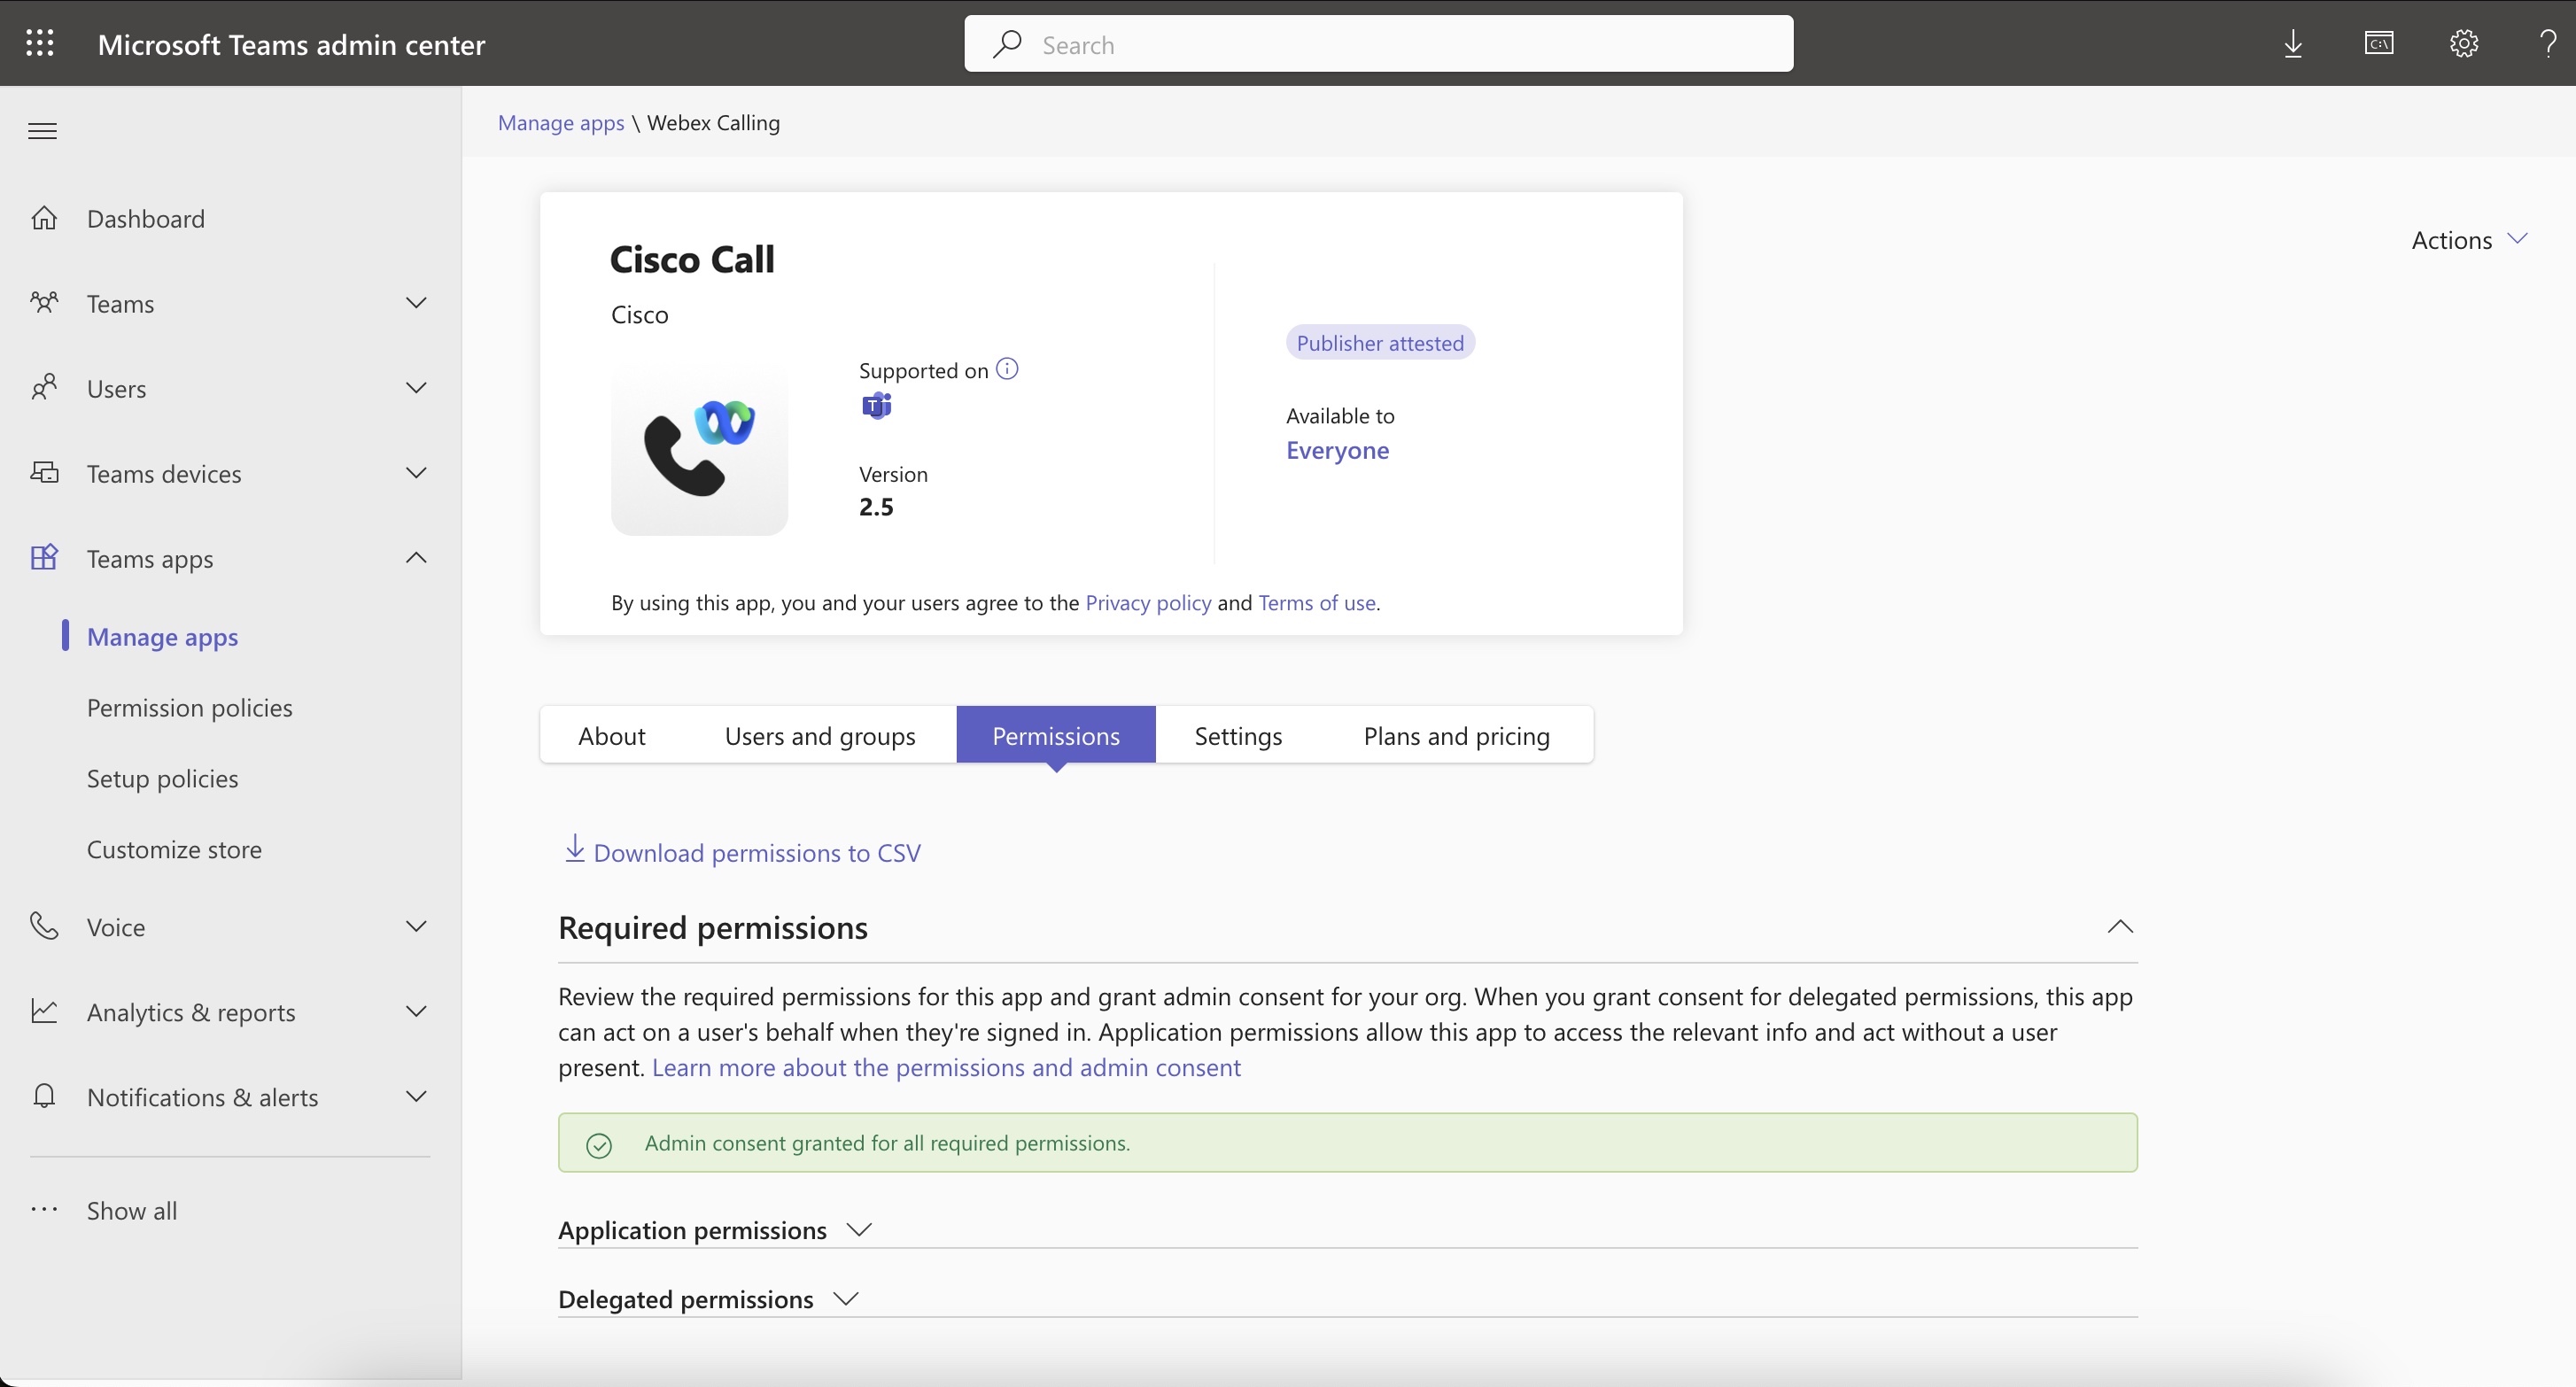
| 1 |
În meniul Tablou de bord, accesați |
| 2 |
În caseta de căutare, introduceți |
| 3 |
Faceți clic pe fila Permisiuni, apoi pe Acordați consimțământul administratorului. |
| 4 |
Verificați dacă sunt incluse următoarele permisiuni.
 |
| 5 |
Faceți clic pe Acceptă pentru a accepta permisiunile. |
| 6 |
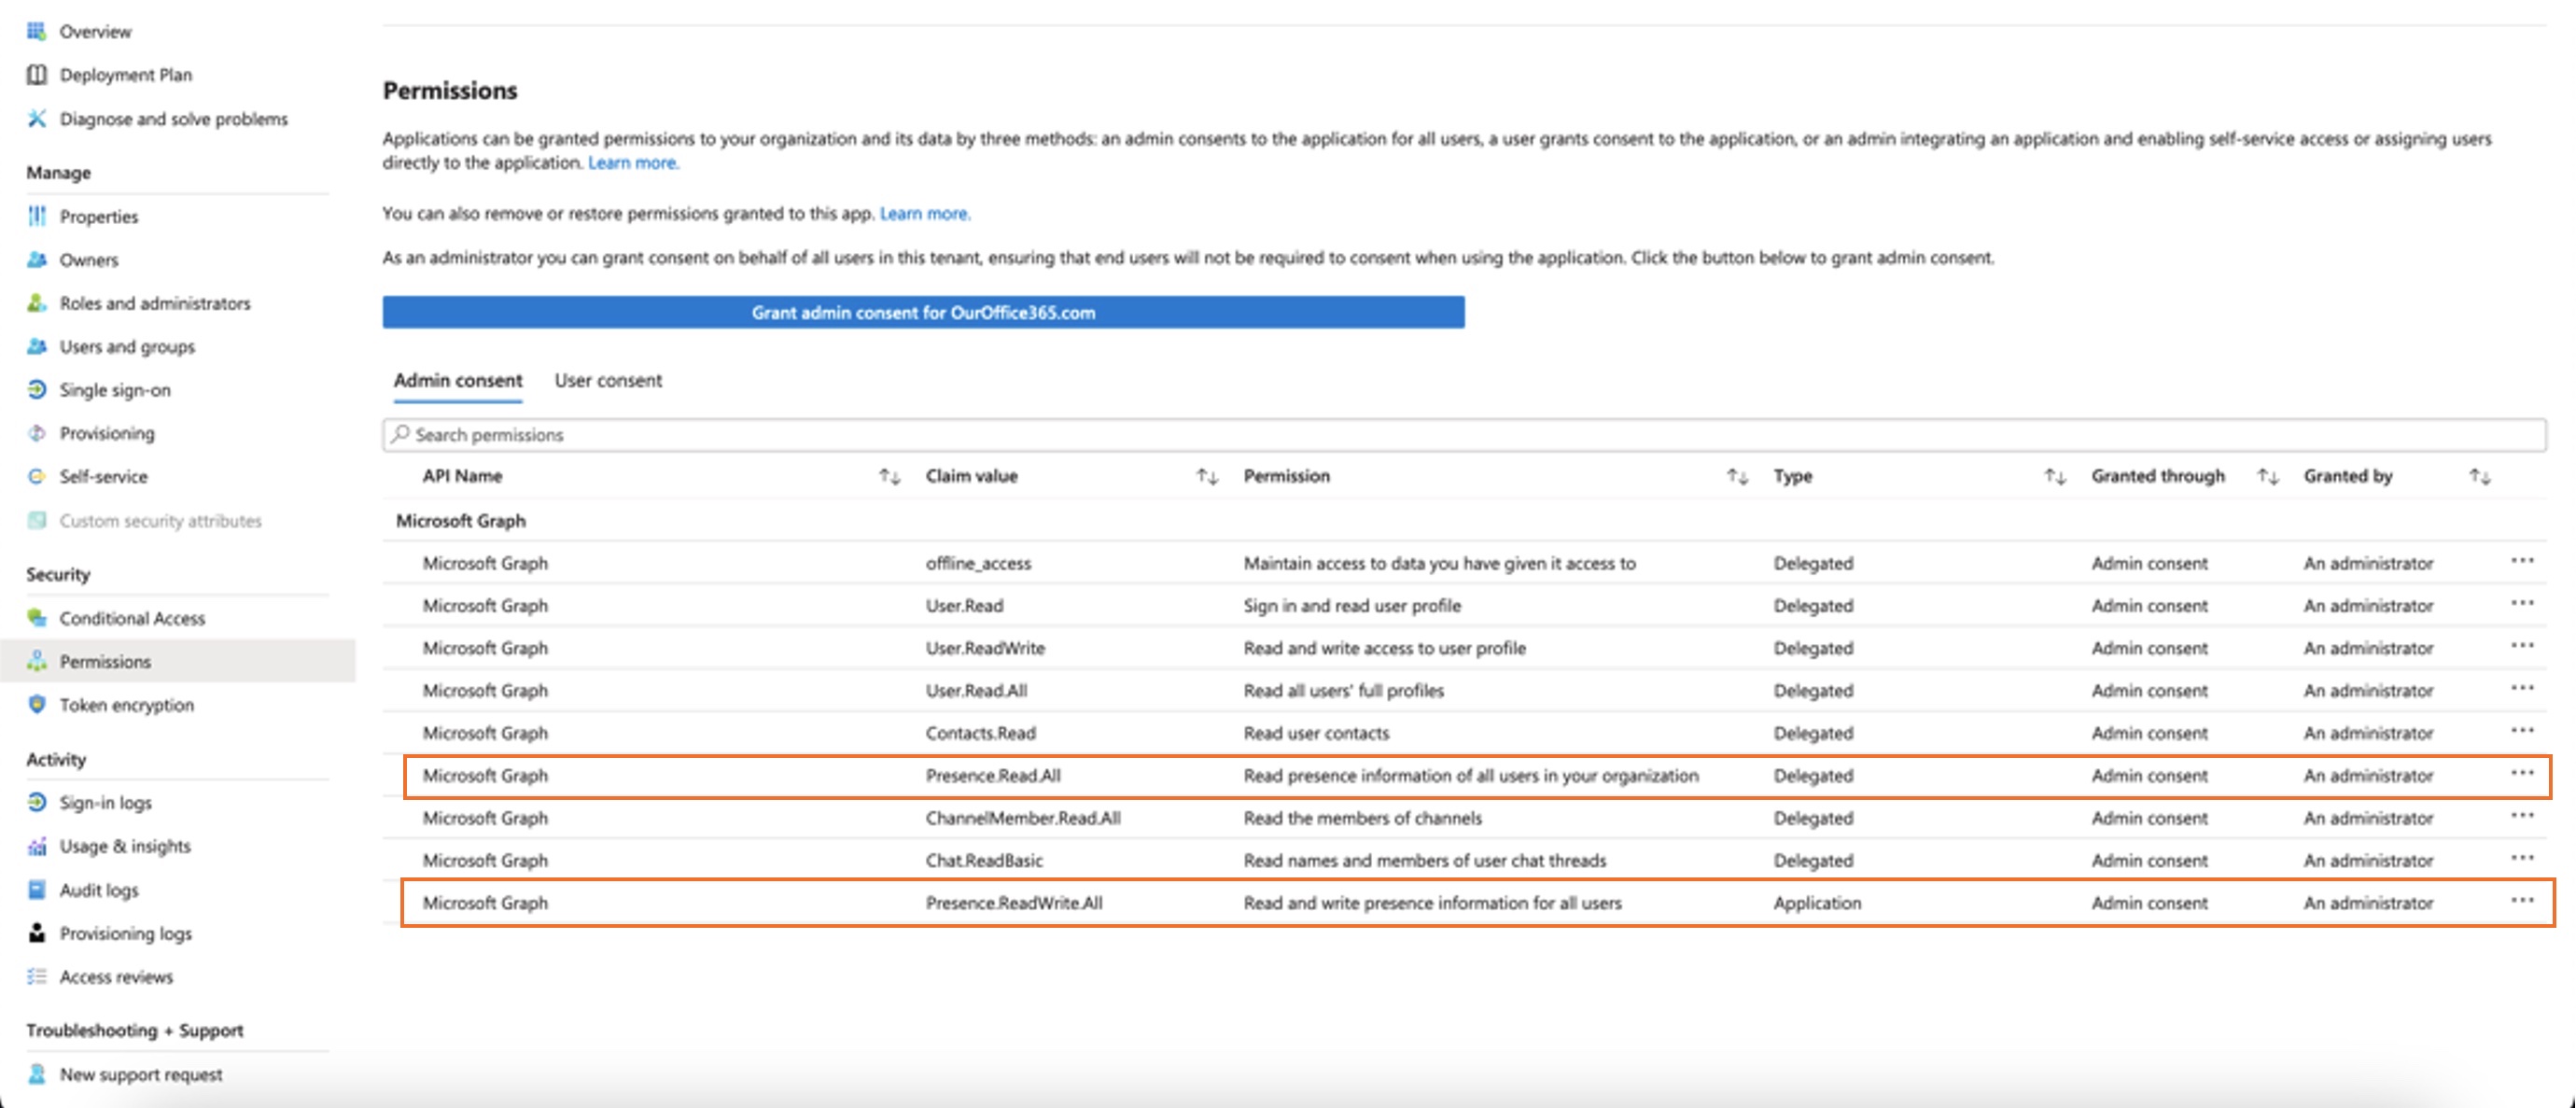
Asigurați-vă că noile permisiuni sunt afișate ca acordate:
Următoarele permisiuni trebuie respectate în consimțământul administratorului:
Ambele permisiuni
Dacă organizația dvs. utilizează în prezent permisiunea Dacă vrei să treci doar de la După ce ați verificat permisiunile, activați sincronizarea prezenței în Control Hub. Consultați secțiunea Activare sincronizare prezență bidirecțională. Pentru a evita problemele legate de starea sincronizării prezenței între Microsoft Teams și Webex, vă recomandăm să setați setarea Sarcină necesară la Nu. Pentru a actualiza setarea, accesați Centrul de administrare Microsoft Entry sau portalul Azure și accesați și selectați Nu. Dacă trebuie să păstrați această setare la Da din orice motiv, asigurați-vă că atribuiți utilizatorii corect urmând pașii menționați în aceste documente Microsoft: Atribuiți roluri de aplicație aplicațiilor & Gestionează atribuirea utilizatorilor și grupurilor la o aplicație. |
Personalizați aplicația Cisco Call
Puteți crea mai multe personalizări ale aplicației Cisco Call pentru utilizatorii Microsoft Teams, în funcție de nevoile organizației dvs. Puteți crea o personalizare implicită a aplicației pentru toți utilizatorii sau puteți crea 10 personalizări suplimentare pentru o singură aplicație și le puteți atribui anumitor utilizatori sau grupuri.
Pentru mai multe informații, consultați Personalizarea aplicației Cisco Call pentru utilizatorii Microsoft Teams.
Permisiuni pentru integrarea Cisco Call și Microsoft Teams
Serviciul de integrare utilizează API-uri Webex și Microsoft pentru a accesa date, cum ar fi istoricul centralizat al apelurilor, pentru afișarea și actualizarea stărilor, cum ar fi marcarea mesajelor vocale ca citite, fără a stoca date despre utilizatori. Toate transferurile de date între integrare și Webex/Microsoft backend-urile au loc prin canale HTTPS criptate. Astfel, serviciul garantează că datele utilizatorilor nu sunt stocate în cloud, consolidând confidențialitatea și securitatea datelor.
Solicităm permisiunile minime necesare de la Microsoft pentru a apela API-ul Microsoft în vederea activării funcționalității de integrare. Următorul tabel descrie fiecare permisiune pe care o solicităm și de ce este necesară.
| Permisiune | Motiv |
|---|---|
|
offline_access |
Permite serviciului de integrare să genereze un nou token de acces fără a solicita utilizatorului să se reautorizeze frecvent. |
|
User.Read |
Permite serviciului de integrare să citească informațiile de bază ale utilizatorului, cum ar fi adresa de e-mail. |
|
Utilizator.Citire/Scriere |
Permite serviciului de integrare să stocheze apelări rapide în profilurile de utilizator. |
|
User.Read.All |
Permite serviciului de integrare să caute utilizatori în directorul activ pentru a efectua apeluri. |
|
Contacte.Citește |
Permite serviciului de integrare să caute persoana de contact Outlook a utilizatorului pentru a efectua apeluri. |
|
ChannelMember.Read.All |
Permite extensiei de mesaje de integrare să citească membrii unui canal, astfel încât utilizatorul să poată căuta un anumit membru al canalului pe care să îl apeleze. |
|
Chat.CiteșteBasic |
Permite extensiei de mesaje de integrare să citească membrii unui chat de grup, astfel încât utilizatorul să poată căuta un anumit membru pe care să îl apeleze. |
|
Prezență.Citește.Toate |
Permite serviciului de integrare să citească informațiile de prezență ale tuturor utilizatorilor din director. |
|
Prezență.CitireScriere.Toate |
Permite serviciului de integrare să citească toate informațiile de prezență și să scrie activitatea și disponibilitatea tuturor utilizatorilor din director. |
|
Prezență.Citire/Scriere |
Permite serviciului de integrare să citească informațiile despre prezență și să scrie activitatea și disponibilitatea unui utilizator. |
Configurarea Hub-ului de Control
Puteți configura și activa următoarele caracteristici în Control Hub pentru a le face disponibile utilizatorilor Microsoft Teams.
Ascundeți fereastra aplicației Webex
Pentru organizațiile care au ales să utilizeze integrarea Cisco Call cu Microsoft Teams, integrarea este interfața principală a utilizatorilor către serviciile Webex. Odată configurată, aplicația Webex este încă instalată și rulează pe computerele utilizatorilor dvs., dar fereastra sa va fi închisă în mod implicit. Acțiunile efectuate în integrarea Cisco Call pot lansa anumite funcții în aplicația Webex, dar, în general, utilizatorii nu trebuie să interacționeze cu aplicația Webex.
Prin intermediul Control Hub, puteți ascunde fereastra aplicației Webex la următoarele niveluri:
-
Nivel organizațional
-
Nivel de grup de utilizatori
-
Nivel de utilizator
Ascundeți fereastra aplicației Webex pentru o organizație
Setările configurate la nivel de organizație se aplică automat tuturor utilizatorilor din cadrul organizației.
| 1 |
Conectați-vă la Control Hub. |
| 2 |
Accesați . |
| 3 |
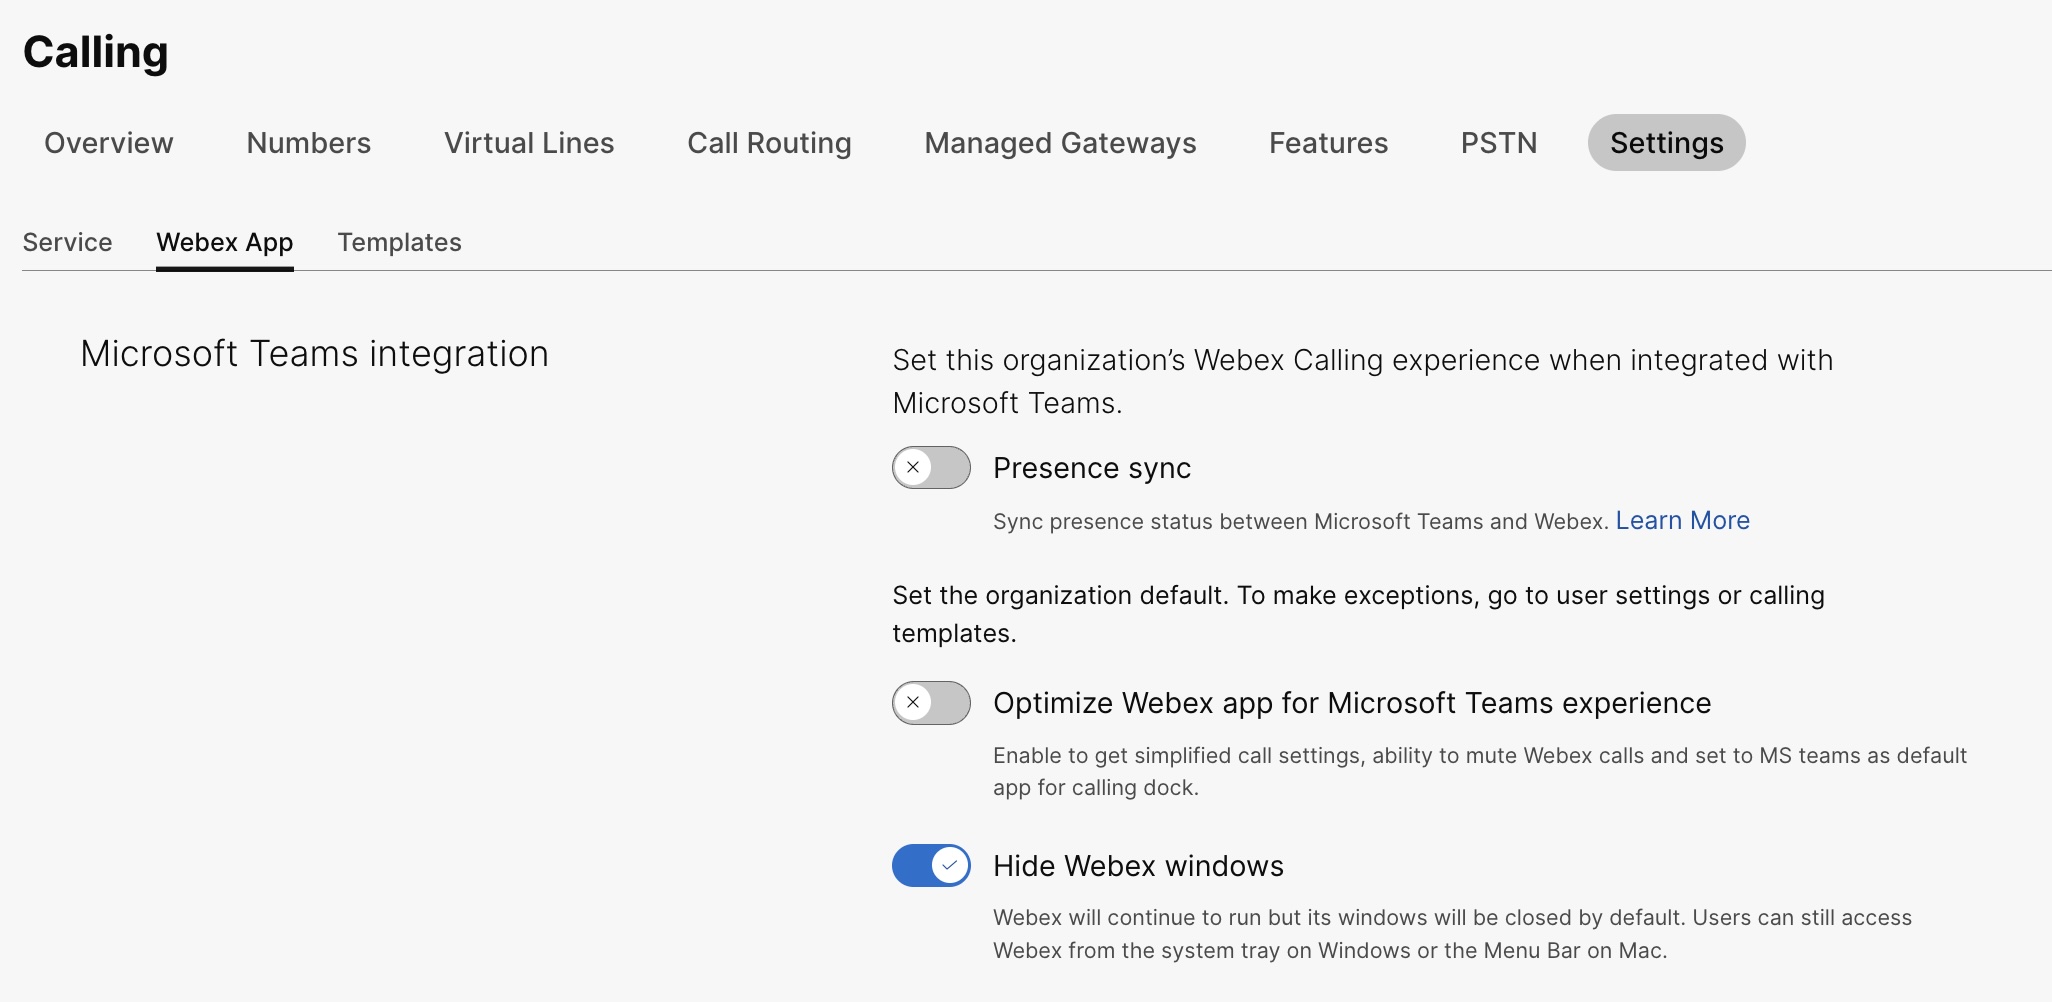
Faceți clic pe fila Aplicația Webex, accesați secțiunea Integrare Microsoft Teams și activați Ascundeți ferestrele Webex.
De asemenea, puteți utiliza API-ul public pentru a ascunde fereastra aplicației Webex pentru toți utilizatorii dintr-o organizație care utilizează integrarea Cisco Call cu Microsoft Teams. Pentru detalii, consultați Actualizarea setării MS Teams a unei organizații în developer.webex.com. |
Ascundeți fereastra aplicației Webex pentru un grup de utilizatori
Pentru a ascunde fereastra aplicației Webex pentru un grup de utilizatori, creați un șablon de apelare și atribuiți-l unui grup de utilizatori. Configurația din șablon se aplică tuturor utilizatorilor din grup.
Pentru a crea un șablon nou pentru a ascunde fereastra aplicației Webex:
| 1 |
Conectați-vă la Control Hub. |
| 2 |
Accesați . |
| 3 |
Faceți clic pe Creare șablon, alegeți Creare șablon și faceți clic pe Următorul. Dacă domeniul tău de activitate este Educația, poți aplica șabloane predefinite cu setări personalizate pentru elevi sau profesori. |
| 4 |
În secțiunea General, introduceți Numele șablonului și Descrierea. |
| 5 |
Accesați secțiunea Integrare Microsoft Teams și activați Ascundeți ferestrele Webex. |
| 6 |
Faceți clic pe Creare șablon și următorul. |
| 7 |
Căutați și selectați un grup pentru acest șablon și faceți clic pe Gata. Modificarea sau ștergerea unui șablon:
Pentru a modifica un șablon, faceți clic pe șablon, modificați comutatoarele și faceți clic pe Salvare. Pentru a șterge un șablon, faceți clic pe șablon și alegeți Ștergere din lista derulantă Acțiuni. În pagina Ștergere șablon, bifați caseta care vă informează că ștergerea unui șablon este definitivă, apoi faceți clic pe Ștergere. |
Considerații la aplicarea șabloanelor de apelare unui grup de utilizatori
-
Când un utilizator este încorporat într-o organizație, utilizatorul moștenește setările de la nivel de organizație.
-
Dacă utilizatorul este adăugat la un grup de utilizatori, atunci se aplică setările din șablonul de apelare.
-
Dacă un utilizator aparține mai multor grupuri de utilizatori, atunci șablonul cu cel mai înalt rang (Rang 1) are cea mai mare prioritate și se aplică setările acelui șablon.
-
Dacă utilizatorul are setări individuale, atunci aceste setări au prioritate față de setările la nivel de grup de utilizatori sau de organizație.
Consultați Configurați șabloanele de setări pentru mai multe informații despre gestionarea șabloanelor.
Puteți aplica șablonul existent fie din secțiunea Grup, fie din secțiunea Apelare.
- Pentru a aplica șablonul din secțiunea Grup, consultați Configurați șablonul de setări.
- Pentru a aplica din secțiunea Apeluri, urmați pașii următori.
| 1 |
Conectați-vă la Control Hub. |
| 2 |
Accesați . |
| 3 |
Faceți clic pe |
| 4 |
Tastați numele grupului la care doriți să aplicați șablonul, apoi alegeți grupul. |
| 5 |
Faceți clic pe Terminat. |
 lângă un șablon existent și faceți clic pe
 Ascundeți fereastra aplicației Webex pentru un utilizator
Setările individuale ale utilizatorilor au prioritate față de setările la nivel de organizație și la nivel de grup de utilizatori.
| 1 |
Conectați-vă la Control Hub. |
| 2 |
Accesați . |
| 3 |
Selectați un utilizator și faceți clic pe Apelare. |
| 4 |
Accesați Experiența apelurilor utilizatorului și faceți clic pe Integrare Microsoft Teams. |
| 5 |
Activați Ascundeți ferestrele Webex. 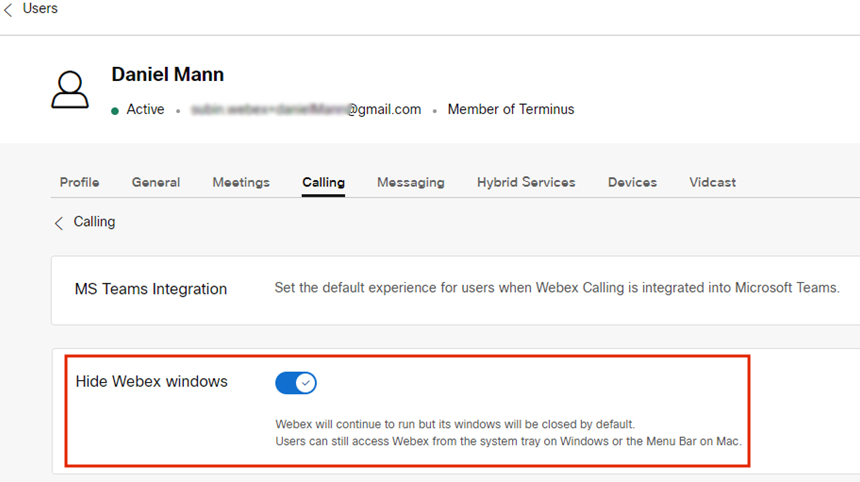 După ce ați configurat setările pentru un utilizator, puteți modifica setările la nivel de utilizator. Setările utilizatorului nu revin automat la setările implicite ale unei organizații. Puteți utiliza API-ul public pentru a ascunde fereastra aplicației Webex din clientul Microsoft Teams pentru un utilizator individual. Consultați Configurarea setării MS Teams a unei persoane și Recuperarea setărilor serviciului de aplicații ale unei persoane în developer.webex.com. |
După ce ați configurat setările, utilizatorii trebuie să repornească aplicația Webex și să se conecteze pentru a vedea modificarea.
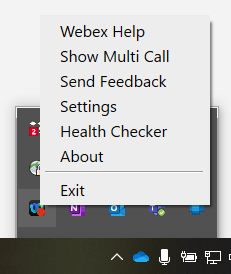
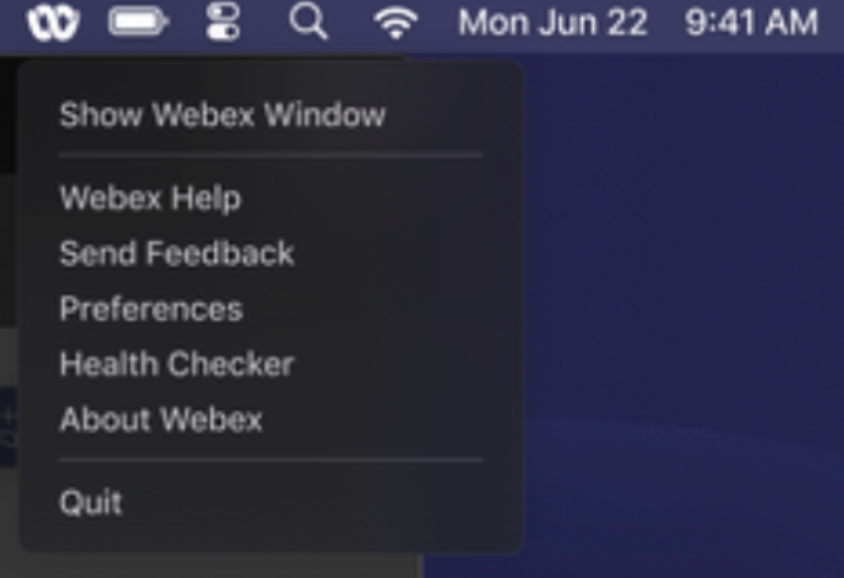
Dacă utilizatorii doresc să interacționeze cu aplicația Webex, o pot accesa din bara de sistem pe Windows și din bara de meniu pe Mac. Aplicația Webex este vizibilă doar în bara de activități Windows sau în docul macOS atunci când o fereastră este activă și în uz.
|
Aplicația Webex în bara de sistem Windows |
Aplicația Webex în bara de meniu Mac |
Activează fereastra de andocare pentru apelare
Fereastra Apelare (apeluri multiple) este o fereastră separată, plutitoare, care ajută utilizatorii să gestioneze linii multiple sau partajate într-o singură fereastră. Utilizatorii pot efectua și primi apeluri, pot vedea starea tuturor liniilor și pot avea acces îmbunătățit la funcții precum așteptarea, transferul și intrarea în afara apelurilor, fără a trece la o altă fereastră.
| 1 |
Conectați-vă la Control Hub. |
| 2 |
Accesați . |
| 3 |
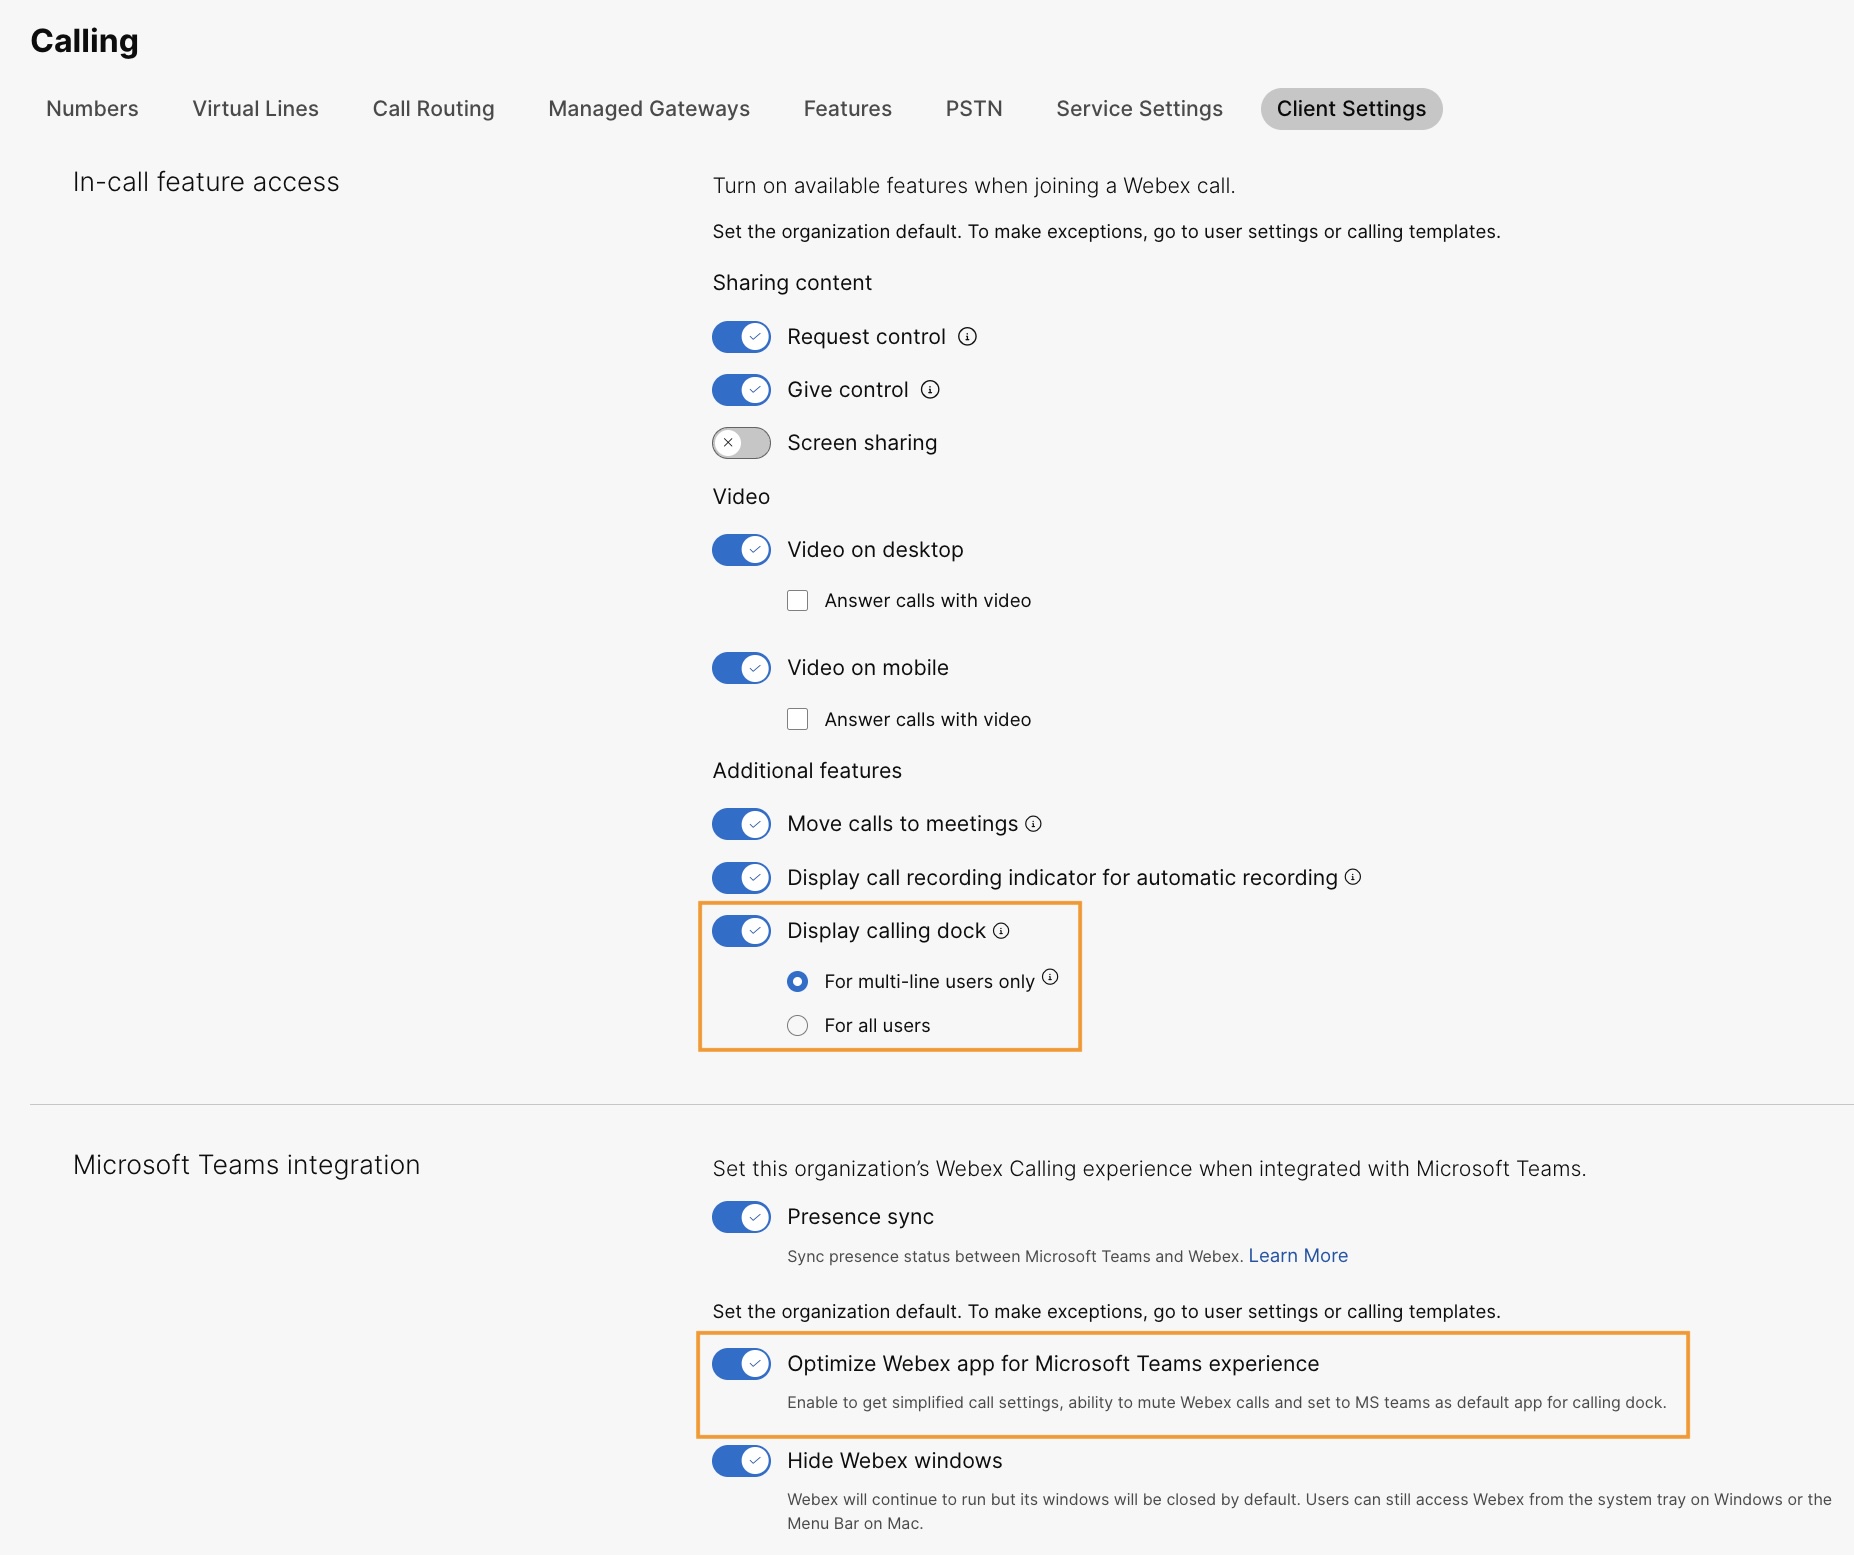
Faceți clic pe fila Aplicația Webex, accesați secțiunea Acces la funcțiile din timpul apelurilor și, sub Funcții suplimentare, activați Afișați docul de apeluri și alegeți una dintre următoarele opțiuni:
De asemenea, puteți configura această funcție la nivel de grup de utilizatori și la nivel de utilizator.
|
Optimizați aplicația Webex pentru experiența Microsoft Teams
Această funcție oferă utilizatorilor următoarele experiențe:
-
Setări de apel simplificate — Setările de apel afișează doar opțiunile necesare pentru integrare. Activarea acestei funcții simplifică doar setările de apel accesibile prin intermediul Dock-ului de apeluri. Setările de apel accesibile din integrarea Cisco Call rămân simplificate în mod implicit.
-
Dezactivarea sunetului apelurilor Cisco – Apelurile Cisco primite sunt dezactivate atunci când un utilizator se află într-un apel sau într-o întâlnire Microsoft Teams. Pentru ca această funcție să funcționeze, trebuie să activați această funcție în Control Hub, iar utilizatorul trebuie să activeze opțiunea Dezactivează notificările doar când sunt într-o întâlnire sau într-un apel din setările apelului din integrarea Cisco Call.
Dacă dezactivați această funcție în Control Hub, setările utilizatorului vor funcționa numai atunci când utilizatorul se află într-un apel sau într-o întâlnire Cisco. Dacă activați această caracteristică, setările utilizatorului vor funcționa atunci când utilizatorul se află fie într-un apel sau o întâlnire Microsoft Teams, fie într-un apel sau o întâlnire Cisco.
-
Experiență într-o singură aplicație: atunci când un utilizator dă clic pe pictogramele mesageriei vocale și istoricului centralizat al apelurilor din docul de apeluri, acesta este redirecționat către apelul Cisco din Microsoft Teams în loc de aplicația Webex.
Pentru utilizatorii de Windows: Dacă faceți clic pe aplicația Webex din bara de sistem, se deschide docul de apelare în loc de aplicația Webex.
| 1 |
Conectați-vă la Control Hub. |
| 2 |
Accesați . |
| 3 |
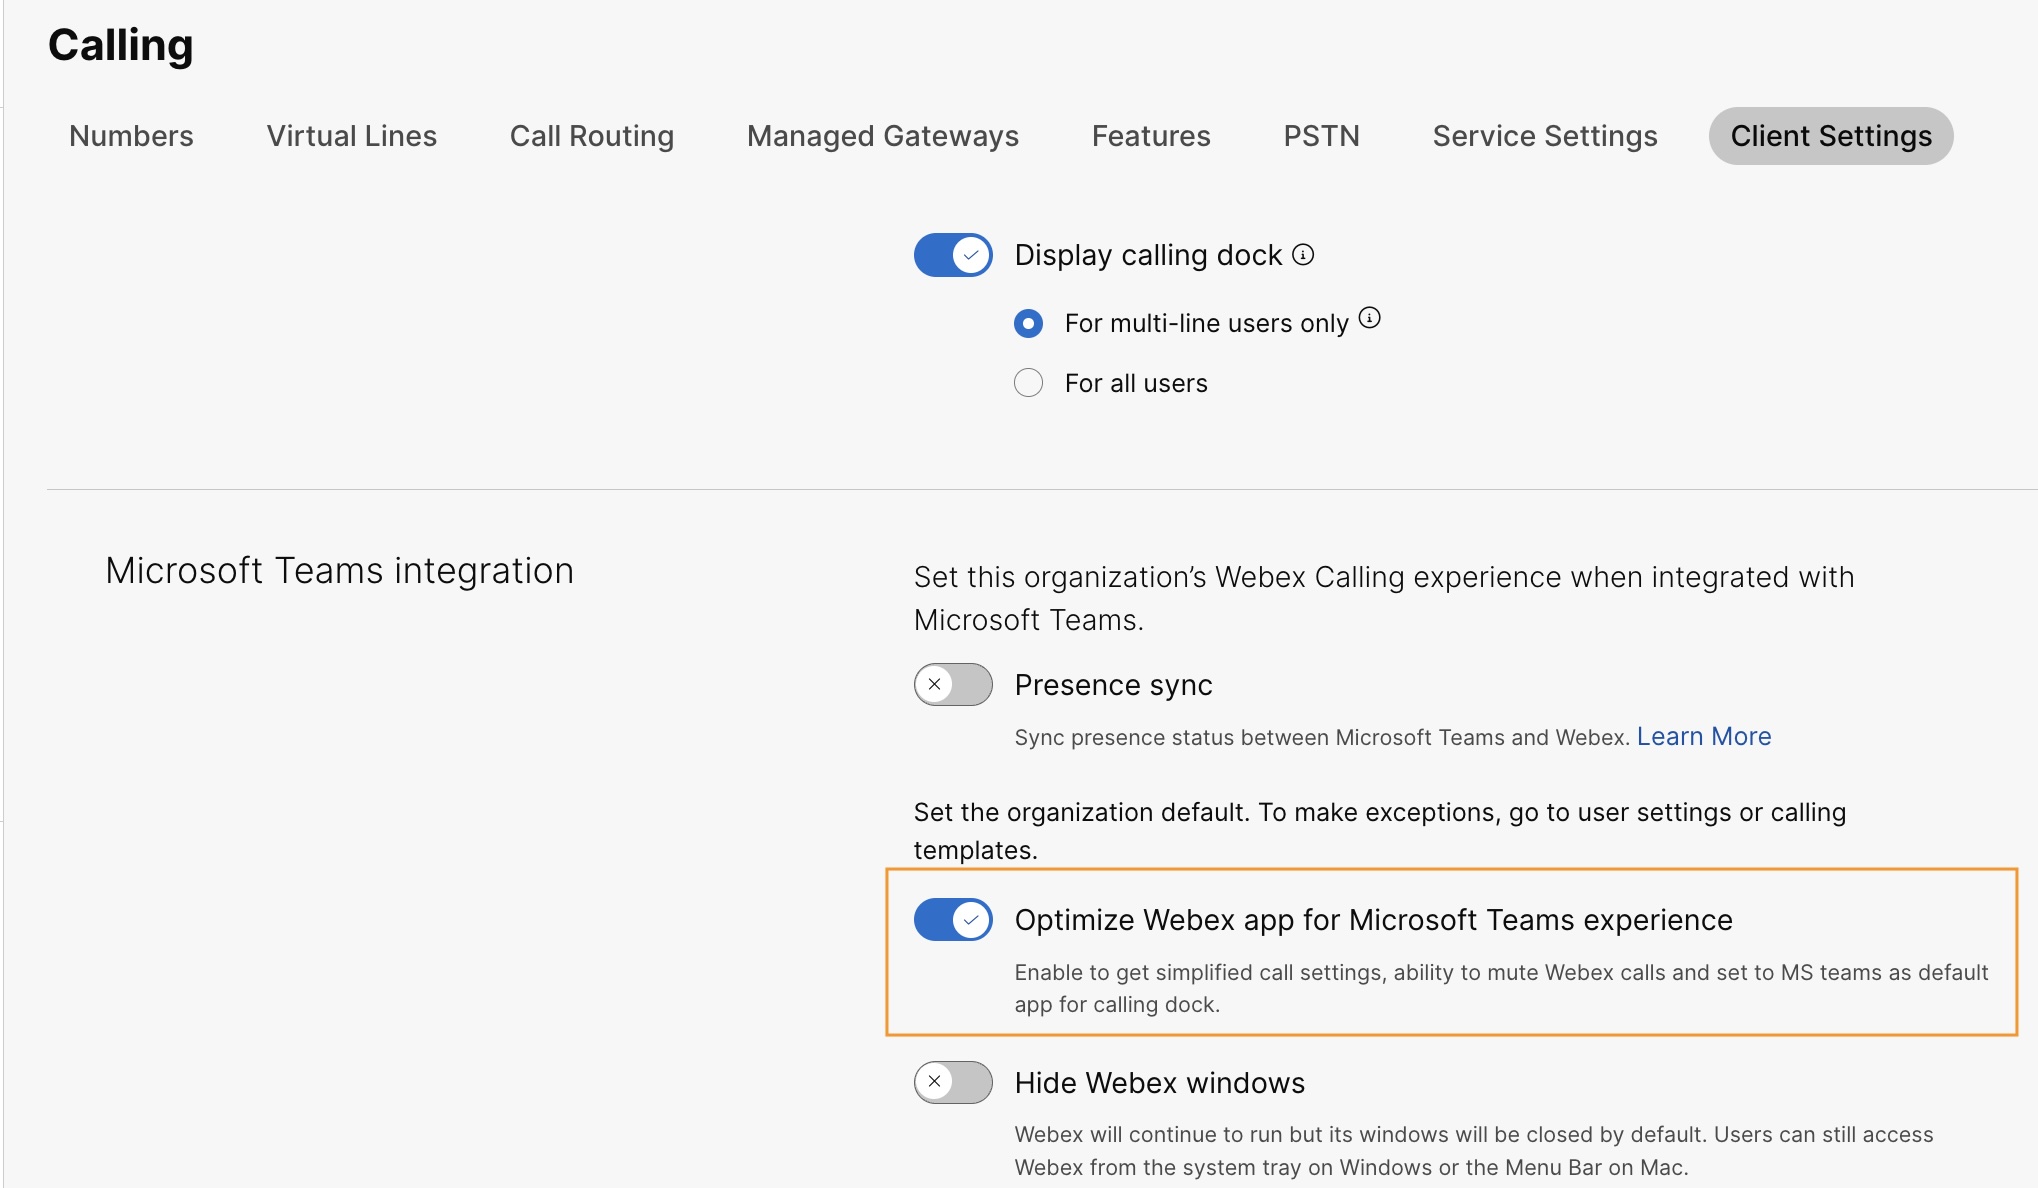
Faceți clic pe fila Aplicația Webex, accesați secțiunea Integrare Microsoft Teams și activați Optimizați aplicația Webex pentru experiența Microsoft Teams.
Această opțiune este dezactivată dacă nu ați activat opțiunea Afișare doc apeluri din secțiunea Acces funcții în timpul apelurilor. De asemenea, puteți configura această funcție la nivel de grup de utilizatori și la nivel de utilizator.
|
Activați mesageria vocală, istoricul centralizat al apelurilor și sincronizarea prezenței
Mesagerie vocală și istoric centralizat al apelurilor
Funcțiile de mesagerie vocală și istoricul centralizat al apelurilor sunt activate în mod implicit pentru clienții Webex Calling, Dedicated Instance și UCM Cloud.
Pentru mai multe informații despre activarea mesageriei vocale pentru utilizatorii Webex Calling, consultați: Configurați și gestionați setările de mesagerie vocală pentru un utilizator Webex Calling.
Pentru mai multe informații despre activarea mesageriei vocale pentru utilizatorii BroadWorks, consultați Activarea mesageriei vocale pentru integrarea Microsoft Teams.
Administratorii BroadWorks trebuie să activeze istoricul apelurilor centralizat și unificat pentru a se asigura că această funcție funcționează corect. Consultați Ghidul de configurare Webex pentru Cisco BroadWorks pentru mai multe detalii.
Sincronizare bidirecțională a prezenței
Această funcție permite sincronizarea bidirecțională a stării prezenței între Microsoft Teams și Webex, acceptând mai multe entități găzduite Microsoft Teams în aceeași organizație Webex. Starea prezenței include Într-un apel, Într-o întâlnire, Prezentareși Nu deranjați.
După activarea acestei funcții, atunci când un utilizator efectuează sau primește un apel Webex, starea sa Microsoft Teams se schimbă în Într-un apel. Când activează opțiunea Nu deranjați în aplicația Webex sau pe orice dispozitiv Webex, starea este sincronizată automat cu Microsoft Teams. În mod similar, stările Într-o întâlnire și Prezentare se sincronizează între aplicații.
Când opțiunea Nu deranjați este activată în aplicația Webex a utilizatorului sau pe orice dispozitiv Webex, acesta nu va primi nicio notificare privind apelurile și mesajele primite în aplicația Webex, dispozitivul Webex sau Microsoft Teams.
De asemenea, puteți utiliza API-ul public pentru a activa sincronizarea prezenței Webex cu clientul Microsoft Teams. Pentru detalii, consultați Actualizarea setării MS Teams a unei organizații în developer.webex.com.
Următorul tabel prezintă reprezentarea sincronizării bidirecționale a stării între Webex și Microsoft Teams.
|
Stare Webex |
Starea Microsoft Teams |
|---|---|
|
|
|
|
|
|
|
|
|
|
|
|
În prezent, puteți configura această funcție doar la nivel de organizație.
| 1 |
Conectați-vă la Control Hub. |
| 2 |
Accesați . |
| 3 |
Faceți clic pe fila Aplicația Webex, accesați secțiunea Integrare Microsoft Teams și activați Sincronizare prezență. Puteți activa comutatorul Ascundeți ferestrele Webex pentru o experiență optimă, dar este opțional. |
| 4 |
Accesați secțiunea Sincronizare stare Nu deranjați (DND) și activați comutatorul. 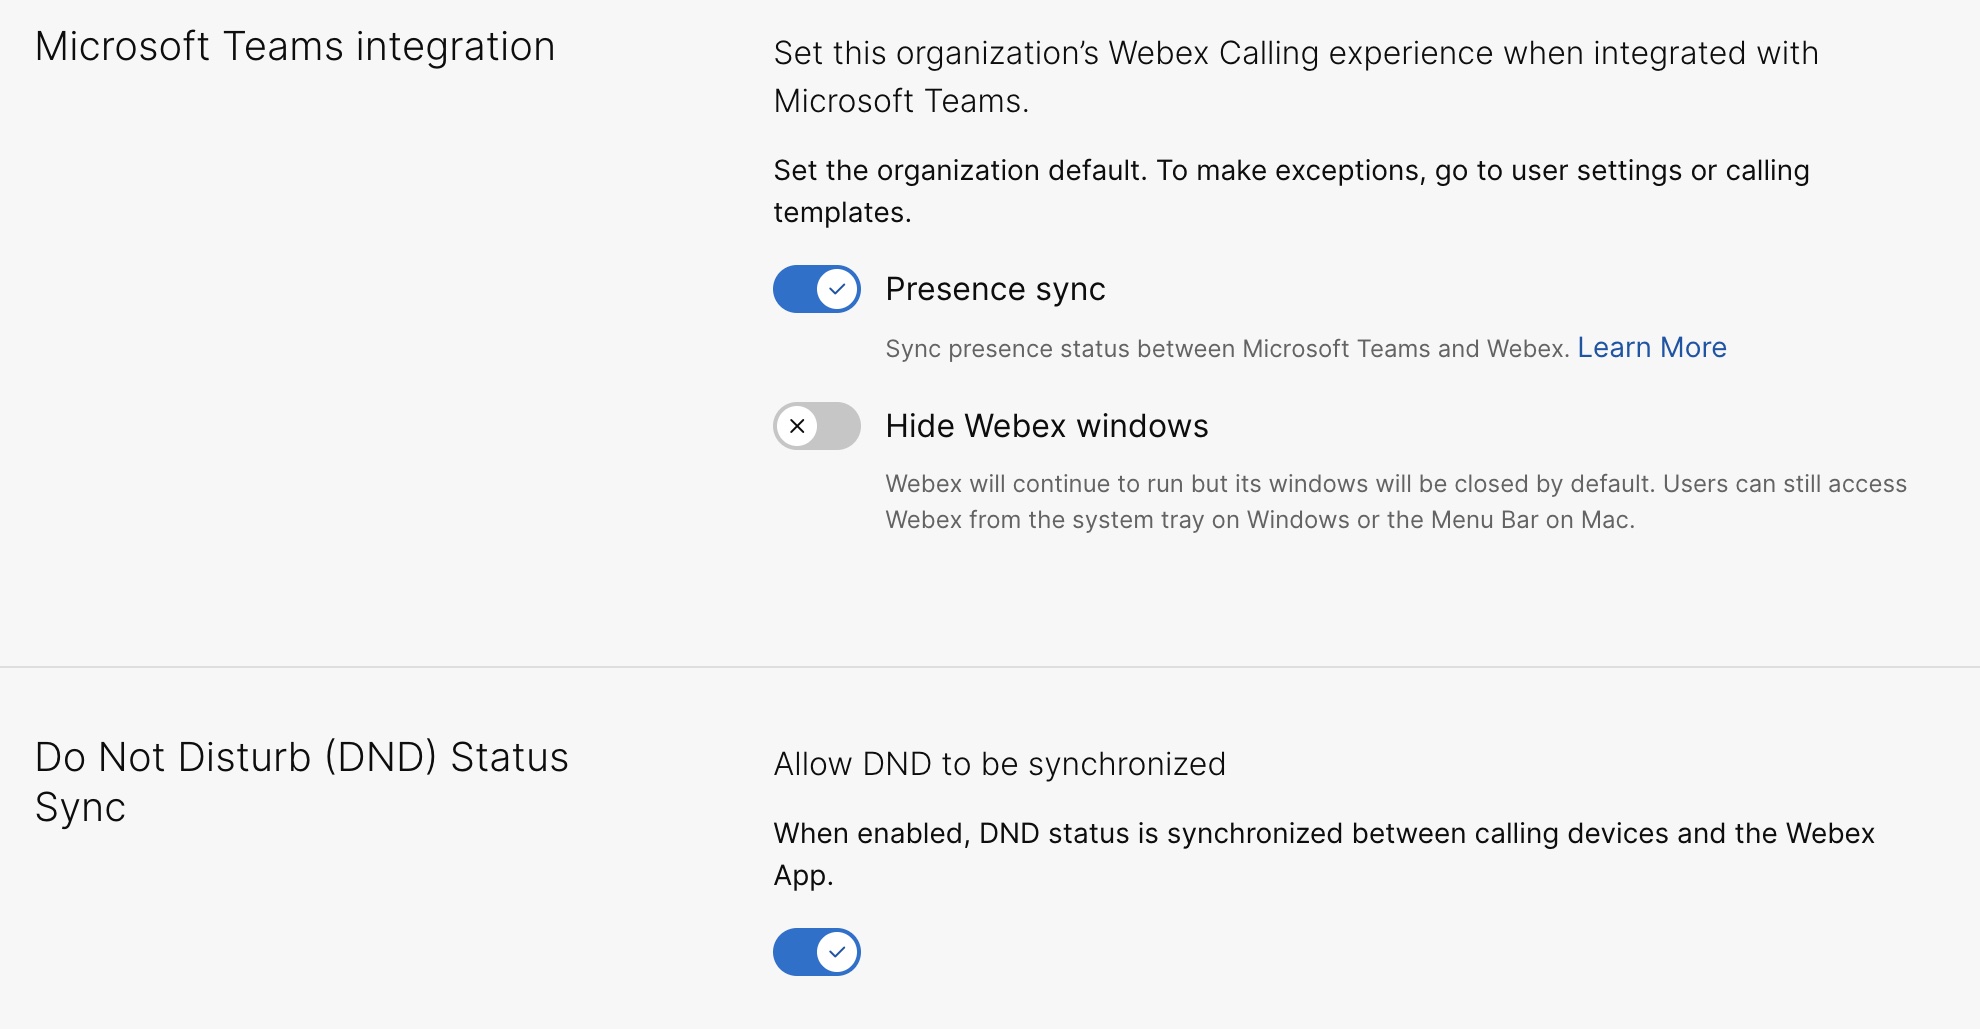 |
Configurație suplimentară pentru utilizatorii Unified CM
Pentru a activa mesageria vocală, istoricul centralizat al apelurilor și serviciul de sincronizare a prezenței bidirecționale pentru clienții Unified CM locali, urmați pașii următori:
Activarea serviciului de mesagerie vocală pentru clienții locali durează maximum 12 ore.
| 1 |
Conectați-vă la Control Hub. | ||||
| 2 |
Accesați . În fila UC Management, faceți clic pe Inventar. Este afișată lista grupurilor de clustere, împreună cu descrierea, starea, clusterele și nodurile. | ||||
| 3 |
Efectuați următoarele acțiuni:
Este afișată pagina Inventar, unde apare lista clusterelor care aparțin grupului de clustere selectat. | ||||
| 4 |
Faceți clic pe Detalii, în dreptul clusterului căruia îi aparține nodul de produs respectiv. Va fi afișat numele nodului, împreună cu versiunea, produsul și starea. | ||||
| 5 |
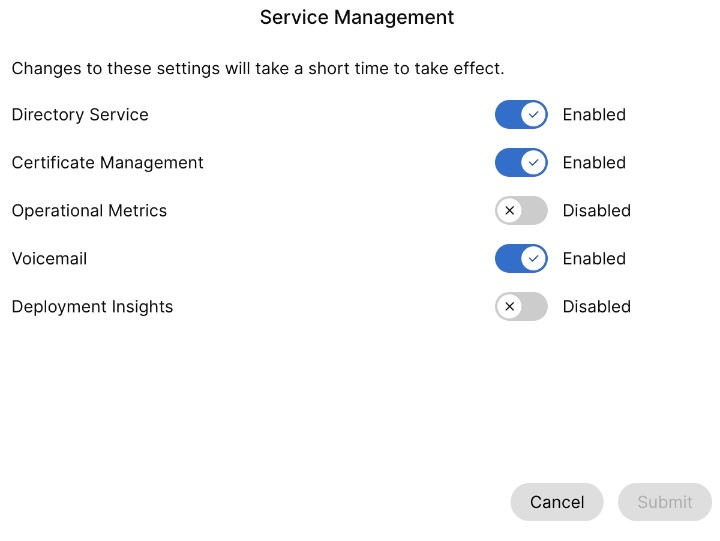
Faceți clic pe pictograma ⋮ din dreptul Istoricului evenimentelor și alegeți Gestionare serviciu. Este afișată pagina Gestionare serviciu, unde apare lista de servicii. | ||||
| 6 |
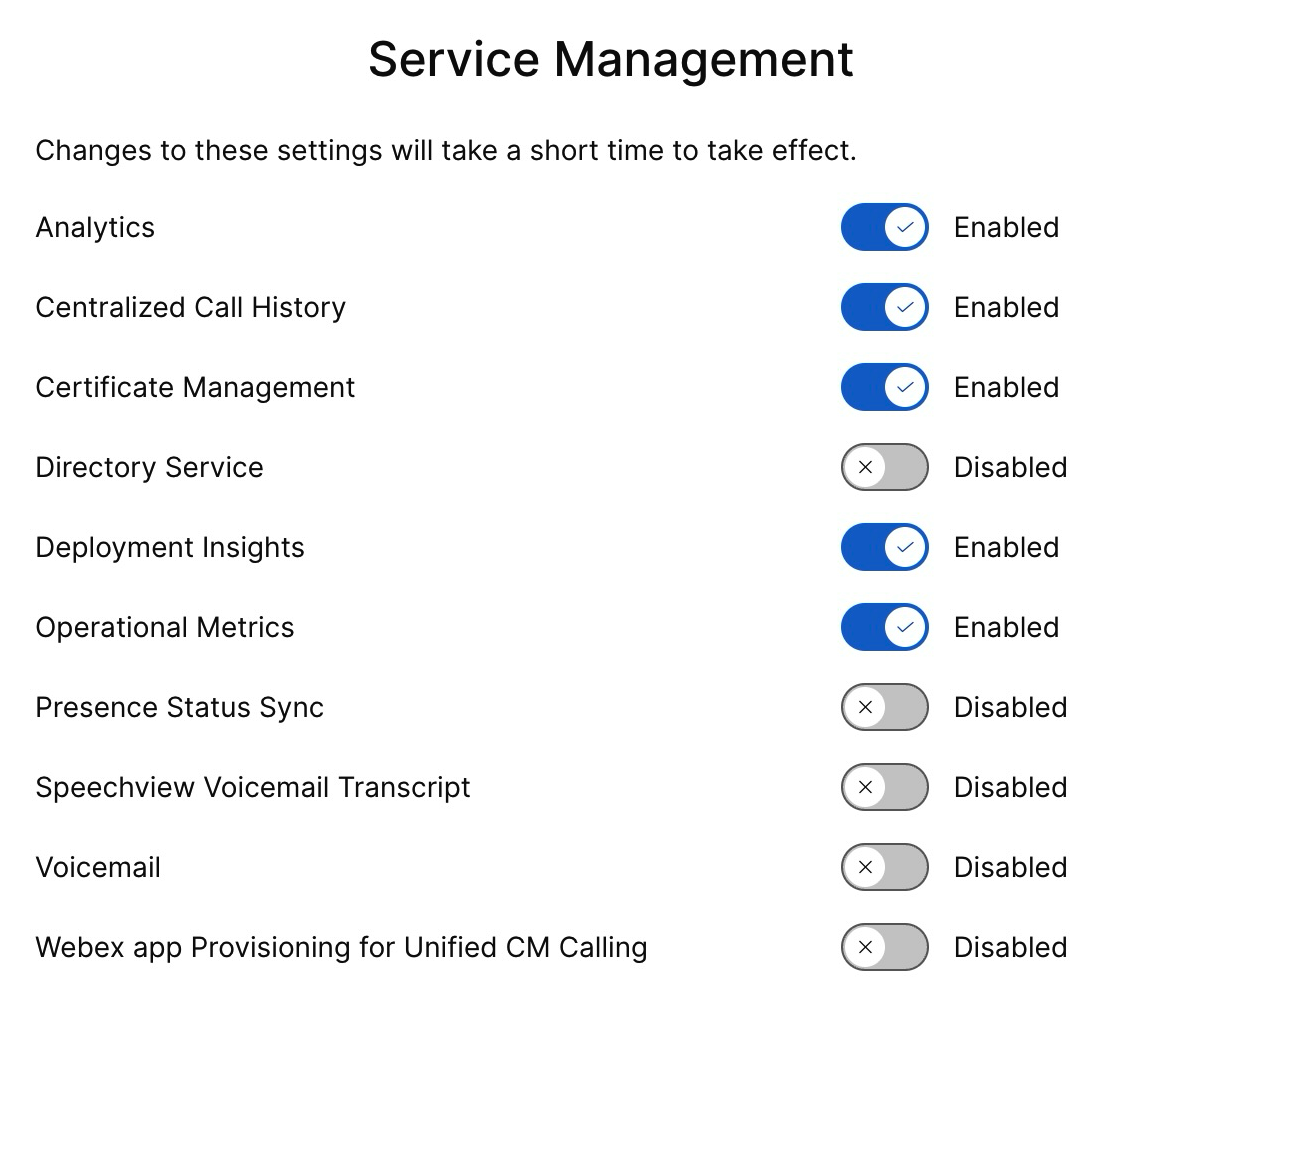
Folosește butonul de comutare pentru a activa Mesageria vocală, Istoricul apelurilor centralizat și Sincronizarea stării prezenței.
| ||||
| 7 |
Faceți clic pe Trimitere. | ||||
| 8 |
Dacă se afișează fereastra pop-up Confirmare colectare date, acceptați-o bifând caseta de selectare și făcând clic pe Trimitere. |
Activați Cisco AI Assistant
Această funcție se aplică numai utilizatorilor Webex Calling.
Asistentul Cisco AI generează rezumate la care utilizatorii pot accesa atât în timpul, cât și după o interacțiune, indiferent dacă apelul este înregistrat sau nu.
Dacă Asistentul AI este utilizat în timpul unui apel, utilizatorul care a activat rezumatul și transcrierea post-apel are acces la rezumatele, acțiunile și transcrierile post-apel din istoricul apelurilor sale. Această disponibilitate se aplică indiferent dacă apelul a fost înregistrat sau nu și este controlată atât de setările administratorului, cât și de cele ale utilizatorului. Datele Asistentului AI sunt stocate pentru o durată fixă de 365 de zile.
Puteți activa setările de rezumat al apelurilor din Asistentul AI pentru transferul apelurilor și conferințe la nivel de organizație, utilizator și șablon. Funcțiile Asistentului AI nu sunt disponibile pentru utilizatorii din afara Indiei.
Pentru mai multe detalii despre activarea Cisco AI Assistant din Control Hub, consultați Gestionarea Cisco AI Assistant pentru Webex Calling.


