
Thanks for your feedback.
Webex Expert on Demand
 Feedback?

Expert on Demand aims to facilitate real-time advice, guidance, and assistance from professionals who possess specialized knowledge and skills. The solution is designed to facilitate knowledge sharing and problem-solving, enabling individuals or organizations to access expertise remotely without the need for a physical presence. Expert on Demand leverages the power of the Webex platform, supporting end-to-end encryption, screen sharing, 1080p capabilities, and much more, to enable seamless interactions between users and experts.
Using assisted reality (AR) hands free hardware capabilities, Webex Expert on Demand increases the availability of geographically dispersed experts and service teams at locations where you need them most while reducing physical travel. Frontline workers can use head tracking movements and voice commands—leaving their hands free—to join multi-party audio and video calls, getting real time guidance and sharing content and documents with real time annotations, leading to faster resolutions, improved experiences, and increased safety.
Update to Expert on Demand version 2.1
End of support for Google Glass
Starting with version 2.1, Google Glass is no longer supported by Expert on Demand as indicated in earlier announcements.
All Expert on Demand devices must be registered in Control Hub
Expert on Demand now available in the RealWear Marketplace
The Expert on Demand application is now available in the RealWear Marketplace.
Reach out for support
Should you have any questions or require assistance regarding license migration and the new customer-driven trial process, please reach out to rexar-pteam@cisco.com. At the same time, if you require any sales support, please follow this link and contact the appropriate Cisco support team within your region.
Expert on Demand version 2.0 is coming!
Version 2.0 of Expert on Demand is coming in October 2023 and will be available in the RealWear marketplace! Please check the Release notes and What’s new tabs for information on all new features and enhancements.
Prerequisites
To upgrade to Webex Expert on Demand 2.0 make sure you meet the following requirements:
- Access to the Webex Expert on Demand app in RealWear cloud.
- A Webex Expert on Demand paid or trial device licenses.
- Webex Control Hub administrator access.
- XoD devices onboarded and registered in Control Hub. See Manage Expert on Demand devices in the Admin guide tab for details.
Per-Device license migration
As part of our commitment to continually improving our services, we have announced End-of-Sale and End-of-Life for Webex Expert on Demand named User-based Licensing on June 30th, 2022 (please see the announcement). Expert on Demand device licensing is already available, so we encourage all our existing paid user named Webex Expert on Demand license customers to migrate to per device-based licenses before Jan 25th, 2024 (extended from Dec 15th 2023).
To migrate to device-based licenses, please see this link and contact the appropriate Cisco support team, and they will guide you through the necessary steps.
For more information, see Migrate to device-based licensing in the Admin guide tab.
New customer trial process
For both existing and new Webex Expert on Demand trial customers we are announcing a new automated trial process including five (5) device licenses for a 60-day trial period. This trial will be applicable to all existing and new trial customers starting in October 2023.
We request all the existing and new Webex Expert on Demand trial customers to check below mentioned steps which explains the trial licenses accessibility and the process to register the RealWear devices in Webex Control hub for 60-day trial.
The following terms apply:
- The 60-day trial window starts once an administrator adds the first device.
- If no commercial licenses were bought during the trial period, the trial devices are automatically moved to an expired state after 60 days.
- Upon expiration of the trial period, you’ll need to transition to a production device license to continue using the Webex Expert on Demand application.
Prerequisites
To access a Webex Expert on Demand trial, you’ll need the following:
- A RealWear hardware device such as a Nav500, NAV 520, or HMT-1.
- RealWear device serial numbers for registration.
- Access to Webex Expert on Demand app version 2.0 from the RealWear cloud.
- Webex Control Hub administrator access for Expert on Demand device onboarding and trial license management.
- A Webex user license.
- Expert on Demand devices onboarded and registered in Webex Control Hub.
Licensing notes
Please keep the following licensing notes in mind:
- For existing Expert on Demand Customers with paid Webex Expert on Demand device licenses subscription, all existing licenses are mapped to added devices.
- If the devices added exceed the number of licenses purchased, then those devices are moved to a trial state with a trial period set to 60 days (for the migration period only).
- After expiration of the 60-day trial, those devices are marked expired in the absence of additional paid licenses.
- Users aren’t allowed to add new devices until all the devices in the trial state are mapped to Expert on Demand Device License Subscriptions.
- After the 60 days trial period has expired, all the devices in the trial state are moved to an expired state.
For information on onboarding new devices, see Manage Expert on Demand devices in the Admin guide tab.
Manage integration access in Control Hub
We are introducing a specific change to enhance Webex Expert on Demand integration user accessibility control through Webex Control hub. Webex administrators can now allow or deny access to Expert on Demand integrations for everyone in the organization or, if they have the Pro Pack for Control Hub, configure access to Expert on Demand integrations for specific users. This capability will be available for Expert on Demand beginning in October 2023.
Prerequisites
To administer integrations, you must meet the following requirements:
- A Webex Control Hub administrator account.
- OPTIONAL: If you want to control Expert on Demand integrations for specific users, a Webex Control hub Pro-Pack. See Pro Pack for Control Hub.
For information on onboarding new devices, see Manage Expert on Demand integrations in the Admin guide tab.
May 2024
- Expert on Demand 2.1 has been released with support for live annotations as well as the ability to display the availability of users within the app. See Live annotations and User presence/availability in the User guide tab for details.
March 2024
- Webex Expert on Demand Application version 1.9.3.0 is now supported in the newly released RealWear Navigator-520.
- Webex administrators with Device Administrator and Partner Administrator roles can manage Expert on Demand Devices licenses and onboarding processes. For more information, see Manage Expert on Demand devices in the Admin guide tab.
October 2023
Expert on Demand 2.0 has been released!
Enhancements
- The telephoto module and thermal camera module now support the RealWear 500/520 device series.
- Joining end-to-end encrypted meetings as well as enhanced space meetings is now supported.
- Czech, Turkish, and Danish languages are now enabled for supported RealWear devices.
- You can now select the transmission video resolution.
- Automatic sign-out for inactive sessions is now supported.
- Screen sharing has been optimized for higher FPS.
- Rooted device detection and In-App notification to the user.
- User notification on low bandwidth/network drop during a call.
New customer trial features
- Sign up for a free trial today, no sales contact and approval are required!
- Trials are available to ALL new and existing Webex customers.
Trial licenses are not available to paid Expert on Demand customers.
- Five Expert on Demand device licenses are offered during the 60-day trial.
Hardware is not included.
Device licensing update
-
We’ve added a ten percent XOD device license expansion for all Expert on Demand existing and future paid customers!
April 2023
RealWear Navigator-520 is compatible with Webex Expert on Demand.
Webex Expert on Demand Application version 1.9.3.0 is now supported in the newly released RealWear Navigator-520.
Control hub XoD license management is now available for Device Admin and Partner Admin roles.
Webex administrators with Device Administrator and Partner Administrator roles can manage Expert on Demand Devices licenses and onboarding processes.
See the View device licensing and app version details entry in the Admin guide tab for details.
March 2023
ANNOUNCEMENT: Google has announced the End of Sale of Google Glass Enterprise Edition
Google will no longer sell Glass Enterprise Edition as of March 15, 2023. See this link for details- https://support.google.com/glass-enterprise/customer/answer/13417888)
Q: Will Webex Expert on Demand still work on Glass Enterprise Edition devices? If so, for how long?
A: Yes. Webex Expert on Demand will still work with version 1.9.3 and we will support it until April 1, 2024. No software updates will be available from Webex Expert on Demand for Glass Enterprise.
December 19, 2022
Version 1.9.3
Feature additions
We've added the following new functionality:
- Bulk add devices in Control Hub.
- Toggle the BNR (Background Noise Reduction) feature on or off before getting on a call.
Bug fixes
- Fixed inconsistency in providing a continuous video stream to all the participants in a call.
- During a call, unintended usage of numbers in the conversation are recognized as dummy commands and ignored.
August 26, 2022
Version 1.9.2
Control Hub integration
We've added the following new Control Hub functionality:
Find details for Google Glass, HMT, and Navigator-500 devices registered to your organization
View the total number of active XoD device licenses registered to your organization
Expert on Demand device management:
Addition of single and multiple devices
Removal of devices
Expert on Demand now available on the Navigator 500
The Nav500 is a next generation ruggedized assisted-reality solution, with enhanced camera capability.
Extended support for Webex meetings
You can now view meetings from the current time until the end of the day. In addition, you can join meetings that were scheduled to start up to 90 minutes prior to the current time.
Capture and share photos in audio-only mode
You can now share photos when in audio-only mode. Photos can be annotated and shared with direct contacts or with a space depending upon the type of call.
July 13, 2022
Version 1.9.1
Higher resolution during calls
Expert on Demand now supports 1080p video resolution during calls, allowing remote experts to view shared content more clearly.
Check if someone else is signed in
Before you sign in to Expert on Demand, you can check if another user is already signed in. This is useful for organizations that share devices between multiple people and user accounts.
March 30, 2022
Version 1.9.0.1
Share content
You can access files from your local storage and share them in a space or with a meeting host. You can then access that content at any time and simultaneously analyze content with other people.
For more information, see Share content.

Remote control
Remote Webex App users can now take control during a call with an Expert on Demand user. The Expert on Demand user must share their screen before the remote user can request control.
The remote user must be using the desktop version of Webex App.
For more information, see In-call controls.

More options during calls
We've added additional audio and video options during calls, such as stopping your video or switching to audio-only mode when bandwidth is low.
For more information, see In-call controls.
August 31, 2021
Version 1.8.0.4
FedRAMP Authorized
Webex Expert on Demand is now available with Webex for Government offer/sites.
May 27, 2021
Version 1.8.0.3
Join meetings
You can now join scheduled meetings. You'll also see notifications a few minutes before a scheduled meeting begins, letting you choose to join the meeting early.
For more information, see Join a meeting.
Cisco Webex Expert on Demand with Augmentir
A Webex Expert on Demand integration with Augmentir is available for customers currently using Augemntir on the RealWear HMT Device. This integration lets you open Augmentir from the Webex Expert on Demand app for AI-Powered workflows and guided instructions.
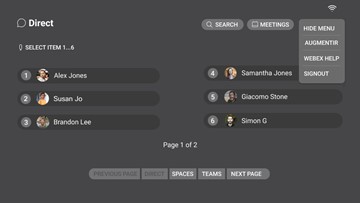
Menu Option
We've added a new menu option on the home screen, where you can access the following:
-
Webex Help—descriptions for commonly used commands.
-
Augmentir—launch the Augmentir app, if installed on the device.
-
Signout—sign out of Expert on Demand.
For more information, see Menu Options.
Simplified Annotation
We've simplified the process for annotating a photo. You can now move the annotation cursor around the screen using your head movements.
For more information, see In Call Controls. 
Focus controls
We've updated the on-screen controls to include a manual focus option, that you can use when you're in a call.
For more information, see In Call Controls. 
Zoom controls
When you zoom in on a shared screen, you can use your head movements to pan around the screen.
For more information, see In Call Controls. 
Language support
We've added support for more languages, including Thai, Simplified Chinese, Russian,
Polish, Portuguese, Korean, German, Italian, and French. 
Improvements to video quality
We've also improved video quality, by including a Higher frame rate for shared content (15fps), and improved image stabilization for captured video content.
November 13, 2020
Version 1.7.0
Join meetings
You can now join ongoing meetings in group spaces.
For more information, see Join an Ongoing Meeting.
Exposure controls
We've updated the on-screen controls to include exposure levels, that you can use when you're in a call.
For more information, see In Call Controls.

Display improvements to the QR code
We've added a larger QR code, to make it easier to scan with your RealWear HMT-1 device, when you sign in.
For more information, see Power on and Sign in.
Language support
We've also added support for more languages, including Thai, Russian, Polish, Korean, German, and French.
August 7, 2020
Version 1.6.0
The following features are included in this release:
-
Annotations by remote expert
-
Language support for Chinese, Japanese, Portuguese, and Spanish
June 19, 2020
Version 1.5.1
The following are the features included in this release:
-
New branding
-
New QR code authentication application expert-on-demand.webex.com
-
Flashlight feature
-
Annotations by HMT user
-
Multi-party calls with video pinning
-
Network status
December 11, 2019
Version 1.4.2
The following are the features included in this release:
-
Audio/Video calling with one other person
-
One-way remote expert screen sharing to Expert on Demand (HMT user)
-
Send request for help message to a specific member of a team or the entire team
-
Search for members in the same organization
-
Search and display teams
You need the following to use Expert on Demand:
- RealWear assisted reality hardware (Nav-520 and 500 or HMT-1)
- RealWear cloud free or paid access - https://www.realwear.com/cloud/
- RealWear marketplace access - https://marketplace.realwear.com/ (*access to XoD ver-2.0 )
- Webex XoD per device license subscription
- Webex org with Control hub access to onboard XoD device
- Webex user basic or advance/meeting suite license
- Access to Webex XoD sign-in QR code generator
- Wireless network requirement to support video calls – Webex bandwidth
- Network ports and url allow list for RealWear cloud
- Network Requirements for Webex Services
License provisioning workflow
After an Expert on Demand subscription is added to an organization, you’ll be greeted with the provisioning workflow wizard. Follow the instructions in each wizard page to provision your new subscription.
For more details on provisioning subscriptions, see Provision your Webex services subscription.
| 1 |
To get started, download RealWear Explorer from https://www.realwear.com/. This app lets you control the RealWear HMT. |
| 2 |
Then you need to get the RealWear Companion to configure your RealWear HMT. It's a mobile app available for Android and iOS devices:
|
The RealWear HMT works best with your dominant eye. Eye dominance is the tendency to prefer visual input from one eye over the other. Here's some tips to help you figure out which eye is dominant.
| 1 |
Form a triangle with your hands placed together at arms-length. |
| 2 |
With both eyes open, focus on any distant object centered in the triangle. |
| 3 |
Maintain focus on the object centered in the triangle and close your right eye. If the object is still in the triangle, then you're left-eye dominant. 
|
| 4 |
Maintain focus on the object centered in the triangle and close your left eye. If the object is still in the triangle, then you're right-eye dominant. |
| 1 |
Put the device on your head with the display pod positioned on the side, according to your eye dominance. Don't extend the display too far from your eye. 
|
| 2 |
Keep the display as close to the eye as possible for the best viewing experience. Adjust the overhead strap so that the HMT rests horizontally, slightly above your ears. Move the HMT into position in a “Z” shape, below your line of vision. 
|
When the device first turns on, it may beep to indicate that it needs to be set up. The device searches for a QR Code to scan to perform configuration. Open the RealWear Companion on your mobile device to generate a QR Code.
| 1 |
Press and hold the power button located on the side of the device to turn it on. 
|
| 2 |
Select Configuration, select First Time Setup, and follow the steps on the device. |
| 3 |
Point the HMT camera at the QR code once it is generated. 
|
| 4 |
To confirm that the device has been configured, say NAVIGATE HOME and check the time and date, as well as the wireless network. |
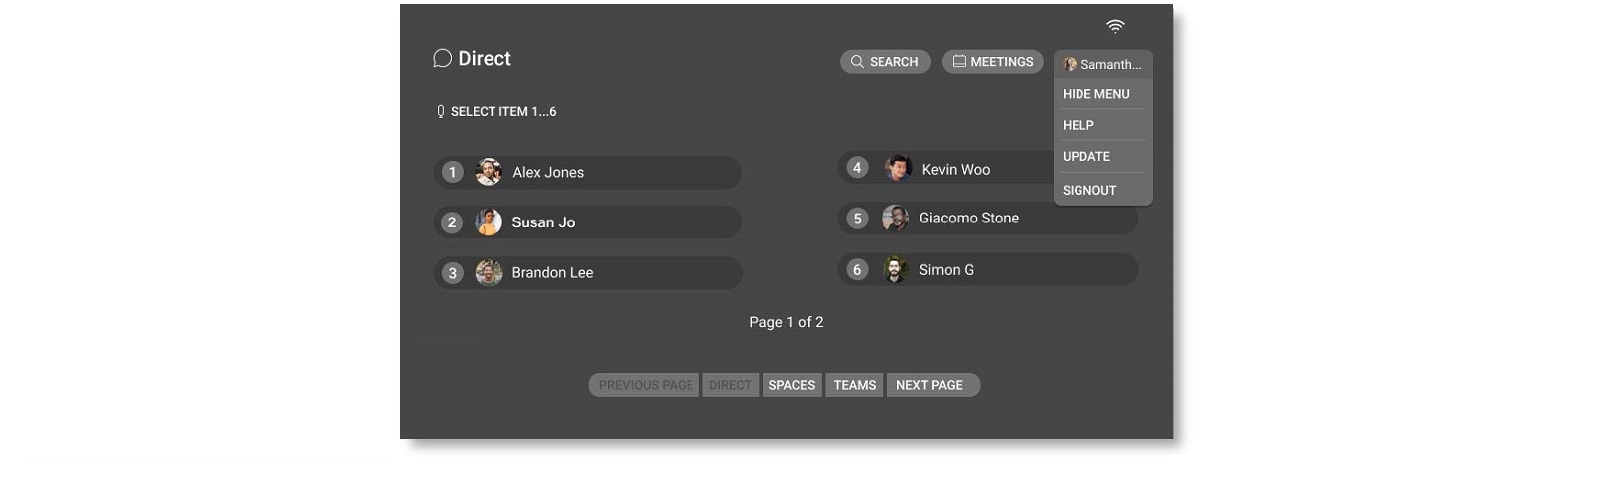
In some organizations, wearable devices with Webex Expert on Demand installed, are shared between multiple people, and user accounts.
Before you sign in to Webex Expert on Demand, check if another user is already signed in.
Applies to a shared wearable device, on which Webex Expert on Demand is already powered on and configured.
| 1 |
Say Menu.
You'll see the name of the person who's currently signed in, at the top of the menu list. |
| 2 |
Say Signout, to sign the user out of the application. |
| 3 |
Then, follow the steps to sign in to Webex Expert on Demand. |
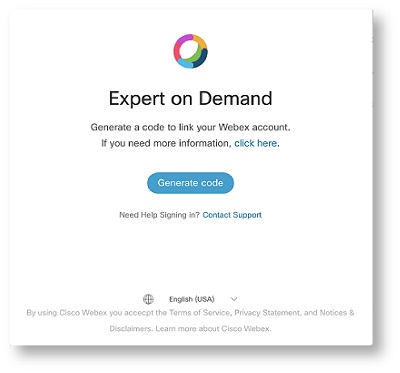
| 1 |
Say Scan code.
|
| 2 |
There are a couple of ways to get your code:
Ensure that you select the check box if you are using Webex Expert on Demand 1.9 or later. |
| 3 |
Click Generate Code. |
| 4 |
Sign in using your Webex App username and password. |
| 5 |
Scan the code with your RealWear HMT-1. |

For extra security, you can enable the automatic sign out feature in Expert on Demand which lets you automatically perform a sign out operation, if you’ve been inactive in the Expert on Demand app for a user-specified period. If you’re using shared devices with the Expert on Demand app, that prevents a subsequent user from being able to use the account of a previously signed in user.
- After signing into the Expert on Demand app, you’ll be asked if you want to allow and
configure the automatic sign out feature. Say ALLOW to enable automatic sign out.
If you don’t want to enable automatic sign out, say CANCEL.
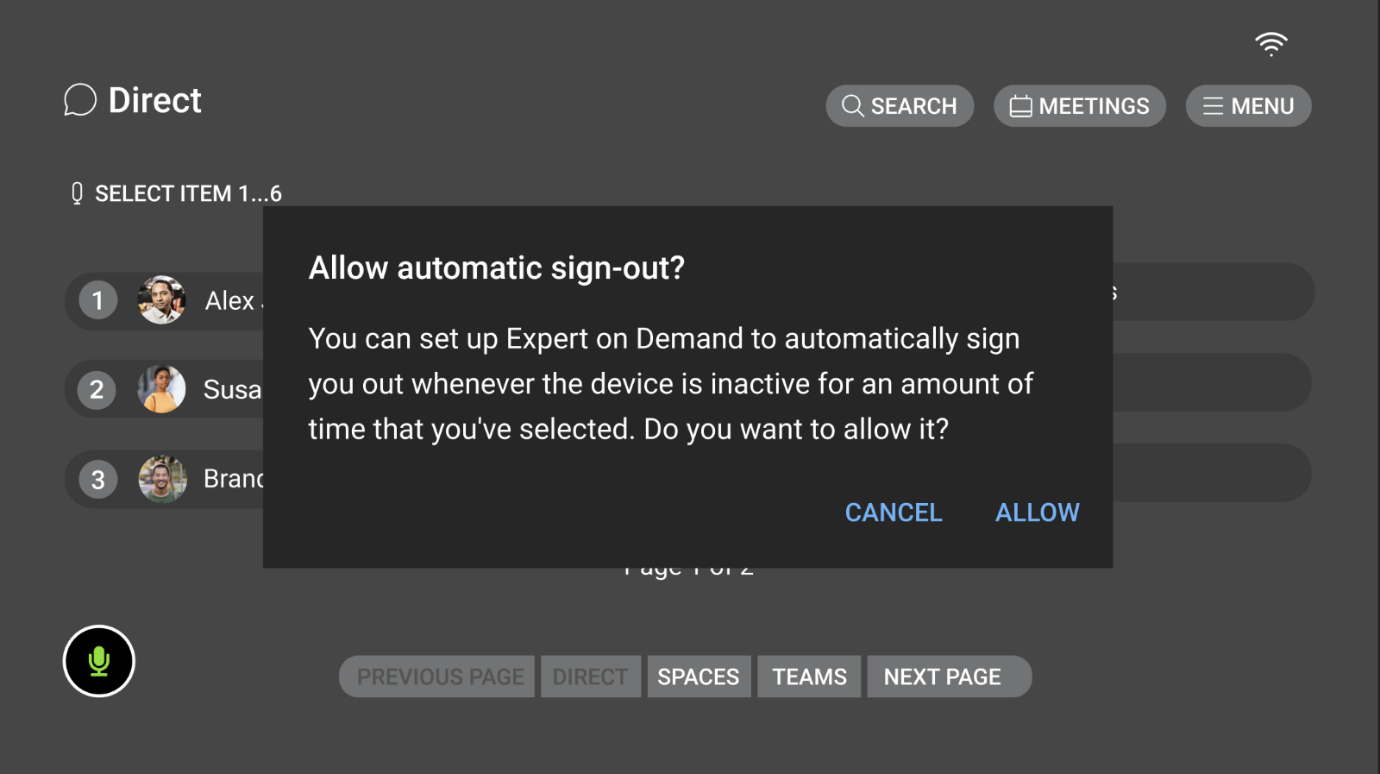 This option is shown only once after your first sign in. If, after dismissing the initial prompt, you want to access automatic sign out later, say the MENU command followed by the AUTO SIGN-OUT command.
 - If you choose ALLOW, you’ll be presented with automatic sign out options.
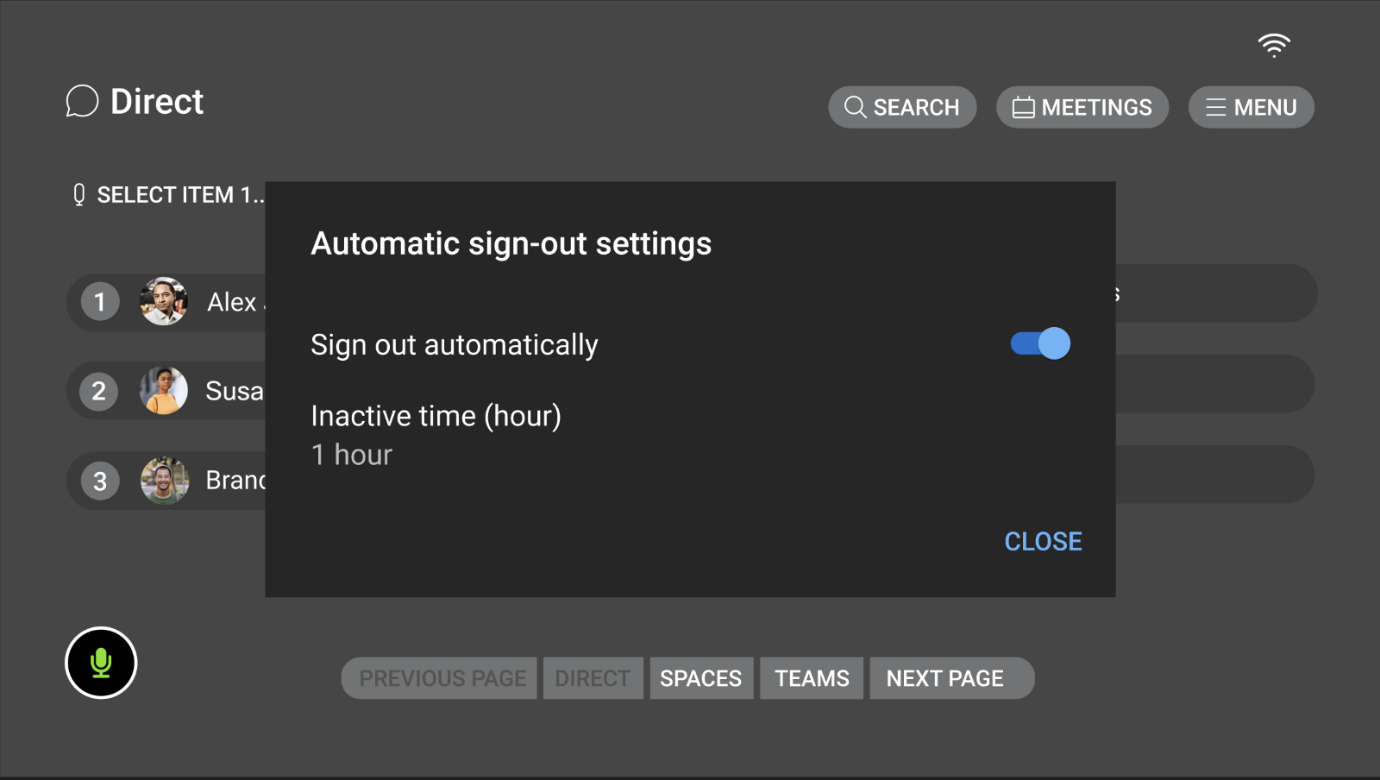
- To toggle the option on or off, say Sign out automatically (RealWear users can say the command Select Item 1 if desired).
- To select the automatic timeout period, say Inactive time (RealWear users can say
the command Select Item 2 if desired).
You can select from 3 predefined options, 1, 6, or 12 hours by saying 1 hour, 6 hours, or 12 hours (RealWear users can say Select Item X where X is 1, 2, or 3 as indicated). To choose a custom timeout period, say Customize, then say EDIT and input the desired value in hours.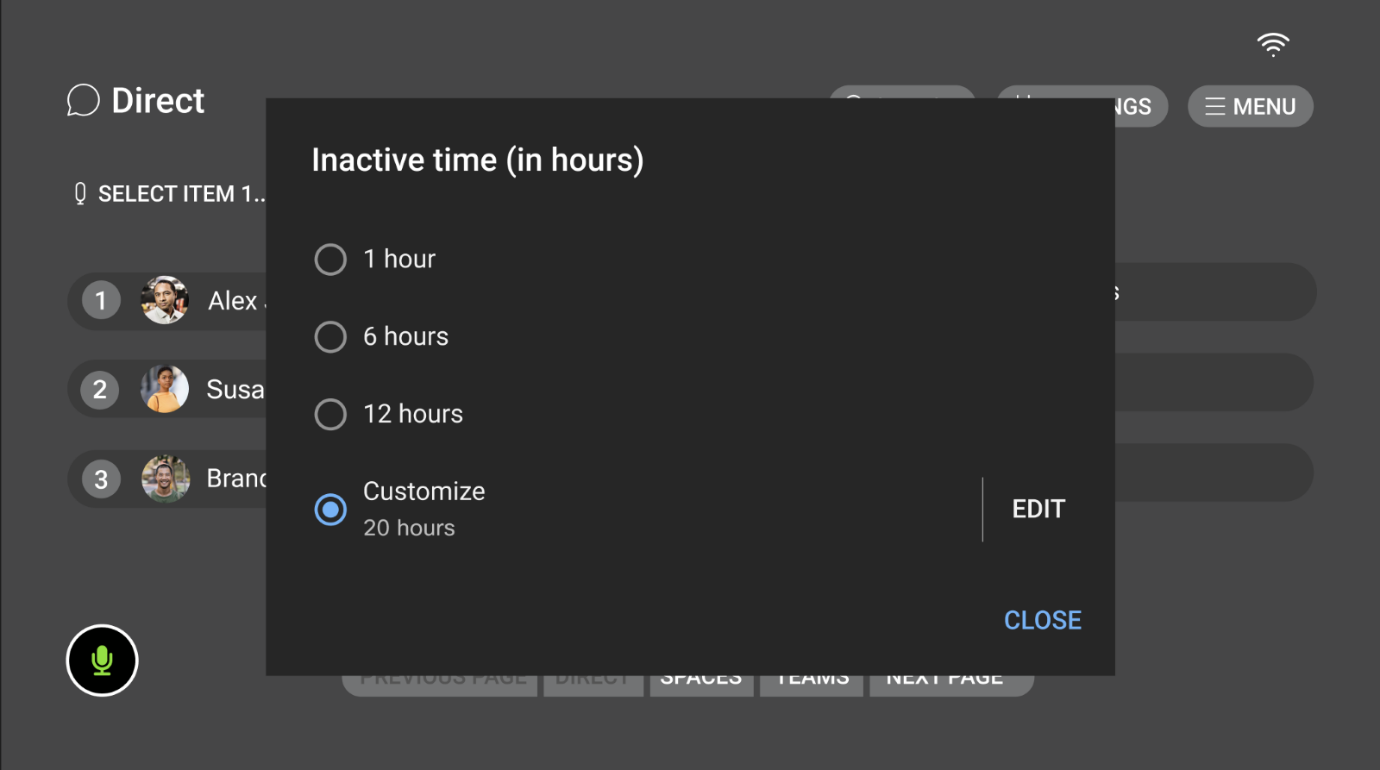 The minimum allowed value is .1 hours, and the maximum is 500 hours. If you enter a decimal value, it is internally converted to the corresponding time. For example, entering .1 hours is converted to a timeout of 6 minutes. Similarly, 1.5 hours is converted to 90 minutes.
 - Once set, when the automatic timeout threshold is reached, a toast message is displayed,
and the application is closed.
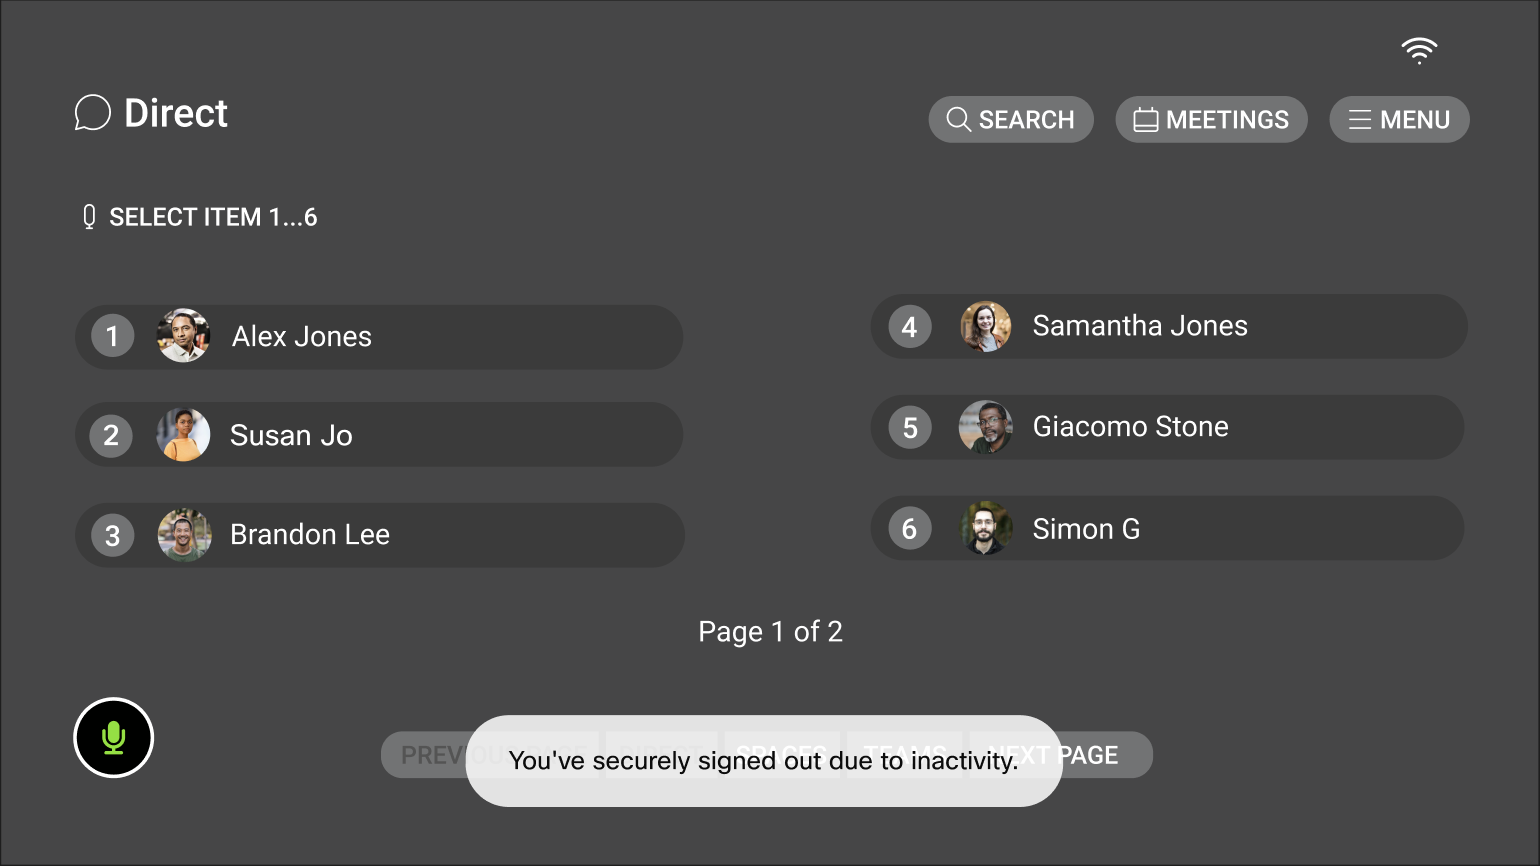
Relaunching the app will return you to the sign in screen.
| 1 |
Say Enter username and password.
|
| 2 |
Say Select Item 1 to bring up the keyboard. |
| 3 |
Enter your Webex username and password and then say Submit. |
Before you begin
| 1 |
When a new version becomes available, Webex Expert on Demand prompts you to upgrade.
|
| 2 |
Say Update to download the latest installation file, or say Close to do it at a later time. |
| 3 |
Once the download is successful, say Install and follow the instructions to upgrade Webex Expert on Demand. |
Expert on Demand lets you configure video transmission resolution to be set to 1080p, 720p, or 360p. You can use lower resolutions in areas where there is insufficient bandwidth. By default, the resolution is set to 720p for all users.
- To change the resolution setting, open the app menu using the voice command MENU.
- Say the command RESOLUTION.
- To change the resolution setting, use the command SELECT ITEM X where X is
the option corresponding to the resolution you’d like to use, 1 – 1080p, 2 –
720p, and 3 – 360p.
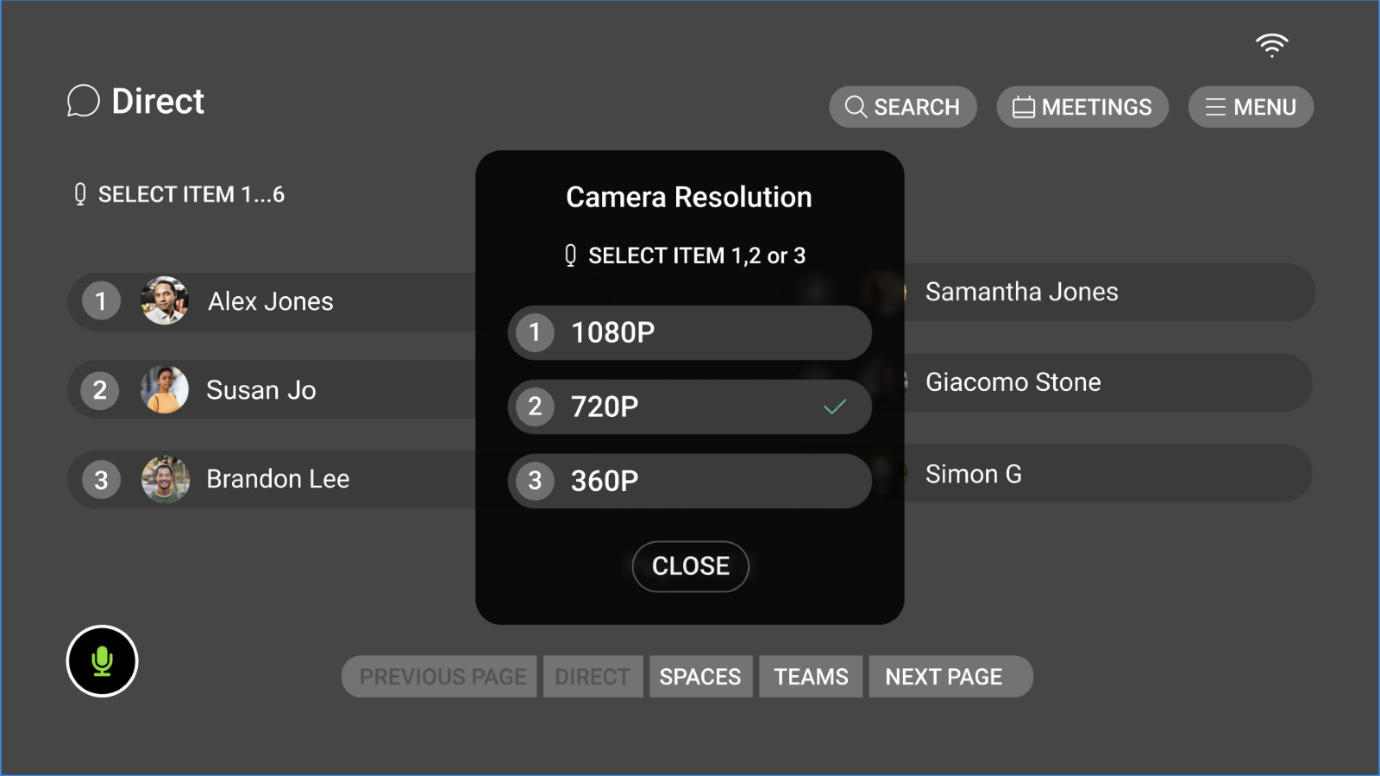
- Once you’ve selected the resolution, say CLOSE to dismiss the pop-up.
Keep in mind the following points regarding Expert on Demand resolution support:
- Currently the resolution selection setting needs to be applied before joining a call or meeting. Any active calls or meetings must be disconnected to modify this setting.
- The resolution you choose is the maximum resolution at which the video from the Expert on Demand app is transmitted if the necessary bandwidth requirements are met. In the case of an unstable network, the video may be transmitted at a lower resolution than the selected setting.
- While you may be on a network capable of sending video at the selected resolution setting, the receiving users may need to have the required network bandwidth available, as well as respective feature-flags configured for the Webex client, to be able to receive the video at that resolution. If one or more of the required conditions are not satisfied, then the video stream is displayed at a lower resolution. For example, Expert on Demand may be transmitting at 1080p but due to some missing conditions, the Webex desktop may only be able to receive at 720p.
Expert on Demand now shows the availability of other people when using the app, allowing you to see if someone is available, before contacting or reaching out to them for assistance.
You can see someone's availability information whenever their profile picture is visible, whether they’re listed in recent contacts or a team, during a search, or even when reaching out to them with a request for help or to make a call:
For more details on the availability icons and the associated status, see: See people's availability.
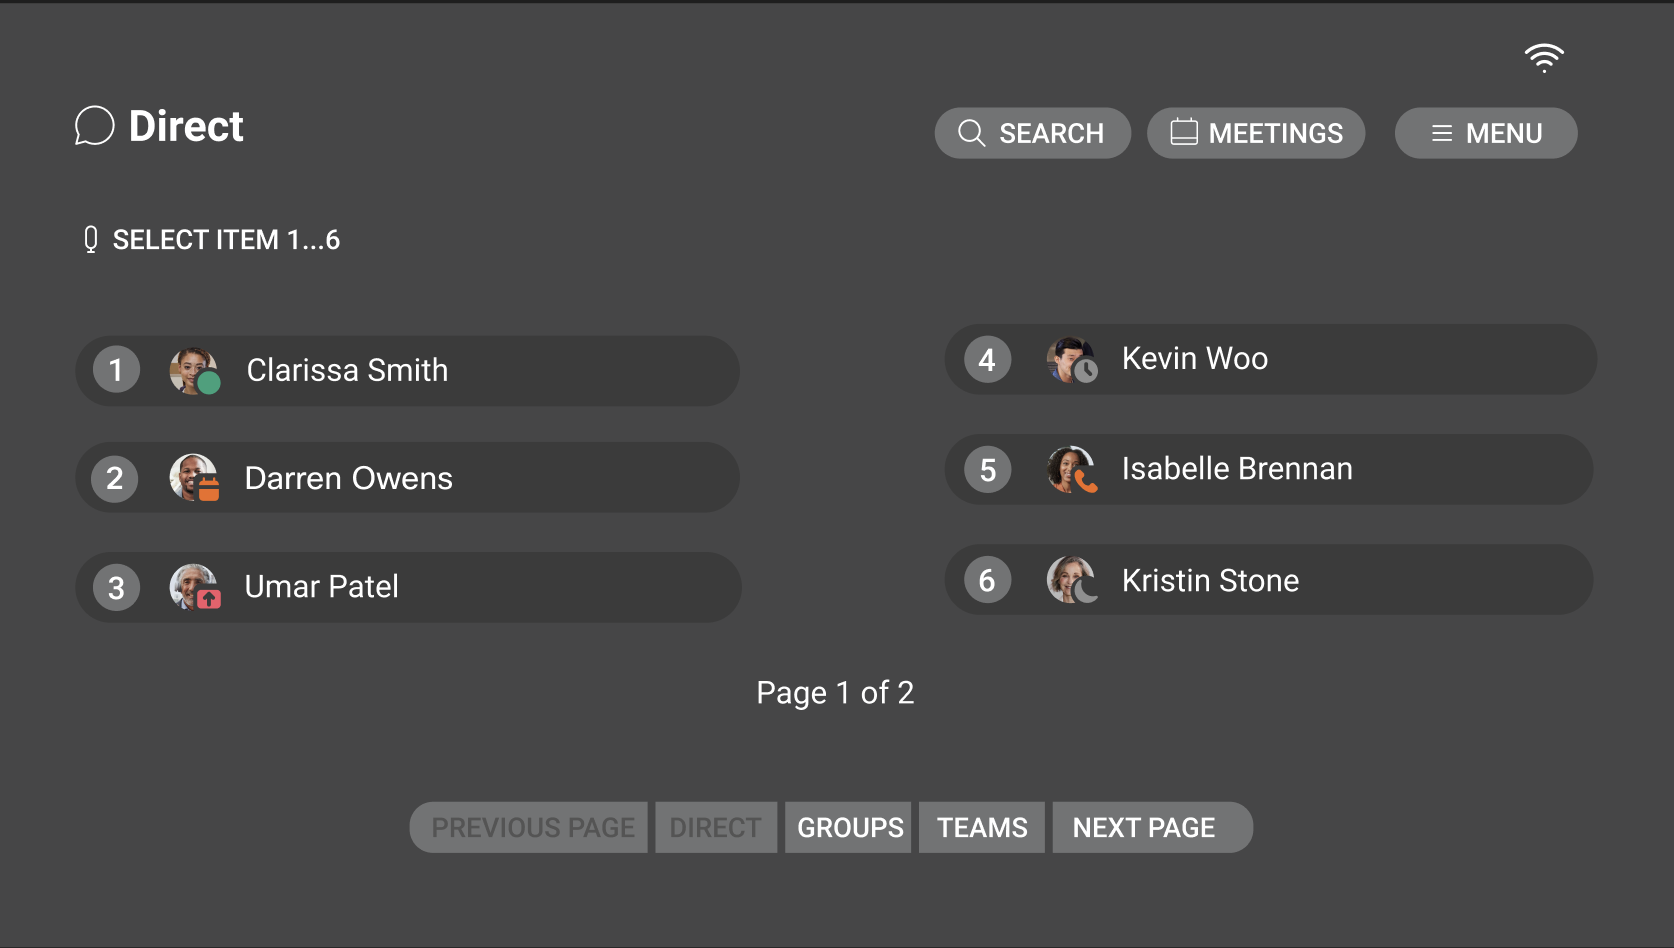
| 1 |
From the home screen, say Direct. 
|
| 2 |
Say the person's name or say Select item and the number beside their name. |
| 3 |
Say Make call. |
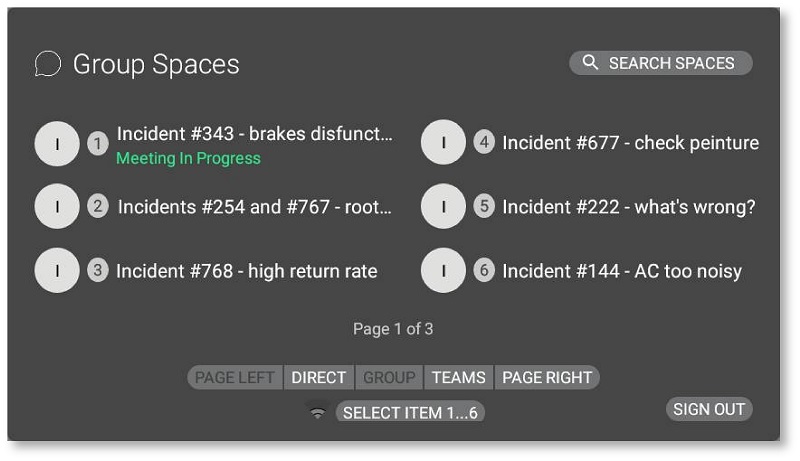
| 1 |
From the home screen, say Spaces. 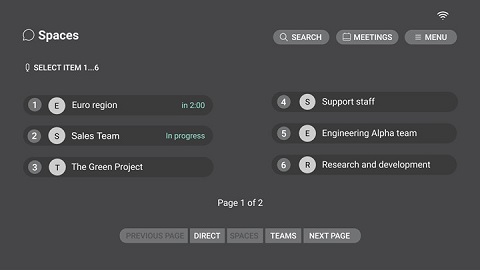
|
| 2 |
Say Select Item and the number beside the group space. |
| 3 |
Then say, Make call. |
| 1 |
From the home screen, say Teams, and then say the team name, or say Select Item and the number beside the team name. 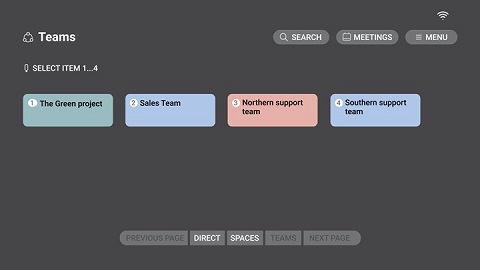
|
| 2 |
From the team members, say the person's name or say Select Item and the number beside their name, then say Make call. 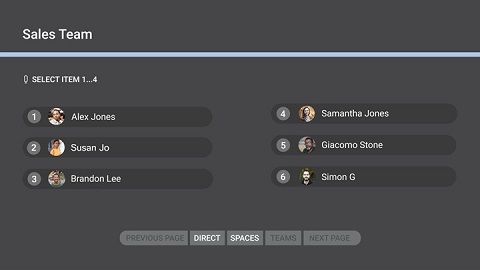
|
If you receive an unscheduled call when the app is in the background, a notification banner is displayed. The notification shows the name of the person calling, or the name of the space if it's a group call.
|
Say Accept to receive the call, or say Reject to decline the call. 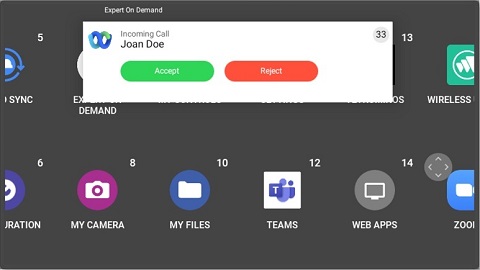
|
| 1 |
From the home screen, say Spaces. |
| 2 |
Say Select Item and the number beside the group space.
|
| 3 |
Say Make Call. |
| 1 |
From the home screen, say Spaces.
All ongoing meetings are shown. |
| 2 |
Say Select Item and the number beside the meeting you want to join. |
| 3 |
Say Join Call. |
|
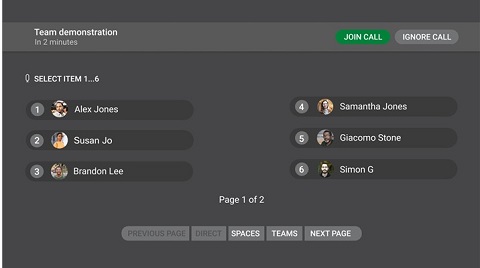
A notification is displayed across the top of the screen, before a meeting is scheduled to start.
A countdown timer is also shown next to the space or the persons name, before the meeting is scheduled to start: |
You can also join Personal Meeting Room (PMR) or Collaboration Meeting Room (CMR) meetings, that you've been invited to attend.
| 1 |
From the home screen, say Meetings. 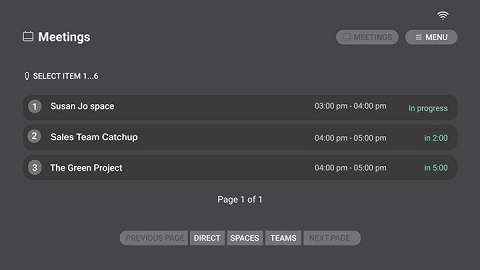
All ongoing and upcoming meetings are shown. |
| 2 |
Say Select Item and the number beside the meeting you want to join. |
| 3 |
Say Join Call. |
Join an end-to-end encrypted meeting
Users in scheduled meetings that have end-to-end encryption enabled, can join from the Expert on Demand application through the Meetings tab on the application home screen.
For details on how to schedule end-to-end encrypted meetings from other sources, see Schedule a Webex Meeting with end to end encryption.
Join enhanced meetings associated with a Webex space
Expert on Demand users can now join enhanced meetings associated with a space. For further details on enhanced meetings, see Webex App – Improved meetings associated with a space.
| 1 |
From the Direct Spaces screen, say Search, to open your directory.
|
| 2 |
Spell out the name and say Accept to search your directory. 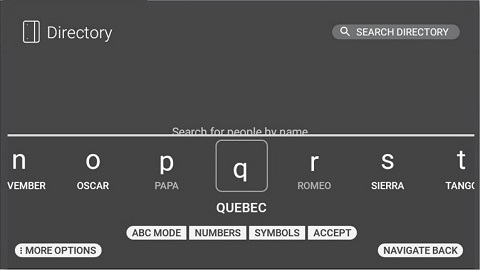
|
| 3 |
From the search results, say the person's name, or say Select item and the number beside their name and then say Request Help. Your request is sent to that person in a Webex App space. |
| 1 |
From the home screen, say Teams, and then say the team name.
|
| 2 |
Say the name of the team member, or say Select item and the number beside their name, and then say Request Help.
Your request is sent to that person in a Webex App space. |
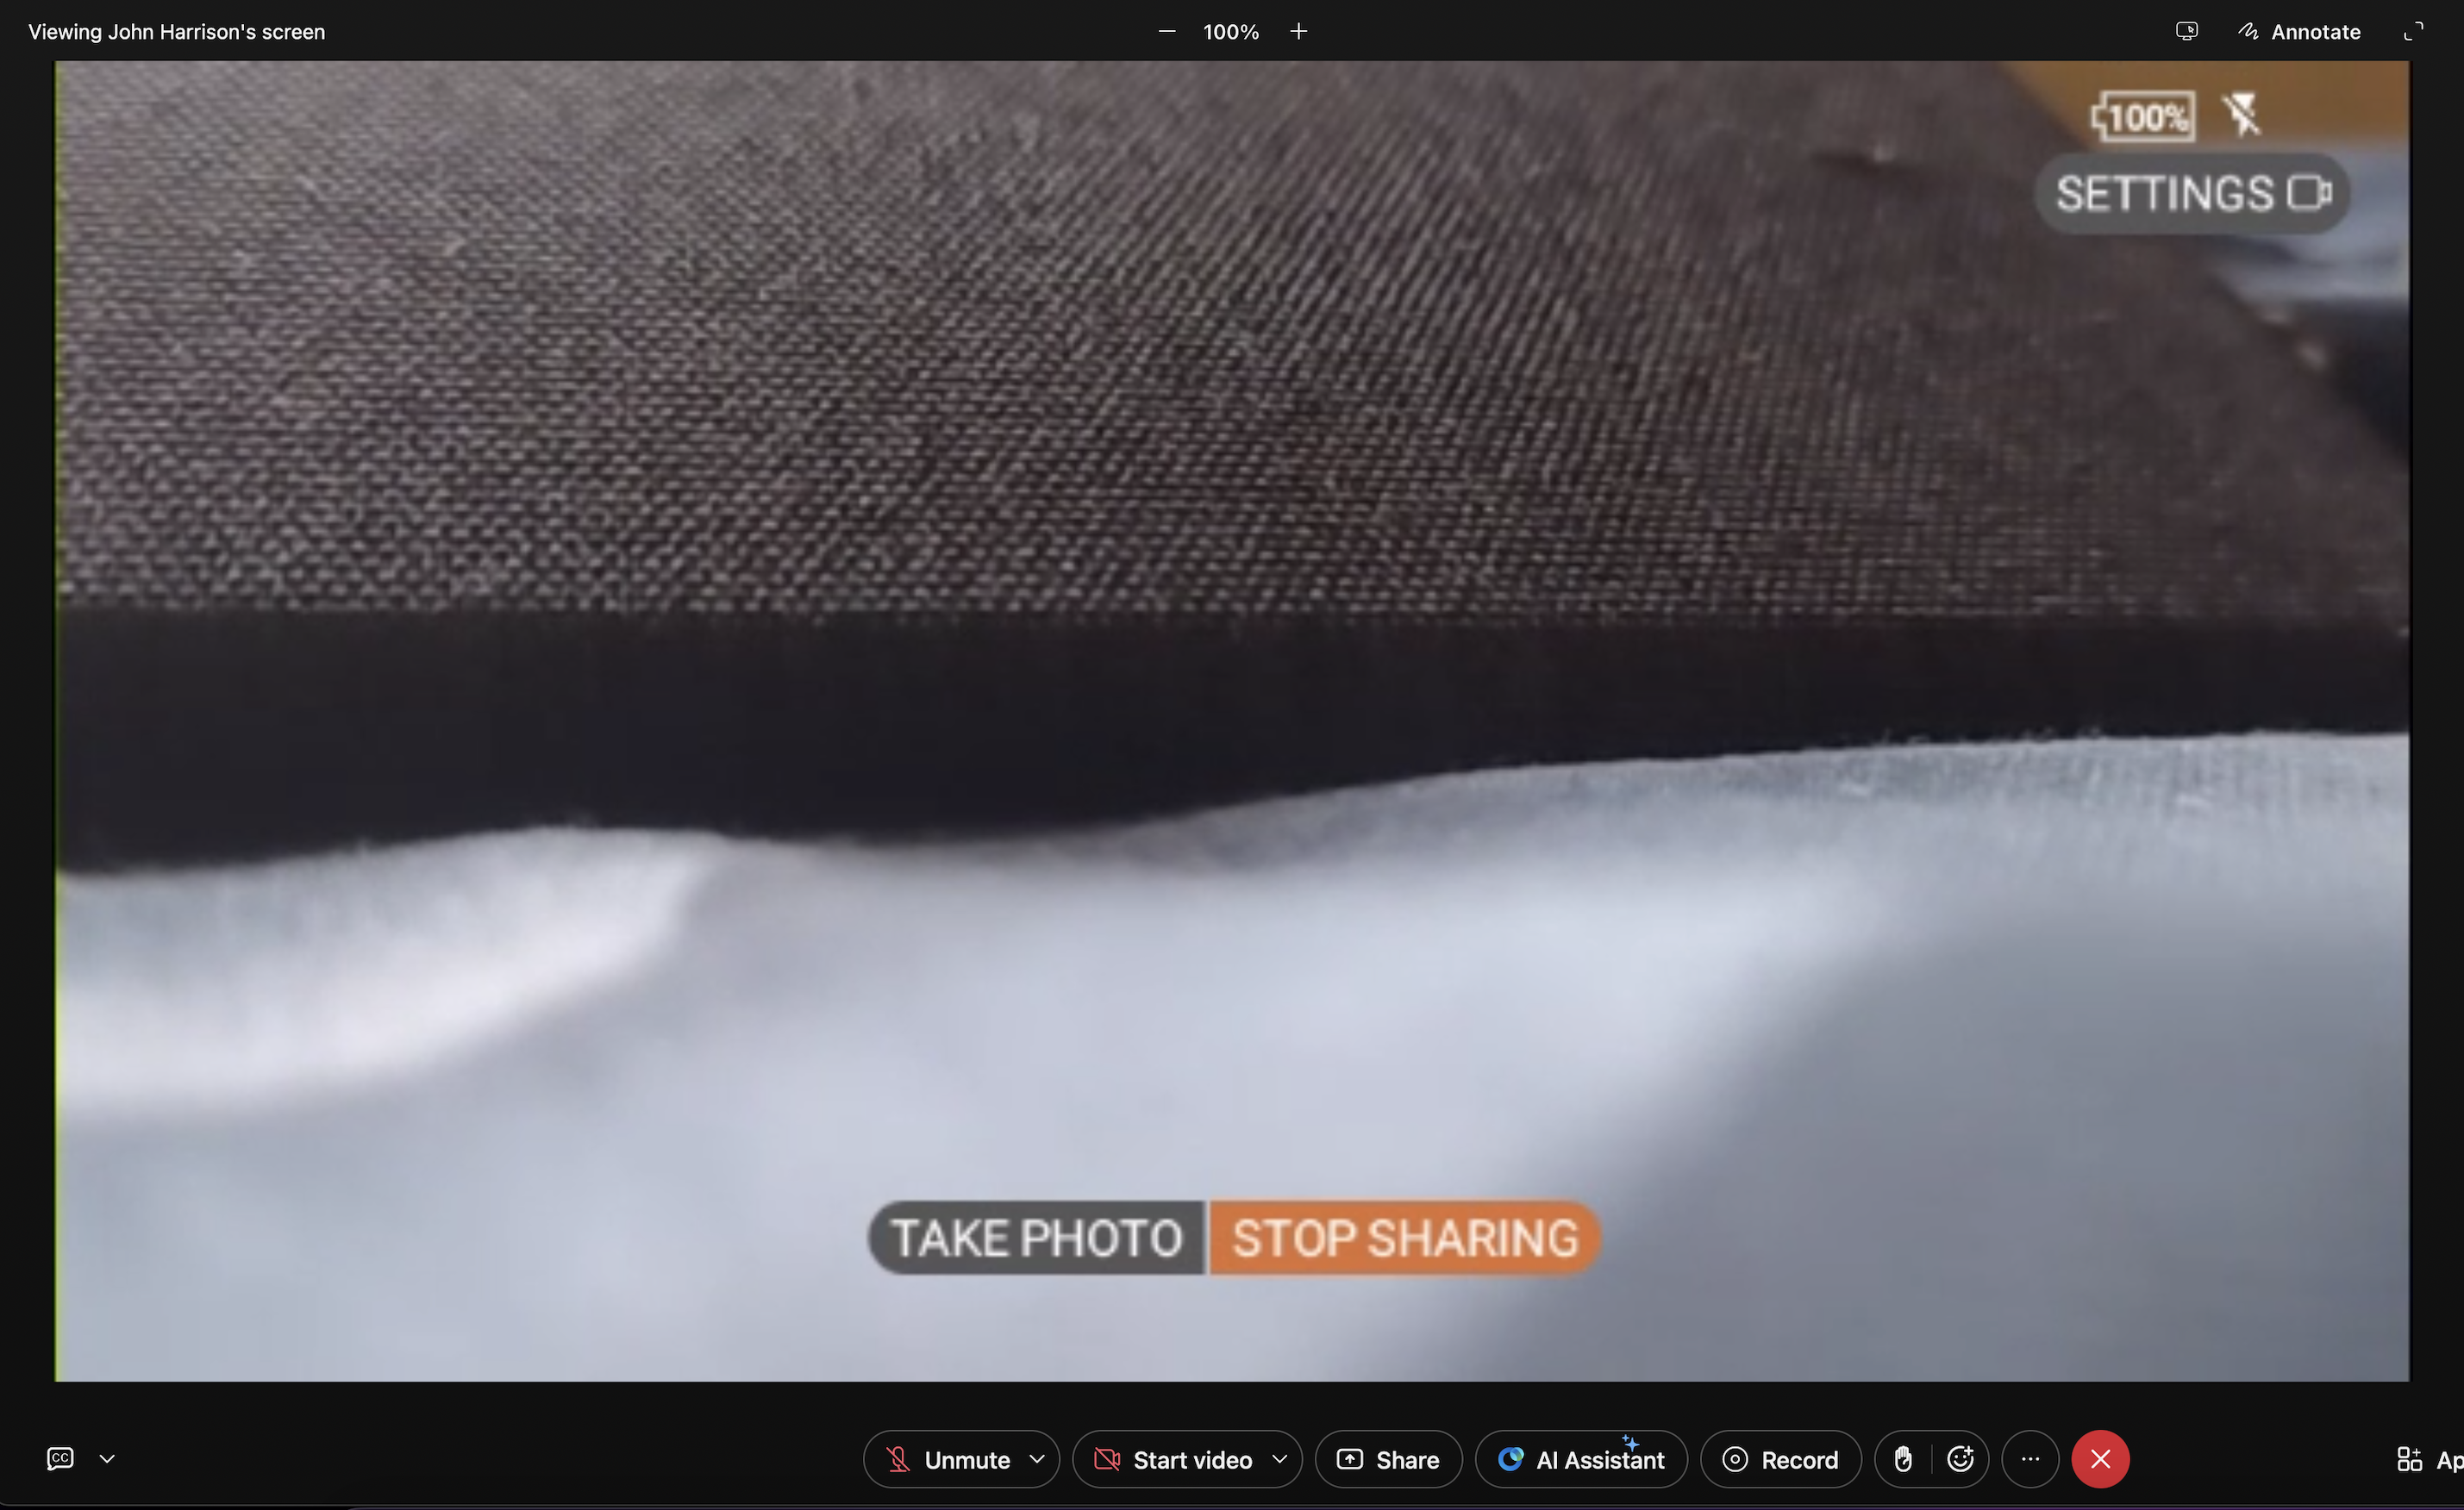
With Webex Expert on Demand, there are some basic on-screen controls that you can use when you're in a call.
|
You can use the flashlight, view your Wi-Fi status, share your screen, pause, end the call and take a photo. You can also open the settings menu to change the focus, zoom, exposure and volume levels.
Once zoomed in, you can then pan around the screen using your head movements.
|


When the HMT user is in a video call with 3 or more people, they can stream their video to all experts on the call as a shared screen. This is useful when all experts need to see the HMT video, regardless of who is speaking on the call.
| 1 |
In the video call, say Share screen. 
|
| 2 |
Say Start now, to start sharing the HMT screen. If you don't want to see the prompt again, say Don't show again, to check the box. |
| 3 |
Say Stop sharing, when you're finished sharing your screen. |
Remote control is available during a direct call between Expert on Demand users and Webex App desktop users. The remote Webex App user can take control once you are sharing your screen in Expert on Demand.
| 1 |
While on a call with an Expert on Demand user, click Request remote control
The Expert on Demand user must share their screen before the remote user can request control. |
| 2 |
In Expert on Demand, click Approve to allow the Webex App user to control your screen. Expert on Demand notifies you that the remote Webex App user is controlling your device.
The remote user cannot access any other applications on your device other than Expert on Demand. They can use any of the in-call options available while in control. Remote users can click the buttons to incrementally increase the zoom, volume, and exposure levels. Focus points are also clickable. |
| 3 |
To take back control at any time, say Regain Control. The remote control session also ends if you stop sharing your screen. |
 .
.RealWear HMT stores photos in the My photos folder. These include photos and screenshots you've taken with the RealWear HMT.
| 1 |
Say Navigate home and say My files. |
| 2 |
Say My photos and to select a photo say Select item and the corresponding photo's number. |
Before you begin
| 1 |
When you're in a call, say Take photo, then say Annotate to start the annotation. 
|
| 2 |
Move the annotation cursor around the screen using your head movements. Say Place to fix the cursor position.
|
| 3 |
When you're finished annotating, say Done, then say Save photo. Photos are stored in the My photos folder on the RealWear HMT. These include photos and screenshots you've taken with the RealWear HMT. |
| 4 |
If you want to send the annotated photo to the expert on the call, Say Share.
You'll see a notification, when the annotated photo is successfully sent. |


Expert on Demand supports annotations over live video streams to make clarifying workflows and identifying points of interest much easier.
To enable and access Live Annotations:
- After updating to the latest version of Expert on Demand, log out of your account and sign back in to enable the Live Annotations functionality.
- During a screen-sharing session in a meeting, an Annotate button appears at the
far top-right of the share-screen view:
- Select the Annotate button to begin annotating the screen sharing session.
Annotations that you draw on the screen are now visible to all attendees:
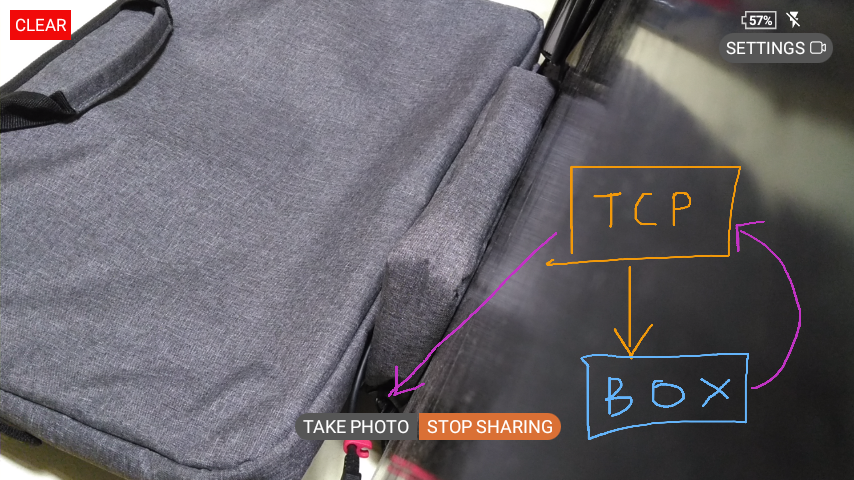
- To clear and exit annotation mode, activate the CLEAR function indicated at the
top left of the screen by issuing the voice command, CLEAR. When live annotations are active, no other controls or voice commands are accessible within the application. You must use the CLEAR action to regain control and access other functions of the app.
Telephoto support
The RealWear Navigator 500 and 520 series devices offer a telephoto mode allowing up to a 2x optical zoom that lets you get closer to a subject without losing any picture detail.
To access the telephoto feature:
- When you're in a video call, say the voice command SETTINGS to open the settings menu.
- Say the voice command TELEPHOTO to toggle the telephoto feature on and
off.
- In the screen below, the telephoto setting is disabled:
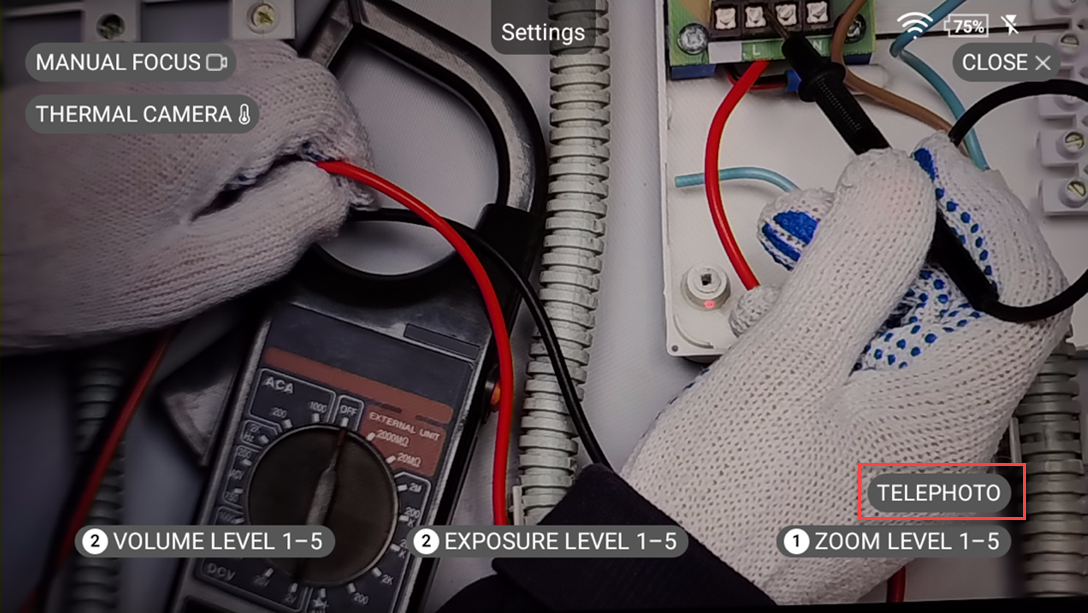
- In the following screen, the telephoto setting is enabled:
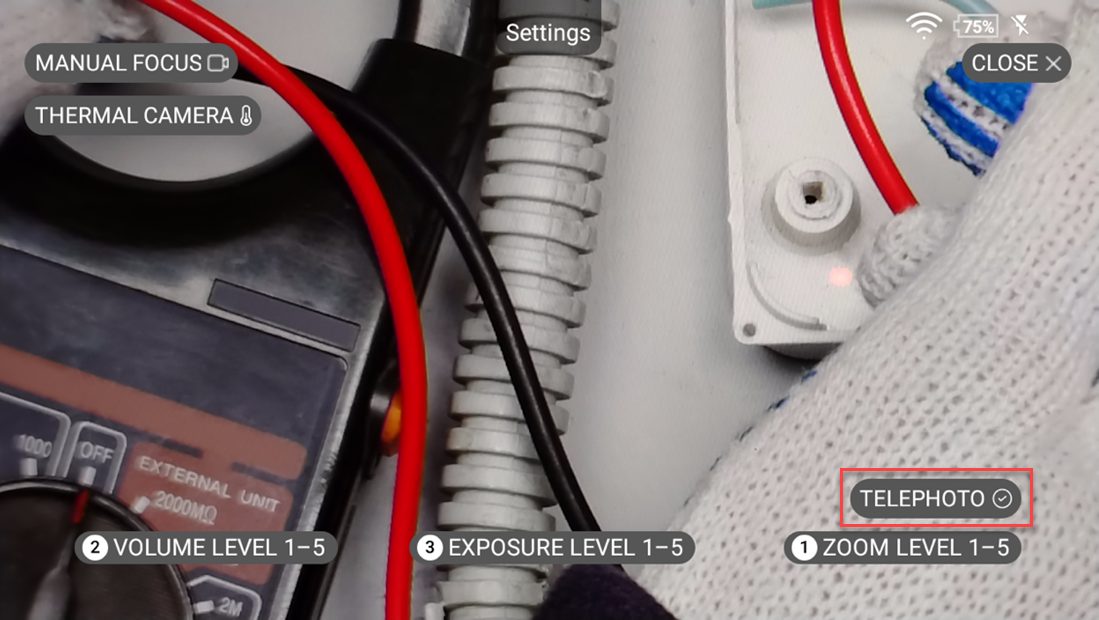
- In the screen below, the telephoto setting is disabled:
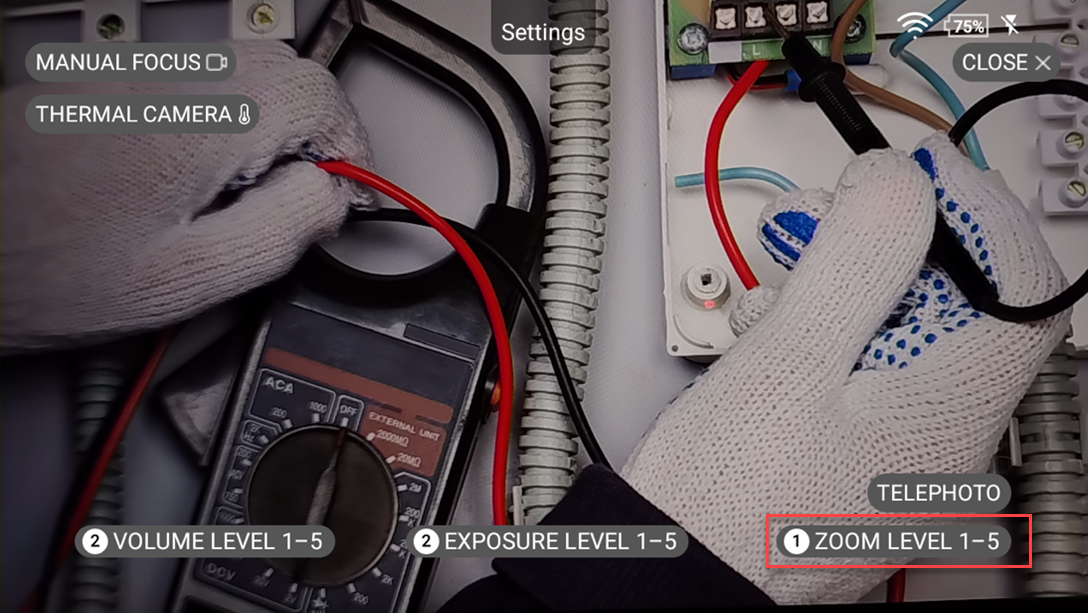
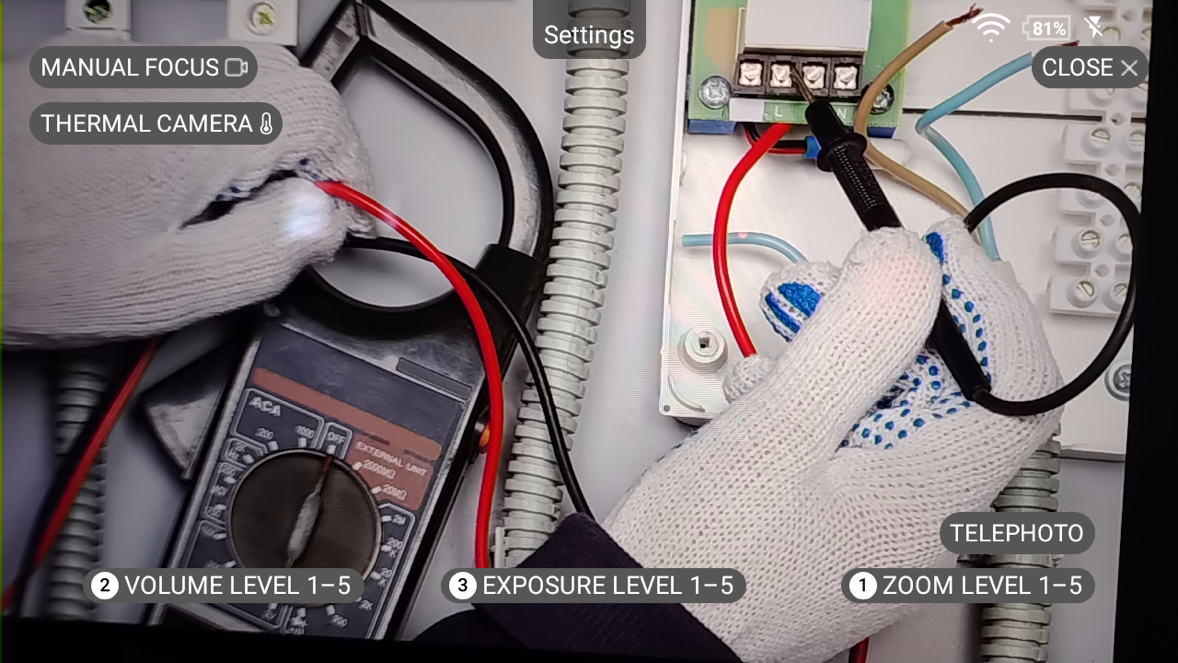
- To set the zoom level for the device, say the voice command ZOOM LEVEL
followed by 1 to 5.
- In the following image, the zoom level has been set to 1 using the command ZOOM
LEVEL 1:
- In the following image, the zoom level has been set to 1 using the command ZOOM
LEVEL 1:
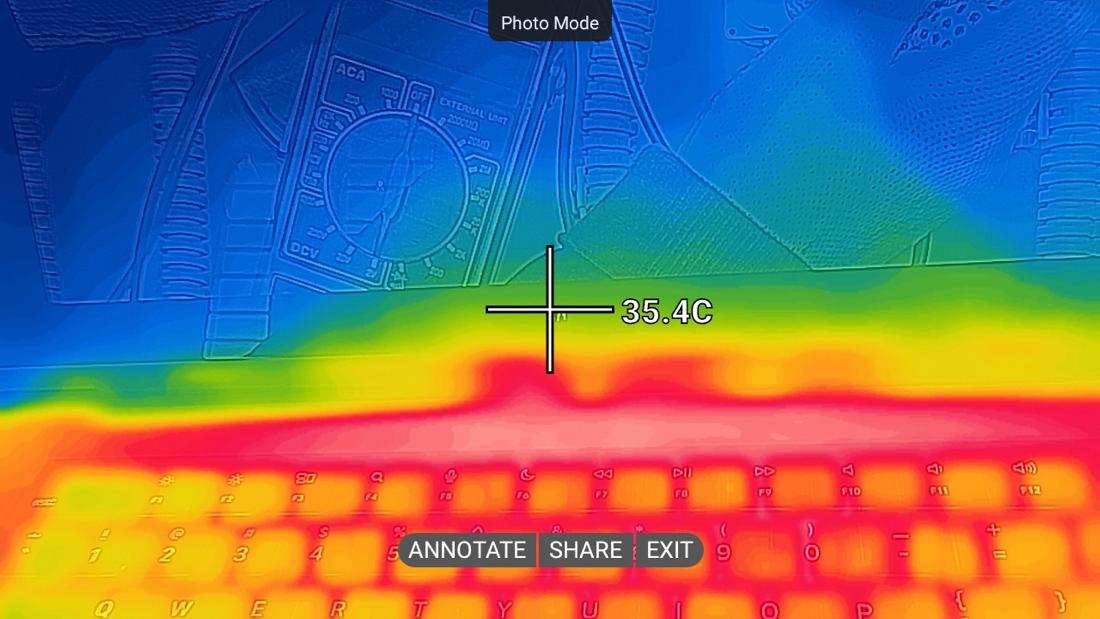
Thermal camera support
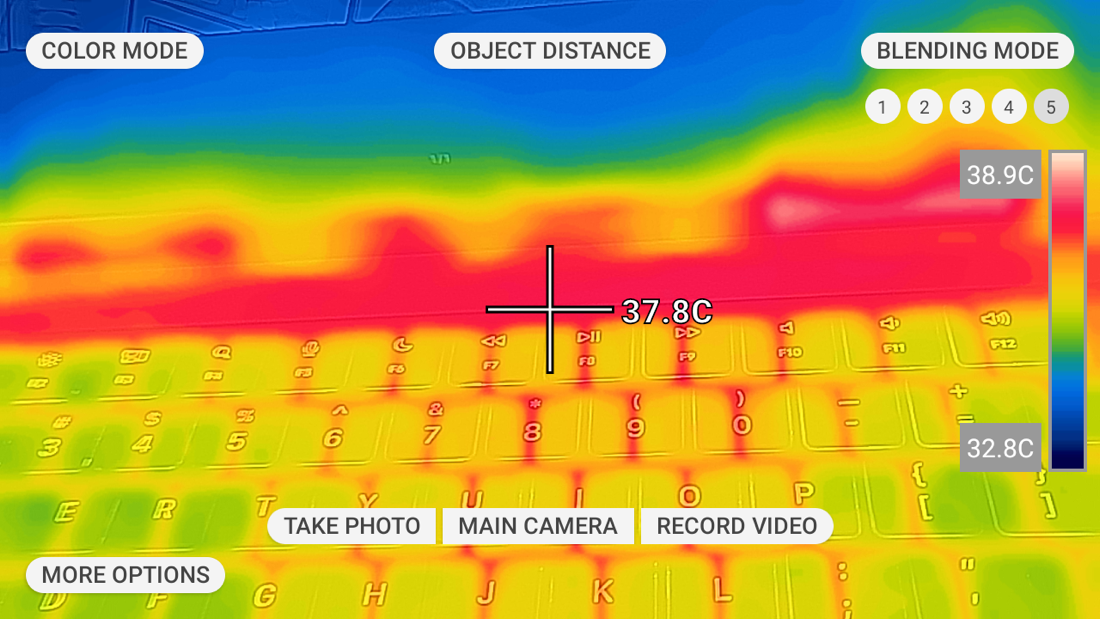
The RealWear Navigator 500 and 520 series devices offer an optional Thermal Camera Module that, if installed and enabled, lets you access thermal imaging in your sessions.
- For information on using the Thermal Camera Module, see this video.
- For additional details and FAQs on the Thermal Camera Module, refer to https://support.realwear.com/knowledge/thermal-camera-module-faqs.
To access the Thermal Camera during a call:
- Say the voice command SETTINGS to open the settings menu.
- Say the voice command THERMAL CAMERA to launch the RealWear’s native interface
for the thermal camera.
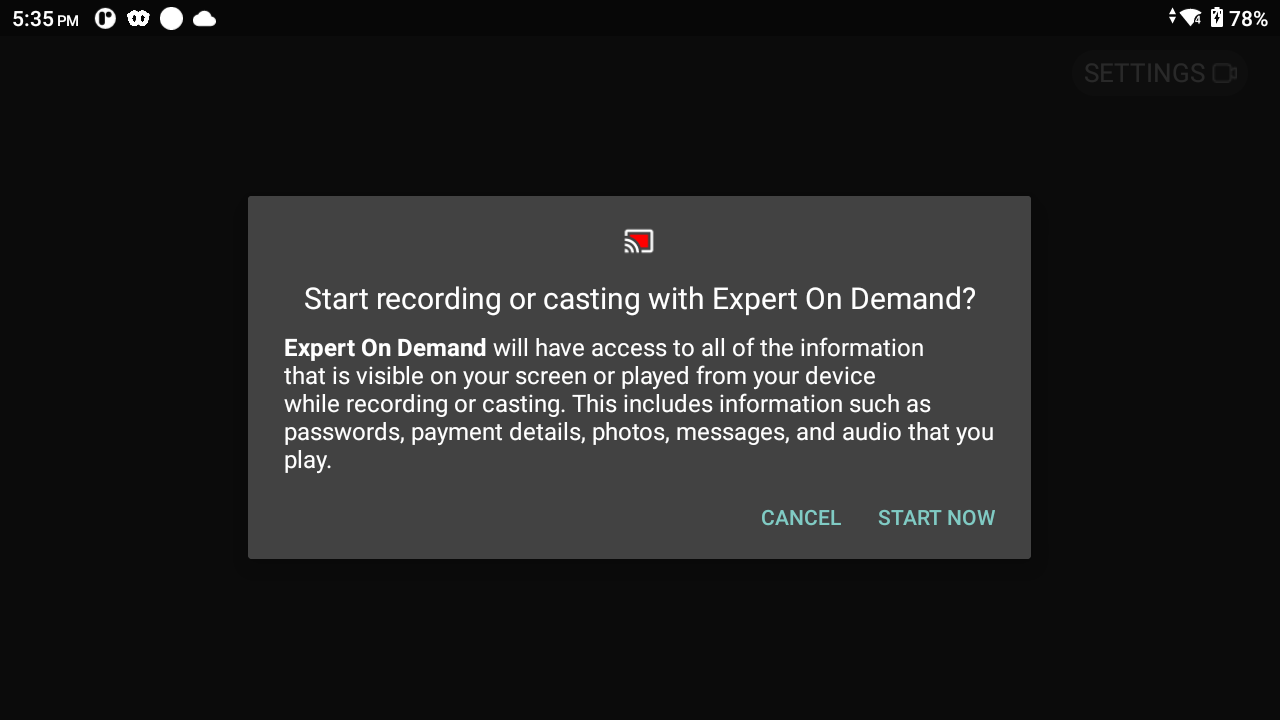
- Say the command START NOW to start the screen share.
- The RealWear Thermal Camera View is displayed:
 Screen sharing stops automatically when you exit Thermal Camera Mode. However, if a screen sharing session was already in progress before accessing thermal camera, then it continues to remain active and only the thermal camera is stopped.
 - To capture a photo, say the command TAKE PHOTO. You’re returned to the Expert on
Demand application’s interface with the captured photo where you can optionally annotate
the photo before sharing it with the remote expert.
- You can take a photo or record a video to share with the remote expert, or simply navigate back to the Expert on Demand application’s call screen. To navigate back to Expert on Demand Application, say the command NAVIGATE BACK.
- Use the EXIT command to switch back to local default call view.
Before you begin
When the remote expert shares their screen to the HMT, you can take a screenshot.
|
When a screen is being shared, say Take screenshot. The screen capture is saved in My photos. |
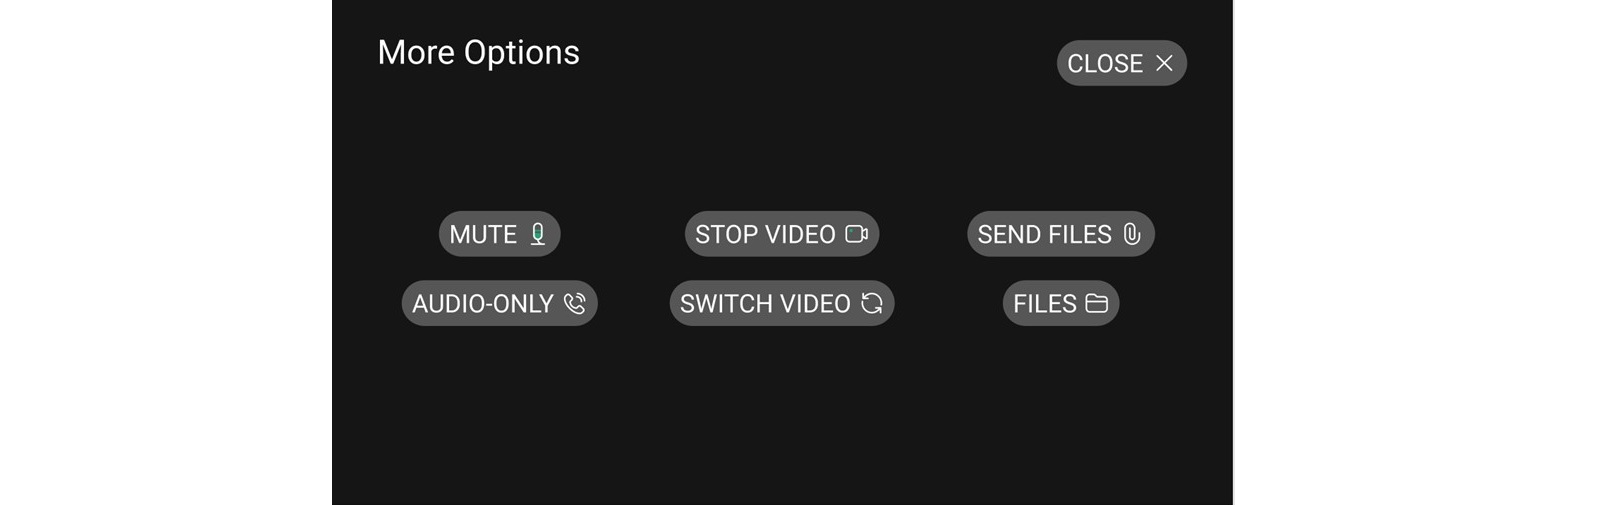
There are more options available to you while you're on a call, such as stopping your video or switching to audio-only mode when bandwidth is low.
| 1 |
When you're in a call, say More. The More options menu appears.
|
| 2 |
You can change some of your audio and video settings from here.
|
| 3 |
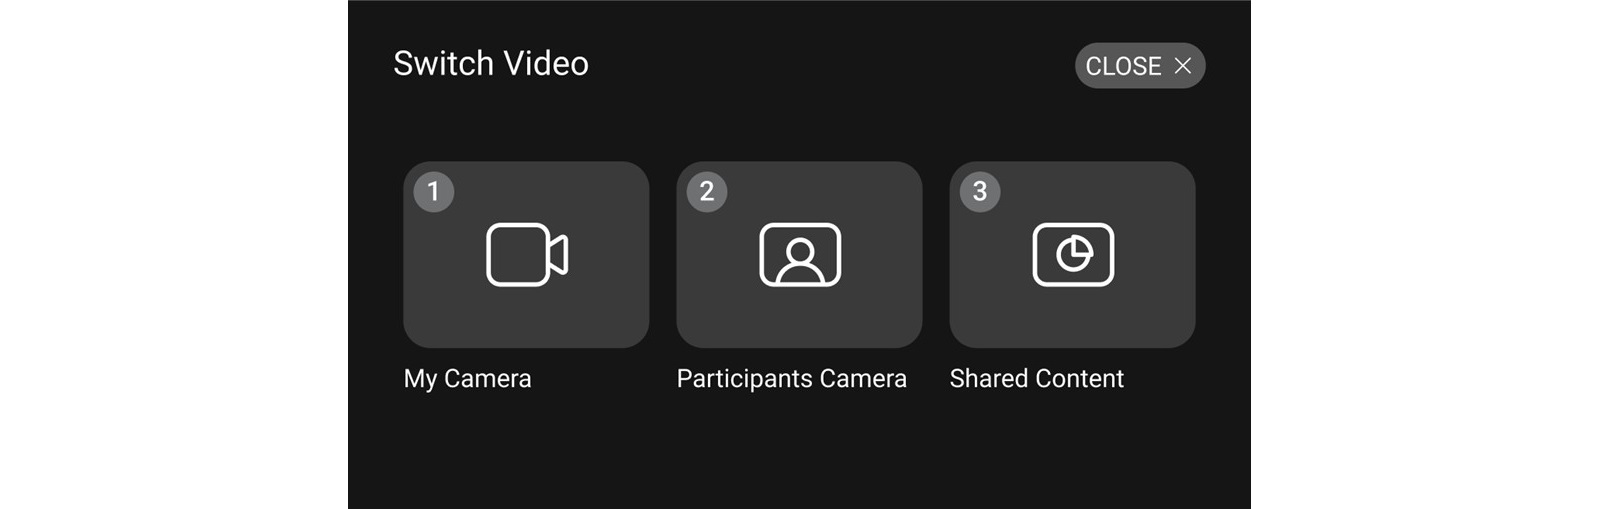
To switch the view from your camera to the camera of another participant that is sharing, say Switch Video. Then say Select item and the number beside the video option.
|
The Background Noise Reduction (BNR) feature is enabled by default when a user logs in. Use the Menu voice command to access the application menu and say, Noise Off to toggle the feature off.
Disabling this feature toggles the corresponding switch in the menu to the OFF
position, and the BNR status is also shown as disabled at the top-right of the screen.

To enable BNR again, access the menu and say the voice command Noise On. This
updates the switch in the menu to the ON position, and the status icon at the
top-right of the screen also changes to indicate the feature has been enabled. 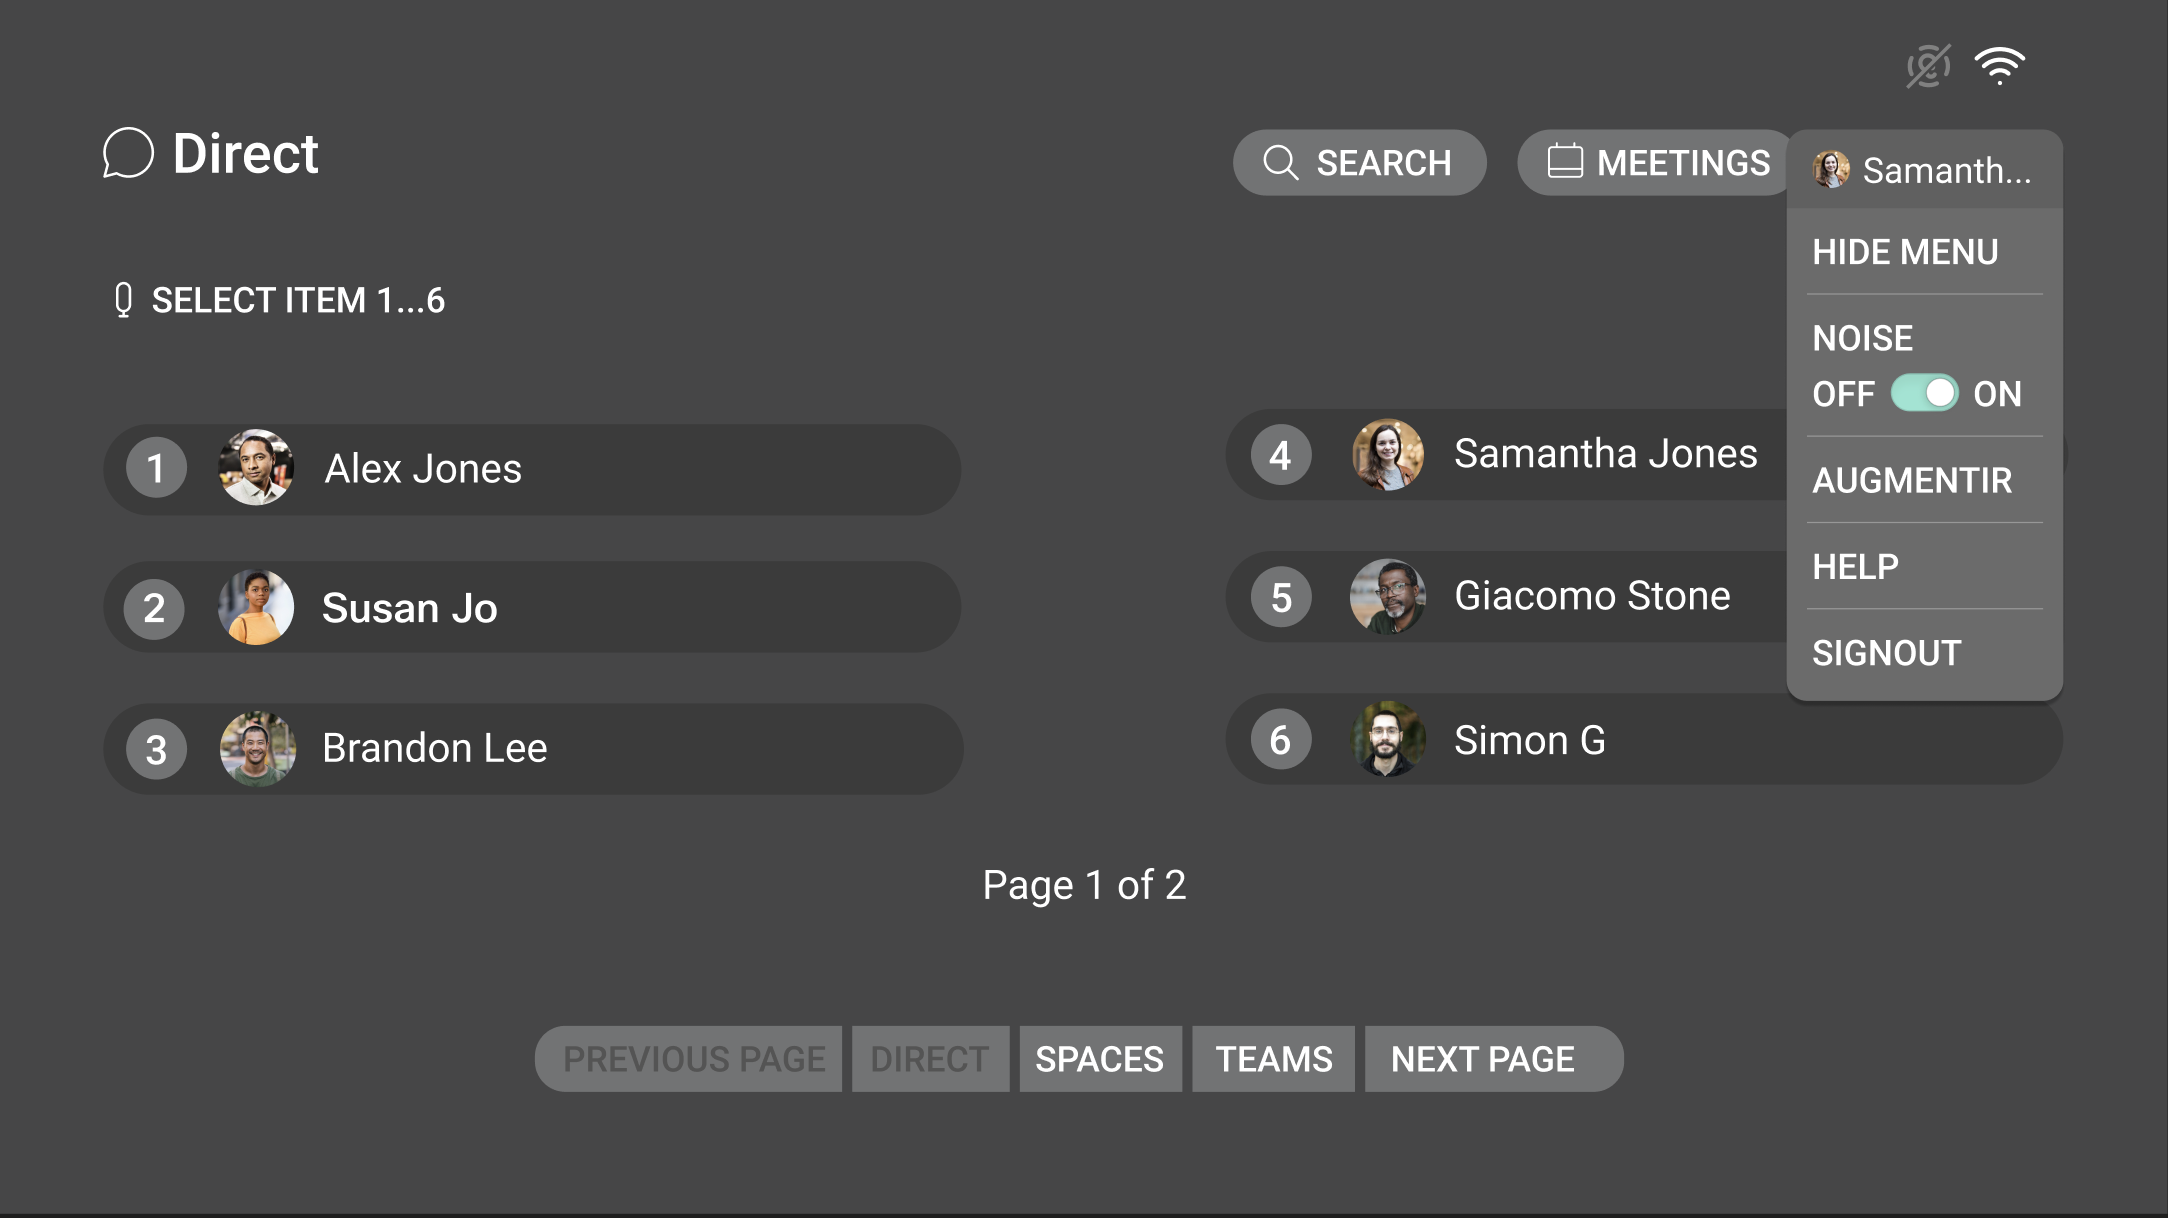
Notes
- The BNR feature can be toggled only when there are no on-going calls. Support to toggle BNR during a call is not currently available.
- The corresponding voice commands to toggle BNR on and off are also supported without requiring the menu to be open. The status indicator at the top will update to reflect the current state accordingly.
- While a user’s chosen BNR preference will persist across application or device restarts, the setting is stored locally on the device. Hence, once a user logs out, the application will reset back to the default BNR-enabled state.
Access files from your local file storage and share them in a space. All the users in the space can see the shared content.
| 1 |
From the home screen, say Direct or Spaces. |
| 2 |
Say Select item and the number beside the name or space. |
| 3 |
To share files from your local file storage, say Send Files. |
| 4 |
Say the name of a folder to open it. For example, say My Downloads. 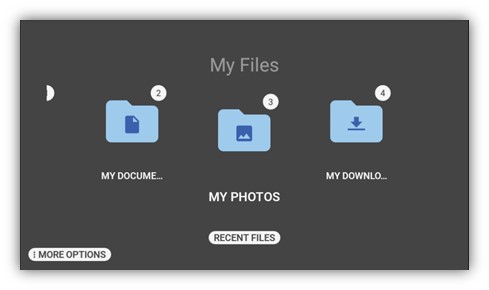
|
| 5 |
Say Select Item and the number beside the name of the file. 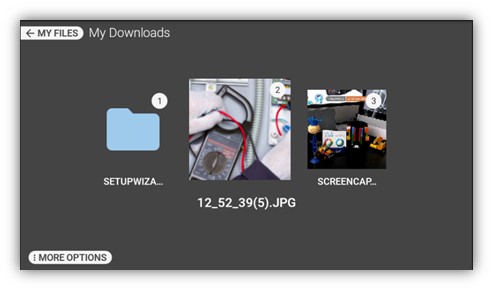
|
| 6 |
Say Share to share the content in the space. The file is saved there. 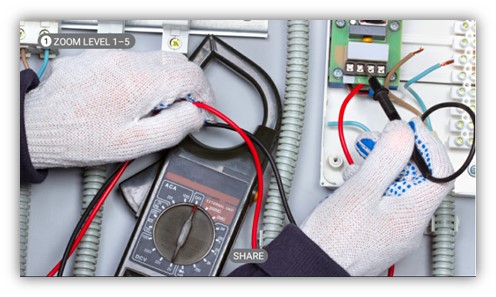
|
While you're in a call or meeting you can share files from your local file storage, and participants can view and analyze them simultaneously. There are different options available depending on the type of content you share; for example you can pause and stop videos or zoom in on documents.
| 1 |
During a call or meeting, say More. |
| 2 |
Say Send Files. |
| 3 |
Say the name of a folder to open it. For example, say My Downloads.
|
| 4 |
Say Select Item and the number beside the name of the file.
|
| 5 |
Inspect the content using the various commands available. |
| 6 |
Say Share to share the content.
If you're on a call, the content is sent to the direct space. If you're in a meeting, the content is sent to the meeting host. |
Access files previously shared in a direct or group space and use different commands to analyze them. Different options are available depending on the type of content you're viewing; for example you can pause and stop videos or zoom in on documents. When you're finished, you can share it back to the space so that other users can see it.
| 1 |
During a call, say More. |
| 2 |
Say Files. |
| 3 |
Say Next Page and Previous Page to navigate through the files. 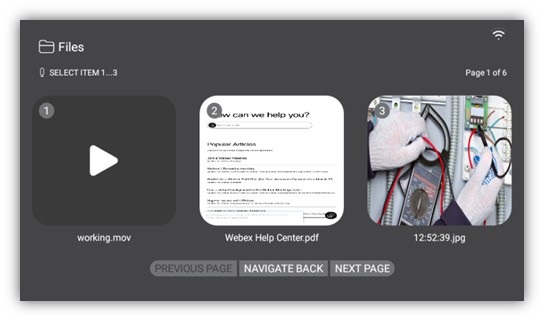
|
| 4 |
Say Select Item and the number beside the name of the file. |
| 5 |
Inspect the content using the various commands available. |
| 6 |
Say Share to save the modified content in the space with the other participant, or Download to save it to your local storage. 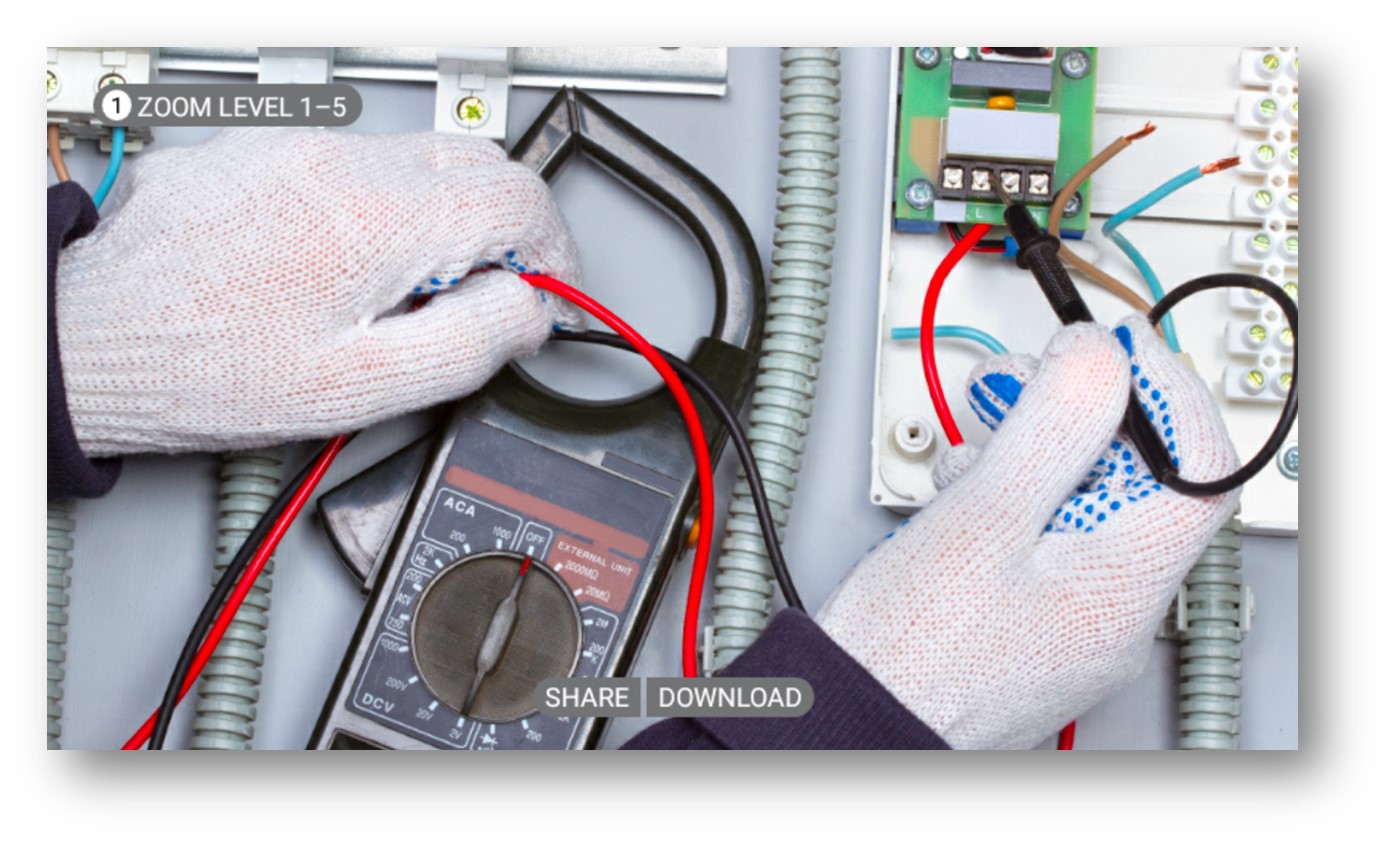
|
Access files previously shared in a direct or group space and use different commands to analyze them. Different options are available depending on the type of content you're viewing; for example you can pause and stop videos or zoom in on documents. When you're finished, you can share it back to the space so that other users can see it.
| 1 |
From the home screen, say Direct or Spaces. |
| 2 |
Say Select item and the number beside the name or space. |
| 3 |
Say Files. |
| 4 |
Say Next Page and Previous Page to navigate through the files.
|
| 5 |
Say Select Item and the number beside the name of the file. |
| 6 |
Inspect the content using the various commands available. |
| 7 |
Say Share to save the modified content in the space, or Download to save it to your local storage.
|
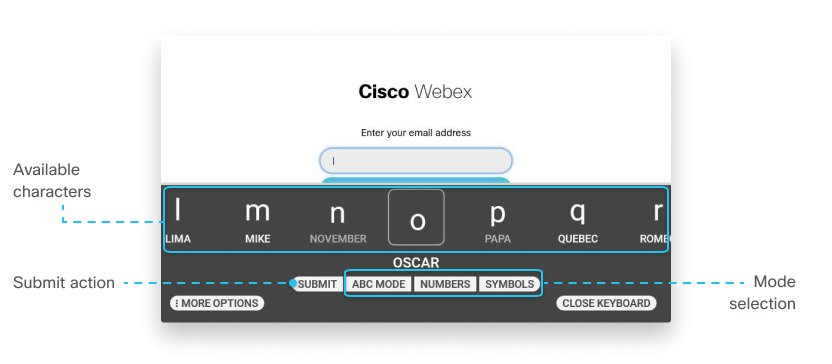
The following is a description of how to use your visual keyboard.
-
To scroll through the characters, move your head left and right.
-
To enter a character, say the corresponding word beneath the letter that you wish to enter. For example, to enter the letter b, say Bravo.
-
You can enter multiple letters at one time by saying the corresponding words together. For example, to enter the name Becky, say Bravo Echo Charlie Kilo Yankee.
-
To change how you enter data into text fields, say A B C mode, Symbols or Numbers.
-
When you've finished entering your text, say the submit action command that's on the screen. For example, in the example shown above, the submit action is Submit.
-
To clear your entry, say Backspace to remove the last letter or Cleartext to clear all.
-
To undo the last entry, say Undo.
The character doesn't need to be visible on the screen to be entered.
Dictation allows you to use natural language to input information.
| 1 |
To show more input options, say More options. |
| 2 |
To switch to dictation mode, say Dictation. |
| 3 |
Say the words that you want to enter. You can say dot com to enter the text .com. |
| 4 |
When you've completed your dictation, the HMT displays the rendered text on screen. |
Certain global voice commands, such as Navigate Back, and Navigate Home, can be recognized and activated from any screen.
- For a list of global commands in English, see: https://support.realwear.com/knowledge/voice-commands#GlobalVC.
- For global commands in other languages, see the following user guide: https://support.realwear.com/knowledge/realwear-navigator-500-series#user-guide.
Sign in
|
Voice Command |
Action |
|---|---|
|
Scan code |
Authenticates using a QR code |
|
Enter username and password |
Authenticates using a username and password |
Main functions
|
Voice command |
Action |
|---|---|
|
Menu |
Display menu options |
|
Webex Help |
Descriptions for commonly used commands |
|
Send Logs |
Upload logs from the device |
|
Signout |
Sign out from Expert On Demand |
|
Previous page / Next page |
Navigates to 1 page left / right |
|
Direct |
Searches your direct spaces and lists contacts |
|
Spaces |
Searches your group spaces |
|
Teams |
Displays existing teams |
|
Select item <item number> |
Selects item associated with the specified item number |
|
Search |
Search for direct spaces, teams, or team members |
|
Request help (from selected team) |
Sends a request for help to all team members |
|
Make call |
Makes a call to the selected contact |
|
Request help (from selected contact) |
Sends a request for help to the selected contact |
|
Cancel call |
Cancels a call |
Calls
|
Voice command |
Action |
|---|---|
|
Show controls / Hide controls |
Shows and hides the controls menu |
|
Manual focus |
Switch to manual focus mode |
|
Focus point 1…9 |
Select a focus point on screen |
|
Auto focus |
Switch to auto focus mode |
|
Exposure level 1…5 |
Changes exposure level |
|
Volume level 1…5 |
Changes volume level |
|
Zoom level 1…5 |
Changes zoom level |
|
Take photo |
Takes a photo of the current camera view |
|
Annotate |
Starts annotation mode |
|
Color |
Opens the annotation color menu |
|
Shape |
Opens the annotation shape menu |
|
Pause / Resume call |
Pauses the audio and video signal until the call is resumed |
|
Take screenshot |
Takes a screenshot of shared screen |
|
Join call |
Join a scheduled call |
|
End call |
Ends the call |
|
Accept |
Accept an unscheduled call |
|
Reject |
Reject an unscheduled call |
Keyboard commands
|
Voice command |
Action |
|---|---|
|
Letters |
Switches keyboard to alphabet keyboard to enter letters |
|
Numbers |
Switches keyboard to number keyboard to enter numbers |
|
Symbols |
Switches keyboard to symbol keyboard to enter symbols |
|
Abc mode |
Switches keyboard to ABC Mode keyboard |
|
Show options / Hide options |
Shows and hides keyboard options |
|
Secure entry |
Switches entry mode to secure |
|
Normal entry |
Switches entry mode to normal |
|
Dictation |
Activates dictation and enters text based on speech recognition |
|
Scan code |
Scans QR code |
|
Flashlight on / off |
Switches On / Off flashlight |
|
Close keyboard |
Closes keyboard |
|
Backspace |
Deletes the last character |
|
Clear text |
Clears text in the input box |
|
Undo |
Undoes the last entry |
|
Accept |
Accepts the information entered |
File sharing
|
Voice command |
Action |
|---|---|
|
Files |
Select files previously shared in the space |
|
Send Files |
Select files from your local storage |
|
Select item <item number> |
Select a specific file |
|
Previous page / Next page |
Navigates to 1 page left / right when selecting files, or navigates through the pages of a document |
|
Pause |
Pause a video |
|
Stop |
Stop and close the video player |
|
Replay |
Replay a video after it finishes |
|
Rewind |
Rewind a video 10 seconds |
|
Fast Forward |
Forward a video 10 seconds |
|
Zoom level 1…5 |
Changes zoom level when viewing content |
|
Share |
Share the content in a space or with a meeting host |
|
Download |
Download a file to your local storage |
Global commands
|
Voice Command |
Action |
|---|---|
|
Navigate home |
Navigates to home screen |
|
Navigate back |
Navigates to previous screen |
|
My controls |
Navigates to system control panel |
|
Mute microphone |
Temporarily mutes the microphone |
|
My notifications |
Opens notification section |
|
Recent applications |
Opens applications running in the background |
|
Show help |
Displays a pop-up window with help for commands associated with the current screen |
|
Say Menu to open the menu options.
Choose from:
|

To migrate to device-based licenses, reach out to your Cisco partner contact person, Cisco Account Manager, or Customer success manager. If you do not have access to any of those, please see this link and contact the appropriate Cisco support team, and they will guide you through the necessary steps.
Prerequisites
To migrate to device-based licensing please make sure you meet the following requirements:
- Webex Expert on Demand named-user paid licenses.
- Administrator access to Webex Control Hub.
Expert on Demand device-based licensing setup
Once your Expert on Demand subscription has been added to your Webex organization, to complete your subscription setup:
- Login to Webex Control Hub using your administrator
credentials.
You’ll be prompted to complete the Expert on Demand subscription setup (along with any of your other subscriptions).
- Select Next and then select Submit.
- Select Set up now:
Follow the instructions to complete licensing setup.
The Device Management in Control Hub setting allows users to manage the Expert on Demand Devices in your organization. To manage Webex Expert on Demand devices, you’ll need to meet the following prerequisites:
- You’ll need an administrator for your customer organization with either the full admin role or device admin role. Alternatively, you can have a partner administrator with the appropriate permissions handle the licensing on your behalf.
- Of course, you’ll need a supported Expert on Demand Device:
- RealWear HMT-1
- RealWear HMT-1Z1
- RealWear Navigator 500
- RealWear Navigator 520
- Google Glass 2
To manage your Webex on Demand devices:
-
Depending on whether your customer organization is an existing or new user of the Expert on Demand, you may encounter slight differences in the initial device management experience.
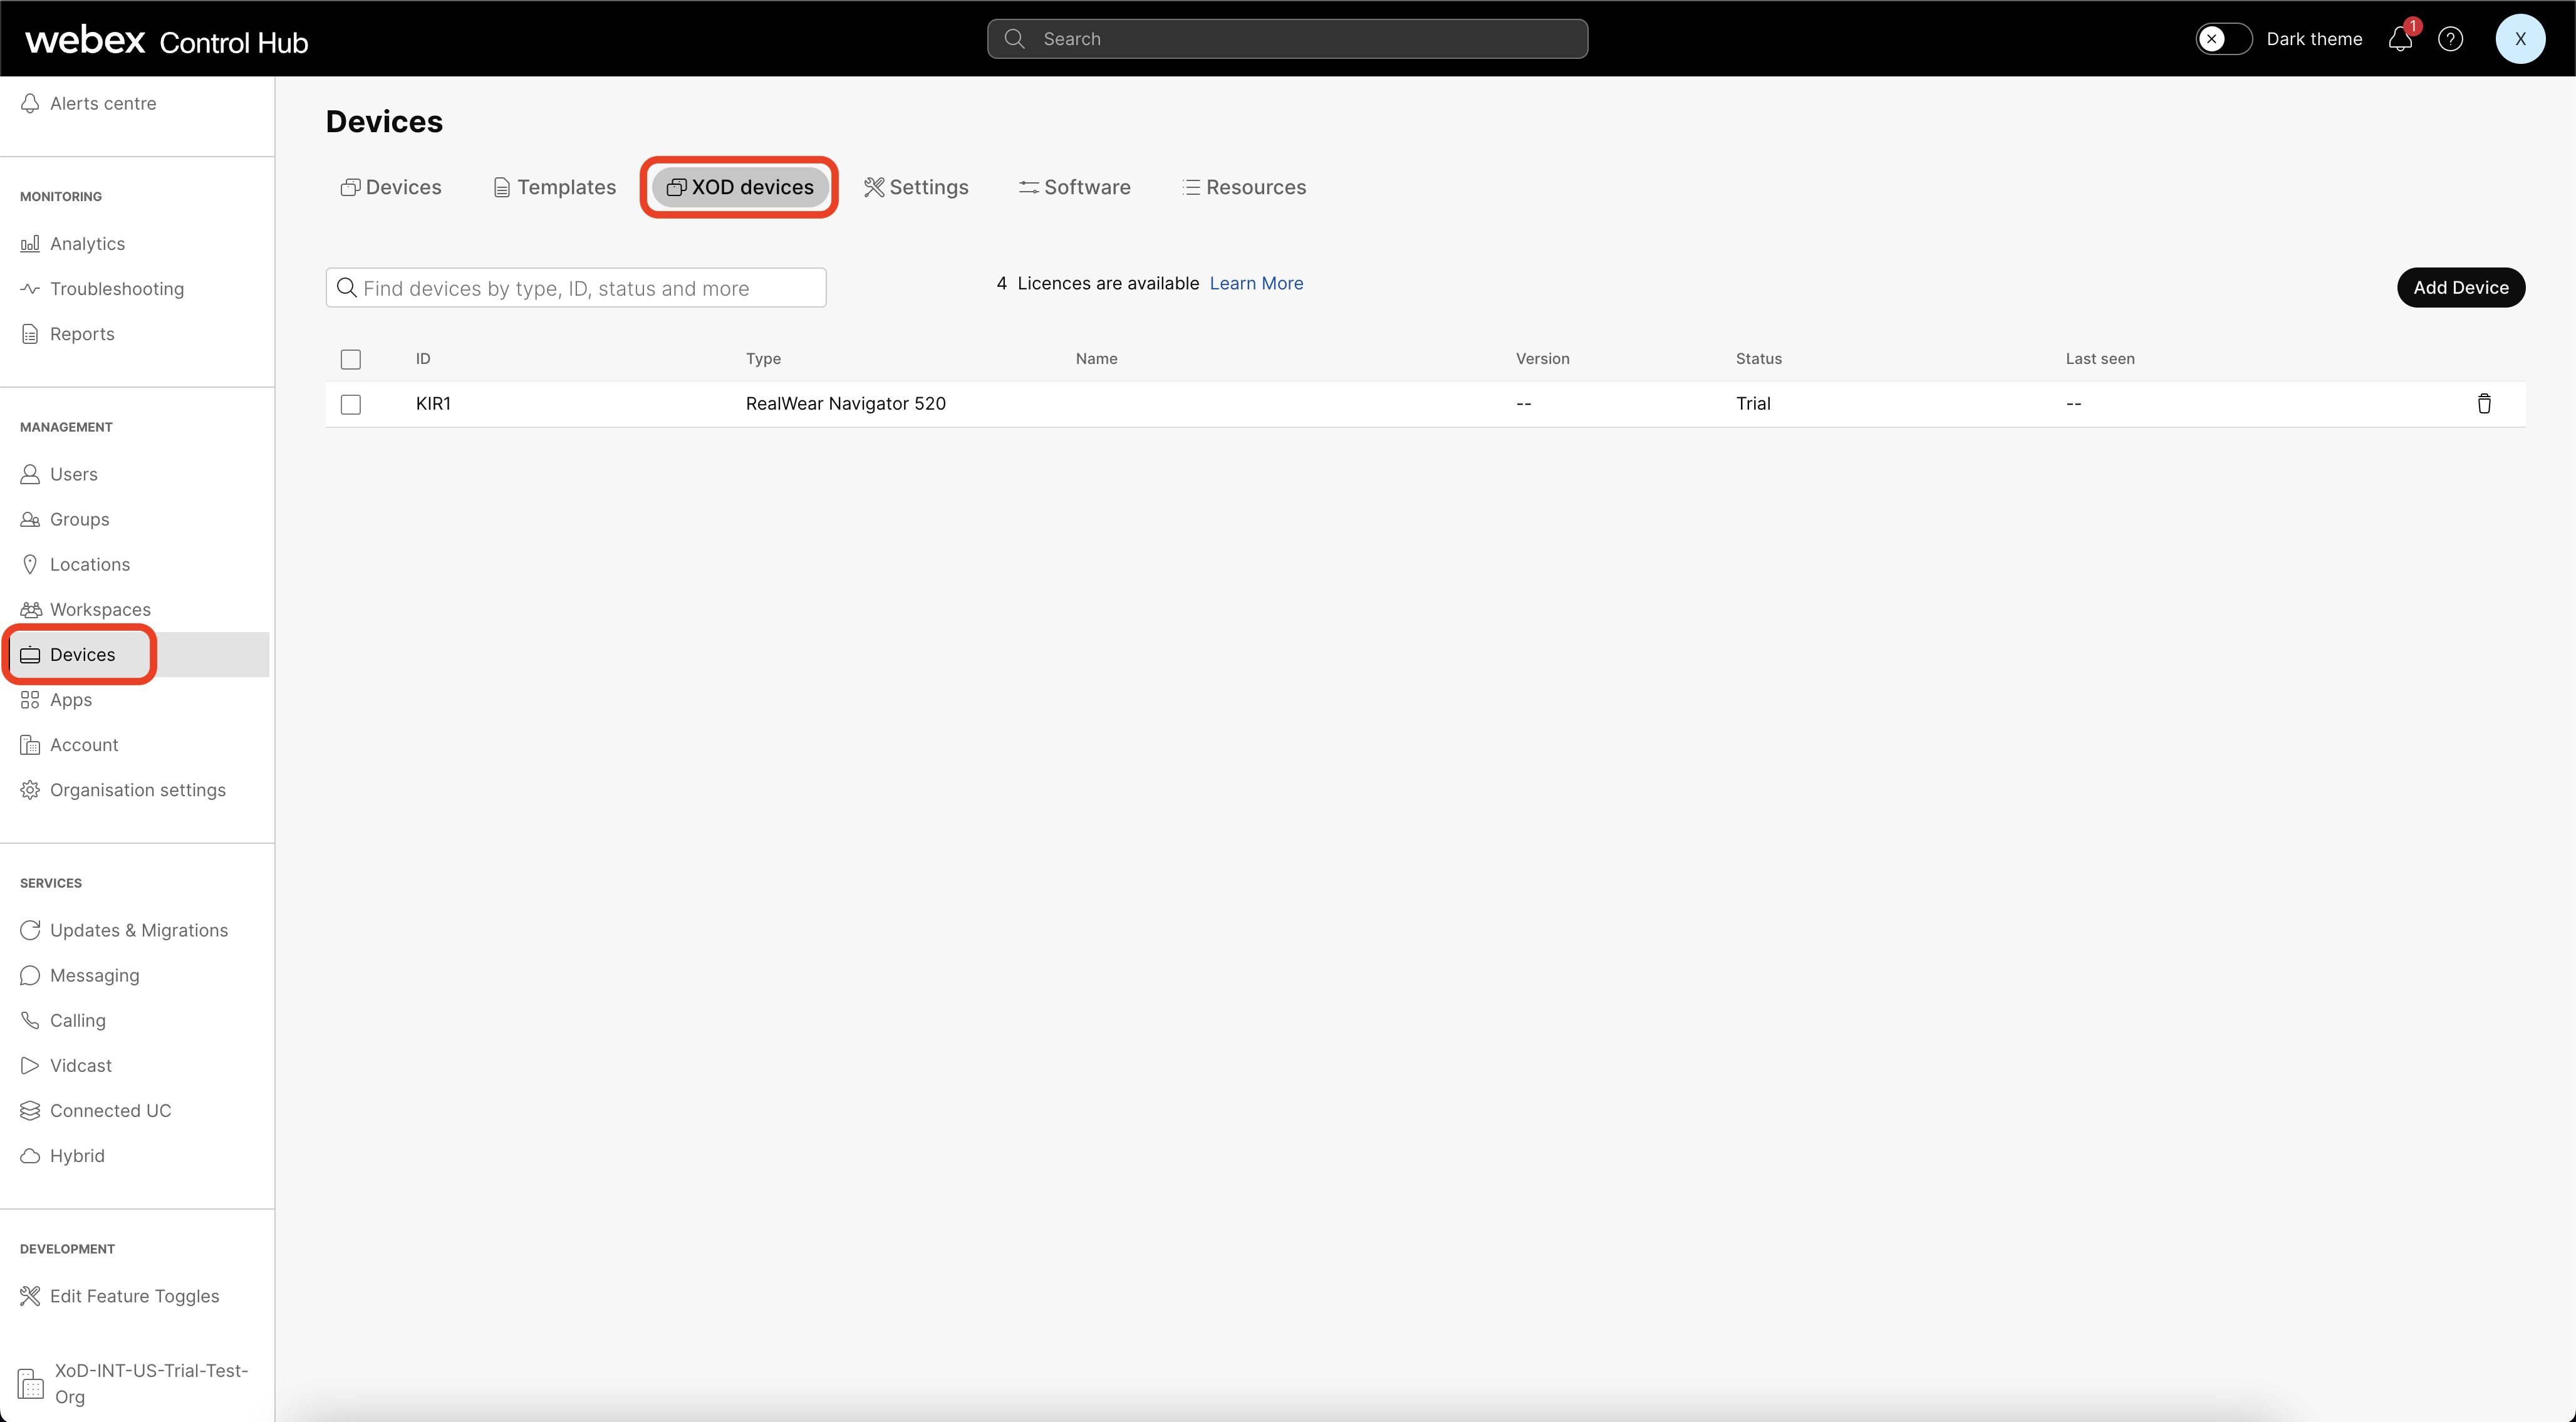
From the customer view in https://admin.webex.com, go to Management > Devices:
 Use of the Control Hub integration requires certain feature toggles to be enabled. Contact the Cisco Customer Success team for assistance.
 -
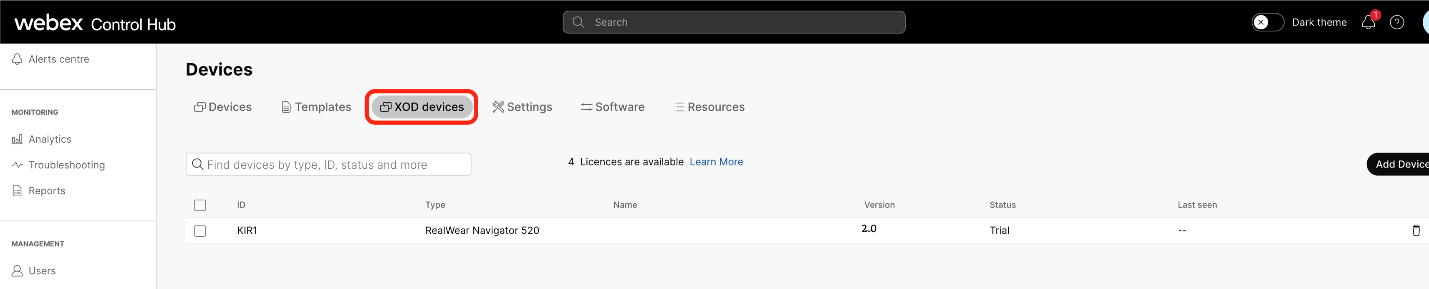
Click on the XOD devices tab.
Users can search for devices by Id, Type, and Name, as well as free text search:
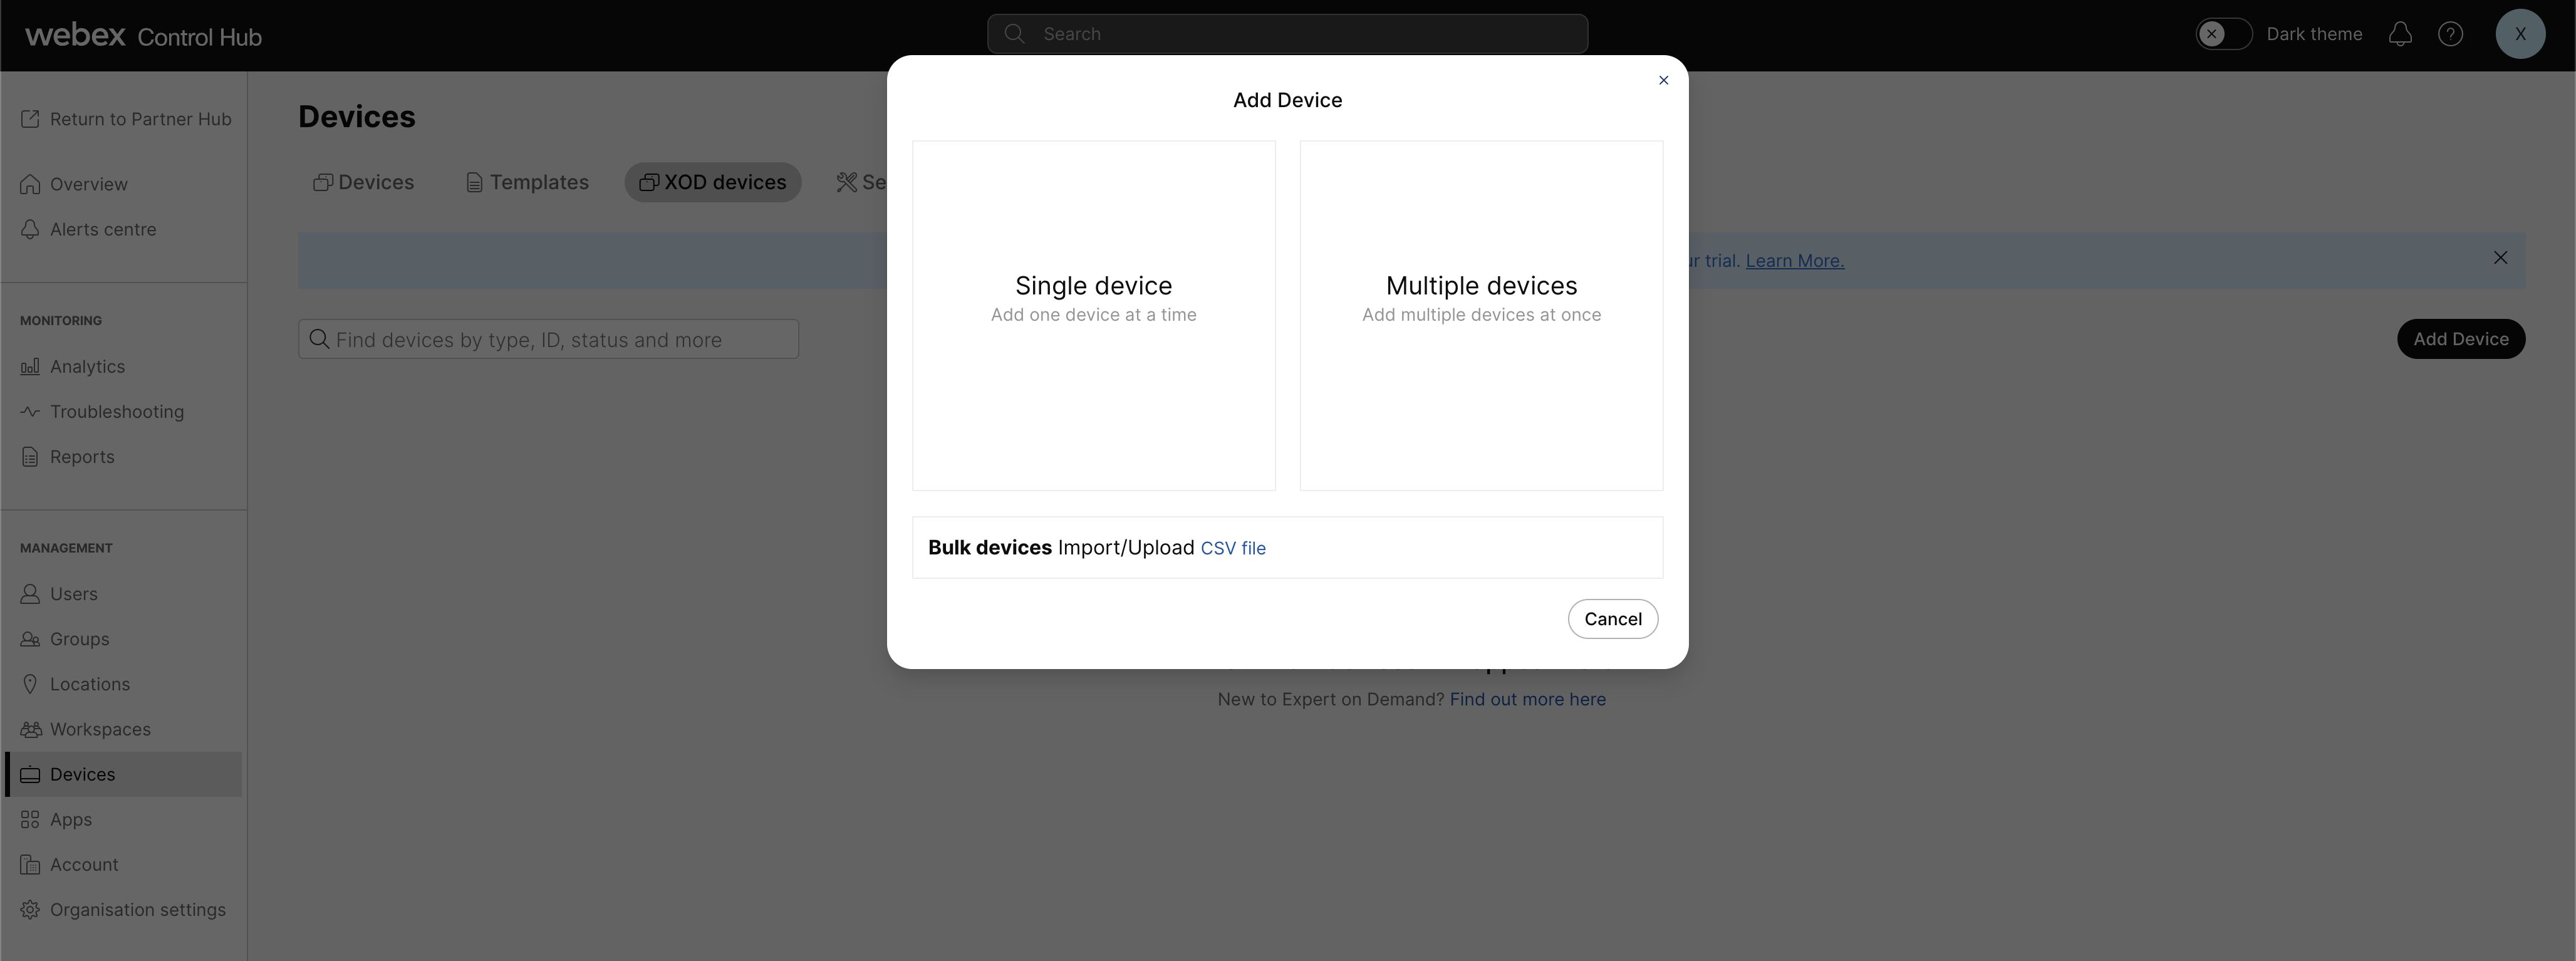
Add a single XoD device
To add a single XoD device:
-
Click Add Device.
Devices need to be added here to use the Expert on Demand App. -
Choose Single Device:
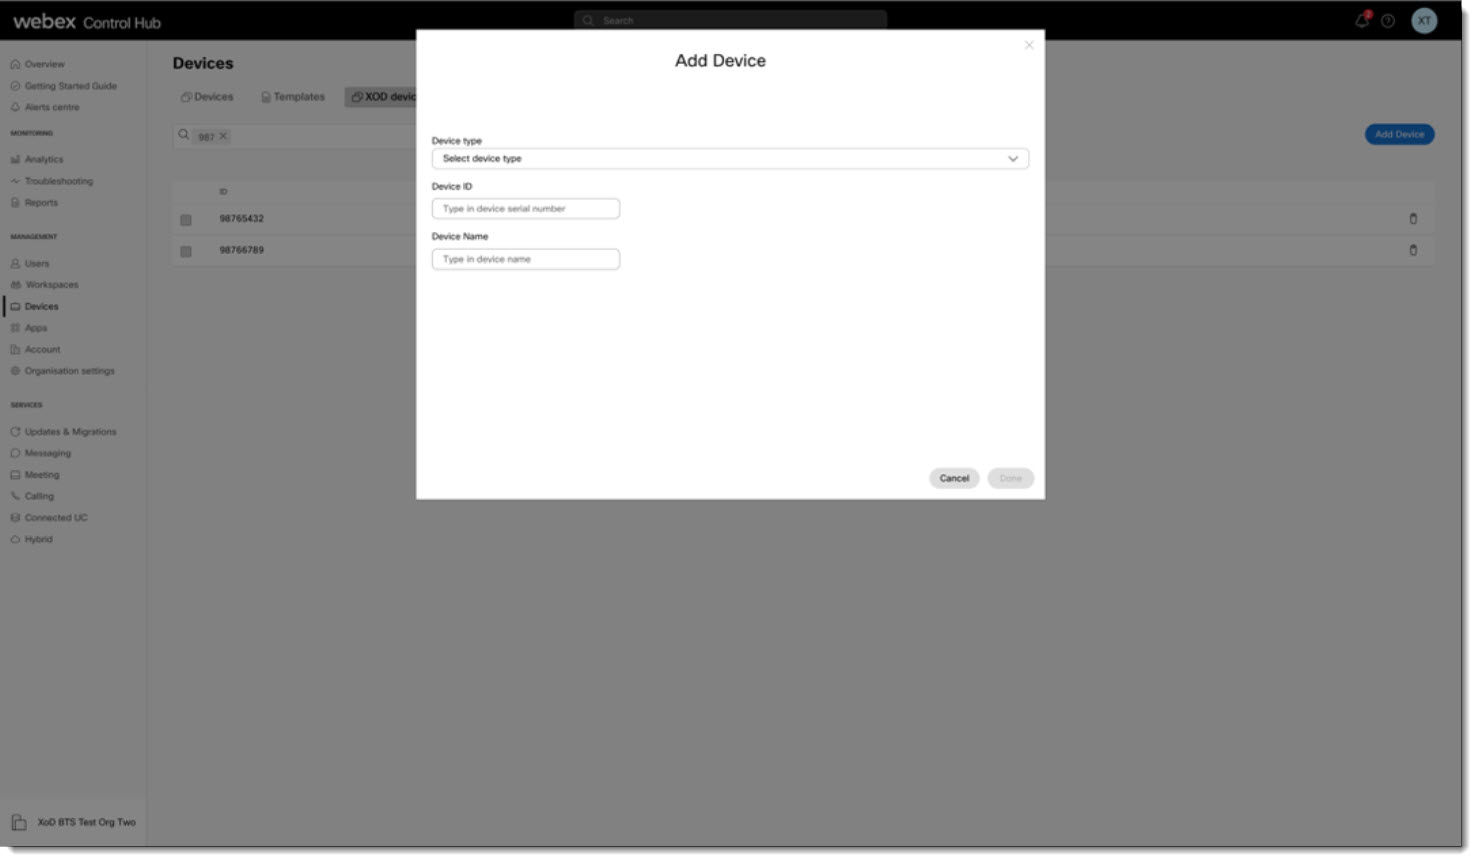
- Enter the following Device information:
Select Device Type from the options provided in the drop-down menu:
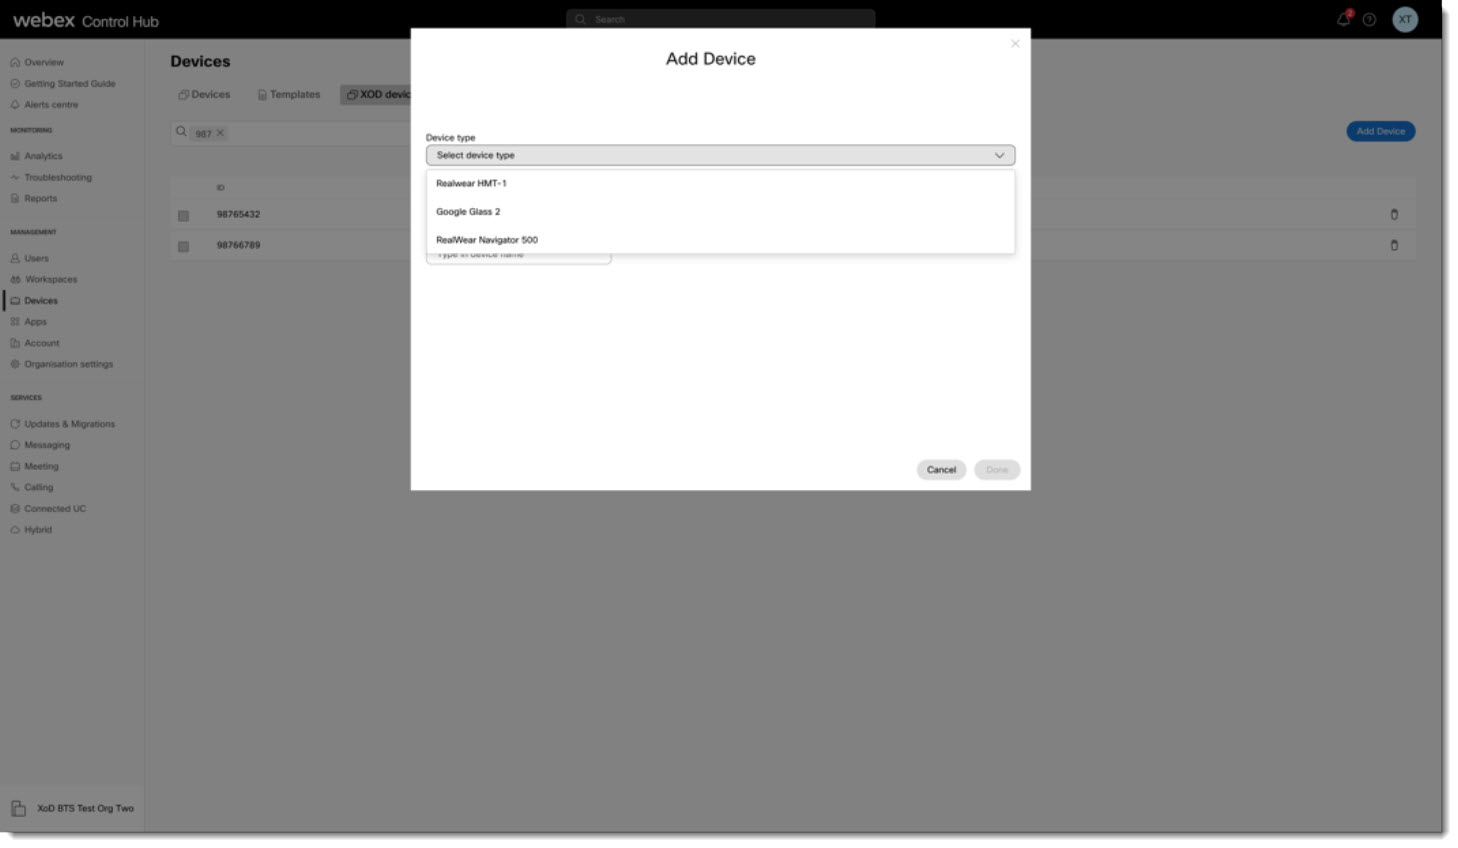
- Enter your Device Serial Number
- Optionally, enter a Custom Device name (Example: Tom’s RealWear HMT-1)
-
Click Done to add a single device:
Add multiple XoD devices
To add multiple XoD devices:
-
Click Add Device.
Devices need to be added here to use the Expert on Demand App on those devices. -
Choose Multiple Devices:
-
Enter the same information as you would for adding a single device for each device you’d like to add.
Delete an XoD Device
You can delete devices by clicking on the trash can icon next to each device or by
selecting multiple devices and choosing bulk delete: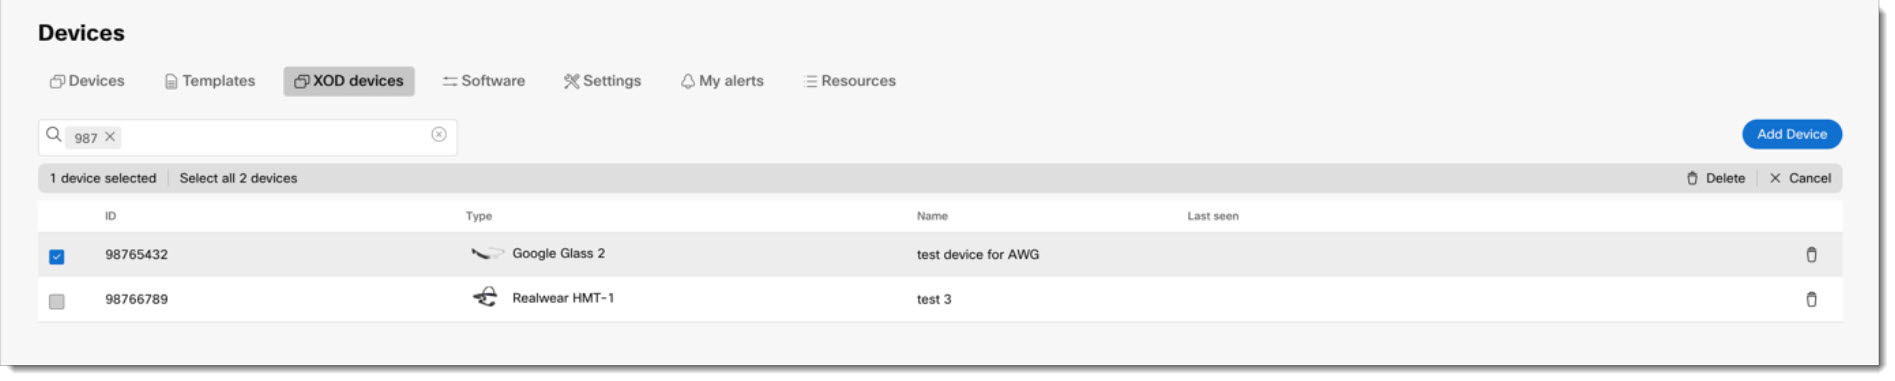
You can easily add multiple devices to your Expert on Demand registry using simply formatted Comma Separated Value (CSV) files.
To bulk add devices to the Expert on Demand registry:
- Under Management in the left nav, select Devices and then select the
XOD devices tab. Click Add Device.
- Select Bulk Devices Import/Upload CSV file.
- In the Bulk add devices dialog, click Download a file to download a sample CSV
template.
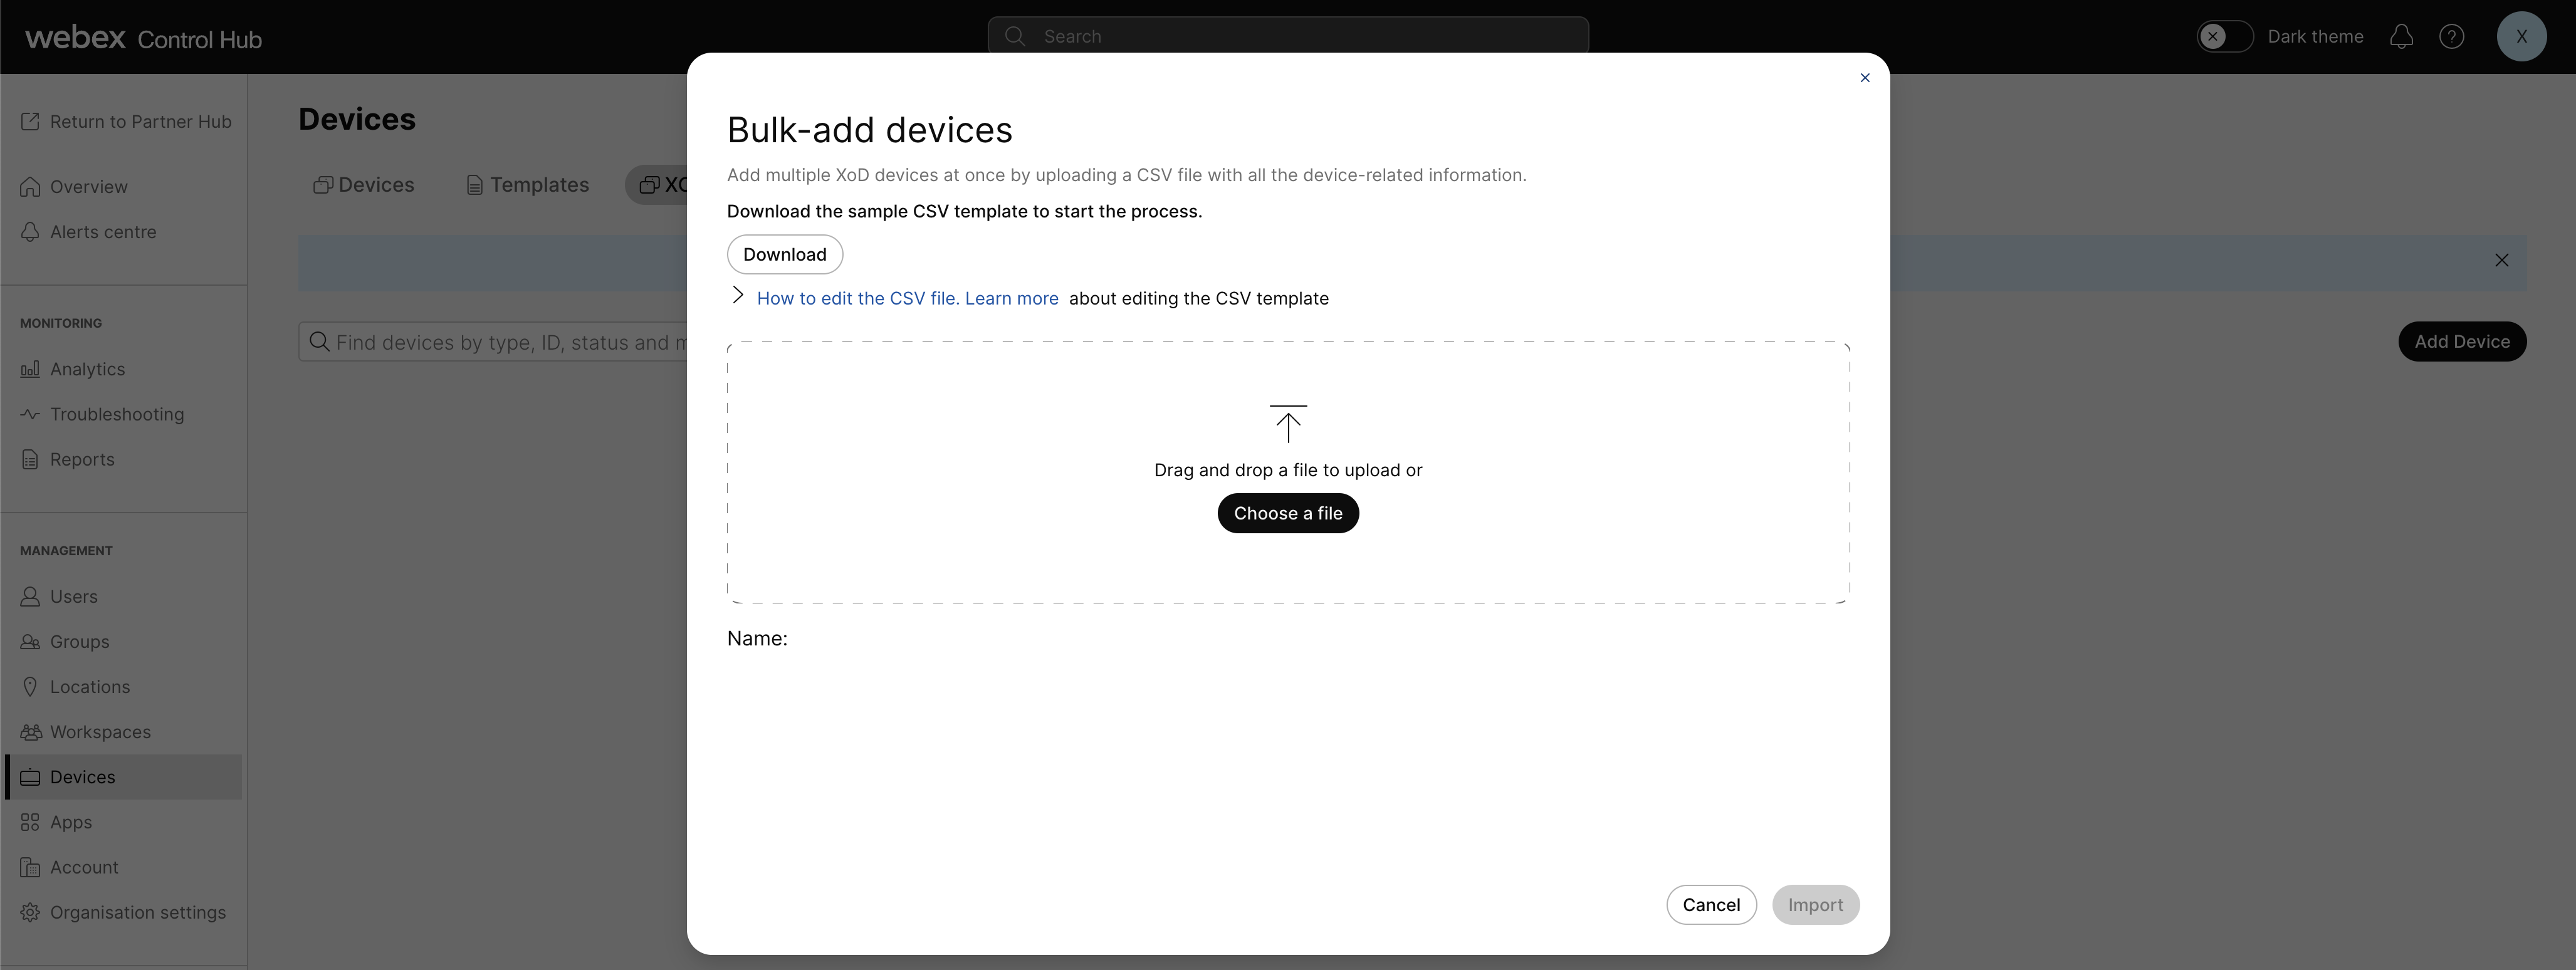
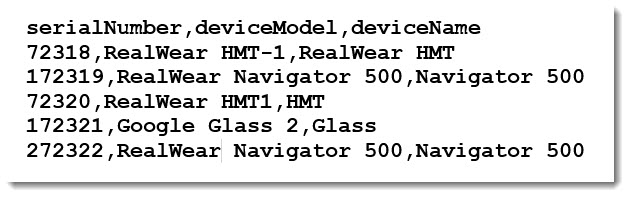
- Fill in the fields in the sample CSV file:
- serialNumber: The serial number of the device. Required.
- deviceModel: The model of the device. Required.
- deviceName: A friendly name for the device. Optional.
The supported devices are:
- RealWear HMT-1
- RealWear HMT-1Z1
- RealWear Navigator 500
- RealWear Navigator 520
- Google Glass 2
The entries in the device model column must exactly match one of those names (ignoring case).An example CSV file:
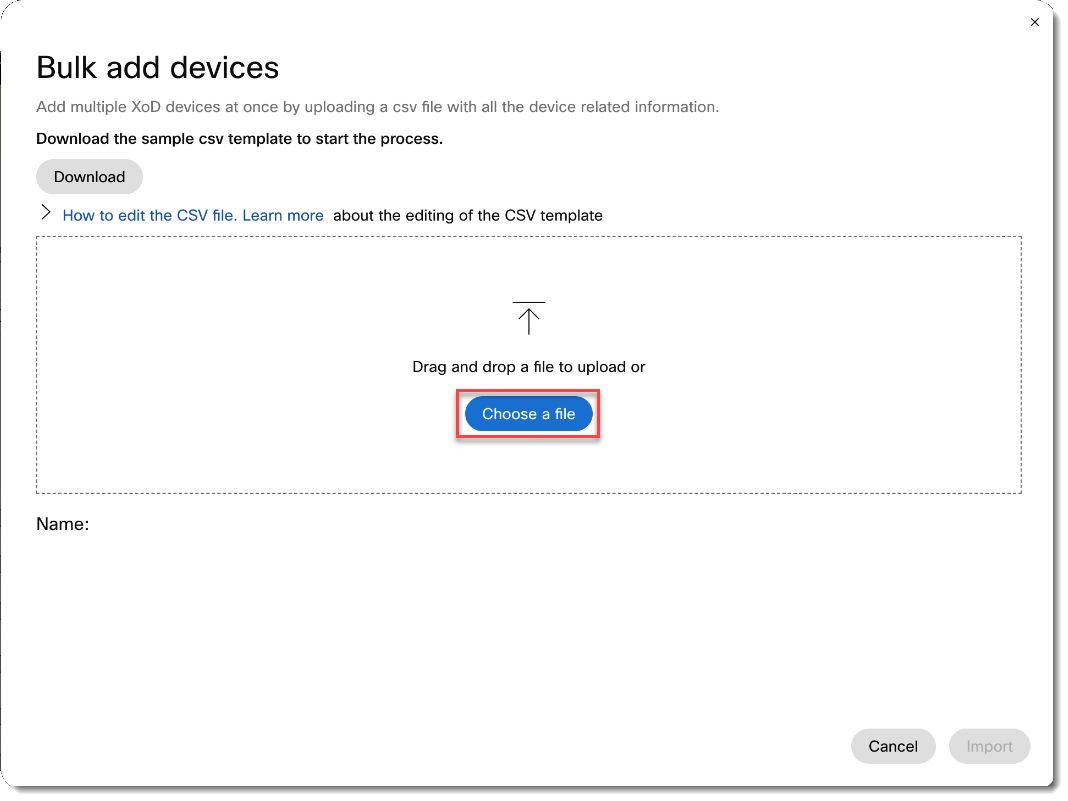
- After you’ve created your CSV file, click Choose a file and navigate to it,
select the file, and click OK to upload it to the server.
- Once the file is uploaded, click Import to perform the file import.
 If the system finds any errors such as duplicate serial numbers, formatting errors, or unknown devices, a dialog is displayed. Correct the errors and reupload the files.
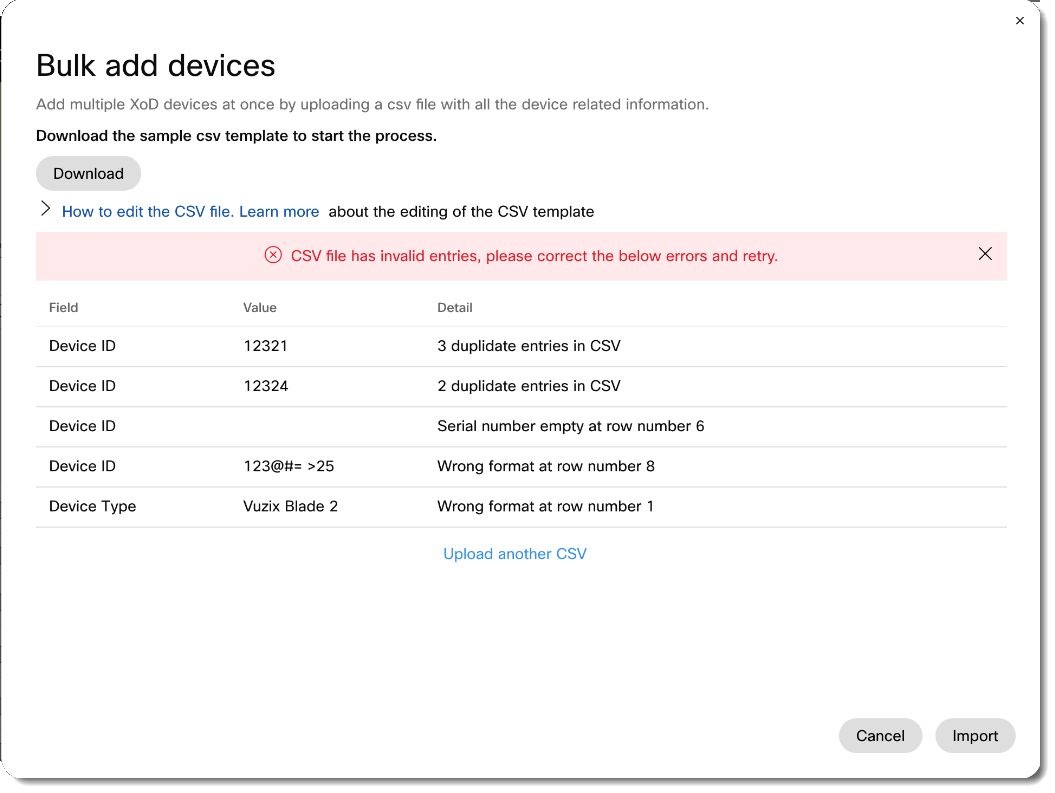
- If no errors are found the devices are added to the XoD registry. Navigate to the XoD Devices tab to see the newly added devices.
- For each device added, apart from the information entered while adding the device, there
are three additional fields listed:
- Version – which indicates the current XOD app version running on that device.
- Status – indicates the license status for the device.
- Last seen – indicates when the last license validation was performed by the device.
The Version and Last seen fields are populated only after the XoD app is opened once the devices have been added in Control Hub.
You can find information on controlling access to your Webex on Demand integration in the Control Hub documentation:
- For information on enabling (or disabling) access to all of your integrations, see Enable global access to integrations for all users.
- If you have a Pro Pack for Control Hub license and
you’d like to selectively allow access to Expert on Demand for specific users,
see Configure user access with Pro Pack.
You’ll need to search for Expert on Demand integration using the following ID:
Y2lzY29zcGFyazovL3VzL0FQUExJQ0FUSU9OL0MyZDhkNjk0MzkxNTcyMTM0MGEzNTg3MjA0ZmZlYjEyMGVmZjE0MzZhM2I1YjliOGVmOWJiMzY1YTNjZTQxZGM0 - For information on resetting integration access, see: Perform a hard policy reset for all your integrations.
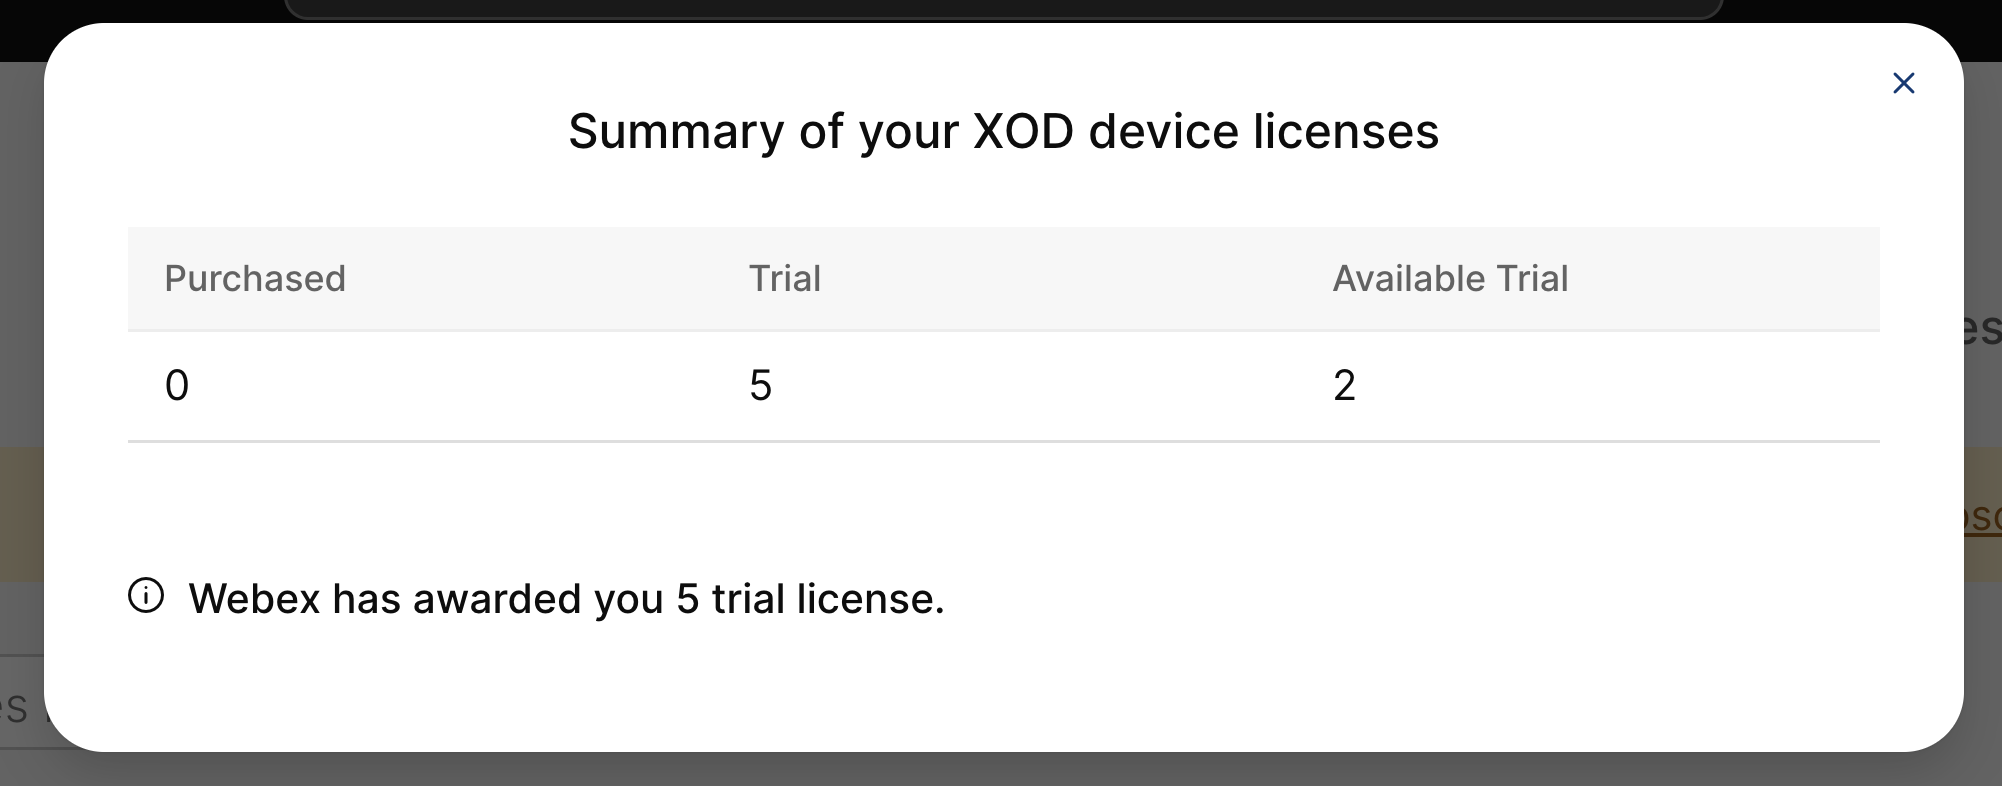
If you’ve never accessed Expert on Demand, we offer a 60-day trial for up to five supported devices. The trial window starts on adding the first device. The availability of the trial feature for the organization, as well as the trial-period start indication, is conveyed through banners in the Control Hub device administration page. At the end of trial period, any added devices are moved to an expired state, unless you’ve purchased an Expert on Demand device license subscription (the trial also ends immediately upon purchase of a subscription).
For existing organizations that have already added one or more Expert on Demand devices to their Control Hub account (either with or without an Expert on Demand device license subscription), there is no separate trial period offered. However, if your organization has added a greater number of devices than their purchased subscription licenses count, then those additional devices are added to a 60-day trial period. No additional trials would be offered to existing orgs.
Onboarding new devices
For more information on adding devices, see the corresponding entries in the Admin guide tab.
Check Device license and subscription status
When you’re viewing your list of devices in Control Hub, the ‘Status’ field indicates the current license status of each added device.
To view the Expert on Demand device license and subscription status for each of your devices:
- Login to Webex Control Hub using your administrator credentials.
- Select Devices and then select the XOD Devices tab.
- The version of the Expert on Demand app on the device is indicated in the Status
column of the device list:
The available statuses are:
- Trial – indicates that the device is associated against a trial license.
- Paid – indicates that the device is associated against one of the paid subscriptions.
- Expired – indicates that the license associated against the device has expired.
There are banners displayed on the XOD Devices page for any upcoming license or subscription expiration occurring within the next 28 days. Similarly, the license expiration indicators are also shown at the device-level adjacent the Status field for each device, mentioning the indicating the month and year of the license expiration. The expiration date starts from the oldest-added device first.
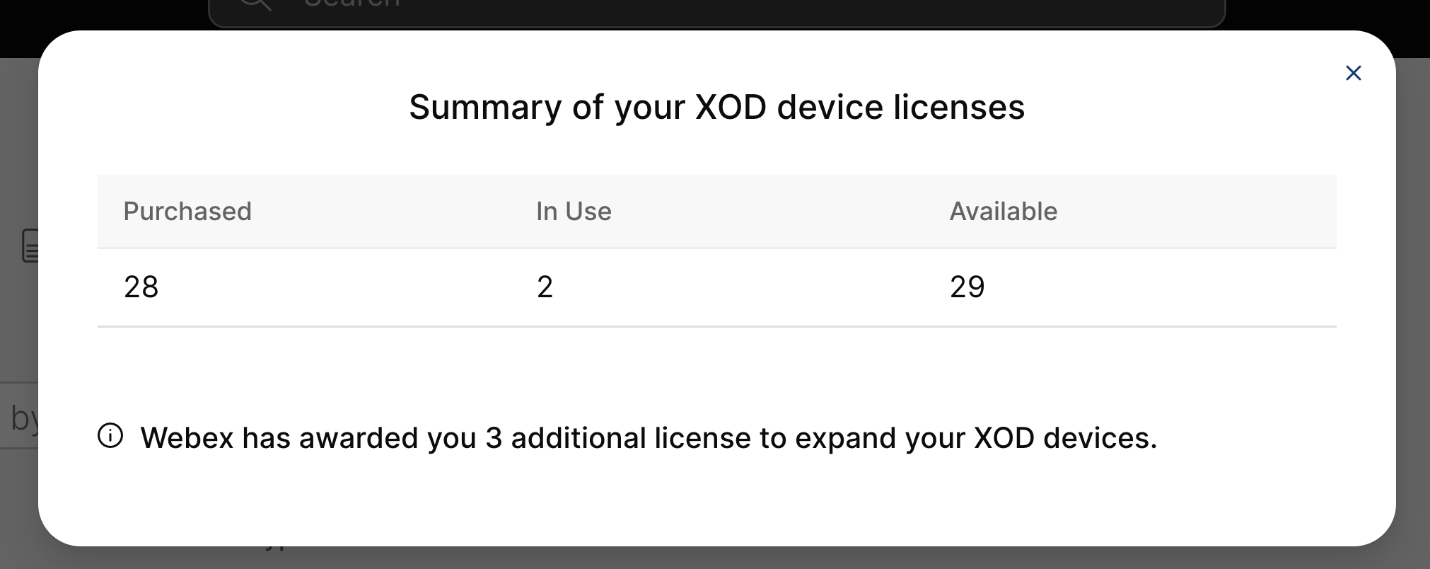
License Usage Summary
The Learn More text displayed next to the available license count, shows a license usage summary popup. When the trial window is running for an organization, this summary displays the information related to your trial. If your organization has purchased an Expert on Demand device license subscription, then the summary indicates the number of purchased licenses, in-use licenses, and available licenses:
Bonus device licenses
Cisco is currently offering an additional increase in licenses equal to ten percent of the number of your existing licenses if you’ve purchased an Expert on Demand license subscriptions. The exact count of those additional bonus licenses is also indicated in the summary:
Check the Expert on Demand client version
To view the Expert on Demand app version for each of your devices:
- Login to Webex Control Hub using your administrator credentials.
- Select Devices and then select the XOD Devices tab.
- The version of the Expert on Demand app on the device is indicated in the Version
column of the device list:
What are the use cases for Webex Expert on Demand
This table lists just a few of the possible use cases for Expert on Demand:
| Industry | Use Case | ROI |
| Manufacturing |
|
|
|
Oil & Gas Mining |
|
|
|
Energy, Utilities, Service Providers, Field Services |
|
|
| Healthcare & first responders |
|
|
What happens to an organization’s existing XoD devices added to Control Hub when the new licensing changes are rolled out?
For an organization that has already added devices to their Control Hub account, the added devices are mapped against a license from the organization’s purchased XoD device license subscription. If the organization has not purchased any subscriptions or has a greater number of devices than purchased licenses, then all devices in excess are moved to a 60-day trial period.
How are users without device license impacted?
For Expert on Demand version 2.0, a device license is mandatory to use the app. In the absence of a device license, a user is logged out of the application.
What happens to the Expert on Demand app if a license expires?
When a device license expires, the Expert on Demand app provides the device with a 60-hour grace period, during which an admin can associate the device with a valid license. The Expert on Demand app can be used normally during this 60-hour window. When the grace period expires, if the device still does not have a valid license, the Expert on Demand app will no longer function.
What if a user has no access to Control Hub?
Usually, only administrators have access to Webex Control Hub. Users can reach out to their organization administrators to get their devices licensed. Alternatively, they can reach out to a partner who manages the organization.
How can a new customer request a trial?
For new customers, an Expert on Demand trial is available by default on the organization Webex Control Hub XOD Devices page and is indicated by a banner on the Control Hub page itself. The trial window starts when the first device is added.
What are the restrictions during trial and the duration of the trial period?
On the Expert on Demand application side, there are no differences in features when running a trial license versus a paid license. The trial duration is for 60 days and is limited to five (5) devices. The 60-day trial window starts when the first device is added via Webex Control Hub.
Which device models are supported by XoD currently?
The device models currently supported by Expert on Demand are:
- RealWear HMT-1
- RealWear HMT-1Z1
- RealWear Navigator 500
- RealWear Navigator 520
- Google Glass 2 (end of sale announcement)
Where can I find the serial number for a Google Glass device?
The Google Glass device serial number is an alphanumeric string of sixteen (16) characters. To find the serial number:
- Scan or read it off the inner side of your Glass Enterprise Edition's pod.
OR
- Find it under the build ID on the About device card in Settings:
For additional details, see: Glass Enterprise Edition Help.
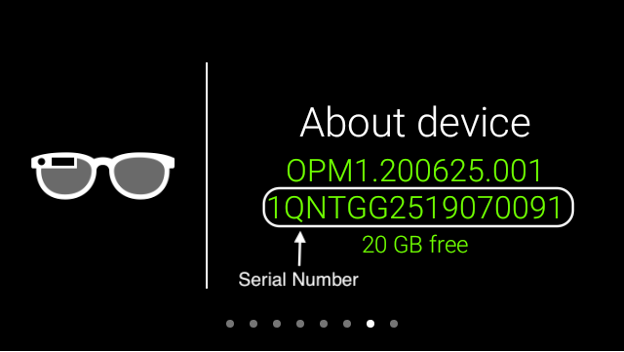
Where do I find serial numbers for RealWear devices?
The serial number for the RealWear Navigator series devices is in the battery
compartment. For the RealWear HMT series of devices, the serial number is on the
inside surface of the device band. When entering your serial number, do not include
S/N or WK1234. For example, for S/N
123456789012345 WK1234, only enter
123456789012345.
For RealWear devices, the serial number is also available in the About Device
application: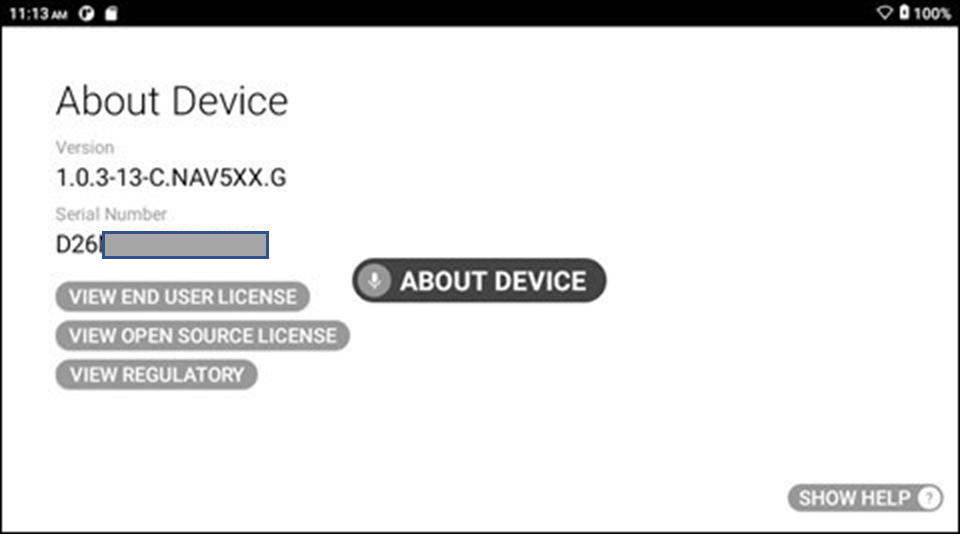
I'm seeing a rooted device warning. What should I do?
Rooting a phone involves gaining administrative privileges, allowing users to access and modify system files and settings beyond the manufacturer's limitations. While it provides customization opportunities and access to advanced features, rooting carries security risks, including potential malware infections, and incompatibility with certain apps and services. If a device has been rooted, you’ll see the following security warning:
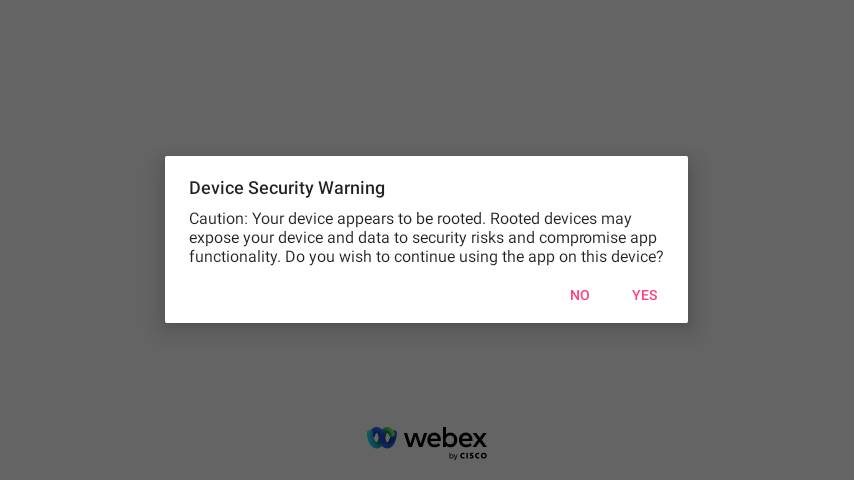
Respond YES to continue using the device or NO to close the application and sign out. For further help with this security warning, contact your organization administrator or RealWear.
My video stream has been turned off. What is going on?
If there are any fluctuations in the network bandwidth during a call or meeting that result in the video stream being turned off, you’ll see the following notification:
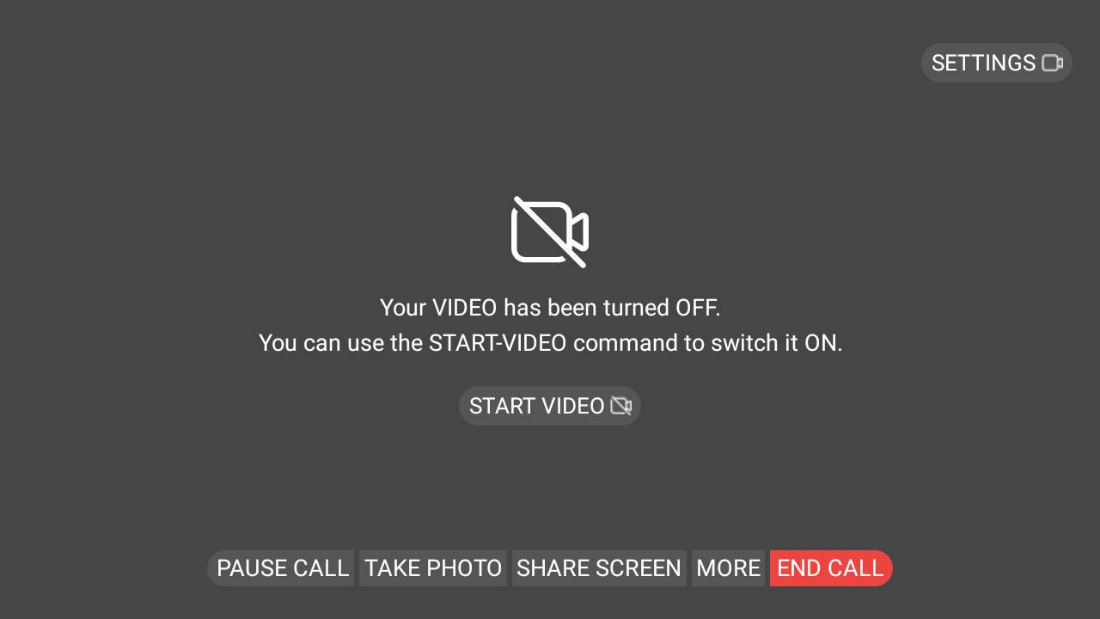
Once the network has stabilized, say the START VIDEO command to re-enable the video stream.
May 10, 2024
Version 2.1
New features
- The new Live Annotations feature supports user annotations over live video streams during screen sharing sessions within meetings. See Live annotations in the User guide tab for details.
- User presence/availability is now displayed directly in the application. See User presence/availability in the User guide tab for details.
- As per earlier announcements, Google Glass support has been removed.
Fixes
- Crashes when trying to view a remote user's screen share on RealWear NAV-5XX devices running firmware v2.0 have been fixed.
October 3, 2023
Version 2.0
Fixes
- Call audio not being routed to connected wired headphones without a disconnect/reconnect has been fixed.
- A UI indicator rather than a frozen screen is shown when video transmission is disabled.
- Blank user names and images appearing in the Expert on Demand menu for signed-in users have been fixed.
- We’ve made a variety of additional performance and stability enhancements.
April 4, 2023
Version 1.9.3 (no version change)
RealWear Navigator-520 is compatible with Webex Expert on Demand.
Webex Expert on Demand Application version 1.9.3.0 is now supported in the newly released RealWear Navigator-520.
Control hub XoD license management is now available for Device Admin and Partner Admin roles.
Webex administrators with Device Administrator and Partner Administrator roles can manage Expert on Demand Devices licenses and onboarding processes. For more information, see the corresponding entry in the Admin guide tab.
December 19, 2022
Version 1.9.3
Bulk add devices to the Expert on Demand registry
You can easily add multiple devices to your Expert on Demand registry using simply formatted Comma Separated Value (CSV) files. For more information, see Bulk add devices in the Admin guide tab.
Toggle Background Noise Reduction (BNR)
The Background Noise Reduction (BNR) feature is enabled by default when a user logs in. Use the Menu voice command to access the application menu and say, No Noise Off to toggle the feature off. For more information, see Toggle Background Noise Reduction (BNR) in the User guide tab.
August 26, 2022
Version 1.9.2
Resolved bugs
-
Fixed inconsistent ringer sound issues, for both incoming and outgoing calls.
-
Fixed a rare blank screen experienced with video / remote screen-share streams.
-
Fixed an intermittent crash occurring when toggling local audio/video streams ON/OFF.
-
Fixed incoming calls (and associated ring tones) not being available when a device is sleeping or locked.
Control hub integration
Device management in Control Hub
The Device Management in Control Hub setting allows users to manage the Expert on Demand Devices in your organization. For more information, see Manage Expert on Demand devices in the Admin guide tab.
July 13, 2022
Version 1.9.1
The following are the resolved bugs for this release:
-
During a space meeting, shared content is sent to the space meeting initiator instead of being shared in the space.
March 30, 2022
Version 1.9.0.1
The following are the resolved bugs for this release:
-
Content shared by a remote expert appearing blurry to the Expert on Demand user when zoomed in.
-
Wi-Fi network changes not being reflected correctly in Expert on Demand.
Known issues
-
Avatars for US-based users do not load for an EU-based user.
-
Team memberships for teams created by US-based users cannot be seen by EU-based users.
October 11, 2021
Version 1.8.1.0
The following are the resolved bugs for this release:
-
Some users are unable to see video from Expert on Demand when using a Webex DX-80 device on a call.
August 31, 2021
Version 1.8.0.4
FedRAMP Authorization—Expert on Demand is now available to Webex for Government sites.
Known Issue—When the Remote Expert annotates a screen share, the live annotations are not visible to the Expert on Demand user. A similar behavior is seen when both users are using the Webex App on FedRAMP. Check back for updates.
May 27, 2021
Version 1.8.0.3
The following are the resolved bugs for this release:
-
Photo previews display upside down, when the headset is worn on the left eye.
-
Taking and sending a photo is not available when zoom is enabled.
-
When a remote expert zooms in or out of shared content on a mobile device, the headset user's screen is distorted.
-
Some users are unable to send photos.
-
Some users are signed out after 14 days.
November 13, 2020
Version 1.7.0
The following are the resolved bugs for this release:
-
The camera view appears on the headset even when the remote expert declines a call.
-
Some users see no annotations during a call in a space.
-
The calling screen stays open on the headset after a call is connected.
-
A bad gateway message appears when a headset user declines a call.
-
Some users in the EMEAR region are unable to add users from different organizations to their contacts.
-
Headset users’ shared screens are visible when a call is paused.
-
When a user navigates back from the call screen before a call is connected, the app still tries to connect the call.
-
Users who connect to their network via a proxy server can't use screen sharing and sometimes can't launch the app.
August 7, 2020
Version 1.6.0
The following are the resolved bugs for this release:
-
Users in some regions aren't able to send messages or make calls.
-
When the remote expert stops sharing a whiteboard, the video call ends, and the Webex Expert on Demand app displays unusual behavior.
-
The software encounters an infinite loop while loading recent contacts.
-
Users can't return to the sign-in screen if there is an error while signing in.
-
An error message erroneously states that the device's time and date are incorrect.
June 19, 2020
Version 1.5.1
We've released a new version of Cisco Webex Expert on Demand. For information about new features, check out What’s New in Cisco Webex Expert on Demand.
December 11, 2019
Version 1.4.2
The following are the resolved bugs for this release:
-
Password sign-in field is half covered by the virtual keyboard.
-
Password field gets pushed down and covered by the virtual keyboard when an error message appears.
-
Item numbers used to select items within the application are not properly aligned. Usually occurs after closing the virtual keyboard.
-
Profile photo for incoming caller is not displaying.
-
Virtual keyboard pops up on team member’s page after APP has been revoked from the backend (Home Page).
-
Administrator user can’t send a message to an administrator user of different organization
-
Shows error message on directory search when sign in with Cisco account


