
Thanks for your feedback.
Schedule, start, and join Webex Meetings in Microsoft Teams
 Feedback?
Webex Meetings app commands for Microsoft Teams
Commands for private chat with the Webex Meetings app
Use these commands with the Meetings app.
|
Command |
Description |
|---|---|
|
Example: |
Sets the Webex site URL for your default Webex site. When you share a meeting link, your default Webex site URL is used. |
|
|
Removes your default Webex site URL. |
|
|
Shows the available commands for the Webex Meetings app. |
Use these commands in team channels that have the Meetings app installed:
To check if a team has the Meetings app installed, see Deploy the Webex Meetings integration for Microsoft Teams to your organization.
|
Command |
Description |
|---|---|
|
|
Shows the team's Webex site. |
|
Example: |
Sets the Webex site URL for your team. When you can change the Webex site, the site changes for all team members. |
|
|
Removes the team's Webex site URL. |
|
|
Shares a Join button and shows the meeting link for your Webex Personal Room meeting. If you don't have a Webex Personal Room, the command shares a Join button and shows the meeting link for a Webex meeting. |
|
|
Shares a Join button and shows a meeting link for the Webex Personal Room meeting that is associated with the specified Personal Room host ID, either yours or another host’s. |
|
|
Shares a Join button and shows a meeting link for a scheduled Webex meeting with the specified meeting number. |
|
|
Lists all the commands available for the Webex Meetings app. |
|
|
Shows a link to this Help article. |
Schedule and manage meetings
You must install the Webex Meetings bot before you can schedule meetings from the Webex tab.
| 1 |
Do one of the following
|
| 2 |
Select Schedule. |
| 3 |
For Meeting type, select whether you want to schedule a Webex meeting or a Webex Personal Room meeting. 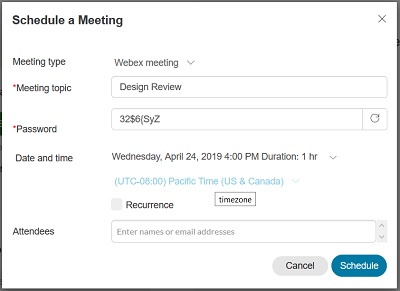
|
| 4 |
Enter the meeting topic and password, and then select the date, time, and time zone of the meeting. Passwords are available for Webex meetings only. |
| 5 |
Check the Recurrence check box if you want the meeting to repeat. Select the frequency (Daily, Weekly, Monthly, Yearly) that the meeting should repeat, and then select options for the frequency. This option is not available if you are using a hybrid or
on-premise Microsoft Exchange account |
| 6 |
Next to Attendees, enter the email addresses of the people who you want to invite. If you're scheduling the meeting in a channel, all channel members are automatically invited. You can add more guests by entering their email addresses next to Additional Attendees. |
| 7 |
Select Schedule. No email invites are sent to hosts or attendees if you are
using a hybrid or on-premise Microsoft Exchange account. The meeting won't appear in
Microsoft Outlook calendars either. |
| 1 |
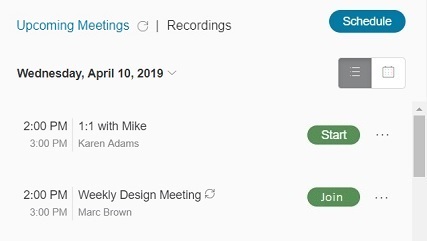
Select the Webex tab in Microsoft Teams. You first see the meetings list in List view
 , which shows a consolidated list of your upcoming meetings for the next few days. , which shows a consolidated list of your upcoming meetings for the next few days. If you see an arrow circle If you see a calendar icon 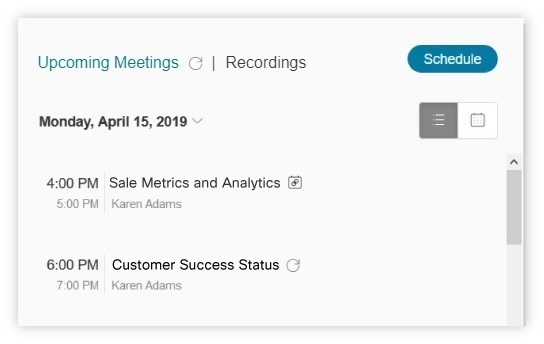 |
| 2 |
To see your meetings in real time for a single day, select Day view 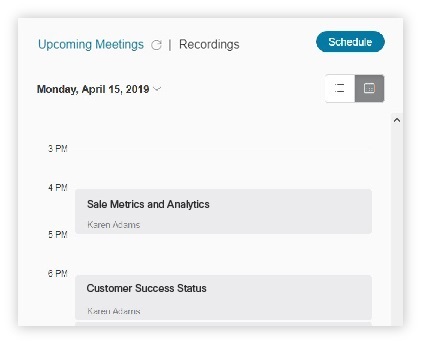
|
 next to the meeting, it means that the meeting is a recurring meeting.
 next to the meeting, it means that the meeting was scheduled in this channel.
 .
.| 1 |
Select the Webex tab in Microsoft Teams. |
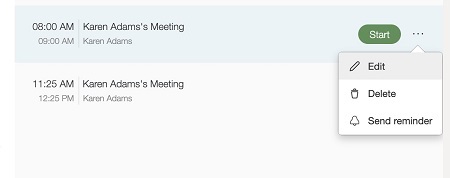
| 2 |
Under Upcoming Meetings, locate the meeting. select ... More options next to the meeting name and choose one of the following:
|
| 3 |
If it's a recurring meeting, select whether you want to edit or delete this meeting only or the entire series and select OK.
|


Use the Webex messaging extension in a channel conversation, group chat, or private chat to schedule a Webex meeting.
If you want to schedule meetings from the messaging extension, you must set your Webex site in a private chat with the Webex bot first. If you didn't set your site, you'll be asked to set it before you can schedule a meeting.
When you schedule a meeting in a channel, there are no invitees added. None of the meeting attendees receive an email invite or see the meeting in their calendar.
| 1 |
In the conversation or chat message, select
Webex
|
| 2 |
Select Schedule a Webex meeting. |
| 3 |
Select the date, start time, and end time of your meeting, and then click Schedule. |
 on the messaging extensions bar.
Start and join meetings
There are two types of meetings you can start.
-
Instant meetings—Use when a meeting isn't scheduled but you need to meet right away.
-
Scheduled Webex meetings—Use for meetings that you schedule in advance.
| 1 |
Do one of the following
|
| 2 |
To start an instant meeting:
|
| 3 |
To start a Webex meeting that you had scheduled previously:
|
You can send meeting reminders starting at 15 minutes before your meeting start time.
|
Click ... More options next to your meeting and then click Send reminder.
|
A reminder appears in the channel where you scheduled the meeting. It includes the meeting details and a link that attendees can click to join. As the host, you can also start the meeting from this reminder.
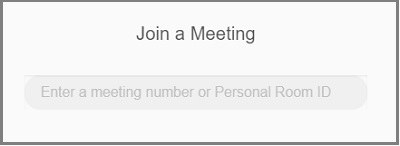
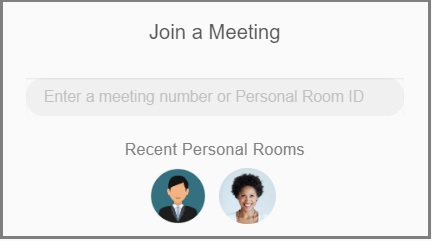
| 1 |
Select the Webex tab in Microsoft Teams. |
| 2 |
Do one of the following:
|
| 1 |
Enter |
| 2 |
Select @Cisco Webex Meetings from the search results. |
| 3 |
Do one of the following:
|
| 4 |
Select Join or Join meeting to start or join the meeting. The Webex meeting opens in a new browser window.
|
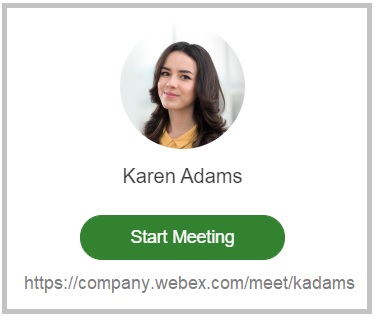
In a channel conversation, group chat, or private chat, you can send a link to a meeting in your Personal Room or a scheduled Webex meeting. Your Personal Room is used by default for any meetings that you share. If you don't have a Personal Room, a link to an instant meeting is shared instead.
For the best experience, we recommend that you set your Webex site in a private chat with the Webex bot. If you don't set your site, the extension automatically chooses one based on your Microsoft Teams email address.
| 1 |
In the conversation or chat message, select Cisco Webex
|
| 2 |
Enter the meeting topic, and then click Send. The meeting information is added to the conversation or chat message. You can start the meeting and others can join the meeting by selecting Join. |
Play and share recordings
You can only share recordings to channels, but before you can share you must add the Webex tab to the channel.
When a meeting is recorded in the cloud, a recording notification is sent after the meetings ends. The recording notification includes the meeting topic, date, time, duration, and a Play Recording button.
Recording notifications for channel meetings are sent to the channel. All team members can view the notification and play the recording.
Recording notifications for private meetings are sent to the private chat with the Meetings app. The host can view the notification and play the recording.
You can see a list of your recordings from all of your Webex sites on the right side of the Webex tab. The list includes recordings from the last 10 days. You can select and play recordings from the list.
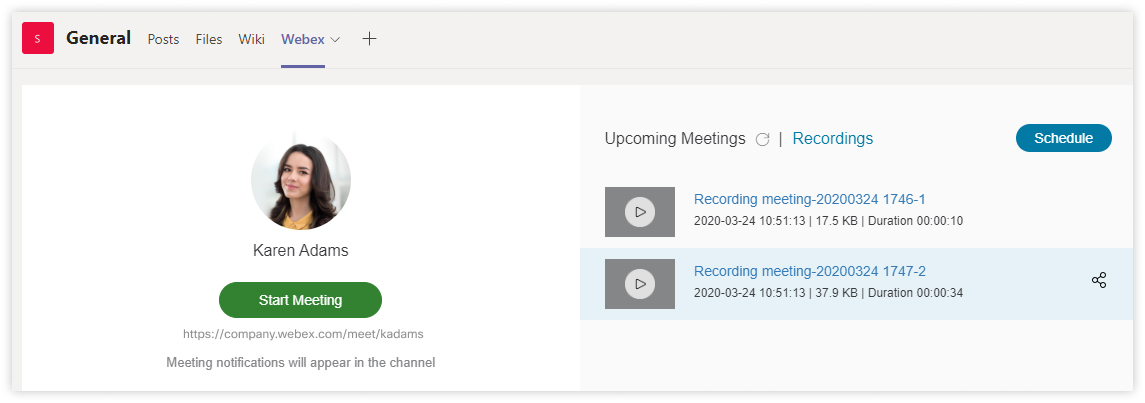
| 1 |
To play a recording, do one of the following:
The recording opens in a new browser window.
|
| 2 |
To share a recording: The recording is shared in the channel conversation history.
|


