
Thanks for your feedback.
Administration guide for Webex Meetings Virtual Desktop software
 Feedback?
Migration from Webex Meetings VDI to Webex App VDI is now open. Refer to Webex Meetings desktop app VDI to Webex app VDI migration guide to learn more.
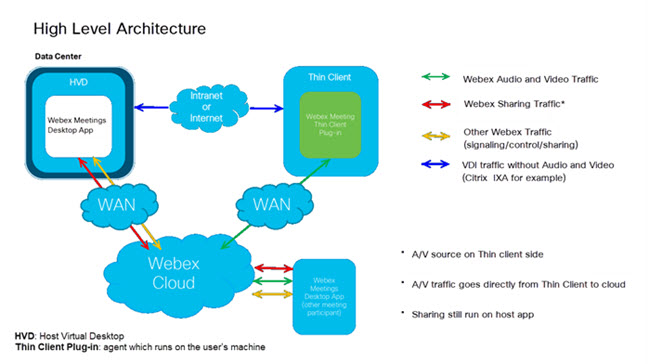
Virtual desktop infrastructure (VDI) technology lets you deploy and manage users' desktops in an on-premises or cloud data center. Using thin clients, your users connect to their hosted virtual desktops in the data center. A thin client can be a traditional PC, or a thin-client device. This centralized approach can help to lower costs, and to improve operations and security.
The Cisco Webex Meetings application provides an enhanced experience in VDI environments. If it must travel through the data center, the additional bandwidth required for audio and video can cause a bottleneck. The application improves performance by routing all audio and video streams directly between the thin client and Webex Meetings cloud.
The Webex Meetings Virtual Desktop Software provides the same architecture components as a video device.
To deploy the Webex Meetings Virtual Desktop App, ensure that your deployment meets the following requirements:
Software in the data center
-
Microsoft Windows on the hosted virtual desktops (HVD):
- Windows 8
- Windows 10
- Windows Server 2012
- Windows Server 2016
-
Citrix Virtual Apps and Desktops 7 1906, 1912, 2012, 2103, 2206
XenApp is now known as Citrix Virtual App and XenDesktop is known as Citrix Desktop.
This release supports only Citrix Desktop.
OR
-
VMware Horizon
-
VMware Horizon 7 version 7.6, 7.7, 7.8, 7.9, 7.10, or 7.11
-
VMware Horizon Agent 8 version 2111
VMware Horizon HTML Access is not supported.
-
Citrix (on thin client)
Citrix Workspace App (formerly Citrix Receiver)—any version that supports Citrix Virtual Apps and Desktops 7 1906, 1912, 2012, 2103, 2206.
VMware (on thin client)
VMware Horizon Client for Windows versions 5.0, 5.1, 5.2, 5.3, 5.5, or 2209.
Hardware
All thin clients that run Microsoft Windows 10, and that meet following minimum requirements:
-
Processor: AMD Embedded G-Series GX-420GI Radeon R7E 2.00GHz Cores 2
Memory: 4G
-
Processor: 6th Generation Intel Core i5-6500TE processor
Memory: 4G
Cisco-tested thin clients
-
HP t630
-
HP t640
-
HP t730
-
HP t740
-
Dell Optiplex 7060
-
Dell Wyse 5070
-
Lenovo ThinkCentre M710q
To deploy the Webex Meetings Virtual Desktop App, ensure that the following requirements are met:
Software in the data center
-
Microsoft Windows on the hosted virtual desktops (HVD):
- Windows 8
- Windows 10
-
Citrix Virtual Apps and Desktops 7 1906, 1912, 2012, 2103, 2206
XenApp is now known as Cirtix Virtual App and XenDesktop is known as Citrix Desktop.
This release supports only Citrix Desktop.
Citrix (on thin client)
Citrix Workspace App (formerly Citrix Receiver): any version that supports Citrix Virtual Apps and Desktops 7 1906, 1912, 2012, 2103, 2206
Hardware
All hardware thin clients that run Ubuntu 16.04 64–bit, and meet the following minimum requirements:
-
Processor: AMD Embedded G-Series GX-420GI Radeon R7E 2.00GHz Cores 2
Memory: 4G
-
Processor: 6th Generation Intel Core i5-6500TE processor
Memory: 4G
Cisco-tested thin clients
-
HP t630
-
HP t640
-
HP t730
-
HP t740
-
Dell Optiplex 7060
-
Dell Wyse 5070
-
Lenovo ThinkCentre M710q
To deploy the Webex Meetings Virtual Desktop App, ensure that the following requirements are met:
Software in the data center
-
Microsoft Windows on the hosted virtual desktops (HVD):
- Windows 8
- Windows 10
-
Citrix Virtual Apps and Desktops 7 1906, 1912, 2012, 2103, 2206
Citrix Virtual App is not supported.
Citrix (on thin client)
Citrix Workspace App (formerly Citrix Receiver): any version that supports Citrix Virtual Apps and Desktops 7 1906, 1912, 2012, 2103, 2206.
Recommended version: Citrix Receiver 4.12.0 and later.
Hardware
All hardware Thin Clients that run eLux 6.5.2000 64–bit, and meet the following minimum requirements:
-
Processor: AMD Embedded G-Series GX-420GI Radeon R7E 2.00GHz Cores 2
Memory: 4G
-
Processor: 6th Generation Intel Core i5-6500TE processor
Memory: 4G
Cisco-tested thin clients
-
HP t630
-
HP t730
-
HP t740
The Cisco Webex Meetings Virtual Desktop Plugin comes preinstalled for supported HP ThinPro, & Dell Wyse Thin OS versions.
Supported HP Thin Clients
HP t740 Thin Client
OS: ThinPro 7.1/ThinPro 7.2
CPU: AMD Ryzen Embedded V1756B with Radeon Vega Gfx, quad core 3.25GHz
Minimum Memory:4G
HP mt46 Mobile Thin Client
OS: ThinPro 7.1/ThinPro 7.2
CPU: AMD Ryzen 3 PRO 4450U with Radeon Graphics, quad core 2.50GHz
Minimum Memory: 8G
HP t640 Thin Client
OS: ThinPro 7.1/ThinPro 7.2
CPU: AMD Ryzen Embedded R1505G with Radeon Vega Gfx, dual core 2.40GHz
Minimum Memory:4G
HP mt22 Mobile Thin Client
OS: ThinPro 7.1/ThinPro 7.2
CPU: Intel(R) Celeron(R) CPU 5205U, dual core 1.90GHz
Minimum Memory:8G
HP t730 Thin Client
OS: ThinPro 7.1/ThinPro 7.2
CPU: AMD RX-427BB with AMD Radeon R7 Graphics, quad core 2.70GHz
Minimum Memory:4G
Dell Wyse 5070
- OS: Win10 IoT 64-bit LTSC 2019
- CPU: Intel Celeron™ J4105 (4 Cores/4MB/4T/up to 2.5GHz/10W)
- Minimum memory: 4GB 1x4GB, 2400MHz DDR
- 32 GB eMMC, on-board
Software in the data center
-
Microsoft Windows on the hosted virtual desktops (HVD):
- Windows 10
- Windows Server 2016
- Windows Server 2019
- Windows Server 2022
-
Citrix
- Citrix Virtual Apps and Desktops 7 CR 2209
- Citrix Virtual Apps and Desktops 7 2203 LTSR CU1
- Citrix Virtual Apps and Desktops 7 1912 LTSR CU6
- XenApp and XenDesktop (7.15 LTSR up to CU8)
-
VMware Horizon
- VMware Horizon 7 version 7.6, 7.7, 7.8, 7.9, 7.10 or 7.11
- VMware Horizon Agent 8 2111
- VMware Horizon HTML Access is not supported
Software on the endpoint
-
Citrix
- IGEL OS 11.04.100 or later / Citrix Workspace App 18.10.0.11 or later
-
VMware Horizon
- IGEL OS 11.04.100 or later / VMware Horizon Client 5.4.1-15988340 or later
-
Hardware
All hardware running IGEL OS 11.04.100 or later that meets the following minimum requirements:
- CPU: Any 64-bit x86 CPU (2 cores min. / 4 cores recommended)
- RAM: 2GB (4GB recommended)
- HDD / Flash: 2 GB (4 GB recommended)
- I/O ports: USB 2.0 (or later) for accessories (Headset, Webcam, etc.)
Test the Virtual Desktop Infrastructure (VDI) plugin
To test the VDI plugin for a few users, enable the native VDI feature by adding the following registry keys to their Hosted Virtual Desktops (HVD) (add both keys if you don't know if the Windows OS is 32-bit or 64-bit).
Key:
-
For 32-bit versions:
Computer\HKEY_LOCAL_MACHINE\SOFTWARE\WOW6432Node\Webex\NativeVDI -
For 64-bit versions:
Computer\HKEY_LOCAL_MACHINE\SOFTWARE\Webex\NativeVDI
Value:
| Name | Type | Data |
|---|---|---|
VDIFeatureEnabled
| REG_DWORD |
Others - Ignore |
Use this procedure to install the Webex Meetings Virtual Desktop software components.
Before you begin
Set up and test the Citrix or VMware connection between the thin clients and the hosted virtual desktops (HVD).
For more information about installation and configuration, see the documentation for your Citrix or VMware solution.
| 1 |
On the thin clients, install the Webex Meetings Virtual Desktop plugin. The Webex Meetings Virtual Desktop plugin is available for the following operating systems:
Follow the installation procedure for your thin client OS. The Webex Meetings Virtual Desktop plugin comes preinstalled for supported IGEL and Dell Wyse Thin OS versions. |
| 2 |
Install the Webex Meetings App on the Hosted Virtual Desktops (HVDs). |
Before you begin
Install or update your Citrix or VMware solution before you install the plugin.
| 1 |
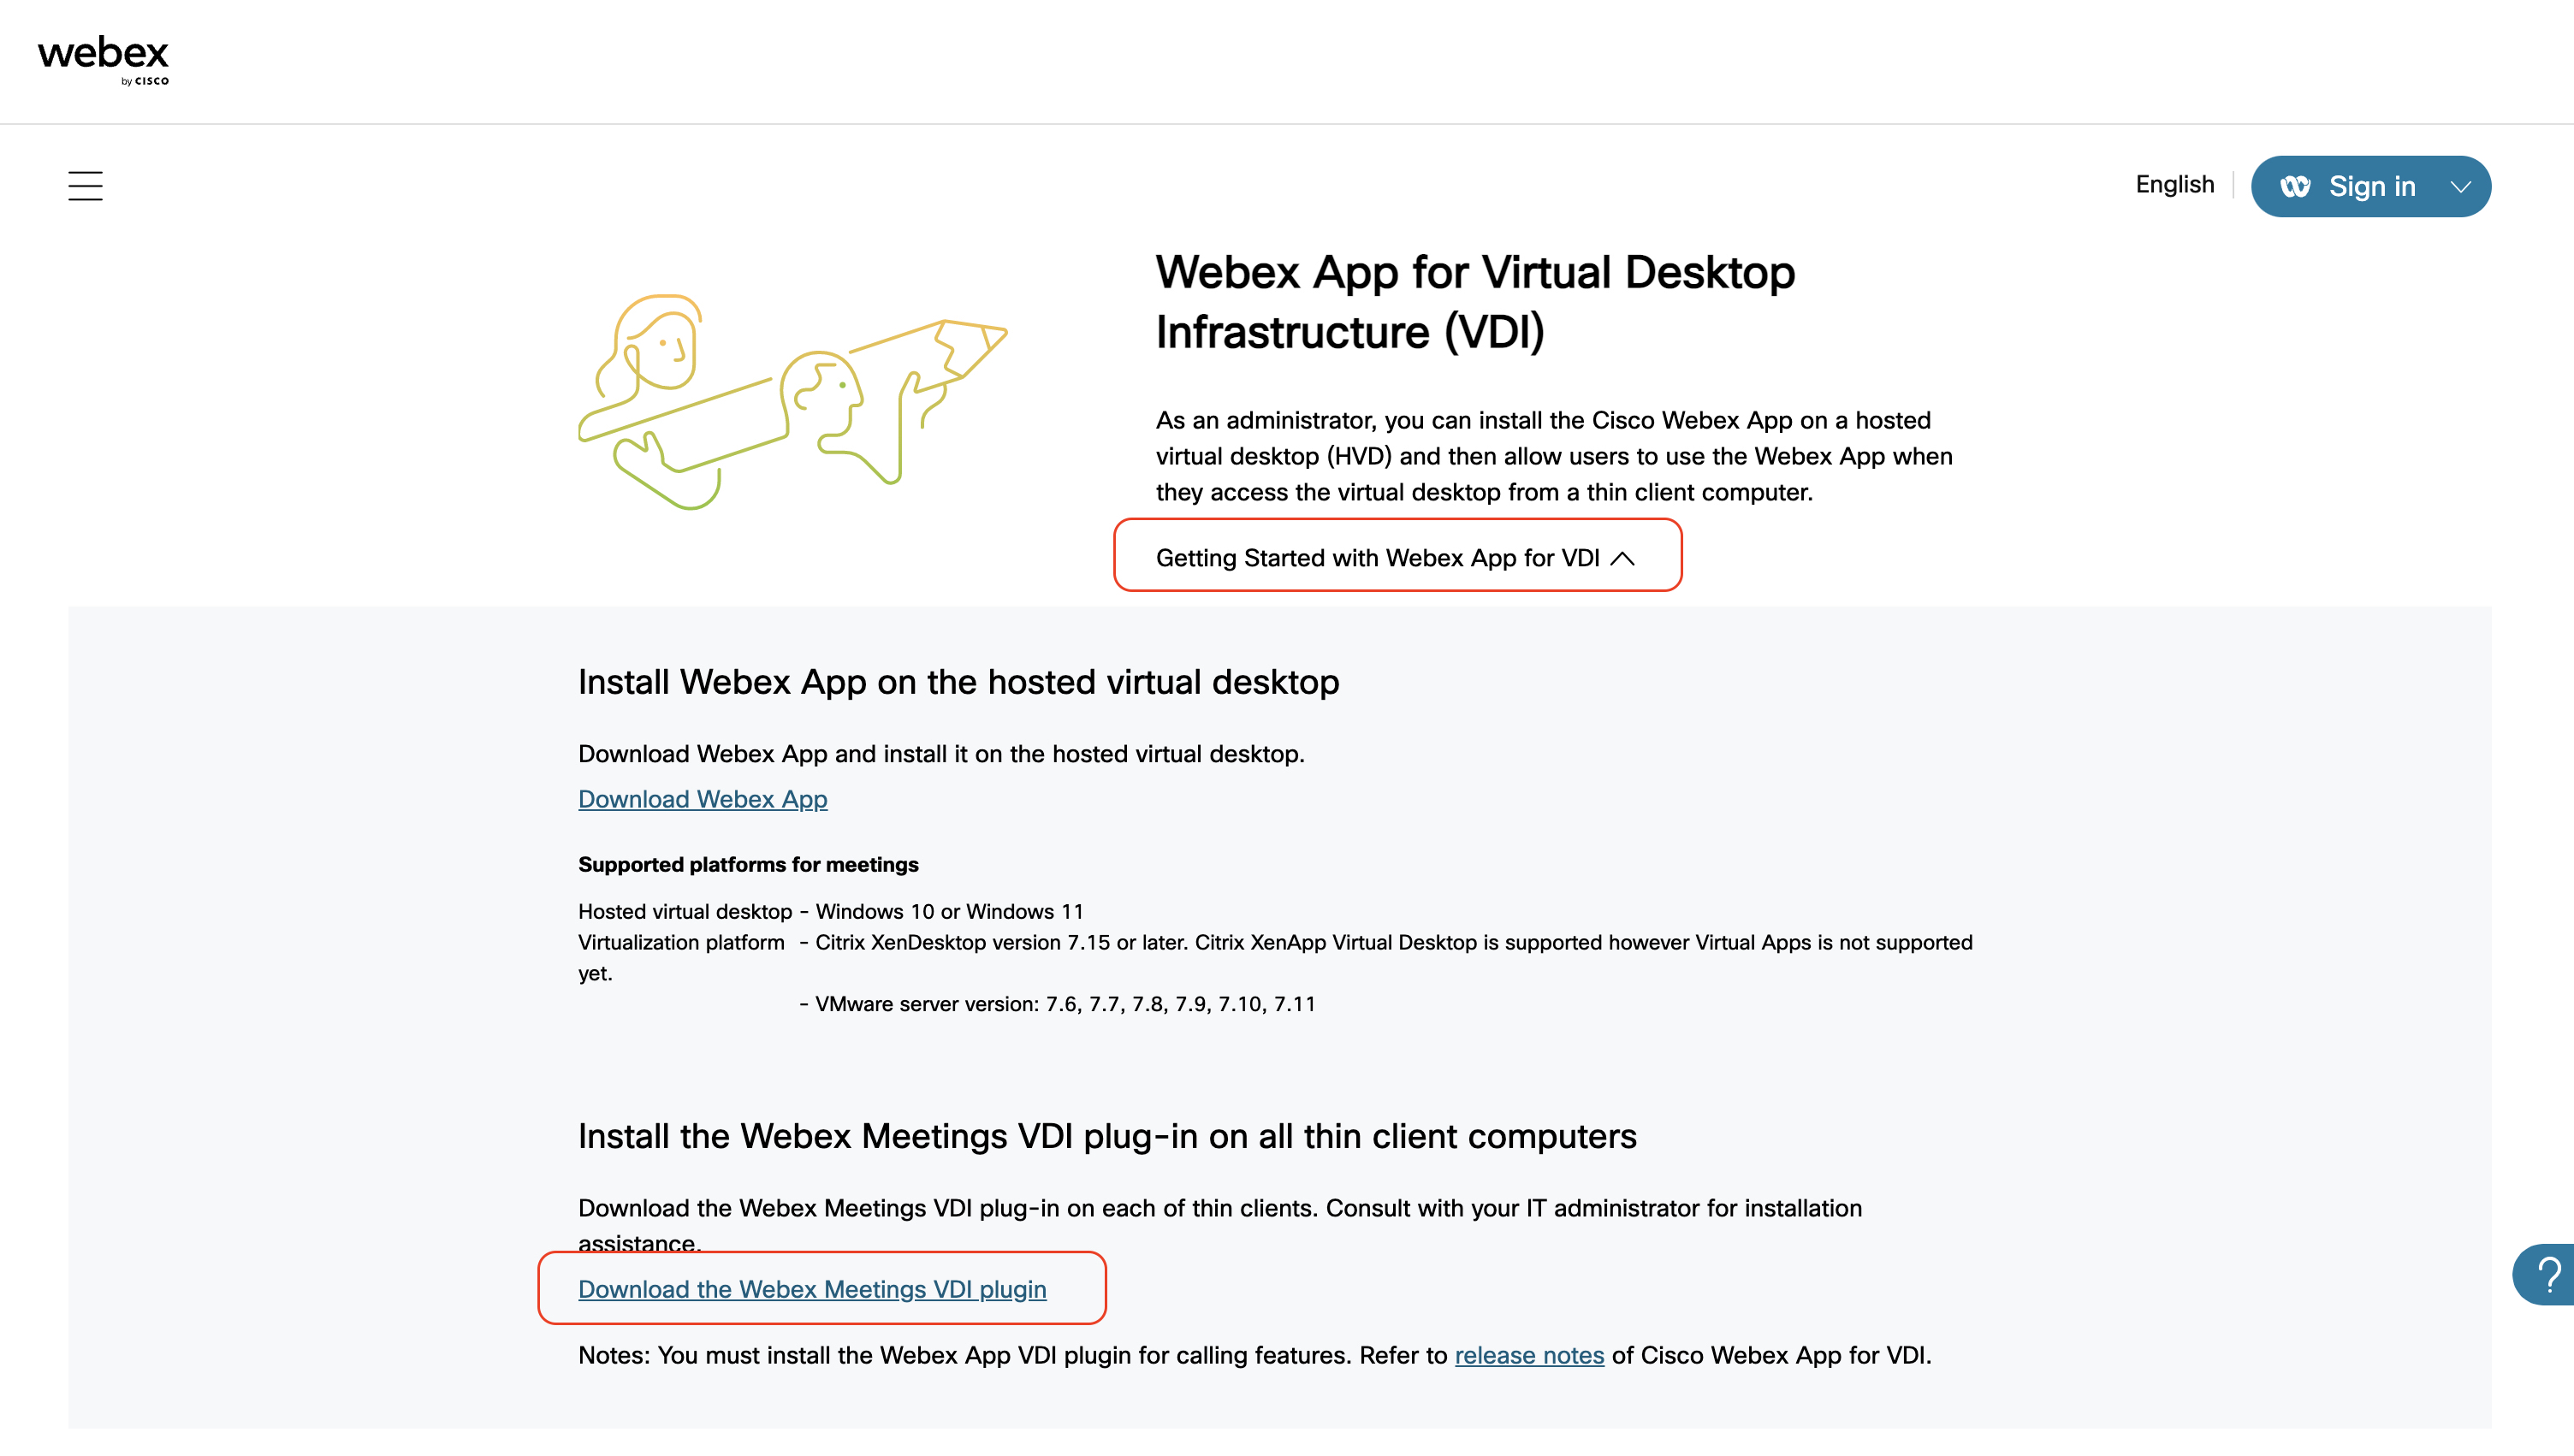
Download the Webex Meetings Virtual Desktop Plugin for Windows:
|
| 2 |
Install the plugin by double-clicking the The plugin is installed.
|
| 1 |
Download the Webex Meetings Virtual Desktop Plugin for Ubuntu.
Depending on your browser settings, the file downloads to the Downloads folder or to the folder of your choice. |
| 2 |
Extract the |
| 3 |
Double-click the |
| 4 |
Enter you user name and password and click Authenticate. After the system reboots, the newly-installed upgrade is ready to use. |
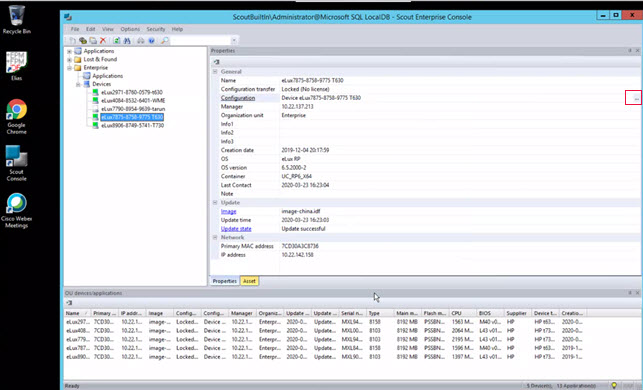
The follow procedure requires familiarity with Scout ELIAS. For more information about how to use Scout ELIAS, see the documentation available from Unicon eLux.
| 1 |
Download the Cisco Webex Meetings Virtual Desktop Plugin for eLux.
|
| 2 |
Extract the files from the downloaded zip archive. 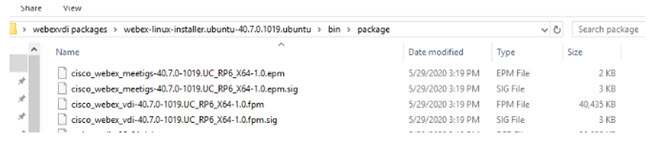
|
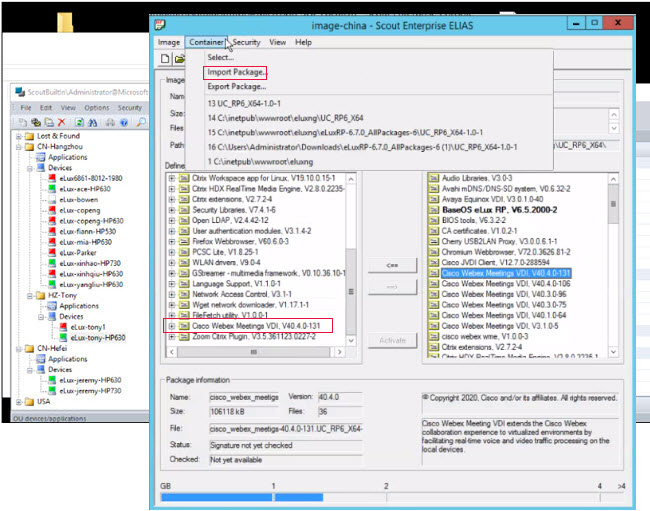
| 3 |
Import this package through Scout ELIAS.
|
| 4 |
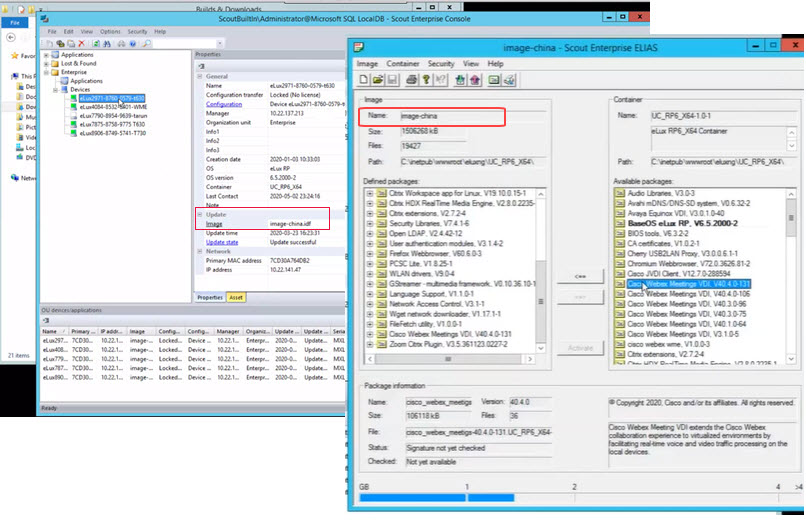
Select the Firmware tab and from the drop-down option select the Image file.
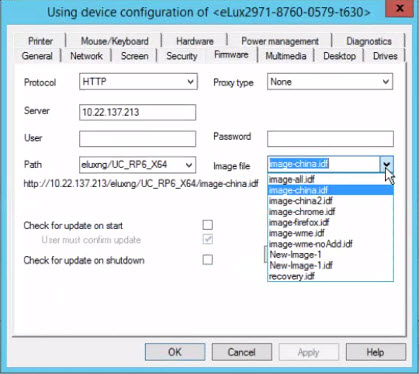 |
| 5 |
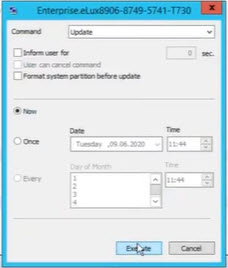
Configure your device in the Network, Security, Screen, Hardware, Power Management, and Multimedia tabs. The system restarts multiple times during this process. Ensure that you set the Network settings to Never Change. |
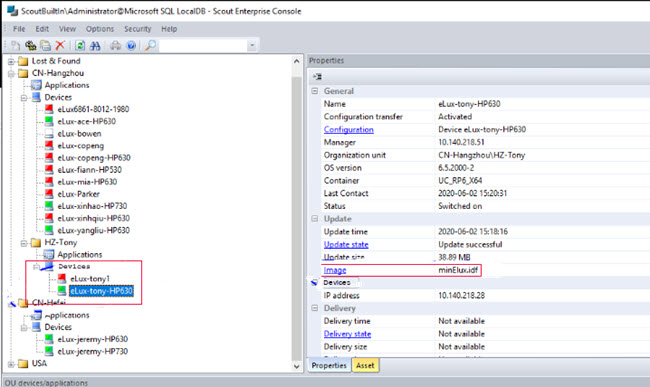
| 6 |
Select the eLux Device and click to send the firmware update through the Scout Console. |
| 7 |
Click Execute.
|
| 1 |
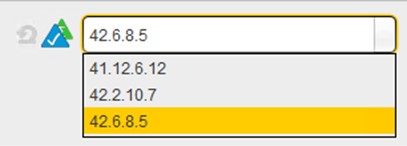
Deployment Since IGEL OS 11.06.100, each release of IGEL OS contains three different versions of the Cisco Webex Meetings VDI Client. These versions enable customers to switch to the appropriate Cisco Webex Meetings Client version if needed, if there is an update within the customers backend. In accordance with the N-7 compatibility rule for Webex Meetings VDI the containing VDI-client versions complement one another and empower IT to update the version of Cisco Webex Meetings on their servers and within their backend without having to deploy anything on your IGEL OS-based clients. |
| 2 |
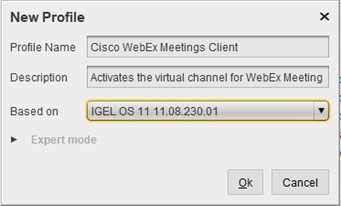
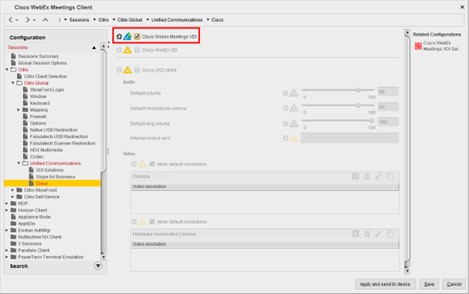
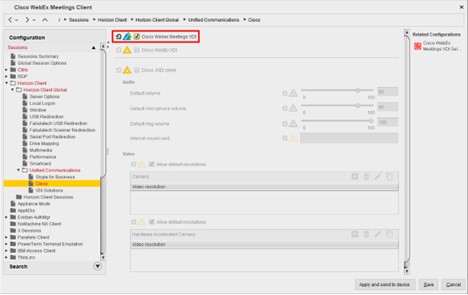
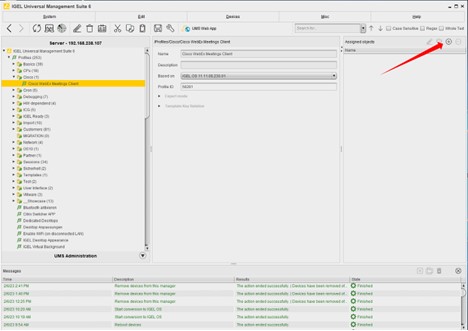
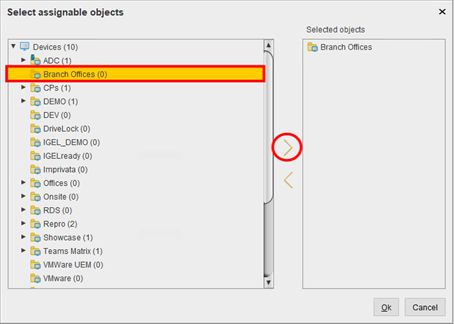
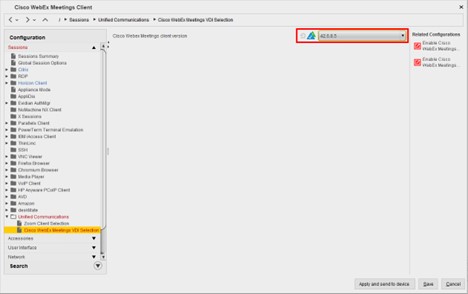
Configuration To enable Cisco Webex Meetings VDI on IGEL OS, create a new profile within the IGEL Universal Management Suite (UMS) or edit / update an already existing profile. Within the UMS console, expand IGEL Universal Management Suite 6, and right-click on Profiles. Then click on New Profile. 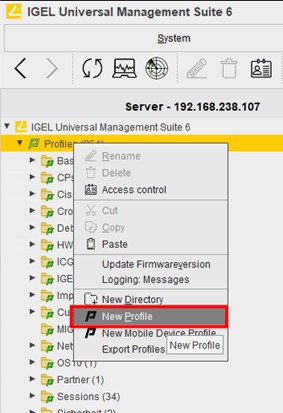
|
| 3 |
Determine Cisco Webex Meetings VDI Client version.
|
| 1 |
Download the Webex Meetings Virtual Desktop Plugin for HP Thinpro.
Depending on your browser settings, the file downloads to the Downloads folder or to the folder of your choice. |
| 2 |
Go to Start > Tools and open X Terminal. 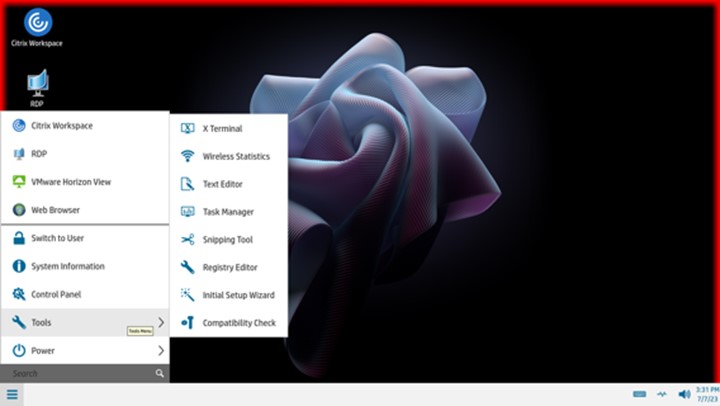
|
| 3 |
Go to the folder where you downloaded the file. |
| 4 |
Insert the command |
| 5 |
Insert the command 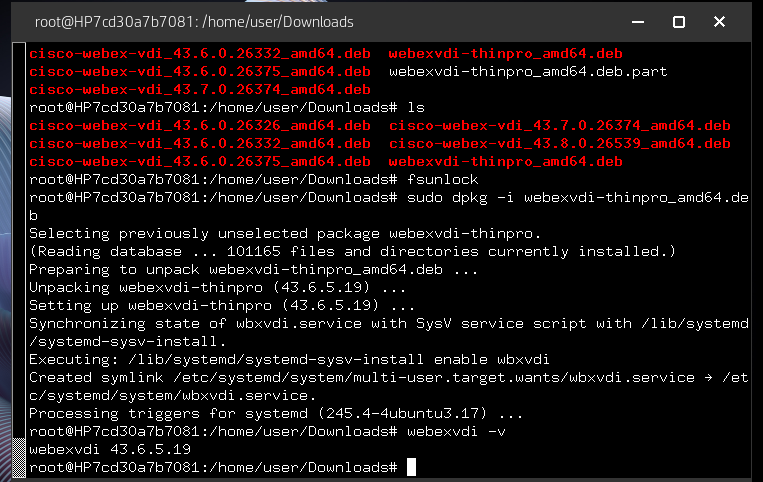 |
| 6 |
Launch Citrix Workspace or VMWare Horizon to use. |
| 1 |
Log in to the hosted virtual desktop (HVD). |
| 2 |
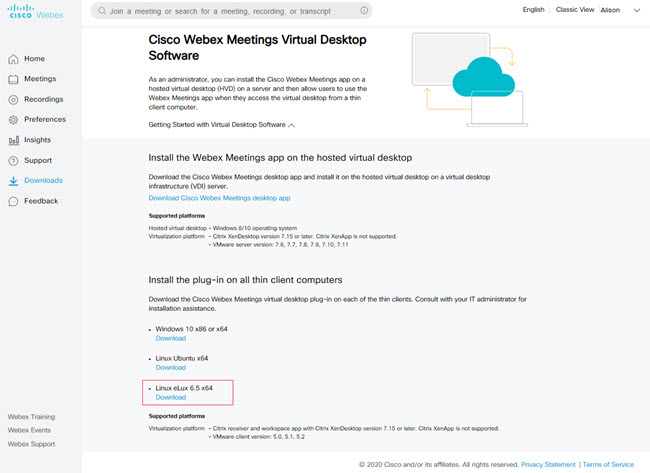
Download the Cisco Webex Meetings desktop app from your company website. |
| 3 |
Double-click the .msi file and follow the prompts to install the Meetings desktop app on the HVD. |
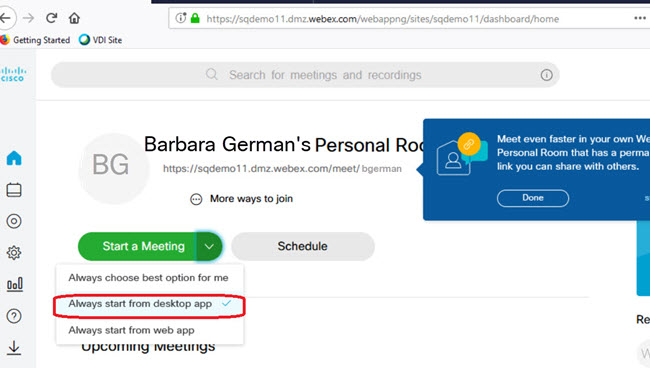
| 4 |
In the Personal Room, select the down arrow on the right side of the Start Meeting or Join Meeting button. |
| 5 |
Select Always start from desktop app to open the meeting in the virtual desktop app.
|
| 6 |
Select Start meeting or Join meeting to join in meeting.
 |
What to do next
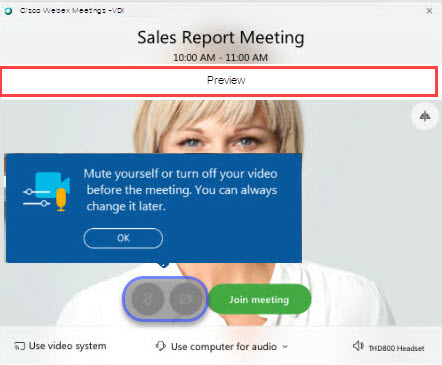
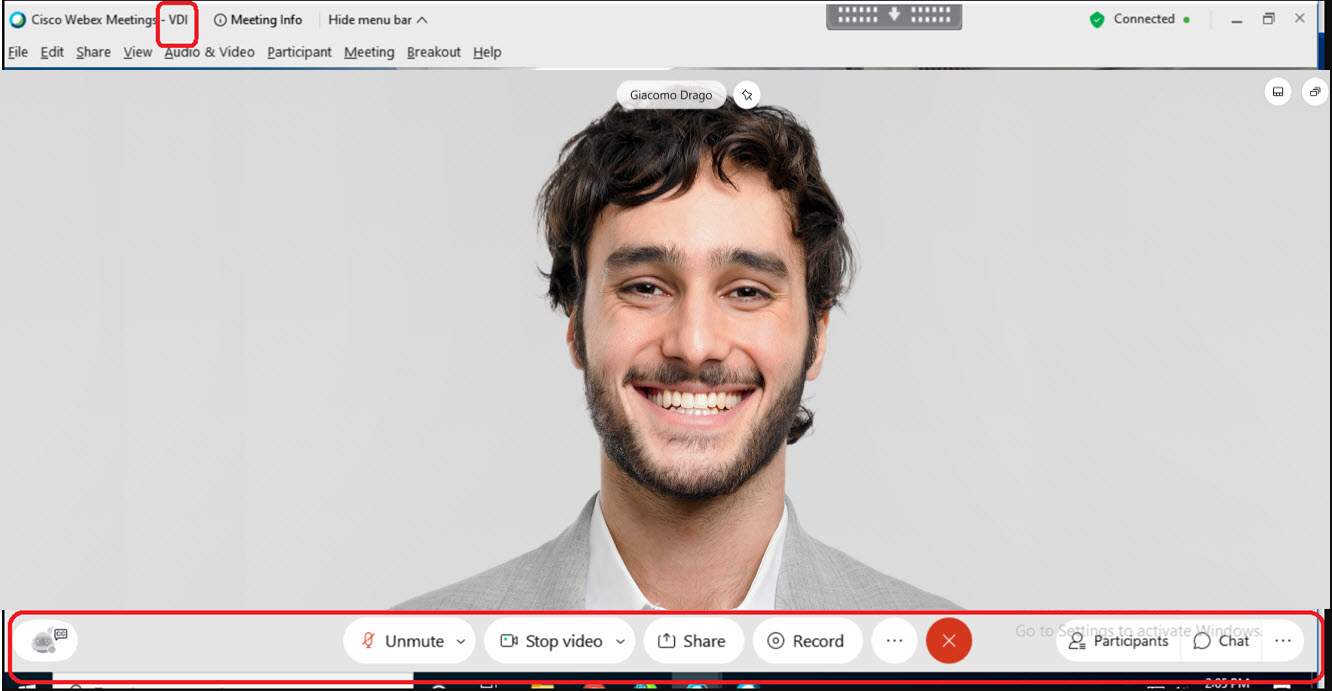
Start a meeting and check the title bar; for a VDI meeting, the title bar says Cisco Webex Meetings –VDI .
The Preview banner is solid white when you join using VDI. During the meeting, the action bar is fixed and not transparent, and it overlaps the video area.


