- Home
- /
- Article

Thanks for your feedback.


 In this article
 Feedback?
You can install a Custom Device Certificate (CDC) in a manual or automatic way. For certain environments, you can utilize DHCP option 43 to provide the SCEP parameters for the certificate installation. This Help article is for Cisco Desk Phone 9800 Series and Cisco Video Phone 8875 registered to Cisco BroadWorks.
Installation of Custom Device Certificate
To install a Custom Device Certificate (CDC) on your phone, use one of the following ways based on your situation:
The most recently installed certificate on the phone takes effect.
- Manual installation—you can install a certificate by uploading it from the phone administration web page. For details, see Manual installation of Custom Device Certificate by upload.
- Automatic installation—you can configure the Simple Certificate Enrollment Protocol (SCEP) parameters to trigger an automatic installation of a certificate. The phone sends SCEP requests to a SCEP server to install the certificate.
The SCEP parameters can be configured via the phone administration web page, the phone configuration file (cfg.xml) or Control Hub. For details, see Auto installation of Custom Device Certificate by SCEP and Parameters for phone settings on Control Hub.
- DHCP option 43—In certain environment, you can install a certificate by utilizing the DHCP option 43. The option 43 can provide the SCEP parameters for the certificate installation. For details, see SCEP parameters configuration via DHCP option 43.
-
When you use the DHCP option 43 for provisioning of SCEP parameters, the phone can also retrieve the domain name carried from the DHCP option 15. Based on the retrieved domain name, the phone can construct the SCEP CSR Common Name and 802.1X User ID. For details, see Provisioning of Common Name or User ID via DHCP option 15.
For more information about how to configure DHCP options, see Configure DHCP options.
-
Manual installation of Custom Device Certificate by upload
You can manually install a Custom Device Certificate (CDC) on the phone by uploading the certificate from the phone administration web page.
Before you begin
Before you can install a custom device certificate for a phone, you must have:
- A certificate file (.p12 or .pfx) saved on your PC. The file contains the certificate and private key.
- The extract password of the certificate. The password is used to decrypt the certificate file.
| 1 |
Access the phone administration web page. |
| 2 |
Select Certificate. |
| 3 |
In the Add Certificate section, click Browse.... |
| 4 |
Browse to the certificate on your PC. |
| 5 |
In the Extract password field, enter the certificate extract password. |
| 6 |
Click Upload. If the certificate file and password are correct, you will receive the message "
Certificate added.". Otherwise, the uploading fails with an error message indicating that the certificate can't be uploaded. |
| 7 |
To check details of the installed certificate, click View in the Existing Certificates section. |
| 8 |
To remove the installed certificate from the phone, click Delete in the Existing Certificates section. Once you click the button, the removal operation starts immediately without a confirmation. After the certificate is removed, the |
Auto installation of Custom Device Certificate by SCEP
You can configure the Simple Certificate Enrollment Protocol (SCEP) related parameters to interact with the SCEP server to install the Custom Device Certificate (CDC) automatically.
Once any of the SCEP parameters is configured, the phone will send an SCEP enrollment request to the server. The phone will validate the received CA certificate using the configured fingerprint.
Before you begin
Before you can perform an auto installation of a Custom Device Certificate (CDC) for a phone, you must have:
- SCEP server address
- SHA-1 or SHA-256 fingerprint of the root CA certificate for the SCEP server
| 1 |
Access the phone administration web page. |
| 2 |
Select Certificate. |
| 3 |
In the SCEP Configuration 1 section, set the parameters as described in Parameters for SCEP configuration . |
| 4 |
Click Submit All Changes. |
Parameters for SCEP configuration
The following table describes the function and usage of SCEP configuration parameters in the SCEP Configuration 1 section on the Certificate tab of the phone administration web page. It also includes the syntax of the strings that you add to the phone configuration file (cfg.xml) to configure a parameter.
Any change to these parameters causes the phone to request a new certificate.
| Parameter | Description |
|---|---|
| Server |
SCEP server address. This parameter is mandatory. Perform one of the following:
Valid values: A URL or IP address. The HTTPS scheme is not supported. Default: Empty |
| CA Fingerprint |
SHA256 or SHA1 fingerprint of the Root CA for validation during the SCEP process. This parameter is mandatory. Perform one of the following:
Default: Empty |
| Challenge Password |
The challenge password for Certificate Authority (CA) authorization against the phone during a certificate enrollment via SCEP. This parameter is optional. According to the actual SCEP environment, the behavior of challenge password varies.
Perform one of the following:
Default: Empty |
| Common Name |
Specifies the Common Name (CN) used as the identifier for the phone that requests the certificate. The CN is used for Certificate Signing Request (CSR) in the SCEP process. This parameter also supports macro expansion variables, see Macro expansion variables for details. Perform one of the following:
Valid Values: Maximum of 64 characters Default: Empty |
| Country Name |
Specifies the organization's country. Perform one of the following:
Valid Values: String of 0 to 2 characters Default: Empty |
| State or Province Name |
Specifies the organization's state or province. Perform one of the following:
Valid Values: String of 0 to 64 characters. Default: Empty |
| Locality Name |
Specifies the locality name for the certificate subject. Perform one of the following:
Valid Values: String of 0 to 64 characters Default: Empty |
| Organization Name |
Specifies the Certificate Signing Request (CSR) subject name. Perform one of the following:
Valid Values: String of 0 to 64 characters Default: Empty |
| Organizational Unit |
Specifies the organizational unit names for the Certificate Signing Request (CSR) subject name. Phone will add up to 5 "/OU=" parameters to the CSR Subject Name. Perform one of the following:
Valid Values: Each entry is a string array of 0 to 64 characters separated by a comma, with a maximum length of 512 characters. Up to 5 units can be specified. Default: Empty |
| SAN DNS |
Specifies the Domain Name Server (DNS) parameters for the Certificate Signing Request (CSR) Subject Alternative Name (SAN). Phone will add up to five DNS parameters to the CSR SAN. Perform one of the following:
Valid Values: Each entry is a string array of 0 to 64 characters separated by a comma, with a maximum length of 512 characters. Up to five DNS parameters can be specified. Default: Empty |
| SAN IP |
Specifies the IP parameters for the Certificate Signing Request (CSR) Subject Alternative Name (SAN). Phone will add up to five IP parameters to the CSR SAN. Perform one of the following:
Valid Values: Each entry is a string array of 0 to 64 characters separated by a comma, with a maximum length of 512 characters. Up to five IP parameters can be specified. Default: Empty |
| SAN Email |
Specifies the Email parameters for the Certificate Signing Request (CSR) Subject Alternative Name (SAN). Phone will add up to five Email parameters to the CSR SAN. Perform one of the following:
Valid Values: Each entry is a string array of 0 to 64 characters separated by a comma, with a maximum length of 512 characters. Up to five Email parameters can be specified. Default: Empty |
| SAN URI |
Specifies the URI parameters for the Certificate Signing Request (CSR) Subject Alternative Name (SAN). Phone will add up to five URI parameters to the CSR SAN. Perform one of the following:
Valid Values: Each entry is a string array of 0 to 64 characters separated by a comma, with a maximum length of 512 characters. Up to five URI parameters can be specified. Default: Empty |
Certificate renewal by SCEP
The device certificate can be refreshed automatically by the SCEP process.
- The phone checks whether the certificate will expire in 15 days every 4 hours. If so, the phone starts the certificate renewal process automatically.
- If the challenge password is empty, the phone uses MIC/SUDI for
both initial enrollment and certificate renewal. If the challenge password is configured,
it is used in the following cases:
-
When Reuse Challenge Password for Renewal is set to No (default), the phone uses the provided password only for initial enrollment and uses the existing certificate for renewal.
-
When Reuse Challenge Password for Renewal is set to Yes, the phone uses the provided password for both initial enrollment and renewal.
-
- The phone doesn't remove the old device certificate until it retrieves the new one.
- If certificate renewal fails because device certificate or CA expires, the phone triggers the initial enrollment automatically. In the meantime, if the challenge password authentication fails, a password input screen pops up on the phone screen, and users are prompted to enter the challenge password on the phone.
CDC Common Name configuration
By default, the Common Name in MIC/SUDI is used as the Common Name for CDC.
You can configure the Common Name for CDC when you install the certificate. Use one of the following methods to install a CDC on the phone:
-
Generate a Certificate Signing Request (CSR) that contains your desired Common Name, and then upload and install the new certificate on phone administration web page.
-
Configure the Common Name via the phone administration web page, phone configuration file (cfg.xml), or Control Hub. This will trigger the phone to request a new certificate automatically.
For more information about the parameters on phone web page and Control Hub, see Auto installation of Custom Device Certificate by SCEP and Parameters for phone settings on Control Hub.
- Utilize DHCP option 43 and 15 to provision Common Name for CDC and wired 802.1X identity.
For more information, see Provisioning of Common Name or User ID via DHCP option 15.
SCEP parameters configuration via DHCP option 43
In some environments, you can't install the Custom Device Certificate (CDC) by uploading it or directly configuring the SCEP parameters. In this situation, you can use DHCP option 43 to supply the SCEP parameters from a DHCP server to the phone. After the phone is reset to factory defaults, it receives the parameters from the DHCP server and installs the CDC using SCEP.
- This feature (SCEP parameters configuration via DHCP option 43) is available only for phones that have been reset to factory defaults.
- Don't deploy phones that rely on options 43 in a network that also uses remote provisioning (for example, Options 66,150, 159, and 160, or cloud provisioning). Otherwise, the phones might not receive the option 43 configurations.
To install a CDC certificate by the SCEP parameters provided from the DHCP option 43, do the following:
- Prepare an SCEP environment.
For information about SCEP environment setup, see your SCEP server documentation.
- Set up DHCP option 43 (defined in 8.4 Vendor Specific Information, RFC 2132).
Suboptions (10–15) are reserved for the method:
Parameter on phone web page Suboption Type Length (byte) Mandatory FIPS Mode 10 boolean 1 No* Server 11 string 208 - length (Challenge Password) Yes Root CA Fingerprint 12 hex 20, 32, 48 or 64 Yes Challenge Password 13 string 208 - length (Server) No* Enable 802.1X Authentication 14 boolean 1 No Certificate Select 15 unsigned 8-bit 1 No * means that the parameter is configured according to the actual situation.
When you use the DHCP option 43, notice the following characteristics of the method:
- Suboptions (10–15) are reserved for Custom Device Certificate (CDC).
- The maximum length of DHCP option 43 is 255 bytes.
- The maximum length of Server + Challenge Password must be less than 208 bytes.
- The value of FIPS Mode must match the onboarding provisioning configuration.
Otherwise, the phone fails to retrieve the previously installed certificate after
onboarding. Specifically,
- If the phone is registered to an environment where FIPS mode is disabled, you don't need to configure FIPS Mode in DHCP option 43. By default, the FIPS mode is disabled.
- If the phone is registered to an environment where FIPS mode is enabled, you must enable FIPS mode in DHCP option 43. See Enable FIPS mode for details.
- The challenge password in Option 43 is in clear text.
- To have the phone use MIC/SUDI for initial enrollment and certificate renewal, leave the challenge password empty.
- To use the challenge password only for initial enrollment, provide the challenge password and set Reuse Challenge Password for Renewal to No. In this case, the installed certificate is used for certificate renewal.
- To use the challenge password for both initial enrollment and renewal, provide the password and set Reuse Challenge Password for Renewal to Yes.
- Enable 802.1X Authentication and Certificate Select apply only to phones in wired networks.
- DHCP option 60 (Vendor Class Identifier) is used to identify the device model.
Example of DHCP option 43 (suboptions 10–15):
Suboption decimal/hex Value length (byte) decimal/hex Value Hex value 10/0a 1/01 1 (0: Disabled; 1: Enabled) 01 11/0b 18/12 http://10.79.57.91 687474703a2f2f31302e37392e35372e3931 12/0c 20/14 12040870625C5B755D73F5925285F8F5FF5D55AF 12040870625C5B755D73F5925285F8F5FF5D55AF 13/0d 16/10 D233CCF9B9952A15 44323333434346394239393532413135 14/0e 1/01 1 (0: No; 1: Yes) 01 15/0f 1/01 1 (0: Manufacturing installed; 1: Custom installed) 01 Summary of the parameter values:
-
FIPS Mode =
Enabled -
Server =
http://10.79.57.91 -
Root CA Fingerprint =
12040870625C5B755D73F5925285F8F5FF5D55AF -
Challenge Password =
D233CCF9B9952A15 -
Enable 802.1X Authentication =
Yes -
Certificate Select =
Custom installed
The syntax of the final hex value is:
{<suboption><length><value>}...According to the parameter values above, the final hex value is as the follows:
0a01010b12687474703a2f2f31302e37392e35372e39310c1412040870625C5B755D73F5925285F8F5FF5D55AF0d10443233334343463942393935324131350e01010f0101 - Configure DHCP option 43 on a DHCP server.
This step provides an example of the DHCP option 43 configurations on Cisco Network Register.
- Add DHCP option definition set.
The Vendor Option String is model name of the IP phones. The valid value is: DP-9841, DP-9851, DP-9861, DP-9871, or CP-8875.
- Add the DHCP option 43 and suboptions to the DHCP option definition set.
Example:
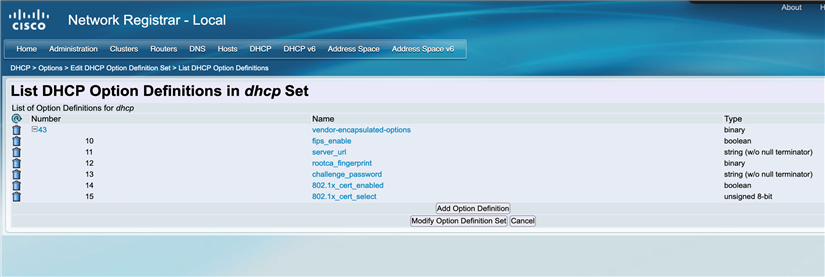
- Add options 43 to the DHCP policy and set up the value as follows:
Example:
(10 1)(11 http://10.79.57.91)(12 12040870625C5B755D73F5925285F8F5FF5D55AF)(13 D233CCF9B9952A15)(14 1)(15 1) - Verify the settings. You can use Wireshark to capture a trace of the network traffic between the phone and the service.
- Add DHCP option definition set.
- Factory reset the phone.
After the phone is reset, the parameters Server, Root CA Fingerprint, and Challenge Password are filled in automatically. These parameters are located in the SCEP Configuration 1 section under on the phone administration web page.
To view details of the installed certificate, click View in the Existing Certificates section.
To check the certificate installation status, select . The Download Status 1 field shows the latest result. If an issue occurs during the certificate enrollment, the download status shows the reason for troubleshooting purposes.
If challenge password authentication fails, the phone prompts users to enter the password on the phone screen.
- (Optional): To remove the installed certificate from the phone, click Delete in the Existing Certificates section.
When you click Delete, the phone removes the certificate immediately, without a confirmation prompt.
Provisioning of Common Name or User ID via DHCP option 15
During the SCEP certificate enrollment via the DHCP option 43, the phone can also get the domain name provided in the DHCP option 15 (if configured). After the phone receives the domain name, it can construct the Common Name or User ID with the domain name, which is represented as following:
- Common Name = <Common Name in MIC/SUDI >.<Domain Name in Option 15>
The Common Name will be used for CSR in SCEP process, and later it will be the Common Name in CDC.
- User ID = <Common Name in MIC/SUDI >@<Domain Name in Option 15>
The User ID will be used as the identity for wired 802.1X authentication.
For example, phone's MAC address is 00:1A:2B:3C:4D:5E, phone model is 9871:
| Domain name in DHCP option 15 | Common Name | User ID |
|---|---|---|
| example.nl | CP-9871-SEP001A2B3C4D5E.example.nl | CP-9871-SEP001A2B3C4D5E@example.nl |
| Empty | CP-9871-SEP001A2B3C4D5E |
CP-9871-SEP001A2B3C4D5E |
If domain name isn't configured in option 15, the Common Name and User ID will be the same with the Common Name in MIC/SUDI.


