- Home
- /
- Article

Thanks for your feedback.

 In this article
 Feedback?
You can ensure that people only sign in to Webex App using accounts from a predefined list of domains. Use a proxy server to intercept requests and limit the domains that are allowed.
Configure allowed domains
Use this task to configure your web proxy server to limit which account domains can sign in to Webex App from your corporate network. The proxy adds the CiscoSpark-Allowed-Domains HTTP header to Webex identity requests so that only accounts from the domains you specify can sign in. People who attempt to sign in from an unauthorized account receive an error.
This configuration also applies to guests who sign in while their traffic is routed through your corporate network.
Before you begin
-
Install a proxy server that can perform Transport Layer Security (TLS) interception, insert HTTP headers, and filter destinations using fully qualified domain names (FQDNs) or URLs.
The following tested proxy servers have configuration tasks in this article:
-
Cisco Web Security Appliance (WSA)
-
Blue Coat
-
-
To insert HTTP headers in HTTPS traffic, configure TLS interception on your proxy. See Network requirements for Webex services, and make sure that you meet the requirements for your proxy server.
| 1 |
Route all outbound traffic to Webex through your web proxy servers. |
| 2 |
Enable TLS interception on the proxy server. |
| 3 |
Configure the proxy server to intercept requests to: |
| 4 |
Add the |
| 5 |
Set the header value to the domains that are allowed to sign in, separated by commas. For example, to allow users from the example.com domain, add To allow users from multiple domains, add each domain to the same header value. For example: |
Configure allowed domains in Cisco WSA
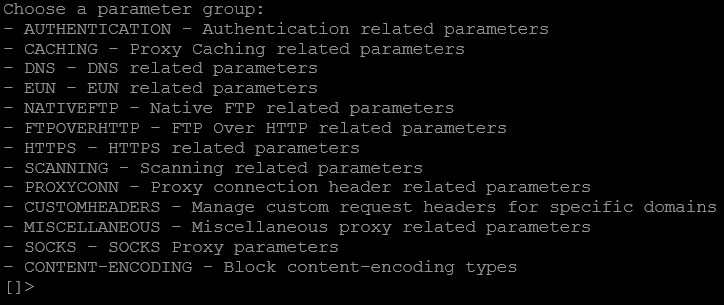
Use this task to add the CiscoSpark-Allowed-Domains custom header in the
Cisco Web Security Appliance (WSA) CLI. The header tells Webex which account domains are
allowed to sign in from your corporate network.
| 1 |
Access the WSA CLI. |
| 2 |
Enter |
| 3 |
Enter |
| 4 |
Enter |
| 5 |
Select Return, select Return again, and then enter |
Configure allowed domains in Blue Coat
Use this task to create a policy in Blue Coat Visual Policy Manager that intercepts TLS traffic and adds the CiscoSpark-Allowed-Domains header to Webex identity requests.
| 1 |
In Visual Policy Manager, select . |
| 2 |
Click Add rule, right-click the Action column, and select Set. |
| 3 |
Select , enter a name, and click OK. |
| 4 |
Select , and add |
| 5 |
Click Add rule, right-click the Destination column, and select Set. |
| 6 |
Select , and enter the Webex identity domains in Simple Match URL. Enter |
| 7 |
Click Add, click Close, and then click OK. |
| 8 |
Right-click the Action column, select Set, and create a Control Request Header action.
|
| 9 |
Click OK, click OK again, and then click Install Policy. |


