
Thanks for your feedback.
 Feedback?
-
Settings and their values are not currently localized in the users configured language.
-
Changing settings at the organization level applies to all locations.
-
For steps on how to customize settings for Cisco Video Phone 8875 and Cisco Desk Phone 9800 Series, see Configure phone settings on Control Hub.
| 1 |
Sign in to Control Hub. |
| 2 |
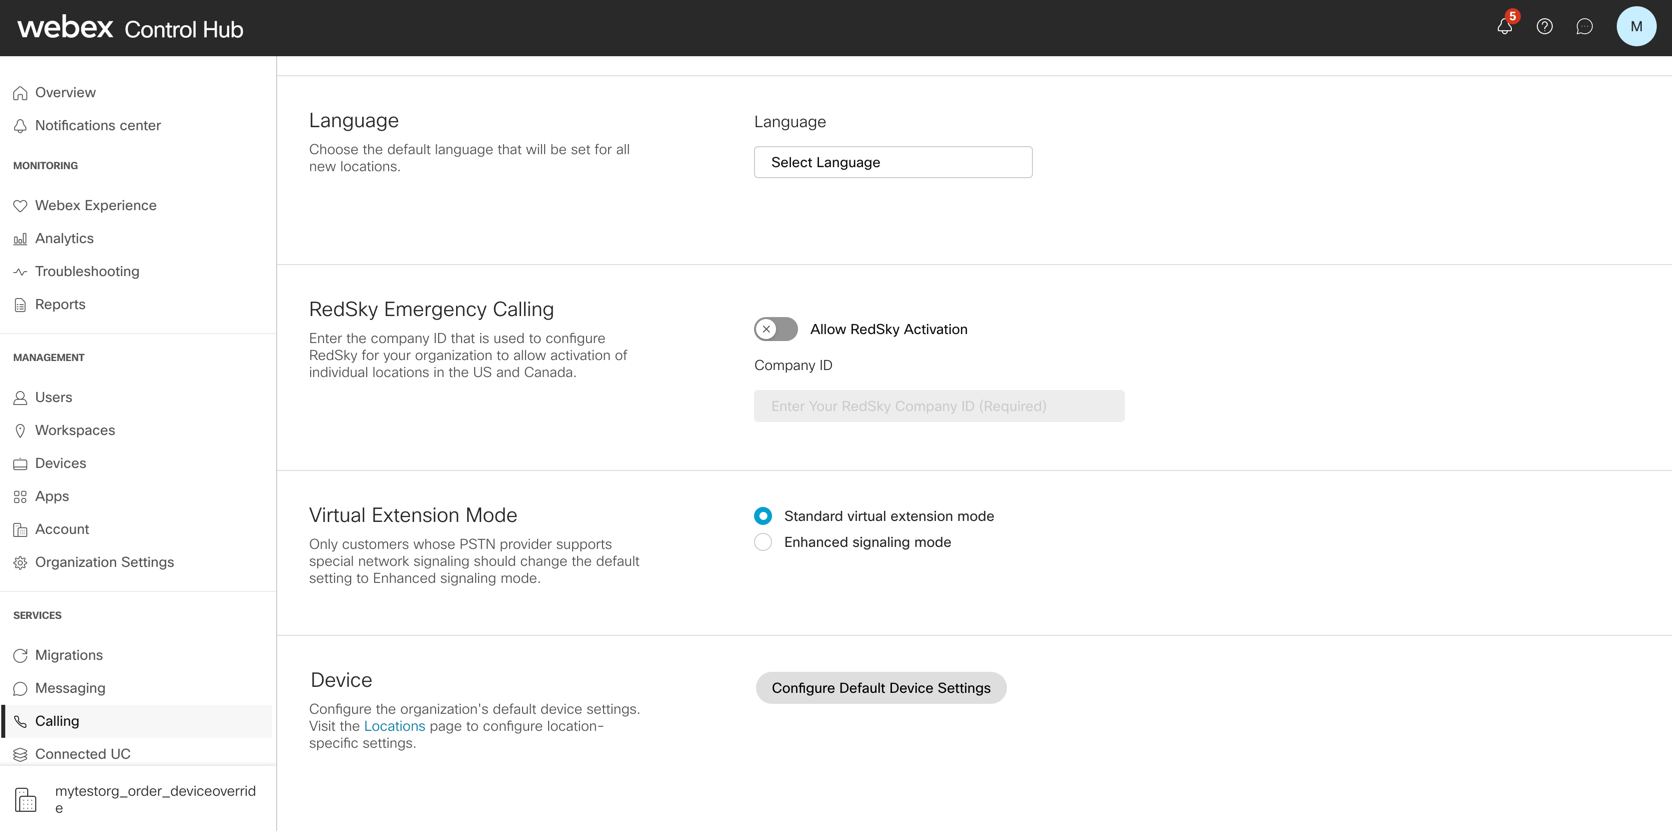
In the Services menu, go to |
| 3 |
In the Device section, click Configure Default Device Settings.
|
| 4 |
Select type of device from the drop-down menu, such as MPP, ATA, DECT or third-party devices. 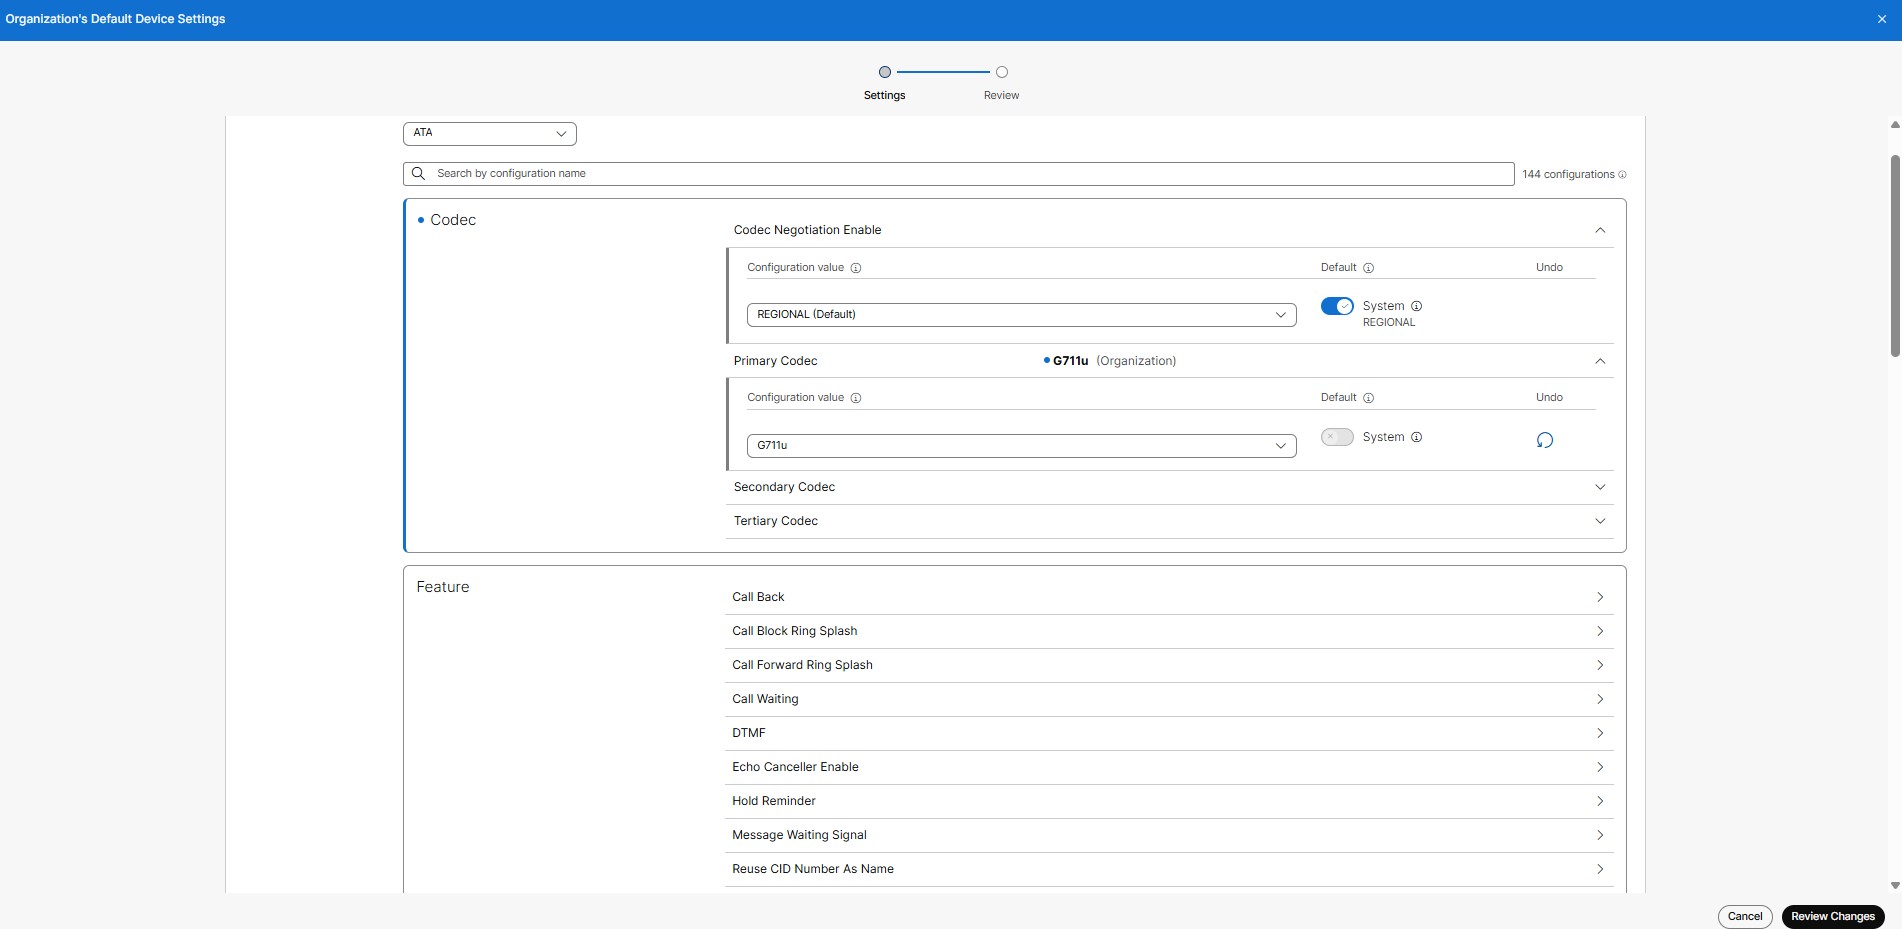
|
| 5 |
Update the required device settings and click Review changes . Use tooltip next to the setting to view its definition.
|
| 6 |
Click Start Processing. Devices with custom settings that override organization or location defaults will not be updated. Once the process begins, you can track progress on the Tasks page. Device settings will be locked until the update is complete. |
What to do next
After the process is completed, resync the devices from Control Hub, or have users resync their devices from the device settings menu for the changes to take effect.
-
Settings and their values are not currently localized in the users configured language.
-
Time and date are set by the location address and timezone selected. You can only configure time and date from the local device.
-
For steps on how to customize settings for Cisco Video Phone 8875 and Cisco Desk Phone 9800 Series, see Configure phone settings on Control Hub.
| 1 |
Sign in to Control Hub. |
| 2 |
Go to |
| 3 |
Select the location you want to update. |
| 4 |
Select the Calling tab, and click Manage next to Device management . 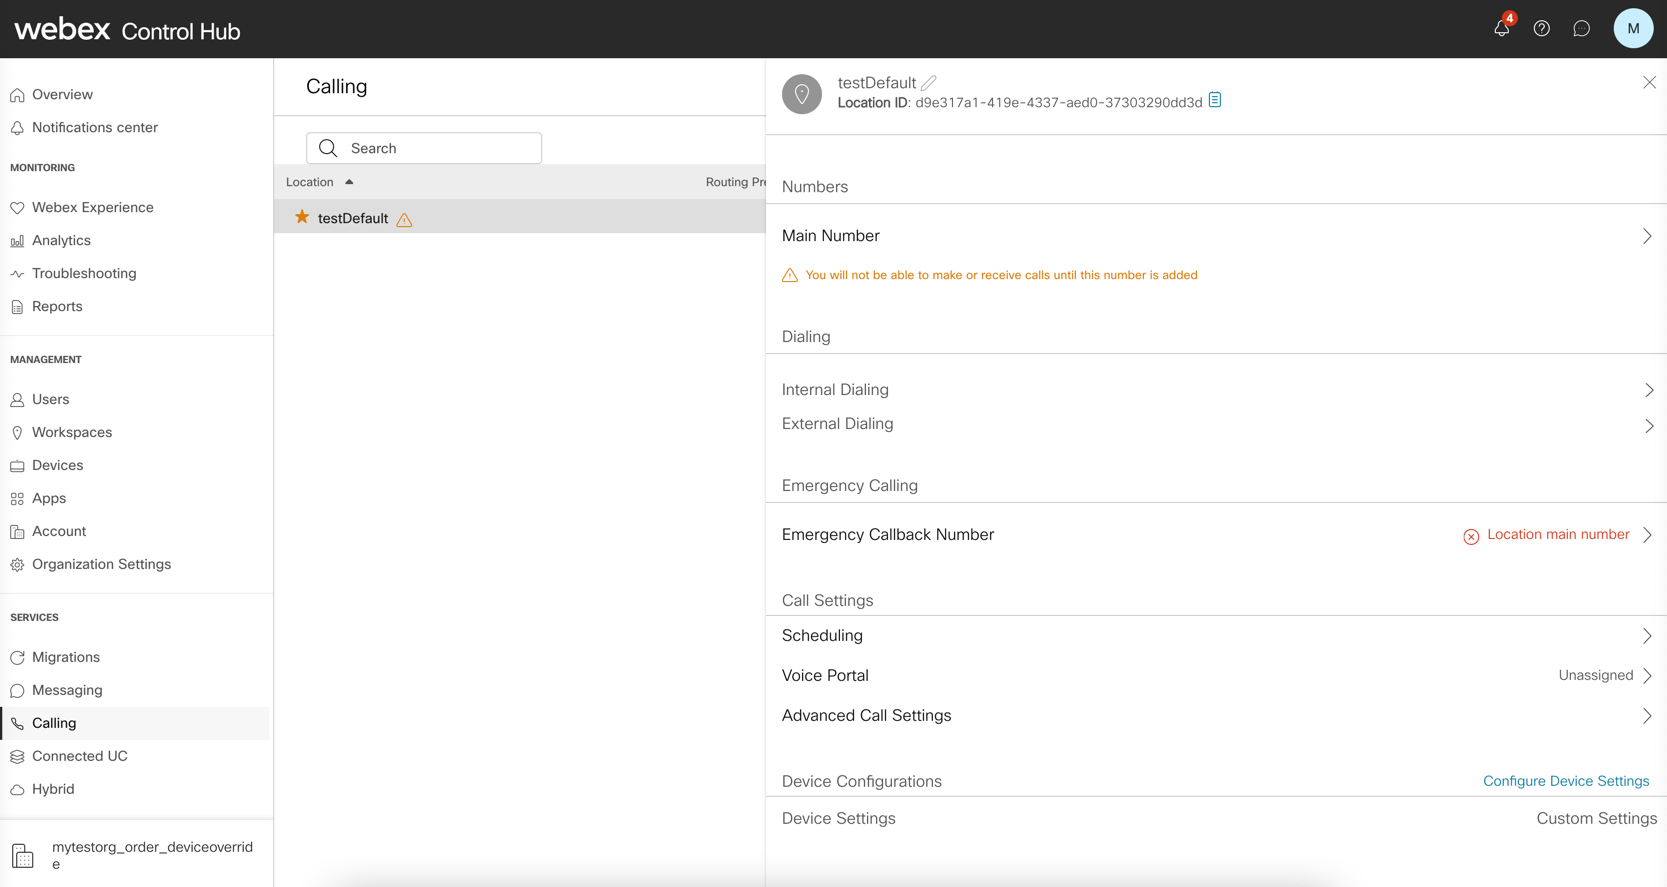
|
| 5 |
Select type of device from the drop-down menu, such as MPP, ATA, DECT or third-party devices.
|
| 6 |
Update the required device settings and click Review changes . Use tooltip next to the setting to view its definition.
|
| 7 |
Click Start Processing. Devices with custom settings that override organization or location defaults will not be updated. Once the process begins, you can track progress on the Tasks page. Device settings will be locked until the update is complete. |
What to do next
After the process is completed, resync the devices from Control Hub, or have users resync their devices from the device settings menu for the changes to take effect.
In Control Hub, configure settings on the device level for device modifications.
Control Hub configurations override manual configurations on devices.
Before you begin
-
Devices resync after business hours, with the configuration applied to the device.
-
Configuration to devices are only valid until the next scheduled resync.
-
Settings and their values are not currently localized in the users configured language.
-
Time and date are set by the location address and timezone selected. You can only configure time and date from the local device.
-
For steps on how to customize settings for Cisco Video Phone 8875 and Cisco Desk Phone 9800 Series, see Configure phone settings on Control Hub.
| 1 |
Sign in to Control Hub. |
| 2 |
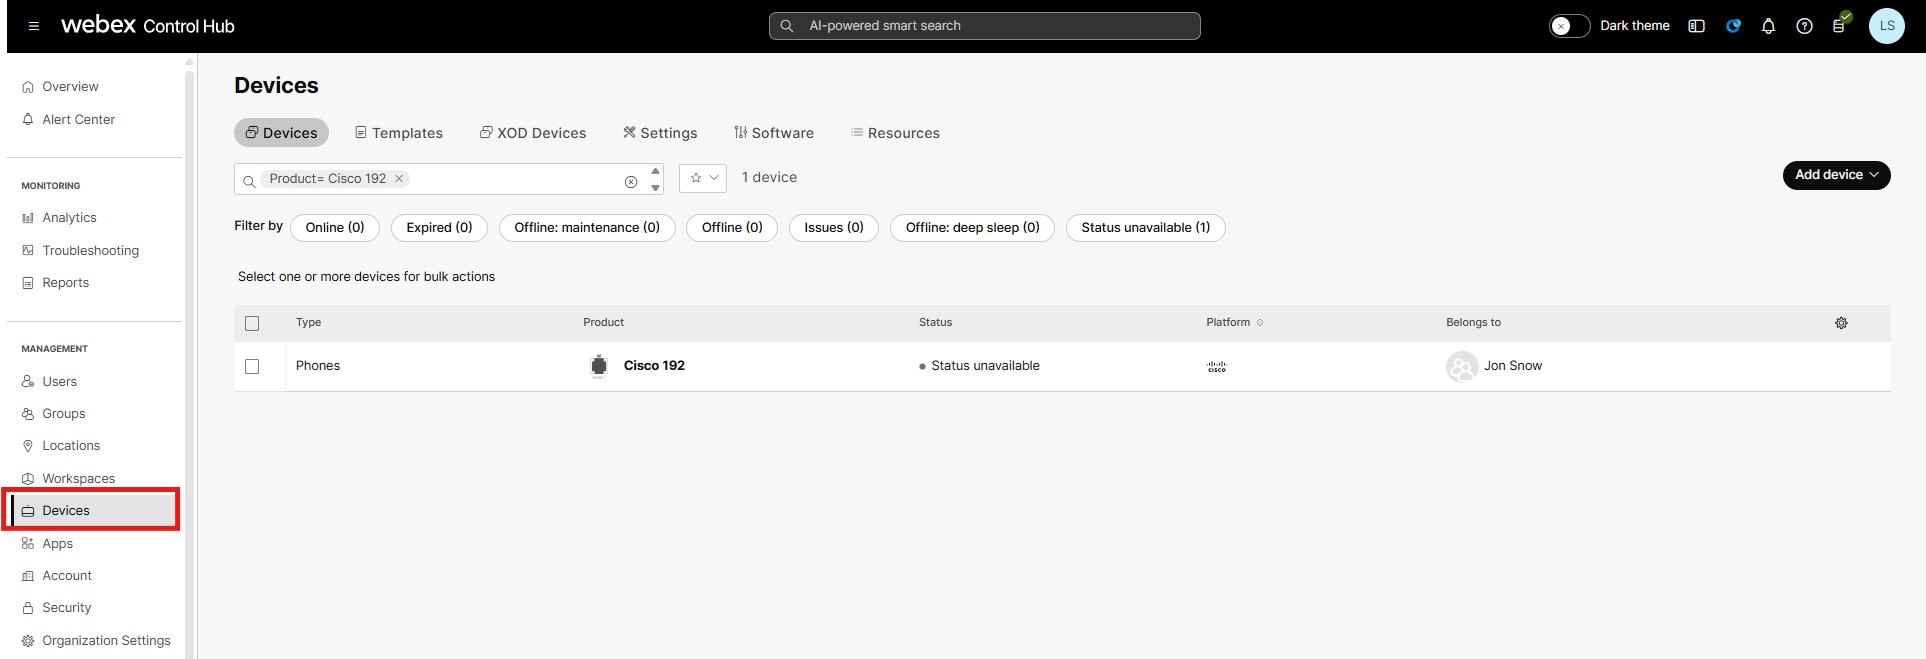
Go to , select the device you want to configure. You can search the required device by selecting status or giving search
criteria in the search drop-down.
 |
| 3 |
Click All Configurations. |
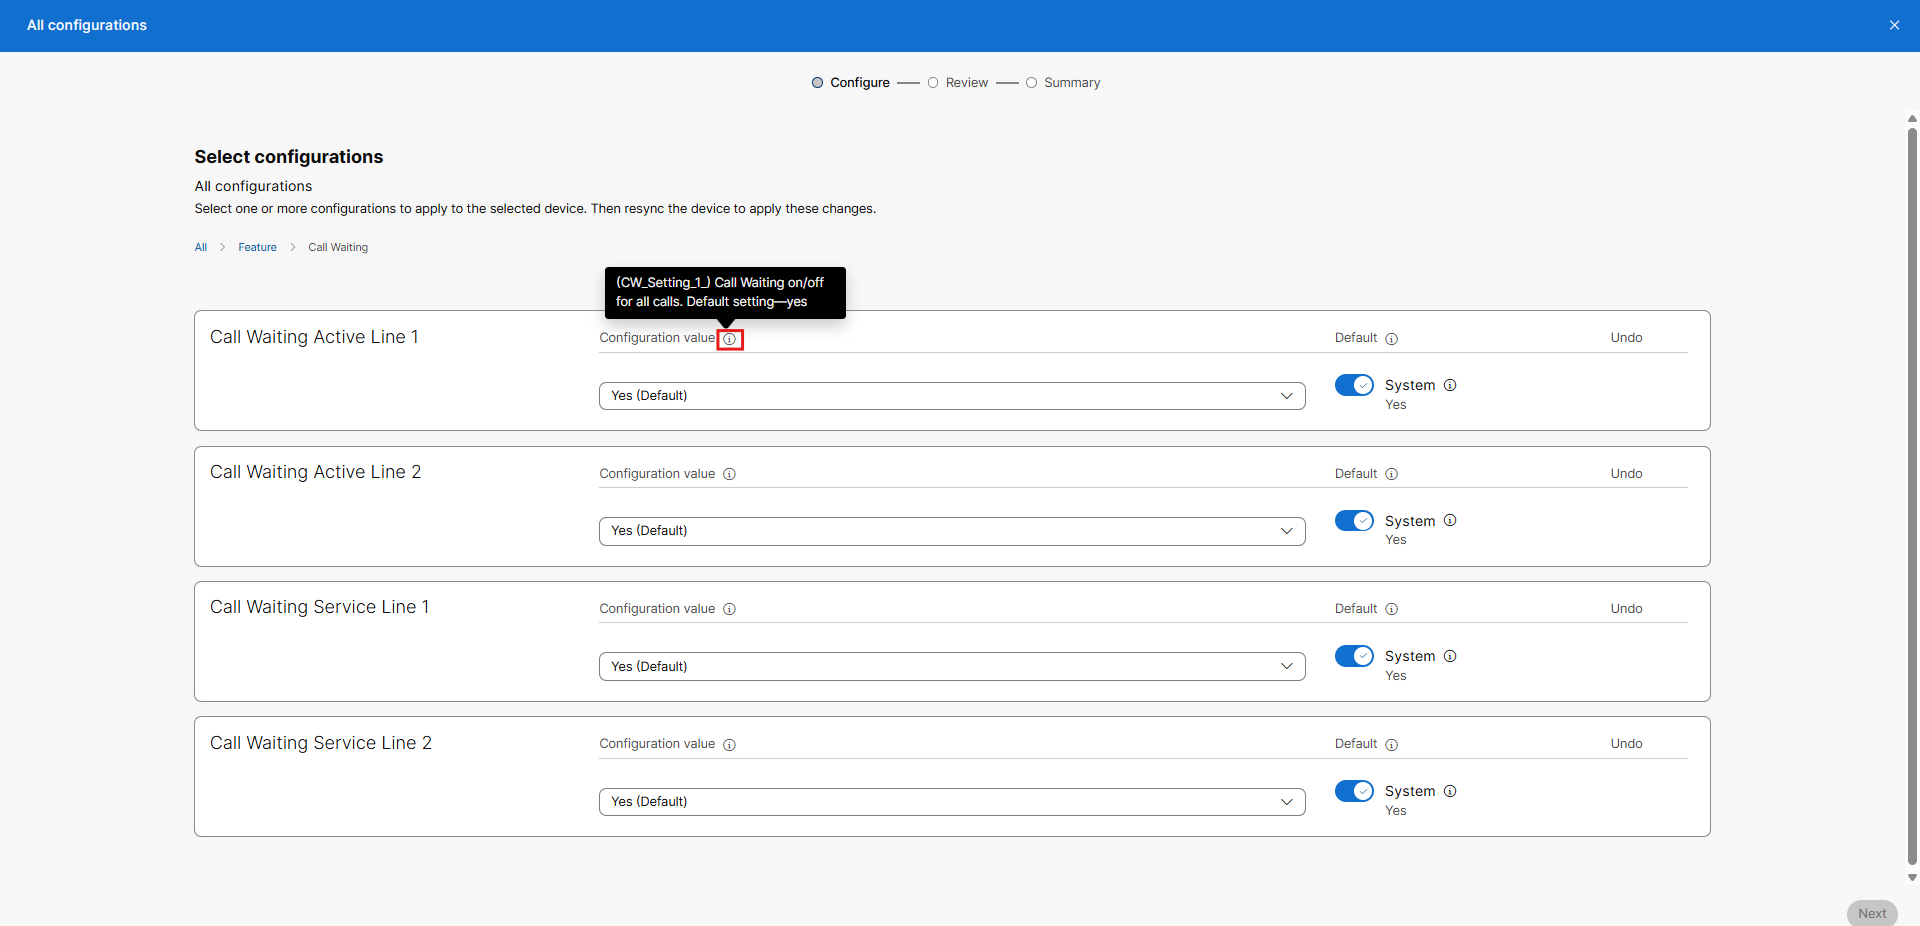
| 4 |
Configure the desired parameters in the respective device settings. In Search by configuration name field, select the
device setting from drop-down menu or enter the name of a specific device
setting that you want to configure.
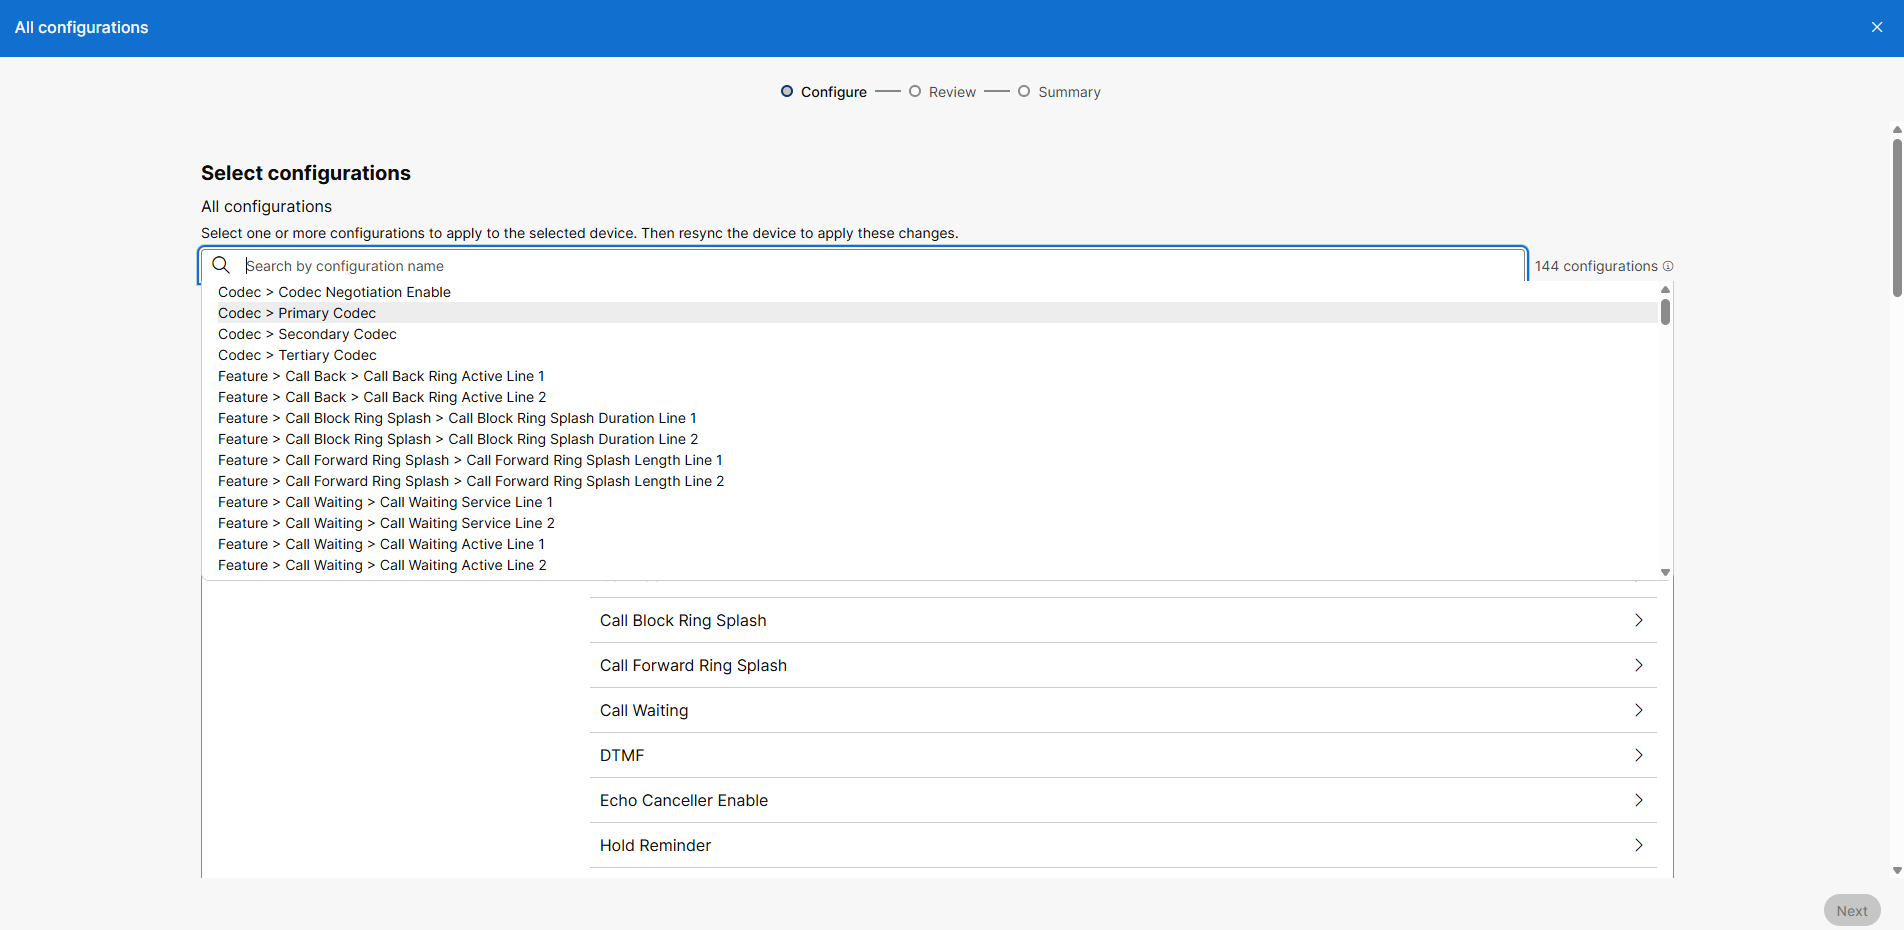
Use tooltip next to the setting to view its definition.
|
| 5 |
Click Next. |
| 6 |
On Review screen, check the configuration changes and click Apply. You can also click on Edit or
Delete icons, to take necessary action.
|
| 7 |
On Summary page, view the changes applied and click Done to close the page. |
| Type | Settings | Description |
|---|---|---|
| Codec |
Codec Negotiation Enable |
Enables Custom Codec Negotiation. Values are:
Set to CUSTOM in order to set primary, secondary, and tertiary tags. |
|
Primary Codec |
Select primary codec. WARNING - Primary, secondary, and tertiary codec cannot be the same values. Set Codec Negotiation Enable to CUSTOM in order to set primary, secondary, and tertiary tags. |
|
|
Secondary Codec |
Select secondary codec. WARNING - Primary, secondary, and tertiary codec cannot be the same values. Set Codec Negotiation Enable to CUSTOM in order to set primary, secondary, and tertiary tags. |
|
|
Tertiary Codec |
Select tertiary codec. WARNING - Primary, secondary, and tertiary codec cannot be the same values. Set Codec Negotiation Enable to CUSTOM in order to set primary, secondary, and tertiary tags. |
|
| Feature |
Call Back > Call Back Ring Active Line |
Ring pattern for call back notification. Default setting—7 |
|
Call Block Ring Splash |
Duration of ring splash when a call is blocked (0 – 10.0s) Default setting—0 |
|
|
Call Forward Ring Splash |
Duration of ring splash when a call is forwarded (0 – 10.0s) Default setting—0 |
|
|
Call Waiting |
Call Waiting on/off for all calls. Default setting—yes |
|
|
DTMF > DTMF Process AVT |
To use the DTMF process AVT feature, select yes. Otherwise, select no. Default setting—yes |
|
| DTMF > DTMF Transfer Mode |
DTMF Detection Tx Mode is available for SIP information and AVT. Options are: Strict or Normal. Default setting—Strict for which the following are true:
|
|
|
DTMF > DTMF Transfer Method |
Select the method to transmit DTMF signals to the far end: InBand, AVT, INFO, or Auto.
|
|
|
Echo Canceller Enable |
To enable the use of the echo canceller, select yes. Otherwise, select no. Default setting—yes |
|
|
Hold Reminder |
Ring pattern for reminder of a holding call when the phone is on-hook. Default setting—8 |
|
|
Message Waiting Signal |
Setting this value to yes can activate stutter tone and VMWI signal. This parameter is stored in long term memory and will survive after reboot or power cycle. Default setting—no |
|
|
Reuse CID Number As Name |
Use the Caller ID number as the caller name. Default settings: yes |
|
|
Silence Suppression Enable |
To enable silence suppression so that silent audio frames are not transmitted, select yes. Otherwise, select no. Default setting—no |
|
|
Silence Threshold |
Select the appropriate setting for the threshold: high, medium, or low. Default setting—medium |
|
|
Voice Mail > Ring On No New Voice Mail Line |
The parameter controls when a ring splash is played when a the VM server sends a SIP NOTIFY message to the ATA indicating the status of the subscriber's mail box. You can set voice mail line 1 and line 2. Following three settings are available:
Default setting—New VM Available |
|
|
Voice Mail > Voice Mail Waiting Indicator Refresh Interval |
Interval between VMWI refresh to the device. Range: 0–65535 seconds. Default setting—0 |
|
|
Voice Mail > Voice Mail Waiting Indicator Ring Policy Line |
Duration of ring splash when new messages arrive before the VMWI signal is applied (0 – 10.0s). Default setting—0 |
|
|
Voice Mail > Voice Mail Waiting Indicator Ring Splash Length Line |
Duration of ring splash when new messages arrive before the VMWI signal is applied (0 – 10.0s). Default setting—0 |
|
| Logging |
Debug Enable |
Enable debug level. |
|
Syslog Server |
The IP address (in dotted-decimal notation) of the computer you are using to run the Syslog server. |
|
|
Modules |
Value that indicates the debug flag of modules:
|
|
| Network |
Time Server |
IPv4 address or domain name of an NTP server. Valid inputs—IPv4 address or domain name Default—0.ciscosb.pool.ntp.org |
|
CDP ENABLE |
Enables or disables Cisco Discovery Protocol (CDP). Valid inputs are 0 and 1. 0 means that the CDP is disabled. 1 means that the CDP is enabled.
Misconfiguration could cause local devices to lose contact with the network. WARNING, setting this option incorrectly may cause devices to become disconnected from the network and require a local factory reset of the device to bring it back online. |
|
|
LLDP ENABLE |
Enables or disables Link Layer Discovery Protocol (LLDP) Valid inputs are 0 and 1. 0 means that the LLDP is disabled. 1 means that the LLDP is enabled.
Misconfiguration could cause local devices to lose contact with the network. WARNING, setting this option incorrectly may cause devices to become disconnected from the network and require a local factory reset of the device to bring it back online. |
|
|
Web Utility Access HTTP(S) |
Controls user level web access to the local device. |
|
|
Flow Control |
Enables or disables flow control. User Interface—Interface Setup > Advanced Settings > Port Setting page, Flow Control field. Values are: 0—Disabled and 1—Enabled Default—1 |
|
|
Speed Duplex |
The port speed and duplex mode. User Interface—Interface Setup > Advanced Settings > Port Setting page, Speed Duplex field. Values are: auto, 10h, 10f, 100h, and 100f. Default—auto Example—100 Mbps, half-duplex mode 100h |
|
|
QoS Enable |
Enable or disable the QOS tagging of packets from the local device to the Webex Calling platform. |
|
|
Jitter > Jitter Buffer Line |
Choose yes to enable or no to disable this feature. Default setting—yes |
|
|
Jitter > Jitter Level Line |
Determines how jitter buffer size is adjusted by the ATA. Jitter buffer size is adjusted dynamically. The minimum jitter buffer size is 30 milliseconds or (10 milliseconds + current RTP frame size), whichever is larger, for all jitter level settings. However, the starting jitter buffer size value is larger for higher jitter levels. This setting controls the rate at which the jitter buffer size is adjusted to reach the minimum. Select the appropriate setting: low, medium, high, very high, or extremely high. There are Jitter Level Line 1 and 2. Default setting—high |
|
|
Modem |
Enable an alternate method to make the modem call without Modem Line Toggle Code pre-dialing. Default setting: 0 |
|
|
RTP > RTP CoS Value |
CoS value for RTP data. Valid values are 0 through 7. Default setting—6. |
|
|
RTP > RTP TOS DiffServ Value |
ToS/DiffServ field value in IP packets carrying RTP data. Default setting: 0xb8 |
|
|
SIP > Refer Target Bye Delay Line |
The number of seconds to wait before sending a BYE to the refer target to terminate a stale call leg after a call transfer. |
|
|
SIP > Referee Bye Delay Line |
The number of seconds to wait before sending a BYE to the referee to terminate a stale call leg after a call transfer. |
|
|
SIP > Referor Bye Delay Line |
The number of seconds to wait before sending a BYE to the referrer to terminate a stale call leg after a call transfer. |
|
|
SIP > SIP CoS Value |
CoS value for SIP messages. Valid values are 0 through 7. Default setting—3 |
|
|
SIP > SIP TOS DiffServ Value |
TOS/DiffServ field value in IP packets carrying a SIP message. Default setting: 0x68 |
|
|
SNMP > Auth Password |
Password for SNMPv3 authentication. User Interface—Administration > Management > SNMP page, Auth-Password field for SNMPv3. Valid inputs—string. Default—1111111111. Example—MyPassword. |
|
|
SNMP > Auth Protocol |
SNMPv3 authentication protocol User Interface—Administration > Management > SNMP page, SNMPV3 section, Auth-Protocol field Valid inputs are: MD5 and SHA. Default—MD5. Example—SHA enabled SHA. |
|
|
SNMP > Get Community Authentication |
A community string for authentication for SNMP GET commands. User Interface—Administration > Management > SNMP page, SNMP section, Get/Trap Community field. |
|
|
SNMP > Set Community Authentication |
A community string for authentication for SNMP GET commands. User Interface—Administration > Management > SNMP page, SNMP section, Set Community field. |
|
|
SNMP > Privacy Password |
Privacy authentication protocol for SNMPv3. User Interface—Administration > Management > SNMP page, SNMPV3 section, privprotocol field. Valid inputs are: None and DES. Default—DES. Example—DES enabled DES. |
|
|
SNMP > Privacy Password |
Privacy authentication password for SNMPv3. User Interface—Administration > Management > SNMP page, SNMPV3 section, Privacy Password field Valid inputs—string Default—1111111111 Example MyPrivacyPassword |
|
|
SNMP > SNMP Enabled |
Enables or disables SNMP User Interface—Administration > Management > SNMP page, SNMP section, Enabled and Disabled options. Valid inputs are: 0—Disabled and 1—Enabled. |
|
|
SNMP > SNMP Trusted IP |
Trusted v4 IP address that can access the ATA through SNMP. User Interface—Administration > Management > SNMP page, SNMP section, Trusted IP field. Valid inputs—IPv4 address and subnet mask in this order: 0.0.0.0/0.0.0.0. |
|
|
SNMP > SNMP User |
A username for SNMP authentication. User Interface—Administration > Management > SNMP page, SNMPV3 section, R/W User field. Valid inputs—username Default—v3rwuser Example—MyUsername |
|
|
SNMP > SNMPV3 |
User Interface—Administration > Management > SNMP page, SNMPV3 section, Enable and Disable fields. Valid inputs are: 0—Disabled and 1—Enabled |
|
|
SNMP > TRAP > TRAP IP Address |
The IP Address of the SNMP manager or trap agent. User Interface—Administration > Management > SNMP page, Trap Configuration section, IP Address field. Valid inputs—IPv4 address Default—192.168.15.100 Example—209.165.202.129 |
|
|
SNMP > TRAP > TRAP Port |
The SNMP trap port used by the SNMP manager or trap agent to receive the trap messages. User Interface—Administration > Management > SNMP page, Trap Configuration section, Port field Valid inputs—162 or 1025~65535 Default—162 |
|
|
SNMP > TRAP > TRANP SNMP Version |
The SNMP version in use by the SNMP manager or trap agent. User Interface—Administration > Management > SNMP page, Trap Configuration section, SNMP Version field. Valid inputs—One of the SNMP version number listed below:
Default—v1 |
|
|
VLAN > WAN VLAN ID |
A number that identifies the VLAN. User Interface—NetworkSetup > AdvancedSettings > VLAN page, VLAN ID field. Valid inputs are—1~4094.
Setting this parameter incorrectly may cause devices to become disconnected from the network and require a local factory reset of the device to bring it back online. |
|
|
VLAN > WAN VLAN Enable |
Enables or disables a VLAN on your network. User Interface—NetworkSetup > AdvancedSettings > VLAN page, Enable VLAN field Valid inputs are: 0—Disabled and 1—Enabled. |
|
| Phone settings |
Callee On Hook Delay |
This is the on-hook time required before the analog telephone adapter will tear down the current inbound call. The range is 0 seconds to 255 seconds. |
|
Reorder Delay |
Delay after far end hangs up before reorder tone is played.
|
|
|
Call Back Expires |
Expiration time in seconds of a call back activation. Range: 0–65535 seconds. Default setting—1800 |
|
|
Call Back Retry Interval |
Call back retry interval in seconds. Range: 0–255 seconds. Default setting—30 |
|
|
Call Back Delay |
Delay after receiving the first SIP 18x response before declaring the remote end is ringing. If a busy response is received during this time, the ATA still considers the call as failed and keeps on retrying. Range: 0–65 seconds Default setting—0.5 |
|
|
Interdigit Short Timer |
Short timeout between entering digits when dialing. The Interdigit_Short_Timer is used after any one digit, if at least one matching sequence is complete as dialed, but more dialed digits would match other as yet incomplete sequences. Range: 0–64 seconds. Default setting—3 |
|
|
FXS Port Impedance |
Sets the electrical impedance of the PHONE port. Choices are: 600, 900, 600+2.16uF, 900+2.16uF, 270+750 |
|
|
Interdigit Long Timer |
Long timeout between entering digits when dialing. The interdigit timer values are used as defaults when dialing. The Interdigit_Long_Timer is used after any one digit, if all valid matching sequences in the dial plan are incomplete as dialed. Range: 0–64 seconds. |
|
|
MAC Address Clone Enabled |
Enables or disables MAC address cloning. User Interface—InterfaceSetup > AdvancedSettings > MAC Address Clone page, MAC Clone field Values are: 0—Disabled and 1—Enabled. Default—0 Example—MAC clone enabled 1 |
|
|
Nightly Resync |
Allows the automatic nightly configuration resync of the MPP device to be disabled.
By disabling the nightly resync, any configuration changes to the phone will not be applied unless a manual Apply Changes request is issued from Control Hub or if the phone is manually rebooted. |
|
|
Hook Flash > Hook Flash Timer Minimum |
Minimum on-hook time before off-hook qualifies as hook flash. Less than this the onhook event is ignored. Range: 0.1–0.4 seconds. Default setting—0.1 |
|
|
Hook Flash > Hook Flash Timer Maximum |
Maximum on-hook time before off-hook qualifies as hook flash. More than this the onhook event is treated as on hook (no hookflash event) Range: 0.4–1.6 seconds. Default setting—0.9 |
|
|
Polarity > Callee Connected Polarity Line |
Polarity after an inbound call is connected: Forward or Reverse. Default setting—Forward |
|
|
Polarity > Caller Connected Polarity Line |
Polarity after an outbound call is connected: Forward orReverse. Default setting—Forward. |
|
|
Polarity > Idle Polarity Line |
Polarity before a call is connected: Forward or Reverse. Default setting—Forward |
|
| Ring |
Ring Voltage |
Ringing voltage. Choices are 60–90 (V) |
|
Ring Waveform |
Waveform for the ringing signal. Choices are Sinusoid or Trapezoid. Default setting—Sinusoid |
|
| Security |
Custom CA |
The URL of a file location for a custom Certificate Authority (CA) certificate. Either the IP address or the FQDN of the server can be specified. The file name can have macros, such as $MA, which expands to the ATA MAC address. Default setting—blank. |
|
Custom CA URL |
The URL of a file location for a custom Certificate Authority (CA) certificate. Either the IP address or the FQDN of the server can be specified. The file name can have macros, such as $MA, which expands to the ATA MAC address. |
|
|
Conference Act Code |
If this code is specified, the user must enter it before dialing the third party for a conference call. Enter the code for a conference call. Default setting—blank. |
|
| Tone |
Call Forward Dial Tone |
Played when all calls are forwarded. Default setting—350@-5,440@-5;2(.2/.2/1+2);10(*/0/1+2) |
|
Holding Tone |
Informs the local caller that the far end has placed the call on hold. Default setting—600@-5;*(.1/.1/1,.1/.1/1,.1/9.5/1) |
|
|
Secure Call Indication Tone |
Played when a call has been successfully switched to secure mode. It should be played only for a short while (less than 30 seconds) and at a reduced level (less than -19 dBm) so it does not interfere with the conversation. Default setting—397@-5,507@-5;15(0/2/0,.2/.1/1,.1/2.1/2) |
|
|
Feature Invocation Tone |
Played when a feature is implemented. Default setting—350@-4;*(.1/.1/1) |
|
|
Call Remind Tone |
The holding tone is played on the Phone ports during the active call to remind you of the held call. Default setting: blank |
|
|
Conference Tone |
Played to all parties when a three-way conference call is in progress. Default setting—350@-5;20(.1/.1/1,.1/9.7/1) |
|
|
Dial Tone |
Prompts the user to enter a phone number. Reorder Tone is played automatically when Dial Tone or any of its alternatives times out. Default setting—350@-5,440@-5;10(*/0/1+2) |
|
|
Busy Tone |
Played when a 486 RSC is received for an outbound call. Default setting—480@-5,620@-5;10(.5/.5/1+2) |
|
|
Reorder Tone |
Played when an outbound call has failed, or after the far end hangs up during an established call. Reorder Tone is played automatically when Dial Tone or any of its alternatives times out. Default setting—480@-5,620@-5;10(.25/.25/1+2) |
|
|
MWI Dial Tone |
Played instead of the Dial Tone when there are unheard messages in the caller's mailbox. Default setting—350@-5,440@-5;2(.1/.1/1+2);10(*/0/1+2) |
|
|
Cadence > Ring Cadence |
Cadence script for distinctive ring. There are Ring Cadence from ring 1 to ring 8. Default setting—60(0.25/9.75) |
|
|
Cadence > CWT |
Cadence script for distinctive CWT. There are CWT 1 to CWT 8 cadence. Default setting—30(.3/9.7) |
|
|
Ring Back |
Played during an outbound call when the far end is ringing. Default setting: 440@-19,480@-19;*(2/4/1+2) |
|
|
SIT |
Alternative to the Reorder Tone played when an error occurs as a caller makes an outbound call. The RSC to trigger this tone is configurable on the SIP screen. There are SIT 1 and SIT 2 tones. Default setting—985@-4,1428@-4,1777@-4;20(.380/0/1,.380/0/2,.380/0/3,0/4/0) |
In the Default Value column of the following settings table, some parameters are listed
with Empty as default value. If a parameter hasn’t been previously
configured from Webex or the device CLI command, it uses the device’s factory default
value. If the parameter is configured before, either from Webex or the device CLI, the
parameter with an Empty value retains the last configured valid
value.
|
Settings |
Default value |
Description |
|---|---|---|
|
Preferred Codec |
G711u or G711a |
This parameter specifies the primary codec that the Voice Gateway (VG4xx ATA) should use for audio compression and transmission during calls. The preferred codec is chosen based on its balance of audio quality and bandwidth usage (for example, G.711, G.729). If the preferred codec is unavailable, the device may fall back to secondary codecs if configured.
The Preferred Codec is based on per region. So the default system Tag value reflects what region they are in as its a Per Region Tag. For example, USA location preferred codecs are :
For UK or Europe location Preferred codecs are :
|
|
Second Preferred Codec |
G711u or G711a |
This parameter specifies the second-choice codec that the Voice Gateway (VG4xx ATA) should use for audio compression and transmission during calls. If the primary (preferred) codec is unavailable, it is used as a fallback option. This ensures continued call functionality with an alternative codec that maintains a balance between audio quality and bandwidth efficiency. |
|
Third Preferred Codec |
G729a |
This parameter specifies the third-choice codec that the Voice Gateway (VG4xx ATA) should use for audio compression and transmission during calls. It acts as a fallback option if both the primary (Preferred_Codec_1_) and secondary (Second_Preferred_Codec_1_) codecs are unavailable. This ensures robust codec selection to maintain communication in diverse network conditions. |
|
Settings | Default value |
Description |
|---|---|---|
|
Time Server |
IPv4 address or domain name of an NTP server. Valid inputs—IPv4 address or domain name | |
|
Web > Enable protocol |
|
Enables Valid inputs— |
|
Web > Enable Web Server |
Yes |
Enables access to the VG4xx ATA's web interface. Set this parameter to Yes by default to allow users or administrators to access the VG4xx ATA's web interface. |
|
Settings | Default value |
Description |
|---|---|---|
|
Modem passthrough |
Empty |
This is a system level setting to implicitly enable or disable the NSE-based Modem Passthrough feature on Voice Gateway (VG4xx ATA) based on the VBD Codec of G711ulaw, G711alaw, or none being passed as an input. Valid inputs—G711ulaw, G711alaw, or Empty |
|
Settings | Default value |
Description |
|---|---|---|
|
Phone settings > Modem Passthrough |
Empty |
This is a port or extension level setting to implicitly enable or disable NSE-based Modem Passthrough feature on Voice Gateway (VG4xx ATA) based on the VBD Codec of G711ulaw or G711alaw or none being passed as an input. Valid inputs—G711ulaw, G711alaw, or Empty |
|
Phone settings > Interdigit Timeout |
4 |
This is a port or extension level setting that allows the user to configure the number of seconds for which the system waits (after the caller inputs the initial digit) for the caller to input a subsequent digit of the dialed digits. Valid inputs—0–120 seconds |
|
Phone settings > Initial Timeout |
Empty |
This is a port or extension level setting that allows the user to configure the initial timeout which is the time to wait for the first digit after the user picks up the phone or goes off-hook. Valid inputs—0–120 seconds |
|
Phone settings > Call Disconnect Timeout |
Empty |
This is a port or extension level setting that allows the user to configure the time for which the voice port remains connected after the Calling party stop responding. Valid inputs—0–120 seconds or infinity |
|
Phone settings > Power Denial Timeout |
Empty |
This is a port or extension level setting that allows the user to set the duration of the power denial that the Voice Gateway (VG4xx ATA) applies to the FXS port when a call disconnects. During the power denial duration, the caller hears silence. Valid inputs—0-2500 |
|
Phone settings > Ringing Timeout |
Empty |
This is a port or extension level setting on the Voice Gateway(VG4xx ATA) that allows the user to set the timeout duration for the ringing of an incoming call. This setting governs how long the phone rings before considering the call unanswered. Valid inputs—5-60000 or infinity |
|
Phone settings > Wait Release Timeout |
Empty |
This is a port or extension level setting on the Voice Gateway(VG4xx ATA) that allows the user to set the timeout duration to wait for a call to fully release after disconnection. Applicable during call termination scenarios where resources need to be freed up. Valid inputs—1-3600 or infinity |
|
Phone settings > DTMF Duration |
Empty |
This is a port or extension level setting on the Voice Gateway(VG4xx ATA) that allows the user to set the dual-tone multi-frequency (DTMF) digit signal duration for handling individual digits entered during dialing at the designated voice port. Valid inputs—50-5000 |
|
Phone settings > Interdigit Timing |
Empty |
This is a port or extension level setting on the Voice Gateway(VG4xx ATA) that allows the user to set the interdigit timing in milliseconds, specifying how much time is configured between two digits being entered. Valid inputs—50-500 milliseconds |
|
Phone settings > Hook Flash Timing |
Empty |
This is a port or extension level setting on the Voice Gateway(VG4xx ATA) that allows the user to set the timing for detecting a hook flash signal. A hook flash is a momentary interruption (within a specific time frame) in the line current or voltage for call switch operations. Valid inputs—<50-1550> <0-400> |
|
Phone settings > Caller ID Enable |
Yes |
This is a port or extension level setting on the Voice Gateway(VG4xx ATA) that allows the user to enable the FXS voice port to send caller-ID information during call setup Valid inputs—Yes or Empty |
|
Phone settings > Voice Activity Detection (VAD) Enable |
Empty |
This is a port or extension level setting to disable or enable the Voice Activity Detection (VAD) function on the Voice Gateway (VG4xx ATA). Enabling VAD optimizes bandwidth usage by sending packets only when voice activity is detected. This setting is enabled by default. Select No to disable VAD. Valid inputs—No or Empty |
|
Phone settings > Echo Canceller Enable |
Empty |
This is a port or extension level setting on the Voice Gateway(VG4xx ATA) that allows the user to enable Echo Canceller which aids in eliminating echo from call audio to improve user experience. When activated during calls, echo cancellation measures active feedback noise and cancels it algorithmically. Default is enable. To disable it, select No. Valid inputs—No or Empty |
|
User preferences > Message Waiting Indicator (MWI) |
Yes |
This is a port or extension level setting on the Voice Gateway(VG4xx ATA) that allows the user to enable Message Waiting Indicator (MWI) to notify users about voicemail when going off-hook through stutter tone. Yes - Enable. Empty - Disable Valid inputs—Yes or Empty |
|
User preferences > Call Progress Tone (CPTONE) |
Empty |
This is a port or extension level setting on the Voice Gateway(VG4xx ATA) that allows the user to set the Call Progress Tone (CPTONE) based on countries or regions as they often have different call progress tones (for example, dial tone or busy tone). So CPTONE configures tones to meet local PSTN requirements. |
|
User preferences > Output Attenuation |
Empty |
This is a port or extension level setting on the Voice Gateway(VG4xx ATA) that allows the user to configure voice output attenuation in decibels (dB). This helps adjust the output volume transmitted by the device to a connected endpoint and can reduce or amplify the volume to address audio clarity issues. Valid inputs—'-6' to '+14' |
|
User preferences > Visual Message Waiting Indicator (VMWI) |
FSK |
This is a port or extension level setting on the Voice Gateway(VG4xx ATA) that allows the user to enable DC voltage or FSK visual message-waiting indicator (VMWI) on an analog FXSLS voice port. Valid inputs—DC voltage or Empty |
|
Settings | Default value |
Description |
|---|---|---|
|
PRT Upload Enable |
Disable |
Specifies whether the device automatically uploads test results to the Product Reporting Tool (PRT) after test execution. When enabled, the system enables automatic upload of test logs, configuration data, and status reports from the VG ATA to the centralized PRT server. When disabled, data uploads are disabled, and results remain stored locally on the device or test system. Valid inputs—Enable or Disable |
|
Debug Level |
off |
The Debug_Level parameter typically offers several choices for the level of debugging with warnings and errors. Valid inputs—off, info, or debug |
|
Daylight Savings Time > Daylight Saving Time Rule |
|
Enter the rule for calculating daylight saving time. This rule is comprised of three fields. Each field is separated by a semicolon (;). Optional values inside brackets [ ] are assumed to be 0 if they aren’t specified. Midnight is represented by colons. For example, 0:0:0 of the given date. This is the format of the rule: Start = ; end=; save = . The end values specify the start and end dates and times of daylight saving time. Each value is in this format: / / [/HH:[mm[:ss]]]. The value is the number of hours, minutes, and/or seconds to add to the current time during daylight saving time. The value can be preceded by a negative (-) sign if subtraction is desired instead of addition. The value is in this format: [/[+. |
|
Quality of Service (QOS) |
Enable or disable quality of service tagging of packets from the local device to Webex Calling. |
|
Enable or Disable CDP & LLDP |
Enable or disable Cisco Discovery Protocol and Link Layer Discovery Protocol for local devices. Misconfigured devices can lose contact with the network, requiring that you revert your changes and do a local factory reset of the devices to bring them back online. |
|
Nightly Resync |
Controls the phone's default behavior regarding the nightly maintenance synchronization with Webex Calling. |
|
Set the Hoteling Guest Association Timer |
Choose the duration (in hours) of Hoteling guest login. |
|
Set a VLan |
Specify a numeric Virtual LAN ID for devices. Misconfigured devices can lose contact with the network, requiring that you revert your changes and do a local factory reset of the devices to bring them back online. |
|
DECT 6825 Top Button |
Specify the destinaton number to be dialed from the DECT Handset top button when pressed. Excessive misdials to emergency service numbers may result in penalties or fines. |
|
Web Access |
Allows or blocks the access to the phone administration pages:
When set to No, the web page for administrator is inaccessible. Only the web page for user is accessible. To allow access to the administration web page after the access is blocked, perform a factory reset from the phone. |
|
Choose from a list of predefined Codec Priorities — Coming soon |
Choose up to three predefined codec priority options available for your region. Misconfigured devices can lose contact with the network, requiring that you revert your changes and do a local factory reset of the devices to bring them back online. |
|
Audio Codec Priority |
Choose from one of the three predefined codec priority schemes available for your region. We recommend consulting a Certified Cisco voice engineer before making changes and to avoid any impact to voice quality. |
|
Phone Security Password |
Administrators can allow users to protect their MPP phones with a password for added security. Enter the password while booting the phone for the first time, or after the phone is reset to its factory default settings, to prevent unauthorized changes to phone settings. |
|
Lightweight Directory Access Protocol (LDAP) |
Enable or disable the Lightweight Directory Access Protocol. The IP Phone supports LDAP, which allows a user to search a specified LDAP directory for a name, phone number, or both. LDAP-based directories, such as Microsoft Active Directory 2003 and OpenLDAP-based databases, are supported. |
|
Web Access |
Allows or blocks the access to the phone administration pages:
When set to No, the web page for administrator is inaccessible. Only the web page for user is accessible. To access the administration web page again after the access is blocked, perform a factory reset from the phone. |
Poly and Yealink devices are available as Webex Calling managed devices. To configure these third-party device settings, see the following:
-
To configure an AudioCodes device, see https://www.audiocodes.com/solutions-products/products/ip-phones
-
To configure a Yealink device, see https://support.yealink.com/en/portal/knowledge
-
To configure a Poly device, see https://docs.poly.com/


