
Thanks for your feedback.
Webex LTI for teachers
 Feedback?
Setup
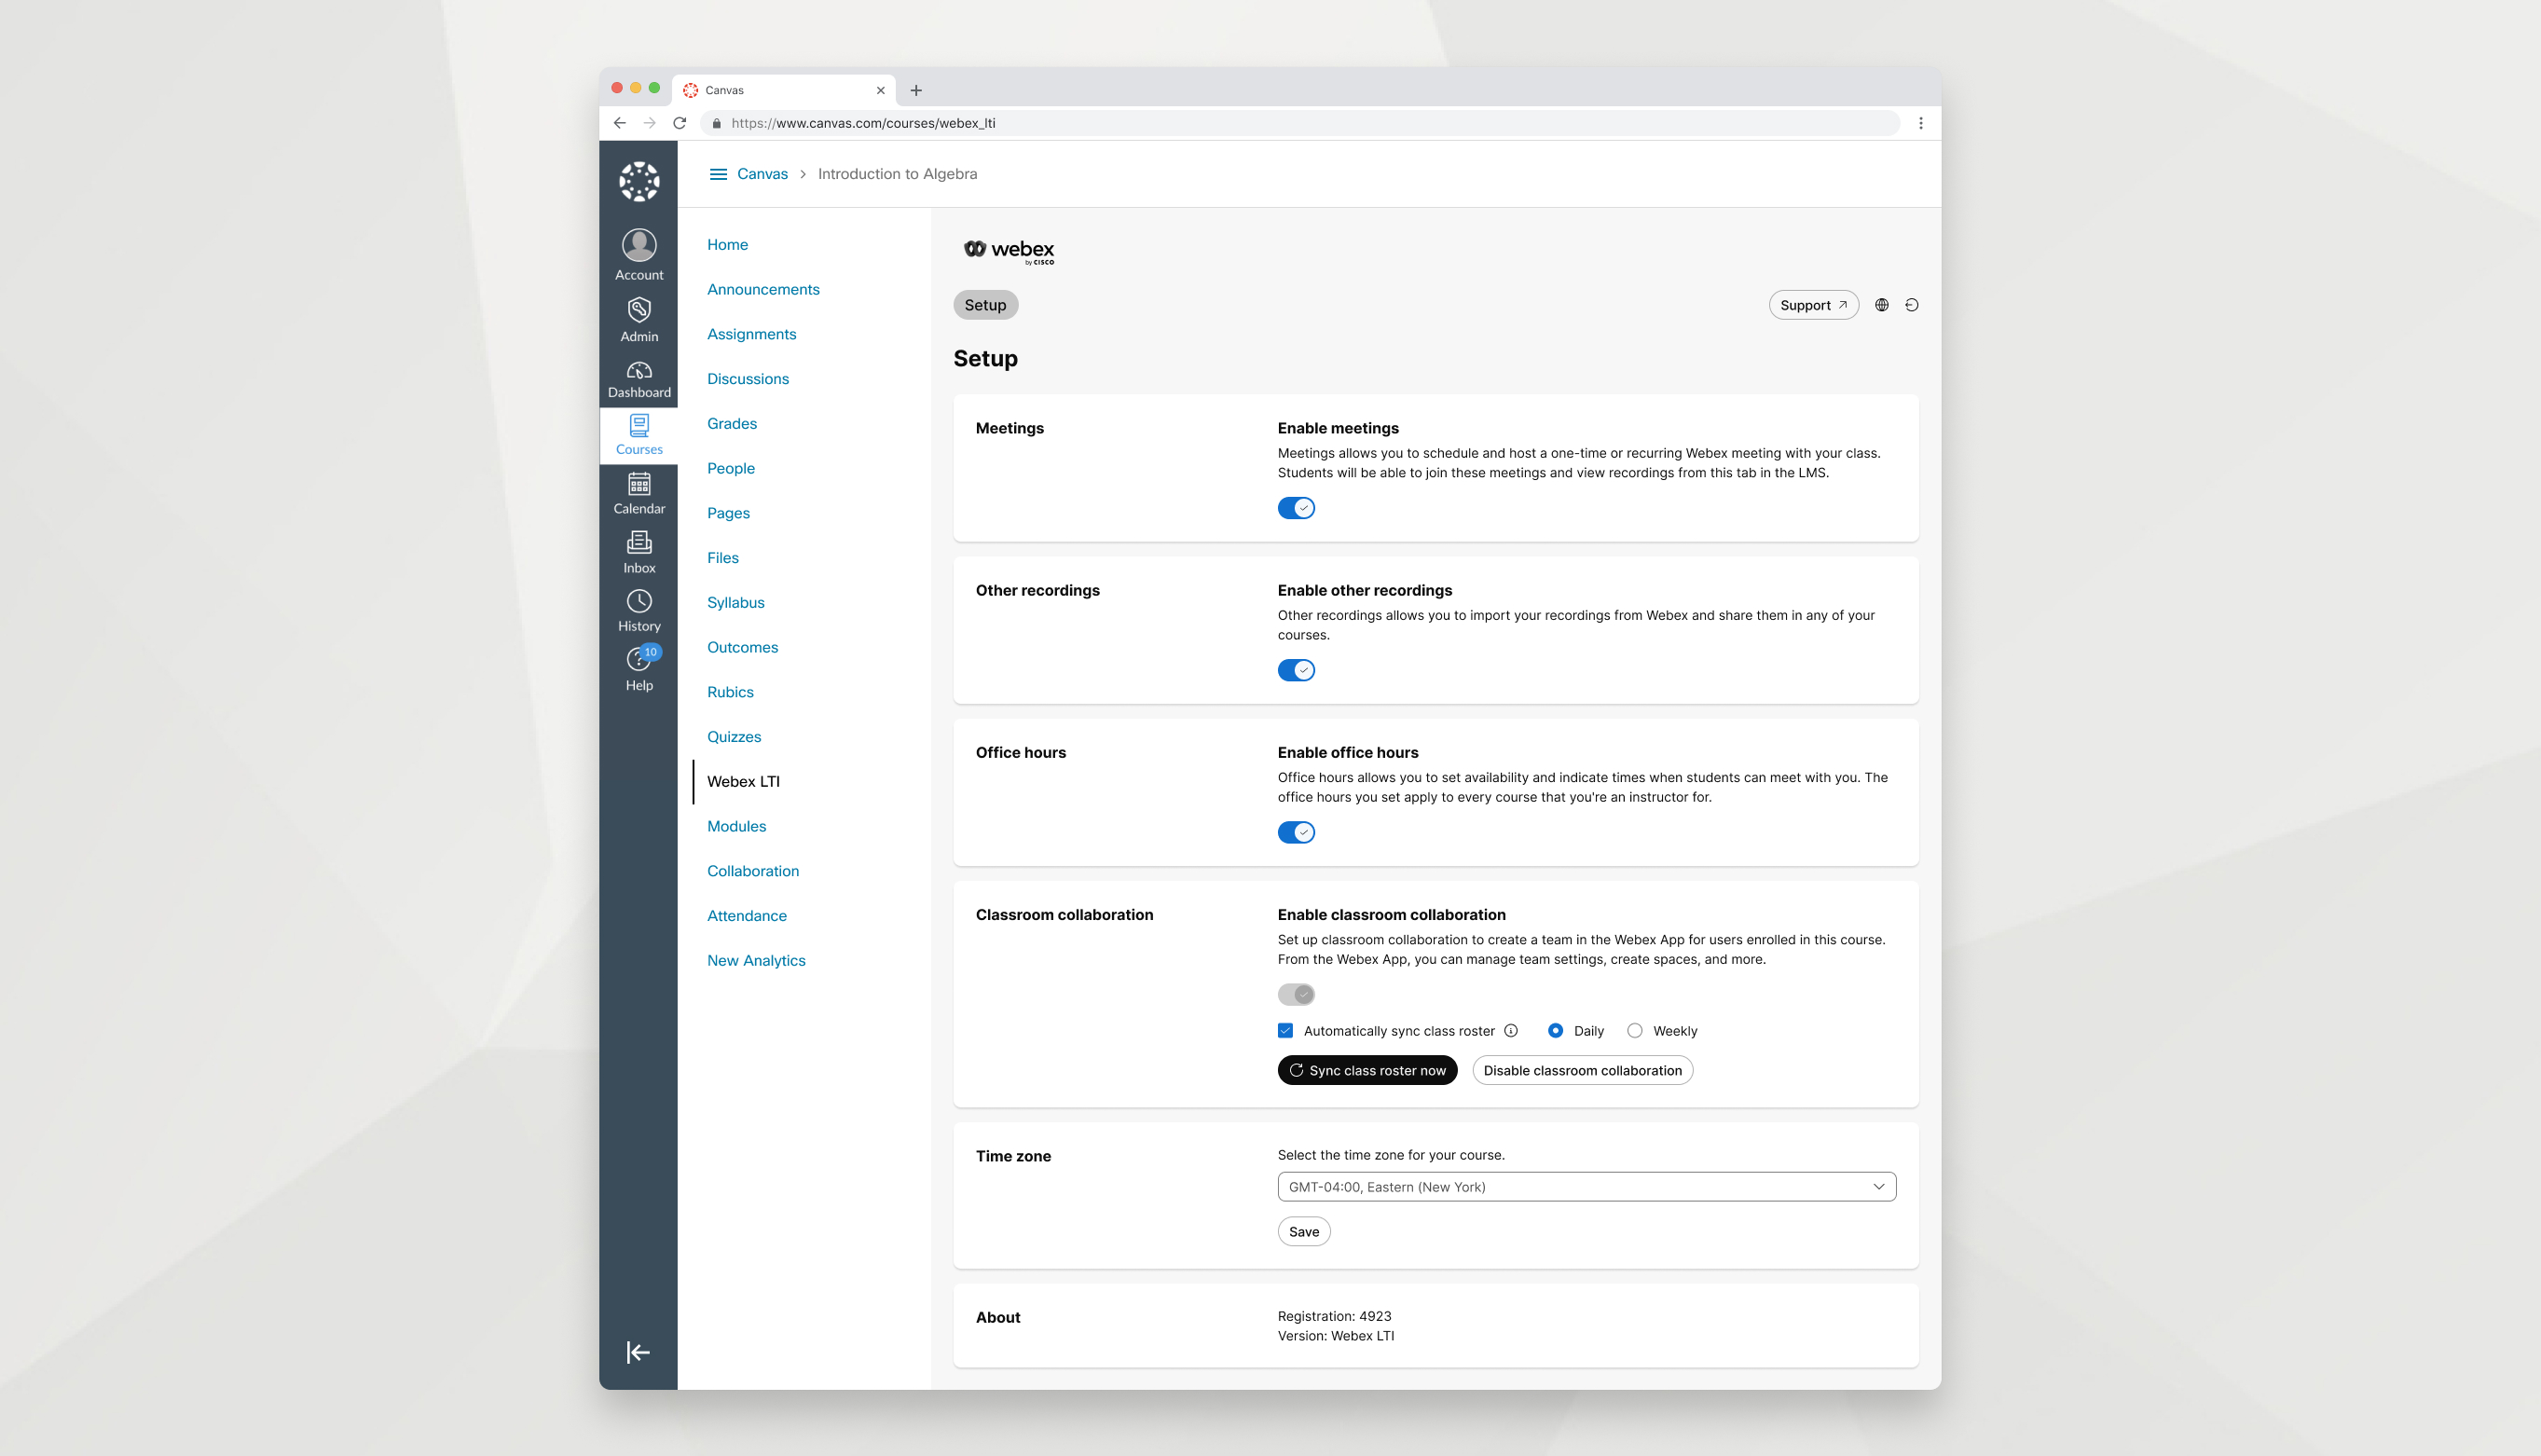
Customize feature preferences for your course.
| 1 |
Open Webex LTI in your LMS and go to the Setup tab. |
| 2 |
Choose the features that you want to enable in your class.
Each feature that you enable appears as its own tab. If you don't see one of the options in the Setup tab, your school’s administrator hasn't enabled it. |
| 3 |
Choose your time zone and click Save. |
Meetings
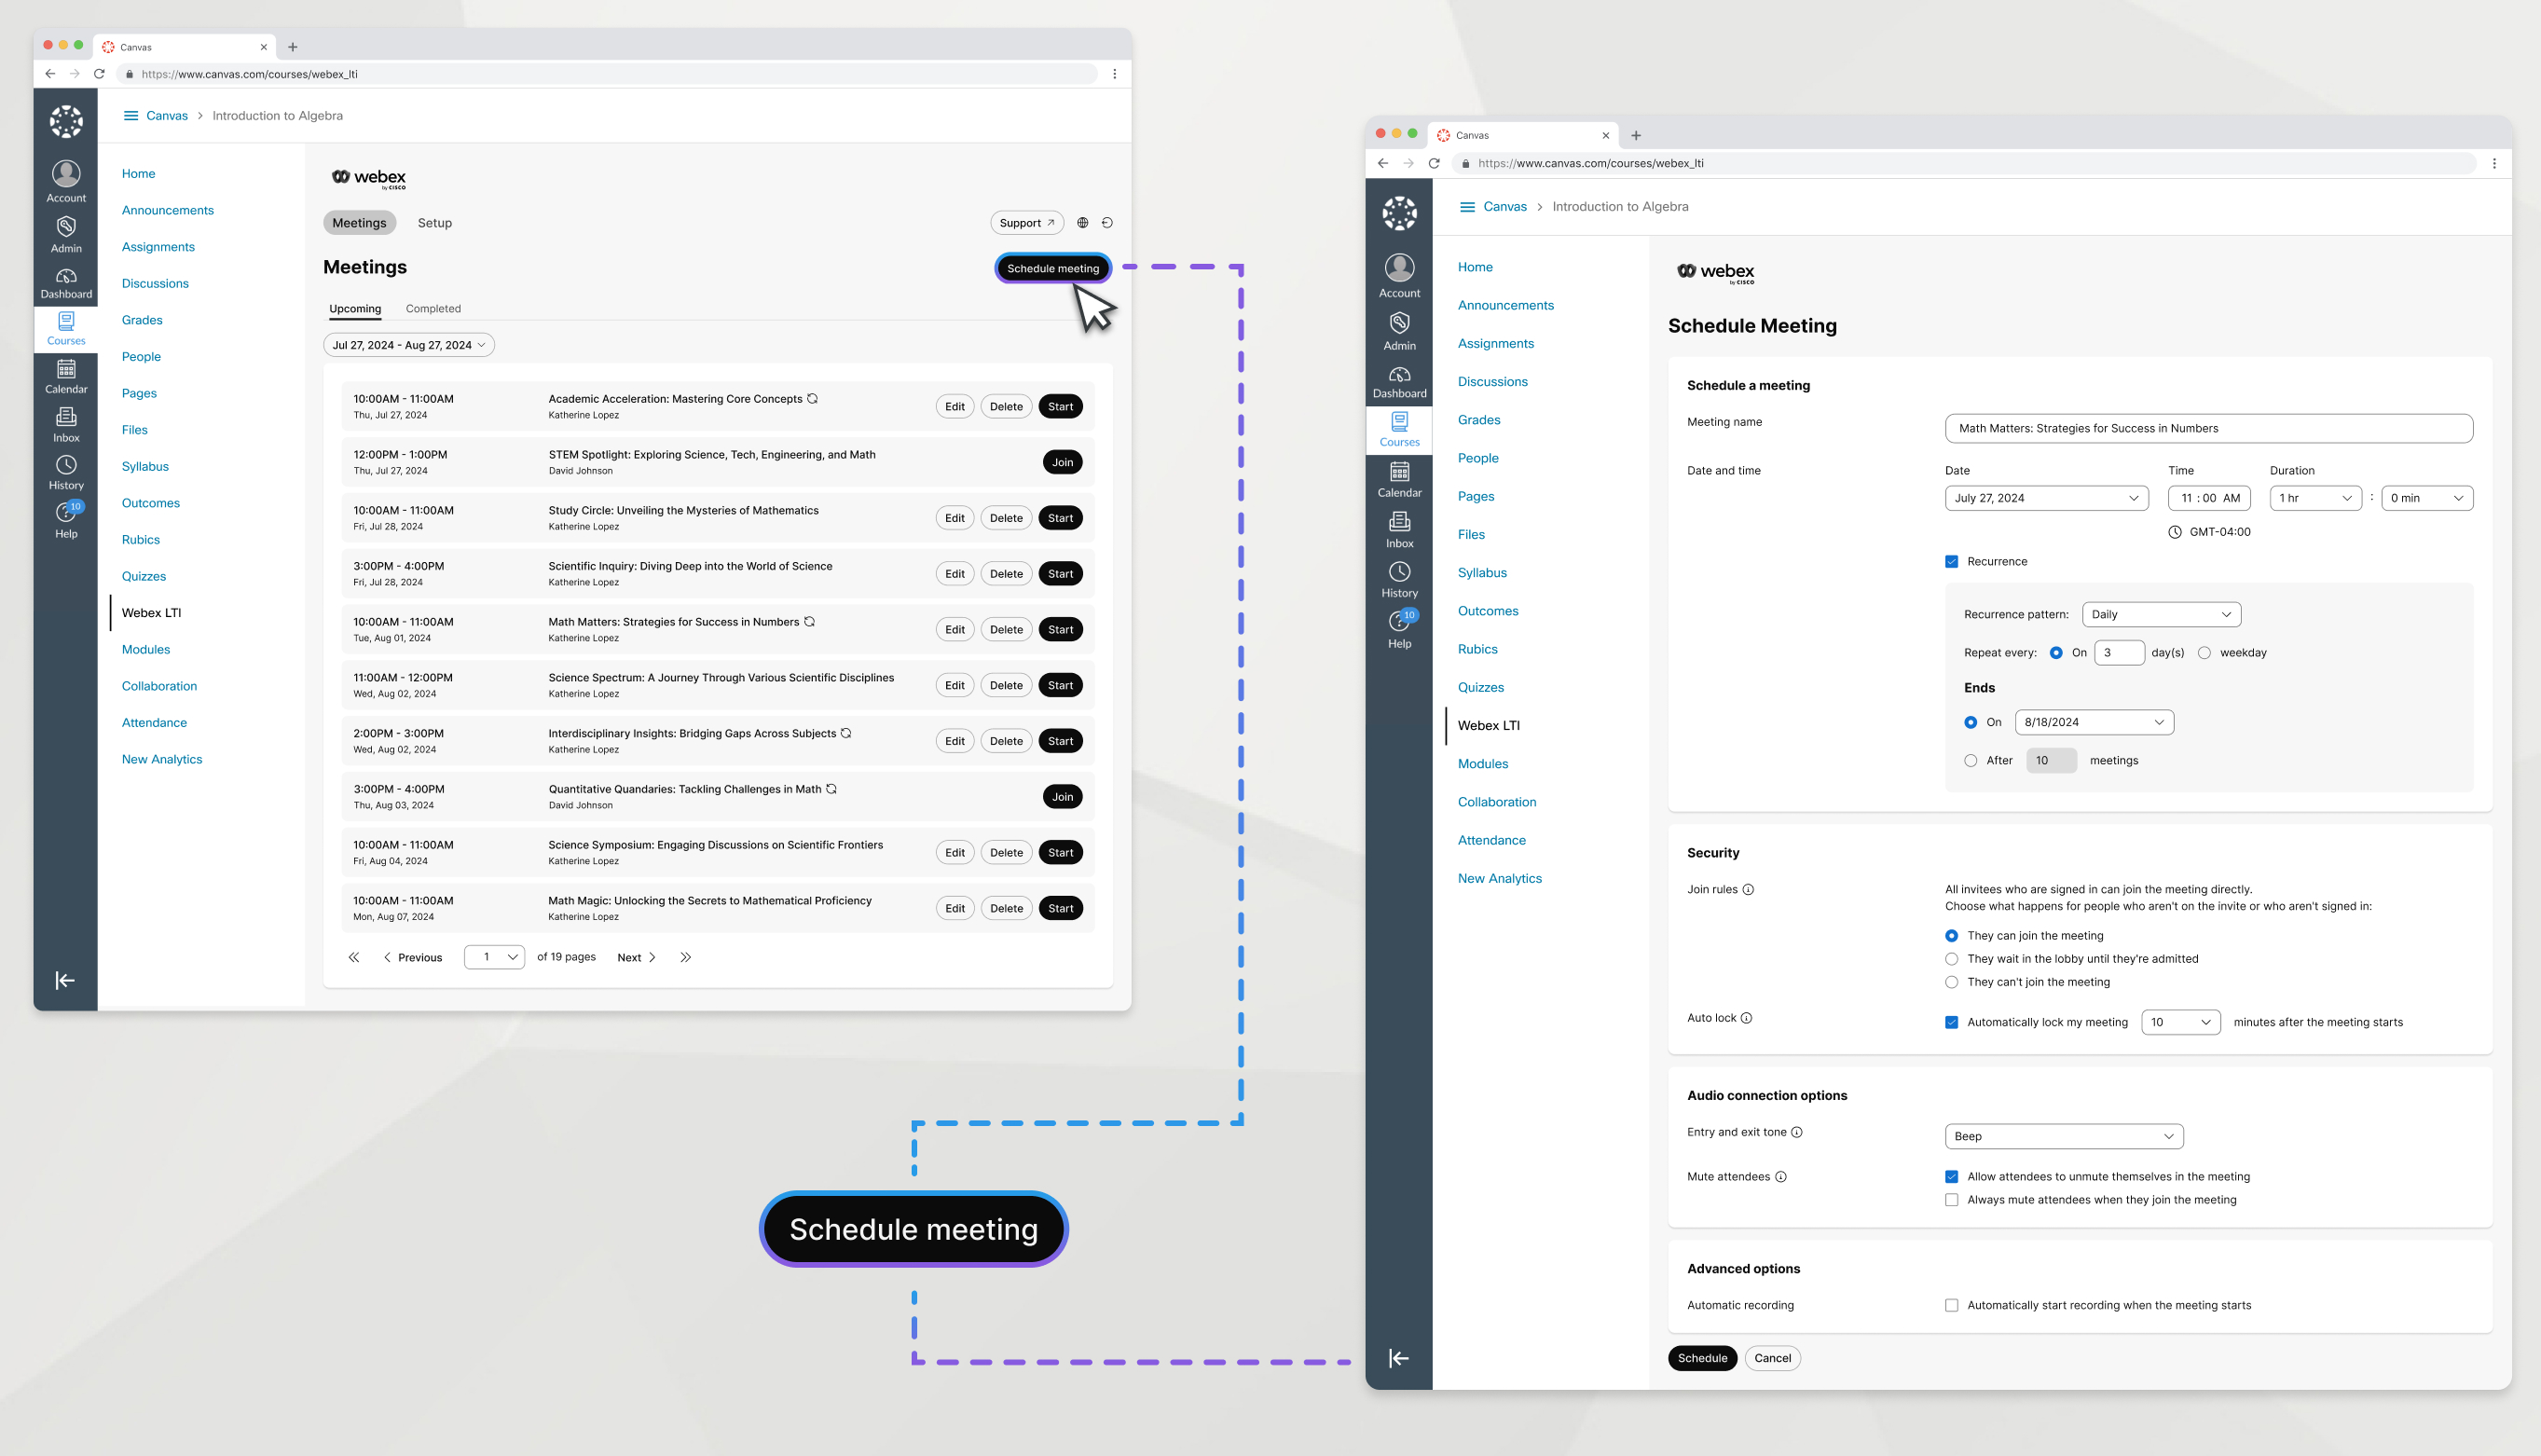
The meetings feature allows you to schedule and host a one-time or recurring meeting with your class.
| 1 |
Go to Meetings and click Schedule meeting. If prompted, sign in with Webex. |
| 2 |
Enter the following information:
|
| 3 |
Click Schedule |
After you create a meeting, it appears in your Upcoming tab, where everyone that is enrolled in the course can see it. From the Upcoming tab, you can start, edit, or delete meetings
Editing or deleting a recurring meeting will edit or delete the entire meeting series. Recurring meetings can't be individually edited or deleted.
If there are multiple instructors in a course, you can only start, edit, and delete the meetings that you created.
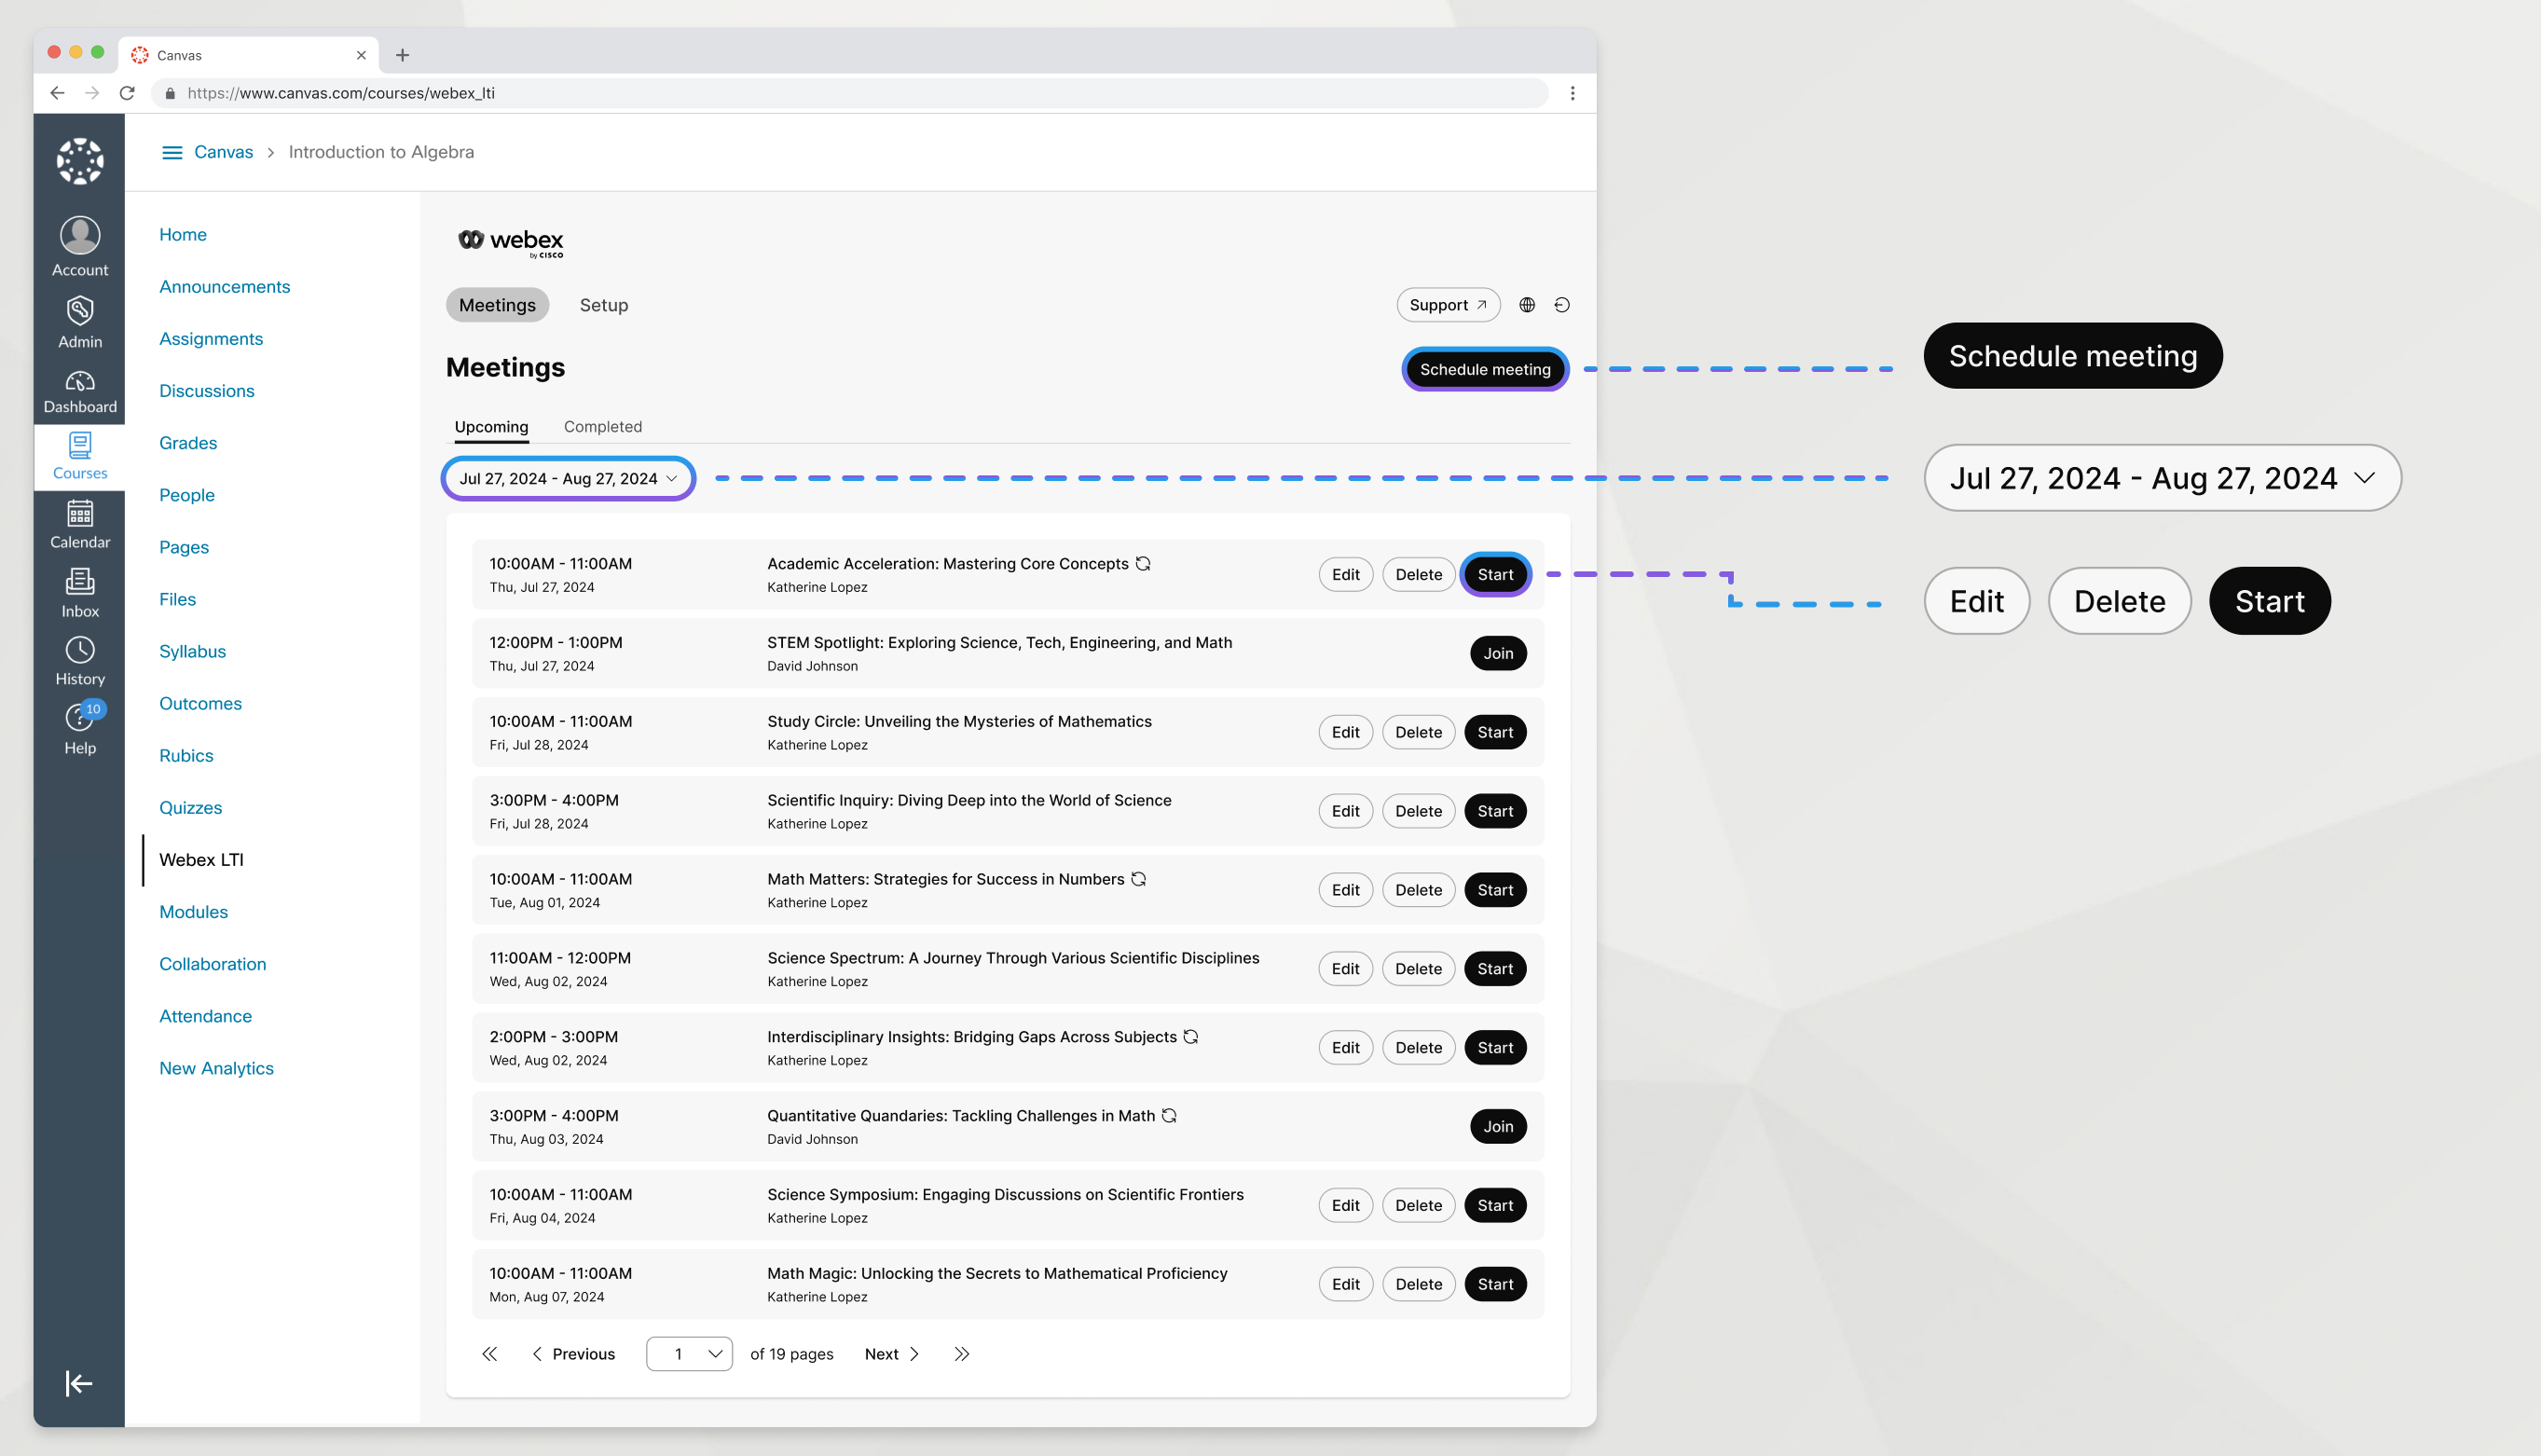
Start class meetings from your LMS with Webex LTI.
| 1 |
Go to the Meetings tab. |
| 2 |
Under the Upcoming tab, find your meeting and click Start. |
You can record a meeting that you scheduled in Webex LTI to make it available for your students.
For recordings to appear in Webex LTI, you must schedule the meeting in Webex LTI and be signed in to Webex from within Webex LTI when you start the meeting.
| 1 |
During your class meeting, click Record
If you don't see the Record button, look for it under More |
| 2 |
Select Record in cloud and then click Record. You and other meeting participants should see a red icon at the top right of your window when a recording is in progress. |
| 3 |
If needed, click Record
|
 in Webex.
 options.
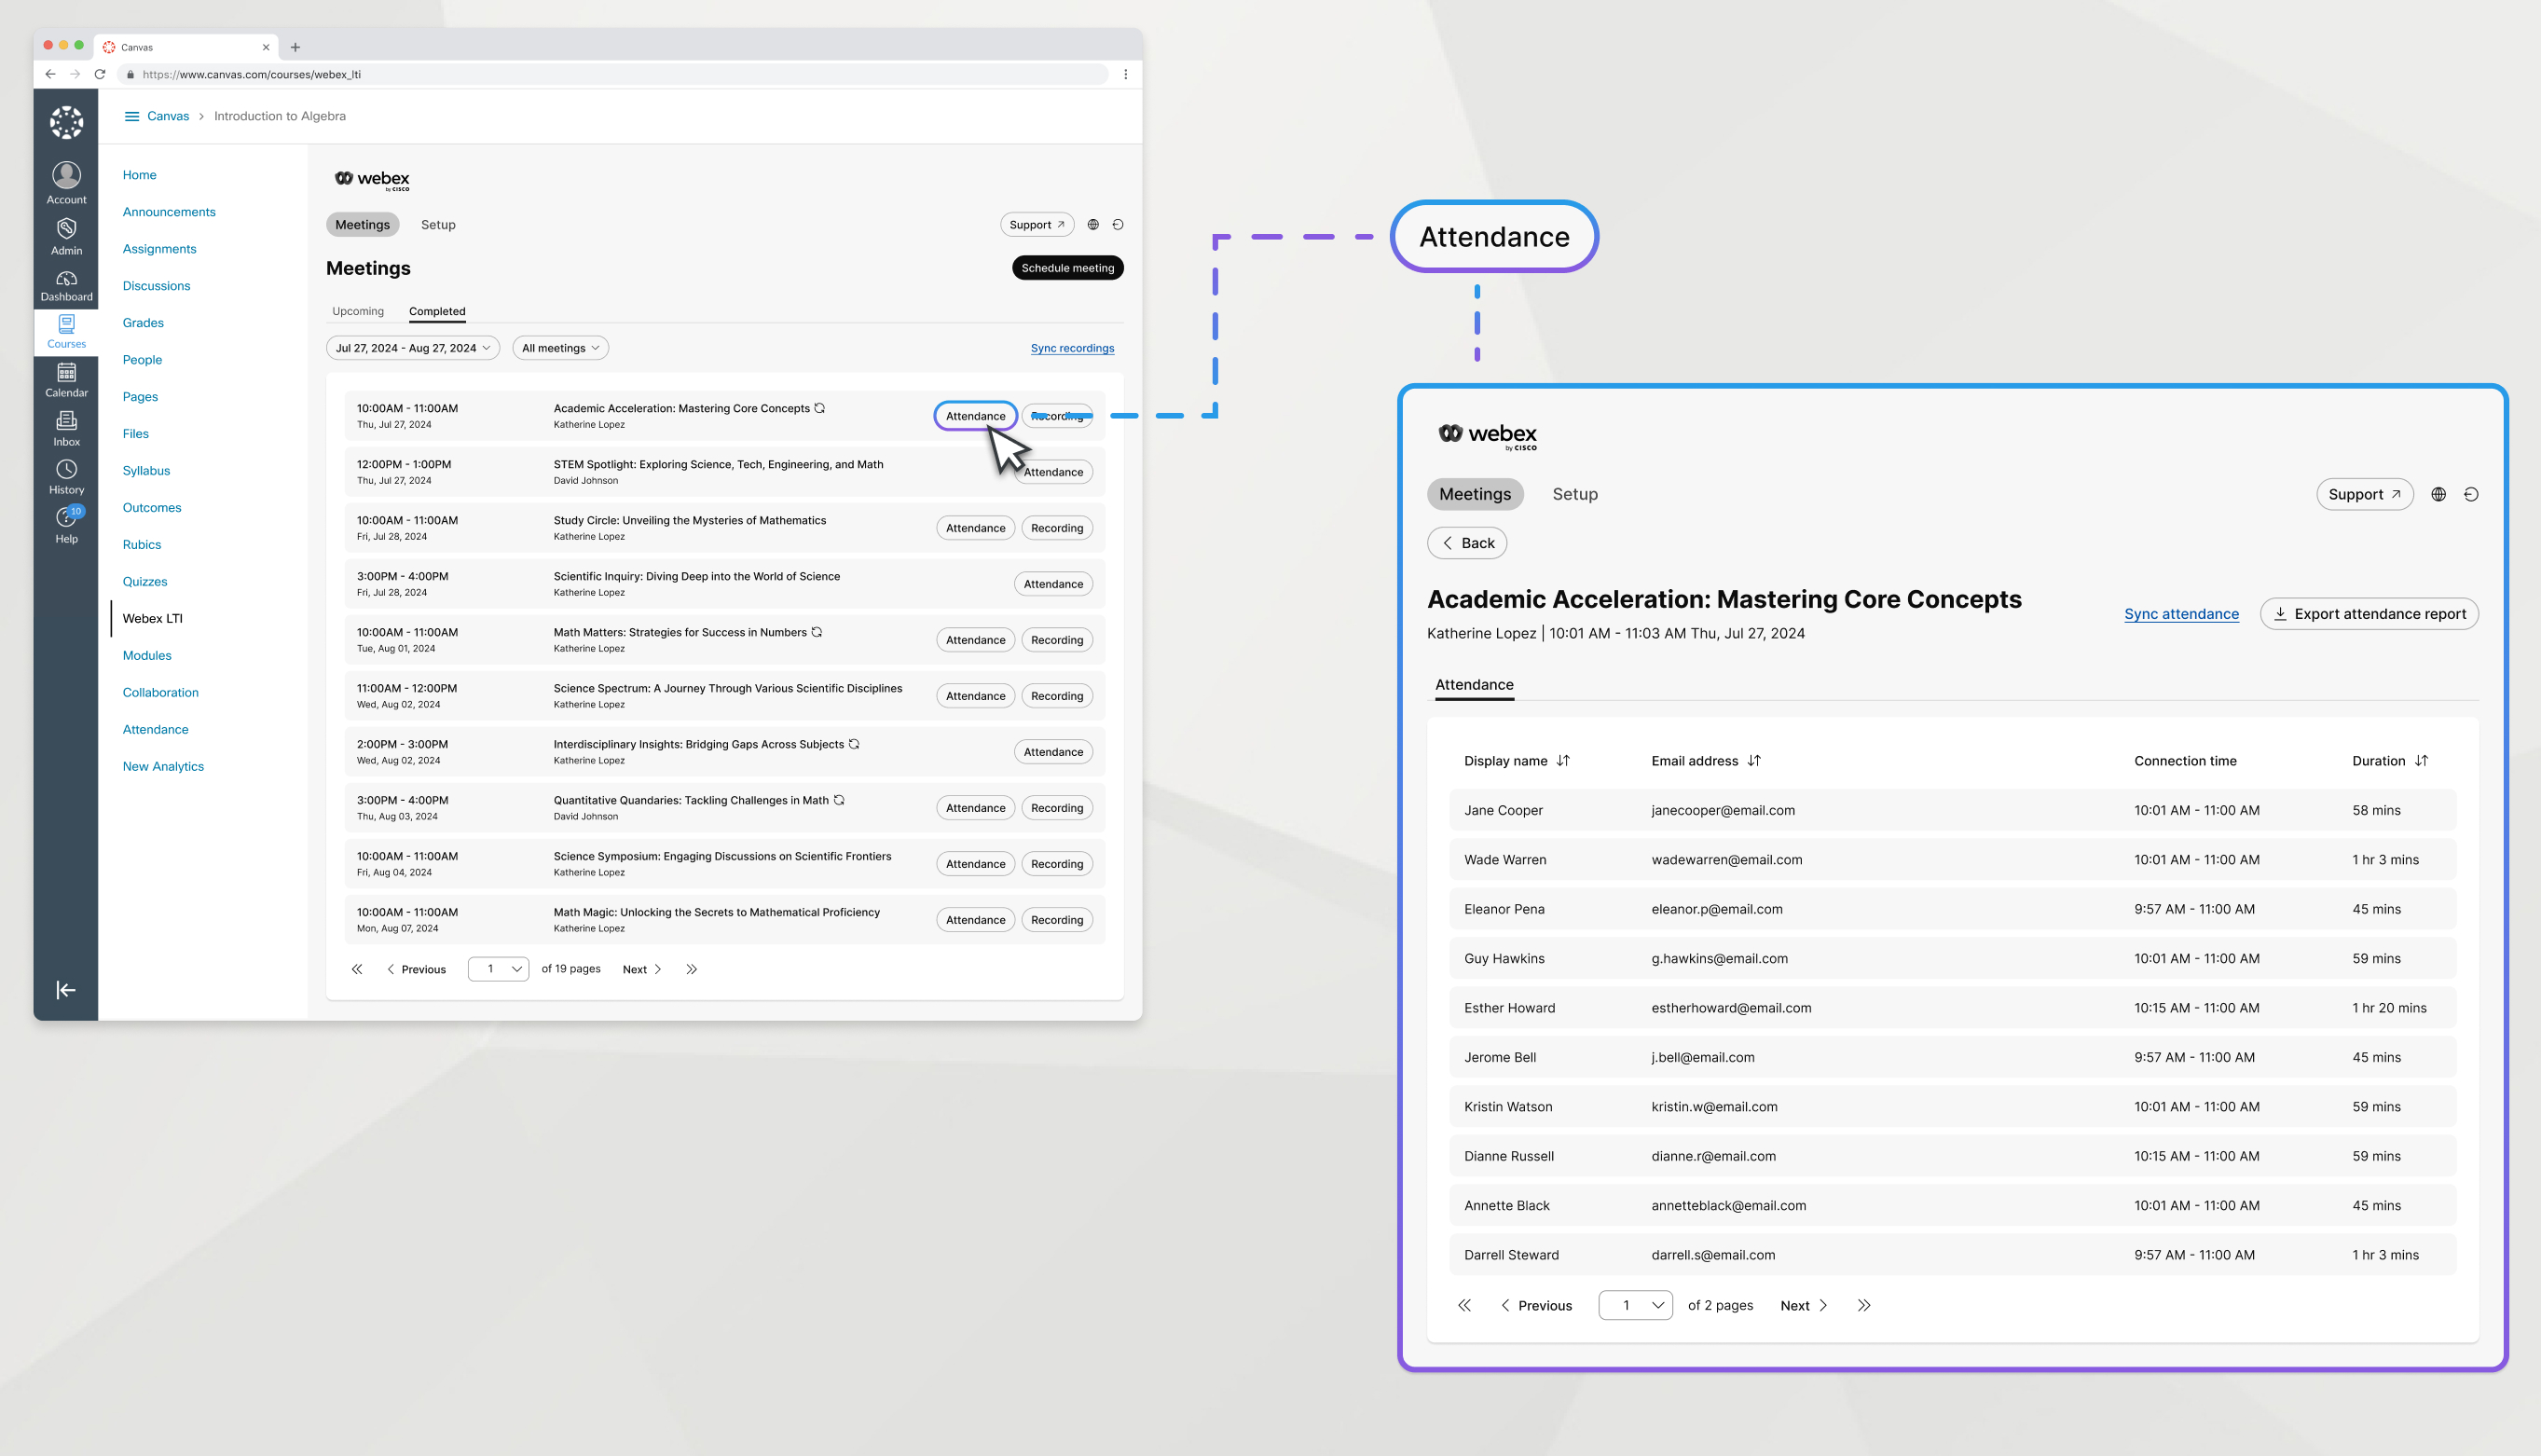
After your meeting has ended, see a list of participants that joined the meeting.
| 1 |
Go to the Meetings tab and click Completed. |
| 2 |
Find the meeting that you want to see the attendance for and click Attendance. |
| 3 |
(Optional): if there is no attendance yet, click the Sync attendance button. |
What to do next
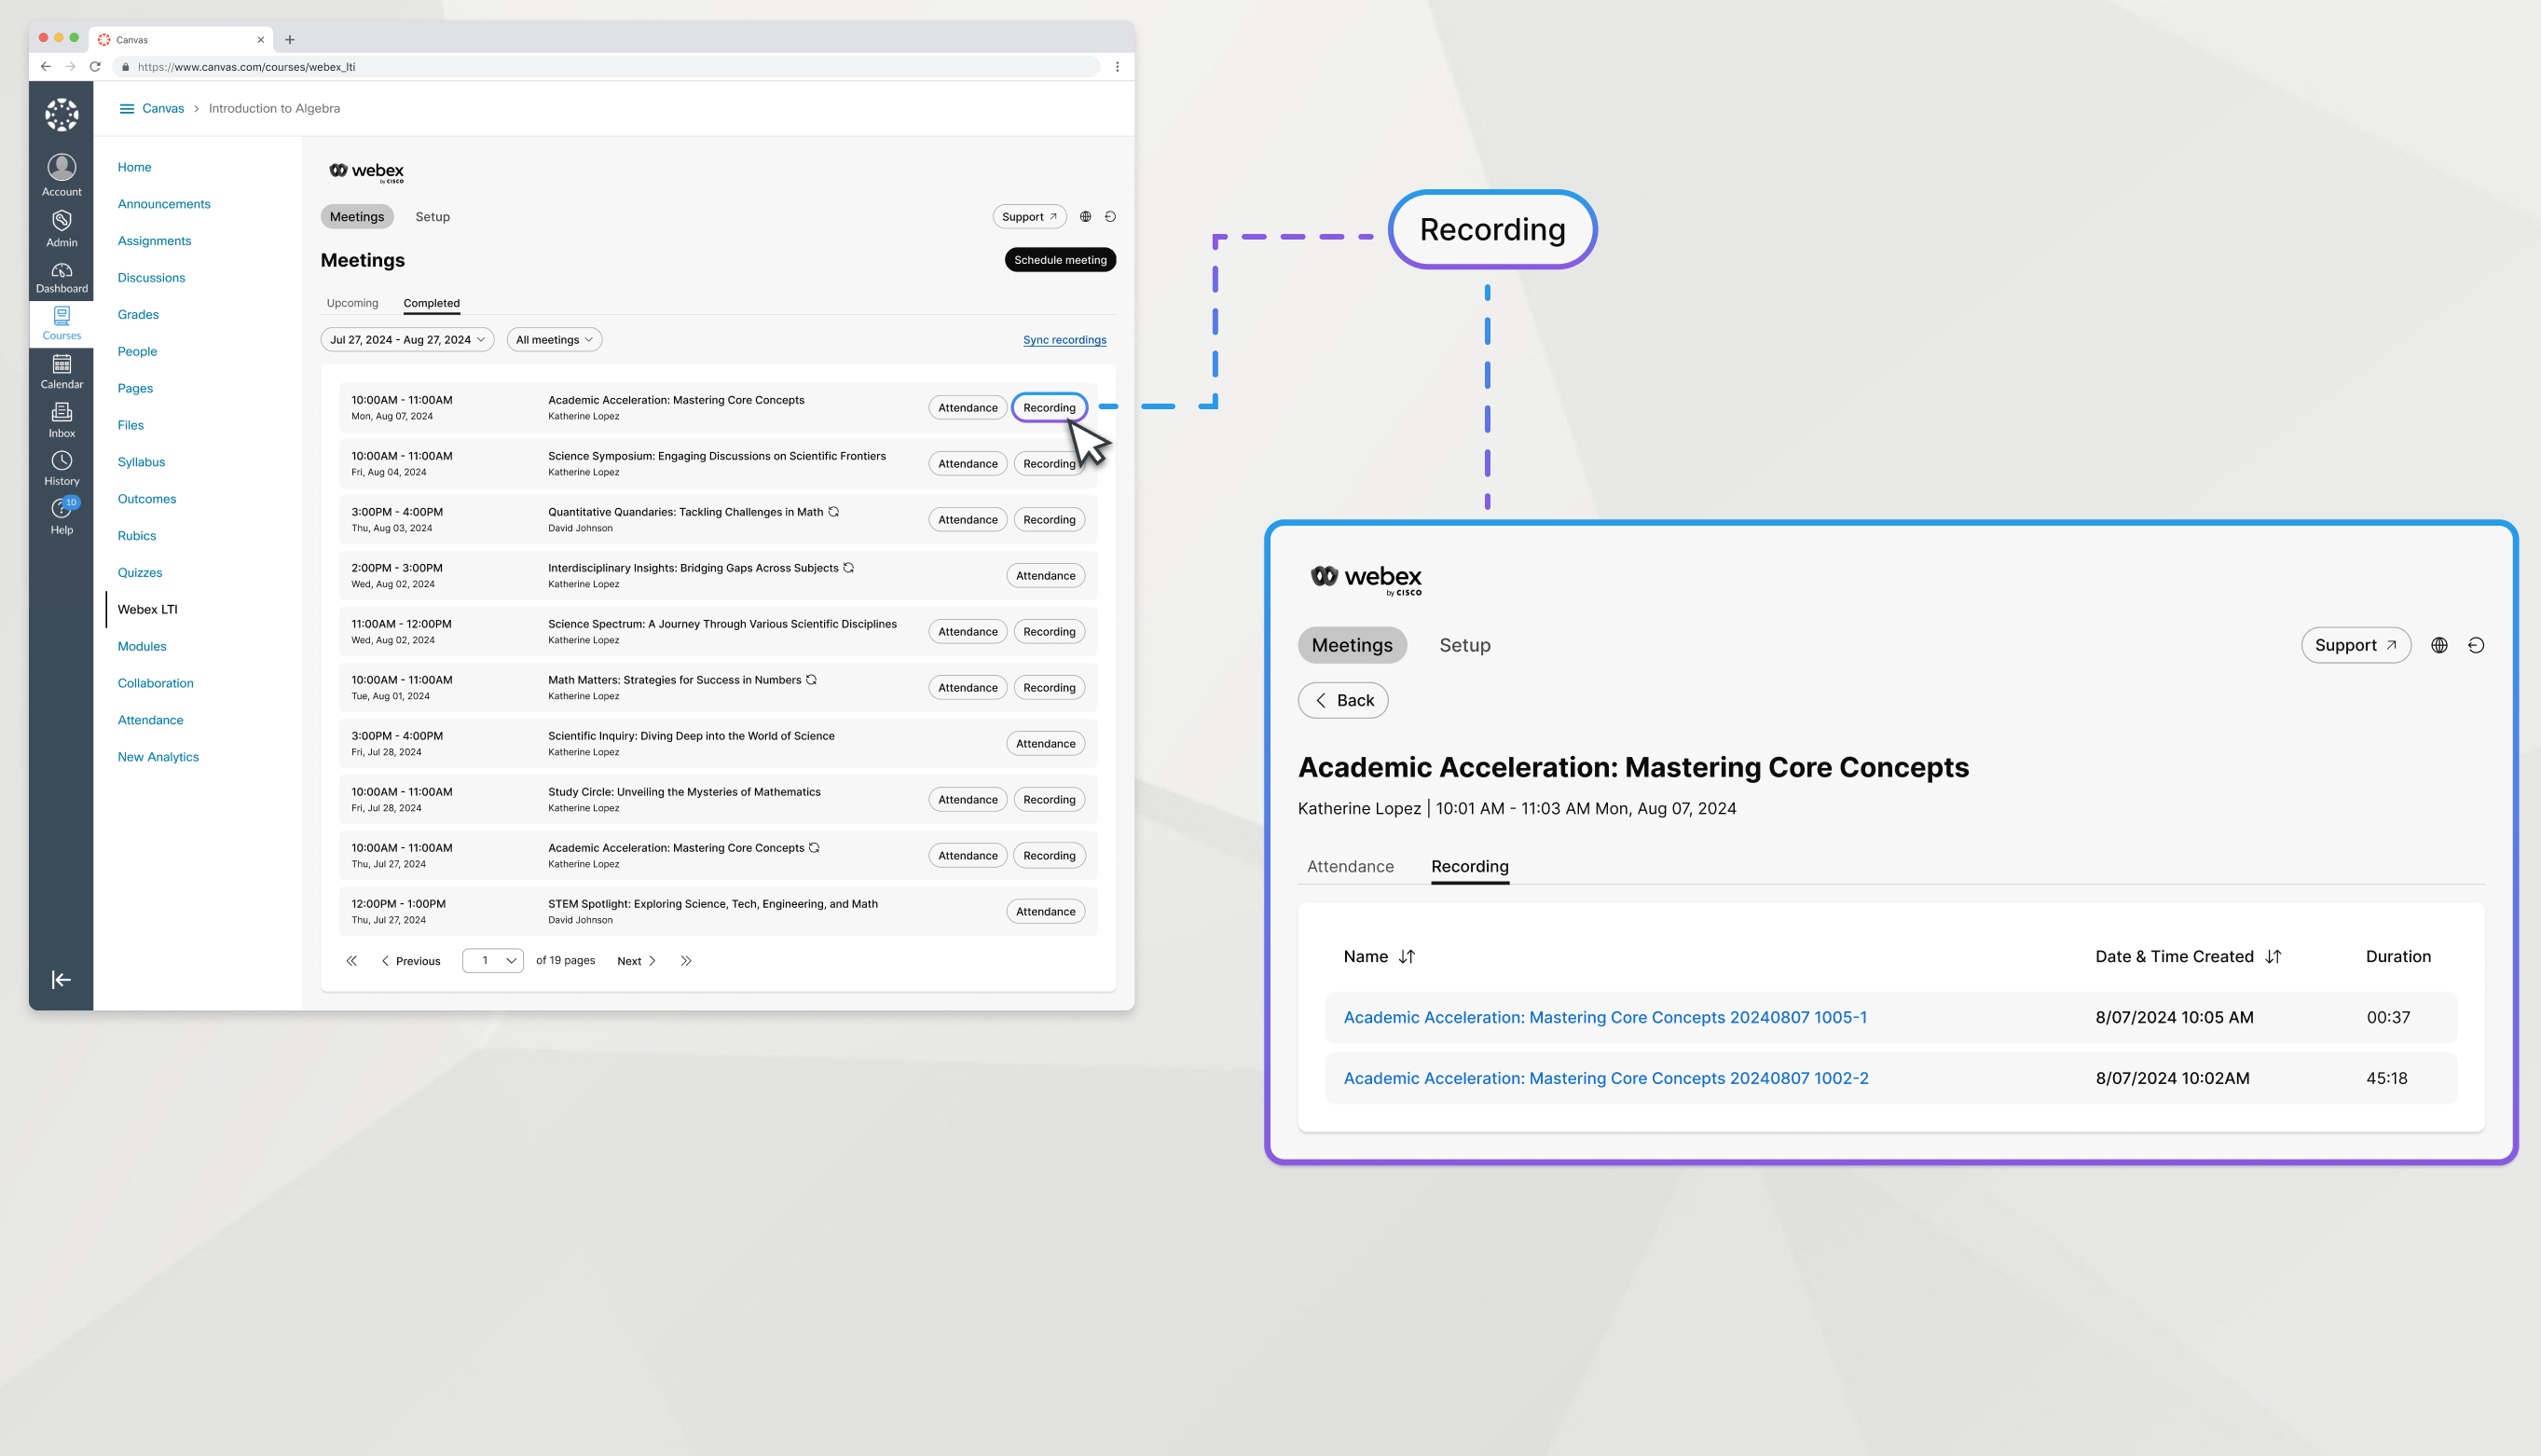
Watch recordings of your class meetings.
| 1 |
Go to the Meetings tab and click Completed. |
| 2 |
Find the meeting with the recording you want to watch and click Recording. |
| 3 |
Click the name of the recording to open it. |
| 4 |
Copy the recording password and click View recording. Enter the password on the next screen to view the meeting recording.
|
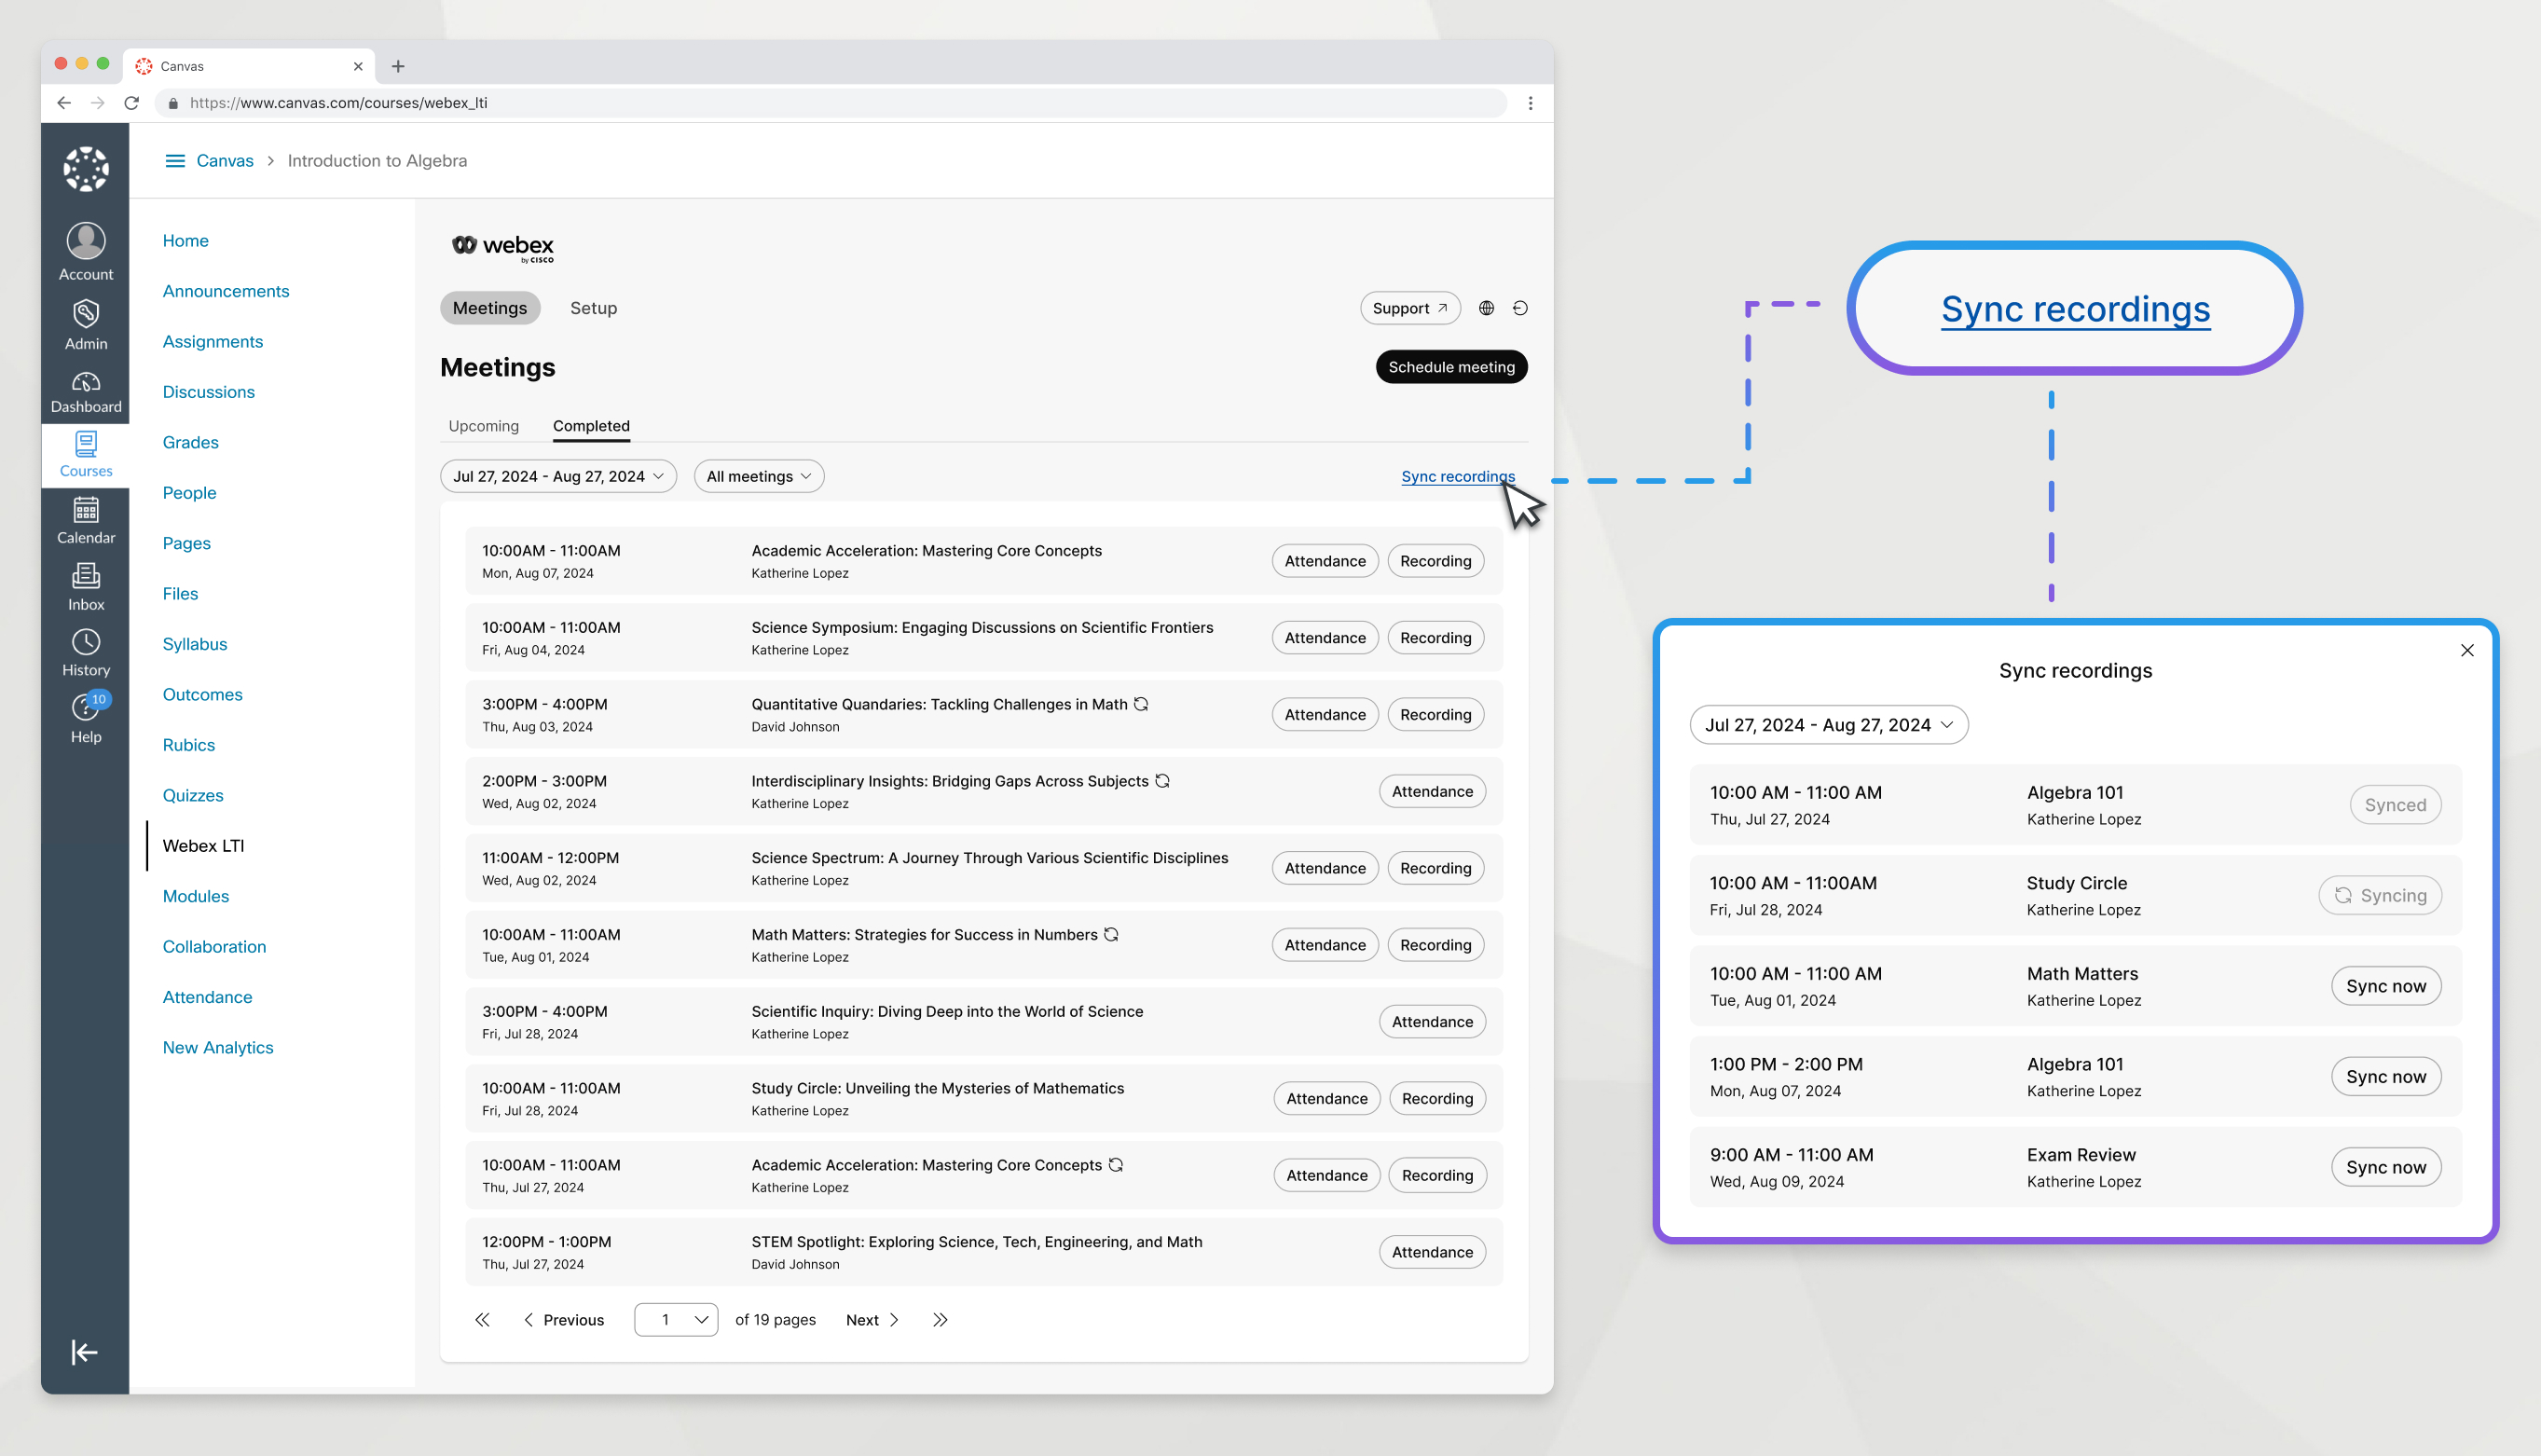
Your meeting recordings will automatically appear in the meeting content after the meeting has ended and the recording has been processed. If you need the recording to be available before the automatic process happens, you can manually sync the recording.
| 1 |
Go to the Meetings tab and click Completed. |
| 2 |
Click the Sync recordings button. |
| 3 |
Select a date range during which the recorded meeting happened. You can only select a date range up to 7 days. |
| 4 |
Find the meeting with the recording that you want to sync and click Sync now. Meetings only appear in this window if they have already been processed by Webex. |
| 5 |
When the recording has been synced, close the window. |
What to do next
Other recordings
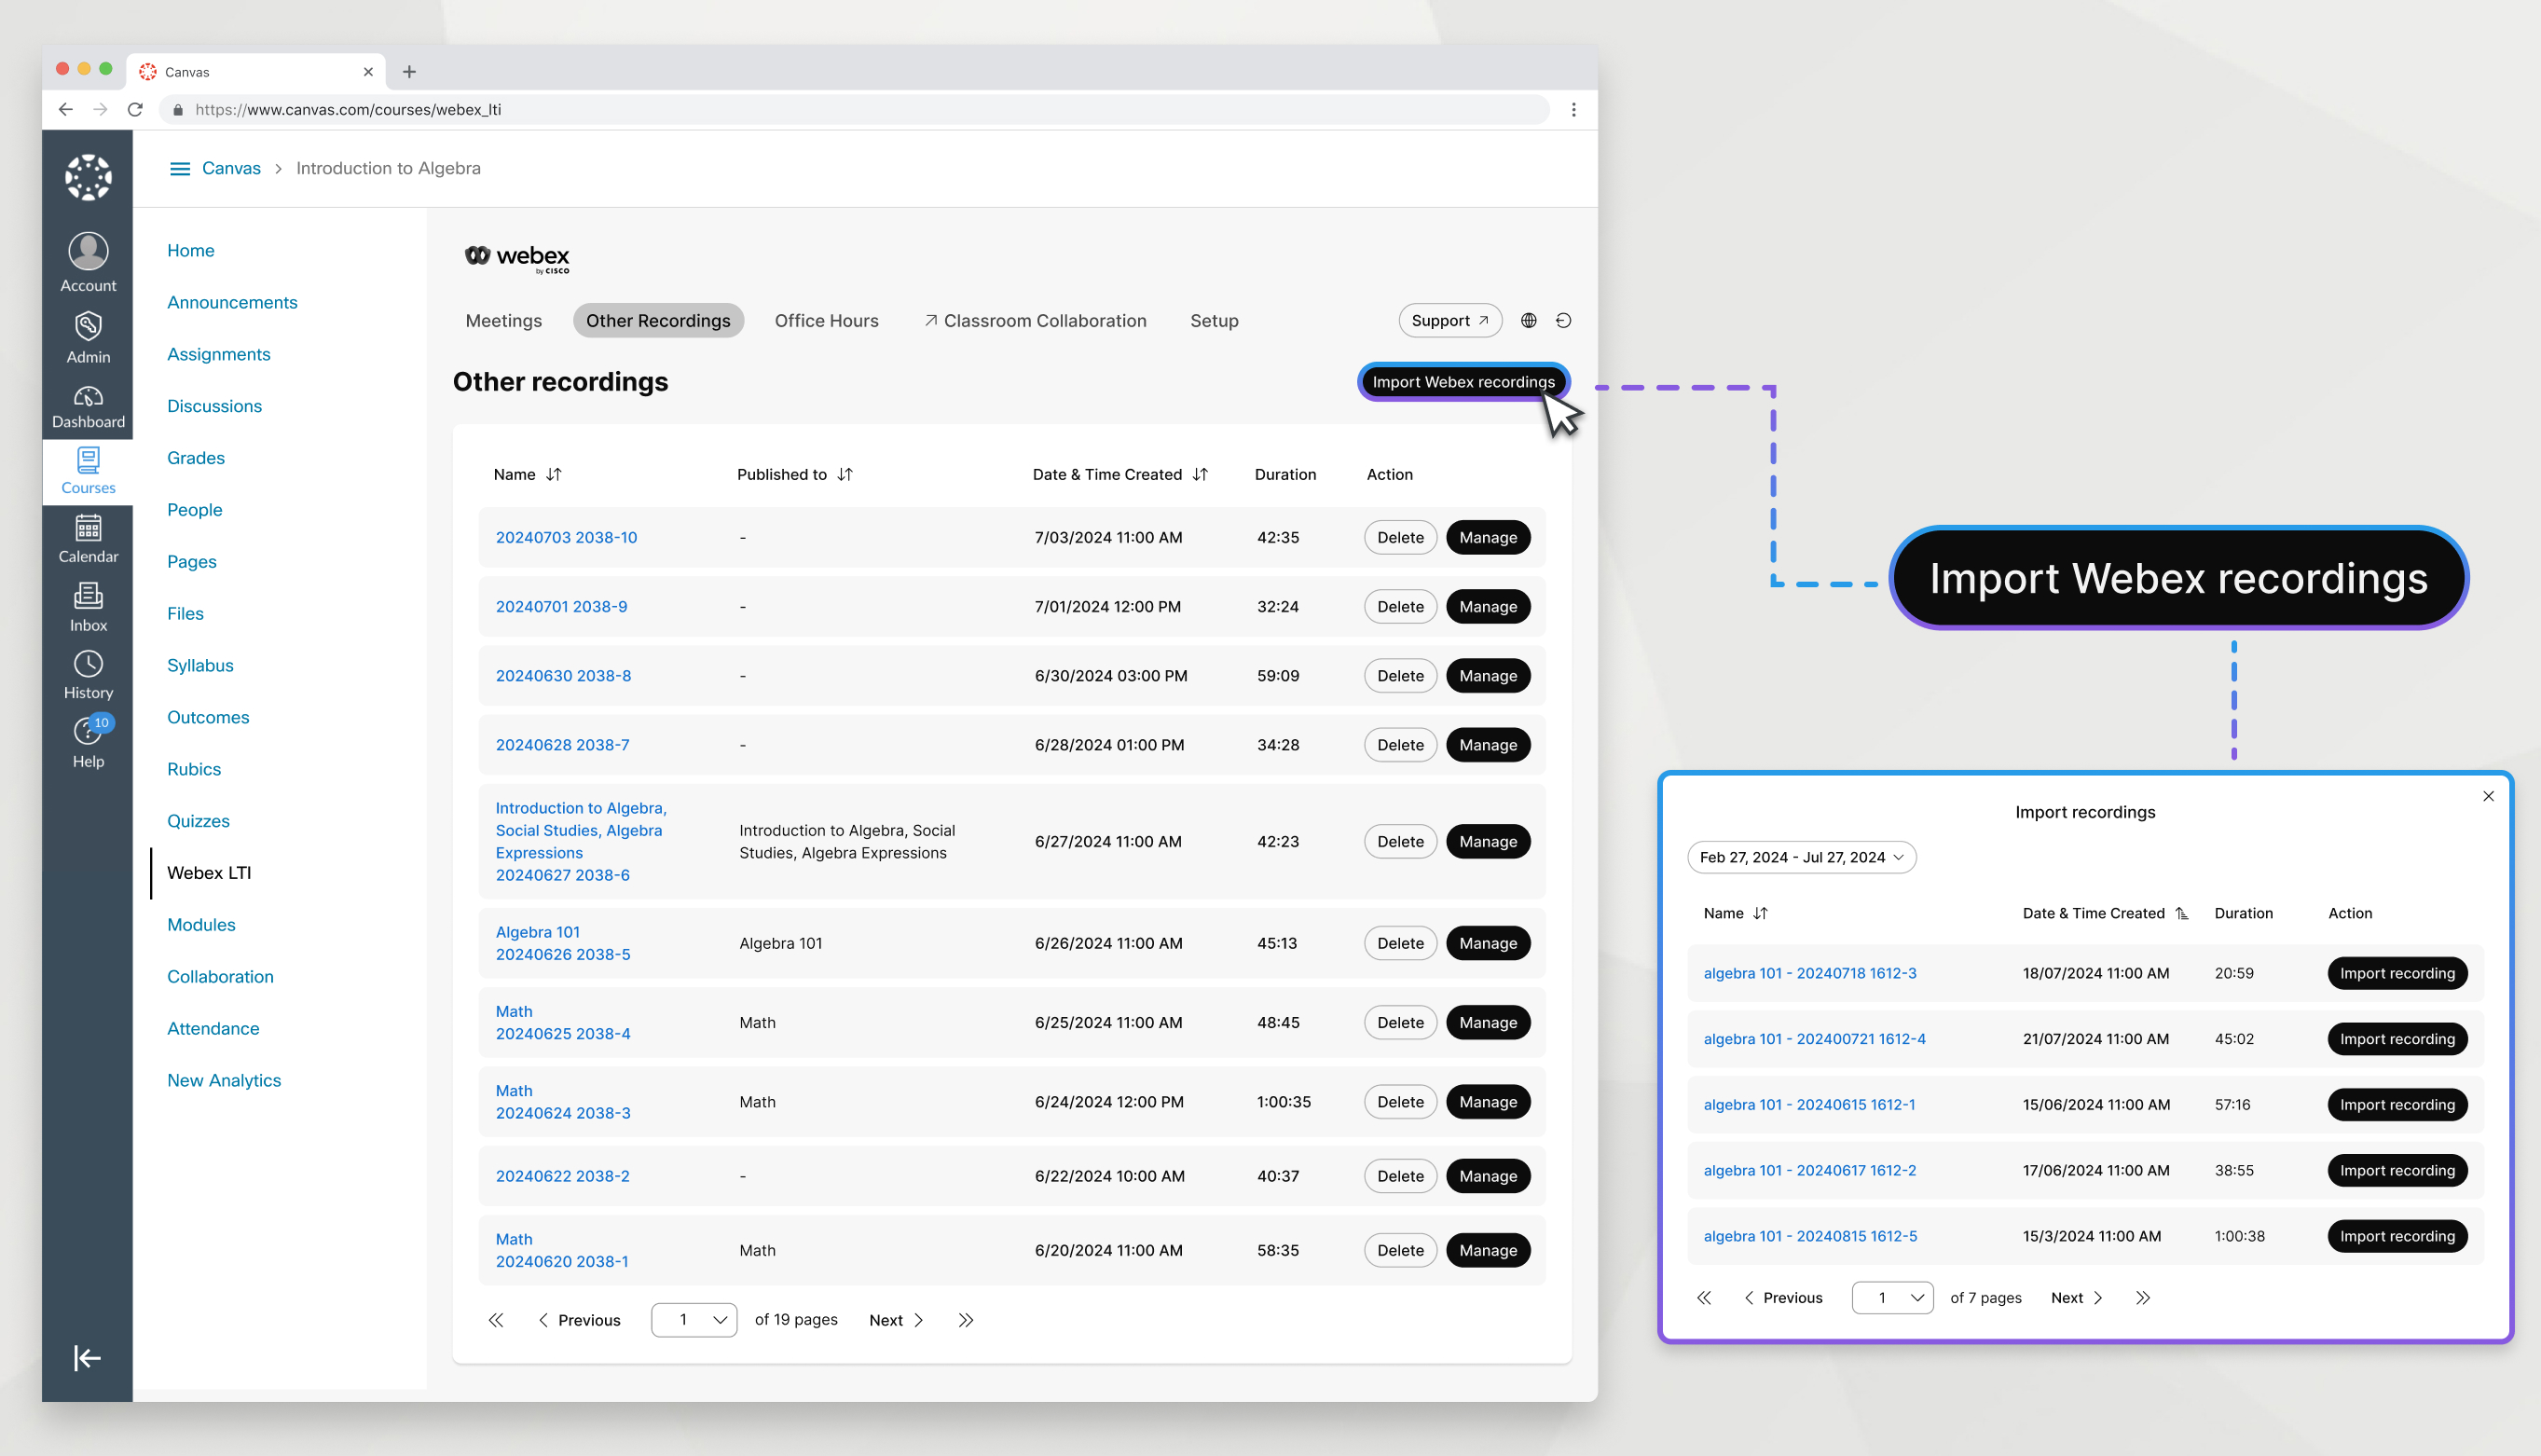
Other recordings allows you to import any of your Webex recordings that aren't associated with any scheduled Webex LTI meetings and publish them in your classes. Record yourself teaching a lesson or explaining a topic without any participants—you can reuse these recordings from semester to semester.
| 1 |
Go to the Other Recordings tab. |
| 2 |
Click Import Webex recordings. |
| 3 |
Select a date range that includes the recording you want to import. |
| 4 |
Find your recording and click Import recording. |
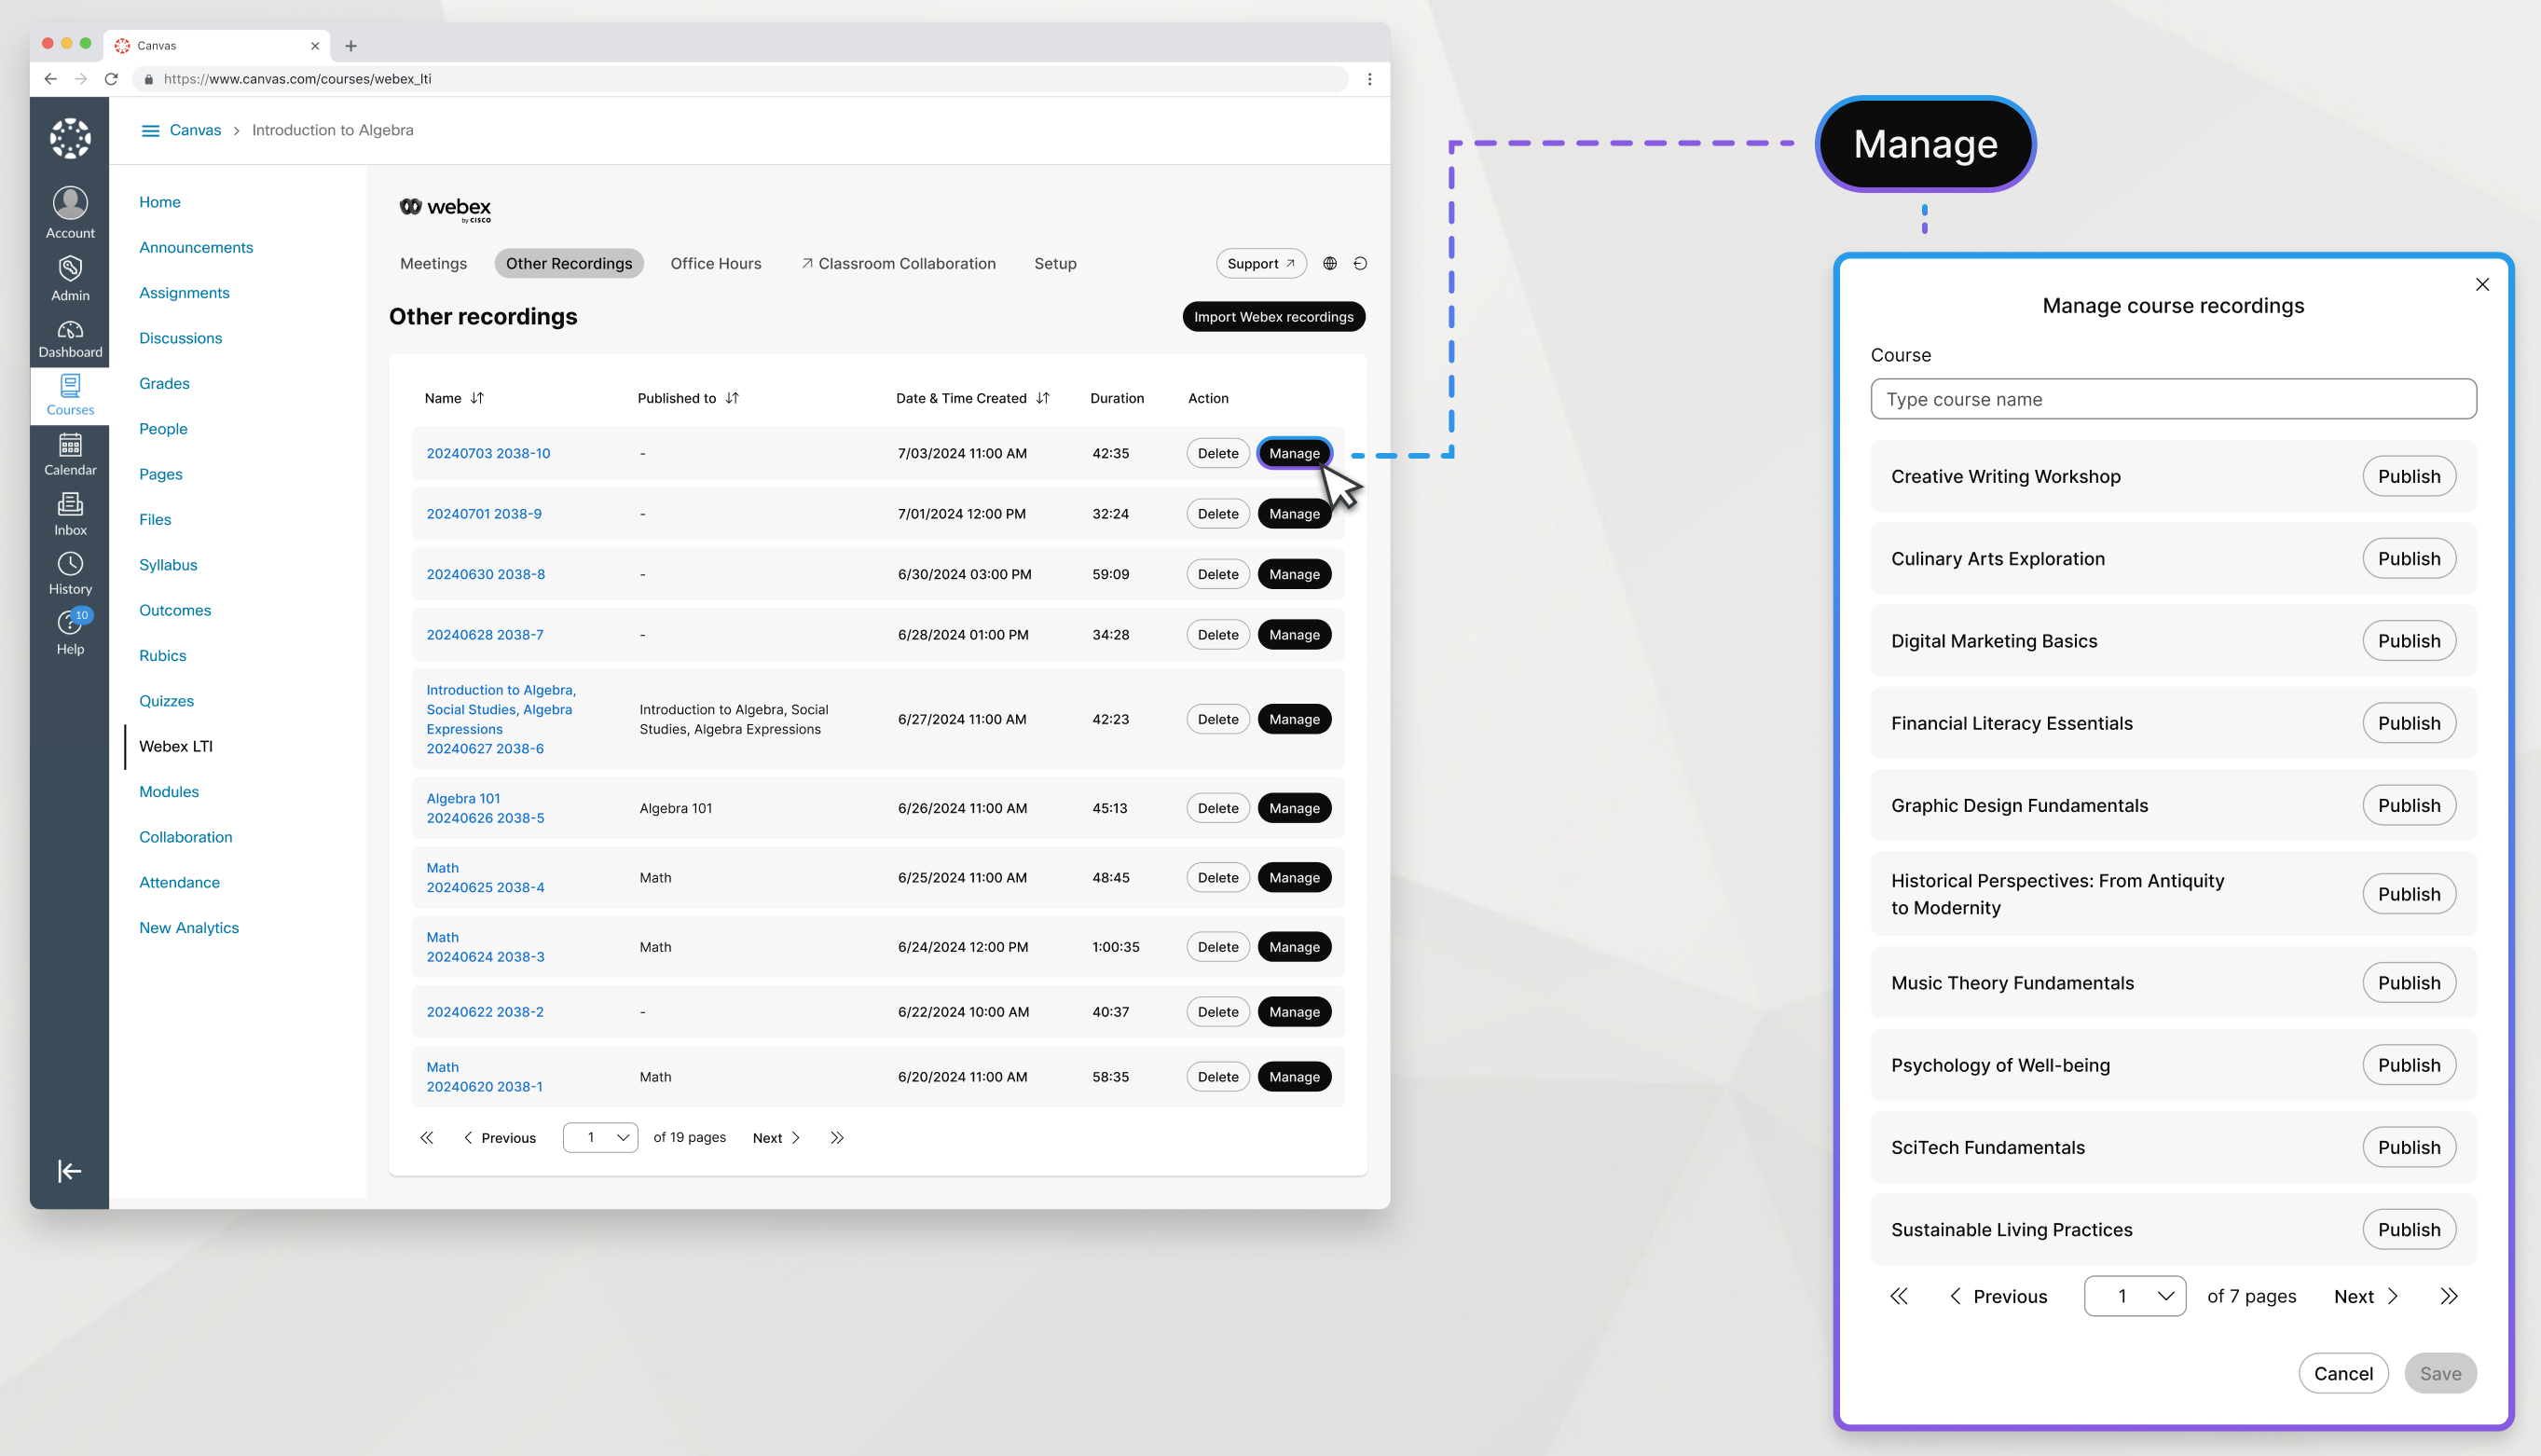
After you've imported a Webex recording into Other Recordings, you can publish it to any of your courses to make it available to students.
| 1 |
In the Other Recordings tab, find the recording and click Manage. |
| 2 |
Find the course in which you want to publish your recording and click Publish. For a course to appear in this list, you must open Webex LTI at least one time in that course. |
| 3 |
Click Save. |
You can unpublish a recording from a course to make it unavailable to students.
| 1 |
In the Other Recordings tab, find the recording and click Manage. |
| 2 |
Find the course in which you want to publish your recording and click Unpublish. |
| 3 |
Click Save. |
Deleting a recording removes it from any course that you had published it in and from the Other Recordings tab.
| 1 |
Go to the Other Recordings tab.
|
| 2 |
Find the recording that you want to delete and click Delete. |
Office hours
You can schedule and host office hours using Webex LTI. Under the Office Hours tab, set your availability and indicate times when your students can meet with you. The office hours you set apply to every course that you're an instructor for. If there are multiple instructors for a course, students must choose you from the list of instructors to schedule a meeting with you.
Office hours meetings allow students to schedule meetings directly with you. To hold office hours for multiple students at the same time, we recommend that you create a virtual meeting and name it “Office Hours.”
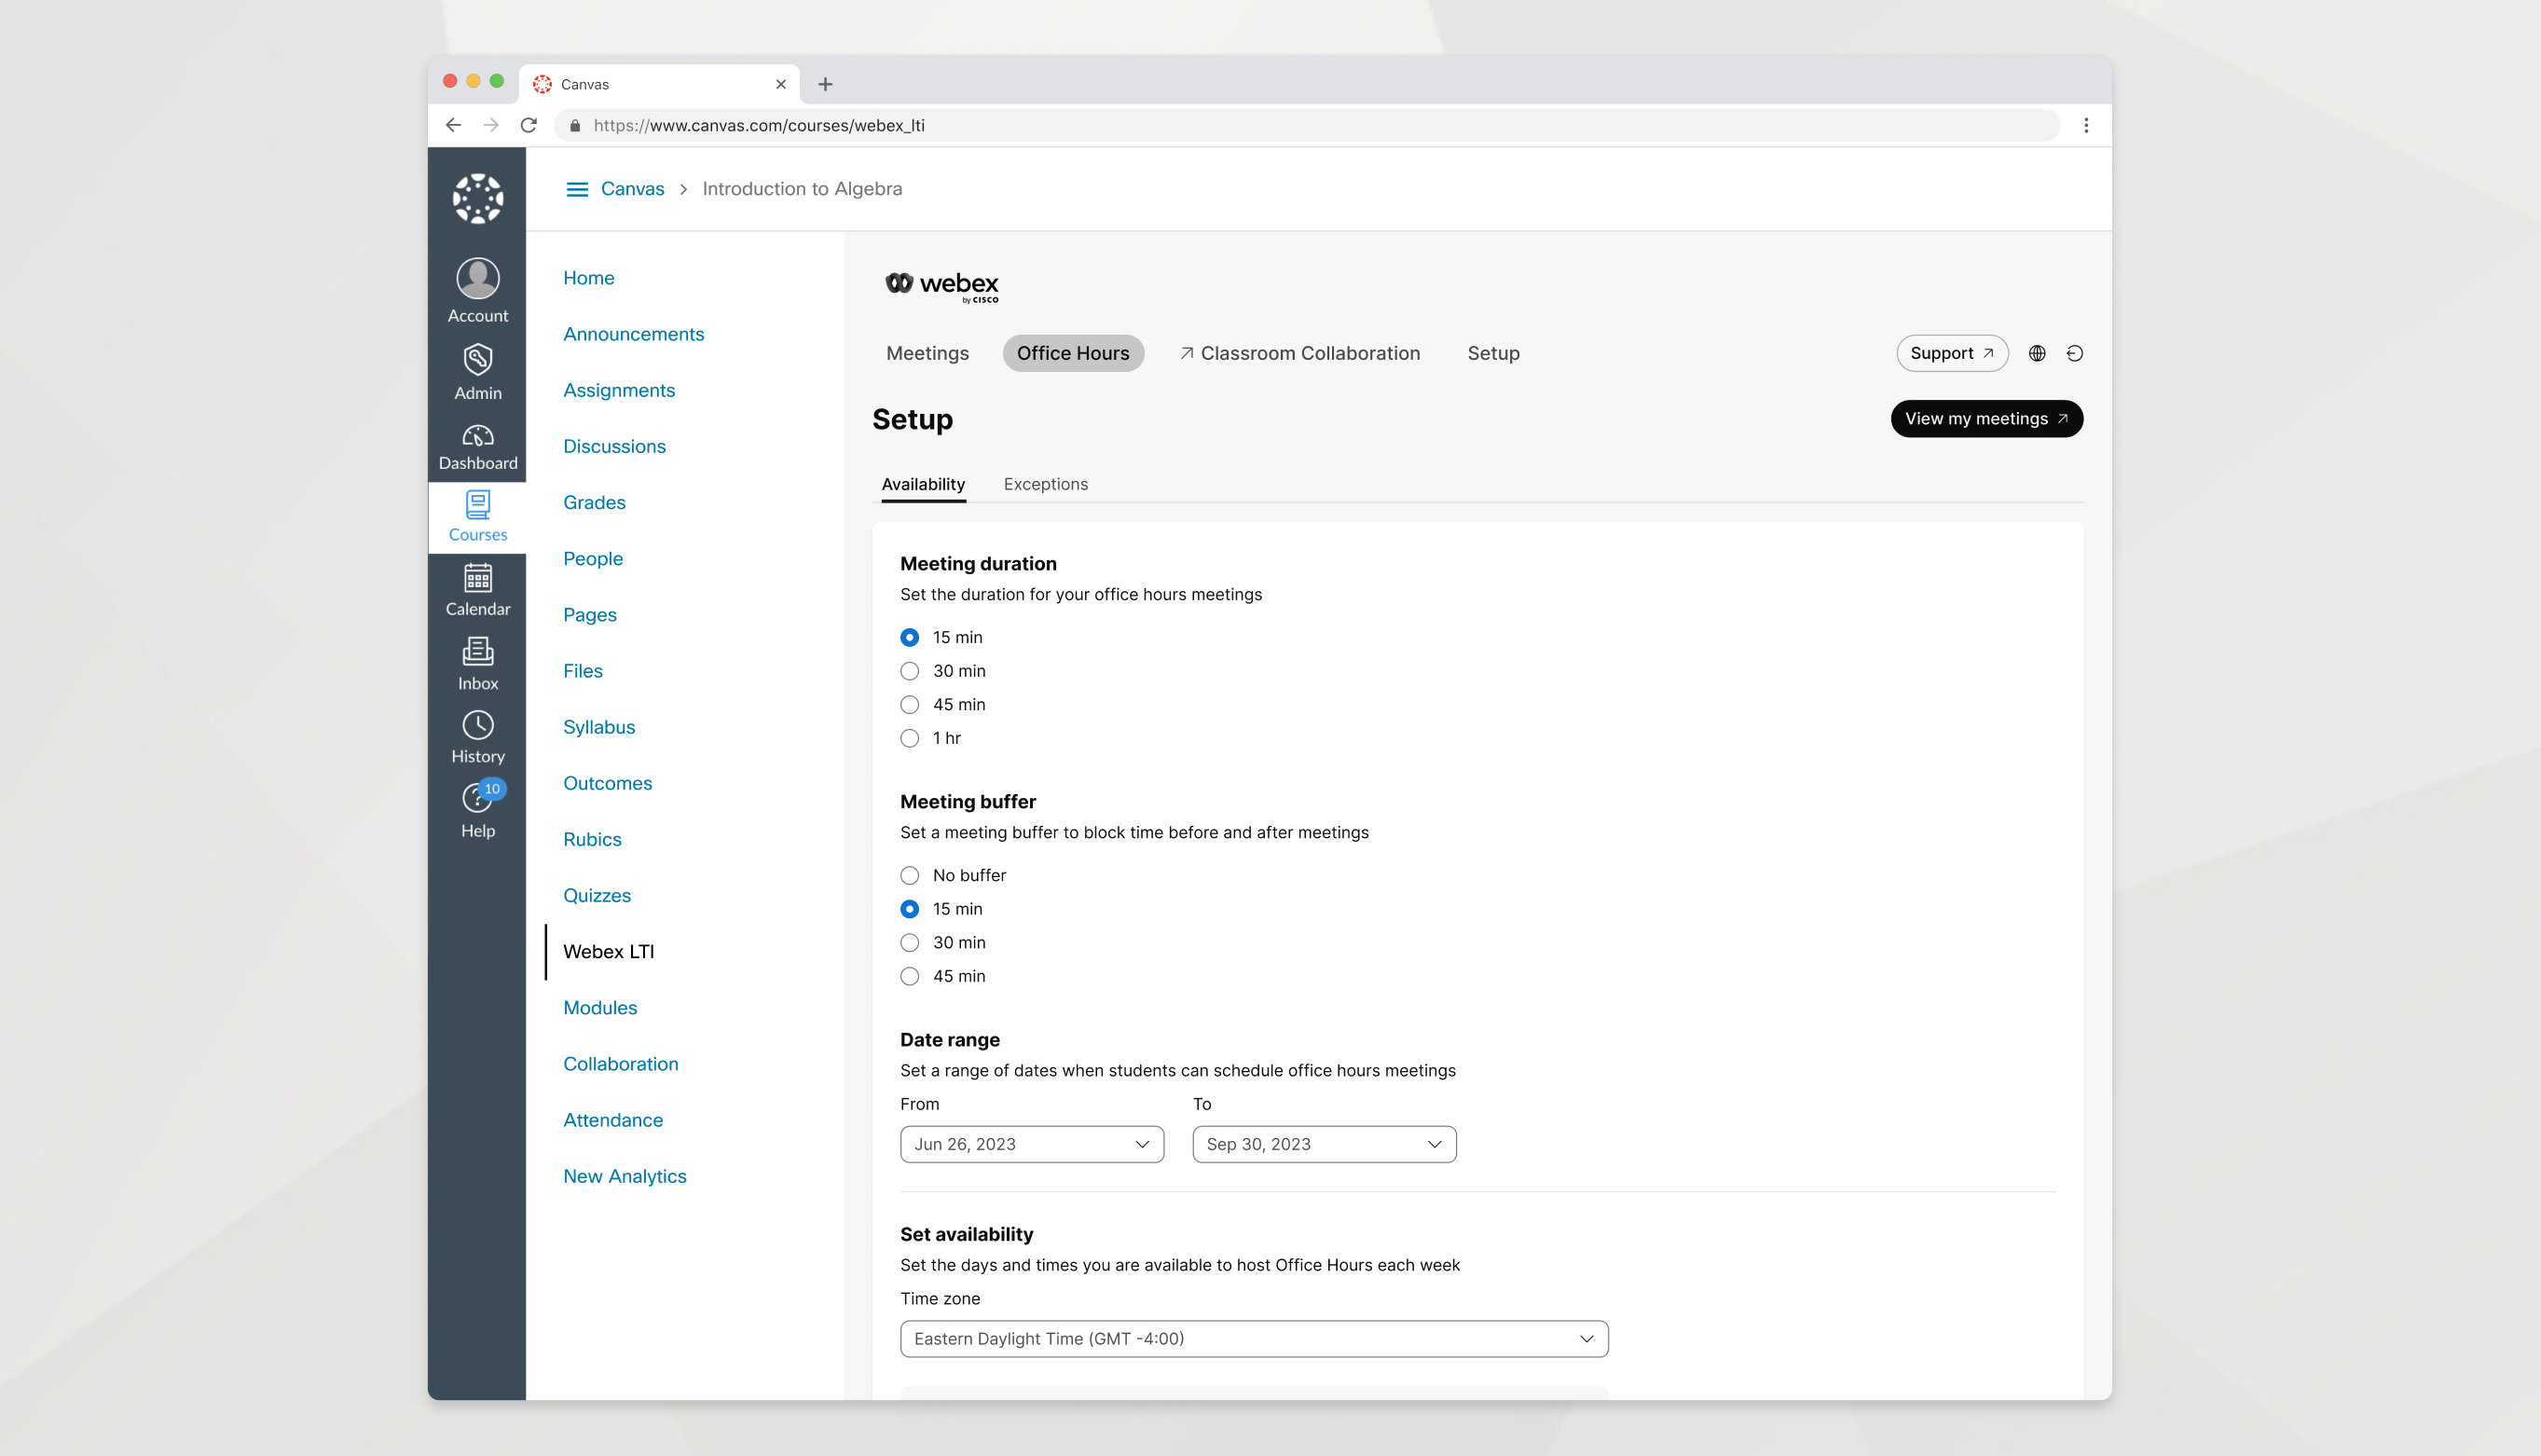
The Office Hours feature allows you to indicate your availability on different days and times so your students can meet with you.
| 1 |
Go to the Office Hours tab. |
| 2 |
In the Availability tab, set the following:
|
| 3 |
Scroll down and click Save. |
Your students can now select a time to meet with you. When a student successfully schedules an appointment, that time slot isn't available to anyone else. You get an email with the meeting link and see the meeting in your Upcoming Meetings list on your Webex site.
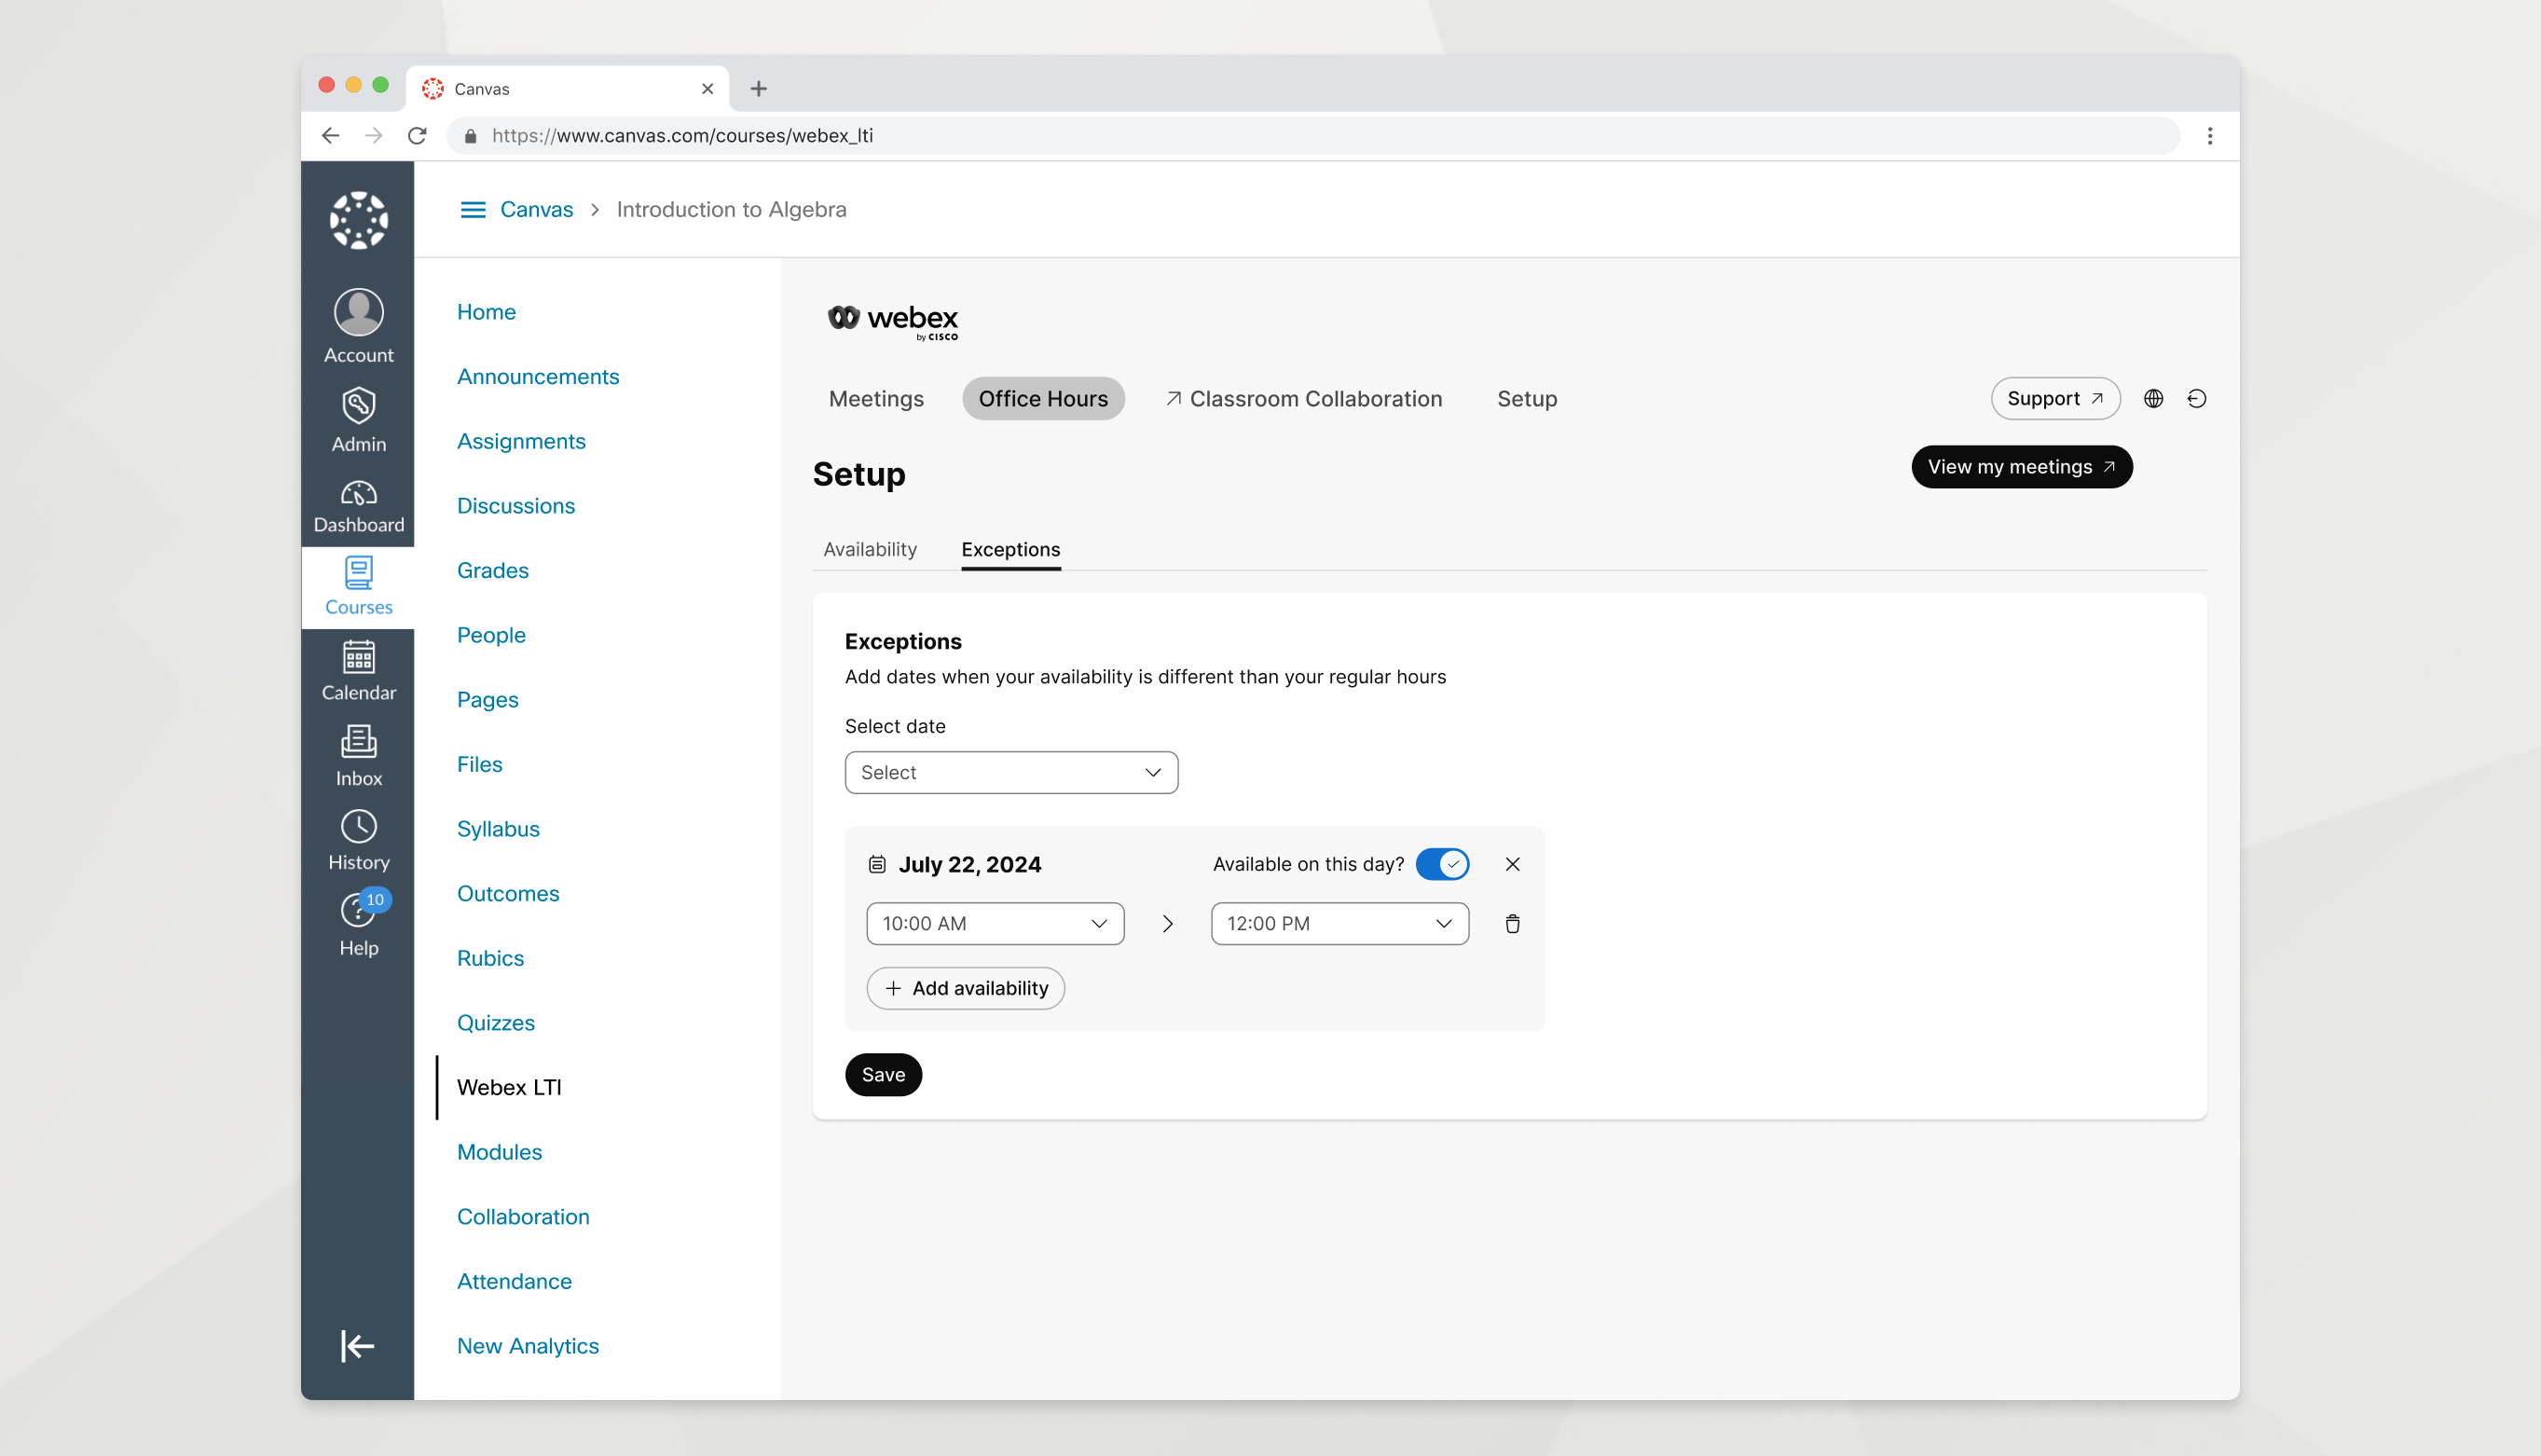
Set exceptions to change your availability on a specific date so that your office hours accurately reflect your schedule. You can block availability for an entire date, remove time intervals from a date, or add new time intervals to a date.
| 1 |
Go to the Office Hours tab and click Exceptions. |
| 2 |
Choose a date and use the following options to change your availability for that date:
|
| 3 |
Click Save. |
What to do next
You can have a maximum of 50 future exceptions set at any time. Setting an exception for a date will not affect any office hours meetings that a student scheduled before you set the exception. If necessary, you can reschedule these meetings in Webex.
Classroom collaboration
Before you begin
To enable classroom collaboration in Webex LTI Legacy, you must first authorize with your LMS and sign in with Webex.
| 1 |
In the Setup, go to the classroom collaboration section. |
| 2 |
Click Authorize and follow the on-screen prompts to authorize Webex LTI Legacy in your LMS. If you have already authorized with your LMS, you will not see the Authorize button and can skip this step. |
| 3 |
Click Sign in with Webex to enable classroom collaboration and enter your Webex credentials. If you have already signed in with Webex, you will not see the Sign in with Webex to enable classroom collaboraiton button and can skip this step. |
| 4 |
Toggle the switch on to enable classroom collaboration. |
Before you begin
To enable classroom collaboration in Webex LTI, you must first sign in with Webex.
| 1 |
In the Setup, go to the classroom collaboration section. |
| 2 |
Click Sign in with Webex to enable classroom collaboration and enter your Webex credentials. If you have already signed in with Webex, you will not see the Sign in with Webex to enable classroom collaboraiton button and can skip this step. |
| 3 |
Toggle the switch on to enable classroom collaboration. |
Enabling classroom collaboration creates a team for your course in the Webex App and adds everyone in the course as a member of that team. By default, Webex LTI automatically syncs your class roster daily. The automatic sync ensures that the members of the Webex team accurately reflect the list of members enrolled in your course.
|
Go to the Setup tab and find the classroom collabroation section.
|
You can disable classroom collaboration if you no longer want to use it in your class.
| 1 |
Go to the Setup tab and find the classroom collaboration section. |
| 2 |
Click Disable classroom collaboration. |
| 3 |
Read the explanation of what happens when you disable classroom collaboration and click OK. |
What to do next
Archive the team in the Webex App to make the team and spaces unavailable to your students.


