- Home
- /
- Article

Thanks for your feedback.

One Button to Push with Microsoft Exchange
 In this article
 Feedback?
OBTP for cloud-registered devices
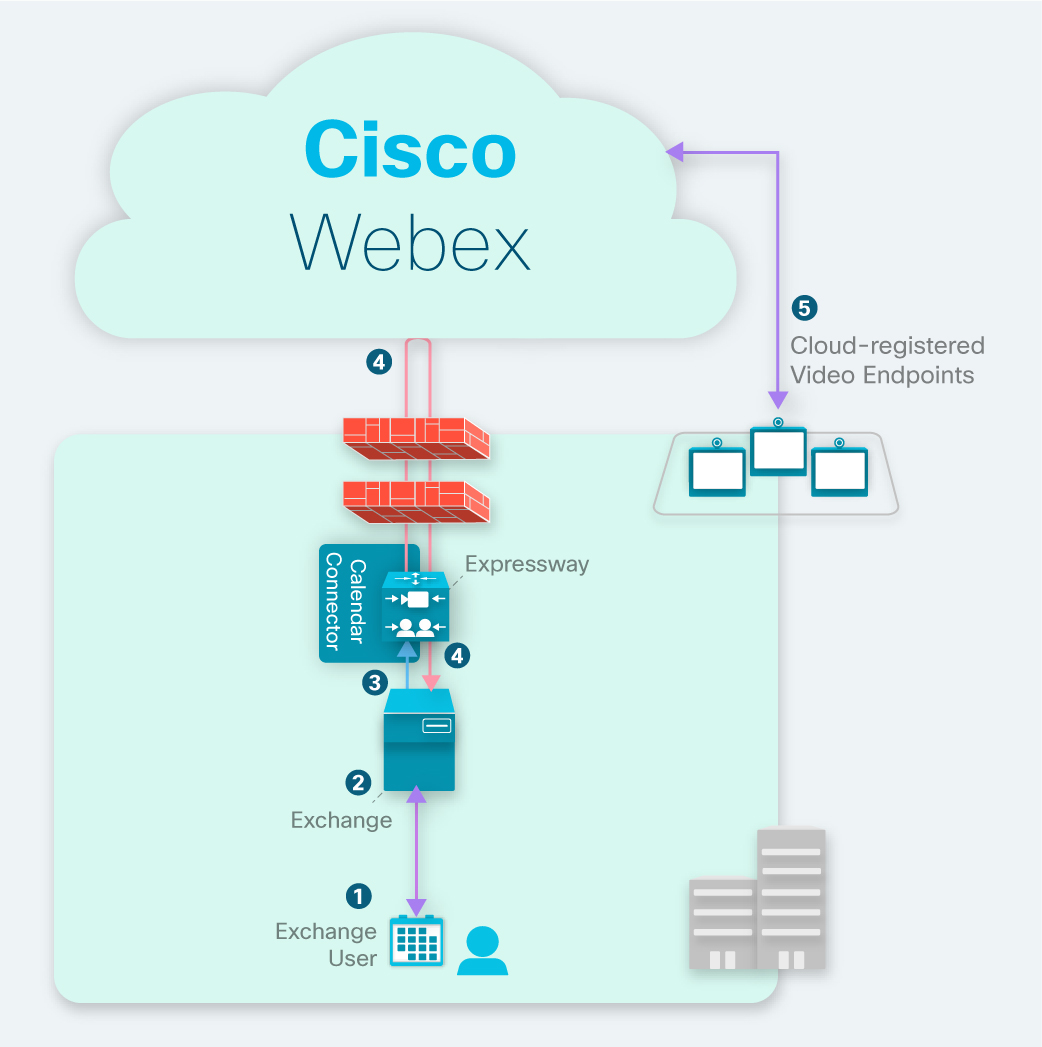
How OBTP works with cloud-registered devices
-
You can schedule a meeting using a keyword or video address, and invites a cloud-registered video endpoint by its room resource calendar.
-
If the endpoint is available at that time, Microsoft Exchange automatically accepts the invitation on its behalf.
-
EWS notifications from Microsoft Exchange alert the Calendar Connector that a meeting is scheduled.
-
For Webex meetings, the Hybrid Calendar Service retrieves the join details from the Webex cloud and updates the meeting invitation.
-
Just before the meeting time, cloud-registered devices receive OBTP information from the cloud.
OBTP for cloud-registered devices deployment task flow
Before you begin
If you haven't yet set up the Hybrid Calendar Service, see the Deployment guide for Webex hybrid calendar service. If the service is running, proceed with these instructions to add OBTP for cloud-registered room devices and boards.
| 1 |
Add Hybrid Calendar to workspaces with Board, Desk, and Room Series Toggle on the calendar service for the device, and configure the room mailbox email address. |
| 2 |
Associate personal rooms with Webex App If your Webex site is managed in Control Hub or users on your Webex site are Webex App linked, you can skip this task. |
| 3 |
Test OBTP with Board, Desk, and Room series Schedule a meeting from the calendar and add a cloud-registered device. |
Add Hybrid Calendar to workspaces with Board, Desk, and Room Series
Before you begin
This task assumes that you've already created places for the Board, Desk, and Room devices. If you need to create the workspace, see Add shared devices and services to a workspace.
| 1 |
Sign in to the customer view of https://admin.webex.com/login. |
| 2 |
In the left-hand navigation pane, under Management click Workspaces and select the workspace to modify. |
| 3 |
Go to Scheduling and select Calendar so that users can use One Button to Push (OBTP) on their devices. |
| 4 |
Select the calendar provider. |
| 5 |
Enter the email address of the room mailbox. (For help locating this email address, see " Create and manage room mailboxes" on the Microsoft Docs website.) This is the email address that will be used to schedule meetings. |
| 6 |
Click Save. |
Associate personal rooms with Webex App
To provide the join button to devices when scheduling Webex Personal Room meetings, users must have their Personal Room associated with their Webex App account. This can happen in one of the following ways:
-
The users on your Webex site have been Webex App-linked. (For site linking steps, see Link Webex sites to Control Hub.)
-
Users can change their own preferred Webex site from Webex App settings or preferences. For more information, see Change your default meeting site.
-
For a comprehensive approach, complete the following steps to use the bulk CSV import process from Control Hub to set users’ preferred Webex site.
| 1 |
Sign in to Control Hub. |
| 2 |
Under Management click Users. |
| 3 |
Click Manage Users. |
| 4 |
Use a CSV editor to change the |
| 5 |
Import the CSV file. See Manage multiple users in Control Hub with the CSV template for the detailed CSV import/export procedure.
|
Test OBTP with Board, Desk, and Room series
| 1 |
In Outlook, Outlook Web Access, or https://mail.office365.com, create a new meeting, and then add |
| 2 |
Go to the Scheduling Assistant and click Add room, and choose the device you want to add. |
| 3 |
Fill out other meeting information as needed, and send the invitation. |
| 4 |
When the meeting is scheduled to begin, verify that the Join button appears on the device. |
OBTP for premises-registered devices
How OBTP works with premises-registered devices
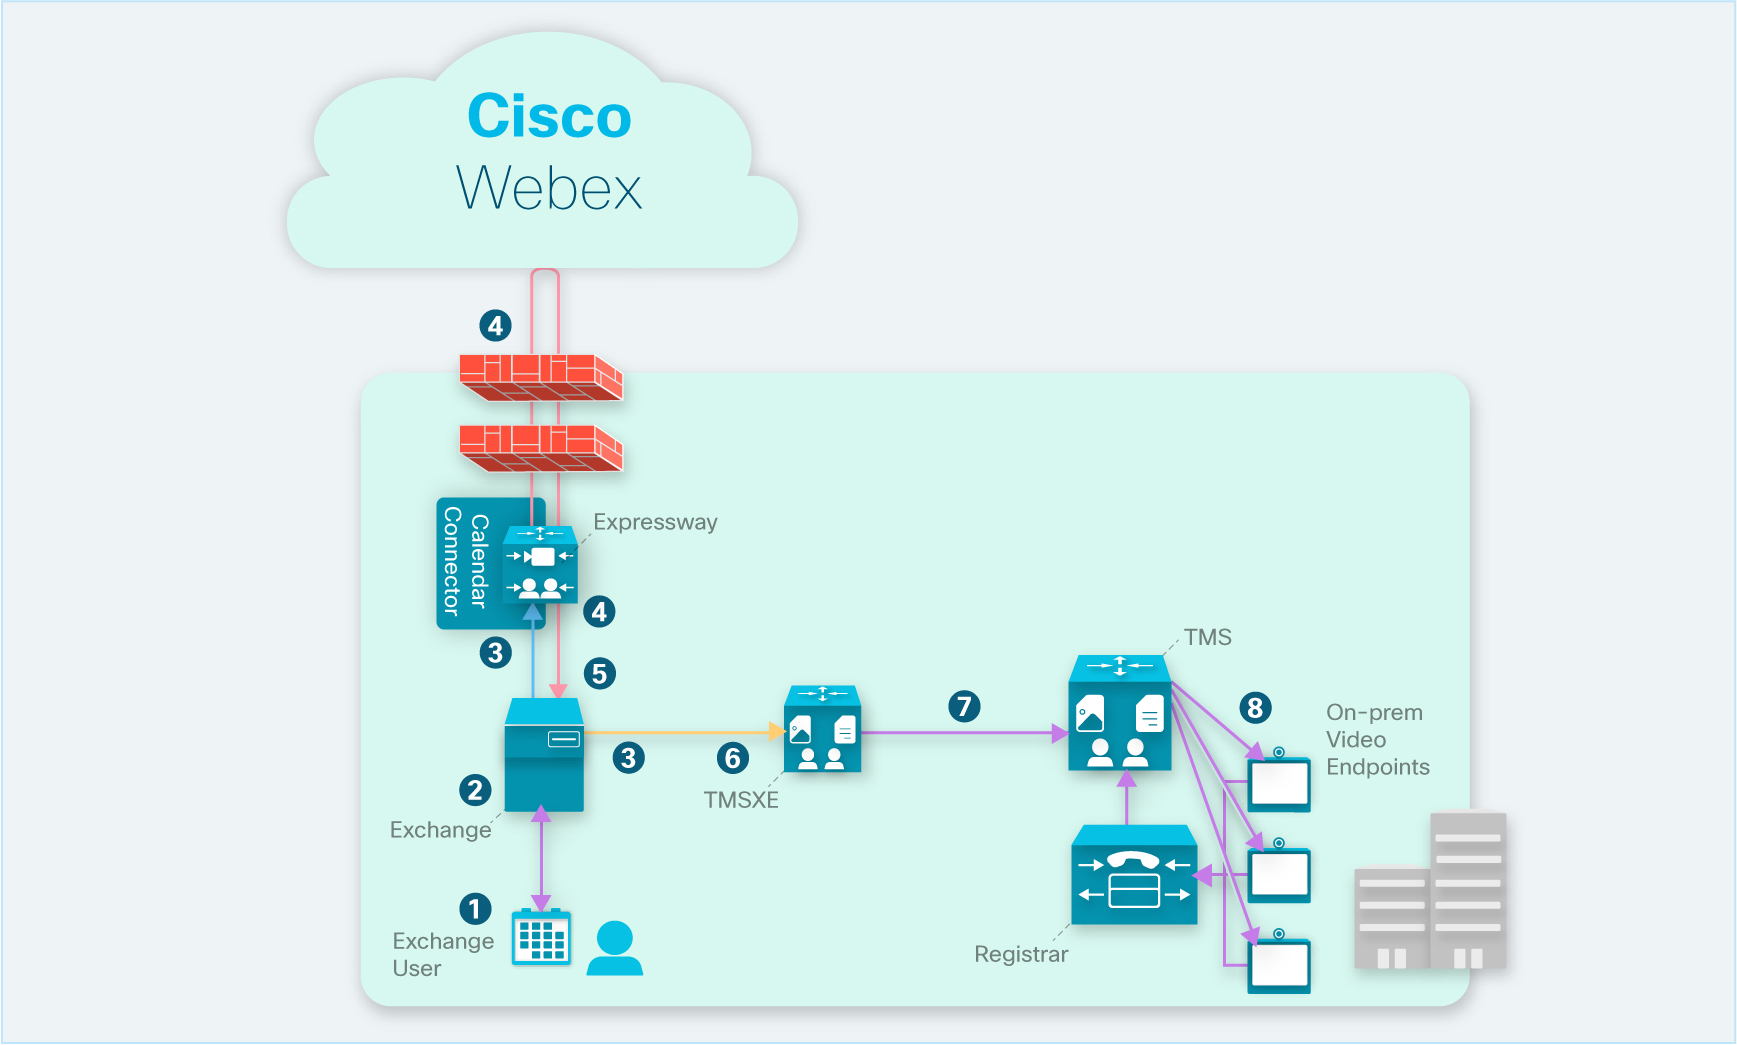
-
A user schedules a meeting using a keyword or video address, and invites a premises-registered video endpoint by its room resource calendar.
-
If the endpoint is available at that time, typically Microsoft Exchange automatically accepts the invitation on its behalf.
-
EWS notifications from Exchange alert the Calendar Connector and Cisco TMSXE that a meeting has been scheduled.
-
For Cisco Webex meetings, the Hybrid Calendar Service retrieves the join details from the Cisco Webex cloud and updates the meeting invitation.
-
The Calendar Connector populates the description field with all available join details, and sets the value of the user attribute "TMS:ExternalConferenceData" to the meeting's SIP URI.
-
EWS notifications from Exchange alert Cisco TMSXE of a meeting update.
-
Cisco TMSXE updates the meeting in Cisco TMS to Externally Hosted and sets the OBTP dial string.
-
Cisco TMS sends OBTP information for upcoming meetings to the endpoints.
Set up OBTP for premises-registered devices
For premises-registered endpoints, OBTP works with Hybrid Calendar Service and the Productivity Tools plugin for meeting invitations:
-
Hybrid Calendar Service (scheduling keywords or supported video address) populates the user attribute "TMS:ExternalConferenceData" with the SIP URI for TMS to set the OBTP dial string.
-
The Productivity Tools plugin populates the attribute "UCCapabilities" attribute with the SIP URI for TMS to set the OBTP dial string.
| 1 |
Set up Cisco TMS 15.0 and Cisco TMSXE 5.0 or higher with Microsoft Exchange integration. See the Cisco Collaboration Meeting Rooms (CMR) Hybrid Configuration Guide (TMS 15.0 - WebEx Meeting Center WBS30). |
| 2 |
To make conference rooms schedulable in Microsoft Outlook/Exchange, configure them in XE as if you were using on-premises conferencing. To configure rooms in Exchange, use the Cisco TelePresence Management Suite Extension for Microsoft Exchange Administration Guide. |
| 3 |
Obtain licenses for TMS and TMSXE. TMS and XE Licensing is the same as if using on-premises resources. You require enough licenses to cover the number of endpoints that will use OBTP. A TMS license is needed to manage the endpoint and to push the speed dial button on the touchpad at the time of the scheduled conference. A TMS-XE license is needed for the endpoint to be scheduled in Exchange. |
| 4 |
If you plan to deploy a hybrid Exchange environment with Office 365, enable TNEF for remote domains in Exchange Online. Having TNEF disabled causes Exchange Online to strip the TMS:ExternalConferenceData and UCCapabilities attributes, breaking OBTP for Unified CM-registered endpoints. For more information on TNEF, see https://docs.microsoft.com/en-us/exchange/mail-flow/content-conversion/tnef-conversion. |
Troubleshoot the Join button
No Join button on premises-registered devices
In a Hybrid Exchange environment, the Join button does not appear on any premises-registered device.
In Hybrid Exchange environments, disabling TNEF for remote domains causes Exchange Online to strip the TMS:ExternalConferenceData and UCCapabilities user attributes for the meeting. This breaks OBTP for Unified CM-registered endpoints. Without these attributes, Cisco TMSXE cannot update the meeting in Cisco TMS, and Cisco TMS cannot set the OBTP dial string for the meeting.
To fix this condition, verify that TNEF is allowed for remote domains. For instructions, see Exchange Server: TNEF conversion options.
No Join button on a specific device
A device does not show the join button when meetings are about to start.
The device does not automatically accept meeting invitations.
Check the resource calendar for the device, and see if it has accepted the meeting invitation. If not, configure the device's resource mailbox to automatically accept meeting requests.


