- Home
- /
- Article

Thanks for your feedback.

Add and manage Webex sites in Control Hub
 In this article
 Feedback?
You can add, configure, manage, and delete Webex sites in Control Hub. You can also redistribute licenses from old Webex sites to new ones.
This article focuses on site administrators, who manage enterprise accounts. If you have a personal account for Webex Meetings, see manage my account.
New sites are enabled for the Webex Suite meeting platform. Learn more at Webex App | About the Webex Suite meeting platform.
General Limitations
-
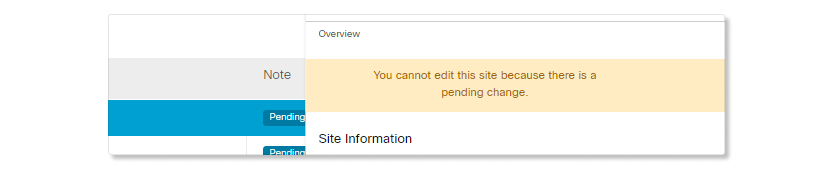
Webex site management, such as adding, deleting, or editing, will be unavailable until any pending action for a Webex site is complete.
-
Pending actions typically take up to 24 hours to complete, but may take longer.
- We recommend that you don't create more than 50 sites.
-
We recommend that you don't perform any user management-related tasks until the pending action for a Webex site is completed.
Add a Webex site in Control Hub
If you purchased Webex services from a partner, contact the partner to manage the Webex site in Control Hub.
| 1 |
Sign in to Control Hub. |
| 2 |
In the left navigation pane under Services, click Meeting. |
| 3 |
Click Add Site. |
| 4 |
Choose the subscription to add your new site to, and select Next. |
| 5 |
Click Next. |
| 6 |
Enter the site name, time zone, choose where you want to manage your users, and ensure that the site name adheres to the following naming rules:
To ensure that your site receives access to features before the normal deployment cycle, check the box for Set up Webex site for early release. You can't change this setting later. |
| 7 |
Select Add Site and click Next. Choose the time zone where most of your users are. |
| 8 |
Distribute licenses across sites, and then select Save. |
Delete a Webex site in Control Hub
Sites with only Basic Meetings can't be deleted. You can set up a license template if you want to manage access on who receives a Basic Meetings license.
When you delete a Webex site, make sure to take note that:
-
You lose all the recordings that are associated with that site. It's a good idea to download Webex recordings before deleting your site.
-
Scheduled meetings on that site won't work anymore. You need to educate your users to use a different or new Webex site for their meetings.
| 1 |
Sign in to Control Hub. |
| 2 |
In the left navigation pane under Services, click Meeting. |
| 3 |
Click , and in the pop-up window, click Delete. This action CANNOT be undone. |
| 4 |
Redistribute the licenses associated with the site you're deleting, and click Delete. |
Rename a Webex site in Control Hub
To rename a Webex site, follow the steps in Rename your Webex site in Control Hub.
Redistribute Webex licenses in Control Hub
| 1 |
Sign in to Control Hub. |
| 2 |
In the left navigation pane under Services, click Meeting. |
| 3 |
Select a site, and then click Redistribute under Licenses and Users. |
| 4 |
Redistribute licenses, and click Save. |
Determine your Webex site version in Control Hub
Different Webex site versions can have different features, so it's a good idea to know what version you have.
| 1 |
Sign in to Control Hub. |
| 2 |
In the left navigation pane under Services, click Meeting. |
| 3 |
Select your website, and click Configure Site. |
| 4 |
Under Common Settings select Site Information. The site's page and client versions appear under Site Information.
|
Webex site management in Control Hub
There are a few differences that you come across when managing a Webex site in Control Hub instead of Webex Site Administration. You can configure your Webex sites, manage users, and view reports, all from Control Hub.
The following Webex Site Aministration features and options are not available when you use Control Hub to manage your Webex site:
-
Security Options
-
Specify lock out account after [n] failed attempts to log in.
-
Deactivate account after [n] days of inactivity.
-
Specify options to display when a user forgets their password.
-
Show security check in the signup form.
-
Manage password requirements.
-
Self registration.
-
View reports
| 1 |
Sign in to Control Hub. |
| 2 |
In the left navigation pane under Monitoring, click Analytics and select the service for which to generate reports. For more information about how to interpret the reports, see Analytics for your Cloud Collaboration portfolio.
|
Set default version for new Webex sites
| 1 |
Sign in to Partner Hub. |
| 2 |
In the left navigation pane under Settings, scroll to Webex. |
| 3 |
Under Cisco Webex Teams Application Version, check Provision new Webex Sites with the latest client version, or uncheck that box and select a different Webex version from the drop-down list. |


