
Hvala na povratnim informacijama.
Ograničenja saradnje za Webex Meetings na portalu Control Hub
 Povratne informacije?
Pregled
Možete ograničiti sve korisnike da se pridruže sastancima izvan vaše organizacije ili ograničiti pristup određenim funkcijama na sastanku kako biste bili sigurni da korisnici prate pravila vaše organizacije. Kada korisnici pokušaju da koriste onemogućenu funkciju, pojavljuje se indikator koji ih obaveštava o ograničenju koje je postavila organizacija.
Da biste osigurali bezbednost, preporučujemo da primenite ograničenja na vaše pretraživače i sve vaše uređaje.
Ograničenja saradnje podržavaju samo Vebek sastanke i Vebek vebinare. Ova ograničenja se ne odnose na Vebek događaje (klasične), Vebek trening i Vebek podršku.
Ova podešavanja se primenjuju samo na korisnike koji se nalaze na verziji klijenta Vebek Meetings KSNUMKS ili novijoj verziji i klijentu Vebek App verzije KSNUMKS ili novije.
Korisnici mogu zaobići ova ograničenja tako što će se pridružiti internim i eksternim sastancima sa svojim ličnim adresama e-pošte ili kao gostima. Da biste izbegli da korisnici zaobiđu ova ograničenja, sledite korake u Ograniči funkcije saradnje za Vindovs, Mac, Android i iOS uređaje i Chrome i Edge veb pretraživače da biste dodali token na uređaje kompanije kako biste bili sigurni da računi koji se koriste sa uređajima prate ograničenja koja je postavila vaša organizacija.
Kada primenjujete ograničenja saradnje:
- Ako se korisnik prijavi sa drugim ID organizacije iz registra, Control Hub prati najrestriktivniju politiku. I korisnička politika i politika organizacije su proverene.
- Ako se korisnik prijavi sa istim ID-om organizacije u registru, Control Hub prati politiku prijavljenog korisnika.
Ograničenja saradnje na nivou grupe ili korisnika
Da biste postavili pravila za određene grupe ili po korisniku umesto cele organizacije, kreirajte šablone za podešavanja sastanaka.
Dozvolite ili blokirajte spoljne korisnike da se pridruže sastancima u vašoj organizaciji
Možete dozvoliti ili blokirati korisnike izvan vaše organizacije da se pridruže sastancima koje hostuju korisnici u vašoj organizaciji.
| 1 |
Prijavite se na Control Hub. |
| 2 |
Idi na . |
| 3 |
U odjeljku Sastanci izaberite jedno od sledećeg pored opcije Interno:
|
| 4 |
Ako ste izabrali Dozvoli spoljne korisnike sa odobrenim domenima e-pošte, unesite odobreni domen e-pošte i kliknite na dugme Dodaj. Takođe možete da uključite Primenite ova podešavanja samo na sastanke u ličnoj sobi. |
| 5 |
Ako ste izabrali Blokiraj spoljne korisnike sa izabranim domenima e-pošte, unesite domen e-pošte da biste blokirali spoljne korisnike i kliknite na dugme Dodaj. Takođe možete da uključite Primenite ovu konfiguraciju na sastanke u ličnoj sobi samo na. |
Kada blokirate korisnike da se pridruže spoljnim sastancima, oni se ne mogu pridružiti sastancima koji su hostovani sa Vebek sajtova izvan vaše organizacije. Ali možete dozvoliti korisnicima da se pridruže sastancima na određenim Vebek sajtovima, dodavanjem tih Vebek sajtova na odobrenu postavku liste.
| 1 |
Prijavite se na Control Hub. |
| 2 |
Idi na . |
| 3 |
U odjeljku Sastanci izaberite jedno od sledećeg pored Eksterno:
|
| 4 |
Ako ste izabrali Dozvoli odobrene spoljne sajtove, unesite ime veb lokacije Vebek i kliknite na dugme Dodaj. |
| 5 |
Ako ste izabrali Blokiraj odabrane spoljne sajtove, unesite Vebek sajtove koje želite da blokirate i kliknite na dugme Dodaj da biste sproveli ograničenje. |
Šta dalje
Ograničite funkcije saradnje u Vebek sastancima
Ova podešavanja se odnose na korisnike koji se pridružuju internim i eksternim sastancima. Ako želite da ograničite funkcije na sastanku, onda možete kreirati i koristiti prilagođeni tip sesije ili šablon podešavanja sastanka.
Tipovi sesija podržavaju samo interne politike sastanaka. Tipovi sesija se primenjuju samo kada je korisnik domaćin sastanka.
Šabloni za podešavanja sastanaka podržavaju interne i eksterne politike sastanaka. Šabloni podešavanja sastanka primenjuju se kada je korisnik domaćin sastanka ili učesnik.
Kada domaćin zakaže sastanak, predložak postavki sastanka domaćina kontroliše dostupnost funkcija tokom tog sastanka. Ako domaćin ima isključenu funkciju, ta funkcija je onemogućena za sve učesnike na sastanku. Ako domaćin ima uključenu funkciju, funkcija je omogućena za sastanak, ali sposobnost pojedinačnih učesnika da koriste ovu funkciju zavisi od njihovih sopstvenih postavki sastanka.
| 1 |
Prijavite se na Control Hub. | |||||||||||||||||||||||||||||||||||||||||||||||||||||||||||||||||||||||||||||||||||||||
| 2 |
Idi na . | |||||||||||||||||||||||||||||||||||||||||||||||||||||||||||||||||||||||||||||||||||||||
| 3 |
Uključite ili isključite funkcije za korisnike tokom internih ili eksternih sastanaka: Trajni sastanci u prostoru – Omogućava vam da uključite opciju Dozvoli trajne sastanke za prostore. Sesije za manje grupe učesnika
Alatke za saradnju
Na sastanku
Snimak
Daljinsko upravljanje
Deljenje
Telefonija
Video
Preuzimanje snimaka
Veze do snimaka
Istek veze do snimaka
Poništavanje podešavanja
Vebek sastanak lobiji
|
Ograničite funkcije saradnje za Vindovs, Mac, Linuk, Android i iOS uređaje i Chrome i Edge veb pretraživače
Ako želite da ograničite ove uređaje za podešavanja saradnje u vašoj organizaciji, možete da izmenite sistemske datoteke tako da se ta podešavanja primenjuju na svakoga ko koristi uređaj da se pridruži sastanku izvan vaše organizacije.
Da biste to uradili, prvo morate da pronađete i kopirate ID organizacije u Control Hub-u. Nakon dobijanja ID organizacije, sledite korake koji se odnose na uređaje koje želite da uredite.
Obavezno zaključajte ID organizacije u registru tako da korisnici ne mogu sami da ga menjaju. Ako korisnici promene ID organizacije, ograničenja saradnje se neće primenjivati na njihove uređaje.
Da biste osigurali bezbednost, preporučujemo da primenite ograničenja na vaše pretraživače i sve vaše uređaje.
| 1 |
Prijavite se na Control Hub i idite na . |
| 2 |
Kliknite na ikonu Kopiraj u polju ID organizacije. |
Možete izabrati jednu od tri opcije za podešavanje ograničenja funkcija saradnje za Vindovs uređaje:
-
Konfigurišite ručno pomoću vrednosti registra – možete ručno da uređujete određene uređaje dodavanjem ID-a organizacije u registar:
-
Otvorite registar i pregledajte kontekst u kojem želite da primenite ovu politiku. Jedan od:
-
HKEY_CURRENT_USER\SOFTWARE\Policies\CiscoWebex\ -
HKEY_LOCAL_MACHINE\SOFTWARE\Policies\CiscoWebex\
-
- Kreirajte novu vrednost stringa koja se zove
OrganizationID. - Kliknite desnim tasterom miša na novu vrednost, a zatim Izmeni...
- Nalepite ID organizacije u podatke o vrednosti novog niza.
-
-
Konfigurišite pomoću šablona grupne politike – možete da uvezete administrativni šablon grupne politike (.adm) da biste primenili ID organizacije na iste vrednosti registra kao gore.
-
Konfigurišite pomoću MSI instalacije – možete pokrenuti komandu za instalaciju webexapp.msi koristeći ID organizacije da biste izmenili ovu vrednost registra:
HKEY_LOCAL_MACHINE\SOFTWARE\WOW6432Node\Webex\Policies\OrganizationID.
Konfigurišite pomoću ključeva registratora
-
Otvorite Editor registra.
-
Dodajte ID organizacije u jednu od sledećih vrednosti registratora:
-
HKEY_CURRENT_USER\SOFTWARE\Policies\CiscoWebex\OrganizationID -
HKEY_LOCAL_MACHINE\SOFTWARE\Policies\CiscoWebex\OrganizationID
-
Konfigurišite pomoću šablona grupne politike
-
Uvezite datoteku
.adm. -
U alatu za upravljanje grupnom politikom kliknite na sledeće:
-
Konfiguracija računara za primenu ID-a organizacije
HKEY_CURRENT_USER\SOFTWARE\Policies\CiscoWebex\OrganizationID -
Korisnička konfiguracija za primenu organizacije na
HKEY_LOCAL_MACHINE\SOFTWARE\Policies\CiscoWebex\OrganizationID
-
-
Na navigacionom panelu kliknite na .
-
Dvaput kliknite na Konfiguriši ID organizacije u Cisco Vebek-u.
-
Kliknite na dugme Omogućeno, dodajte ID svoje organizacije u polje Opcije, a zatim kliknite na dugme Primeni.
Konfigurišite pomoću MSI instalacije
-
Pokrenite sledeću komandu da biste instalirali
webexapp.msisa parametromORGANIZATIONIDza konfigurisanjeHKEY_LOCAL_MACHINE\SOFTWARE\WOW6432Node\Webex\Policies\OrganizationID:msiexec /i webexapp.msi /log webexapp.log ORGANIZATIONID="xxxxxxxx-xxxx-xxxx-xxxx-xxxxxxxxxxxx"
Da biste podesili ograničenja saradnje na Mac uređajima, kreirajte datoteku .plist pod nazivom com.cisco.webexmeetings.config.plist , /Library/Preferences/i dodajte sledeći ključ u datoteku:
|
Ime i prezime |
Vrednost |
Opis |
|---|---|---|
|
Identifikaцija organizaцije |
%OrganizationID% |
Navedite ID organizacije koji ste kopirali iz Control Hub-a za ograničenja saradnje. |
Da biste postavili ograničenja saradnje na Android i iOS mobilnim uređajima, morate konfigurisati ID organizacije pomoću usluge AppConfig za upravljanje mobilnim uređajima.
Ova funkcija radi samo za mobilne uređaje koji koriste aplikaciju Vebek Meetings na verziji KSNUMKS i novijim.
|
Konfiguracioni ključ |
Vrsta vrednosti |
Opis |
|---|---|---|
|
Identifikaцija organizaцije |
Niska |
Navedite ID organizacije koji ste kopirali iz Control Hub-a za ograničenja saradnje. |
Da bi se pravila vaše organizacije primenjivala na korisnike koji se pridružuju iz Google Chrome-a, morate dodati dodatak za politiku Vebek sastanaka preuzet iz Chrome veb prodavnice, a zatim dodati pravilo za vašu organizaciju u politiku.
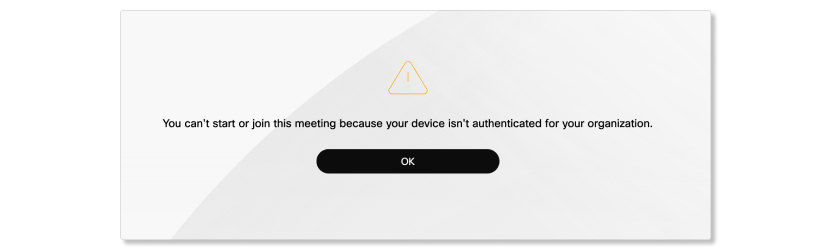
Korisnici kojima je ograničeno pridruživanje određenim sastancima vide sledeću poruku kada pokušaju da se pridruže ograničenom sastanku putem Google Chrome-a.
-
Otvorite Google Chrome IT admin stranicu na .https://admin.google.com
-
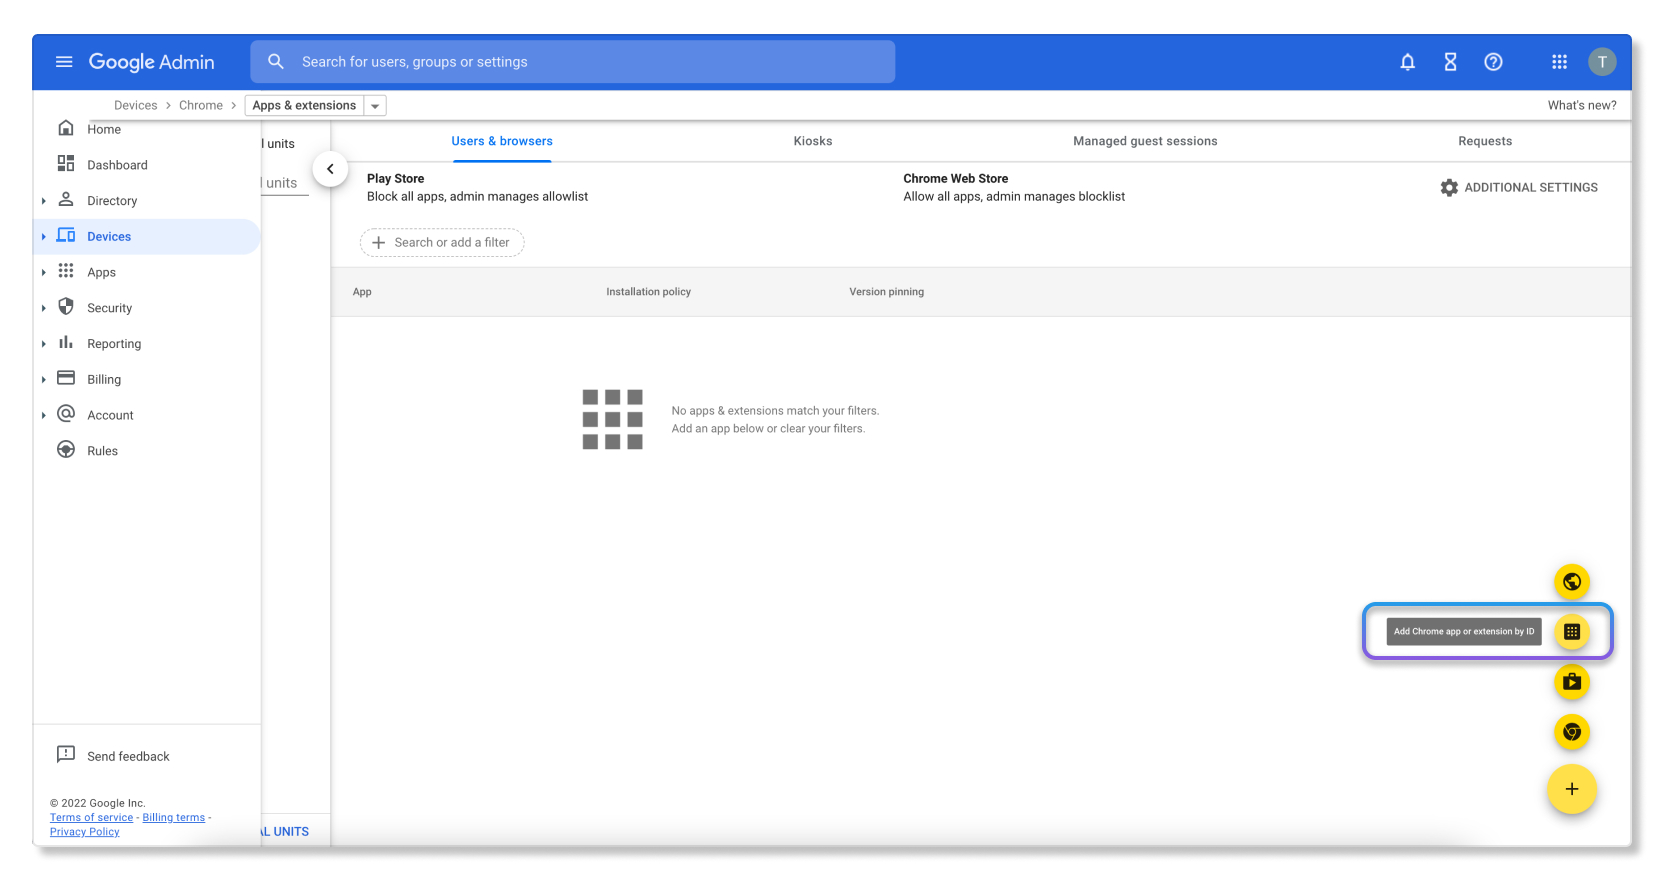
Dodajte proširenje dodatka za politiku Vebek sastanaka tako što ćete otići na Chrome > Aplikacije i ekstenzije > Korisnici i pretraživači > Dodajte Chrome aplikaciju ili proširenje po ID-u.
-
Dodajte sledeću ekstenziju po ID-u:
denhmfenjcamjiamkogegcjieeiahjgp.
-
Dodajte sledeće pravilo u politiku (koristeći sopstveni ID organizacije):
{"orgID": {"Value": "xxxxxxxx-xxxx-xxxx-xxxx-xxxxxxxxxxxx"}}
-
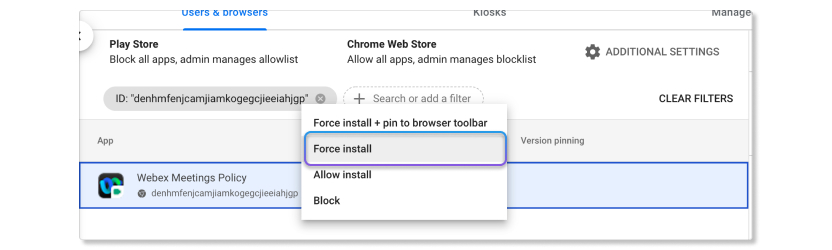
Kliknite desnim tasterom miša na karticu i izaberite Force install.
Konfigurišite pomoću šablona grupne politike
Možete koristiti grupne politike da biste instalirali proširenje politike Vebek sastanaka.
Pre nego što počnete, uverite se da ste uvezli ADM ili ADMKS šablone za Google Chrome.
-
U uređivaču pravila grupe idite na .
Izaberite 'Konfigurišite listu prisilno instaliranih aplikacija i ekstenzija'.
Kliknite desnim tasterom miša i izaberite Uredi.
Izaberite Omogućeno.
Kliknite na Prikaži.
Unesite sledeći ID pod "ID-ovi proširenja / aplikacija i ažurirajte URL-ove koji će se tiho instalirati".
denhmfenjcamjiamkogegcjieeiahjgp;https://clients2.google.com/service/update2/crxKliknite na dugme Appli.
Možda će trebati vremena da Chrome učita konfiguraciju. Možete ponovo pokrenuti Google Chrome ili ponovo učitati pravila unosom chrome://policy/ u traku za adresu.

Konfigurišite ID organizacije sa ključem registratora koristeći grupnu politiku
Možete koristiti Microsoft Group Policy da biste instalirali proširenje Veeks Meetings Policy na Google Chrome i konfigurisali ID organizacije.
-
U uredniku za upravljanje grupnom politikom, kreirajte novi objekat grupne politike (GPO).
Takođe možete da izmenite postojeći GPO.
Povežite GPO sa organizacijom koja sadrži vaše korisnike ili uređaje i prebacite se na režim uređivanja GPO-a.
Idite na .
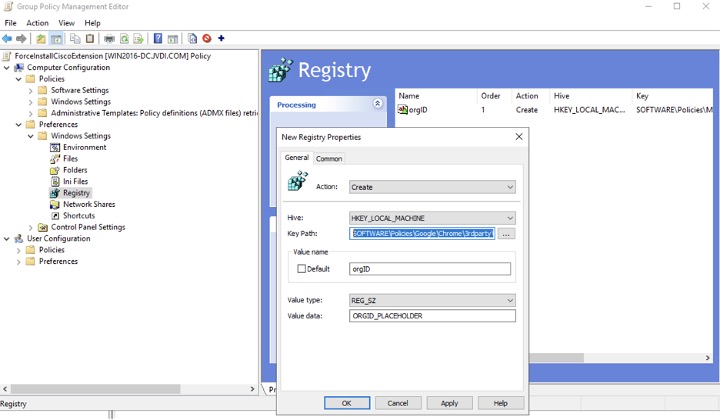
Kliknite desnim tasterom miša na Registar i izaberite registra >.
U prozoru Nova svojstva registratora izaberite karticu Opšte.
- U odjeljku Akcija izaberite Kreiraj.
-
Unesite sledeće detalje:
-
Košnica—
HKEY_LOCAL_MACHINE -
Ključni put—
SOFTWARE\Policies\Google\Chrome\3rdparty\extensions\denhmfenjcamjiamkogegcjieeiahjgp\policy -
Naziv vrednosti—
orgID -
Vrsta vrednosti—
REG_SZ -
Podaci o vrednosti—ID organizacije koju pruža Cisco.
-
Kliknite na dugme Appli.
Morate instalirati i konfigurisati proširenje politike Vebek sastanaka na Chrome pretraživačima. Ova konfiguracija primenjuje politiku ograničenja sastanaka vaše organizacije na korisnike koji se pridružuju sastancima koristeći Chrome na MacOS računarima. Detalji koji su vam potrebni su:
- Proširenje ID: Ovo je isto za sve:
denhmfenjcamjiamkogegcjieeiahjgp - ID vaše organizacije: Jedinstveno za vašu Vebek organizaciju. Ovaj ID možete kopirati iz Control Hub-a, na stranici Upravljanje .
Korišćenje Google Admin konzole
Opisuje kako da prisilite da instalirate ekstenziju Vebek Meetings sa Google Admin konzolom i konfigurišete je sa ID-om vaše organizacije.
-
Prijavite se na Google Admin konzolu na .https://admin.google.com
-
Idite na Chrome > aplikacije i ekstenzije > Korisnici i pretraživači > Dodajte Chrome aplikaciju ili proširenje po ID-u.
-
Dodajte sledeću ekstenziju po ID-u:
denhmfenjcamjiamkogegcjieeiahjgp. -
Dodajte sledeće pravilo u politiku (koristeći sopstveni ID organizacije):
{"orgID": {"Value": "xxxxxxxx-xxxx-xxxx-xxxx-xxxxxxxxxxxx"}} -
Kliknite desnim tasterom miša na karticu i izaberite Force install.
Podešavanje MacOS preferencije
Opisuje kako da prisilite da instalirate ekstenziju Vebek Meetings koristeći Chrome-ove preferencije
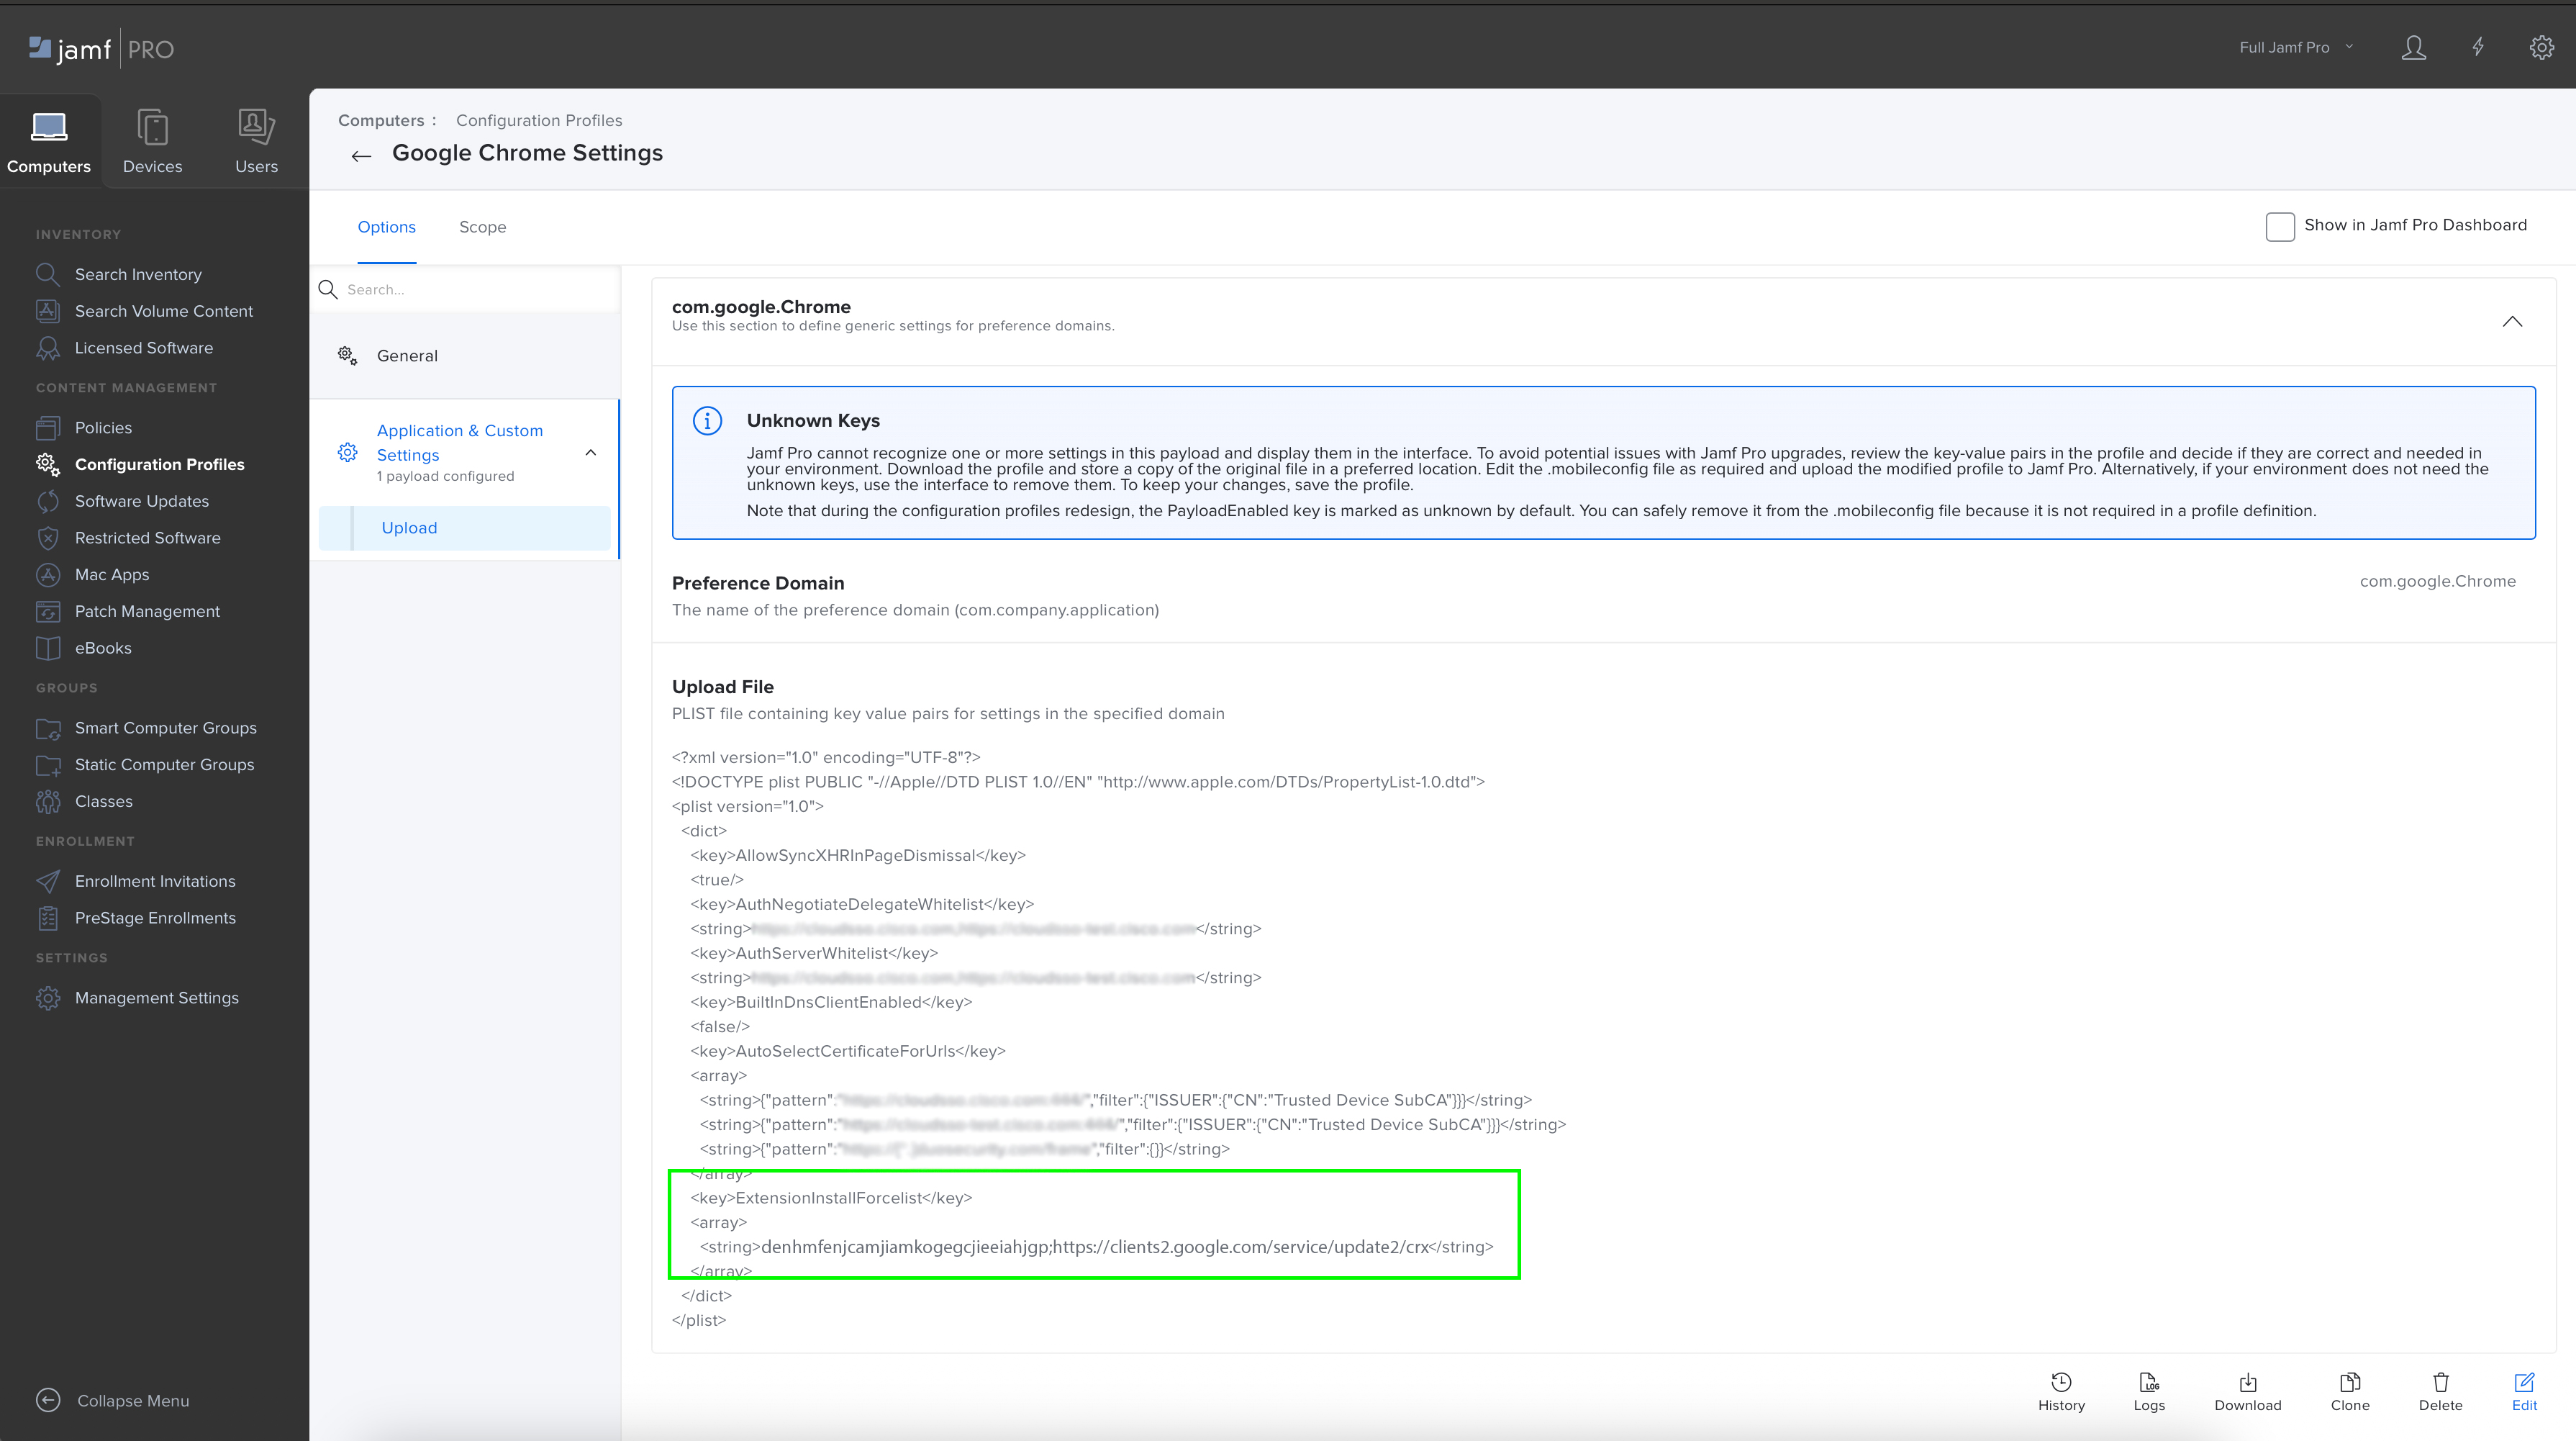
ExtensionInstallForcelistna MacOS-u, a zatim konfigurišete ekstenziju sa ID-om organizacije.
- Pročitajte temu EktensionInstallForcelist u Google-ovoj dokumentaciji o politici Chrome Enterprise.
-
Koristite softver za upravljanje mobilnim uređajima da biste ažurirali preferenciju
ExtensionInstallForcelist
.-
Dodajte sledeći ID ekstenzije:
denhmfenjcamjiamkogegcjieeiahjgpi -
Dodajte URL URL za ažuriranje ekstenzije:
https://clients2.google.com/service/update2/crx
Trebalo bi da završite sa novim nizom u nizu koji definiše listu instalacije ekstenzije:
denhmfenjcamjiamkogegcjieeiahjgp;https://clients2.google.com/service/update2/crx other-extension-id;other-extension-update-URL another-extension-id;another-extension-update-URL -
- Rasporedite modifikovani profil konfiguracije na svoje MacOS računare.
- Proverite da li je ekstenzija instalirana na Mac-u.
Kreirajte profil konfiguracije
Opisuje kako konfigurisati ID organizacije za proširenje Vebek politike.
-
Kreirajte datoteku
com.google.Chrome.extensions.denhmfenjcamjiamkogegcjieeiahjgp.plistliste osobina sa ID-om vaše organizacije koristeći sledeću vrednost:orgID xxxxxxxx-xxxx-xxxx-xxxx-xxxxxxxxxxxx -
Rasporedite modifikovani profil konfiguracije na svoje MacOS računare.
-
Proverite da li se vaša politika sastanaka primenjuje kada korisnik na upravljanom MacOS računaru koristi Chrome da se pridruži sastanku.

Možete da primenite ograničenja saradnje na vašu organizaciju za korisnike koji se pridruže iz Microsoft Edge-a. Možete koristiti i proširenje pretraživača Google Chrome na Microsoft Edge-u.
Pre nego što počnete, proverite da li je vaš uređaj upisan za upravljanje mobilnim uređajima (MDM).
Kreirajte novi profil konfiguracije
-
Prijavite se na Microsoftovu administratorsku stranicu i idite na .
-
Izaberite sledeće osobine:
-
Platforma—Windows 10 ili noviji.
-
Tip profila—Šabloni.
-
-
Kliknite na dugme Kreiraj.
-
U odjeljku Osnove izaberite ime i opis politike vaše organizacije.
-
Kliknite na dugme Sledeći.
-
U postavkama računara, potražite "Kontrolišite koje ekstenzije se instaliraju tiho" i izaberite ga.
-
Izaberite Omogućeno i unesite sledeći ID pod "ID-ovi proširenja / aplikacija i ažurirajte URL-ove koji će se tiho instalirati":
denhmfenjcamjiamkogegcjieeiahjgp;https://clients2.google.com/service/update2/crx?response=updatecheck&x=id%3Ddenhmfenjcamjiamkogegcjieeiahjgp%26uc -
Kliknite na dugme Sledeći.
(Opciono) Pod oznakama obima možete dodeliti oznake obima profilu.
U odjeljku Zadaci izaberite "Dodaj sve korisnike" i "Dodaj sve uređaje".
-
Kliknite na dugme Sledeći.
-
U odjeljku Pregled + kreiranje, pregledajte podešavanja i kliknite na dugme Kreiraj.
Sinhronizujte svoj upravljani uređaj
-
Na upravljanom uređaju idite na Podešavanja > Računi > Pristup poslu ili školi
U odeljku "Povezano sa MSFT MDM-om" kliknite na dugme Info.
Pomerite se do "Status sinhronizacije uređaja" i kliknite na dugme Sinhronizacija.
Ekstenzija Google Chrome-a se instalira kada se sinhronizacija završi. Možete da proverite sinhronizaciju proverom Registri Editor na sledećoj lokaciji:
HKEY_LOCAL_MACHINE\SOFTWARE\Policies\Microsoft\Edge\ExtensionInstallForcelistProširenje je takođe dostupno u Microsoft Edge-u na edge://extensions.
Konfigurišite pomoću ključa registratora
Da biste konfigurisali politiku za određeni ID organizacije, proširenje za Chrome čita pravilo koje je postavljeno u registru. Možete ručno uvesti ključ registratora kreiranjem datoteke .reg .
-
Otvorite Editor registra.
- Kreirajte datoteku
.regsa sledećom vrednošću:Windows Registry Editor Version 5.00 [HKEY_LOCAL_MACHINE\SOFTWARE\Policies\Microsoft\Edge\3rdparty\extensions\denhmfenjcamjiamkogegcjieeiahjgp\policy] "orgID"="xxxxxxxx-xxxx-xxxx-xxxx-xxxxxxxxxx" - Dvaput kliknite na datoteku da biste instalirali ključ registratora.
Takođe možete koristiti PoverShell da biste instalirali ključ registratora. Koristite sledeću vrednost:
reg import
            .\edge_policy.reg
Potvrdite ID svoje organizacije
-
Ponovo pokrenite Microsoft Edge i idite na web.webex.com.
Otvorite konzolu za programere i unesite
webex.config.meetings.installedOrgID.Prikazan je ID organizacije iz datoteke
.reg.
Konfigurišite pomoću šablona grupne politike
Možete koristiti grupne politike da biste instalirali proširenje politike Vebek sastanaka.
Pre nego što počnete, uverite se da ste uvezli Microsoft Edge administrativne šablone.
-
U uređivaču politike grupe idite na .
- Izaberite 'Kontrolišite koje ekstenzije se instaliraju tiho'.
Izaberite Omogućeno.
Kliknite na Prikaži.
Unesite sledeći ID pod "ID-ovi proširenja / aplikacija i ažurirajte URL-ove koji će se tiho instalirati".
denhmfenjcamjiamkogegcjieeiahjgp;https://clients2.google.com/service/update2/crxKliknite na dugme Appli.
Konfigurišite ID organizacije sa ključem registratora koristeći grupnu politiku
Možete koristiti Microsoft Group Policy da biste instalirali proširenje Vebek Meetings Policy na Microsoft Edge i konfigurisali ID organizacije.
-
U uredniku za upravljanje grupnom politikom, kreirajte novi objekat grupne politike (GPO).
Takođe možete da izmenite postojeći GPO.
Povežite GPO sa organizacijom koja sadrži vaše korisnike ili uređaje i prebacite se na režim uređivanja GPO-a.
Idite na .
Kliknite desnim tasterom miša na Registar i izaberite registra >.
U prozoru Nova svojstva registratora izaberite karticu Opšte.
- U odjeljku Akcija izaberite Kreiraj.
-
Unesite sledeće detalje:
-
Košnica—
HKEY_LOCAL_MACHINE -
Ključni put—
SOFTWARE\Policies\Microsoft\Edge\3rdparty\extensions\denhmfenjcamjiamkogegcjieeiahjgp\policy -
Naziv vrednosti—
orgID -
Vrsta vrednosti—
REG_SZ -
Podaci o vrednosti—ID organizacije koju pruža Cisco.
-
Kliknite na dugme Appli.
Možete primeniti ograničenja saradnje na vašoj organizaciji za korisnike koji se pridruže iz Mozilla Firefox-a. Možete da primenite politiku ID-a Vebeks organizacije i Vebek ekstenziju za Firefok svim svojim korisnicima putem Microsoft Intune-a.
Konfigurišite pomoću šablona politike
Pre nego što počnete, proverite da li ste preuzeli šablone Mozilla politike.
ADMKS fajlovi uključuju:
mozilla.admxfirefox.admx
ADML fajlovi uključuju:
mozilla.admlfirefox.adml
- Otvorite datoteku
firefox.admxi pronađite oznaku.Ubacite sledeću vrednost unutar
oznake i sačuvajte datoteku: - Kliknite na ,
en_USotvorite datotekufirefox.adml.Pronađite oznaku
<i dodajte sledeću vrednost:stringTable>orgID Webex Meeting Policy SettingPronađite oznaku
<i dodajte sledeću vrednost:presentationTable> -
Prijavite se na Microsoftovu stranicu administratora i idite na .
- Idite na karticu Uvoz ADMKS i kliknite na dugme Uvoz.
- Pratite uputstva za otpremanje ADMKS i ADML datoteke.
Prvo uvezite
mozilla.admximozilla.admldatoteke. Uverite se da status prikazuje Dostupno. Zatim, uvezitefirefox.admxifirefox.admldatoteke.
Kreirajte novi profil konfiguracije
-
Prijavite se na Microsoftovu stranicu administratora i idite na .
- Idite na karticu Politike i kliknite na dugme .
-
Izaberite sledeće osobine:
-
Platforma—Windows 10 ili noviji.
-
Tip profila—Šabloni > Uvezeni administrativni šabloni (pregled).
-
- Kliknite na dugme Kreiraj.
- U odjeljku Osnove izaberite ime i opis politike vaše organizacije.
- Kliknite na dugme Sledeći.
- U odjeljku Podešavanja konfiguracije izaberite
orgIDi konfigurišite postavke koje želite u svojoj politici. - Izaberite Omogućeno i unesite ID organizacije.
- Kliknite na dugme Sledeći.
- (Opciono) Pod oznakama obima možete dodeliti oznake obima profilu.
- U odjeljku Zadaci kliknite na dugme Dodaj grupe i izaberite grupu da biste primili svoj profil.
Ako je profil dodeljen korisničkim grupama, konfigurisana podešavanja ADMKS-a primenjuju se na bilo koji uređaj na koji se korisnik upisuje i prijavljuje. Ako je profil dodeljen grupama uređaja, podešavanja se primenjuju na svakog korisnika koji se prijavljuje na uređaj. Ovo se odnosi i na konfiguracije računara (
HKEY_LOCAL_MACHINE) i korisničke konfiguracije (HKEY_CURRENT_USER). Neke postavke koje dodeljuje korisnik takođe mogu uticati na druge korisnike na istom uređaju. - Kliknite na dugme Sledeći.
-
U odjeljku Pregled + kreiranje, pregledajte podešavanja i kliknite na dugme Kreiraj.
Konfigurišite politiku za instaliranje Firefok ekstenzija
Pre nego što počnete, obavezno preuzmite Firefok ADMKS šablon. Možete preuzeti datoteku policy_templates_v6.3.zip, izvaditi datoteku i pronaći prozore > firefox.admx.
-
Prijavite se na Microsoftovu stranicu administratora i idite na .
- Idite na karticu Politike i kliknite na dugme .
-
Izaberite sledeće osobine:
-
Platforma—Windows 10 ili noviji.
-
Tip profila—Šabloni > Prilagođeni.
-
- Kliknite na dugme Kreiraj.
- U odjeljku Osnove izaberite ime i opcioni opis za politiku vaše organizacije.
- Kliknite na dugme Sledeći.
-
U podešavanjima konfiguracije kliknite na dugme Dodaj:
- Unesite ime i opcioni opis.
-
OMA-URI—Unesite:
./Device/Vendor/MSFT/Policy/ConfigOperations/ADMXInstall/Firefox/Policy/FirefoxAdmx -
Tip podataka—Izaberite String.
- Vrednost – Kopirajte sav tekst iz fajla
firefox.admx.
- Kliknite na dugme Sačuvaj, a zatim kliknite na dugme Dalje.
- U odjeljku Zadaci kliknite na dugme Dodaj grupe i izaberite grupu da biste primili svoj profil.
- Kliknite na dugme Sledeći.
- U odjeljku Pregled + kreiranje, pregledajte podešavanja i kliknite na dugme Kreiraj.
Dodajte pojedinačne politike
-
Prijavite se na Microsoftovu stranicu administratora i idite na .
- Kliknite na politiku koju ste kreirali.
- U odjeljku Properties dođite do Podešavanja konfiguracije i kliknite na dugme Uredi.
-
Kliknite na dugme Dodaj.
- Unesite ime i opcioni opis.
-
OMA-URI—Unesite:
./Device/Vendor/MSFT/Policy/Config/Firefox~Policy~firefox~Extensions/ExtensionSettings -
Tip podataka—Izaberite String.
- Vrednost – Unesite vrednost za politiku koju želite da promenite.
Kliknite na Sačuvaj.
- Pod Pregled + sačuvaj, pregledajte promene i kliknite na dugme Sačuvaj.
Poznati problemi
Poznati problemi za Vebek pomoćnika za sastanke
Ako je na sastanku omogućen zatvoreni titl i Vebek pomoćnik , korisnici sa te dve funkcije ne mogu da ih isključe tokom sastanka ako im je data uloga domaćina.
Poznati problemi za Vebek uređaje
- Korisnici na Mac uređajima mogu da preuzmu ulogu prezentera od korisnika na Vebek uređajima čak i ako je funkcija Take presenter onemogućena.
- Korisnici sa onemogućenom funkcijom napomena i dalje će videti napomene kada koriste Vebek uređaje za pridruživanje sastancima.
- Ograničenja saradnje se ne primenjuju na Vebek uređaje (lične i zajedničke) na Vebek sastancima. To znači, ako administrator onemogući određene funkcije, korisnik i dalje može da koristi te funkcije na Vebek uređajima. Na primer, ako je deljenje onemogućeno, korisnik (domaćin ili učesnik) i dalje može da deli bez obzira na politiku sastanka ili korišćeni Vebek uređaj.
Poznati problemi sa starijim verzijama klijenta
Preporučujemo da nadogradite klijent Vebek Meetings na poslednju verziju (VBS KSNUMKS ili noviji) ili barem na najnoviju verziju zaključavanja (VBSKSNUMKS) kako bi korisnici dobili najbolje iskustvo sa funkcijama saradnje. Ako su korisnici na starijoj verziji klijenta (kao što je VBS 42.3 ili niže), neke funkcije saradnje možda neće biti dostupne ili mogu raditi neispravno.
Poznati problemi sa ograničavanjem funkcija za deljenje napomena i datoteka i bele table
Kada je napomena ograničena, ali deljenje datoteka i bele table nije, korisnici i dalje mogu da vide napomene ako prezenter deli belu tablu i počne da beleži.
Ograničite funkcije saradnje za Vindovs, Mac, Linuk, Android i iOS uređaje i Chrome i Edge veb pretraživače
Ako želite da ograničite ove uređaje za podešavanja saradnje u vašoj organizaciji, možete da izmenite sistemske datoteke tako da se ta podešavanja primenjuju na svakoga ko koristi uređaj da se pridruži sastanku izvan vaše organizacije.
Da biste to uradili, prvo morate da pronađete i kopirate ID organizacije u Control Hub-u. Nakon dobijanja ID organizacije, sledite korake za uređaje koje želite da uredite.
Obavezno zaključajte ID organizacije u registru tako da korisnici ne mogu sami da ga menjaju. Ako korisnici promene ID organizacije, ograničenja saradnje se neće primenjivati na njihove uređaje.
Da biste osigurali bezbednost, preporučujemo da primenite ograničenja na vaše pretraživače i sve vaše uređaje.
| 1 |
Prijavite se na Control Hub i idite na . |
| 2 |
Kliknite na ikonu Kopiraj u polju ID organizacije. |
Možete ograničiti funkcije saradnje u Vebek aplikaciji za Vindovs uređaje tako što ćete odrediti koji korisnici organizacije mogu da se prijave. Kada podesite OrganizationID u Vindovs registru, osiguravate da se samo korisnici iz vaše organizacije mogu prijaviti u Vebek aplikaciju na tom uređaju.
Ako korisnik pokuša da se prijavi sa nalogom iz druge organizacije, Vebek aplikacija odbija pristup i prikazuje grešku. Ako uklonite OrganizationID vrednost iz registra, onda ovo ograničenje više ne važi, a korisnici iz bilo koje organizacije mogu da se prijave.
Možete izabrati neku od ovih opcija da biste postavili ograničenja funkcija saradnje za Vindovs uređaje:
Konfigurišite pomoću ključeva registratora
Možete ručno izmeniti određene uređaje dodavanjem OrganizationID u jednu od ovih vrednosti registratora:
-
Otvorite Editor registra.
-
Dodajte ID organizacije u jednu od sledećih vrednosti registratora:
-
HKEY_LOCAL_MACHINE\SOFTWARE\Policies\CiscoWebex\OrganizationID -
HKEY_LOCAL_MACHINE\SOFTWARE\Cisco Spark Native\OrganizationID
-
Za sastanke na platformi za sastanke Vebek Suite, možete podesiti ključ HKEY_LOCAL_MACHINE\SOFTWARE\Policies\CiscoWebex\AllowOrganizationIDInHKCU registratora sa Vrednost kao 1 i Upišite kao DWORD32, i primenite ID organizacije na jednu od ovih vrednosti registra:
-
HKEY_CURRENT_USER\SOFTWARE\Policies\CiscoWebex\OrganizationID -
HKEY_ CURRENT_USER\SOFTWARE\Cisco Spark Native\OrganizationID
Konfigurišite pomoću šablona grupne politike
Možete da uvezete administrativni šablon .adm ili datoteku Grupne politike da .admx biste primenili ID organizacije na iste vrednosti registra kao gore.
Uvezite datoteku .adm :
- Preuzmite administrativni obrazac grupne politike i dodajte ga u alat za upravljanje grupnom politikom.
-
U alatu za upravljanje grupnom politikom kliknite na sledeće:
-
Konfiguracija računara za primenu ID-a organizacije
HKEY_LOCAL_MACHINE\SOFTWARE\Policies\CiscoWebex\OrganizationID -
Korisnička konfiguracija za primenu organizacije na
HKEY_ CURRENT_USER\SOFTWARE\Policies\CiscoWebex\OrganizationID
-
-
Na navigacionom panelu kliknite na .
-
Dvaput kliknite na Konfiguriši ID organizacije u Cisco Vebek-u.
-
Kliknite na dugme Omogućeno, dodajte ID svoje organizacije u polje Opcije, a zatim kliknite na dugme Primeni.
Uvezite datoteku .admx :
- Preuzmite administrativni šablon grupne politike i dodajte ga u fasciklu PolicyDefinitions.
-
U alatu za upravljanje grupnom politikom kliknite na sledeće:
-
Konfiguracija računara za primenu ID-a organizacije
HKEY_LOCAL_MACHINE\SOFTWARE\Policies\CiscoWebex\OrganizationID -
Korisnička konfiguracija za primenu organizacije na
HKEY_ CURRENT_USER\SOFTWARE\Policies\CiscoWebex\OrganizationID
-
-
Na panelu za navigaciju kliknite na dugme .
-
Dvaput kliknite na Konfiguriši ID organizacije u Cisco Vebek-u.
-
Kliknite na dugme Omogućeno, dodajte ID svoje organizacije u polje Opcije, a zatim kliknite na dugme Primeni.
Konfigurišite pomoću MSI instalacije
Možete pokrenuti sledeću komandu da biste webexapp.msi instalirali sa parametrom ORGID da biste konfigurisali ID organizacije na ovu vrednost registratora: HKEY_LOCAL_MACHINE\SOFTWARE\Cisco Spark Native\OrganizationID.
Na primer:
msiexec /i c:\work\Webex.msi ACCEPT_EULA=TRUE EMAIL=xxxx@example.com ORGID=xxxxxxxx-xxxx-xxxx-xxxx-xxxxxxxxxxxxKonfigurišite pomoću redosleda prioriteta
Možete podesiti redosled prioriteta od visokog do niskog.
Možete podesiti ključ HKEY_LOCAL_MACHINE\SOFTWARE\Policies\CiscoWebex\AllowOrganizationIDInHKCU registratora sa Value as 1 i Tip kao DWORD32.
ID organizacije se preuzima sa sledećim redosledom sa visokim do niskim prioritetom:
-
HKEY_CURRENT_USER\SOFTWARE\Policies\CiscoWebex\OrganizationID(konfigurisano ručno ili putem šablona grupne politike) -
HKEY_CURRENT_USER\SOFTWARE\Cisco Spark Native\OrganizationID -
HKEY_LOCAL_MACHINE\SOFTWARE\Policies\CiscoWebex\OrganizationID(konfigurisano ručno ili putem šablona grupne politike) -
HKEY_LOCAL_MACHIN\SOFTWARE\Cisco Spark Native\OrganizationID(konfigurisano kroz MSI instalaciju)
Konfigurišite pomoću upravljanja mobilnim uređajima (MDM)
Preporučujemo da pratite proceduru Vebek App MDM Deploiment da biste dodali ID organizacije u domen Cisco-Systems.Sparkpreferencija.
Da biste postavili ograničenja saradnje za platformu za sastanke Vebek Suite na Linuk uređajima, kreirajte datoteku .json pod nazivom managedConfig.json i dodajte sledeći ključ u datoteku:
|
Ime i prezime |
Lokacija |
Sadržaj datoteke |
|---|---|---|
|
Identifikaцija organizaцije |
/sl/cisco-vebek/managedConfig.json |
|
Da biste postavili ograničenja saradnje na Android i iOS mobilnim uređajima, preporučujemo da pratite uputstva u Omogući bezbednosna podešavanja za mobilne verzije Vebek aplikacije.
Da bi se pravila vaše organizacije primenjivala na korisnike koji se pridružuju iz Google Chrome-a, morate dodati dodatak za politiku Vebek sastanaka preuzet iz Chrome veb prodavnice, a zatim dodati pravilo za vašu organizaciju u politiku.
Korisnici kojima je ograničeno pridruživanje određenim sastancima vide sledeću poruku kada pokušaju da se pridruže ograničenom sastanku putem Google Chrome-a.
-
Otvorite Google Chrome IT admin stranicu na .https://admin.google.com
-
Dodajte proširenje dodatka za politiku Vebek sastanaka tako što ćete otići na Chrome > Aplikacije i ekstenzije > Korisnici i pretraživači > Dodajte Chrome aplikaciju ili proširenje po ID-u.
-
Dodajte sledeću ekstenziju po ID-u:
denhmfenjcamjiamkogegcjieeiahjgp. -
Dodajte sledeće pravilo u politiku (koristeći sopstveni ID organizacije):
{"orgID": {"Value": "xxxxxxxx-xxxx-xxxx-xxxx-xxxxxxxxxxxx"}} -
Kliknite desnim tasterom miša na karticu i izaberite Force install.
Konfigurišite pomoću šablona grupne politike
Možete koristiti grupne politike da biste instalirali proširenje politike Vebek sastanaka.
Pre nego što počnete, uverite se da ste uvezli ADM ili ADMKS šablone za Google Chrome.
-
U uređivaču pravila grupe idite na .
Izaberite 'Konfigurišite listu prisilno instaliranih aplikacija i ekstenzija'.
Kliknite desnim tasterom miša i izaberite Uredi.
Izaberite Omogućeno.
Kliknite na Prikaži.
Unesite sledeći ID pod "ID-ovi proširenja / aplikacija i ažurirajte URL-ove koji će se tiho instalirati".
denhmfenjcamjiamkogegcjieeiahjgp;https://clients2.google.com/service/update2/crxKliknite na dugme Appli.
Možda će trebati vremena da Chrome učita konfiguraciju. Možete ponovo pokrenuti Google Chrome ili ponovo učitati pravila unosom chrome://policy/ u traku za adresu.
Konfigurišite ID organizacije sa ključem registratora koristeći grupnu politiku
Možete koristiti Microsoft Group Policy da biste instalirali proširenje Veeks Meetings Policy na Google Chrome i konfigurisali ID organizacije.
-
U uredniku za upravljanje grupnom politikom, kreirajte novi objekat grupne politike (GPO).
Takođe možete da izmenite postojeći GPO.
Povežite GPO sa organizacijom koja sadrži vaše korisnike ili uređaje i prebacite se na režim uređivanja GPO-a.
Idite na .
Kliknite desnim tasterom miša na Registar i izaberite registra >.
U prozoru Nova svojstva registratora izaberite karticu Opšte.
- U odjeljku Akcija izaberite Kreiraj.
-
Unesite sledeće detalje:
-
Košnica—
HKEY_LOCAL_MACHINE -
Ključni put—
SOFTWARE\Policies\Google\Chrome\3rdparty\extensions\denhmfenjcamjiamkogegcjieeiahjgp\policy -
Naziv vrednosti—
orgID -
Vrsta vrednosti—
REG_SZ -
Podaci o vrednosti—ID organizacije koju pruža Cisco.
-
Kliknite na dugme Appli.
Morate instalirati i konfigurisati proširenje politike Vebek sastanaka na Chrome pretraživačima. Ova konfiguracija primenjuje politiku ograničenja sastanaka vaše organizacije na korisnike koji se pridružuju sastancima koristeći Chrome na MacOS računarima. Detalji koji su vam potrebni su:
- Proširenje ID: Ovo je isto za sve:
denhmfenjcamjiamkogegcjieeiahjgp - ID vaše organizacije: Jedinstveno za vašu Vebek organizaciju. Ovaj ID možete kopirati iz Control Hub-a, na stranici Upravljanje .
Korišćenje Google Admin konzole
Opisuje kako da prisilite da instalirate ekstenziju Vebek Meetings sa Google Admin konzolom i konfigurišete je sa ID-om vaše organizacije.
-
Prijavite se na Google Admin konzolu na .https://admin.google.com
-
Idite na Chrome > aplikacije i ekstenzije > Korisnici i pretraživači > Dodajte Chrome aplikaciju ili proširenje po ID-u.
-
Dodajte sledeću ekstenziju po ID-u:
denhmfenjcamjiamkogegcjieeiahjgp. -
Dodajte sledeće pravilo u politiku (koristeći sopstveni ID organizacije):
{"orgID": {"Value": "xxxxxxxx-xxxx-xxxx-xxxx-xxxxxxxxxxxx"}} -
Kliknite desnim tasterom miša na karticu i izaberite Force install.
Podešavanje MacOS preferencije
Opisuje kako da prisilite da instalirate ekstenziju Vebek Meetings koristeći Chrome-ove preferencije
ExtensionInstallForcelistna MacOS-u, a zatim konfigurišete ekstenziju sa ID-om organizacije.
- Pročitajte temu EktensionInstallForcelist u Google-ovoj dokumentaciji o politici Chrome Enterprise.
-
Koristite softver za upravljanje mobilnim uređajima da biste ažurirali preferenciju
ExtensionInstallForcelist
.-
Dodajte sledeći ID ekstenzije:
denhmfenjcamjiamkogegcjieeiahjgpi -
Dodajte URL URL za ažuriranje ekstenzije:
https://clients2.google.com/service/update2/crx
Trebalo bi da završite sa novim nizom u nizu koji definiše listu instalacije ekstenzije:
denhmfenjcamjiamkogegcjieeiahjgp;https://clients2.google.com/service/update2/crx other-extension-id;other-extension-update-URL another-extension-id;another-extension-update-URL -
- Rasporedite modifikovani profil konfiguracije na svoje MacOS računare.
- Proverite da li je ekstenzija instalirana na Mac-u.
Kreirajte profil konfiguracije
Opisuje kako konfigurisati ID organizacije za proširenje Vebek politike.
-
Kreirajte datoteku
com.google.Chrome.extensions.denhmfenjcamjiamkogegcjieeiahjgp.plistliste osobina sa ID-om vaše organizacije koristeći sledeću vrednost:orgID xxxxxxxx-xxxx-xxxx-xxxx-xxxxxxxxxxxx -
Rasporedite modifikovani profil konfiguracije na svoje MacOS računare.
-
Proverite da li se vaša politika sastanaka primenjuje kada korisnik na upravljanom MacOS računaru koristi Chrome da se pridruži sastanku.
Možete da primenite ograničenja saradnje na vašu organizaciju za korisnike koji se pridruže iz Microsoft Edge-a. Možete koristiti i proširenje pretraživača Google Chrome na Microsoft Edge-u.
Pre nego što počnete, proverite da li je vaš uređaj upisan za upravljanje mobilnim uređajima (MDM).
Kreirajte novi profil konfiguracije
-
Prijavite se na Microsoftovu administratorsku stranicu i idite na .
-
Izaberite sledeće osobine:
-
Platforma—Windows 10 ili noviji.
-
Tip profila—Šabloni.
-
-
Kliknite na dugme Kreiraj.
-
U odjeljku Osnove izaberite ime i opis politike vaše organizacije.
-
Kliknite na dugme Sledeći.
-
U postavkama računara, potražite "Kontrolišite koje ekstenzije se instaliraju tiho" i izaberite ga.
-
Izaberite Omogućeno i unesite sledeći ID pod "ID-ovi proširenja / aplikacija i ažurirajte URL-ove koji će se tiho instalirati":
denhmfenjcamjiamkogegcjieeiahjgp;https://clients2.google.com/service/update2/crx?response=updatecheck&x=id%3Ddenhmfenjcamjiamkogegcjieeiahjgp%26uc -
Kliknite na dugme Sledeći.
(Opciono) Pod oznakama obima možete dodeliti oznake obima profilu.
U odjeljku Zadaci izaberite "Dodaj sve korisnike" i "Dodaj sve uređaje".
-
Kliknite na dugme Sledeći.
-
U odjeljku Pregled + kreiranje, pregledajte podešavanja i kliknite na dugme Kreiraj.
Sinhronizujte svoj upravljani uređaj
-
Na upravljanom uređaju idite na Podešavanja > Računi > Pristup poslu ili školi
U odeljku "Povezano sa MSFT MDM-om" kliknite na dugme Info.
Pomerite se do "Status sinhronizacije uređaja" i kliknite na dugme Sinhronizacija.
Ekstenzija Google Chrome-a se instalira kada se sinhronizacija završi. Možete da proverite sinhronizaciju proverom Registri Editor na sledećoj lokaciji:
HKEY_LOCAL_MACHINE\SOFTWARE\Policies\Microsoft\Edge\ExtensionInstallForcelistProširenje je takođe dostupno u Microsoft Edge-u na edge://extensions.
Konfigurišite pomoću ključa registratora
Da biste konfigurisali politiku za određeni ID organizacije, proširenje za Chrome čita pravilo koje je postavljeno u registru. Možete ručno uvesti ključ registratora kreiranjem datoteke .reg .
-
Otvorite Editor registra.
- Kreirajte datoteku
.regsa sledećom vrednošću:Windows Registry Editor Version 5.00 [HKEY_LOCAL_MACHINE\SOFTWARE\Policies\Microsoft\Edge\3rdparty\extensions\denhmfenjcamjiamkogegcjieeiahjgp\policy] "orgID"="xxxxxxxx-xxxx-xxxx-xxxx-xxxxxxxxxx" - Dvaput kliknite na datoteku da biste instalirali ključ registratora.
Takođe možete koristiti PoverShell da biste instalirali ključ registratora. Koristite sledeću vrednost:
reg import
            .\edge_policy.reg
Potvrdite ID svoje organizacije
-
Ponovo pokrenite Microsoft Edge i idite na web.webex.com.
Otvorite konzolu za programere i unesite
webex.config.meetings.installedOrgID.Prikazan je ID organizacije iz datoteke
.reg.
Konfigurišite pomoću šablona grupne politike
Možete koristiti grupne politike da biste instalirali proširenje politike Vebek sastanaka.
Pre nego što počnete, uverite se da ste uvezli Microsoft Edge administrativne šablone.
-
U uređivaču politike grupe idite na .
- Izaberite 'Kontrolišite koje ekstenzije se instaliraju tiho'.
Izaberite Omogućeno.
Kliknite na Prikaži.
Unesite sledeći ID pod "ID-ovi proširenja / aplikacija i ažurirajte URL-ove koji će se tiho instalirati".
denhmfenjcamjiamkogegcjieeiahjgp;https://clients2.google.com/service/update2/crxKliknite na dugme Appli.
Konfigurišite ID organizacije sa ključem registratora koristeći grupnu politiku
Možete koristiti Microsoft Group Policy da biste instalirali proširenje Vebek Meetings Policy na Microsoft Edge i konfigurisali ID organizacije.
-
U uredniku za upravljanje grupnom politikom, kreirajte novi objekat grupne politike (GPO).
Takođe možete da izmenite postojeći GPO.
Povežite GPO sa organizacijom koja sadrži vaše korisnike ili uređaje i prebacite se na režim uređivanja GPO-a.
Idite na .
Kliknite desnim tasterom miša na Registar i izaberite registra >.
U prozoru Nova svojstva registratora izaberite karticu Opšte.
- U odjeljku Akcija izaberite Kreiraj.
-
Unesite sledeće detalje:
-
Košnica—
HKEY_LOCAL_MACHINE -
Ključni put—
SOFTWARE\Policies\Microsoft\Edge\3rdparty\extensions\denhmfenjcamjiamkogegcjieeiahjgp\policy -
Naziv vrednosti—
orgID -
Vrsta vrednosti—
REG_SZ -
Podaci o vrednosti—ID organizacije koju pruža Cisco.
-
Kliknite na dugme Appli.
Poznati problemi
Poznati problemi za Vebek aplikaciju
- Kada primenjujete ograničenja saradnje, može potrajati do KSNUMKS minuta da se nove politike primenjuju za sastanke na platformi za sastanke Vebek Suite.
- Kada se korisnik upari sa uređajem ličnog režima, politike snimanja u oblaku za korisnika se primenjuju na njihov lični uređaj. Ali kada je korisnik uparen sa uređajem za zajedničku sobu, pravila snimanja u oblaku određuju politika sastanka, a ne politika korisnika. Ovo je primenljivo za sastanke na platformi za sastanke Vebek Suite.
- Kada koristite platformu za sastanke Vebek Suite, ako korisniku Vindovs, Mac ili iOS nije dozvoljeno da se pridruži sastanku, od korisnika se traži da promeni svoj nalog. Klikom na Prebaci nalog, aplikacija Vebek se ponovo pokreće i korisnik se vraća na stranicu za prijavu. Ali, za korisnike Android-a, klikom na Prebaci nalog ne ponovo pokreće Vebek aplikaciju, već se zatvara aplikacija.
- Kada koristite sastanke na platformi za sastanke Vebek Suite, politika sastanka za Grab Presenter primenjuje se samo ako je korisnik domaćin.
- Prilikom pokretanja Vebek aplikacije preko Safarija ili Firefok-a, ako je video ili VoIP onemogućen, korisnik i dalje može slati ili primati video i VoIP.
Poznati problemi za Vebek uređaje
Kada administratori onemoguće bele table, zatvorene titlove ili snimke, ove funkcije su blokirane na uređajima, ali poruka o grešci ne prikazuje razlog za blokiranje sastanaka Vebek App-a na platformi za sastanke Vebek Suite.
- Funkcije su blokirane na osnovu korisničke politike za uređaje ličnog režima.
- Funkcije su blokirane na osnovu politike sastanka za uređaje sa deljenim režimom.
Poznati problemi sa starijim verzijama klijenta
Preporučujemo da nadogradite Vebek aplikaciju za platformu za sastanke Vebek Suite na verziju klijenta VBS KSNUMKS ili noviju, tako da korisnici dobiju najbolje iskustvo sa funkcijama saradnje. Ako su korisnici na starijoj verziji klijenta, onda neke funkcije saradnje možda neće biti dostupne ili mogu raditi neispravno.


