- Home
- /
- Article

Thanks for your feedback.

Add your partner-managed device
 In this article
 Feedback?
Enterprise administrators can add and manage third-party devices from Control Hub. You can cross-launch and select solution partners for configuring Webex Calling devices.
Get started with partner-managed device
You must provision the devices manually and own the SIP Authentication credential. You’re responsible for any fraud created due to failure to secure these credentials.
The following specifications apply when adding third-party SIP devices:
-
Assign partner-managed devices to a user. Also, you can assign each device to multiple users.
-
All third-party devices must support the Webex Calling Security requirements. See Security requirements for Webex Calling.
-
There are minimum firmware requirements in place. Check the third-party documentation for details.
To manage the partner device, request special access to the Device Management integration from your accounts teams.
Add partner-managed device to user
| 1 |
Sign in to Control Hub, and go to . You can also add a device to the user from the Users section by navigating to > select a user > . |
| 2 |
Choose Personal usage to assign a device to a user and then click Next. |
| 3 |
Enter either the username or the actual name of the phone's owner, choose the user from the results, and then click Next. |
| 4 |
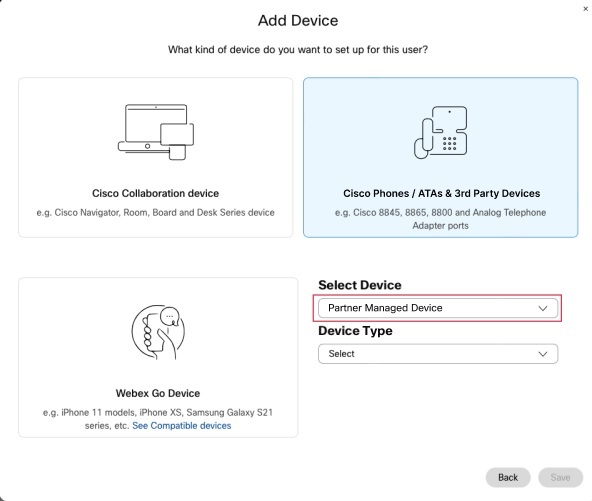
Choose Cisco phone, ATA, or 3rd party device. |
| 5 |
Choose Partner Managed Devices from the Select device drop-down menu. |
| 6 |
Choose the device type from the Device type drop-down menu. |
| 7 |
Enter the following details related to the device:
Currently, you can add approved SIP devices and can’t add a non-approved device. |
| 8 |
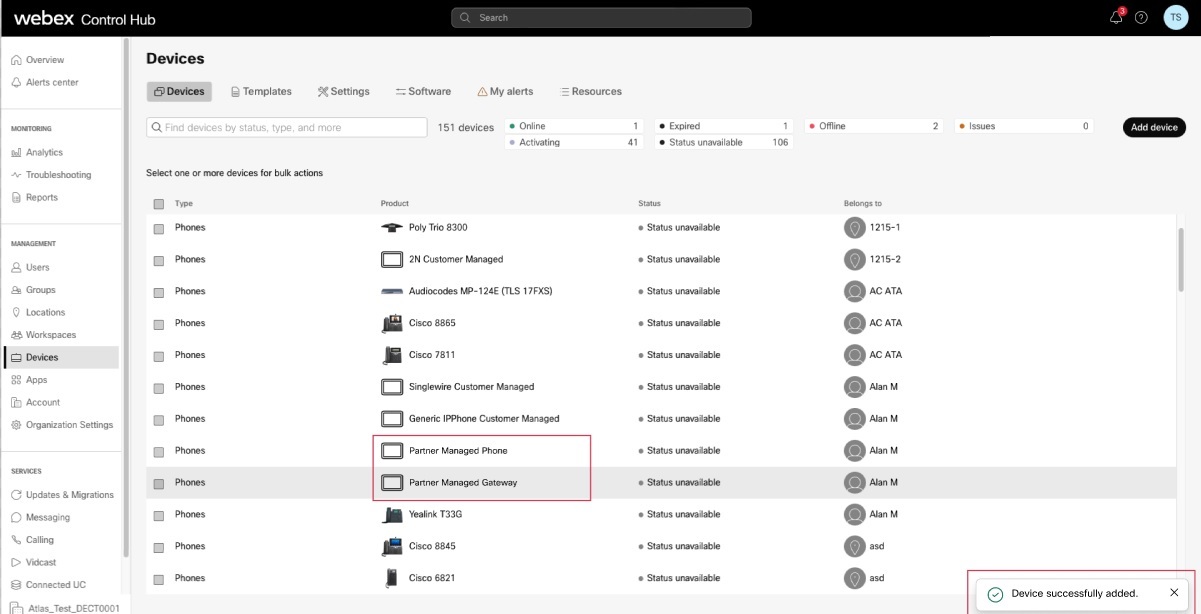
Read the disclaimer and click the confirmation box. Then, click Save. You can now view the device under the device list.
You can add and manage partner devices in bulk using APIs. For details, see Devices Overview and Webex Calling Overview. |
Add partner-managed device to new workspace
Before you begin
- You can add up to 5 partner-managed devices to a workspace with professional workspace license.
You can add multiple devices to a professional workspace only from the new workspace page. You need to toggle on Try new Workspaces from the upper right corner of the workspace page to use the new workspace page.
- You can add only one device to a workspace with common area workspace license.
| 1 |
Sign in to Control Hub, and go to . You can also add a device to the new workspace from the Workspaces section by navigating to . |
| 2 |
Choose . |
| 3 |
Enter a name for the workspace (such as the name of the physical room), select the room type and add capacity, and then click Next. A workspace name can't be longer than 30 characters and it can't have %, #, <, >, /, \, and " characters. |
| 4 |
Choose Cisco phone, ATA, or 3rd party device. |
| 5 |
Choose Partner Managed Devices from the Select device drop-down menu. |
| 6 |
Choose a device type from the Device type drop-down menu. |
| 7 |
Enter the following details related to the device:
Currently, you can add approved SIP devices and can’t add a non-approved device. |
| 8 |
Read the disclaimer and click the confirmation box. Then, click Next. |
| 9 |
Click the Calling service, and choose the subscription and license type that you want to assign to the workspace.
To find out more about the features that are available with the licenses, see Features available by license type for Webex Calling. |
| 10 |
Assign a Location and Phone Number (determined by the location that you choose), and then click Save. You also have the option of assigning an extension. If you want to add additional devices to a professional workspace, you can do it in any one of the following ways:
|
 under the
 Reset the SIP password for partner-managed device
| 1 |
Sign in to Control Hub, and go to . |
| 2 |
Select a partner-managed device/gateway. |
| 3 |
Under Details, click Update Password.
|
| 4 |
Click Update to confirm your password. Your newly generated password displays in the field. |
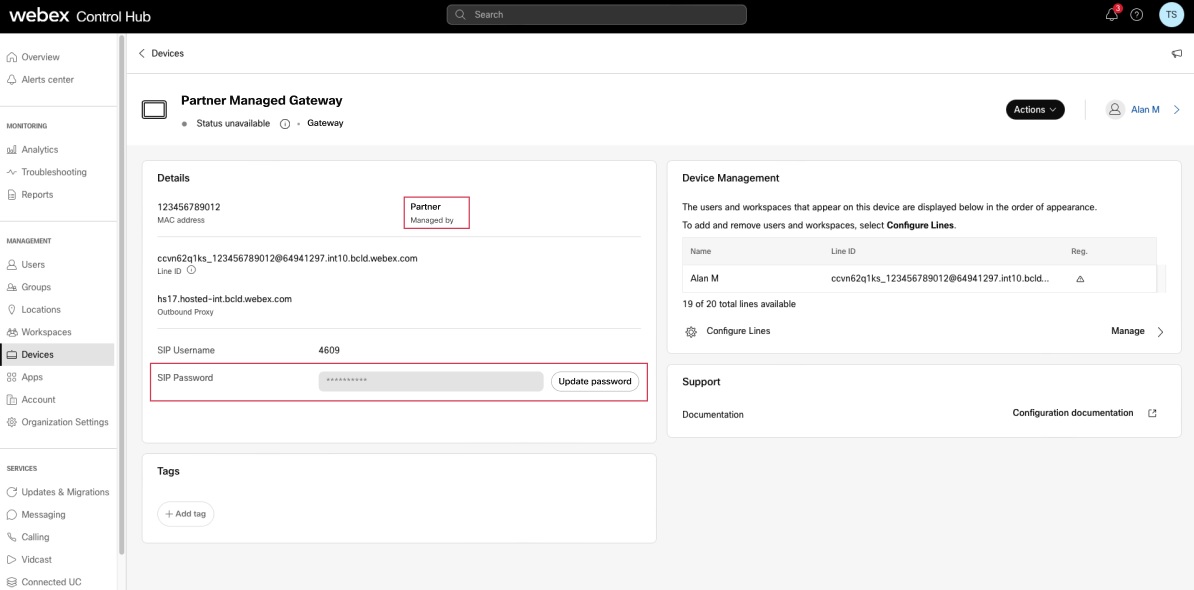
The administrator for this device is responsible for maintaining these credentials. This is the last time that you can view the password in full. Copy and keep this information for your records and future use.


