Thanks for your feedback.
Set up Webex Share
 Feedback?
Webex Share connects to your television or HDMI display with the HDMI-CEC port. There are several ways to power your device so choose the one that works best for your office.
-
Wi-Fi—For administrators who require a wireless office.
-
Ethernet with a Power Adapter—For administrators who require a consistent, efficient power source.
-
Ethernet with a Power over Ethernet—For administrators who require a consistent power source but only want a single cable. PoE is easier to manage, but it can use more electricity. Confirm that your device connects to a RJ-45 port that supports PoE.
If your organization uses enhanced security, you can generate and manage certificates to complete authentication of a new device with your corporate network.
As you install your device, keep the following best practices in mind:
-
Your device needs a dry, well-ventilated space that is free of any obstructions. Webex Share operates at an external operating temperature of 32° to 140°F (0° to 60°C) so it is warm when you touch it.
-
The HDMI cable is designed to hold the weight of the device. Avoid unnecessary tugging, bending, or stress on the cable. Use the included cord keeper to support the connector cable and reduce the stress on the device. Don't let the Webex Share hang freely because this places stress on the connector cable and damages the unit.
-
Webex Share has an acoustic horn that enables ultrasound proximity pairing. Never block the horn. For best performance, point it away from the floor and from other absorbing surfaces, such as carpets or fabrics.
-
Webex Share functions best when it is the only ultrasound pairing device in the room. Some laptops have automatic noise canceling turned on by default for the microphone input. This prevents ultrasonic pairing.
-
When you install the Webex Share, hold it in one hand and grasp the connector cable case in the other hand. Push the cable connector into the HDMI screen display port. Don't grasp the cable body.
After you have connected your Webex Share to your TV or display screen, enter your activation code to register the device.
Some Webex Share features require Consumer Electronics Control (CEC) so connect your Webex Share to a HDMI-CEC port on your display screen. Refer to the screen documentation for additional information.
If you use security certificates, then deploy them to the Webex Share before activating your device. You need your device's IP address which appears on your display screen after you connect Webex Share to your network.
Deploy your Webex Share with Wi-Fi if you do not want cables in your office. Webex Share supports the following authentication protocols:
-
Extensible Authentication Protocol-Transport Layer Security (EAP-TLS)—Doesn't require username and password authentication. EAP-TLS requires certificate authentication and validation. Certificates require authentication on both the client and server, as well as a public and a private key.
-
Extensible Authentication Protocol-Flexible Authentication via Secure Tunneling (EAP-FAST)—Requires username and password authentication.
-
Protected Extensible Authentication Protocol - Microsoft Challenge Handshake Authentication Protocol version 2 (PEAP-MS-CHAP-v2)—Requires username and password authentication.
-
Protected Extensible Authentication Protocol - Generic Token Card (PEAP-GTC)—Requires username and password authentication.
Also you can select Automatic which detects the available authentication methods and chooses one in the following order:
-
Extensible Authentication Protocol (EAP) methods (see the preceding list)
-
Wireless Private Key (WPK)—Requires shared passphrases for authentication
-
Wired Equivalent Privacy (WEP)—Requires shared passphrases for authentication
-
OPEN—No authentication
Some Webex Share features require Consumer Electronics Control (CEC) so connect your Webex Share to a HDMI-CEC port on your display screen. Refer to the screen documentation for additional information.
Before you begin
-
Choose whether you will use your laptop or your mobile device to complete the setup.
-
Make sure you have the proper equipment.
-
Add Webex Shareto a Place.
-
Set a proxy if your organization uses one.
-
Obtain your activation code.
| 1 |
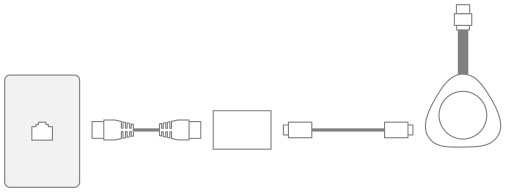
Plug in the device as shown in the printed Let's get started document found in the box. Use the Wi-Fi adapter shown here:
|
| 2 |
Use your mobile device or laptop to connect to the hosted access point (AP). Enter your Wi-Fi credentials when prompted. If you don't see your Wi-Fi network, refresh your list of Wi-Fi networks. Hidden networks do not appear in the list. |
| 3 |
Click Enter Activation Code to enter your activation code. If you use security certificates, then deploy them to the Webex Share before activating your device. |
Deploy your Webex Share with a power adapter if you want a consistent power source for your device.
Some Webex Share features require Consumer Electronics Control (CEC) so connect your Webex Share to a HDMI-CEC port on your display screen. Refer to the screen documentation for additional information.
Before you begin
-
Choose whether you will use your laptop or your mobile device to complete the setup.
-
Make sure you have the proper equipment.
-
Add Webex Share to a Workspace.
-
Set a proxy if your organization uses one.
-
Obtain your activation code.
| 1 |
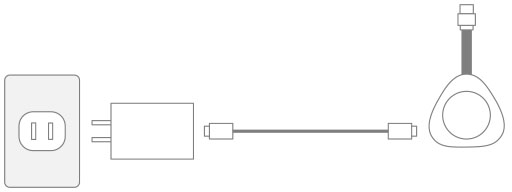
Plug in the device as shown in the printed Let's get started document found in the box. Use the Ethernet adapter shown here:
Your TV shows the Webex Share IP address and prompts you to enter this IP address in your web browser.
|
| 2 |
In your web browser (either your laptop or mobile device), enter the IP address to access the device page. |
| 3 |
In your web browser, add and confirm a security exception for the web page. |
| 4 |
Click Setup in your web browser. |
| 5 |
Click Enter Activation Code to enter an activation code. If you use security certificates, then deploy them to the Webex Share before activating your device. |
| 6 |
Follow the remaining instructions in your web browser to complete the setup. |
Deploy your Webex Share with Power over Ethernet (PoE) if you need a power source but only want one cable connected to your device.
Some Webex Share features require Consumer Electronics Control (CEC) so connect your Webex Share to a HDMI-CEC port on your display screen. Refer to the screen documentation for additional information.
Before you begin
-
Choose whether you will use your laptop or your mobile device to complete the setup.
-
Make sure you have the proper equipment.
-
Add Webex Share to a Place.
-
Set a proxy if your organization uses one.
-
Obtain your activation code.
| 1 |
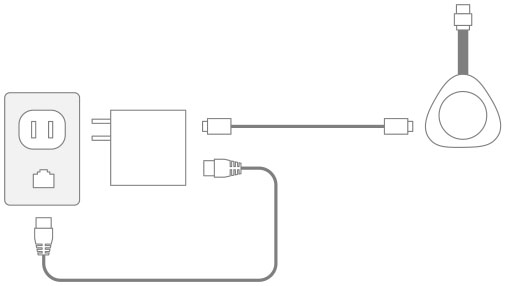
Plug in Webex Share as shown in the printed Let's get started document found in the box. Use the Power over Ethernet (PoE) adapter shown here:
Your TV shows the Webex Share IP address and prompts you to enter this IP address in your web browser.
|
| 2 |
In your web browser (either your laptop or mobile device), enter the Webex Share IP address to access the device page. |
| 3 |
In your web browser, add and confirm a security exception for the web page. |
| 4 |
Click Setup in your web browser. |
| 5 |
Click Enter Activation Code to enter an activation code. If you use security certificates, then deploy them to the Webex Share before activating your device. |
| 6 |
Follow the remaining instructions in your web browser to complete the setup. |