
Thanks for your feedback.
Migrate Users to Webex
 Feedback?
Understanding Users and Contacts
Perform the new user and Organizational Contact (Org contact) synchronization from Control Hub, to migrate your users or Org contacts in Unified CM. Use this migration tool when you are not using the existing Webex methods to provision users such as Cisco Directory Connector, adding users manually or using bulk import in Control Hub. For more information, see Ways to add Users to your Control Hub Organization .
Use this table to understand the definition of user in Control Hub:
|
Term |
Definition |
|---|---|
|
User |
Is a person within an organization. He has a phone or a soft client assigned to him. An administrator manages the User. |
|
Workspace |
Is a public space. For example: lobby or cafeteria phone, conference room, etc, that has a device and/or a machine account. Workspace is within an organization and is managed by an administrator. |
|
Service Number |
Is a machine account for a feature with or without a device. For example: Hunt group, analog access, voice Portal, VXML, RP, Meet-Me Conference, Instant Group Call, Group Paging, Flexible Seating Host, Find-me/Follow-me, Call Center, Broad works Anywhere Portal. Service Number is associated to an organization and managed by an administrator. |
|
Personal Contact |
Refers to user, workspace, Service number or an Organizational Contact. The Personal contact is managed by an administrator. |
|
Organizational Contact (Org Contact) |
Is a person or a contact number that is not associated with the organization. However, the person or a contact number can be searched by users or devices within the organization. The Organizational Contact is referred as Labeled User and is managed by an administrator. |
Use the Migrate Users/Contacts to Webex card on Control Hub to do the following:
-
Classify users found in Unified CM database into users and organizational contacts using configurable rules.
-
Synchronize organizational contacts from Directory service/LDAP to contact service.
The benefits of User or Organizational Contact synchronization are:
-
Provides seamless user search experience. By synchronizing users and contacts to cloud, this feature helps Webex app to provide search functionality similar to Jabber.
-
Automates the task of synchronizing users from Unified CM database into Webex. This feature facilitates synchronization and simplifies migration task as sync done manually is error prone and time consuming.
This release does not support Contact synchronization.
Prerequisite
Before you start synchronization of the users, make sure that you meet the following requirements:
-
Get familiar with Control Hub.
Webex Control Hub is the management interface for the Webex platform. For more information, see Get Started with Webex Control Hub.
-
Access with full administrator privileges.
With full administrator privileges, you can assign one or more roles to any user in your organization. Ensure to assign a user with administrator privilege so you can migrate the rest of your Unified CM users. For more information, see Assign Organizational Account Roles in Webex Control Hub.
-
Set your preferences for sync. Select Go to settings.
-
Onboard all the Unified CM clusters to Control Hub to enable importing the Common Identity (CI).
-
Use Bulk Administration Tool (BAT) to migrate users.
Use the Import/Export menu in the Cisco Unified Communications Manager application, to migrate users. See the Import Users Using the Bulk Administration Tool (BAT) for detailed information.
Import Users Using the Bulk Administration Tool (BAT)
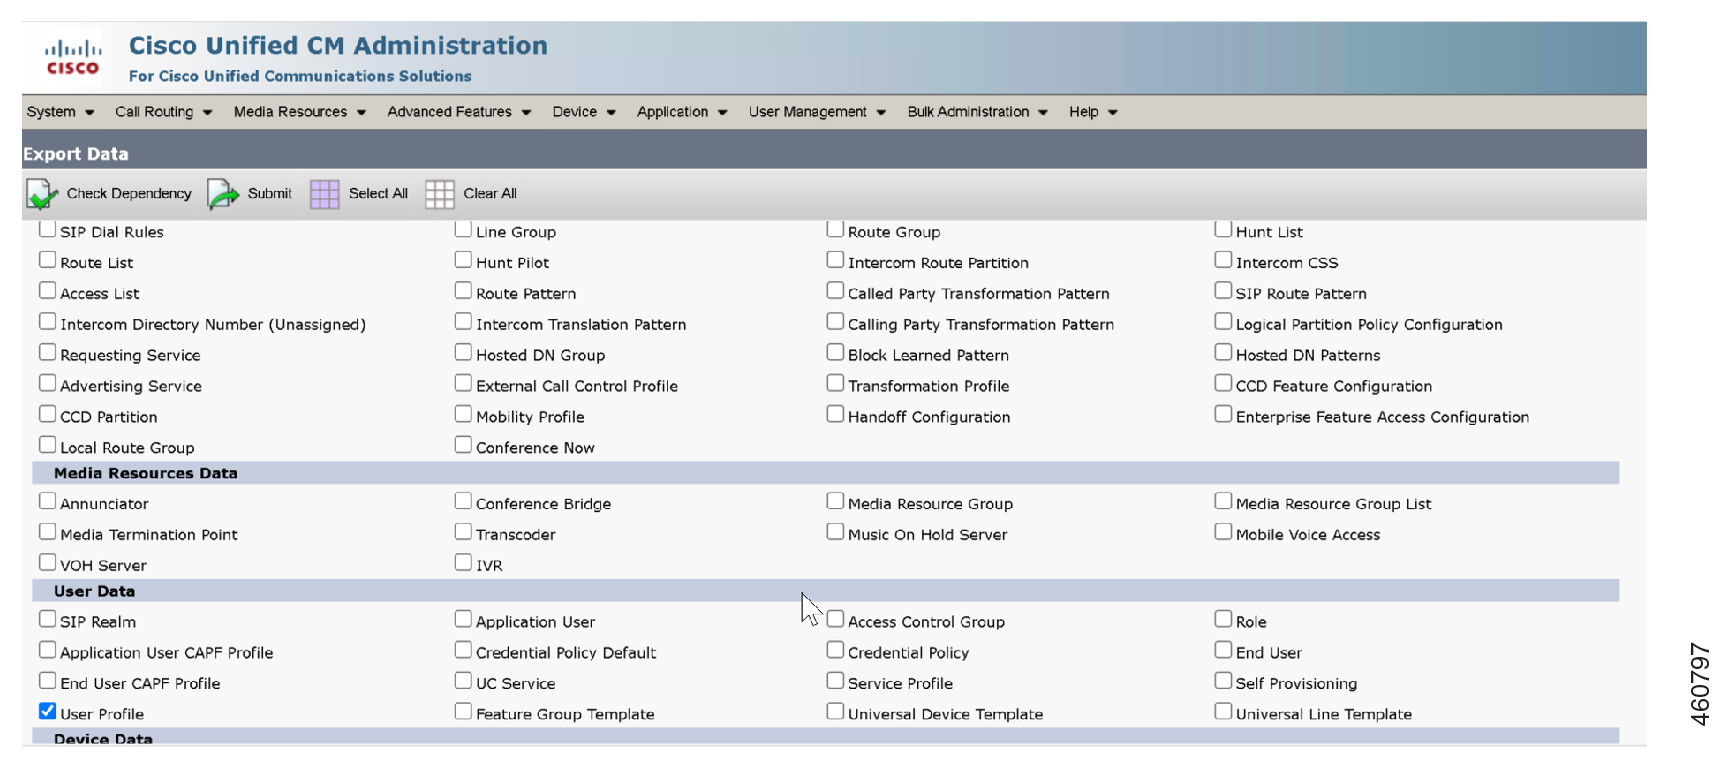
Use the Bulk Administration Tool (BAT) in Cisco Unified Communications Manager application to export users from Unified CM, and later import to Control Hub and Webex Users. Complete these steps to import the users:
| 1 |
Select Bulk Administration > Import/Export > Export to export the contact lists of the migrating users from the current home cluster. The Export Data window displays.
 |
| 2 |
Choose Select All in the Select items to Export section. |
| 3 |
Choose a filename for the exported list data. In the Job
Description field, enter the description that you want to
provide for the job. 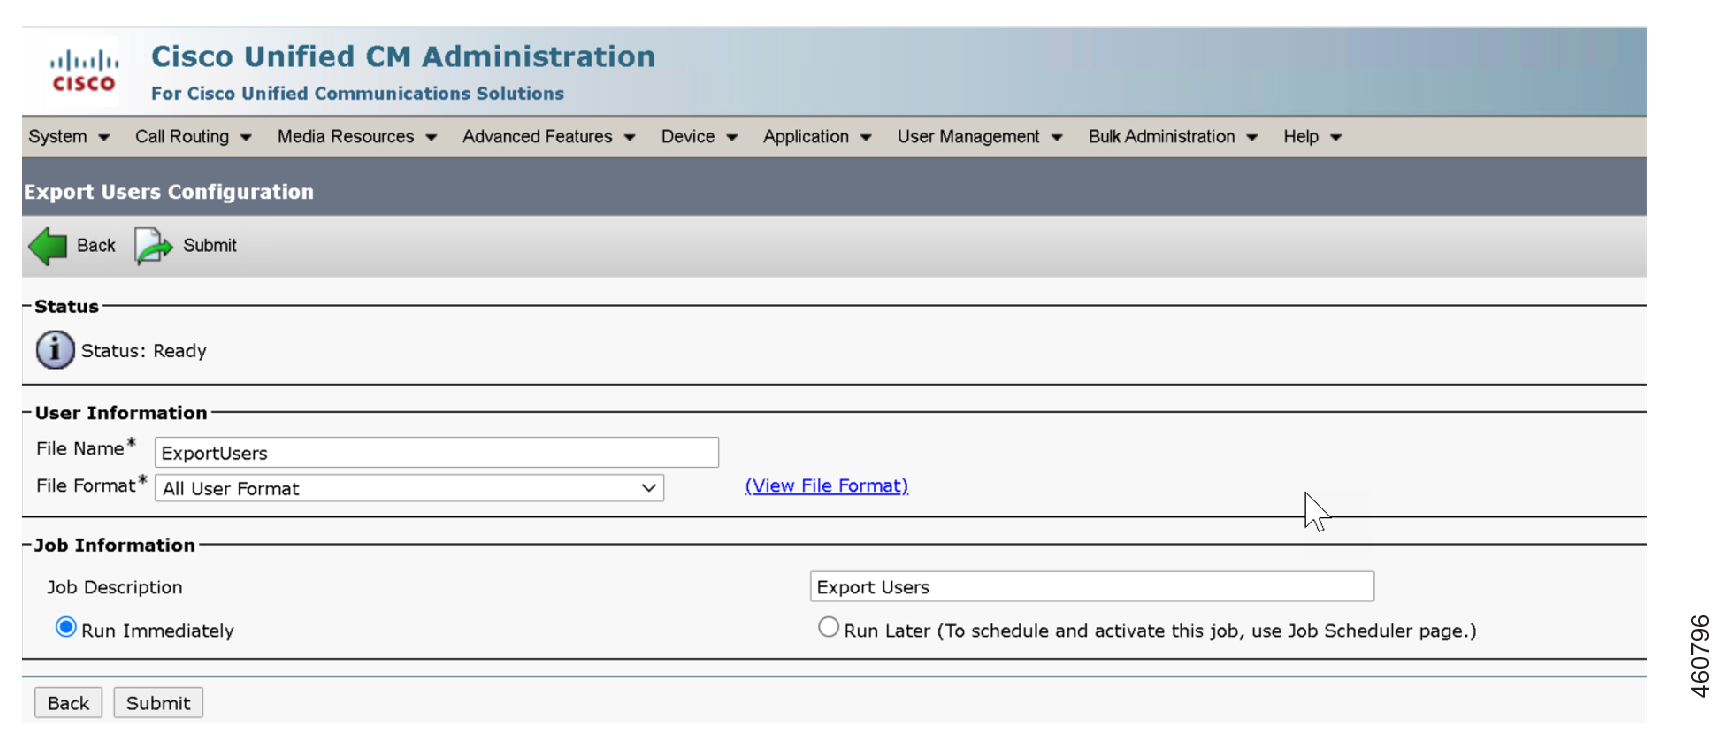
|
| 4 |
Click Run Immediately or schedule the job to run later. Click Submit. |
| 5 |
Monitor the status of the export job. Use the Job Scheduler option in the Bulk Administration main menu to schedule and/or activate this job. 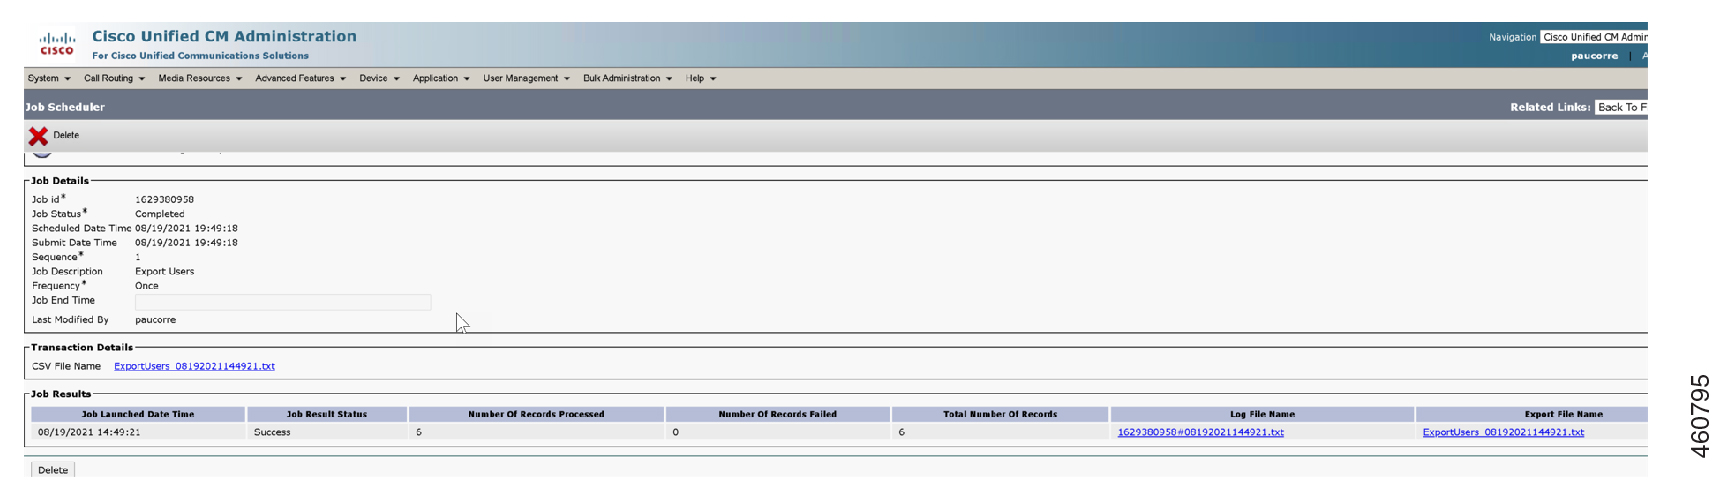
Do not modify or update the tar file after you export the file from Unified CM application. |
| 6 |
Download the export file and store it for use later when the user migration is complete. Choose Cisco Unified CM IM and Presence Administration > Bulk Administration > Upload/Download Files.
From the Upload/Download window select the tar file and click on Download Selected. 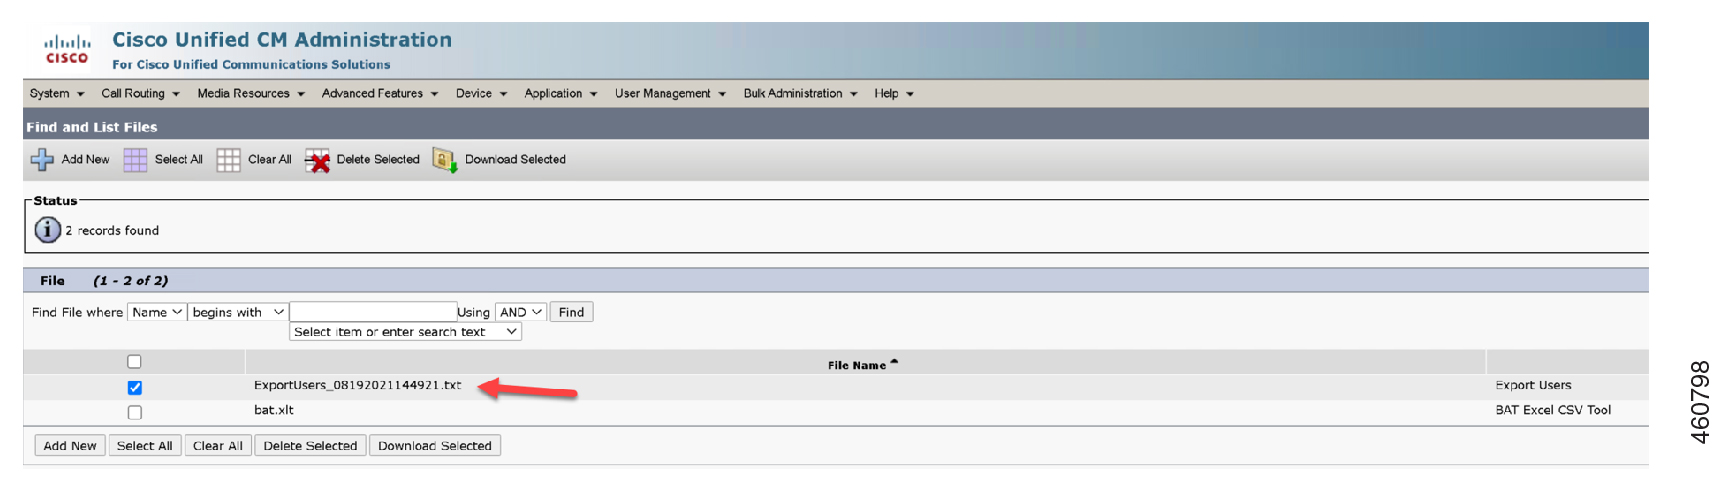
|
| 7 |
Un-tar the .tar file to any location on your machine using the tar -xvf command. Extract the .csv file to the specified location. See the Cisco Unified Communications Manager Bulk Administration Guide for detailed information. If you receive an error similar to: BAT TAR Upload Failed. Error detected parsing the header or Import failed during BAT file upload, then you must manually modify the tar file. Follow these steps if there is an upload failure: For Linux/Windows system
|
| 1 |
From the customer view in Webex Control Hub, go to Services > Migrations. Select a use case depending on the type of configuration you have:
|
| 2 |
On the Migrate Users/Contacts to Webex card under Unified CM Upgrade Utilities, click Get started. The User/Contact Synchronization page appears. Use User/Contact Synchronization to synchronize a maximum of 20k users at a time. If there are more than 20k users, you can synchronize them in batches. |
| 1 |
From the Control Hub dashboard, Go to Updates and Migration. | ||||||||||||||||||
| 2 |
Select the User/Contact Sync tile and click Go to Settings under Prerequisites. The Settings page appears. | ||||||||||||||||||
| 3 |
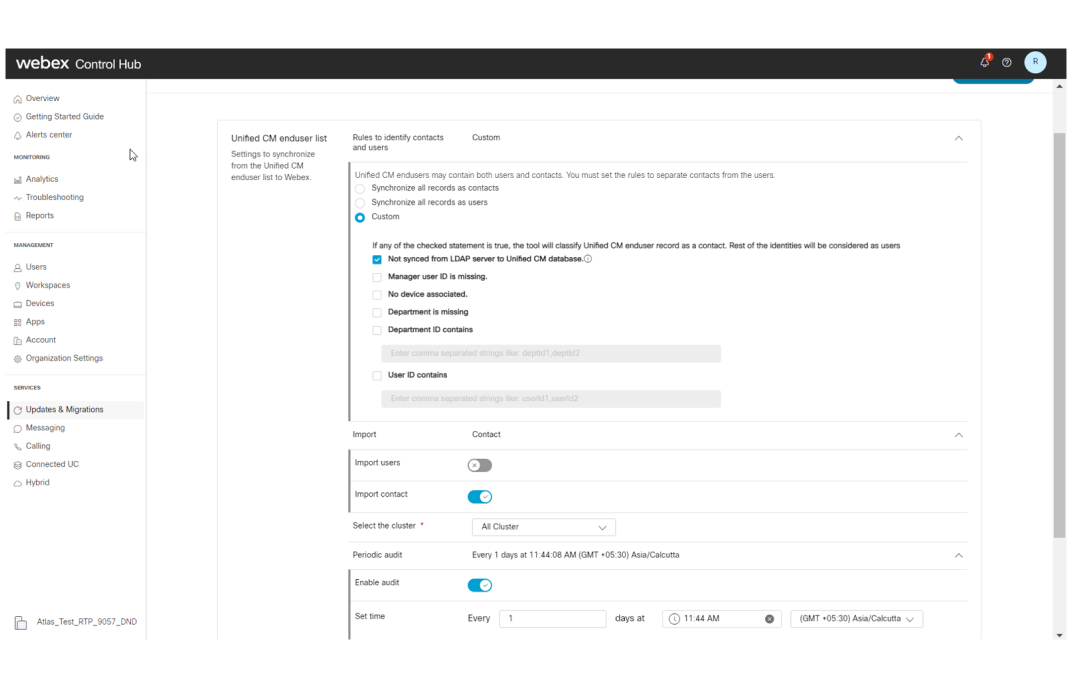
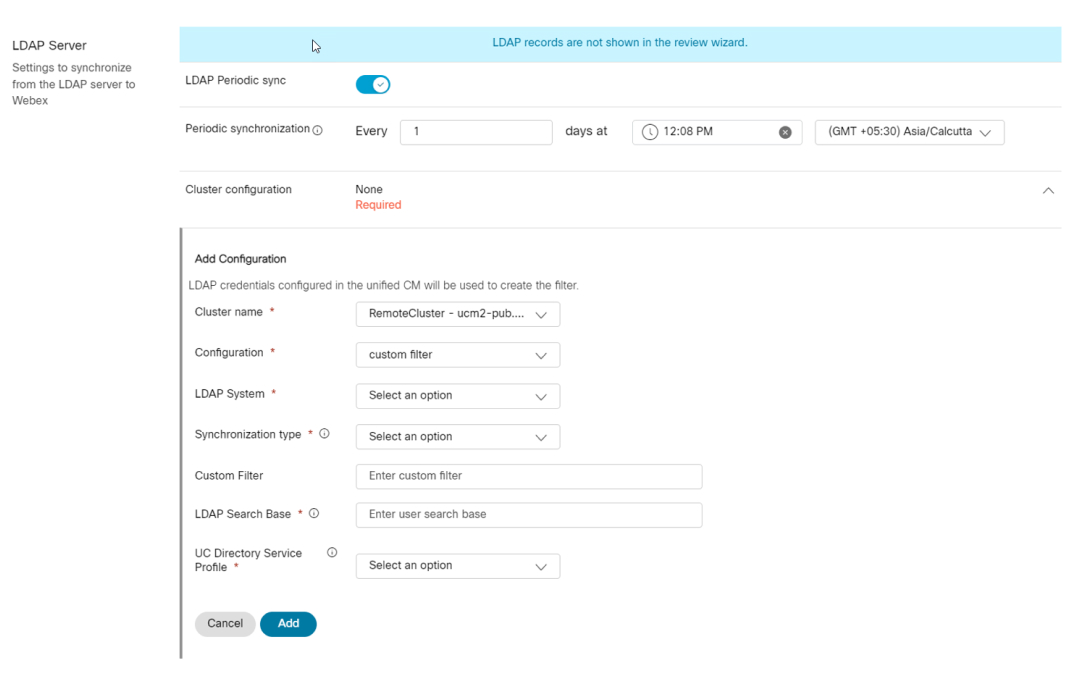
Configure either the Unified CM or the LDAP server for user synchronization function. Select the details from the following sections:
| ||||||||||||||||||
| 4 |
Click Save and proceed. The Pending for sync section appears. |
Displays the users or contacts that are imported using the BAT file from Unified CM enduser's list. This data is categorized based on the selected preference.
| 1 |
In the Pending for sync section, choose one of the following options:
Note: The tar file contains a collection of CSV files. After uploading the file successfully, the following identity details appear on the screen:
| ||||||||||||
| 2 |
Click Import New Data to delete the imported file. If you have uploaded a wrong file or want to update the identity details, you can delete the imported file. See Import New Data for details. | ||||||||||||
| 3 |
Click Review for sync. The Review for sync page allows you to review the list of user and contact details before you start the synchronization. You can fix the flagged errors before the users are synchronized. |
| 1 |
To delete the imported data, click the Import New Data ellipsis icon displayed at the top on the Pending for Synchronization page. The Import New Data dialog box appears with the following options: Ensure that you are aware of the consequences of your action. The action cannot be undone.
|
| 2 |
Check all the three options and then click Delete. The Delete button is enabled only after you check all the options. |
| 3 |
After you delete the data, upload the file with the updated data and then click Review for sync. |
| 1 |
From the Pending for Sync section, click Review for sync. The Review users before synchronization page appear. | ||||||||
| 2 |
Review the error details and fix the errors. The error classification is as follows:
| ||||||||
| 3 |
From the View Users page, click Actions to perform the following tasks:
| ||||||||
| 4 |
Click Next. Displays the Review contacts before synchronization page. If the display name is changed, you must update the Unified CM contact details. Use the export list of updated records from the Control Hub in Unified CM, to import the changes. | ||||||||
| 5 |
In the Review contacts before synchronization page, you can perform the same set of tasks such as Search, Sort, Edit Settings, and Change user/ Contact Rules. | ||||||||
| 6 |
Click Next. The Summary page appears. |
The Summary page lists the error and warning messages for the selected users and contacts. It also provides you with the necessary suggestions and solutions to resolve them. Resolve the errors before you proceed. However, you can ignore the warnings.
Note: You can also remove the identities (user or contact) with errors and proceed. The removed identities are added back to the unsynchronized list.
To resolve the user errors, click View Errors and select Remove from sync list.
When you use the Remove from sync list option to remove users from the Summary page, the User sync count on Control Hub is not updated.
| 1 |
You can view the count of these invalid identities:
The users and Org contact details in the review wizard is reverted when the Settings page is updated. Export updated records- we recommend updating the Unified CM contact list for any changes made to the records. Click Expost list, to download the updated records and manually update them in Unified CM. |
| 2 |
Click Start synchronization. The Syncing identities progress bar displays during sync and you cannot perform any action till the sync completes. The Latest synchronization tab displays the user sync count after the sync operation completes. The Logs page appears with the Synchronization summary. |
| 3 |
View the status of the synchronization from the Logs page. This page displays the Users that are synced and also the reason for failure, if any. |
| 4 |
Click Export csv, to download the user list. |


