- Home
- /
- Articolo

Grazie per il feedback.

 In questo articolo
 Feedback?
Se gestisci utenti e gruppi in Microsoft Entra ID, utilizza l'app Entra ID Wizard in Control Hub per sincronizzare utenti e gruppi con Webex.
Abilita Entra ID in Control Hub
In Webex for Government, l'app Entra ID Wizard è disponibile sia per i clienti GCC con Entra ID di livello moderato che per quelli con Entra ID di livello elevato.
Alcune delle funzionalità descritte in questo articolo non sono ancora disponibili per tutti i clienti.
Operazioni preliminari
Assicurati di avere accesso a un account Entra ID che abbia l'autorità di concedere il consenso amministrativo a livello di tenant per un'applicazione.
Per configurare l'app Entra ID Wizard, è necessario disporre dei diritti di amministratore completo nell'organizzazione di Control Hub.
| 1 | |
| 2 |
Vai a Impostazioni organizzazione e scorri verso il basso fino a App Microsoft Entra ID Wizard. |
| 3 |
Fare clic su Imposta per avviare la configurazione. |
| 4 |
(Facoltativo) Per gli amministratori di Webex for Government, selezionare Entra Worldwide oppure Entra GCC High e fare clic su Procedi. Entra Worldwide invia il Mago all'Entra AD sia per GCC Moderato che Commerciale. Entra GCC High invia il Mago all'Entra AD per GCC High.
|
| 5 |
Autentica il tuo account amministratore Entra ID. Se non si è un amministratore globale o con privilegi elevati in Entra ID, è possibile richiedere l'accesso per concedere l'autorizzazione all'app Entra ID Wizard. Se disponi di privilegi di amministratore completi in Entra ID, puoi rivedere e concedere l'accesso alle richieste andando su . In Attività, seleziona Richieste di consenso amministrativo e fai clic su Integrazione identità Cisco Webex e seleziona Rivedi autorizzazioni e accetta. Questo processo garantisce l'autenticazione generale all'applicazione Webex. Infine, fai clic sulla scheda Tutto (anteprima), seleziona Cisco Webex Identity Integration e fai clic su Rivedi applicazione. Sotto , fare clic su Concedi il consenso amministrativo per Cisco per concedere tutte le autorizzazioni necessarie per abilitare Entra ID in Control Hub. Consultare il supporto Microsoft per ulteriori informazioni su questa procedura. |
| 6 |
Rivedi le autorizzazioni e fai clic su Accetta per concedere all'account l'autorizzazione ad accedere al tuo tenant Entra ID. Cisco Webex Identity Integration è un'applicazione aziendale Entra ID in Entra ID. L'app Wizard si connette a questa applicazione per accedere alle API del grafico Entra ID. Le autorizzazioni richieste per accedervi sono le autorizzazioni minime necessarie per supportarlo e utilizzarlo. |
| 7 |
Per i clienti SMB, accettare le impostazioni predefinite selezionando la casella di controllo Sincronizza impostazioni predefinite e facendo clic su Continua. Per i clienti aziendali, andare al punto successivo e continuare la configurazione. Se si accettano le impostazioni predefinite, significa che si desidera:
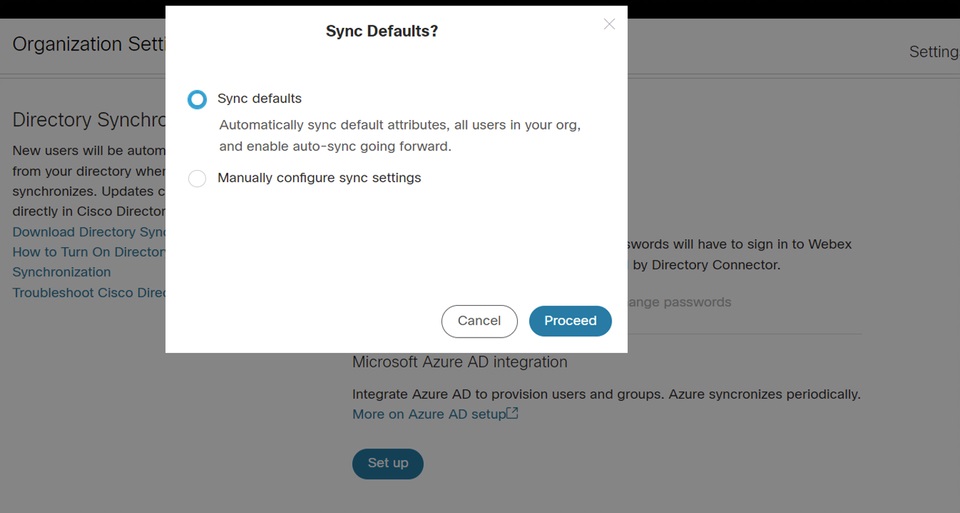 |
| 8 |
Per i clienti Enterprise (con più di 1000 utenti) o per i clienti che desiderano configurare le impostazioni manualmente, fare clic sulla scheda Attributi e mappare gli attributi. Fai clic su Salva. È possibile mappare altri attributi utente da Entra ID a Webex oppure modificare le mappature degli attributi utente esistenti utilizzando la pagina Attributi. È possibile personalizzare l'associazione verificando che sia stata configurata correttamente. Il valore mappato come nome utente è importante. Webex utilizza l'indirizzo e-mail dell'utente come nome utente. Per impostazione predefinita, il nome utente principale (UPN) in Entra ID corrisponde all'indirizzo email (nome utente) in Control Hub. Non è possibile modificare l'associazione durante la prima impostazione. A quel punto, l'istanza corrispondente non viene creata completamente e non esiste alcuna istanza dell'attributo di mappatura personalizzato. Tuttavia, è possibile fare clic su Modifica per modificarla al termine dell'installazione. |
| 9 |
Aggiungere gli utenti all'ambito di sincronizzazione facendo clic sulla scheda Utenti. È possibile inserire il nome utente per cercare e aggiungere l'utente all'ambito di sincronizzazione. È inoltre possibile rimuovere un utente dall'ambito di sincronizzazione facendo clic sull'icona del Cestino a destra. Fai clic su Salva. Se desideri selezionare tutti gli utenti da Entra ID, seleziona Seleziona tutti gli utenti. Se viene selezionata, non è necessario selezionare gruppi nell'ambito poiché questa opzione sincronizza i gruppi allo stesso tempo.  Si consiglia di non utilizzare Seleziona tutti gli utenti per significativi clienti aziendali con centinaia di migliaia di utenti, in quanto il processo di inizializzazione richiede più tempo. Se si sincronizza accidentalmente molti utenti in Control Hub, è necessario più tempo per eliminare tali utenti. Fare clic su Salva. |
| 10 |
Nella scheda Gruppi, è possibile cercare singoli gruppi e aggiungerli a Webex.
|
| 11 |
(Facoltativo) Nella scheda Altro, è possibile configurare alcune opzioni di sincronizzazione avanzate:
|
| 12 |
È possibile decidere se consentire la sincronizzazione immediatamente o in un secondo momento. Se si seleziona l'opzione Consenti ora , tutte le impostazioni verranno applicate alla successiva sincronizzazione. Se si seleziona l'opzione Salva e consenti in seguito , la sincronizzazione non viene avviata fino a quando non viene consentita la sincronizzazione automatica. 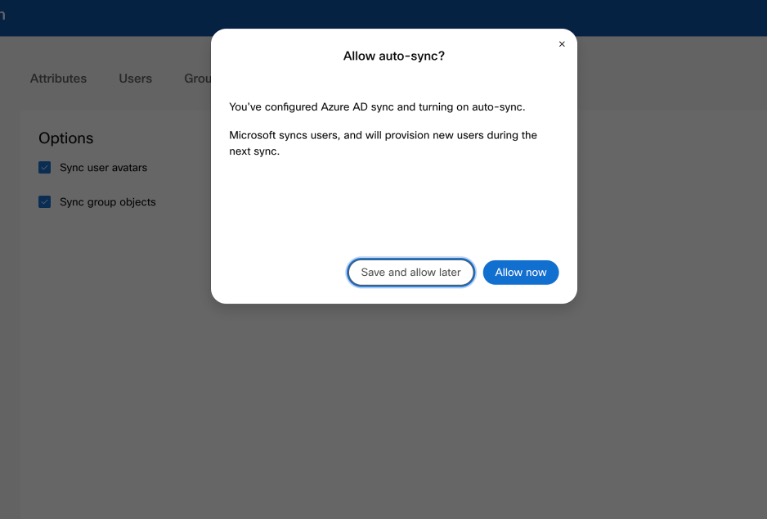 |
| 13 |
L'applicazione comunica con Entra ID per impostare la configurazione e pianificare la sincronizzazione. 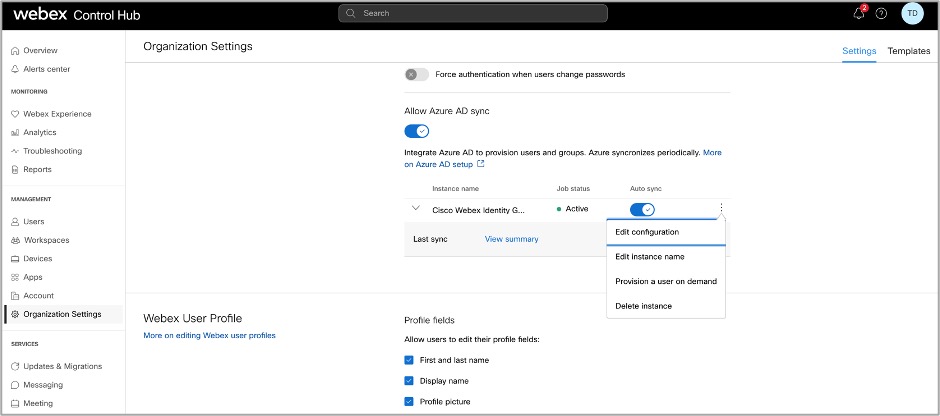 |
- Attivo: La sincronizzazione è avvenuta con successo.
- Quarantena: Il processo di sincronizzazione è stato messo in quarantena nell'ID Entra dopo diversi errori. Consultare la documentazione Entra ID per ulteriori informazioni.
- Non eseguito: Questo stato appare solo dopo la prima configurazione. Il servizio non è ancora stato avviato dopo la prima configurazione.
Puoi anche fare clic su Visualizza riepilogo per visualizzare informazioni aggiuntive come l'ora e la data dell'ultima sincronizzazione e il numero di utenti sincronizzati, saltati o non riusciti:
Utenti
- Sincronizzato: Mostra il numero di utenti che sono stati sincronizzati correttamente con Webex.
- Saltato: Mostra il numero di utenti che sono stati saltati nell'ultima sincronizzazione. Ad esempio, i nuovi utenti in Entra ID che non sono stati aggiunti all'ambito di sincronizzazione dell'app Entra ID Wizard. Questi utenti non erano sincronizzati con Webex; aggiungili all'ambito di sincronizzazione per sincronizzarli con Webex.
- Fallito: mostra il numero di utenti che non sono riusciti a sincronizzarsi. Consulta il registro di controllo del provisioning dell'applicazione Entra ID per ulteriori informazioni sul motivo per cui questi utenti non sono riusciti a sincronizzarsi. Se devi sincronizzare immediatamente questi utenti, puoi eseguire il provisioning degli utenti su richiesta.
Gruppi
- Sincronizzato: Mostra il numero di gruppi che sono stati sincronizzati correttamente con Webex e creati in Control Hub.
- Da sincronizzare: Questo stato indica che non tutti gli utenti di un gruppo sono stati ancora aggiunti. Gli utenti devono prima essere sincronizzati correttamente con Webex.
Esegui la migrazione delle configurazioni esistenti di Cisco Webex Enterprise App all'app Entra ID Wizard.
Se hai già configurato un'app Cisco Webex Enterprise in Entra ID, puoi migrare automaticamente tutte le tue configurazioni all'app Entra ID Wizard. È possibile gestire Entra ID interamente in Control Hub senza perdere le configurazioni precedenti.
| 1 |
Accedi a Control Hub con un account amministratore cliente completo. |
| 2 |
Vai a Impostazioni organizzazione e scorri verso il basso fino alla sezione App Microsoft Entra ID Wizard. |
| 3 |
Fare clic su Imposta per avviare la configurazione. |
| 4 |
Autenticare l'account amministratore di Entra ID con la configurazione di Entra ID. Accertarsi di utilizzare un account con le autorizzazioni descritte nel passo successivo. |
| 5 |
Rivedi le autorizzazioni e fai clic su Accetta per concedere all'account l'autorizzazione ad accedere al tuo tenant Entra ID. Cisco Webex Identity Synchronization è un'applicazione aziendale di Entra ID in Entra ID. L'app Wizard si connette a questa applicazione per accedere alle API del grafico Entra ID. Le autorizzazioni richieste per accedervi sono le autorizzazioni minime necessarie per supportarla e utilizzarla. |
| 6 |
Seleziona Migra l'app esistente. |
| 7 |
Dopo aver accettato le richieste di autorizzazione di sola lettura aggiuntive, seleziona l'app esistente che desideri migrare all'app Wizard, quindi seleziona Procedi. Se l'app esistente selezionata non assegna utenti allo stesso Control Hub, la migrazione non andrà a buon fine. |
| 8 |
Al termine della migrazione, consigliamo di eseguire una prova a secco prima di abilitare la sincronizzazione automatica per verificare che non vi siano errori. |
Eseguire una prova a secco
Prima di attivare la sincronizzazione automatica, consigliamo di effettuare una prova per verificare che non si verifichino errori. Una volta completata la prova a secco, è possibile scaricare un rapporto per visualizzare informazioni dettagliate. Le colonne disponibili nel report sono:
| Nome colonne | Descrizione |
|---|---|
| Tipo di oggetto | Tipo di oggetto in Entra ID, ad esempio utente o gruppo. |
| Tipo di azione | Tipo di azione che verrà eseguita sull'oggetto durante una sincronizzazione. I possibili tipi di azione sono:
|
| Entra ID | ID dell'oggetto in Entra ID. |
| Inserisci Nome | Nome dell'oggetto in Entra ID. |
| Nome Webex | Nome dell'oggetto in Webex. |
| Motivo | Motivo per cui un determinato tipo di azione si verifica durante una sincronizzazione. |
| 1 |
Accedi a Control Hub con un account amministratore completo. |
| 2 |
Andare a Impostazioni organizzazione, quindi scorrere fino alla sezione Sincronizzazione rubrica. |
| 3 |
Fai clic sui tre puntini verticali accanto all'istanza che desideri sincronizzare, quindi seleziona Esecuzione a secco. |
| 4 |
Una volta completata la prova a secco, fai clic su Scarica riepilogo per scaricare il report come file CSV. |
Disabilita la sincronizzazione dell'ID Av
Mettere in pausa la sincronizzazione tra Control Hub ed Entra ID è semplice e non influisce sulla configurazione esistente. È possibile riprendere la sincronizzazione in qualsiasi momento.
Quando la sincronizzazione è disabilitata, gli utenti e i gruppi precedentemente sincronizzati diventano gestibili direttamente all'interno di Control Hub, proprio come gli utenti o i gruppi aggiunti manualmente. Se riattivi la sincronizzazione, questi utenti e gruppi vengono risincronizzati e tutte le modifiche apportate durante la pausa della sincronizzazione vengono sovrascritte da Entra ID.
| 1 | |
| 2 |
Vai a Impostazioni organizzazione e scorri verso il basso fino a App Microsoft Entra ID Wizard. |
| 3 |
Disattiva l'interruttore di sincronizzazione dell'ID Entra. |
Abilita/disabilita sincronizzazione automatica
L'app Entra ID Wizard e il relativo servizio backend verificano se la sincronizzazione automatica è abilitata per determinare quando sincronizzare utenti o gruppi da Entra ID a Webex. Abilita Sincronizzazione automatica per consentire la sincronizzazione automatica di utenti e gruppi. Quando si disattiva la sincronizzazione automatica, l'app Wizard non sincronizza nulla con Webex, ma la configurazione esistente viene mantenuta.
In genere, gli utenti vengono sincronizzati ogni 40 minuti secondo le policy di Microsoft.
È necessario disabilitare la sincronizzazione dell'ID Entra e non solo Sincronizzazione automatica per apportare modifiche agli utenti o ai gruppi sincronizzati.
| 1 |
Accedi a Control Hub come amministratore cliente completo. |
| 2 |
Andare a Impostazioni organizzazione, quindi scorrere fino alla sezione Sincronizzazione rubrica. |
| 3 |
Passare all'interruttore a destra per abilitare la sincronizzazione automatica. Disabilitarla attivando l'interruttore Sincronizzazione automatica a sinistra. |
Modifica la configurazione dell'app Entra ID Wizard
| 1 |
Accedi a Control Hub con un account amministratore completo. |
| 2 |
Andare a Impostazioni organizzazione, quindi scorrere fino alla sezione Sincronizzazione rubrica. |
| 3 |
Fai clic su Modifica configurazione. 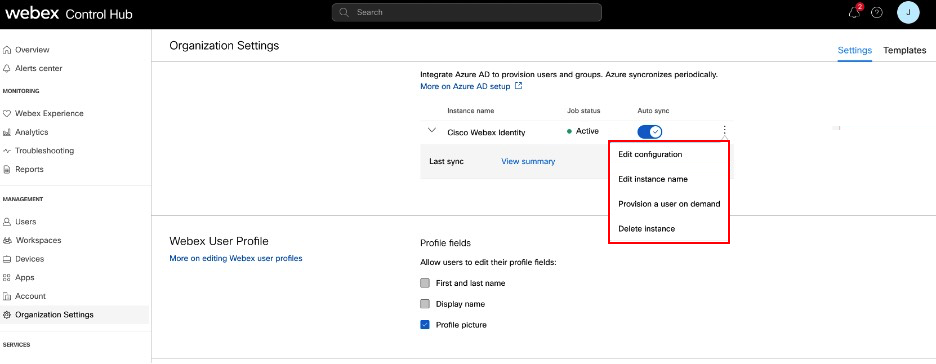 |
| 4 |
Personalizza la mappatura degli attributi selezionando un attributo dalla colonna di sinistra che proviene da Entra ID. L'attributo di destinazione nel cloud Webex si trova nella colonna destra. Per ulteriori informazioni sulla mappatura degli attributi, consultare Entra ID Wizard App attributes mapping.  |
| 5 |
Nelle schede Utenti e Gruppi , aggiungere o rimuovere utenti e gruppi dall'ambito della sincronizzazione. I gruppi annidati non si sincronizzano automaticamente con il cloud. Assicurati di selezionare tutti i gruppi annidati all'interno dei gruppi che desideri sincronizzare. |
| 6 |
Nella scheda Altro , cambiare le preferenze, se necessario. |
| 7 |
Fare clic su Save (Salva) per salvare la configurazione modificata. Gli aggiornamenti vengono applicati alla successiva sincronizzazione. Il meccanismo di sincronizzazione automatica di Entra ID gestisce la sincronizzazione degli utenti e dei gruppi di utenti. |
Modifica il nome dell'istanza Webex
Modifica la modalità di visualizzazione del nome dell'istanza di Cisco Webex Identity nell'elenco delle applicazioni aziendali di Entra ID.
| 1 |
Accedi a Control Hub con un account amministratore completo. |
| 2 |
Andare a Impostazioni organizzazione, quindi scorrere fino alla sezione Sincronizzazione rubrica. |
| 3 |
Fai clic su Modifica nome istanza. |
| 4 |
Inserisci il nuovo nome dell'istanza e poi fai clic su Salva. |
Elimina la configurazione dell'app Entra ID Wizard
Quando si elimina l'app Entra ID Wizard, viene rimossa anche la configurazione per la sincronizzazione di Entra ID. Webex ed Entra ID non conservano la configurazione eliminata. Se in futuro desideri utilizzare la sincronizzazione dell'ID Entra, dovrai eseguire una riconfigurazione completa.
Non disinstallare l'applicazione Cisco Webex da Entra ID.
In tal caso, è comunque possibile configurare una nuova istanza dell'app Entra ID Wizard, ma prima è necessario eliminare l'istanza esistente da Control Hub.
| 1 |
Accedi a Control Hub con un account amministratore completo. |
| 2 |
Andare a Impostazioni organizzazione, quindi scorrere fino alla sezione Sincronizzazione rubrica. |
| 3 |
Fai clic su Elimina istanza. |
| 4 |
Nella pagina Eliminare l'istanza di Entra ID?, seleziona Revoca il consenso amministrativo di Entra ID se desideri rimuovere l'accordo di consenso da Webex. Selezionando questa opzione, è necessario inserire nuovamente le proprie credenziali e concedere le autorizzazioni. |
| 5 |
Fare clic su Elimina |
Fornire un utente a Webex on-demand
È possibile assegnare un utente a Webex immediatamente, indipendentemente dalla sincronizzazione dell'ID Entra, e verificarne subito il risultato. Questa opzione è utile nella risoluzione dei problemi durante l'impostazione.
| 1 |
Accedi a Control Hub con un account amministratore completo. |
| 2 |
Vai a Impostazioni organizzazione e scorri verso il basso fino alla sezione Sincronizzazione directory. |
| 3 |
Fai clic su Effettua il provisioning di un utente su richiesta. |
| 4 |
Cerca e seleziona l'utente che desideri sottoporre a provisioning, quindi fai clic su Provision. |
| 5 |
Al termine dell'operazione, verrà visualizzato uno dei seguenti risultati:
|
| 6 |
Fai clic su Riprova per eseguire nuovamente il provisioning dello stesso utente, se l'operazione è stata saltata o non è andata a buon fine. |
| 7 |
Fai clic su Effettua il provisioning di un altro utente per tornare alla pagina di provisioning. |
| 8 |
Fai clic su Fatto quando hai finito. |
Importa i domini verificati Entra ID in Control Hub
I clienti possono avere centinaia di domini verificati in Entra ID. Sebbene si integrino con Control Hub, se desiderano importare i domini verificati da Entra ID a Control Hub. Ciò consente di risparmiare molti sforzi nel processo di manutenzione o impostazione.
| 1 |
Andare al secionamento del dominio nella scheda Impostazioni organizzazione in Control Hub. |
| 2 |
Fai clic su Aggiungi con ID Entra. 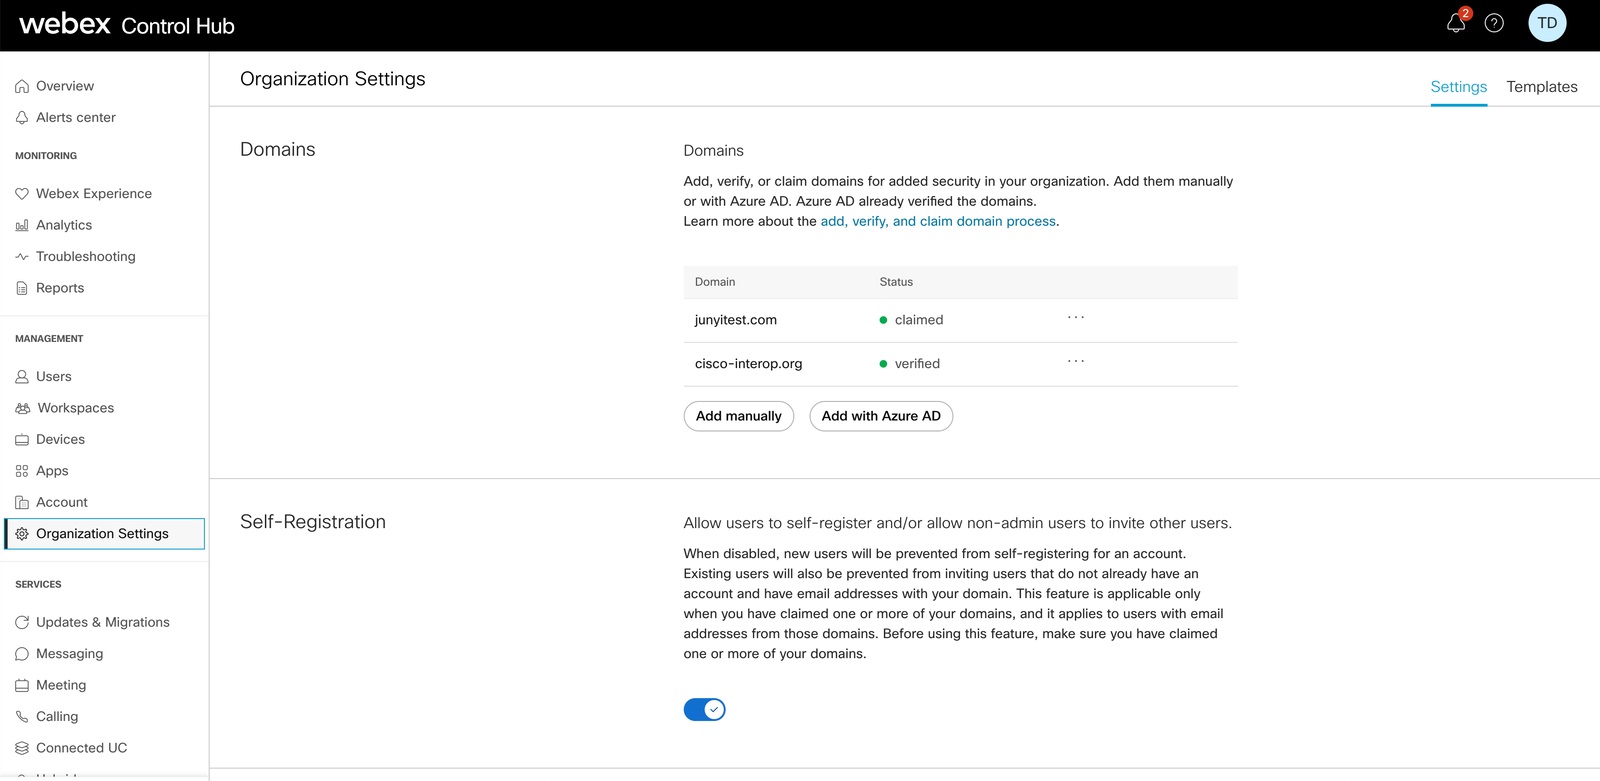 |
| 3 |
Nella pagina Aggiungi domini verificati , cercare e selezionare i domini da aggiungere. |
| 4 |
Fare clic su Aggiungi. I domini verificati appariranno nell'elenco dei domini verificati.
|
Mappatura degli attributi dell'app Entra ID Wizard
L'app Entra ID Wizard è in grado di supportare e sincronizzare qualsiasi modifica apportata alle espressioni degli attributi. Ad esempio, in Entra ID, è possibile mappare displayName in modo che visualizzi entrambi gli attributi surname e givenName. Queste modifiche vengono visualizzate nell'app Wizard.
Puoi trovare maggiori informazioni sulla mappatura delle espressioni degli attributi in Entra ID sul sito della GuidaMicrosoft .
Utilizzare la tabella seguente per informazioni sugli attributi specifici dell'ID Entra.
L'ID Entra non sincronizza i valori nulli. Se si imposta il valore di un attributo su null in Entra ID, questo non viene eliminato né sostituito con un valore null in Webex. Per ulteriori informazioni, consultare le limitazioni sul sito di assistenza Microsoft .
|
Inserisci ID Attributo (fonte) |
Attributo utente Webex (target) | Descrizione |
|---|---|---|
|
Attributi compilati per impostazione predefinita |
||
|
Userprincipalname |
userName |
Si tratta dell'ID univoco dell'utente in Webex. Formato e-mail. |
|
displayName |
displayName |
Nome dell'utente visualizzato sull'applicazione Webex. |
|
Cognome |
nome.familyName |
|
|
Givenname |
nome.givenName |
|
|
Objectid |
ID esterno |
Si tratta dell'UID dell'utente in Entra ID. In genere, è una stringa di 16 byte. Si sconsiglia di modificare questa associazione. |
|
Attributi aggiuntivi disponibili |
||
|
titolo attività |
title |
|
|
utilizzoLocation |
indirizzi[tipo eq "work"].country |
Si consiglia di utilizzare la mappatura di utilizzo per gli indirizzi [tipo eq "work"].country. Se si sceglie un altro attributo, è necessario verificare che i valori degli attributi siano conformi agli standard. Ad esempio, USA deve essere USA. La Cina deve essere CN e così via. |
|
città |
indirizzi[tipo eq "work"].locality |
|
|
indirizzo |
indirizzi[tipo eq "work"].streetAddress |
|
|
stato |
indirizzi[tipo eq "work"].region |
|
|
Postalcode |
indirizzi[tipo eq "work"].postalCode |
|
|
numero di telefono |
phoneNumbers[type eq "work"].value |
|
|
cellulare |
phoneNumbers[tipo eq "mobile"].valore |
|
|
fac faqileTelephoneNumber |
phoneNumbers[tipo eq "fax"].valore |
|
|
manager |
manager |
Sincronizza le informazioni del responsabile degli utenti con Webex, in modo che gli utenti possano sempre visualizzare le informazioni corrette del responsabile sulla scheda contatto di ciascun utente. Quando viene creato un utente, Entra ID verifica se l'oggetto manager dell'utente è presente in Webex Identity. In caso contrario, l'attributo manager dell'utente viene ignorato. Se è presente un attributo "manager", affinché tale attributo venga visualizzato nella scheda contatto dell'utente, devono essere soddisfatte due condizioni:
Queste condizioni verificano l'aggiornamento dell'attributo manager dell'utente quando il token di autenticazione dell'utente è scaduto. Le modifiche agli attributi del responsabile non saranno visibili nella scheda contatto dell'utente finché quest'ultimo non effettuerà il primo accesso dopo la modifica. |
Domande frequenti
Come posso migrare dall'app Cisco Directory Connector all'app Entra ID Wizard?
Durante la configurazione, l'app Wizard rileva se la tua organizzazione utilizza Directory Connector. Se è abilitato, viene visualizzata una finestra di dialogo in cui è possibile scegliere di utilizzare Entra ID e bloccare Directory Connector. Fai clic su Blocca per confermare che desideri continuare la configurazione dell'app Entra ID Wizard.
È inoltre possibile scegliere di disabilitare Directory Connector prima di configurare l'app Wizard. Dopo la configurazione, l'applicazione Wizard gestisce i profili utente. Tuttavia, l'app Wizard gestisce solo gli utenti che sono stati aggiunti all'ambito di sincronizzazione; non è possibile utilizzare l'app Wizard per gestire gli utenti sincronizzati tramite Directory Connector che non facevano parte dell'ambito di sincronizzazione.
È possibile configurare l'accesso Single Sign-On con Microsoft Entra?
È possibile configurare un'integrazione Single Sign-On (SSO) tra un'organizzazione cliente di Control Hub e una distribuzione che utilizza Microsoft Entra ID come provider di identità.
Quando si aggiorna l'avatar dell'utente in Webex?
Gli avatar degli utenti vengono sincronizzati con Webex al momento della creazione dell'utente in Webex Identity. Questo aggiornamento si basa sull'aggiornamento dell'avatar dell'utente in Entra ID. L'app Wizard recupera quindi il nuovo avatar da Entra ID. La scheda contatto dell'utente si aggiorna al primo accesso successivo alla modifica.
Perché un utente non compare immediatamente in un gruppo in Control Hub dopo la sincronizzazione e come si può risolvere questo problema?
La sincronizzazione degli utenti e dei gruppi è un processo indipendente. Mentre le sincronizzazioni degli utenti possono avvenire separatamente, le sincronizzazioni di gruppo si verificano automaticamente ogni 12 ore. Se un utente viene sincronizzato tramite un gruppo ma non compare immediatamente nel gruppo in Control Hub, si tratta comunque di un comportamento previsto. Se un utente compare solo nell'elenco principale degli utenti ma non nel gruppo, non è richiesta alcuna ulteriore azione. Attendi semplicemente il completamento del prossimo ciclo di sincronizzazione del gruppo.
Quando un utente viene contrassegnato come inattivo in Entra ID, cosa succede a quell'utente nella mia organizzazione Webex?
Agli utenti contrassegnati con Inattivi nell'ID Entra viene assegnata tale designazione anche nell'Hub di controllo. Gli utenti inattivi vengono esclusi dalle sincronizzazioni e non saranno modificati in caso di futuri aggiornamenti in Control Hub. Tuttavia, gli utenti inattivi continueranno ad apparire nell'organizzazione di Control Hub finché non li rimuoverai direttamente.


