- Pagină de pornire
- /
- Articol

Mulțumim pentru feedback.

 În acest articol
 Feedback?
Dacă gestionați utilizatorii și grupurile în Microsoft Entra ID, utilizați aplicația Entra ID Wizard din Control Hub pentru a sincroniza utilizatorii și grupurile cu Webex.
Activați Entra ID în Control Hub
În Webex for Government, aplicația Entra ID Wizard este disponibilă atât pentru clienții GCC Moderate Entra ID, cât și pentru clienții GCC High Entra ID.
Unele dintre funcțiile descrise în acest articol nu sunt încă disponibile pentru toți clienții.
Înainte de a începe
Asigurați-vă că aveți acces la un cont Entra ID care are autoritatea de a acorda consimțământul de administrator la nivel de entitate găzduită pentru o aplicație.
Trebuie să fiți administrator complet în organizația dvs. Control Hub pentru a configura aplicația Entra ID Wizard.
| 1 |
Conectați-vă la Control Hub. |
| 2 |
Accesați Setări organizație și apoi derulați în jos până la Aplicația Microsoft Entra ID Wizard. |
| 3 |
Faceţi clic pe Configurare pentru a începe configurarea. |
| 4 |
(Opțional) Pentru administratorii Webex for Government, selectați fie Entra Worldwide, fie Entra GCC High și faceți clic pe Continuă. Entra Worldwide trimite Wizard-ul către Entra AD atât pentru GCC Moderate, cât și pentru Commercial. Entra GCC High trimite Vrăjitorul către Entra AD pentru GCC High.
|
| 5 |
Autentificați-vă contul de administrator Entra ID. Dacă nu sunteți administrator global sau cu rol privilegiat în Entra ID, puteți solicita acces pentru a acorda permisiunea aplicației Entra ID Wizard. Dacă aveți privilegii complete de administrator în Entra ID, puteți revizui și acorda acces la solicitări accesând . Sub Activitate, selectați Cereri de consimțământ administrator și faceți clic pe Integrare Cisco Webex Identity și selectați Verificați permisiunile și acceptați. Acest proces acordă autentificare generală aplicației Webex. În final, faceți clic pe fila Toate (previzualizare), selectați Integrare Cisco Webex Identity și faceți clic pe Verificare aplicație. Sub , faceți clic pe Acordați consimțământul administratorului pentru ca Cisco să acorde toate permisiunile necesare pentru a activa Entra ID în Control Hub. Consultați Asistența Microsoft pentru mai multe informații despre acest proces. |
| 6 |
Verificați permisiunile și faceți clic pe Accept pentru a acorda contului autorizația de a accesa chiriașul Entra ID. Integrarea Cisco Webex Identity este o aplicație enterprise Entra ID în Entra ID. Aplicația Wizard se conectează la această aplicație pentru a accesa API-urile grafice Entra ID. Permisiunile necesare pentru accesarea acestuia sunt permisiunile minime necesare pentru a-l susține și utiliza. |
| 7 |
Pentru clienții IMM-uri, acceptați setările implicite bifând caseta de selectare Sincronizare setări prestabilite și făcând clic pe Continuați. Pentru clienții întreprinderi, treceți la pasul următor și continuați configurarea. Dacă acceptați setările implicite, înseamnă că doriți să:
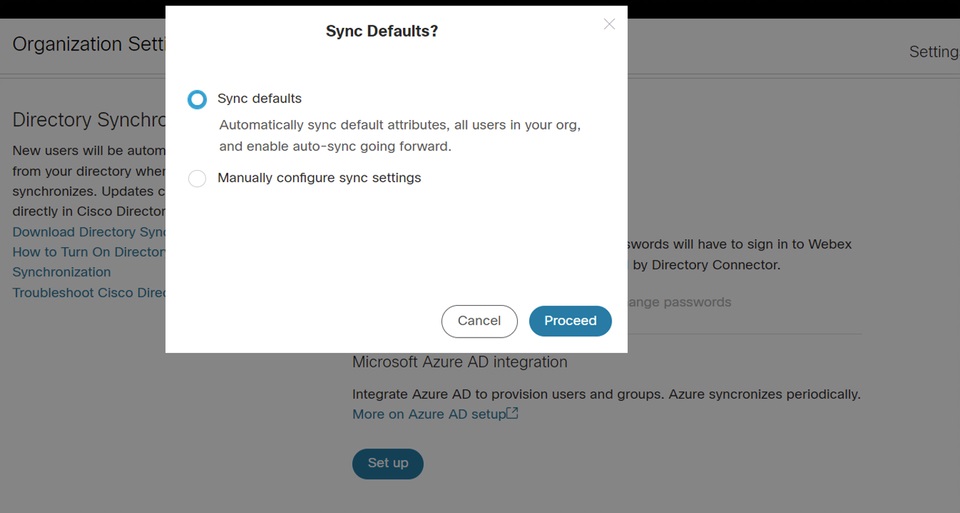 |
| 8 |
Pentru clienții Enterprise (peste 1000 de utilizatori) sau pentru clienții care doresc să configureze manual setările, faceți clic pe fila Atribute și mapați atributele. Faceți clic pe Salvați. Puteți mapa alte atribute de utilizator din Entra ID în Webex sau puteți modifica mapările existente ale atributelor de utilizator utilizând pagina Atribute. Puteți personaliza maparea asigurându-vă că o configurați corect. Valoarea pe care o mapați ca nume de utilizator este importantă. Webex utilizează adresa de e-mail a utilizatorului ca nume de utilizator. În mod implicit, userPrincipalName (UPN) din Entra ID se mapează la adresa de e-mail (numele de utilizator) din Control Hub. Nu puteți edita maparea în timpul primei configurări. În acel moment, instanța corespunzătoare nu este complet construită și nu există nicio instanță a atributului de mapare personalizat. Cu toate acestea, puteți să faceți clic pe Editați pentru a o modifica când se termină configurarea. |
| 9 |
Adăugaţi utilizatori la domeniul de sincronizare făcând clic pe fila Utilizatori. Puteți introduce numele de utilizator pentru a căuta și adăuga utilizatorul în domeniul de sincronizare. De asemenea, puteți elimina un utilizator din domeniul de sincronizare făcând clic pe pictograma Coș de reciclare din partea dreaptă. Faceți clic pe Salvați. Dacă doriți să selectați toți utilizatorii din Entra ID, selectați Selectați toți utilizatorii. Dacă îl selectați, nu este necesar să selectați grupuri în domeniu, deoarece această opțiune sincronizează grupurile în același timp.  Nu vă recomandăm să utilizați Selectați toți utilizatorii pentru clienții întreprinderi semnificativi cu sute de mii de utilizatori, deoarece procesul de inițializare necesită mult timp. Dacă sincronizați din greșeală mulți utilizatori în Control Hub, ștergerea acestor utilizatori durează mai mult. Faceți clic pe Salvare. |
| 10 |
În fila Grupuri, puteți căuta grupuri individuale și le puteți adăuga la Webex.
|
| 11 |
(Opțional) În fila Mai multe, aveți opțiunea de a configura câteva opțiuni avansate de sincronizare:
|
| 12 |
Puteți decide dacă doriți să permiteți sincronizarea să aibă loc imediat sau într-o etapă ulterioară. Dacă selectați opțiunea Permite acum, aceasta aplică toate setările pentru sincronizarea viitoare. Dacă selectați opțiunea Salvați și permiteți mai târziu, sincronizarea nu începe până când nu permiteți sincronizarea automată. 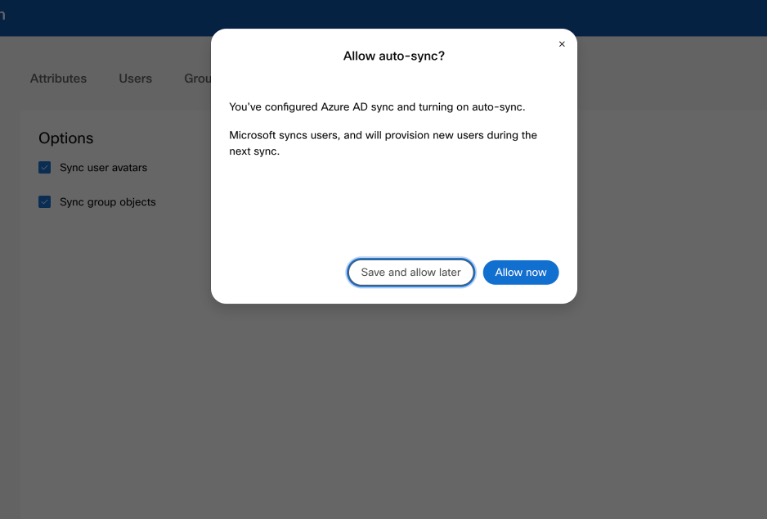 |
| 13 |
Aplicația comunică cu Entra ID pentru a configura și a programa sincronizarea. 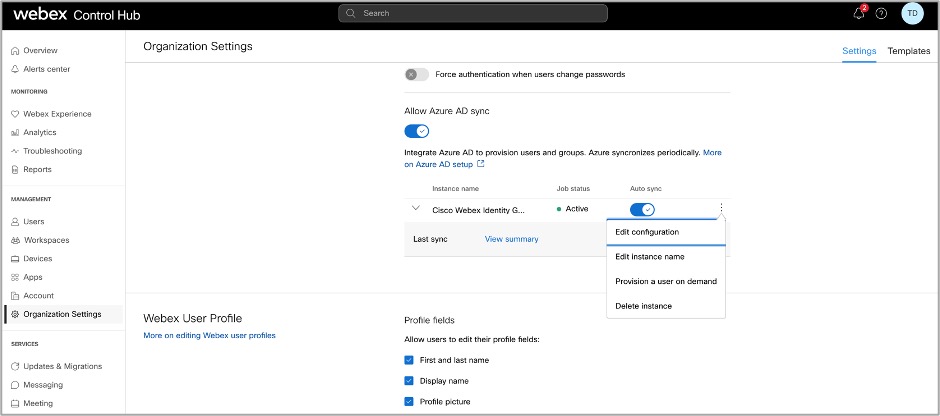 |
- Activ: sincronizarea a avut succes.
- Carantină: Jobul de sincronizare a fost pus în carantină în Entra ID după mai multe eșecuri. Consultați documentația Entra ID pentru mai multe informații.
- Nu rulează: Această stare apare numai după prima configurare. Serviciul nu a rulat încă după prima configurare.
De asemenea, puteți face clic pe Vizualizare rezumat pentru a vedea informații suplimentare, cum ar fi ora și data ultimei sincronizări și numărul de utilizatori sincronizați, omiși sau care au eșuat:
Utilizatori
- Sincronizat: arată numărul de utilizatori care au fost sincronizați cu succes cu Webex.
- Omis: afișează numărul de utilizatori care au fost omiși în ultima sincronizare. De exemplu, utilizatori noi din Entra ID care nu au fost adăugați la domeniul de sincronizare al aplicației Entra ID Wizard. Acești utilizatori nu au fost sincronizați cu Webex; adăugați-i în domeniul de sincronizare pentru a-i sincroniza cu Webex.
- Eșuat: arată numărul de utilizatori care nu au reușit să se sincronizeze. Consultați jurnalul de audit al furnizării de informații pentru aplicația Entra ID pentru mai multe informații despre motivul pentru care acești utilizatori nu au reușit să sincronizeze. Dacă trebuie să sincronizați acești utilizatori imediat, puteți să furnizați utilizatori la cerere.
Grupuri
- Sincronizat: arată numărul de grupuri sincronizate cu succes cu Webex și create în Control Hub.
- De sincronizat: Această stare indică faptul că nu au fost încă adăugați toți utilizatorii dintr-un grup. Utilizatorii trebuie mai întâi sincronizați cu succes cu Webex.
Migrarea configurațiilor existente ale aplicației Cisco Webex Enterprise către aplicația Entra ID Wizard
Dacă ați configurat deja o aplicație Cisco Webex Enterprise în Entra ID, puteți migra automat toate configurațiile în aplicația Entra ID Wizard. Puteți gestiona Entra ID-ul complet în Control Hub fără a pierde configurațiile anterioare.
| 1 |
Conectați-vă la Control Hub cu un cont complet de administrator de client. |
| 2 |
Accesați Setări organizație și apoi derulați în jos până la secțiunea Aplicația Microsoft Entra ID Wizard. |
| 3 |
Faceţi clic pe Configurare pentru a începe configurarea. |
| 4 |
Autentificați contul de administrator Entra ID cu configurația Entra ID. Asigurați-vă că utilizați un cont care are permisiunile descrise în pasul următor. |
| 5 |
Verificați permisiunile și faceți clic pe Accept pentru a acorda contului autorizația de a accesa chiriașul Entra ID. Sincronizarea identității Cisco Webex este o aplicație pentru întreprinderi Entra ID în cadrul Entra ID. Aplicația Wizard se conectează la această aplicație pentru a accesa API-urile grafice Entra ID. Permisiunile necesare pentru a-l accesa sunt permisiunile minime necesare pentru a-l susține și utiliza. |
| 6 |
Selectați Migrați aplicația existentă. |
| 7 |
După ce acceptați solicitări suplimentare de permisiune doar pentru citire, selectați aplicația existentă pe care doriți să o migrați în aplicația Wizard, apoi selectați Continuați. Dacă aplicația existentă selectată nu furnizează utilizatori către același Control Hub, migrarea va eșua. |
| 8 |
După finalizarea migrării, vă recomandăm să efectuați o simulare înainte de a activa sincronizarea automată pentru a vă asigura că nu există erori. |
Efectuați o rulare fără acțiune
Înainte de a activa sincronizarea automată, vă recomandăm să efectuați mai întâi o simulare pentru a vă asigura că nu există erori. După finalizarea testului, puteți descărca un raport al testului pentru a vedea informații detaliate. Coloanele disponibile în raport sunt:
| Numele coloanei | Descriere |
|---|---|
| Tip obiect | Tipul obiectului din Entra ID, cum ar fi utilizator sau grup. |
| Tip de acțiune | Tipul de acțiune care va fi efectuată asupra obiectului în timpul unei sincronizări. Tipurile de acțiuni posibile sunt:
|
| ID de intrare | ID-ul obiectului în Entra ID. |
| Nume intrare | Numele obiectului în Entra ID. |
| Nume Webex | Numele obiectului în Webex. |
| Motiv | Motivul pentru care un tip de acțiune va avea loc în timpul unei sincronizări. |
| 1 |
Conectați-vă la Control Hub cu un cont de administrator complet. |
| 2 |
Accesați Setări organizației și apoi derulați în jos la secțiunea Sincronizare directoare. |
| 3 |
Faceți clic pe cele trei puncte verticale de lângă instanța pe care doriți să o sincronizați, apoi selectați Executare preliminară. |
| 4 |
După finalizarea testului, faceți clic pe Descărcare rezumat pentru a descărca raportul ca fișier CSV. |
Dezactivați sincronizarea Entra ID
Întreruperea sincronizării dintre Control Hub și Entra ID este simplă și nu afectează configurația existentă. Puteți relua sincronizarea în orice moment.
Când sincronizarea este dezactivată, utilizatorii și grupurile care au fost sincronizate anterior devin gestionabile direct în Control Hub, la fel ca utilizatorii sau grupurile adăugate manual. Dacă reactivați sincronizarea, acești utilizatori și grupuri sunt resincronizate, iar orice modificări efectuate în timp ce sincronizarea era întreruptă sunt suprascrise de Entra ID.
| 1 |
Conectați-vă la Control Hub. |
| 2 |
Accesați Setări organizație și derulați în jos până la Aplicația Microsoft Entra ID Wizard. |
| 3 |
Dezactivați comutatorul pentru sincronizarea Entra ID. |
Activați sau dezactivați sincronizarea automată
Aplicația Entra ID Wizard și serviciul backend corespunzător verifică dacă sincronizarea automată este activată pentru a determina când să sincronizeze utilizatorii sau grupurile de la Entra ID la Webex. Activați Sincronizare automată pentru a permite sincronizarea automată a utilizatorilor și grupurilor. Când dezactivați Sincronizare automată, aplicația Wizard nu sincronizează nimic cu Webex, dar configurația existentă este păstrată.
De obicei, utilizatorii sunt sincronizați la fiecare 40 de minute conform politicii Microsoft.
Trebuie să dezactivați sincronizarea Entra ID și nu doar Sincronizarea automată pentru a face modificări utilizatorilor sau grupurilor sincronizate.
| 1 |
Conectați-vă la Control Hub ca administrator de client complet. |
| 2 |
Accesați Setări organizației și apoi derulați în jos la secțiunea Sincronizare directoare. |
| 3 |
Comutați comutatorul la dreapta pentru a activa Sincronizare automată. Dezactivați-l prin comutarea comutatorului Sincronizare automată la stânga. |
Editați configurația aplicației Entra ID Wizard
| 1 |
Conectați-vă la Control Hub cu un cont de administrator complet. |
| 2 |
Accesați Setări organizației și apoi derulați în jos la secțiunea Sincronizare directoare. |
| 3 |
Faceți clic pe Editați configurația. 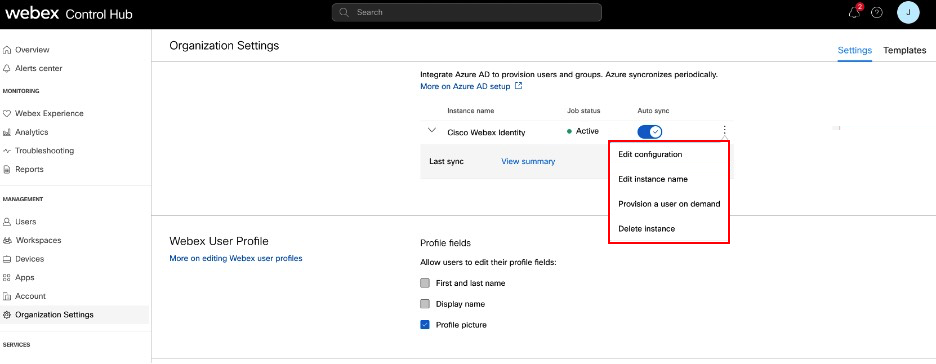 |
| 4 |
Personalizați maparea atributelor selectând un atribut din coloana din stânga care provine din ID-ul Entra. Atributul destinație în Webex Cloud este în coloana din dreapta. Consultați Maparea atributelor aplicației Entra ID Wizard pentru mai multe informații despre maparea atributelor.  |
| 5 |
În filele Utilizatori și Grupuri, adăugați sau eliminați utilizatori și grupuri din domeniul de sincronizare. Grupurile imbricate nu se sincronizează automat cu cloud-ul. Asigurați-vă că selectați toate grupurile imbricate în grupurile pe care doriți să le sincronizați. |
| 6 |
În fila Mai multe, modificați preferințele dacă este necesar. |
| 7 |
Faceţi clic pe Salvare pentru a salva configuraţia modificată. Actualizările dvs. sunt aplicate la următoarea sincronizare. Mecanismul de sincronizare automată Entra ID gestionează sincronizarea utilizatorilor și a grupurilor de utilizatori. |
Editați numele instanței Webex
Schimbați modul în care apare numele instanței Cisco Webex Identity în lista de aplicații pentru întreprinderi Entra ID.
| 1 |
Conectați-vă la Control Hub cu un cont de administrator complet. |
| 2 |
Accesați Setări organizației și apoi derulați în jos la secțiunea Sincronizare directoare. |
| 3 |
Faceți clic pe Editați numele instanței. |
| 4 |
Introduceți numele noii instanțe și apoi faceți clic pe Salvare. |
Ștergeți configurația aplicației Entra ID Wizard
Când ștergeți aplicația Entra ID Wizard, aceasta elimină și configurația pentru sincronizarea Entra ID. Webex și Entra ID nu păstrează configurația ștearsă. Dacă doriți să utilizați sincronizarea Entra ID în viitor, trebuie să efectuați o reconfigurare completă.
Nu ștergeți aplicația Cisco Webex din Entra ID.
Dacă faceți acest lucru, puteți configura în continuare o nouă instanță a aplicației Entra ID Wizard, dar trebuie mai întâi să ștergeți instanța din Control Hub.
| 1 |
Conectați-vă la Control Hub cu un cont de administrator complet. |
| 2 |
Accesați Setări organizației și apoi derulați în jos la secțiunea Sincronizare directoare. |
| 3 |
Faceți clic pe Ștergeți instanța. |
| 4 |
În pagina Ștergeți instanța Entra ID?, selectați Revocați consimțământul administratorului Entra ID dacă doriți să eliminați acordul de consimțământ din Webex. Când selectați această opțiune, trebuie să introduceți acreditările și să acordați din nou permisiunile. |
| 5 |
Faceţi clic pe Șterge. |
Furnizarea unui utilizator la Webex la cerere
Puteți să conectați imediat un utilizator la Webex, independent de o sincronizare Entra ID, și să verificați instantaneu rezultatul. Acest lucru vă ajută la soluționarea problemelor din timpul configurării.
| 1 |
Conectați-vă la Control Hub cu un cont de administrator complet. |
| 2 |
Accesați Setări organizație și derulați în jos până la secțiunea Sincronizare directoare. |
| 3 |
Faceți clic pe Alocați un utilizator la cerere. |
| 4 |
Căutați și selectați utilizatorul pe care doriți să îl configurați, apoi faceți clic pe Conectare. |
| 5 |
Unul dintre următoarele rezultate apare la finalizare:
|
| 6 |
Faceți clic pe Reîncercare pentru a furniza din nou același utilizator, dacă procesul a fost omis sau a eșuat. |
| 7 |
Faceți clic pe Alocați un alt utilizator pentru a reveni la pagina de alocare. |
| 8 |
Faceți clic pe Gata când ați terminat. |
Importați domeniile verificate Entra ID în Control Hub
Clienții pot avea sute de domenii verificate în Entra ID. În timp ce se integrează cu Control Hub, dacă doresc să importe domeniile verificate din Entra ID în Control Hub. Acest lucru poate economisi multe eforturi în procesul de întreținere sau de configurare.
| 1 |
Accesați secțiunea Domeniu din fila Setări organizație din Control Hub. |
| 2 |
Faceți clic pe Adăugare cu ID de intrare. 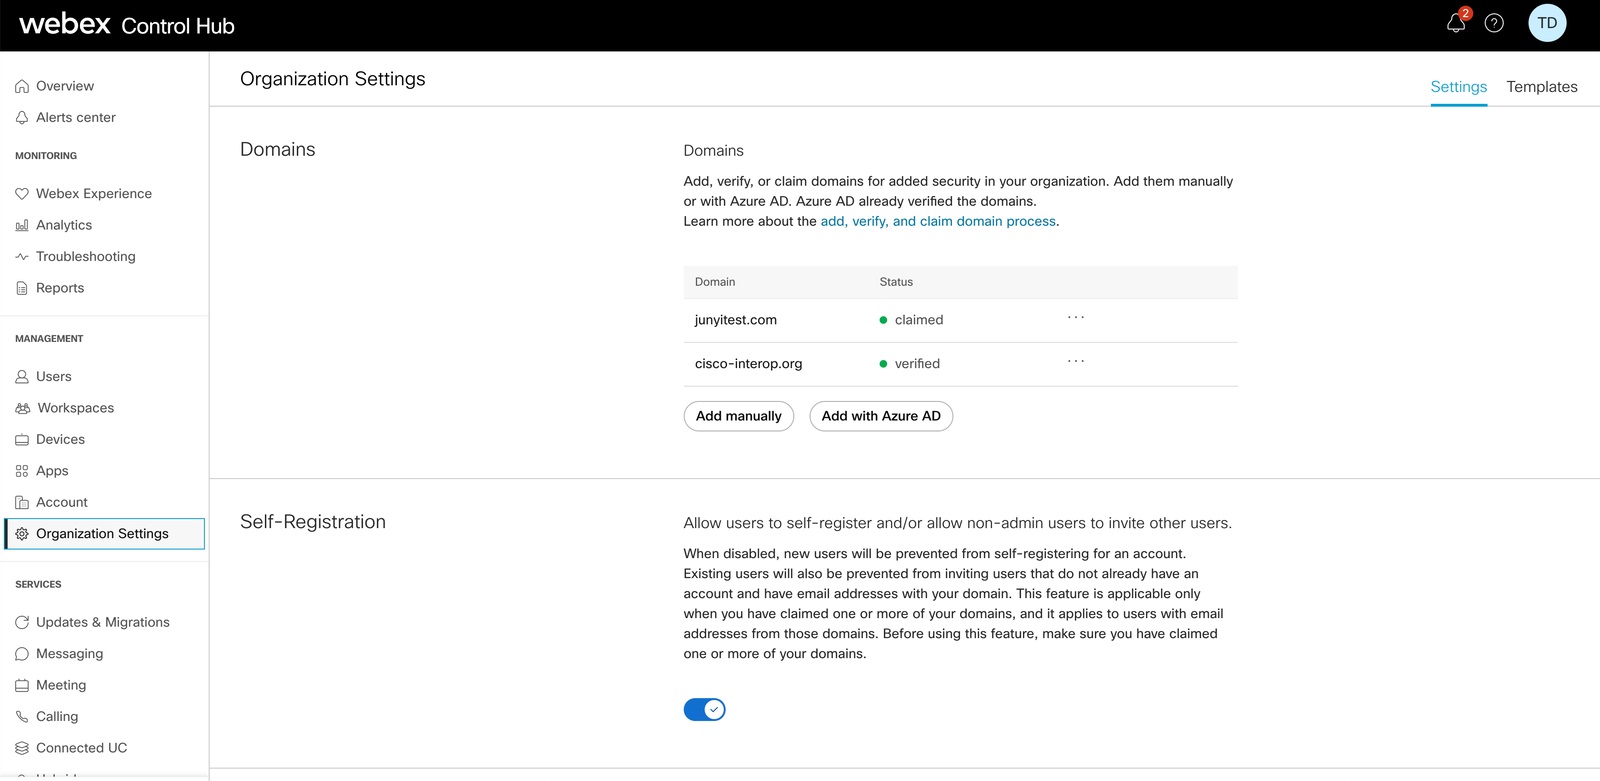 |
| 3 |
În pagina Adăugați domenii verificate, căutați și selectați domeniile de adăugat. |
| 4 |
Faceți clic pe Adăugare. Domeniile verificate vor apărea în lista de domenii verificate.
|
Maparea atributelor aplicației Entra ID Wizard
Aplicația Entra ID Wizard poate suporta și sincroniza orice modificări pe care le faceți expresiilor atributelor. De exemplu, în Entra ID, puteți mapa displayName astfel încât să afișeze ambele atribute surname și givenName. Aceste modificări apar în aplicația Wizard.
Puteți găsi mai multe informații despre maparea expresiilor atributelor în Entra ID pe site-ul de ajutor Microsoft.
Utilizați tabelul următor pentru informații despre atributele specifice ale ID-ului Entra.
ID-ul Entra nu sincronizează valorile nule. Dacă setați o valoare a atributului la nulă în Entra ID, aceasta nu este ștearsă și nu este aplicată o valoare nulă în Webex. Consultați limitările de pe site-ul de ajutor Microsoft pentru mai multe informații.
|
Atribut ID intrare (sursă) |
Atribut utilizator Webex (țintă) | Descriere |
|---|---|---|
|
Atribute populate în mod implicit |
||
|
userPrincipalName |
numeUtilizatoruserName |
Este ID-ul unic al utilizatorului în Webex. Este un e-mail formatat. |
|
nume afișat |
nume afișat |
Numele utilizatorului care se afișează în aplicația Webex. |
|
nume de familie |
name.familyName |
|
|
givenName |
name.givenName |
|
|
objectId |
externalId |
Este UID-ul utilizatorului în Entra ID. În general, este un șir de 16 octeți. Nu vă recomandăm să modificați această mapare. |
|
Atribute disponibile suplimentare |
||
|
jobTitle |
titlu |
|
|
usageLocation |
adrese[tip eq "muncă"].țară |
Vă recomandăm să utilizați maparea Usagelocation la adrese [type eq "work"].country. Dacă alegeți un alt atribut, trebuie să vă asigurați că valorile atributului sunt în conformitate cu standardele. De exemplu, SUA ar trebui să fie SUA. China ar trebui să fie CN și așa mai departe. |
|
oraș |
adrese[tip eq "muncă"].localitate |
|
|
streetAddress |
adrese[tip eq "work"].streetAddress |
|
|
stat |
adrese[tip eq "work"].regiune |
|
|
cod poștal |
adrese[tip eq "work"].postalCode |
|
|
număr de telefon |
phoneNumbers[tip eq "work"].valoare |
|
|
mobil |
phoneNumbers[tip eq "mobile"].valoare |
|
|
facsimilTelephoneNumber |
phoneNumbers[tip eq "fax"].valoare |
|
|
manager |
manager |
Sincronizează informațiile manageriale ale utilizatorilor cu Webex, astfel încât utilizatorii să poată vedea întotdeauna informațiile corecte despre manager pe fișa de vizită a unui utilizator. Când este creat un utilizator, Entra ID verifică dacă obiectul manager al utilizatorului se află sau nu în Webex Identity. Dacă nu, atributul de manager al utilizatorului este ignorat. Dacă există un atribut de manager, trebuie îndeplinite două condiții pentru ca atributul să apară pe cartea de vizită a utilizatorului:
Aceste condiții verifică actualizarea atributului manager al utilizatorului atunci când token-ul de autentificare al unui utilizator a expirat. Modificările atributelor managerului nu vor fi reflectate pe cartea de vizită a utilizatorului decât după ce utilizatorul se conectează pentru prima dată după modificare. |
FAQ
Cum pot migra la aplicația Entra ID Wizard din furnizarea Cisco Directory Connector?
În timpul configurării, aplicația Wizard detectează dacă organizația dvs. utilizează Directory Connector. Dacă este activată, va apărea o casetă de dialog în care puteți alege să utilizați Entra ID și să blocați Directory Connector. Faceți clic pe Blocare pentru a confirma că doriți să continuați configurarea aplicației Entra ID Wizard.
De asemenea, puteți alege să dezactivați Conectorul Director înainte de a configura aplicația Wizard. După configurare, aplicația Wizard gestionează profilurile utilizatorilor. Totuși, aplicația Wizard gestionează doar utilizatorii care au fost adăugați la domeniul de sincronizare; nu puteți utiliza aplicația Wizard pentru a gestiona utilizatorii sincronizați de Directory Connector care nu făceau parte din domeniul de sincronizare.
Pot configura autentificarea unică cu Microsoft Entra?
Puteți configura o integrare Single Sign-On (SSO) între o organizație client Control Hub și o implementare care utilizează Microsoft Entra ID ca furnizor de identitate.
Când se actualizează avatarul utilizatorului în Webex?
Avatarurile utilizatorilor sunt sincronizate cu Webex atunci când utilizatorul este creat în Webex Identity. Această actualizare se bazează pe actualizarea avatarului utilizatorului în Entra ID. Aplicația Wizard preia apoi noul avatar din Entra ID. Fișa de contact a utilizatorului se actualizează atunci când utilizatorul se conectează pentru prima dată după modificare.
De ce nu apare un utilizator într-un grup în Control Hub imediat după sincronizare și cum se poate rezolva această problemă?
Sincronizările utilizatorilor și grupurilor sunt procese independente. Deși sincronizările utilizatorilor pot avea loc separat, sincronizările de grup au loc automat la fiecare 12 ore. Dacă un utilizator este sincronizat printr-un grup, dar nu apare imediat în grup în Control Hub, acesta este în continuare un comportament așteptat. Dacă un utilizator apare doar în lista principală de utilizatori, dar nu și în grup, nu este necesară nicio acțiune suplimentară. Pur și simplu așteptați finalizarea următorului ciclu de sincronizare a grupului.
Când un utilizator este marcat ca inactiv în Entra ID, ce se întâmplă cu acel utilizator din organizația mea Webex?
Utilizatorii marcați cu Inactiv în Entra ID primesc și această denumire în Control Hub. Utilizatorii inactivi sunt omiși în sincronizări și nu vor fi modificați în nicio modificare viitoare din Control Hub. Totuși, utilizatorii inactivi vor continua să apară în organizația Control Hub până când îi veți elimina direct.


