- Startseite
- /
- Artikel

Danke für Ihr Feedback.

 In diesem Artikel
 Feedback?
Wenn Sie Ihre Benutzer und Gruppen in Microsoft Entra ID verwalten, verwenden Sie die Entra ID Wizard App im Control Hub, um Benutzer und Gruppen mit Webex zu synchronisieren.
Entra-ID im Control Hub aktivieren
In Webex for Government ist die Entra ID Wizard App sowohl für GCC Moderate Entra ID- als auch für GCC High Entra ID-Kunden verfügbar.
Einige der in diesem Artikel beschriebenen Funktionen stehen noch nicht allen Kunden zur Verfügung.
Vorbereitungen
Stellen Sie sicher, dass Sie Zugriff auf ein Entra ID-Konto haben, das die Berechtigung besitzt, einer Anwendung eine mandantenweite Administratorzustimmung zu erteilen.
Sie müssen in Ihrer Control Hub-Organisation über vollständige Administratorrechte verfügen, um die Entra ID Wizard App einzurichten.
| 1 | |
| 2 |
Gehen Sie zu Organisationseinstellungen und scrollen Sie dann nach unten zu Microsoft Entra ID Wizard App. |
| 3 |
Klicken Sie auf Einrichten, um die Konfiguration zu starten. |
| 4 |
(Optional) Für Webex for Government-Administratoren wählen Sie entweder Entra Worldwide oder Entra GCC High und klicken Sie auf Weiter. Entra Worldwide sendet den Wizard an den Entra AD für GCC Moderate und Commercial. Entra GCC High sendet den Wizard zum Entra AD für GCC High.
|
| 5 |
Authentifizieren Sie Ihr Entra ID-Administratorkonto. Wenn Sie kein globaler Administrator oder Administrator mit privilegierten Rollen in Entra ID sind, können Sie Zugriff anfordern, um der Entra ID Wizard App Berechtigungen zu erteilen. Wenn Sie über vollständige Administratorrechte in Entra ID verfügen, können Sie Anfragen überprüfen und Zugriffsrechte erteilen, indem Sie zu . Unter Aktivitätwählen Sie Admin-Zustimmungsanfragen aus und klicken Sie auf Cisco Webex Identity Integration und wählen Sie Berechtigungen überprüfen und akzeptierenaus. Dieser Prozess gewährt allgemeine Authentifizierung für die Webex-Anwendung. Klicken Sie abschließend auf die Registerkarte Alle (Vorschau), wählen Sie Cisco Webex Identity Integration aus und klicken Sie auf Anwendung überprüfen. Unter und so alle erforderlichen Berechtigungen zum Aktivieren von Entra ID im Control Hub zu erteilen. Weitere Informationen zu diesem Prozess finden Sie unter Microsoft-Support. |
| 6 |
Überprüfen Sie die Berechtigungen und klicken Sie auf Akzeptieren , um dem Konto die Berechtigung zum Zugriff auf Ihren Entra ID-Mandanten zu erteilen. Cisco Webex Identity Integration ist eine Entra ID Unternehmensanwendung in Entra ID. Die Wizard App stellt eine Verbindung zu dieser Anwendung her, um auf die Entra ID Graph-APIs zuzugreifen. Die für den Zugriff erforderlichen Berechtigungen sind die Mindestberechtigungen, die für die Unterstützung und Nutzung notwendig sind. |
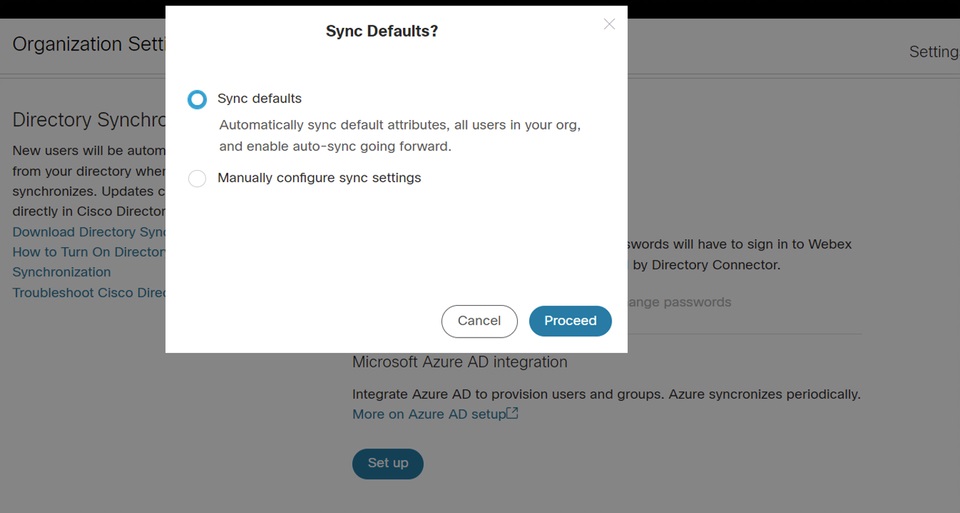
| 7 |
Übernehmen Sie für SMB-Kunden die Standardeinstellungen, indem Sie das Kontrollkästchen Synchronisierungs-Standards aktivieren und auf Fortfahren klicken. Für Unternehmenskunden gehen Sie zum nächsten Schritt und setzen Sie die Konfiguration fort. Wenn Sie die Standardeinstellungen akzeptieren, haben Sie die folgenden Möglichkeiten:
 |
| 8 |
Für Unternehmenskunden (mehr als 1000 Benutzer) oder Kunden, die die Einstellungen manuell konfigurieren möchten, klicken Sie auf die Registerkarte Attribute und ordnen Sie die Attribute zu. Klicken Sie auf Speichern. Sie können weitere Benutzerattribute von der Entra-ID zu Webex zuordnen oder bestehende Benutzerattributzuordnungen über die Seite Attribute ändern. Sie können die Zuordnung anpassen, indem Sie sicherstellen, dass Sie sie richtig konfigurieren. Der Wert, den Sie als Benutzernamen zuordnen, ist wichtig. Webex verwendet die E-Mail-Adresse des Benutzers als Benutzernamen. Standardmäßig wird der Benutzerprinzipalname (UPN) in der Entra-ID der E-Mail-Adresse (Benutzername) im Control Hub zugeordnet. Sie können die Zuordnung während der ersten Einrichtung nicht bearbeiten. Zu diesem Zeitpunkt wird die entsprechende Instanz nicht vollständig erstellt und es gibt keine Instanz des benutzerdefinierten Zuordnungsattributs. Sie können jedoch auf Bearbeiten klicken, um ihn nach Abschluss der Einrichtung zu ändern. |
| 9 |
Fügen Sie Benutzer zum Synchronisierungsumfang hinzu, indem Sie auf die Registerkarte Benutzer klicken. Sie können den Benutzernamen eingeben, um den Benutzer zu suchen und ihn dem Synchronisierungsbereich hinzuzufügen. Sie können einen Benutzer auch aus dem Synchronisierungsbereich entfernen, indem Sie auf das Papierkorbsymbol auf der rechten Seite klicken. Klicken Sie auf Speichern. Wenn Sie alle Benutzer anhand der Entra-ID auswählen möchten, wählen Sie Alle Benutzer auswählen. Wenn Sie diese Option auswählen, müssen Sie keine Gruppen im Umfang auswählen, da diese Option die Gruppen gleichzeitig synchronisiert.  Wir empfehlen die Verwendung von Select all users nicht für bedeutende Unternehmenskunden mit Hunderten von Tausenden von Nutzern, da der Initialisierungsprozess eine lange Zeit erfordert. Wenn Sie versehentlich viele Benutzer in Control Hub synchronisieren, dauert es auch länger, diese Benutzer zu löschen. Klicken Sie auf Speichern. |
| 10 |
Auf der Registerkarte Gruppen können Sie nach einzelnen Gruppen suchen und diese zu Webex hinzufügen.
|
| 11 |
(Optional) Auf der Registerkarte Mehr haben Sie die Möglichkeit, einige erweiterte Synchronisierungsoptionen zu konfigurieren:
|
| 12 |
Sie können entscheiden, ob die Synchronisierung sofort oder später möglich sein soll. Wenn Sie die Option Jetzt zulassen auswählen , werden alle Einstellungen auf die anstehende Synchronisierung angewendet. Wenn Sie die Option Speichern auswählen und später zulassen , wird die Synchronisierung erst gestartet, wenn die automatische Synchronisierung erlaubt ist. 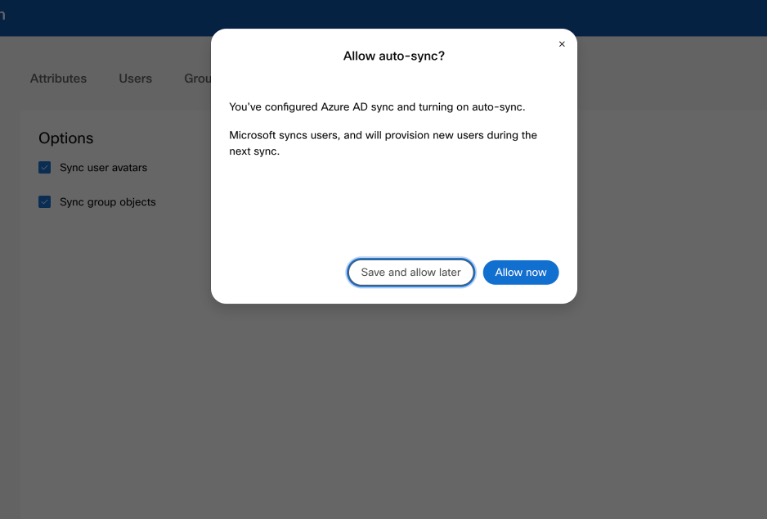 |
| 13 |
Die Anwendung kommuniziert mit Entra ID, um die Konfiguration einzurichten und die Synchronisierung zu planen. 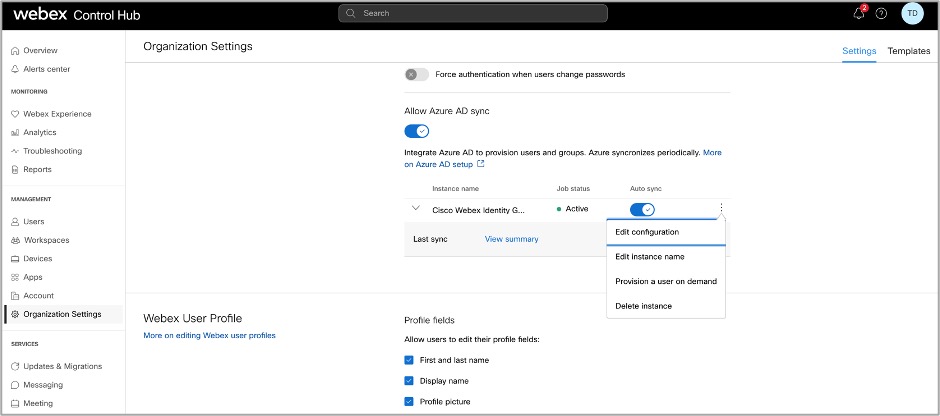 |
- Aktiv: Die Synchronisierung war erfolgreich.
- Quarantäne: Der Synchronisierungsauftrag wurde nach mehreren Fehlversuchen in Entra ID unter Quarantäne gestellt. Weitere Informationen finden Sie in der Entra ID-Dokumentation.
- Nicht ausführen: Dieser Status wird nur nach der Ersteinrichtung angezeigt. Der Dienst wurde nach der ersten Einrichtung noch nicht ausgeführt.
Sie können auch auf Zusammenfassung anzeigen klicken, um zusätzliche Informationen wie Datum und Uhrzeit der letzten Synchronisierung sowie die Anzahl der synchronisierten, übersprungenen oder fehlgeschlagenen Benutzer anzuzeigen:
Benutzer
- Synchronisiert: Zeigt die Anzahl der Benutzer an, die erfolgreich mit Webex synchronisiert wurden.
- Übersprungen: Zeigt die Anzahl der Benutzer an, die bei der letzten Synchronisierung übersprungen wurden. Beispielsweise neue Benutzer in Entra ID, die nicht zum Synchronisierungsbereich der Entra ID Wizard App hinzugefügt wurden. Diese Benutzer wurden nicht mit Webex synchronisiert; fügen Sie sie dem Synchronisierungsbereich hinzu, um sie mit Webex zu synchronisieren.
- Fehlgeschlagen: Zeigt die Anzahl der Benutzer an, bei denen die Synchronisierung fehlgeschlagen ist. Weitere Informationen darüber, warum die Synchronisierung dieser Benutzer fehlgeschlagen ist, finden Sie im Bereitstellungsprotokoll der Entra ID-Anwendung. Wenn Sie diese Benutzer sofort synchronisieren müssen, können Sie Benutzer bei Bedarf bereitstellen.
Gruppen
- Synchronisiert: Zeigt die Anzahl der Gruppen an, die erfolgreich mit Webex synchronisiert und im Control Hub erstellt wurden.
- Zur Synchronisierung: Dieser Status bedeutet, dass noch nicht alle Benutzer einer Gruppe hinzugefügt wurden. Die Benutzer müssen zunächst erfolgreich mit Webex synchronisiert werden.
Migrieren Sie bestehende Cisco Webex Enterprise App-Konfigurationen zur Entra ID Wizard App.
Wenn Sie bereits eine Cisco Webex Enterprise App in Entra ID eingerichtet haben, können Sie alle Ihre Konfigurationen automatisch in die Entra ID Wizard App migrieren. Sie können Entra ID komplett im Control Hub verwalten, ohne Ihre bisherigen Konfigurationen zu verlieren.
| 1 |
Melden Sie sich mit einem vollständigen Kundenadministratorkonto bei Control Hub an. |
| 2 |
Gehen Sie zu Organisationseinstellungen und scrollen Sie dann nach unten zum Abschnitt Microsoft Entra ID Wizard App. |
| 3 |
Klicken Sie auf Einrichten, um die Konfiguration zu starten. |
| 4 |
Authentifizieren Sie das Entra ID-Administratorkonto mit der Entra ID-Konfiguration. Stellen Sie sicher, dass Sie ein Konto mit den im nächsten Schritt beschriebenen Berechtigungen verwenden. |
| 5 |
Überprüfen Sie die Berechtigungen und klicken Sie auf Akzeptieren, um dem Konto die Berechtigung zum Zugriff auf Ihren Entra ID-Mandanten zu erteilen. Cisco Webex Identity Synchronization ist eine Entra ID Unternehmensanwendung in Entra ID. Die Wizard App stellt eine Verbindung zu dieser Anwendung her, um auf die Entra ID Graph-APIs zuzugreifen. Die für den Zugriff erforderlichen Berechtigungen sind die Mindestberechtigungen, die zur Unterstützung und Verwendung erforderlich sind. |
| 6 |
Auswählen Vorhandene App migrieren. |
| 7 |
Nachdem Sie zusätzliche Leseberechtigungsanfragen akzeptiert haben, wählen Sie die vorhandene App aus, die Sie in die Wizard App migrieren möchten, und wählen Sie dann Fortfahren. Wenn die ausgewählte bestehende App keine Benutzer für denselben Control Hub bereitstellt, schlägt die Migration fehl. |
| 8 |
Nach Abschluss der Migration empfehlen wir Ihnen , einen Testlauf durchzuführen, bevor Sie die automatische Synchronisierung aktivieren, um sicherzustellen, dass keine Fehler auftreten. |
Führen Sie einen Trockenlauf durch.
Bevor Sie die automatische Synchronisierung aktivieren, empfehlen wir Ihnen, zunächst einen Testlauf durchzuführen, um sicherzustellen, dass keine Fehler auftreten. Sobald der Testlauf abgeschlossen ist, können Sie einen Testlaufbericht herunterladen, um detaillierte Informationen einzusehen. Folgende Spalten stehen im Bericht zur Verfügung:
| Spaltenname | Beschreibung |
|---|---|
| Objekttyp | Objekttyp in der Entra-ID, z. B. Benutzer oder Gruppe. |
| Aktionstyp | Art der Aktion, die während einer Synchronisierung am Objekt durchgeführt wird. Mögliche Aktionstypen sind:
|
| Zugangs-ID | ID des Objekts in Entra ID. |
| Eintragsname | Name des Objekts in der Entra-ID. |
| Webex-Name | Name des Objekts in Webex. |
| Grund | Grund dafür, warum ein bestimmter Aktionstyp während einer Synchronisierung auftritt. |
| 1 |
Melden Sie sich mit einem vollständigen Administratorkonto bei Control Hub an. |
| 2 |
Gehen Sie zu Organisationseinstellungen und scrollen Sie nach unten zum Abschnitt Verzeichnissynchronisierung . |
| 3 |
Klicken Sie auf die drei vertikalen Punkte neben der Instanz, die Sie synchronisieren möchten, und wählen Sie dann Trockenlaufaus. |
| 4 |
Sobald der Testlauf abgeschlossen ist, klicken Sie auf Zusammenfassung herunterladen, um den Bericht als CSV-Datei herunterzuladen. |
Entra-ID-Synchronisierung deaktivieren
Das Anhalten der Synchronisierung zwischen Control Hub und Entra ID ist einfach und hat keine Auswirkungen auf Ihre bestehende Konfiguration. Sie können die Synchronisierung jederzeit wieder aufnehmen.
Wenn die Synchronisierung deaktiviert ist, können Benutzer und Gruppen, die zuvor synchronisiert wurden, direkt im Control Hub verwaltet werden, genau wie manuell hinzugefügte Benutzer oder Gruppen. Wenn Sie die Synchronisierung wieder aktivieren, werden diese Benutzer und Gruppen erneut synchronisiert, und alle Änderungen, die Sie vorgenommen haben, während die Synchronisierung pausiert war, werden von der Entra-ID überschrieben.
| 1 | |
| 2 |
Gehen Sie zu Organisationseinstellungen und scrollen Sie nach unten zu Microsoft Entra ID Wizard App. |
| 3 |
Schalten Sie die Entra-ID-Synchronisierung aus. |
Automatische Synchronisierung aktivieren oder deaktivieren
Die Entra ID Wizard App und der zugehörige Backend-Dienst prüfen, ob die automatische Synchronisierung aktiviert ist, um zu bestimmen, wann Benutzer oder Gruppen von Entra ID mit Webex synchronisiert werden sollen. Aktivieren Sie Auto Sync, um die automatische Bereitstellung und Synchronisierung von Benutzern und Gruppen zu ermöglichen. Wenn Sie die Option „ Automatische Synchronisierung “ deaktivieren, synchronisiert die Wizard App nichts mit Webex, die bestehende Konfiguration bleibt jedoch erhalten.
Normalerweise werden die Benutzer gemäß den Microsoft -Richtlinien alle 40 Minuten synchronisiert.
Sie müssen die Entra -ID-Synchronisierung deaktivieren und nicht nur die automatische Synchronisierung, um Änderungen an synchronisierten Benutzern oder Gruppen vorzunehmen.
| 1 |
Melden Sie sich als vollständiger Kundenadministrator bei Control Hub an. |
| 2 |
Gehen Sie zu Organisationseinstellungen und scrollen Sie nach unten zum Abschnitt Verzeichnissynchronisierung . |
| 3 |
Umschalten Sie nach rechts, um die automatische Synchronisierung zu aktivieren. Deaktivieren Sie sie, indem Sie den Umschalter für automatische Synchronisierung nach links umschalten. |
Bearbeiten Sie die Konfiguration der Entra ID Wizard App.
| 1 |
Melden Sie sich mit einem vollständigen Administratorkonto bei Control Hub an. |
| 2 |
Gehen Sie zu Organisationseinstellungen und scrollen Sie nach unten zum Abschnitt Verzeichnissynchronisierung . |
| 3 |
Klicken Sie auf Konfiguration bearbeiten.  |
| 4 |
Passen Sie die Attributzuordnung an, indem Sie in der linken Spalte ein Attribut auswählen, das aus der Entra-ID stammt. Das Zielattribut in Webex Cloud befindet sich in der rechten Spalte. Weitere Informationen zur Zuordnung von Attributen finden Sie unter Entra ID Wizard App-Attributezuordnung.  |
| 5 |
Auf den Registerkarten Benutzer und Gruppen können Sie Nutzer und Gruppen aus dem Synchronisierungsumfang hinzufügen oder entfernen. Verschachtelte Gruppen werden nicht automatisch mit der Cloud synchronisiert. Achten Sie darauf, alle Gruppen auszuwählen, die in den zu synchronisierenden Gruppen verschachtelt sind. |
| 6 |
Ändern Sie auf der Registerkarte Mehr Ihre Einstellungen, falls erforderlich. |
| 7 |
Klicken Sie auf Save (Speichern), um die geänderte Konfiguration zu speichern. Ihre Aktualisierungen werden bei der nächsten Synchronisierung angewendet. Der automatische Synchronisierungsmechanismus von Entra ID übernimmt die Synchronisierung von Benutzern und Benutzergruppen. |
Bearbeiten Sie den Webex-Instanznamen
Ändern Sie, wie der Name der Cisco Webex Identity-Instanz in der Entra ID-Unternehmensanwendungsliste angezeigt wird.
| 1 |
Melden Sie sich mit einem vollständigen Administratorkonto bei Control Hub an. |
| 2 |
Gehen Sie zu Organisationseinstellungen und scrollen Sie nach unten zum Abschnitt Verzeichnissynchronisierung . |
| 3 |
Klicken Sie auf Instanznamen bearbeiten. |
| 4 |
Geben Sie den neuen Instanznamen ein und klicken Sie dann auf Speichern. |
Löschen Sie die Entra ID Wizard App-Konfiguration
Wenn Sie die Entra ID Wizard App löschen, wird auch die Konfiguration für die Entra ID-Synchronisierung entfernt. Webex und Entra ID behalten die gelöschte Konfiguration nicht bei. Wenn Sie die Entra-ID-Synchronisierung in Zukunft nutzen möchten, müssen Sie eine vollständige Neukonfiguration durchführen.
Löschen Sie die Cisco Webex-Anwendung nicht innerhalb von Entra ID.
Falls ja, können Sie zwar weiterhin eine neue Instanz der Entra ID Wizard App einrichten, müssen aber die vorhandene Instanz vorher im Control Hub löschen.
| 1 |
Melden Sie sich mit einem vollständigen Administratorkonto bei Control Hub an. |
| 2 |
Gehen Sie zu Organisationseinstellungen und scrollen Sie nach unten zum Abschnitt Verzeichnissynchronisierung . |
| 3 |
Klicken Sie auf Instanz löschen. |
| 4 |
Auf der Seite Entra ID-Instanz löschen? wählen Sie Entra ID-Administratorzustimmung widerrufen, wenn Sie die Zustimmungsvereinbarung von Webex entfernen möchten. Wenn Sie diese Option auswählen, müssen Sie Ihre Anmeldeinformationen erneut eingeben und die Berechtigungen erneut erteilen. |
| 5 |
Klicken Sie auf Löschen. |
Einen Benutzer für Webex on-demand bereitstellen
Sie können einen Benutzer sofort für Webex bereitstellen, unabhängig von einer Entra-ID-Synchronisierung, und das Ergebnis sofort überprüfen. Dies ist hilfreich bei der Behebung von Problemen während der Einrichtung.
| 1 |
Melden Sie sich mit einem vollständigen Administratorkonto bei Control Hub an. |
| 2 |
Gehen Sie zu Organisationseinstellungen und scrollen Sie nach unten zum Abschnitt Verzeichnissynchronisierung. |
| 3 |
Klicken Sie auf Benutzer bei Bedarf bereitstellen. |
| 4 |
Suchen und wählen Sie den Benutzer aus, den Sie bereitstellen möchten, und klicken Sie auf Bereitstellen. |
| 5 |
Nach Abschluss des Vorgangs wird eines der folgenden Ergebnisse angezeigt:
|
| 6 |
Klicken Sie auf Erneut versuchen, um denselben Benutzer erneut bereitzustellen, falls der Vorgang übersprungen wurde oder fehlgeschlagen ist. |
| 7 |
Klicken Sie auf Anderen Benutzer bereitstellen, um zur Bereitstellungsseite zurückzukehren. |
| 8 |
Klicken Sie auf Fertig, wenn Sie fertig sind. |
Importieren Sie Entra ID-verifizierte Domänen in Control Hub
Die Kunden verfügen möglicherweise über Hunderte von Domains, die in Entra ID verifiziert sind. Während sie sich mit Control Hub integrieren, können sie die verifizierten Domains von Entra ID in Control Hub importieren. Dadurch können zahlreiche Bemühungen im Wartungs- oder Einrichtungsprozess ersparen werden.
| 1 |
Wechseln Sie in der Registerkarte "Organisationseinstellungen" im Control Hub zum Domänenbereich. |
| 2 |
Klicken Sie auf Hinzufügen mit Entra-ID. 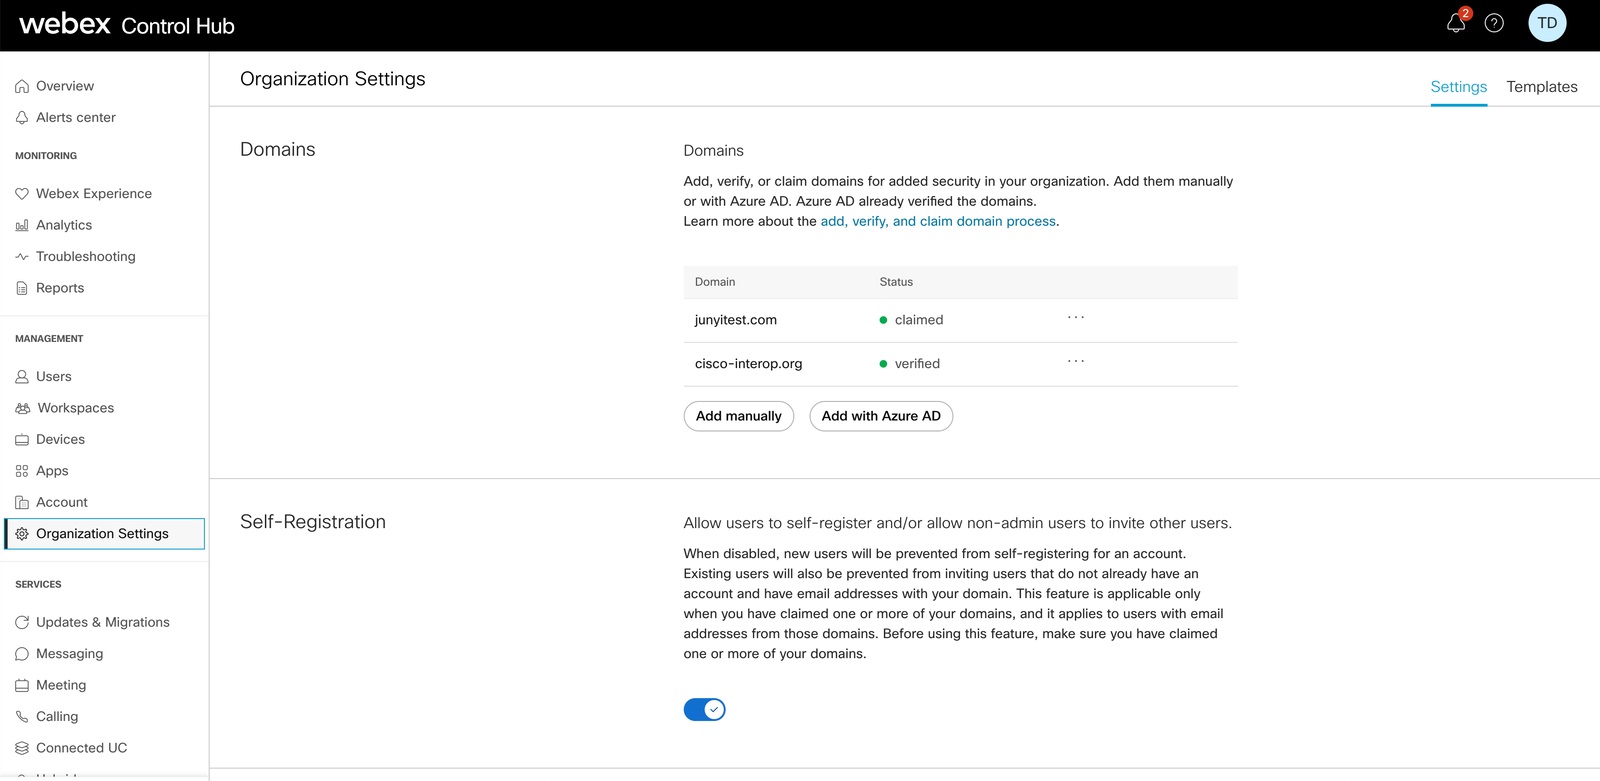 |
| 3 |
Suchen Sie auf der Seite Verifizierte Domänen hinzufügen die hinzuzufügenden Domänen und wählen Sie sie aus. |
| 4 |
Klicken Sie auf Hinzufügen. Die verifizierten Domains werden in der Liste der verifizierten Domains angezeigt.
|
Zuordnung der Entra ID Wizard App-Attribute
Die Entra ID Wizard App kann alle Änderungen, die Sie an Ihren Attributausdrücken vornehmen, unterstützen und synchronisieren. Beispielsweise können Sie in Entra ID die displayName so zuordnen, dass sowohl das surname - als auch givenName das -Attribut angezeigt werden. Diese Änderungen werden in der Wizard-App angezeigt.
Weitere Informationen zum Mapping von Attributausdrücken in Entra ID finden Sie auf der Microsoft-Hilfeseite .
In der folgenden Tabelle finden Sie Informationen zu spezifischen Entra-ID-Attributen.
Entra ID synchronisiert keine Nullwerte. Wenn Sie in Entra ID einen Attributwert auf null setzen, wird dieser in Webex weder gelöscht noch mit einem Nullwert überschrieben. Weitere Informationen zu den Einschränkungen finden Sie auf der Microsoft-Hilfeseite.
|
Eintrags-ID-Attribut (Quelle) |
Webex-Benutzerattribut (Ziel) | Beschreibung |
|---|---|---|
|
Standardmäßig ausgefüllte Attribute |
||
|
Userprincipalname |
Benutzername |
Es handelt sich um die eindeutige Benutzer-ID in Webex. Es handelt sich um eine E-Mail im Format. |
|
displayName |
displayName |
Benutzername, der in der Webex-Anwendung angezeigt wird. |
|
Nachname |
name.familyName |
|
|
givenName |
name.givenName |
|
|
Objectid |
externe ID |
Es handelt sich um die Benutzer-ID (UID) in Entra ID. In der Regel handelt es sich um eine 16-Byte-Zeichenfolge. Wir empfehlen nicht, diese Zuordnung zu ändern. |
|
Zusätzliche verfügbare Attribute |
||
|
jobTitle |
title |
|
|
AuslastungStandort |
adressen[type eq "work"].country |
Wir empfehlen die Verwendung der Zuordnung zu den Adressen [type eq "work"].country. Wenn Sie ein anderes Attribut auswählen, sollten Sie sicherstellen, dass die Attributwerte den Standards entsprechen. Die USA sollten beispielsweise die USA sein. China sollte CN sein und so weiter. |
|
Stadt |
adressen[type eq "work"].locality |
|
|
streetAddress |
adressen[type eq "work"].streetAddress |
|
|
Staat |
adressen[type eq "work"].region |
|
|
postalCode |
adressen[type eq "work"].postalCode |
|
|
telephoneNumber |
phoneNumbers[type eq "work"].value |
|
|
mobile |
phoneNumbers[type eq "mobile"].value |
|
|
facsimileTelephoneNumber |
phoneNumbers[type eq "fax"].value |
|
|
Manager |
Manager |
Synchronisiert die Managerinformationen der Benutzer mit Webex, sodass die Benutzer immer die korrekten Managerinformationen auf ihrer Visitenkarte sehen können. Bei der Erstellung eines Benutzers prüft Entra ID, ob das Manager-Objekt des Benutzers in Webex Identity vorhanden ist oder nicht. Falls nein, wird das Manager-Attribut des Benutzers ignoriert. Wenn ein Managerattribut vorhanden ist, müssen zwei Bedingungen erfüllt sein, damit dieses Attribut auf der Visitenkarte des Benutzers angezeigt wird:
Diese Bedingungen prüfen die Aktualisierung des Manager-Attributs des Benutzers, wenn das Authentifizierungstoken des Benutzers abgelaufen ist. Änderungen an Managerattributen werden erst dann auf der Visitenkarte des Benutzers angezeigt, nachdem sich der Benutzer nach der Änderung zum ersten Mal angemeldet hat. |
Häufig gestellte Fragen
Wie kann ich von der Cisco Directory Connector-Bereitstellung zur Entra ID Wizard App migrieren?
Während der Einrichtung erkennt die Wizard App, ob Ihre Organisation Directory Connector verwendet. Wenn diese Option aktiviert ist, erscheint ein Dialogfeld, in dem Sie die Verwendung der Entra-ID auswählen und den Directory Connector blockieren können. Klicken Sie auf Block, um zu bestätigen, dass Sie die Konfiguration der Entra ID Wizard App fortsetzen möchten.
Sie können Directory Connector auch deaktivieren, bevor Sie die Wizard App konfigurieren. Nach der Konfiguration verwaltet die Wizard-App die Benutzerprofile. Allerdings verwaltet die Wizard App nur die Benutzer, die dem Synchronisierungsbereich hinzugefügt wurden; Sie können die Wizard App nicht verwenden, um Benutzer zu verwalten, die vom Directory Connector synchronisiert wurden und nicht Teil des Synchronisierungsbereichs waren.
Kann ich Single Sign-On mit Microsoft Entra konfigurieren?
Sie können eine Single Sign-On (SSO)-Integration zwischen einer Control Hub-Kundenorganisation und einer Bereitstellung konfigurieren, die Microsoft Entra ID als Identitätsanbieter verwendet.
Wann wird das Benutzer-Avatar in Webex aktualisiert?
Die Benutzeravatare werden mit Webex synchronisiert, sobald der Benutzer in Webex Identity erstellt wird. Dieses Update setzt voraus, dass der Avatar des Benutzers in Entra ID aktualisiert wurde. Die Wizard-App ruft dann den neuen Avatar von Entra ID ab. Die Benutzerkontaktkarte wird aktualisiert, wenn sich der Benutzer nach der Änderung zum ersten Mal anmeldet.
Warum wird ein Benutzer nach der Synchronisierung nicht sofort in einer Gruppe im Control Hub angezeigt, und wie kann dieses Problem behoben werden?
Benutzer- und Gruppensynchronisierungen sind unabhängige Prozesse. Während Benutzersynchronisierungen separat erfolgen können, finden Gruppensynchronisierungen automatisch alle 12 Stunden statt. Wenn ein Benutzer über eine Gruppe synchronisiert wird, aber nicht sofort in der Gruppe im Control Hub erscheint, ist dies dennoch das erwartete Verhalten. Wenn ein Benutzer nur in der Hauptbenutzerliste, aber nicht in der Gruppe erscheint, sind keine weiteren Maßnahmen erforderlich. Warten Sie einfach, bis der nächste Gruppensynchronisationszyklus abgeschlossen ist.
Wenn ein Benutzer in Entra ID als inaktiv markiert wird, was geschieht dann mit diesem Benutzer in meiner Webex-Organisation?
Benutzer, die in der Entra-ID als Inaktiv gekennzeichnet sind, erhalten diese Kennzeichnung auch im Control Hub. Inaktive Benutzer werden bei der Synchronisierung übersprungen und bei zukünftigen Änderungen im Control Hub nicht berücksichtigt. Allerdings werden inaktive Benutzer weiterhin in Ihrer Control Hub-Organisation angezeigt, bis Sie sie direkt entfernen.


