- Accueil
- /
- Article

Merci pour votre commentaire.

 Dans cet article
 Un commentaire ?
Si vous gérez vos utilisateurs et groupes dans Microsoft Entra ID, utilisez l'application Entra ID Wizard dans Control Hub pour synchroniser les utilisateurs et les groupes avec Webex.
Activer l'identifiant Entra dans le Control Hub
Dans Webex for Government, l'application Entra ID Wizard est disponible pour les clients GCC Moderate Entra ID et GCC High Entra ID.
Certaines des fonctionnalités décrites dans cet article ne sont pas encore disponibles pour tous les clients.
Avant de commencer
Assurez-vous d'avoir accès à un compte Entra ID qui a l'autorité pour accorder le consentement administratif à l'échelle du locataire à une application.
Vous devez être administrateur complet de votre organisation Control Hub pour configurer l'application Entra ID Wizard.
| 1 | |
| 2 |
Accédez à Paramètres de l'organisation puis faites défiler vers le bas jusqu'à Application Assistant d'identification Microsoft Entra. |
| 3 |
Cliquez sur Configurer pour commencer la configuration. |
| 4 |
(Facultatif) Pour les administrateurs Webex for Government, sélectionnez Entra Worldwide ou Entra GCC High et cliquez sur Continuer. Entra Worldwide envoie le Wizard à l'AD Entra pour GCC Modéré et Commercial. Entrée GCC High envoie le Magicien à l'entrée AD pour GCC High.
|
| 5 |
Authentifiez votre compte administrateur Entra ID. Si vous n'êtes pas un administrateur global ou disposant d'un rôle privilégié dans Entra ID, vous pouvez demander l'accès pour accorder l'autorisation à l'application Entra ID Wizard. Si vous disposez de privilèges d'administrateur complets dans Entra ID, vous pouvez examiner et accorder l'accès aux demandes en accédant à . Sous Activité, sélectionnez Demandes de consentement de l'administrateur et cliquez sur Intégration d'identité Cisco Webex et sélectionnez Examiner les autorisations et accepter. Ce processus accorde une authentification générale à l'application Webex. Enfin, cliquez sur l'onglet Tout (aperçu), sélectionnez Intégration d'identité Cisco Webex et cliquez sur Examiner l'application. Sous , cliquez sur Accorder le consentement de l'administrateur pour Cisco afin d'accorder toutes les autorisations nécessaires pour activer Entra ID dans Control Hub. Consultez le support Microsoft pour plus d'informations sur ce processus. |
| 6 |
Vérifiez les autorisations et cliquez sur Accepter pour accorder au compte l'autorisation d'accéder à votre locataire Entra ID. Cisco Webex Identity Integration est une application d'entreprise Entra ID dans Entra ID. L'application Wizard se connecte à cette application pour accéder aux API graphiques d'Entra ID. Les autorisations requises pour y accéder sont les autorisations minimales nécessaires à son fonctionnement et à son utilisation. |
| 7 |
Pour les clients SMB, acceptez les paramètres par défaut en cochant la case Synchroniser les paramètres par défaut et en cliquant sur Continuer. Pour les clients professionnels, allez à l’étape suivante et continuez la configuration. Si vous acceptez les paramètres par défaut, cela signifie que vous souhaitez :
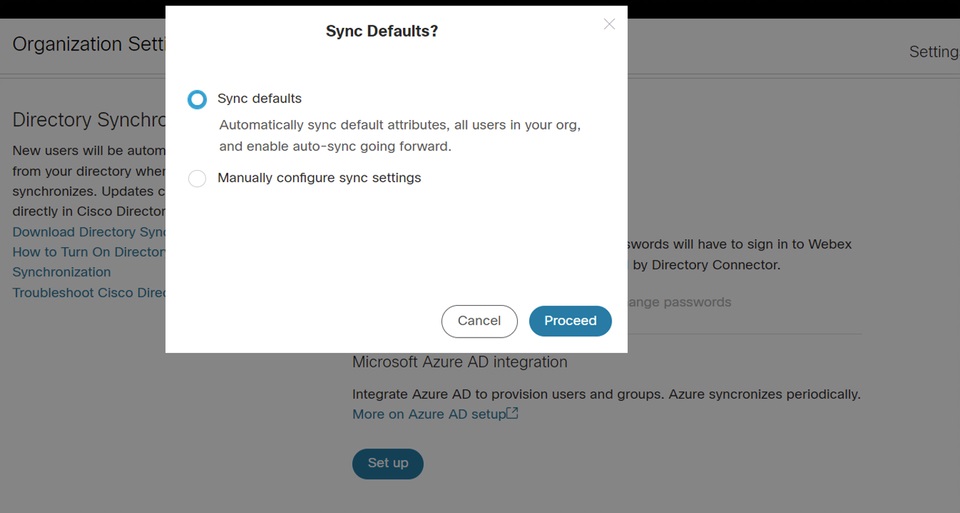 |
| 8 |
Pour les clients Entreprise (plus de 1000 utilisateurs), ou les clients qui souhaitent configurer les paramètres manuellement, cliquez sur l'onglet Attributs et mappez les attributs. Cliquez sur Enregistrer. Vous pouvez mapper d'autres attributs utilisateur d'Entra ID vers Webex, ou modifier les mappages d'attributs utilisateur existants à l'aide de la page Attributs. Vous pouvez personnaliser le mappage en vous assurant que vous le configurez correctement. La valeur que vous mapiez comme nom d’utilisateur est importante. Webex utilise l’adresse électronique de l’utilisateur comme nom d’utilisateur. Par défaut, l'utilisateur principal (UPN) dans Entra ID correspond à l'adresse e-mail (nom d'utilisateur) dans Control Hub. Vous ne pouvez pas modifier le mappage au cours de la première installation. À ce stade, l’instance correspondante n’est pas complètement construite et il n’y a aucune instance de l’attribut de mappage personnalisé. Cependant, vous pouvez cliquer sur Modifier pour le modifier lorsque l’installation est terminée. |
| 9 |
Ajoutez des utilisateurs à la portée de la synchronisation en cliquant sur l’onglet Utilisateurs . Vous pouvez saisir le nom d'utilisateur pour rechercher et ajouter l'utilisateur au périmètre de synchronisation. Vous pouvez également retirer un utilisateur du périmètre de synchronisation en cliquant sur l'icône Corbeille située à droite. Cliquez sur Enregistrer. Si vous souhaitez sélectionner tous les utilisateurs à partir de l'identifiant Entra, sélectionnez Sélectionner tous les utilisateurs. Si vous la sélectionnez, vous n’avez pas besoin de sélectionner des groupes dans le champ car cette option synchronise les groupes en même temps.  Nous ne recommandons pas l’utilisation de Sélectionner tous les utilisateurs pour les clients d’entreprises significatifs avec des centaines de milliers d’utilisateurs, car le processus d’initialisation nécessite un long temps. Si vous synchronisez accidentellement beaucoup d’utilisateurs dans Control Hub, la suppression de ces utilisateurs prend également plus de temps. Cliquez sur Enregistrer. |
| 10 |
Dans l'onglet Groupes, vous pouvez rechercher des groupes individuels et les ajouter à Webex.
|
| 11 |
(Facultatif) Dans l'onglet Plus, vous avez la possibilité de configurer certaines options de synchronisation avancées :
|
| 12 |
Vous pouvez décider si vous souhaitez autoriser la synchronisation immédiatement ou ultérieurement. Si vous sélectionnez l’option Autoriser maintenant , tous les paramètres seront appliqués à la prochaine synchronisation. Si vous sélectionnez l’option Enregistrer et autoriser plus tard , la synchronisation ne démarre pas tant que vous n’autorisez pas la synchronisation automatique. 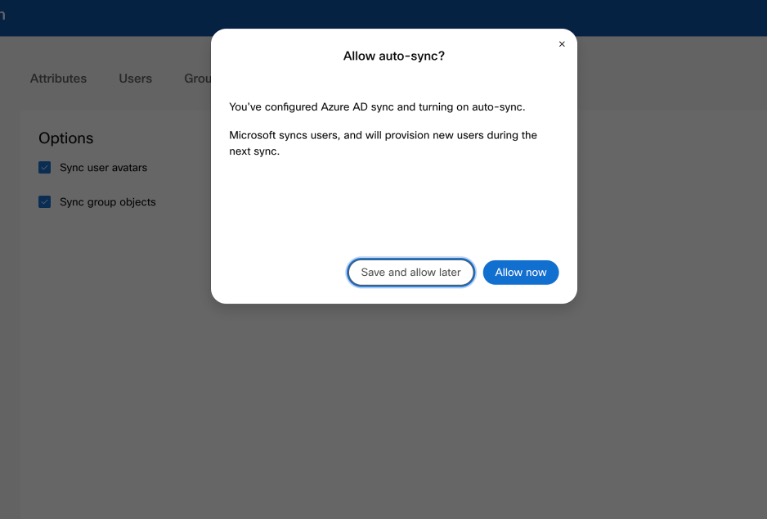 |
| 13 |
L'application communique avec Entra ID pour configurer les paramètres et planifier la synchronisation. 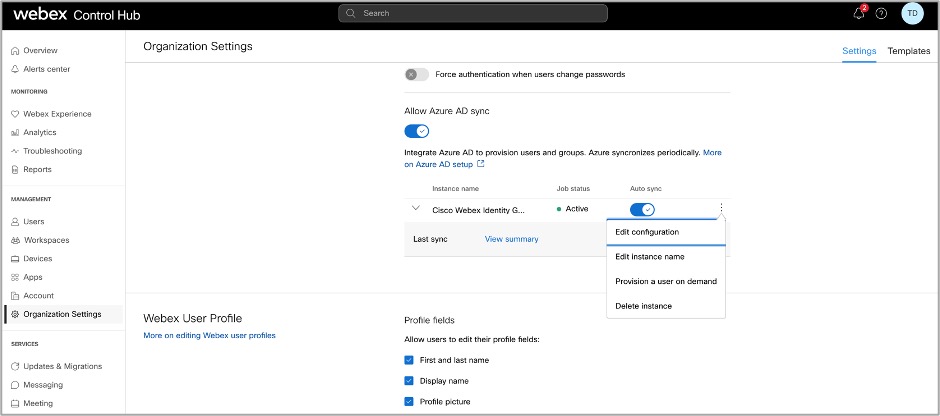 |
- Actif: La synchronisation a réussi.
- Quarantaine: La tâche de synchronisation a été mise en quarantaine dans Entra ID après plusieurs échecs. Consultez la documentation Entra ID pour plus d'informations.
- Non exécuté: Ce statut n'apparaît qu'après la première configuration. Le service n'a pas encore été exécuté après sa première configuration.
Vous pouvez également cliquer sur Afficher le résumé pour consulter des informations supplémentaires telles que la date et l'heure de la dernière synchronisation, ainsi que le nombre d'utilisateurs synchronisés, ignorés ou pour lesquels la synchronisation a échoué :
Utilisateurs
- Synchronisé: indique le nombre d'utilisateurs qui sont synchronisés avec succès avec Webex.
- Ignoré: indique le nombre d'utilisateurs qui ont été ignorés lors de la dernière synchronisation. Par exemple, les nouveaux utilisateurs d'Entra ID qui n'ont pas été ajoutés au périmètre de synchronisation de l'application Entra ID Wizard. Ces utilisateurs n'ont pas été synchronisés avec Webex ; ajoutez-les au périmètre de synchronisation pour les synchroniser avec Webex.
- Échoué: affiche le nombre d'utilisateurs qui n'ont pas pu se synchroniser. Consultez le journal d'audit de l'approvisionnement de l'application Entra ID pour plus d'informations sur les raisons pour lesquelles ces utilisateurs n'ont pas pu se synchroniser. Si vous devez synchroniser ces utilisateurs immédiatement, vous pouvez provisionner des utilisateurs à la demande.
Groupes
- Synchronisé: indique le nombre de groupes qui ont été synchronisés avec succès avec Webex et créés dans Control Hub.
- À synchroniser: Ce statut indique que tous les utilisateurs du groupe n'ont pas encore été ajoutés. Les utilisateurs doivent d'abord être synchronisés avec succès avec Webex.
Migrez les configurations existantes de l'application Cisco Webex Enterprise vers l'application Entra ID Wizard.
Si vous avez déjà configuré une application Cisco Webex Enterprise dans Entra ID, vous pouvez migrer automatiquement toutes vos configurations vers l'application Entra ID Wizard. Vous pouvez gérer Entra ID entièrement depuis Control Hub sans perdre aucune de vos configurations précédentes.
| 1 |
Connectez-vous à Control Hub avec un compte d'administrateur client complet. |
| 2 |
Accédez à Paramètres de l'organisation puis faites défiler vers le bas jusqu'à la section Application Microsoft Entra ID Wizard. |
| 3 |
Cliquez sur Configurer pour commencer la configuration. |
| 4 |
Authentifiez le compte administrateur Entra ID avec la configuration Entra ID. Assurez-vous d’utiliser un compte dont les permissions sont décrites à l’étape suivante. |
| 5 |
Vérifiez les autorisations et cliquez sur Accepter pour accorder au compte l'autorisation d'accéder à votre locataire Entra ID. Cisco Webex Identity Synchronization est une application d'entreprise Entra ID dans Entra ID. L'application Wizard se connecte à cette application pour accéder aux API graphiques d'Entra ID. Les permissions requises pour y accéder sont les permissions minimum nécessaires pour l’aider et l’utiliser. |
| 6 |
Sélectionnez Migrer l'application existante. |
| 7 |
Après avoir accepté les demandes d'autorisation de lecture seule supplémentaires, sélectionnez l'application existante que vous souhaitez migrer vers l'application Wizard, puis sélectionnez Continuer. Si l'application existante sélectionnée ne fournit pas aux utilisateurs le même Control Hub, la migration échouera. |
| 8 |
Une fois la migration terminée, nous vous recommandons d'effectuer un test à blanc avant d'activer la synchronisation automatique afin de vous assurer qu'il n'y a pas d'erreurs. |
Effectuez un essai à blanc
Avant d'activer la synchronisation automatique, nous vous recommandons d'effectuer un test à blanc afin de vous assurer qu'il n'y a pas d'erreurs. Une fois la simulation terminée, vous pouvez télécharger un rapport de simulation pour consulter des informations détaillées. Les colonnes disponibles dans le rapport sont :
| Nom de la colonne | Description |
|---|---|
| Type d’objet | Type d'objet dans l'identifiant Entra, tel qu'un utilisateur ou un groupe. |
| Type d'action | Type d'action qui sera effectuée sur l'objet lors d'une synchronisation. Les types d'actions possibles sont :
|
| Identifiant d'entrée | ID de l'objet dans Entra ID. |
| Nom d'entrée | Nom de l'objet dans l'identifiant Entra. |
| Nom Webex | Nom de l'objet dans Webex. |
| Raison | Raison pour laquelle un type d'action se produira lors d'une synchronisation. |
| 1 |
Connectez-vous à Control Hub avec un compte d'administrateur complet. |
| 2 |
Allez à Paramètres de l’organisation et faites défiler jusqu’à la section Synchronisation du répertoire. |
| 3 |
Cliquez sur les trois points verticaux à côté de l'instance que vous souhaitez synchroniser, puis sélectionnez Exécution à blanc. |
| 4 |
Une fois la simulation terminée, cliquez sur Télécharger le résumé pour télécharger le rapport sous forme de fichier CSV. |
Désactiver la synchronisation des identifiants Entra
La suspension de la synchronisation entre Control Hub et Entra ID est simple et n'affecte pas votre configuration existante. Vous pouvez reprendre la synchronisation à tout moment.
Lorsque la synchronisation est désactivée, les utilisateurs et les groupes qui étaient précédemment synchronisés deviennent gérables directement dans Control Hub, tout comme les utilisateurs ou groupes ajoutés manuellement. Si vous réactivez la synchronisation, ces utilisateurs et groupes sont resynchronisés, et toutes les modifications que vous avez effectuées pendant la suspension de la synchronisation sont écrasées par Entra ID.
| 1 | |
| 2 |
Accédez à Paramètres de l'organisation et faites défiler vers le bas jusqu'à Application Assistant d'identification Microsoft Entra. |
| 3 |
Désactivez le bouton de synchronisation de l'identifiant Entra. |
Activer ou désactiver la synchronisation automatique
L'application Entra ID Wizard et son service backend correspondant vérifient si la synchronisation automatique est activée afin de déterminer quand synchroniser les utilisateurs ou les groupes d'Entra ID vers Webex. Activez Synchronisation automatique pour permettre la synchronisation automatique des utilisateurs et des groupes. Lorsque vous désactivez la synchronisation automatique, l'application Wizard ne synchronise rien avec Webex, mais la configuration existante est conservée.
En règle générale, les utilisateurs sont synchronisés toutes les 40 minutes conformément à la politique de Microsoft.
Vous devez désactiver la synchronisation Entra ID et non pas seulement la synchronisation automatique pour apporter des modifications aux utilisateurs ou groupes synchronisés.
| 1 |
Connectez-vous à Control Hub en tant qu'administrateur client complet. |
| 2 |
Allez à Paramètres de l’organisation et faites défiler jusqu’à la section Synchronisation du répertoire. |
| 3 |
Commutez le bouton sur la droite pour activer la synchronisation automatique. Désactivez-le en commutant la bascule de synchronisation automatique sur la gauche. |
Modifier la configuration de l'application Entra ID Wizard
| 1 |
Connectez-vous à Control Hub avec un compte d'administrateur complet. |
| 2 |
Allez à Paramètres de l’organisation et faites défiler jusqu’à la section Synchronisation du répertoire. |
| 3 |
Cliquez sur Modifier la configuration. 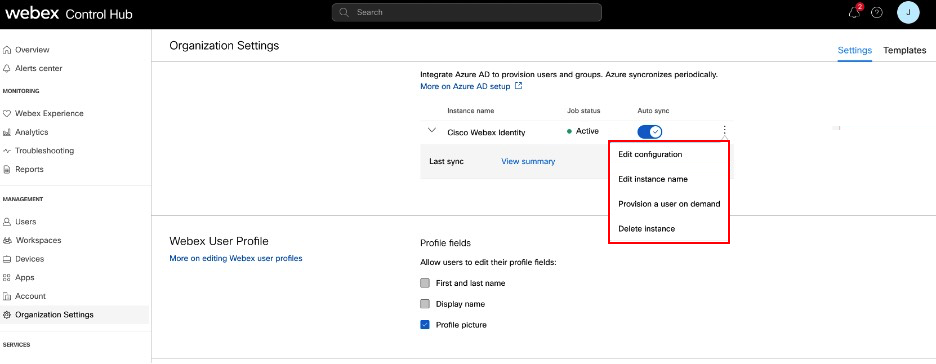 |
| 4 |
Personnalisez le mappage des attributs en sélectionnant un attribut dans la colonne de gauche provenant de l'identifiant Entra. L’attribut de destination dans le Cloud Webex se trouve dans la colonne de droite. Voir Mappage des attributs de l'application Entra ID Wizard pour plus d'informations sur le mappage des attributs.  |
| 5 |
Dans les onglets Utilisateurs et Groupes , ajoutez ou supprimez des utilisateurs et des groupes de la portée de la synchronisation. Les groupes imbriqués ne se synchronisent pas automatiquement avec le cloud. Veillez à sélectionner tous les groupes imbriqués dans les groupes que vous souhaitez synchroniser. |
| 6 |
Dans l’onglet Plus, modifiez vos préférences si nécessaire. |
| 7 |
Cliquez sur Enregistrer pour enregistrer la configuration modifiée. Vos mises à jour sont appliquées dans la prochaine synchronisation. Le mécanisme de synchronisation automatique d'Entra ID gère la synchronisation des utilisateurs et des groupes d'utilisateurs. |
Modifier le nom de l'instance Webex
Modifiez la façon dont le nom de l'instance Cisco Webex Identity apparaît dans la liste des applications d'entreprise Entra ID.
| 1 |
Connectez-vous à Control Hub avec un compte d'administrateur complet. |
| 2 |
Allez à Paramètres de l’organisation et faites défiler jusqu’à la section Synchronisation du répertoire. |
| 3 |
Cliquez sur Modifier le nom de l'instance. |
| 4 |
Saisissez le nouveau nom de l'instance, puis cliquez sur Enregistrer. |
Supprimer la configuration de l'application Entra ID Wizard
Lorsque vous supprimez l'application Entra ID Wizard, la configuration de la synchronisation Entra ID est également supprimée. Webex et Entra ID ne conservent pas la configuration supprimée. Si vous souhaitez utiliser la synchronisation Entra ID à l'avenir, vous devrez effectuer une reconfiguration complète.
Ne supprimez pas l'application Cisco Webex depuis Entra ID.
Si vous le faites, vous pouvez toujours configurer une nouvelle instance de l'application Entra ID Wizard, mais vous devez d'abord supprimer l'instance depuis Control Hub.
| 1 |
Connectez-vous à Control Hub avec un compte d'administrateur complet. |
| 2 |
Allez à Paramètres de l’organisation et faites défiler jusqu’à la section Synchronisation du répertoire. |
| 3 |
Cliquez sur Supprimer l'instance. |
| 4 |
Sur la page Supprimer l'instance Entra ID ?, sélectionnez Révoquer le consentement de l'administrateur Entra ID si vous souhaitez supprimer l'accord de consentement de Webex. Lorsque vous sélectionnez cette option, vous devez saisir vos identifiants et accorder à nouveau les autorisations. |
| 5 |
Cliquez sur Supprimer. |
Configurer un utilisateur pour Webex à la demande
Vous pouvez immédiatement provisionner un utilisateur sur Webex, indépendamment d'une synchronisation d'identifiant Entra, et vérifier instantanément le résultat. Ceci est utile lors du dépannage de problèmes pendant la configuration.
| 1 |
Connectez-vous à Control Hub avec un compte d'administrateur complet. |
| 2 |
Accédez à Paramètres de l'organisation et faites défiler vers le bas jusqu'à la section Synchronisation d'annuaire. |
| 3 |
Cliquez sur Provisionner un utilisateur à la demande. |
| 4 |
Recherchez et sélectionnez l'utilisateur que vous souhaitez provisionner, puis cliquez sur Provisionner. |
| 5 |
L'un des résultats suivants s'affiche une fois l'opération terminée :
|
| 6 |
Cliquez sur Réessayer pour provisionner à nouveau le même utilisateur, si l'opération a été ignorée ou a échoué. |
| 7 |
Cliquez sur Provisionner un autre utilisateur pour revenir à la page de provisionnement. |
| 8 |
Cliquez sur Terminé lorsque vous avez terminé. |
Importer les domaines vérifiés par Entra ID dans Control Hub
Les clients peuvent avoir des centaines de domaines vérifiés dans Entra ID. Bien qu'ils s'intègrent à Control Hub, s'ils souhaitent importer les domaines vérifiés d'Entra ID vers Control Hub. Ceci peut économiser de nombreux efforts au cours du processus de maintenance ou d’installation.
| 1 |
Allez à la secion du domaine dans l’onglet Paramètres de l’organisation dans Control Hub. |
| 2 |
Cliquez sur Ajouter avec l'identifiant d'entrée. 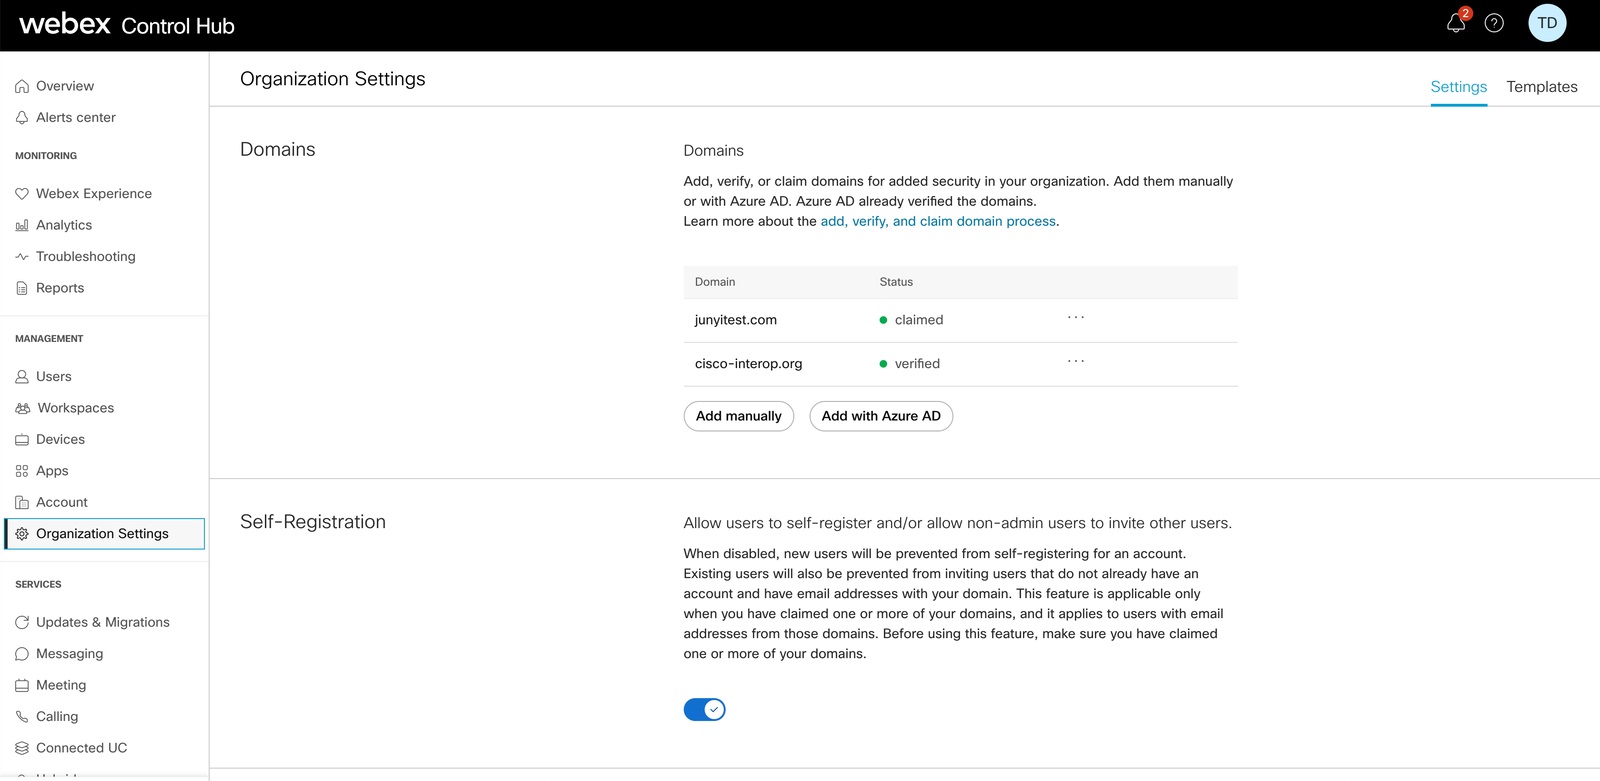 |
| 3 |
Dans la page Ajouter des domaines vérifiés , recherchez et sélectionnez les domaines à ajouter. |
| 4 |
Cliquez sur Ajouter. Les domaines vérifiés apparaîtront dans la liste des domaines vérifiés.
|
Mappage des attributs de l'application Entra ID Wizard
L'application Entra ID Wizard peut prendre en charge et synchroniser toutes les modifications que vous apportez à vos expressions d'attributs. Par exemple, dans Entra ID, vous pouvez mapper le displayName afin qu'il affiche à la fois les attributs surname et givenName. Ces modifications apparaissent dans l'application Assistant.
Vous trouverez plus d'informations sur le mappage des expressions d'attributs dans Entra ID sur le site d'aide Microsoft.
Utilisez le tableau suivant pour obtenir des informations sur les attributs spécifiques de l'identifiant Entra.
L'identifiant d'entrée ne synchronise pas les valeurs nulles. Si vous définissez la valeur d'un attribut sur null dans Entra ID, elle n'est ni supprimée ni remplacée par une valeur nulle dans Webex. Consultez les limitations sur le site d'aide Microsoft pour plus d'informations.
|
Attribut ID d'entrée (source) |
Attribut utilisateur Webex (cible) | Description |
|---|---|---|
|
Attributs remplis par défaut |
||
|
Nomprincipal de l’utilisateur |
Nom d’utilisateur |
Il s'agit de l'identifiant unique de l'utilisateur dans Webex. Il s’agit d’un courrier électronique formaté. |
|
Nom d'affichage |
Nom d'affichage |
Nom d’utilisateur qui s’affiche sur l’application Webex. |
|
Nom |
nom.nomdname |
|
|
Nom donné |
nom.givenName |
|
|
Objectid |
id externe |
Il s'agit de l'UID de l'utilisateur dans Entra ID. Généralement, c’est une chaîne de 16 octets. Nous vous recommandons de ne pas modifier ce mappage. |
|
Attributs disponibles supplémentaires |
||
|
Jobtitle |
titre |
|
|
UtilisationLocation |
adresses[type eq « work"].pays |
Nous vous recommandons d’utiliser le mappage de la fonction delocalisation aux adresses [type eq « work"].pays. Si vous choisissez un autre attribut, vous devez vous assurer que les valeurs d’attribut sont conformes aux normes. Par exemple, usa doit être USA. La Chine doit être un NC, etc. |
|
ville |
adresses[type eq « work"].localité |
|
|
Adresse postale |
adresses[type eq « work"].streetAddress |
|
|
État |
adresses[type eq « work"].région |
|
|
Code postal |
adresses[type eq « work"].code postal |
|
|
Numéro de téléphone |
Numéros de téléphone[typeq « work"].valeur |
|
|
mobile |
Numéros de téléphone[type eq « mobile"].valeur |
|
|
Numéro téléphonique du fax |
Numéros de téléphone[type eq « fax"].valeur |
|
|
manager |
manager |
Synchronise les informations du responsable des utilisateurs avec Webex afin que les utilisateurs puissent toujours voir les informations correctes du responsable sur la fiche de contact d'un utilisateur. Lors de la création d'un utilisateur, Entra ID vérifie si l'objet gestionnaire de l'utilisateur se trouve ou non dans Webex Identity. Dans le cas contraire, l'attribut de gestionnaire de l'utilisateur est ignoré. Si un attribut de gestionnaire existe, deux conditions doivent être remplies pour que cet attribut apparaisse sur la fiche de contact de l'utilisateur :
Ces conditions vérifient la mise à jour de l'attribut gestionnaire de l'utilisateur lorsque le jeton d'authentification de ce dernier expire. Les modifications apportées aux attributs du gestionnaire ne seront pas visibles sur la fiche de contact de l'utilisateur tant que celui-ci ne se sera pas connecté pour la première fois après la modification. |
Foire aux questions
Comment puis-je migrer vers l'application Entra ID Wizard depuis le provisionnement Cisco Directory Connector ?
Lors de la configuration, l'application Wizard détecte si votre organisation utilise Directory Connector. Si cette option est activée, une boîte de dialogue s'affichera vous permettant de choisir d'utiliser Entra ID et de bloquer Directory Connector. Cliquez sur Bloc pour confirmer que vous souhaitez poursuivre la configuration de l'application Entra ID Wizard.
Vous pouvez également choisir de désactiver Directory Connector avant de configurer l'application Wizard. Après la configuration, l'application Wizard gère les profils utilisateurs. Toutefois, l'application Assistant ne gère que les utilisateurs ajoutés au périmètre de synchronisation ; vous ne pouvez pas l'utiliser pour gérer les utilisateurs synchronisés par Directory Connector qui ne faisaient pas partie du périmètre de synchronisation.
Puis-je configurer l'authentification unique avec Microsoft Entra ?
Vous pouvez configurer une intégration d'authentification unique (SSO) entre une organisation cliente Control Hub et un déploiement qui utilise Microsoft Entra ID comme fournisseur d'identité.
Quand l'avatar de l'utilisateur est-il mis à jour dans Webex ?
Les avatars des utilisateurs sont synchronisés avec Webex lors de la création de l'utilisateur dans Webex Identity. Cette mise à jour nécessite la mise à jour de l'avatar de l'utilisateur dans Entra ID. L'application Wizard récupère ensuite le nouvel avatar à partir de l'identifiant Entra. La fiche de contact de l'utilisateur est mise à jour lors de sa première connexion après la modification.
Pourquoi un utilisateur n'apparaît-il pas dans un groupe du Control Hub immédiatement après la synchronisation, et comment résoudre ce problème ?
La synchronisation des utilisateurs et des groupes est un processus indépendant. Alors que la synchronisation des utilisateurs peut se faire séparément, la synchronisation des groupes a lieu automatiquement toutes les 12 heures. Si un utilisateur est synchronisé via un groupe mais n'apparaît pas immédiatement dans le groupe dans Control Hub, ce comportement est normal. Si un utilisateur apparaît uniquement dans la liste principale des utilisateurs mais pas dans le groupe, aucune autre action n'est requise. Il suffit d'attendre la fin du prochain cycle de synchronisation du groupe.
Lorsqu'un utilisateur est marqué comme inactif dans Entra ID, que se passe-t-il pour cet utilisateur dans mon organisation Webex ?
Les utilisateurs marqués Inactif dans Entra ID reçoivent également cette désignation dans Control Hub. Les utilisateurs inactifs sont ignorés lors des synchronisations et ne seront pas modifiés lors des futures mises à jour de Control Hub. Toutefois, les utilisateurs inactifs continueront d’apparaître dans votre organisation Control Hub jusqu’à ce que vous les supprimiez directement.


