- Hjem
- /
- Artikel

Tak for din feedback.

 I denne artikel
 Har du feedback?
Hvis du administrerer dine brugere og grupper i Microsoft Entra ID, skal du bruge Entra ID Wizard -appen i Control Hub til at synkronisere brugere og grupper med Webex.
Aktivér Enter ID i Control Hub
I Webex for Government er Entra ID Wizard-appen tilgængelig for både GCC Moderate Entra ID- og GCC High Entra ID-kunder.
Nogle af de funktioner, der er beskrevet i denne artikel, er endnu ikke tilgængelige for alle kunder.
Før du begynder
Sørg for, at du har adgang til en Entra ID-konto, der har autorisation til at give samtykke til en applikation på tværs af hele lejeren.
Du skal være fuld administrator i din Control Hub-organisation for at konfigurere Entra ID Wizard-appen.
| 1 | |
| 2 |
Gå til Organisationsindstillinger og rul derefter ned til Microsoft Entra ID Wizard-app. |
| 3 |
Klik på Opsæt for at starte konfigurationen. |
| 4 |
(Valgfrit) For Webex til offentlige administratorer skal du vælge enten Entra Worldwide eller Entra GCC High og klikke på Fortsæt. Entra Worldwide sender guiden til Entra AD for både GCC Moderate og Commercial. Entra GCC High sender guiden til Entra AD for GCC High.
|
| 5 |
Godkend din Entra ID-administratorkonto. Hvis du ikke er en global administrator eller administrator med en privilegeret rolle i Entra ID, kan du anmode om adgang til Entra ID Wizard-appen. Hvis du har fulde administratorrettigheder i Entra ID, kan du gennemgå og give adgang til anmodninger ved at gå til . Under Aktivitetskal du vælge Anmodninger om administratorsamtykke og klikke på Cisco Webex Identity Integration og vælge Gennemgå tilladelser og accepter. Denne proces giver generel godkendelse til Webex-applikationen. Klik til sidst på fanen Alle (forhåndsvisning), vælg Cisco Webex Identity Integration og klik på Gennemgå applikation. Under , klik på Giv administratortilladelse til Cisco for at give alle nødvendige tilladelser til at aktivere Entra ID i Control Hub. Se Microsoft support for yderligere oplysninger om denne proces. |
| 6 |
Gennemgå tilladelserne, og klik på Accepter for at give kontoen adgang til din Entra ID-lejer. Cisco Webex Identity Integration er en Entra ID-virksomhedsapplikation i Entra ID. Wizard-appen opretter forbindelse til denne applikation for at få adgang til Entra ID-graf-API'er. De tilladelser, der kræves for at få adgang til den, er de minimumstilladelser, der er nødvendige for at understøtte og bruge den. |
| 7 |
For SMB-kunder skal du acceptere standardindstillingerne ved at markere afkrydsningsfeltet Synkroniser standardindstillinger og klikke på Fortsæt. For virksomhedskunder skal du gå til næste trin og fortsætte konfigurationen. Hvis du accepterer standardindstillingerne, betyder det, at du ønsker at:
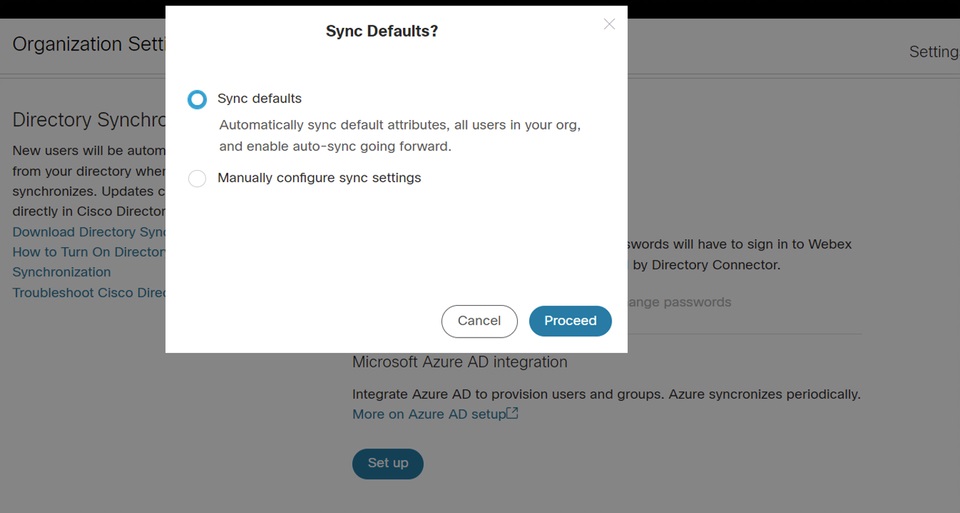 |
| 8 |
For Enterprise-kunder (mere end 1000 brugere) eller kunder, der ønsker at konfigurere indstillingerne manuelt, skal du klikke på fanen Attributter og tilknytte attributterne. Klik på Gem. Du kan knytte andre brugerattributter fra Entra ID til Webex eller ændre eksisterende brugerattributtilknytninger ved hjælp af siden Attributter. Du kan brugertilpasse tilknytningen ved at sikre, at du konfigurerer den korrekt. Den værdi, du tilknytter som brugernavn, er vigtig. Webex bruger brugerens e-mailadresse som brugernavn. Som standard knyttes userPrincipalName (UPN) i Entra ID til e-mailadressen (brugernavnet) i Control Hub. Du kan ikke redigere tilknytningen under den første opsætning. På det tidspunkt er den tilsvarende forekomst ikke helt bygget, og der er ingen forekomst af den tilpassede tilknytningsattribut. Du kan dog klikke på Rediger for at ændre det, når opsætningen er fuldført. |
| 9 |
Føj brugere til synkroniseringsomfanget ved at klikke på fanen Brugere. Du kan indtaste brugernavnet for at søge efter og tilføje brugeren i synkroniseringsområdet. Du kan også fjerne en bruger fra synkroniseringsområdet ved at klikke på papirkurvsikonet i højre side. Klik på Gem. Hvis du vil vælge alle brugere fra Entra ID, skal du vælge Vælg alle brugere. Hvis du vælger det, behøver du ikke at vælge grupper i området, da denne valgmulighed synkroniserer grupperne på samme tid.  Vi anbefaler ikke at bruge Vælg alle brugere til vigtige virksomhedskunder med hundredvis af tusindvis af brugere, da initialiseringsprocessen kræver lang tid. Hvis du ved et uheld synkroniserer mange brugere i Control Hub, tager det også længere tid at slette disse brugere. Klik på Gem. |
| 10 |
På fanen Grupper kan du søge efter individuelle grupper og tilføje dem til Webex.
|
| 11 |
(Valgfrit) På fanen Mere har du mulighed for at konfigurere nogle avancerede synkroniseringsindstillinger:
|
| 12 |
Du kan beslutte, om du vil tillade synkronisering af synkronisering med det samme eller på et senere tidspunkt. Hvis du vælger valgmuligheden Tillad nu, anvender den alle indstillinger til den kommende synkronisering. Hvis du vælger valgmuligheden Gem og tillad senere , starter synkronisering ikke, før du tillader automatisk synkronisering. 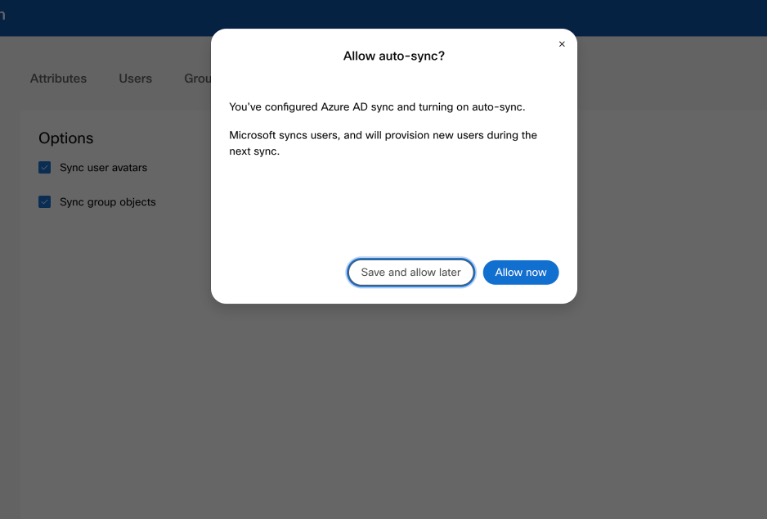 |
| 13 |
Applikationen kommunikerer med Entra ID for at konfigurere og planlægge synkroniseringen. 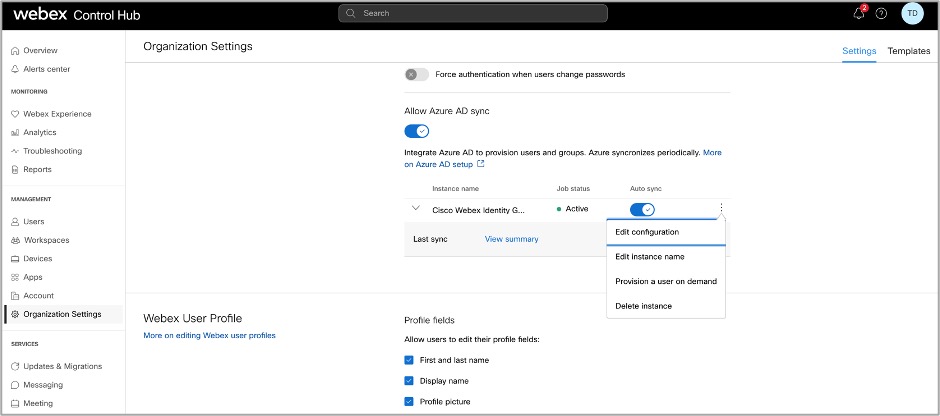 |
- Aktiv: synkroniseringen var vellykket.
- Karantæne: Synkroniseringsjobbet blev sat i karantæne i Entra ID efter flere fejl. Se Entra ID-dokumentationen for yderligere information.
- IkkeKør: Denne status vises kun efter første opsætning. Tjenesten har endnu ikke kørt efter første opsætning.
Du kan også klikke på Vis oversigt for at se yderligere oplysninger, såsom tidspunkt og dato for den sidste synkronisering og antallet af brugere, der er synkroniseret, sprunget over eller mislykkedes:
Brugere
- Synkroniseret: viser antallet af brugere, der er synkroniseret med Webex.
- Springet over: viser antallet af brugere, der blev sprunget over i den seneste synkronisering. For eksempel nye brugere i Entra ID, der ikke blev føjet til synkroniseringsområdet for Entra ID Wizard-appen. Disse brugere blev ikke synkroniseret med Webex. Tilføj dem i synkroniseringsomfanget for at synkronisere dem med Webex.
- Mislykkedes: viser antallet af brugere, der ikke kunne synkronisere. Se Entra ID-applikationens revisionslog for at få flere oplysninger om, hvorfor disse brugere ikke kunne synkronisere. Hvis du har brug for at synkronisere disse brugere med det samme, kan du provisionere brugere efter behov.
Grupper
- Synkroniseret: viser antallet af grupper, der er synkroniseret med Webex og oprettet i Control Hub.
- Skal synkroniseres: Denne status angiver, at alle brugerne i en gruppe endnu ikke er blevet tilføjet. Brugerne skal først synkroniseres med Webex.
Migrer eksisterende Cisco Webex Enterprise App-konfigurationer til Entra ID Wizard-appen
Hvis du allerede har konfigureret en Cisco Webex Enterprise-app i Entra ID, kan du automatisk overføre alle dine konfigurationer til Entra ID Wizard-appen. Du kan administrere Entra ID i Control Hub uden at miste nogen af dine tidligere konfigurationer.
| 1 |
Log ind på Control Hub med en fuld kundeadministratorkonto. |
| 2 |
Gå til Organisationsindstillinger og rul derefter ned til afsnittet Microsoft Entra ID Wizard-app. |
| 3 |
Klik på Opsæt for at starte konfigurationen. |
| 4 |
Godkend Entra ID-administratorkontoen med Entra ID-konfigurationen. Sørg for, at du bruger en konto, der har de tilladelser, der er beskrevet i næste trin. |
| 5 |
Gennemgå tilladelserne, og klik på Accepter for at give kontoen adgang til din Entra ID-lejer. Cisco Webex Identity Synchronization er en Entra ID-virksomhedsapplikation i Entra ID. Wizard-appen opretter forbindelse til denne applikation for at få adgang til Entra ID-graf-API'er. De nødvendige tilladelser til at få adgang til det er de mindste tilladelser, der kræves for at understøtte og bruge den. |
| 6 |
Vælg Migrer eksisterende app. |
| 7 |
Når du har accepteret yderligere anmodninger om skrivebeskyttet tilladelse, skal du vælge den eksisterende app, som du vil migrere til guideappen, og derefter vælge Fortsæt. Hvis den valgte eksisterende app ikke tildeler brugere til den samme Control Hub, mislykkes migreringen. |
| 8 |
Når migreringen er fuldført, anbefaler vi, at du udfører en prøvekørsel før du aktiverer automatisk synkronisering for at sikre, at der ikke er nogen fejl. |
Udfør en tørkørsel
Før du aktiverer automatisk synkronisering, anbefaler vi, at du udfører en prøvekørsel først for at sikre, at der ikke er nogen fejl. Når prøvekørslen er færdig, kan du downloade en prøvekørselsrapport for at se detaljerede oplysninger. De tilgængelige kolonner i rapporten er:
| Kolonnenavn | Beskrivelse |
|---|---|
| Objekttype | Objekttype i Entra ID, f.eks. bruger eller gruppe. |
| Handlingstype | Type af handling, der udføres på objektet under en synkronisering. Mulige handlingstyper er:
|
| Indtastnings-ID | Objektets ID i Entra ID. |
| Indtastningsnavn | Navn på objektet i Entra ID. |
| Webex-navn | Navnet på objektet i Webex. |
| Årsag | Årsag til, hvorfor en handlingstype vil forekomme under en synkronisering. |
| 1 |
Log ind på Control Hub med en fuld administratorkonto. |
| 2 |
Gå til Organisationsindstillinger , og rul ned til afsnittet Mappesynkronisering . |
| 3 |
Klik på de tre lodrette prikker ud for den instans, du vil synkronisere, og vælg derefter Dry-run. |
| 4 |
Når testkørslen er færdig, skal du klikke på Download resumé for at downloade rapporten som en CSV-fil. |
Deaktiver Entra ID-synkronisering
Det er nemt at sætte synkroniseringen mellem Control Hub og Entra ID på pause og påvirker ikke din eksisterende konfiguration. Du kan genoptage synkroniseringen når som helst.
Når synkronisering er deaktiveret, kan brugere og grupper, der tidligere blev synkroniseret, administreres direkte i Control Hub, ligesom manuelt tilføjede brugere eller grupper. Hvis du genaktiverer synkronisering, synkroniseres disse brugere og grupper igen, og eventuelle ændringer, du har foretaget, mens synkroniseringen var sat på pause, overskrives af Entra ID.
| 1 | |
| 2 |
Gå til Organisationsindstillinger og rul ned til Microsoft Entra ID Wizard-app. |
| 3 |
Slå Enter ID-synkronisering fra. |
Aktiver eller deaktiver automatisk synkronisering
Entra ID Wizard-appen og dens tilhørende backend-tjeneste kontrollerer, om automatisk synkronisering er aktiveret for at bestemme, hvornår brugere eller grupper skal synkroniseres fra Entra ID til Webex. Aktiver Automatisk synkronisering for at tillade automatisk synkronisering af brugere og grupper. Når du deaktiverer Automatisk synkronisering, synkroniserer guiden-appen ikke noget med Webex, men den eksisterende konfiguration bevares.
Typisk bliver brugerne synkroniseret hvert 40. minut i henhold til Microsofts politik.
Du skal deaktivere Entra ID-synkronisering og ikke kun Automatisk synkronisering for at foretage ændringer i synkroniserede brugere eller grupper.
| 1 |
Log ind på Control Hub som fuld kundeadministrator. |
| 2 |
Gå til Organisationsindstillinger , og rul ned til afsnittet Mappesynkronisering . |
| 3 |
Skift til højre for at aktivere automatisk synkronisering. Deaktiver den ved at skifte automatisk synkronisering til venstre. |
Rediger Entra ID Wizard-appens konfiguration
| 1 |
Log ind på Control Hub med en fuld administratorkonto. |
| 2 |
Gå til Organisationsindstillinger , og rul ned til afsnittet Mappesynkronisering . |
| 3 |
Klik på Rediger konfiguration. 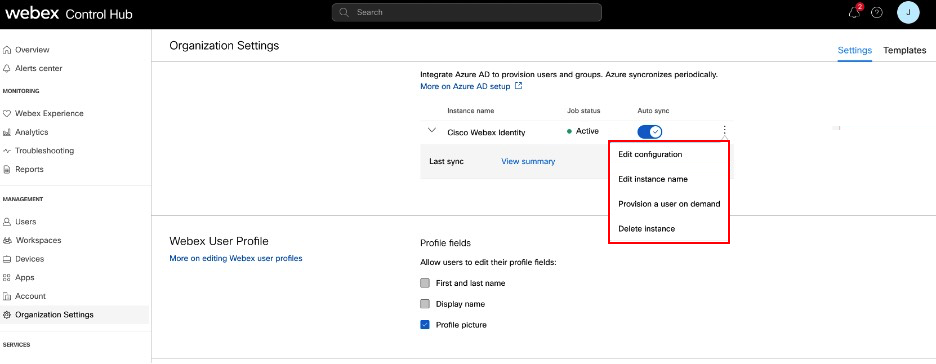 |
| 4 |
Tilpas attributtilknytningen ved at vælge en attribut fra venstre kolonne, der stammer fra Entra ID. Destinationsattributten i Webex Cloud er i den rigtige kolonne. Se Entra ID Wizard App-attributtilknytning for at få flere oplysninger om tilknytning af attributter.  |
| 5 |
I fanerne Brugere og grupper skal du tilføje eller fjerne brugere og grupper fra synkroniseringsomfanget. Indlejrede grupper synkroniseres ikke automatisk med skyen. Sørg for at vælge alle grupper, der er indlejret i de grupper, du vil synkronisere. |
| 6 |
På fanen Mere ændres dine præferencer, hvis det kræves. |
| 7 |
Klik på Gem for at gemme den ændrede konfiguration. Dine opdateringer anvendes ved næste synkronisering. Entra ID's automatiske synkroniseringsmekanisme håndterer synkroniseringen af brugere og brugergrupper. |
Rediger Webex-instansnavnet
Skift, hvordan navnet på Cisco Webex Identity-instansen vises på Entra ID-virksomhedsapplikationslisten.
| 1 |
Log ind på Control Hub med en fuld administratorkonto. |
| 2 |
Gå til Organisationsindstillinger , og rul ned til afsnittet Mappesynkronisering . |
| 3 |
Klik på Rediger instansnavn. |
| 4 |
Indtast det nye instansnavn, og klik derefter på Gem. |
Slet Entra ID Wizard-appens konfiguration
Når du sletter Entra ID Wizard-appen, fjerner den også konfigurationen til Entra ID-synkronisering. Webex og Entra ID gemmer ikke den slettede konfiguration. Hvis du vil bruge Entra ID-synkronisering i fremtiden, skal du foretage en fuldstændig omkonfiguration.
Slet ikke Cisco Webex-applikationen fra Entra ID.
Hvis du gør det, kan du stadig oprette en ny instans af Entra ID Wizard-appen, men du skal først slette instansen fra Control Hub.
| 1 |
Log ind på Control Hub med en fuld administratorkonto. |
| 2 |
Gå til Organisationsindstillinger , og rul ned til afsnittet Mappesynkronisering . |
| 3 |
Klik på Slet forekomst. |
| 4 |
På siden Slet Entra ID-instans? skal du vælge Tilbagekald Entra ID-administratorsamtykke, hvis du vil fjerne samtykkeaftalen fra Webex. Når du vælger denne mulighed, skal du indtaste dine legitimationsoplysninger og give tilladelserne igen. |
| 5 |
Klik på Slet. |
Klargør en bruger til Webex on-demand
Du kan tildele en bruger til Webex med det samme, uafhængigt af en Entra ID-synkronisering, og straks kontrollere resultatet. Dette er nyttigt i forbindelse med fejlfinding af problemer under opsætningen.
| 1 |
Log ind på Control Hub med en fuld administratorkonto. |
| 2 |
Gå til Organisationsindstillinger og rul ned til afsnittet Katalogsynkronisering. |
| 3 |
Klik på Klargør en bruger efter behov. |
| 4 |
Søg efter og vælg den bruger, du vil provisionere, og klik på Provisionering. |
| 5 |
Et af følgende resultater vises, når det er færdigt:
|
| 6 |
Klik på Prøv igen for at provisionere den samme bruger igen, hvis den blev sprunget over eller mislykkedes. |
| 7 |
Klik på Klargør en anden bruger for at vende tilbage til klargøringssiden. |
| 8 |
Klik på Udført, når du er færdig. |
Importér Entra ID-verificerede domæner til Control Hub
Kunderne kan have hundredvis af domæner verificeret i Entra ID. Mens de integrerer med Control Hub, hvis de vil importere de bekræftede domæner fra Entra ID til Control Hub. Dette kan spare mange indsatser i vedligeholdelses- eller opsætningsprocessen.
| 1 |
Gå til domæne sekion under fanen Organisationsindstillinger i Control Hub. |
| 2 |
Klik på Tilføj med indtastnings-ID.  |
| 3 |
På siden Tilføj bekræftede domæner skal du søge efter og vælge de domæner, der skal tilføjes. |
| 4 |
Klik på Tilføj. De verificerede domæner vil blive vist på listen over verificerede domæner.
|
Attributtilknytning i Entra ID Wizard-appen
Entra ID Wizard-appen kan understøtte og synkronisere alle ændringer, du foretager i dine attributudtryk. For eksempel kan du i Entra ID kortlægge displayName, så både attributterne surname og givenName vises. Disse ændringer vises i guide-appen.
Du kan finde flere oplysninger om tilknytning af attributudtryk i Entra ID på Microsofts hjælpeside.
Brug følgende tabel for at få oplysninger om specifikke Entra ID-attributter.
Entra ID synkroniserer ikke nullværdier. Hvis du indstiller en attributværdi til null i Entra ID, slettes eller opdateres den ikke med en nullværdi i Webex. Se begrænsningerne på Microsofts hjælpeside for yderligere information.
|
Entra ID-attribut (kilde) |
Webex-brugerattribut (mål) | Beskrivelse |
|---|---|---|
|
Attributter udfyldt som standard |
||
|
userPrincipalName |
Brugernavn |
Det er brugerens unikke ID i Webex. Det er en e-mail formateret. |
|
VistNavn |
VistNavn |
Brugernavn, der vises på Webex-applikationen. |
|
Efternavn |
name.familyName |
|
|
givenname |
name.givenName |
|
|
Objectid |
externalId |
Det er brugerens UID i Entra ID. Generelt er det en streng på 16-Bytes. Vi anbefaler ikke, at du ændrer denne tilknytning. |
|
Yderligere tilgængelige attributter |
||
|
jobtitle |
titel |
|
|
usageLocation |
adresser[skriv navn "work"].land |
Vi anbefaler, at du bruger Brugstilknytning til adresser [type båndbredde "arbejde"].land. Hvis du vælger en anden attribut, skal du sikre, at attributværdierne er i overensstemmelse med standarderne. Usa bør f.eks. være USA. Kina bør være CN, og så videre. |
|
postnummer |
adresser[type arbejdstype"].lokalitet |
|
|
Gadenavn |
adresser[type adresser "work"].streetAddress |
|
|
tilstand |
adresser[type type "work"].region |
|
|
Postnummer |
adresser[type adresser "work"].postalCode |
|
|
telefonnummer |
phoneNumbers[type mks "work"].værdi |
|
|
mobil |
phoneNumbers[type mks "mobil"].værdi |
|
|
facsimileTelephoneNumber |
phoneNumbers[type fax"].værdi |
|
|
leder |
leder |
Synkroniserer brugernes administratoroplysninger med Webex, så brugerne altid kan se de korrekte administratoroplysninger på en brugers kontaktkort. Når en bruger oprettes, kontrollerer Entra ID, om brugerens managerobjekt er i Webex Identity eller ej. Hvis nej, ignoreres brugerens manager-attribut. Hvis der er en manager-attribut, skal to betingelser være opfyldt for at attributten vises på brugerens kontaktkort:
Disse betingelser kontrollerer opdateringen af brugerens manager-attribut, når en brugers godkendelsestoken er udløbet. Ændringer af lederattributter afspejles ikke på brugerens kontaktkort, før brugeren logger ind for første gang efter ændringen. |
Ofte stillede spørgsmål
Hvordan kan jeg migrere til Entra ID Wizard-appen fra Cisco Directory Connector-provisionering?
Under opsætningen registrerer guiden-appen, om din organisation bruger Directory Connector. Hvis den er aktiveret, vises en dialogboks, hvor du kan vælge at bruge Entra ID og blokere Directory Connector. Klik på Bloker for at bekræfte, at du vil fortsætte konfigurationen af Entra ID Wizard-appen.
Du kan også vælge at deaktivere Directory Connector, før du konfigurerer guiden-appen. Efter konfigurationen administrerer Wizard-appen brugerprofiler. Guide-appen administrerer dog kun de brugere, der blev føjet til synkroniseringsomfanget. Du kan ikke bruge guide-appen til at administrere brugere, der er synkroniseret af Directory Connector, som ikke var en del af synkroniseringsomfanget.
Kan jeg konfigurere single sign-on med Microsoft Entra?
Du kan konfigurere en integration med enkeltlogon (SSO) mellem en Control Hub-kundeorganisation og en implementering, der bruger Microsoft Entra ID som identitetsudbyder.
Hvornår opdateres brugerens avatar i Webex?
Brugeravatarerne synkroniseres med Webex, når brugeren oprettes i Webex Identity. Denne opdatering er afhængig af, at brugerens avatar opdateres i Entra ID. Wizard-appen henter derefter den nye avatar fra Entra ID. Brugerens kontaktkort opdateres, når brugeren logger ind for første gang efter ændringen.
Hvorfor vises en bruger ikke i en gruppe i Control Hub umiddelbart efter synkronisering, og hvordan kan dette løses?
Bruger- og gruppesynkroniseringer er uafhængige processer. Selvom brugersynkroniseringer kan forekomme separat, finder gruppesynkroniseringer automatisk sted hver 12. time. Hvis en bruger synkroniseres via en gruppe, men ikke vises med det samme i gruppen i Control Hub, er dette stadig forventet adfærd. Hvis en bruger kun vises på hovedbrugerlisten, men ikke i gruppen, kræves der ingen yderligere handling. Vent blot på, at den næste gruppesynkroniseringscyklus er færdig.
Når en bruger er markeret som inaktiv i Entra ID, hvad sker der så med den bruger i min Webex-organisation?
Brugere markeret med Inaktive i Entra ID får også denne betegnelse i Control Hub. Inaktive brugere springes over i synkroniseringer og vil ikke blive ændret i fremtidige ændringer i Control Hub. Inaktive brugere vil dog fortsat blive vist i din Control Hub-organisation, indtil du fjerner dem direkte.


