- Home
- /
- Article

Thanks for your feedback.

Manage Recordings with Cisco Webex Site Administration
 In this article
 Feedback?
You can bulk-manage recordings for your site, to help optimize available storage. For example, you can search for and delete recordings that meet specific criteria. You can also reassign recordings, which is useful if the owner leaves your organization.
Search for Recordings to Manage
Use the search options to locate recordings—even recordings moved to the Trash.
| 1 |
Sign in to Webex Site Administration and select . |
| 2 |
Filter the recording location by choosing Recordings or Trash. |
| 3 |
Use the search options to specify the criteria for your search. You can search for recordings by Name, File Size, or Owner. For recordings not in the Trash, you can also search by the Date Created or the date the file was Last Accessed. 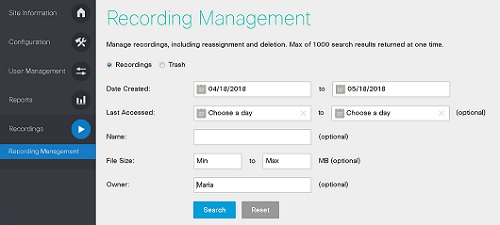
|
| 4 |
Click Search. |
Delete Recordings
A recording moved to the Trash is available to restore for up to 30 days. After 30 days, the system automatically deletes the recording.
| 1 |
Sign in to Webex Site Administration and select . |
| 2 |
Choose Recordings, and then search to find the recordings that you want to delete. |
| 3 |
Check the corresponding check boxes for the recordings that you want to delete. |
| 4 |
Select Move to Trash. |
Restore Recordings
A recording moved to the Trash is available to restore for up to 30 days. After 30 days, the system automatically deletes the recording.
| 1 |
Sign in to Webex Site Administration and select . |
| 2 |
Choose Trash, and then search to find the recordings that you want to restore. |
| 3 |
Check the corresponding check boxes for the recordings that you want to restore. |
| 4 |
Select Restore. |
Permanently Delete Recordings
You can permanently delete selected recordings from the Trash, or empty the trash to delete them all.
| 1 |
Sign in to Webex Site Administration and select . |
| 2 |
Select Trash, and then search to find the recordings that you want to permanently delete. |
| 3 |
Check the corresponding check boxes for the recordings that you want to permanently delete. |
| 4 |
Click Delete. To permanently delete all recordings, click Empty Trash. |
Reassign Recordings
You can reassign recordings created by one user, to another user.
| 1 |
Sign in to Webex Site Administration and select . |
| 2 |
Select Recordings , and then search to find the recordings that you want to reassign. |
| 3 |
Check the corresponding check boxes for the recordings that you want to reassign, and then click Reassign . |
| 4 |
Search for another user to whom you want to assign the recordings. |
| 5 |
Select the user to whom you want to assign the recordings, and then click OK . |


