- Home
- /
- Article


Migration Tools for transitioning to Wholesale RTM solutions
 In this article
 Feedback?
Run migration with minimal pre-configuration. Ease commands to run. Administrators can review their data after the provisioning and make and receive calls immediately after the migration. It supports an automatic upgrade to the Webex App for UC-One clients.
Overview
The purpose of this document is to provide detailed instructions on the use of tools for migrating from Cisco BroadWorks, Webex for BroadWorks, and BroadCloud to Wholesale and Webex Calling. This document covers a set of migration tools designed to help migrate existing Cisco BroadWorks, Webex for BroadWorks, and BroadCloud customers to the Wholesale Route-to-Market solution.
The migration tools are intended to facilitate a complete transition from BroadWorks to Wholesale services. They are not designed for the long-term coexistence of both services within the same customer organization.
Migration impact
The post-migration impacts are as follows:
Administrators
After the migration, administrators must:
- Begin using Partner Hub and Control Hub to configure features rather than CommPilot.
- Reconfigure any features that are not part of the migration.
You need to manually migrate the features that are not automatically migrated after the migration tools are completed.
Users
Supported features should work post-migration the same that they worked before the migration. Webex Calling features not supported by the migration must be reconfigured on Webex after the migration:
- Users will lose their call history and message history.
- Users will lose all personal key-line settings and customizations and must reconfigure these settings after the migration. Examples include speed dials.
- Users must reset their access codes and passwords at first login.
- Users who use the UC-One client are required at first login to upgrade to the Webex App.
Migration tools architecture
The migration tools architecture consist of four different tools:
- Extract tool—Extracts enterprises, groups, numbers, users, services, phones, and soft clients from Cisco BroadWorks. BroadCloud partners must submit an extract request in the Service Provider Portal.
- Transform tool—Transforms the information extracted by the extract tool into a JSON file that can be edited.
- Provisioning tool—Uses the JSON output file from the Transform Tool to provision customers, locations, numbers, users, services, and phones using Webex Public APIs.
-
Device move tool—Uses the Transform Tool JSON output file the Transform Tool to
rebuild the profiles and reboot phones, activate numbers in the Wholesale RTM solution, and
deactivate phone numbers in Cisco BroadWorks.
- This tool supports reverting phone and soft client profiles and number activation back in Cisco BroadWorks.
- BroadCloud partners must submit a migration request in the Service Provider Portal.
The following illustration represents how the four tools work sequentially by communicating with Cisco BroadWorks, Public APIs, and uploading metrics to the Webex services for future analytics after the administrator launches the migration tasks.
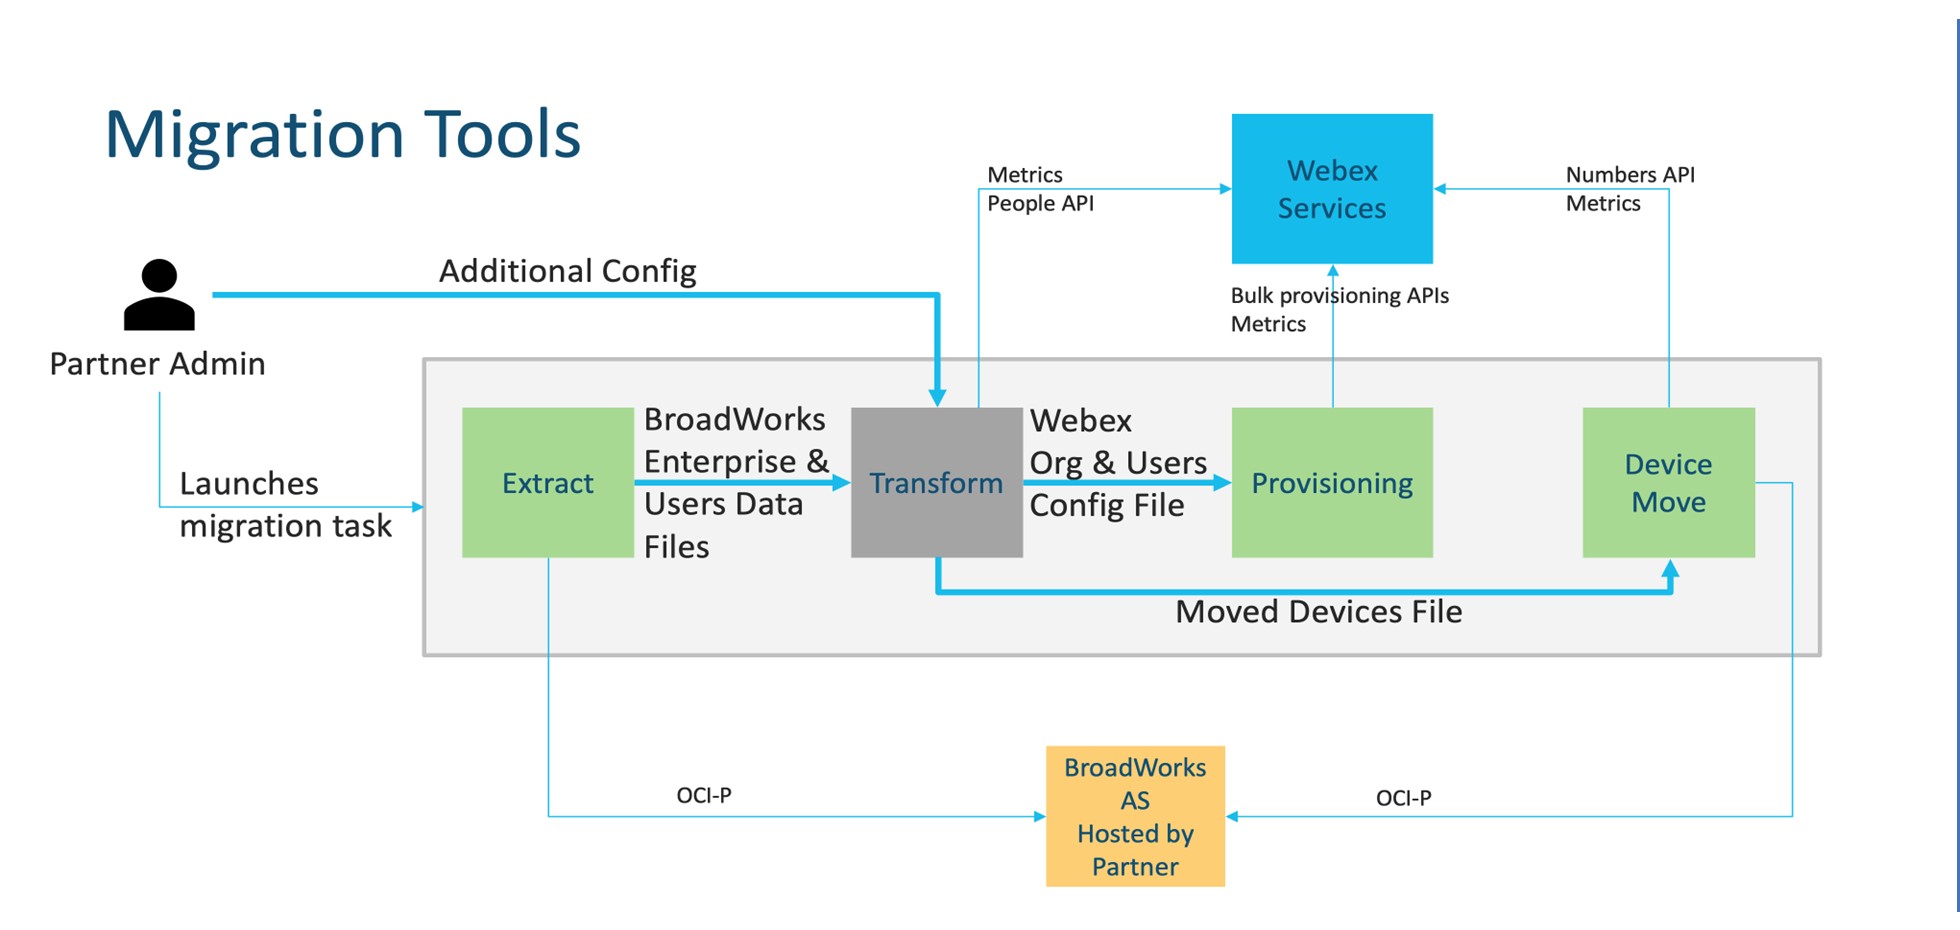
Figure 1: Migration tools
Requirements
Before running migration tools, the partner must meet the following requirements:
- The partner and partner administrator account must be onboard in the Wholesale RTM solution. During the pre-sale stage, partners are not required to be onboarded into the Wholesale RTM solution for running the extract tool.
- The partner must go through the pre-migration checklist to make sure all requirements are met.
- Cisco BroadWorks system administrator credentials are required to run the extract and device move tools. This is not applicable for BroadCloud partners.
- The extract and device move tools must be run from the secondary Cisco BroadWorks Application Server during a maintenance window to minimize risk. BroadCloud partners will run the Device Move Tool from the Service Provider Portal.
- Review the list of supported Webex Calling devices.
- Review the list of non-supported Webex Calling devices.
- Partners must ask their account team at Cisco to get the supported firmware version for phones and devices.
- UC-One clients must upgrade to the following versions:
- Desktop Communicator clients must be version 22.9.12 or higher
- Mobile Connect clients must be version 3.9.14 or higher.
- The administrator's machine must have:
- JDK/JRE 1.8 is required for the Provisioning Tool.
- MAC and Linux machines require Python 3.10.5 or higher for the Transform Tool.
- Customers must have a valid billing address, and end users must have a business email address configured in Cisco BroadWorks. If the values are not set, partner administrators must contact their customers to get them. These details must be added to the CSV (comma-separated values) files before running the transform tool. Example CSV files are provided with the transform tool.
Migration plan
The migration plan has 3 stages:
- Preparation
- Get a copy of user data with the Extract Tool
- Generate a token using the Token Generator Tool
- Use the Transform Tool to format user data
- Provisioning
- Get the latest user data with the Extract Tool
- Use the Transform Tool to format user data
- Provision users with the Provisioning Tool
- Migration
- Migrate devices with the Device Move Tool
- Migrations without devices [ Activating phone numbers through Control Hub ]
If the partner administrators don’t have devices to move from Cisco BroadWorks to Wholesale, then running the device move tool is not necessary. Partner administrators can use the public link below to activate the phone numbers directly through the Control Hub portal. For more information, see Manage phone numbers in Control Hub.
Deactivating the phone numbers in Cisco BroadWorks is optional if the partner administrators activate their phone numbers through Control Hub.
Features automatically migrated to Wholesale Calling
These user features are automatically migrated by the migration tools:
- Voice messaging settings and custom greetings (voice messages, personalized name audio and users' PIN are not migrated)
- Alternate numbers
- BroadWorks Anywhere
- Busy lamp field
- Caller ID (custom name and phone number)
- Call waiting
- Call forwarding settings (call forwarding always/busy/no answer/not reachable)
- Call intercept
- Do not disturb
- Fax settings
- Remote office
- Shared call appearance
- Simultaneous ring personal (including schedule and selective criteria)
- Call notify (including schedule and selective criteria)
- Anonymous call rejection
- Selective call rejection
- Selective call forwarding
- Selective call acceptance
- Sequential ring
- Directed call pickup and barge-in
- Barge-in exempt
- Push to talk
- Privacy
- Music on Hold
- Holiday Service
- Night Service
- Outgoing calling plan
- Outgoing calling plan - Authorization codes
- Outgoing calling plan - Transfer numbers
- Incoming calling plan
- Receptionist client
- Call recording
These group features are automatically migrated by the migration tools:
- Auto attendant
- Custom greetings
- Call forwarding settings (always, busy, selective)
- Alternate numbers
- Holiday menu is not available in Webex
- Selective call rejection
- Cisco BroadWorks Call Center Standard and BroadCloud Call Queue:
- Basic configuration
- Custom greetings
- Agents and supervisors
- Call forwarding settings (always, busy, selective)
- Alternate numbers
- Music on hold
- Forced forwarding
- Comfort message bypass
- Common area workspace:
- Call forwarding
- Do not disturb
- Call waiting
- Call intercept
- Music on hold
- Busy lamp field (Monitoring)
- Caller ID
- Alternate numbers
- Incoming calling plan
- Outgoing calling plan
- Outgoing calling plan - Authorization codes
- Outgoing calling plan - Transfer numbers
- Professional workspace:
- Call forwarding
- Voicemail
- Voicemail - Busy greeting
- Voicemail - No answer greeting
- Do not disturb
- Call waiting
- Call intercept
- Music on hold
- Busy lamp field (Monitoring)
- Push to talk
- Simultaneous ring
- Anonymous call rejection
- Selective call forwarding
- Selective call rejection
- Selective call acceptance
- Sequential ring
- Barge in
- Privacy settings
- Caller ID
- Alternate numbers
- Incoming calling plan
- Outgoing calling plan
- Outgoing calling plan - Authorization codes
- Outgoing calling plan - Transfer numbers
- Call recording
- Virtual line:
- Call forwarding
- Voicemail
- Voicemail - Busy greeting
- Voicemail - No answer greeting
- Call waiting
- Call intercept
- Music on hold
- Push to talk
- Barge in
- Privacy settings
- Caller ID
- Incoming calling plan
- Outgoing calling plan
- Outgoing calling plan - Authorization codes
- Outgoing calling plan - Transfer numbers
- Call recording
- Call park
- Call pickup
- Hunt group
- Call forward settings (always, busy, selective, not reachable)
- Alternate numbers
- Location code (one per location or group)
- Paging group
- Schedules (Enterprise schedules are not migrated)
- Voice portal
- Music on hold
- Common phone list
- Voice Mail Group
Supported devices
Supported phones will be automatically created and assigned to users in Webex Calling by the provisioning tool. The phones marked “yes” in the column “Supported in the device move tool” will also be automatically moved from Cisco BroadWorks or BroadCloud to Webex Calling when the device move tool is run. Phones marked “No” in that column need a manual intervention to change the DMS URL in the Cisco BroadWorks device template or in the phone itself.
The last column provides the mapping of phone models to the “Device type” column of the file transform-tool/input/newphones.csv. (See Transform tool section of this article for more information on newphones.csv).
|
Phone model |
Supported in device move tool |
Device type in newphones.csv |
|---|---|---|
|
Cisco MPP 6821 |
Yes |
DMS Cisco 6821 |
|
Cisco MPP 6841 |
Yes |
DMS Cisco 6841 |
|
Cisco MPP 6851 |
Yes |
DMS Cisco 6851 |
|
Cisco MPP 6861 |
Yes |
DMS Cisco 6861 |
|
Cisco MPP 6871 |
Yes |
DMS Cisco 6871 |
|
Cisco MPP 7811 |
Yes |
DMS Cisco 7811 |
|
Cisco MPP 7821 |
Yes |
DMS Cisco 7821 |
|
Cisco MPP 7832 |
Yes |
DMS Cisco 7832 |
|
Cisco MPP 7841 |
Yes |
DMS Cisco 7841 |
|
Cisco MPP 7861 |
Yes |
DMS Cisco 7861 |
|
Cisco MPP 8811 |
Yes |
DMS Cisco 8811 |
|
Cisco MPP 8832 |
Yes |
DMS Cisco 8832 |
|
Cisco MPP 8841 |
Yes |
DMS Cisco 8841 |
|
Cisco MPP 8845 |
Yes |
DMS Cisco 8845 |
|
Cisco MPP 8851 |
Yes |
DMS Cisco 8851 |
|
Cisco MPP 8861 |
Yes |
DMS Cisco 8861 |
|
Cisco MPP 8865 |
Yes |
DMS Cisco 8865 |
|
Cisco MPP 8875 |
Yes |
DMS Cisco 8875 |
|
Cisco ATA191 |
Yes |
DMS Cisco 191 |
|
Cisco ATA192 |
Yes |
DMS Cisco 192 |
|
Cisco DBS 110 |
Yes |
DMS Cisco DBS110 |
|
Polycom VVX101 |
Yes |
DMS Polycom VVX101 |
|
Polycom VVX150 |
Yes |
DMS Polycom VVX150 |
|
Polycom VVX201 |
Yes |
DMS Polycom VVX201 |
|
Polycom VVX250 |
Yes |
DMS Polycom VVX250 |
|
Polycom VVX301 |
Yes |
DMS Polycom VVX301 |
|
Polycom VVX311 |
Yes |
DMS Polycom VVX311 |
|
Polycom VVX350 |
Yes |
DMS Polycom VVX350 |
|
Polycom VVX401 |
Yes |
DMS Polycom VVX401 |
|
Polycom VVX411 |
Yes |
DMS Polycom VVX411 |
|
Polycom VVX450 |
Yes |
DMS Polycom VVX450 |
|
Polycom VVX501 |
Yes |
DMS Polycom VVX501 |
|
Polycom VVX601 |
Yes |
DMS Polycom VVX601 |
|
Polycom Trio 8300 |
Yes |
DMS Polycom Trio8300 |
|
Polycom Trio 8500 |
Yes |
DMS Polycom Trio8500 |
|
Polycom Trio 8800 |
Yes |
DMS Polycom Trio8800 |
|
Polycom SoundStation 5000 |
Yes |
DMS Polycom SSIP5000 |
|
Polycom SoundStation 6000 |
Yes |
DMS Polycom SSIP6000 |
|
Yealink T33G |
Yes |
DMS Yealink T33G |
|
Yealink T41S |
Yes |
DMS Yealink T41S |
|
Yealink T42S |
Yes |
DMS Yealink T42S |
|
Yealink T43U |
Yes |
DMS Yealink T43U |
|
Yealink T46U |
Yes |
DMS Yealink T46U |
|
Yealink T46S |
Yes |
DMS Yealink T46S |
|
Yealink T48S |
Yes |
DMS Yealink T48S |
|
Yealink T48U |
Yes |
DMS Yealink T48U |
|
Yealink T53W |
Yes |
DMS Yealink T53W |
|
Yealink T54W |
Yes |
DMS Yealink T54W |
|
Yealink T57W |
Yes |
DMS Yealink T57W |
|
Yealink T58V |
Yes |
DMS Yealink T58V |
|
Yealink CP920 |
Yes |
DMS Yealink CP920 |
|
Yealink CP960 |
Yes |
DMS Yealink CP960 |
|
Yealink W52B |
Yes |
DMS Yealink W52P |
|
Yealink W56B |
Yes |
DMS Yealink W56P |
|
Yealink W60B |
Yes |
DMS Yealink W60P |
|
Yealink W70B |
Yes |
DMS Yealink W70P |
|
Yealink CP925 |
Yes |
DMS Yealink CP925 |
|
Yealink CP965 |
Yes |
DMS Yealink CP965 |
|
AudioCodes MP204R |
Yes |
DMS AudioCodes MP204R |
|
AudioCodes MP202R |
Yes |
DMS AudioCodes MP202R |
|
AudioCodes MP204 |
Yes |
DMS AudioCodes MP204 |
|
AudioCodes MP202 |
Yes |
DMS AudioCodes MP202 |
Non-supported devices
If the customer uses the unsupported devices by the Wholesale RTM solution, then those devices are not eligible for migration. In this case, you have the following options:
- Provision new phones on Cisco BroadWorks before you migrate.
- Leave the old phones in Cisco BroadWorks, and users must install the Webex App to make and receive calls.
Wholesale Calling packages
The migration tools have a set of defaults for selecting Wholesale Calling packages for subscribers. If a different package is desired later, these can be changed in Control Hub by a partner admin.
Cisco BroadWorks migration package configuration
All subscribers from migrating from Cisco BroadWorks will default to the Webex Calling Package. If the Webex Voice Package is desired for subscribers who do not have Call Waiting or Voicemail assigned, this can be enabled in the Transform Tool’s partner.cfg file by uncommenting the line USE_WEBEX_VOICE_PACKAGE.
Webex for BroadWorks migration package mapping
Migration from Webex for Broadworks packages is based on the Broadworks package type. Configure the default mapping in the Transform Tool’s config file at conf/w4b_package_to_wholesale_package.csv.
|
Webex for BroadWorks package |
Wholesale Calling package |
|---|---|
|
Softphone |
Webex Voice |
|
Basic |
Webex Calling |
|
Standard |
Webex Suite |
|
Premium |
Webex Suite |
BroadCloud migration package mapping
Migrations from BroadCloud Carrier map packages based upon the station type. Default mapping can be configured in the Transform Tool’s config file conf/rialto_station_type_to_wholesale_package.csv.
|
BroadCloud Carrier station type |
Wholesale Calling package |
|---|---|
|
Basic |
Webex Voice |
|
Conference room |
Webex Voice |
|
Messaging |
Webex Voice |
|
Standard |
Webex Voice |
|
Executive |
Webex Suite |
|
All other station types |
Webex Voice |
Transform a BroadWorks or BroadCloud user account into a Webex Calling workspace
A Webex Workspace is a phone that is shared among many people, for example: for example: phones in a conference room, warehouse, or lobby. Such phones can be configured in Webex Calling as Webex workspaces instead of Webex users. An option is available to transform user accounts from Cisco BroadWorks or BroadCloud Carrier into workspaces automatically during the migration process.
Steps:
- In the file transform_tool/input/users.csv, assign the “common_area” package to the users
to be transformed into a Workspace.
- Example: bwuser@domain,,,common_area
- (BroadCloud Only) To convert all user accounts of a specific station type into workspaces,
add an entry to transform-tool/conf/rialto_station_type_to_wholesale_package.csv and set the
Wholesale package to “common_area_calling”.
- Example: conference_room_v2,common_area_calling
- Run the transform tool.
- Run the provisioning tool.
- Open Control Hub of the newly created customer organization and set a SIP domain (see the figure 2, Configuring a SIP domain in Control Hub).
- Run the provisioning tool again. This creates the workspaces and assign phones to it.
Limitations:
Configuration of user features (for example, call forwarding, do not disturb) is not automatically migrated to the workspace.
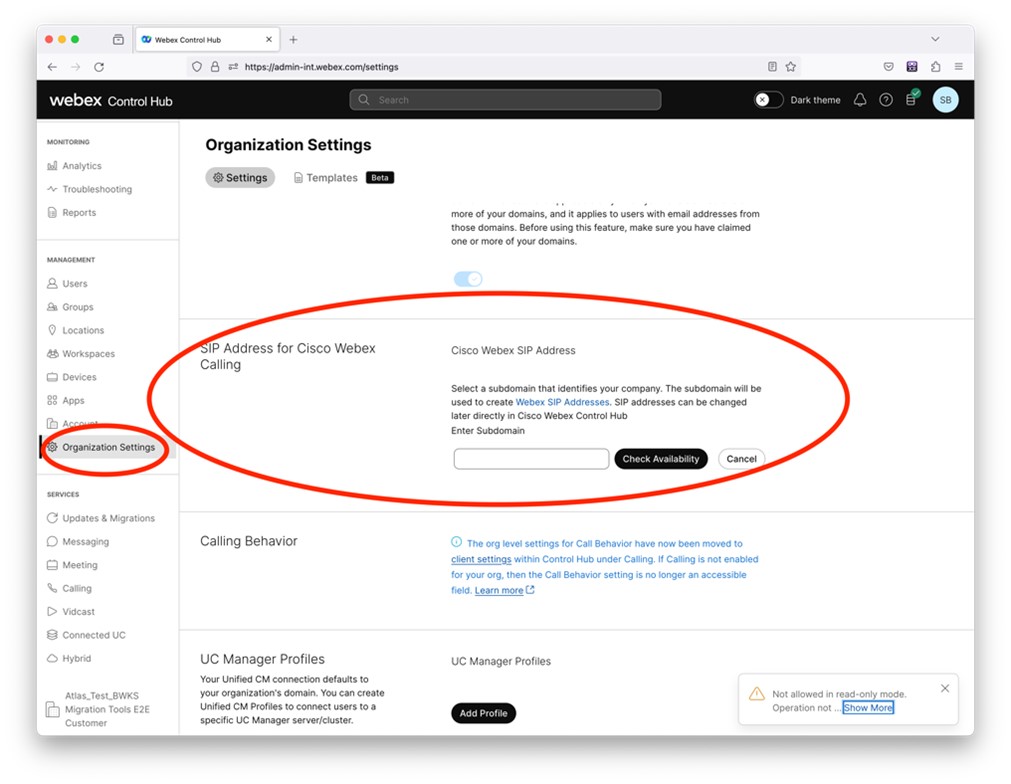
Figure 2: Configuring a SIP domain in Control Hub
Token generator tool
Partner administrators run this token generator utility tool at least one time before starting to run migration tools. Running this tool is a one-time activity after the partner account gets onboarded into the Wholesale RTM solution. This tool allows partner administrators to log in via web browser to get the unique TOKEN that is needed to update to the partner configuration files for the migration tools.
Prerequisites
Install Java 8, 11, 17, or 21 on the computer. Java is available from many sources, including:
- https://learn.microsoft.com/en-us/java/openjdk/download
- https://aws.amazon.com/corretto/
- https://www.oracle.com/java/technologies/downloads/#java21
After downloading, extract the migration tool binaries.
This step is optional
Instructions to run
Run the following command in the terminal inside the token generator directory:
-
The following ports must be available for running the token generator tool. Ports: 8080, 50009, 50010, 50011, 50012, and 50013
-
At least one of these mentioned ports must be open for connection in the user's computer.
Windows:
token_generator.batMacOS:
./token_generator.shOutput:
Tool Name: Token Generator Tool
Version: 1.13.0
Load the URL in your web browser: http://localhost:8080
Open the URL in the web browser on the terminal, login with the partner administrator credentials to get the TOKEN and copy the same for further usage.
The user interface illustrations are given below for reference:
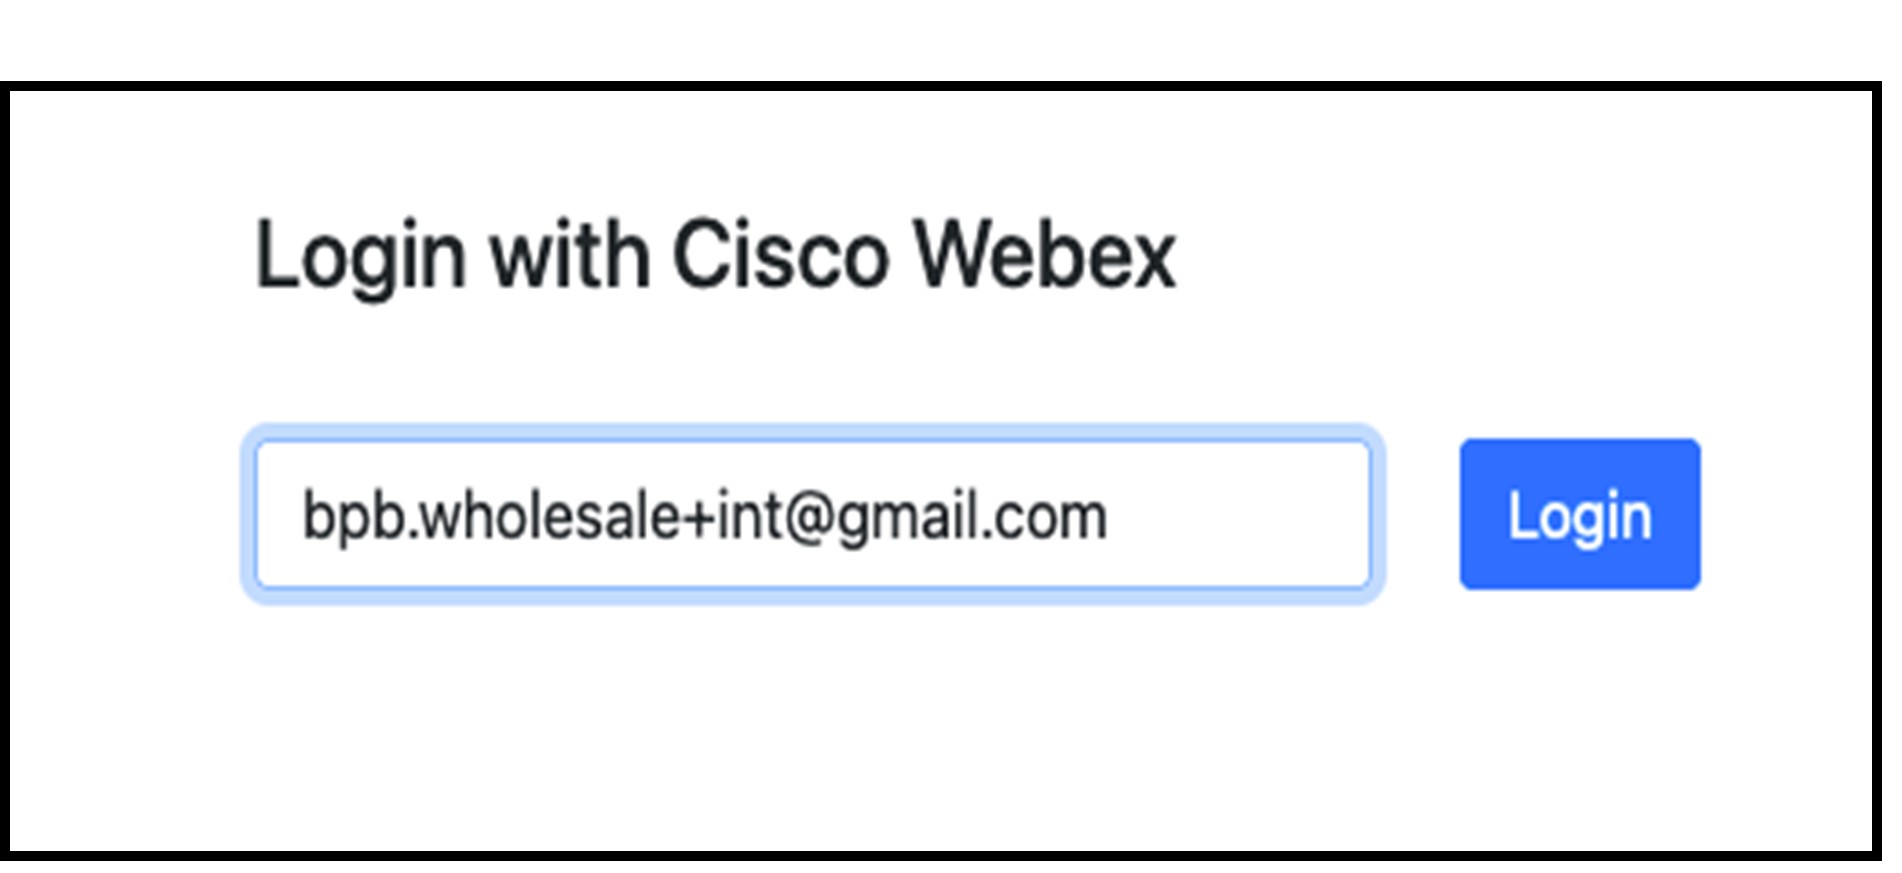
Figure 3: Login with Cisco Webex
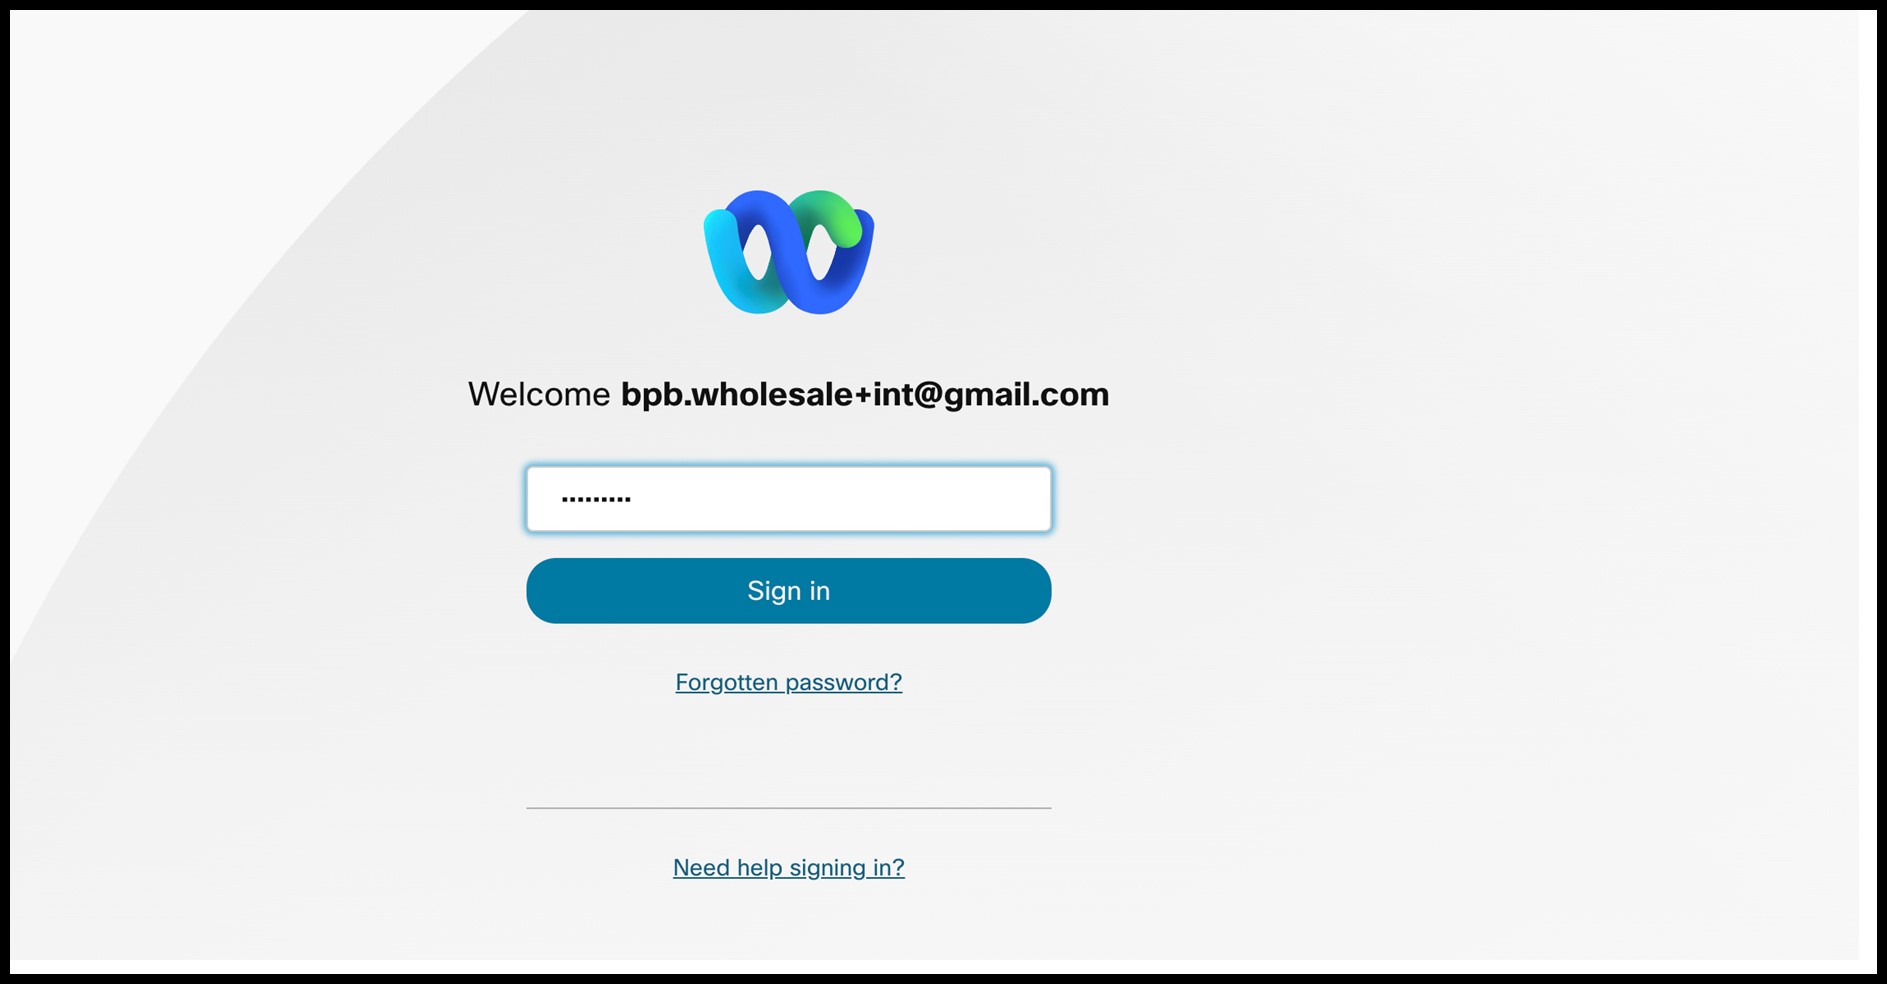
Figure 4: Credentials window
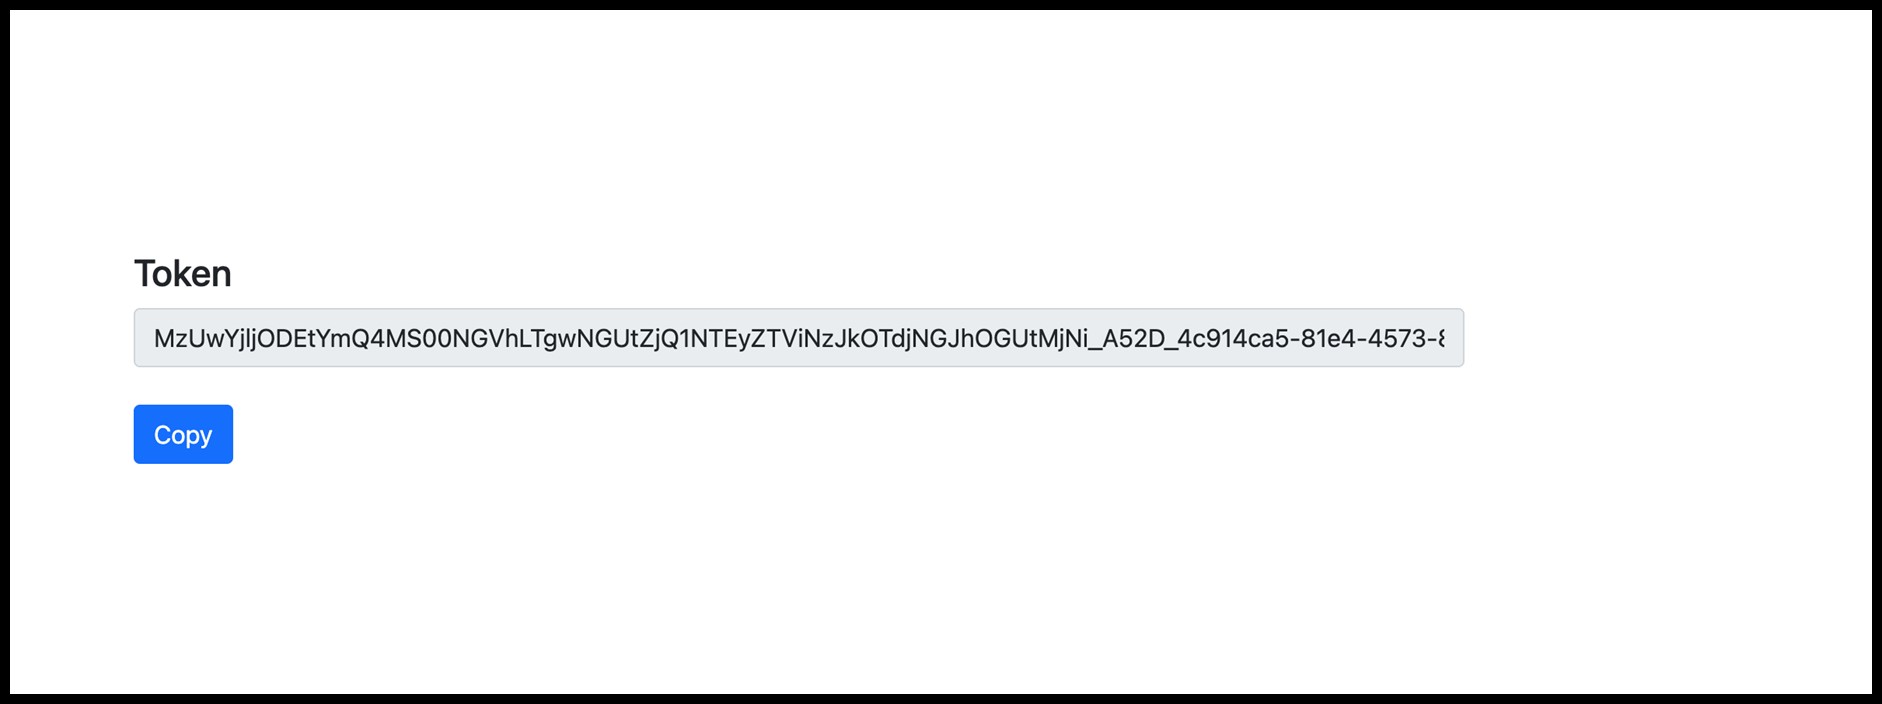
Figure 5: Token generation
BroadWorks setup tasks
Configure the following steps, before running the extract and device move tools in the secondary BroadWorks server.
Enable OCI-P connectivity
The device move tool communicates with the BroadWorks through OCI-P commands, to enable OCI-P connectivity use the steps below:
Step 1: Use the CLI to configure General Settings.
Run the following command in CLI to change to the GeneralSettings directory:
AS_CLI> cd /Applications/OpenClientServer/GeneralSettings.Run the following command in CLI to get the current GeneralSettings:
AS_CLI/Applications/OpenClientServer/GeneralSettings> get
clientPort = 2208
clientPortEnabled = true
secureClientPort = 2209
secureClientPortEnabled = true
systemDomain = <>
If your settings do not match the above, use the set command to reconfigure your settings.
Step 2: Use the CLI to configure the OCI Proxy.
Change the directory to OCI Proxy:
AS_CLI> cd /Applications/OpenClientServer/OCIProxyRun the following CLI to get current settings. You should see the following:
AS_CLI/Applications/OpenClientServer/OCIProxy> get
enabled = true
enabledLoginLevelScreening = false
enableResponseCaching = false
responseCacheDurationHours = 24
responseCacheRenewPeriodMins = 30
messageQueueCapacity = 50
messageQueueTimeoutSeconds = 1800
If your settings do not match the above, use the set command to reconfigure your settings.
Step 3: Use the CLI to configure OCI Provisioning.
Change to the Provisioning directory:
AS_CLI> cd /System/NetworkAccessLists/OCI/ProvisioningRun the following command to get the current OCI Provisioning settings:
AS_CLI/System/NetworkAccessLists/OCI/Provisioning> get
Address Description
========================
127.0.0.1 local as
Step 4: Run the command below in CLI to verify that your configuration is correct.
 AS_CLI/Maintenance/ManagedObjects> get broadworks and check
that your output looks OK.
See below for sample output:
AS_CLI/Maintenance/ManagedObjects> get broadworks
BroadWorks Managed Objects
==========================
* Server:
Identity..............: AS
Version...............: Rel_21.sp1_1.551
Administrative State..: Unlocked
* Applications:
Name Version Deployed Administrative State Effective State
=========================================================================================
ExecutionAndProvisioning 21.sp1_1.551 true Unlocked Unlocked
FlashPolicy 21.sp1_1.551 false Unlocked Stopped
OpenClientServer 21.sp1_1.551 true Unlocked Unlocked
WebContainer 21.sp1_1.551 true Unlocked Unlocked
4 entries found.
* Hosted Applications:
Name Version Context Path Deployed
==================================================================
CommPilot 21.sp1_1.551 / true
DeviceManagementFiles 21.sp1_1.551 /DeviceManagement true
JWSFiles 21.sp1_1.551 /FileRepos true
MediaFiles 21.sp1_1.551 /media true
OCIFiles 21.sp1_1.551 /ocifiles true
5 entries found.
Verify open client server deployed and active
Use the commands below to deploy and start the Open Client Server on the secondary Application Server if it is not deployed or have not started already.
Step 1: Deploy the server with the following CLI command:
AS_CLI/Maintenance/ManagedObjects> deploy application OpenClientServerStep 2: Start the server with this command:
AS_CLI/Maintenance/ManagedObjects> start application OpenClientServerEnable numbers activation
Execute the following commands in CLI to enable the activation of the numbers:
Step 1: Run the number activiation command:
AS_CLI> cd SubscriberMgmt/NumberActivationStep 2: Run the activation enabled command:
AS_CLI> set dnMode groupAndUserActivationEnabledStep 3: At the confirmation prompt, enter Y.
Cisco calling plan
The Cisco Calling Plans provide a bundled solution designed to simplify your cloud calling experience with Webex Calling.
Prerequisites
The Cisco account team must assist the partner administrator in setting the Cloud Connected PSTN vendor to Sinch in the Wholesale provisioning template.
Transform Tool
To enable the Cisco calling plan, add the following configuration to the partner.cfg file:
- ENABLE_CISCO_CALLING_PLAN=Yes
- By default, this property is commented out. Administrators must uncomment and enable it before running the transform tool.
- After enabling this property and executing the Transform Tool, the Wholesale Package section of the customer JSON file will automatically include the Cisco calling plan.
Provisioning tool
For customer locations that opt for the Cisco calling plan, we activate the associated numbers during the number provisioning phase. However, the customers will begin to use the numbers only after the migration process completion.
Extract tool
For BroadCloud
The extract tool is integrated in the BroadCloud Service Provider portal. A service provider admin can:
- Submit extract requests for up to 50 customers per request.Extract request can't be submitted for the same customer more than 10 times in a day.
- Download the extracted data file, in ZIP format, for up to 28 days from request submission date.
The following figures show the Service Provider portal.
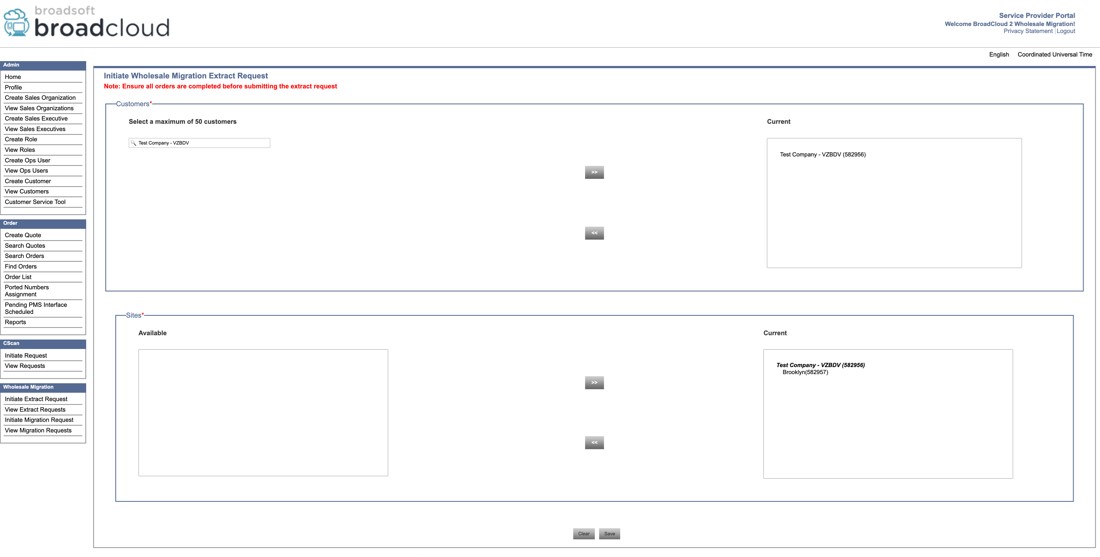
Figure 6: Service Provider portal
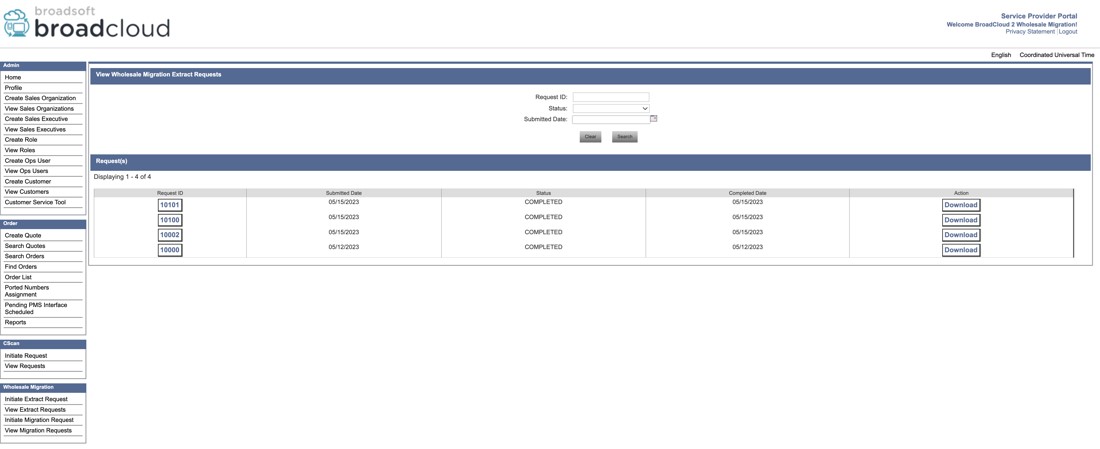
Figure 7: Service Provider portal
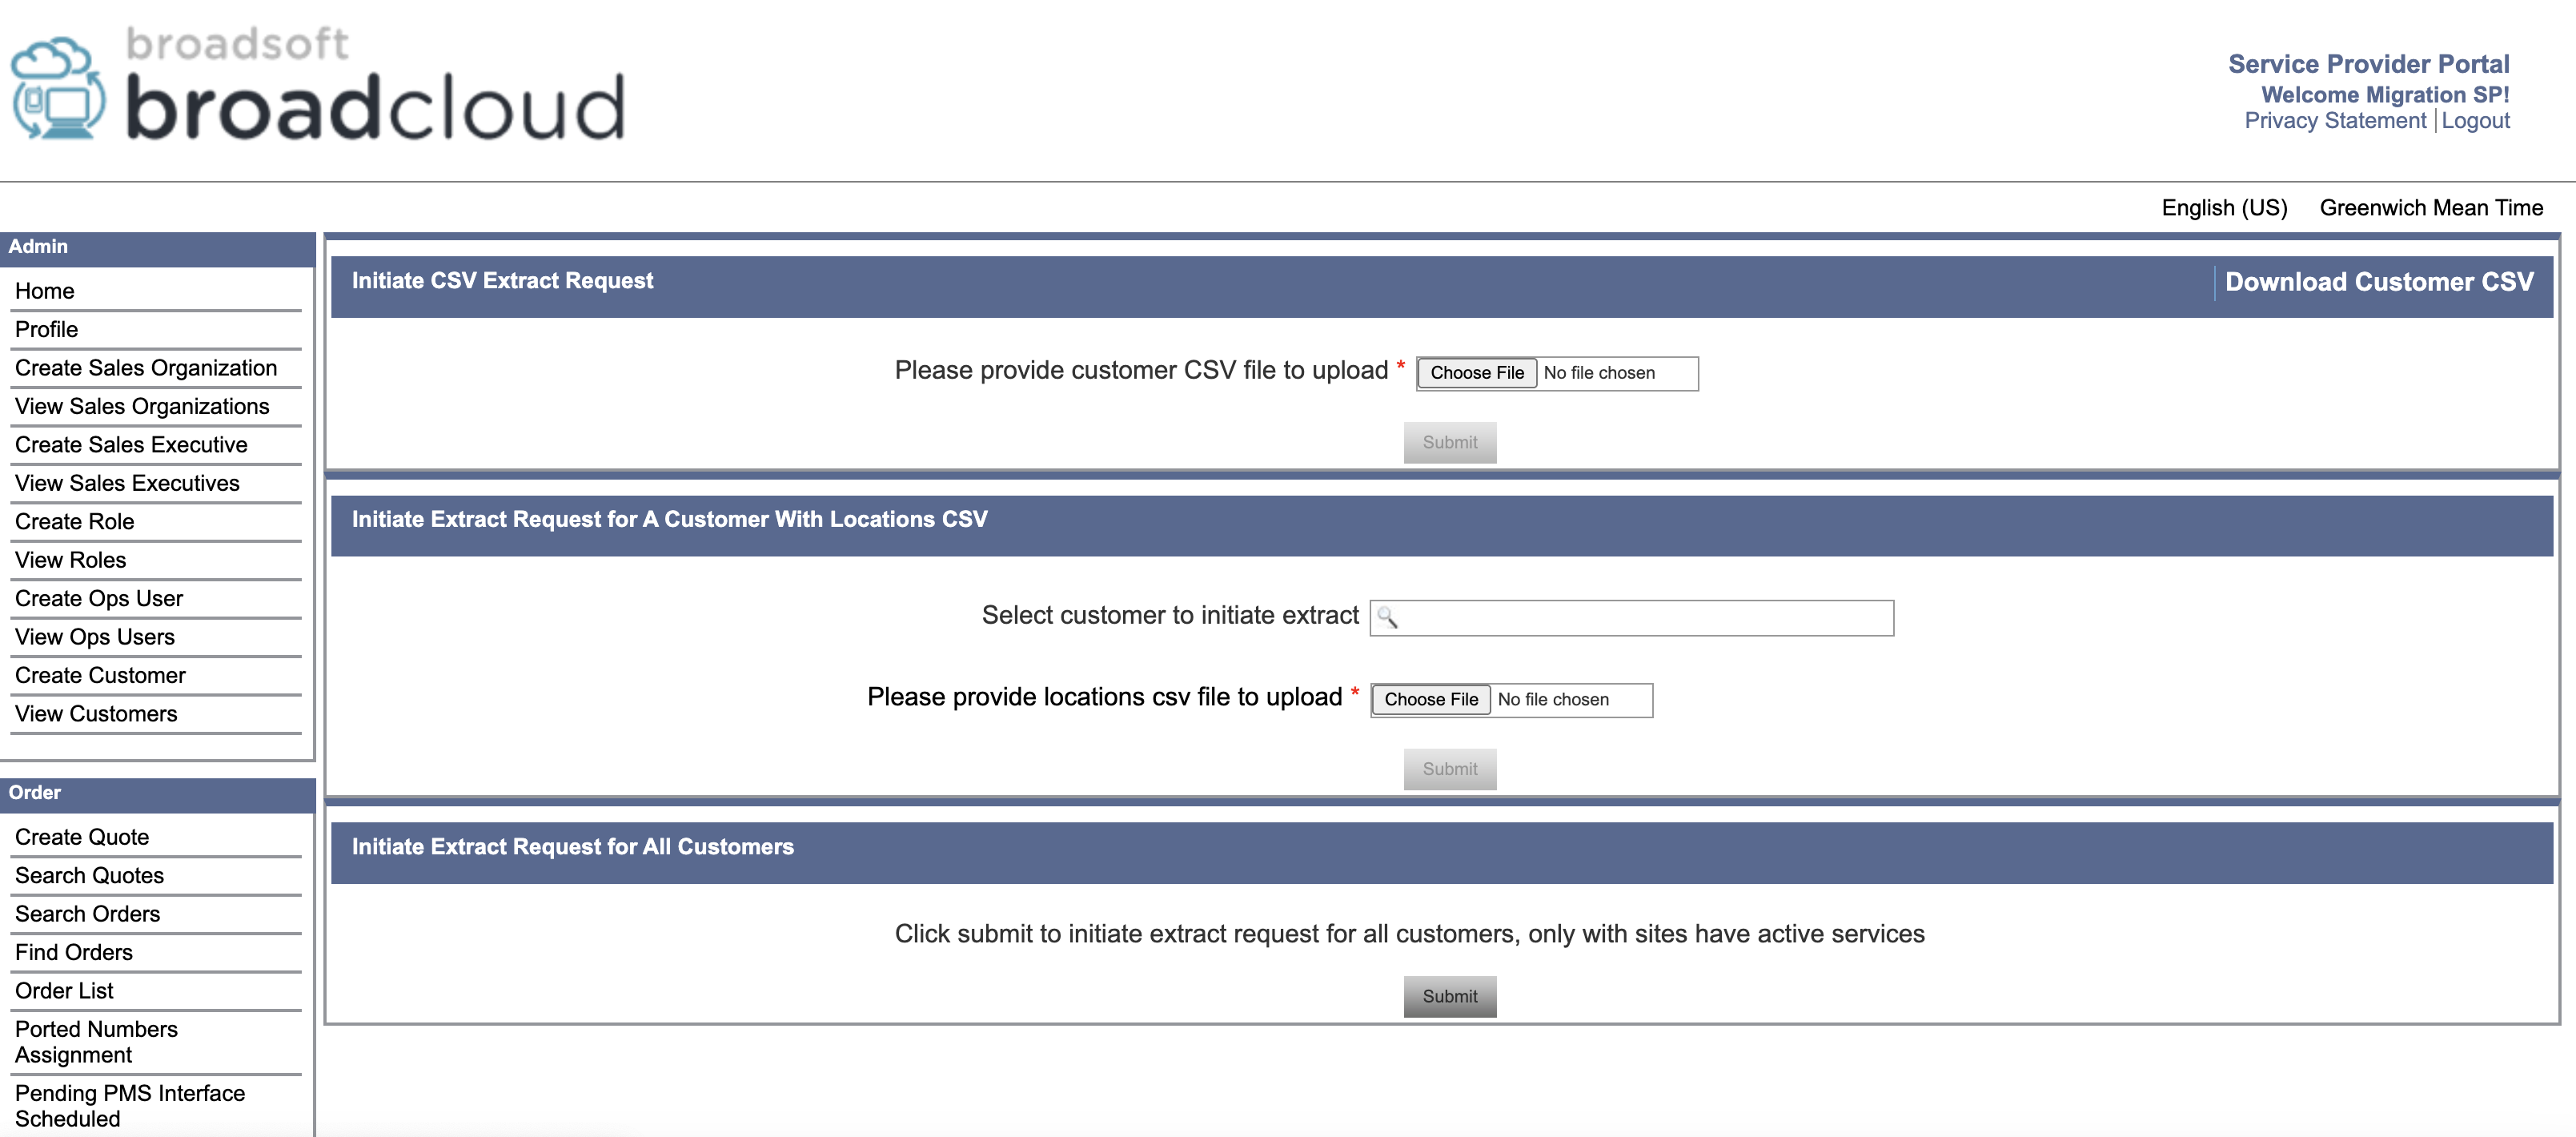
CSV extract request
Initiate CSV Extract Request
-
Download the Customer CSV
Click the Download Customer CSV link at the top-right corner of the Initiate CSV Extract Request section.
-
Edit the Customer List
The admin can edit this CSV file to include only the customers for whom the extract needs to be performed.
-
Upload and Submit
After editing, upload the modified CSV.
Click Submit to initiate an extract request for the listed customers and their associated locations.
Initiate Extract Request for a Customer with Locations CSV
-
Select Customer and Download Locations
Choose a customer from the dropdown.
Download the corresponding locations.csv from View Customers→ Sites tab → Export Locations as CSV.
-
Edit the Locations File
The admin can edit the CSV to include only the locations they wish to extract.
-
Upload and Submit
Upload the edited locations.csv and click Submit.
Only the specified locations for the selected customer will be included in the extract request.
Initiate Extract Request for All Customers
- Click Submit to initiate an extract request for all customers and all their locations under the current service provider.
For Cisco BroadWorks and Webex for BroadWorks
- The extract tool runs on the secondary Cisco BroadWorks Application Server within the partner network and connects over OCI-P.
- The tool pulls raw enterprise, group, numbers, users, services, devices, and soft client's data from the Cisco BroadWorks or BroadCloud platform and outputs this data to XML files that provide the inputs for the transform tool.
The next sections explain how to install and configure the extract tool.
Prerequisites
- SCP the extract tool binaries to secondary Cisco BroadWorks Application Server.
- SSH to the secondary Cisco BroadWorks Application Server to configure the prerequisites and run the extract tool.
- Configure the Service Provider and Group ID to extract from Cisco BroadWorks in the
conf/exportTool.yml. Refer to the following sample YAML
snippet:
ServiceProviderID-A: - GroupID-A1 - GroupID-A2 - GroupID-A3 ServiceProviderID-B: - ALL - Ensure the secondary Cisco BroadWorks Application Server User ID, Password, and Host
Name are correct in the conf/partner.cfg
file:
BROADWORKS_USER_ID = admin
BROADWORKS_PASSWORD = admin
BROADWORKS_HOST_NAME = localhost
REFRESH_TOKEN = Partner administrator’s refresh token copied from the Token Generator tool.
The
REFRESH_TOKENproperty is mandatory for a Webex for BroadWorks migration. - Modify the JDK/JRE environment path in the export.sh file if the secondary Cisco
BroadWorks Application Server JDK/JRE environment path is different than the
file:
JAVA_HOME=/usr/local/java/java_base
Instructions to run
Run the following command in the secondary Cisco BroadWorks Application Server from the extract tool directory:
./export.shTerminal logs
The following logs are available in the terminal on successful export: Running BroadSoft Data Export Tool:
 Running BroadSoft Data Export Tool
************************************************
Starting Export Tool v: 1.15.0
Export started for SP=collabmigrationtestSP_engg, Group=collabmigrationtestGRP_engg
Exporting users for SP=collabmigrationtestSP_engg, Group=collabmigrationtestGRP_engg
Export users completed for SP=collabmigrationtestSP_engg, Group=collabmigrationtestGRP_engg
Export completed for SP=collabmigrationtestSP_engg, Group=collabmigrationtestGRP_engg
Export completed
Export Dump Zip Directory : output/20221017223452_ExportTool
Export Dump Zip File name :extracted_data_1666060500618.zip
Zip file with the name extracted_data_1666060500618.zip has been created
ZIP file creation process completed
Exported files converted as ZIP file
**************************************************
Output
An output ZIP (extracted_data_<timestamp>.zip) file is available in the same extract tool directory. Use the following command to view and use the ZIP file for the Transform Tool input:
ls –ltr
drwxr-xr-x 2 bwadmin bwadmin   4096 Oct  4 11:53 lib/
-rwxr-xr-x 1 bwadmin bwadmin 956719 Oct  4 11:53 exportTool.jar
-rwxr-xr-x 1 bwadmin bwadmin   2635 Oct  4 11:53 export.sh
drwxr-xr-x 2 bwadmin bwadmin   4096 Oct  5 05:04 conf/
drwxrwxr-x 3 bwadmin bwadmin   4096 Oct 17 22:34 output/
drwxrwxr-x 2 bwadmin bwadmin   4096 Oct 17 22:34 logs/
-rw-rw-r-- 1 bwadmin bwadmin  46341 Oct 17 22:35 extracted_data_1666060500618.zip
Transform tool
This transform tool runs for all migrations. The transform tool runs on any computer, including a partner's administrator laptop, and uses the Webex Public APIs. It reads the extract tool output ZIP (extracted_data_<timestamp>.zip) file as an input and transforms the raw XML into a JSON format that is used by the provisioning tool.
Prerequisites
After downloading and extracting the migration tools binaries, configure the following prerequisites:
- Set the REFRESH_TOKEN (Token copied from the Token Generator Tool) and
NAME_OF_MAIN_LOCATION in the conf/partner.cfg
file:
REFRESH_TOKEN=MzUwYjljODEtYmQ4MS00NGVhLTgwNGUtZjQ1NTEyZTViNzJkOTdj NAME_OF_MAIN_LOCATION=Main - Optionally set the PROVISIONING_ID (copied from the template in Partner Hub) in
the conf/partner.cfg
file:
PROVISIONING_ID=YmE4MjFkZGYtYTlkNy00NDdlLWIwODctYmNkOTM2NjUyYWQ1To get more complete verification of the customer email address you can optionally set the PROVISIONING_ID. - Configure missing information in the input/customers.csv file (see next section) if missing.
- Add the end user email address in the input/users.csv file.
- If new phones are to be provisioned, add the mac address and email address of the user’s new phone to input/newphones.csv file. This is required only if the partner administrators want to provision new phones in Wholesale calling.
- Convert the BroadWorks Call Centers into the CxEssentials by using the input/cxessentials.csv file.
- Optionally, enable the UPGRADE_ALL_CALL_CENTERS_TO_CX_ESSENTIALS property to convert all Call Centers to CxEssentials.
- Use the input/locations.csv file to support the large enterprise migration that allows administrators to migrate their customer’s locations by location
- Optionally enable usage of MAC addresses from the User-Agent header of the SIP REGISTER message when the MAC address is not available in the Cisco BroadWorks device profile. Uncomment the line USE_MAC_ADDRESS_FROM_SIP_REGISTER=yes in file conf/partner.cfg
- Optionally enable the properties ANALOG_USER_TYPE_ENABLE_CALL_WAITING, ANALOG_USER_TYPE_ENABLE_MUSIC_ON_HOLD, and ANALOG_USER_TYPE_DISABLE_T38 to configure call waiting, music on hold, and disable T38 settings for all analog-type users.
-
If you want to set up generic gateway devices, add the device's MAC address and user ID to the input/genericgateways.csv file. Also, mention whether the user is the PRIMARY owner or a SHARED user (for shared call appearances). This is only needed if partner admins plan to use generic gateway devices in Wholesale Calling.
This feature is not available for BroadCloud to Wholesale migrations.
-
For BroadCloud migrations, to convert all users with the messaging station type to voice_mail_group, update the conf/rialto_station_type_to_wholesale_package.csv file by replacing the Wholesale Package value with voice_mail_group for the row where the Rialto Station Type is messaging.
Optionally, enable the COMMON_VOICE_MAIL_GROUP_PASSCODE property in partner.cfg to configure the default PIN for voice mail groups.
If this property is not specified in partner.cfg, it must be provided per customer in the customers.csv file under the commonVoicemailGroupPassCode column.
-
For migration of common contacts to Webex Calling
It is the enhancement for managing enterprise and site-level common contacts. These contacts can now be migrated either as organization contacts (Org Contacts) or as virtual extensions, based on the configuration settings. Below are the details to guide you through this migration process.
Key configuration:
- COMMON_PHONE_LIST_TO_VIRTUAL_EXTENSION_START_RANGE
A new property, COMMON_PHONE_LIST_TO_VIRTUAL_EXTENSION_START_RANGE, is introduced in the partner.cfg file. This property determines how common contacts are migrated from Rialto to Webex Calling.
- Without COMMON_PHONE_LIST_TO_VIRTUAL_EXTENSION_START_RANGE
Configured
Common contacts will be migrated as organization contacts (Org Contacts).
No additional configuration is required.
Contacts remain accessible at the organization level.
- With COMMON_PHONE_LIST_TO_VIRTUAL_EXTENSION_START_RANGE
configured
Common contacts will be migrated as Virtual Extensions.
Each contact will be appended with an extension number, and the start range of the extension is defined in the COMMON_PHONE_LIST_TO_VIRTUAL_EXTENSION_START_RANGE property in partner.cfg.
Virtual extensions are supported at both the organization level and location level, depending on the scope of the contact.
- COMMON_PHONE_LIST_TO_VIRTUAL_EXTENSION_START_RANGE
- Enable default call recording vendor to Webex.
This step is required only when migrating call recording settings for users configured with Dubber to Cisco Native Call Recording in Webex.
To enable this option:
- In the partner.cfg file, set the following property,
DEFAULT_CALL_RECORDING_VENDOR=Webex. - Additionally, use the property
WEBEX_CALL_RECORDING_STORAGE_REGIONto configure the storage region.The On Demand recording option from BroadCloud is not supported in Webex Calling. These call recording settings will not migrate and will appear in the exception report.
- In the partner.cfg file, set the following property,
-
Exclusion of selected phone numbers from migration:
To exclude specific phone numbers from the migration process, the following two-step procedure using the transform tool must be followed:
- Initially execute the transform tool for the first time. Upon completion, the tool will generate a file named telephone_numbers_inventory.csv, located within the output/timestamp/ directory. The customer is required to review this file and indicate "Yes" in the "Drop Tn's" column for each phone number that should be excluded from the upcoming migration.
- After updating the telephone_numbers_inventory.csv file with the
appropriate exclusion flags, the transform tool is executed a second
time. The updated file should be passed as an argument in the
following format.
./transform.sh -extract=input/extracted_data_1747640608219.zip -decommissionnumbers={filepath/telephone_numbers_inventory.csv}
- Optionally, set the ALLOW_RESTRICT_BY_PARTNER_MODE property to OFF to allow customer administrators to modify partner-defined settings in Control Hub.
- For migrating mobile numbers (BroadWorks Mobility) from BroadCloud to Webex
Calling
This section outlines the migration of the BroadWorks Mobility(customer mobile numbers) feature from BroadCloud (Mobile Network Integration) to Wholesale Webex Calling (Webex Go Mobile Network Operator).
Prerequisites- Before starting the migration process, partner administrators must reach out to Cisco Account team to do the Cloud Connected PSTN (CCP) vendor and Custom Carrier List (CCL) configururation.
A new property, ASSIGN_MOBILE_NUMBERS_TO_USERS, is added to the partner.cfg file. Enable this property to allow mobile numbers to be assigned and migrated to users.
- This feature is supported only for BroadCloud-to-Wholesale migrations.
- In Wholesale Webex, end users can have either a mobile number or a PSTN number (not both), unlike in BroadCloud.
- When a mobile number is assigned to a user, their primary PSTN number becomes their secondary (alternate) number.
- Mobile numbers cannot be migrated for users who are being converted to Workspaces or Virtual Lines.
- After a mobile number is assigned in Wholesale Webex, it will show as Active in Control Hub. This status does not mean the number is immediately ready to receive calls. Call capability will be available only after migration is fully completed.
- Mobile Phone Integration settings configured by end users in the Calling User Portal (CUP) are not migrated. After migration, when a phone number, mobile number, or extension is called, all of the user’s devices will ring.
Filling-up the input/customers.csv
The file input/customers.csv provides data that maybe missing in Cisco BroadWorks or BroadCloud. This file can be left empty if all mandatory information is already available. You don’t have to fill in all columns, only the missing information is mandatory.
The table below explains the most important columns in input/customers.csv.
|
Column name |
Rules |
|---|---|
|
Id |
In Cisco BroadWorks enterprise mode:
In BroadWorks service provider mode, this is the Cisco BroadWorks groupId. In BroadCloud, this is the Rialto customerId. |
|
externalId |
This is an identifier that matches the partner’s internal identifier for this customer. This column must be unique within a Webex partner org. This column is optional, a unique identifier will be generated automatically by the transform tool. This column is not used for groups within an enterprise. |
|
customerName |
For the enterprise, this column is used as the Webex customer name field. For a group within an enterprise, this column is used as the location name. Location names must be unique within an enterprise. |
|
primaryEmail |
This is used as the email address of the Webex customer admin. This column is optional for groups within an enterprise. |
|
Address columns |
For an enterprise, the address is used as the billing address and the first location address. For a group within an enterprise, the address is used as the location address. |
|
timezone |
Refer to the time zone section of this article. |
|
language | See Languages Webex supports. |
|
defaultvoicemailpin |
See Set a voicemail PIN. |
|
commonVoicemailGroupPassCode | Use this column to specify the default PIN that will be applied
to all voice mail groups for the respective customer. After migration, administrators must update the PIN for each voice mail group. During the transform process, the common PIN specified by the administrator is assigned to all voice mail groups. |
Filling-up the input/users.csv
The file input/users.csv provides data that maybe missing in Cisco BroadWorks or BroadCloud. This file can be left empty if all mandatory information is already available. You don’t have to fill in all columns, only the missing information is mandatory.
All these fields are optional.
|
Column name |
Rules |
|---|---|
|
userid |
A unique identifier for the user. This can be a BroadWorks or BroadCloud user ID. |
|
| (Optional) The user’s email address. If provided, it will be used for provisioning purposes. |
|
phonenumber |
(Optional) The user’s phone number to be provisioned. |
|
package |
(Optional) User package type. Allowed values: voice, calling, suite, common_area, virtual_line, dont_migrate, call_park_ext or voice_mail_group. The dont_migrate value is used when partners want to exclude certain users—along with their devices and phone numbers—from both provisioning and migration. This is supported for both BroadWorks and BroadCloud. When applied, the selected users and their associated resources will not be migrated or provisioned. To use this, administrators should enter dont_migrate in the package column of the users.csv file. |
|
extension |
(Optional) The phone extension to be assigned to the user. |
|
name |
(Optional) The full name of the user. |
|
ata_settings |
(Optional) Allowed values: t38, analog To enable/disable call waiting, music on hold, and T38 settings T38: This option disables call waiting and music on hold, and enables T38 settings for ATA devices. Analog:
|
|
do_not_move_phone |
BroadWorks only. Optional flag to prevent device migration to Webex Calling. This option allows partners to provision users along with their calling settings, devices, and phone numbers without migrating the devices to Webex or activating phone numbers in Webex Calling. This setting is only available for BroadWorks, not BroadCloud. To use it, administrators should specify do_not_move_phone in the do_not_move_phone (BroadWorks only) column of the users.csv file. This ensures users are provisioned without activating numbers or moving their phones, so they continue operating via BroadCloud. |
Instructions to run
Run the Transform Tool in any operating system. Use the below steps to run the tool in Windows and macOS:
Windows
Execute the command below to run the Transform Tool in Windows:
transform.bat -extract=<Extract-Tool-Output-Zip-file> -customers=<Input-Path-Customers-CSV> -users=<Input-Path-Users-CSV> -newphones=<Input-Path-NewPhones-CSV>macOS
Execute the following steps to run the transform tool on macOS:
- Create a virtual environment and install dependencies to run the transform tool using
Python:
python3 -m venv venv source venv/bin/activate python3 -m pip install requests python3 -m pip install requests-oauthlib python3 -m pip install phonenumbers - Run the transform
tool:
./transform.sh -extract=<Extract-Tool-Output-Zip-file> -customers=<Input-Path-Customers-CSV> -users=<Input-Path-Users-CSV> -newphones=<Input-Path-NewPhones-CSV>
Customer/user precheck
The Transform Tool makes API calls to Webex to catch potential provisioning issues. By default, it will validate the customer’s address and primary email. If the PROVISIONING_ID value is specified in the conf/partner.cfg file, it will also validate location information. The precheck results are included in the exception report.
Additionally, the following optional parameters can be added when running the transform tool:
precheck
In addition to running the precheck API for the customer information, the Transform Tool will also run the precheck API for the subscriber emails.
precheckinfo
By default, only precheck errors (i.e., issues that will block provisioning) are included in the exception report. Adding this flag will include successful precheck results as well (e.g., if a Webex organization already exists that can be automatically attached).
precheckinfo takes extra time to run.
Terminal logs
The following logs in the terminal on successful transform:
Summary Report
BroadWorks enterprises that can be successfully migrated: 1
BroadWorks enterprises that cannot be migrated: 0
BroadWorks users that can be successfully migrated: 4
BroadWorks users that cannot be migrated: 0
Phones that can be successfully migrated: 3
Phones that are not compatible with Webex Calling: 0
Exception report
Transform Tool generates the exception report inside the output/<timestamp>/exception_report.txt directory. You can use this report to identify the issues that will affect the migration and fix them in the Cisco BroadWorks system.
After modifying the user data to resolve the exception, rerun the Extract and Transform Tools with the new data. The sample exception report file as follows:
Exception Report
Tue Oct 18 08:12:09 2022

Enterprises with Communication Barring Feature
Recommendation: manually configure the Outgoing Calling Plan in Control Hub
________________________________________________________________________________
collabmigrationtestGRP_engg
Output
An output JSON (customer.json) file will be available in the output/<timestamp>/<groupid> directory. The sample customer.json file is as follows:
{
    "customer": {
        "provisioningId": "!!!!!!!!!!REPLACE_WITH_PROVISIONINGID!!!!!!!!!!",
        "packages": [
            "webex_calling",
            "common_area_calling"
        ],
        "externalId": "external_id_engg_grp1",
        "address": {
            "addressLine1": "100 Main Street",
            "addressLine2": "",
            "city": "Gaithersburg",
            "stateOrProvince": "MD",
            "zipOrPostalCode": "20877",
            "country": "US"
        },
        "customerInfo": {
            "name": "Engineering Group - 1",
            "primaryEmail": "amareswaranvel+engineeringgroup1@gmail.com"
        },
        "provisioningParameters": {
            "calling": {
                "location": {
                    "name": "Main",
                    "address": {
                        "addressLine1": "100 Main Street",
                        "addressLine2": "",
                        "city": "Gaithersburg",
                        "stateOrProvince": "MD",
                        "zipOrPostalCode": "20877",
                        "country": "US"
                    },
                    "timezone": "America/New_York",
                    "language": "en_us",
                    "numbers": [
                        "+15205551101",
                        "+15205551102",
                        "+15205551103",
                        "+15205551104",
                        "+15205551105",
                        "+15205551106",
                        "+15205551107",
                        "+15205551108",
                        "+15205551109",
                        "+15205551110"
                    ],
                    "mainNumber": "+15205551101"
                }
            }
        }
    },
    "broadworks_info": {
        "service_provider_id": "collabmigrationtestSP_engg",
        "group_id": "collabmigrationtestGRP_engg"
    },
    "subscribers": [
        {
            "amareswaranvel+benjaminjack@gmail.com": {
                "subscriber": {
                    "customerId": "!!!!!!!!!!REPLACE_WITH_CUSTOMERID!!!!!!!!!!",
                    "email": "amareswaranvel+benjaminjack@gmail.com",
                    "package": "webex_calling",
                    "provisioningParameters": {
                        "firstName": "Benjamin",
                        "lastName": "Jack",
                        "primaryPhoneNumber": "+15205551102",
                        "extension": "1102"
                    }
                },
                "features": [
                    {
                        "/v1/people/{personId}/features/voicemail": {
                            "enabled": true,
                            "sendBusyCalls": {
                                "enabled": true,
                                "greeting": "DEFAULT"
                            },
                            "sendUnansweredCalls": {
                                "enabled": true,
                                "greeting": "DEFAULT",
                                "numberOfRings": 3
                            },
                            "messageStorage": {
                                "mwiEnabled": true,
                                "storageType": "EXTERNAL",
                                "externalEmail": "engineering17861@mailnator.com"
                            }
                        }
                    }
                ],
                "devices": [
                    {
                        "cisUuid": "!!!!!!!!!!REPLACE_WITH_PERSONID!!!!!!!!!!",
                        "product": "DMS Cisco 7861",
                        "mac": "CC98914EAAD7"
                    }
                ]
            }
        },
        {
            "amareswaranvel+lucasoliver@gmail.com": {
                "subscriber": {
                    "customerId": "!!!!!!!!!!REPLACE_WITH_CUSTOMERID!!!!!!!!!!",
                    "email": "amareswaranvel+lucasoliver@gmail.com",
                    "package": "webex_calling",
                    "provisioningParameters": {
                        "firstName": "Lucas",
                        "lastName": "Oliver",
                        "primaryPhoneNumber": "+15205551103",
                        "extension": "1103"
                    }
                },
                "features": [
                    {
                        "/v1/people/{personId}/features/voicemail": {
                            "enabled": true,
                            "sendBusyCalls": {
                                "enabled": true,
                                "greeting": "DEFAULT"
                            },
                            "sendUnansweredCalls": {
                                "enabled": true,
                                "greeting": "DEFAULT",
                                "numberOfRings": 3
                            },
                            "messageStorage": {
                                "mwiEnabled": true,
                                "storageType": "EXTERNAL",
                                "externalEmail": "engineering16821@mailnator.com"
                            }
                        }
                    }
                ],
                "devices": [
                    {
                        "cisUuid": "!!!!!!!!!!REPLACE_WITH_PERSONID!!!!!!!!!!",
                        "product": "DMS Cisco 6821",
                        "mac": "5486BCAE7E45"
                    }
                ]
            }
        },
        {
            "amareswaranvel+leojackson@gmail.com": {
                "subscriber": {
                    "customerId": "!!!!!!!!!!REPLACE_WITH_CUSTOMERID!!!!!!!!!!",
                    "email": "amareswaranvel+leojackson@gmail.com",
                    "package": "webex_calling",
                    "provisioningParameters": {
                        "firstName": "Leo",
                        "lastName": "Jackson",
                        "primaryPhoneNumber": "+15205551104",
                        "extension": "1104"
                    }
                },
                "features": [
                    {
                        "/v1/people/{personId}/features/voicemail": {
                            "enabled": true,
                            "sendBusyCalls": {
                                "enabled": true,
                                "greeting": "DEFAULT"
                            },
                            "sendUnansweredCalls": {
                                "enabled": true,
                                "greeting": "DEFAULT",
                                "numberOfRings": 3
                            },
                            "messageStorage": {
                                "mwiEnabled": true,
                                "storageType": "EXTERNAL",
                                "externalEmail": "engineeringmacpc@mailnator.com"
                            }
                        }
                    }
                ],
                "devices": []
            }
        },
        {
            "amareswaranvel+owenalex@gmail.com": {
                "subscriber": {
                    "customerId": "!!!!!!!!!!REPLACE_WITH_CUSTOMERID!!!!!!!!!!",
                    "email": "amareswaranvel+owenalex@gmail.com",
                    "package": "webex_calling",
                    "provisioningParameters": {
                        "firstName": "Owen",
                        "lastName": "Alexander",
                        "primaryPhoneNumber": "+15205551101",
                        "extension": "1101"
                    }
                },
                "features": [
                    {
                        "/v1/people/{personId}/features/voicemail": {
                            "enabled": true,
                            "sendBusyCalls": {
                                "enabled": true,
                                "greeting": "DEFAULT"
                            },
                            "sendUnansweredCalls": {
                                "enabled": true,
                                "greeting": "DEFAULT",
                                "numberOfRings": 3
                            },
                            "messageStorage": {
                                "mwiEnabled": true,
                                "storageType": "EXTERNAL",
                                "externalEmail": "engineering8811@mailnator.com"
                            }
                        }
                    }
                ],
                "devices": [
                    {
                        "cisUuid": "!!!!!!!!!!REPLACE_WITH_PERSONID!!!!!!!!!!",
                        "product": "DMS Cisco 8811",
                        "mac": "F87B204E4066"
                    }
                ]
            }
        }
    ],
    "auto_attendants": [],
    "call_queues": [],
    "hunt_groups": [],
    "schedules": [],
    "call_parks": [],
    "call_pickups": [],
    "paging_groups": [],
    "voice_portals": [
        {
            "name": "Automated Voice Portal",
            "firstName": "Automated",
            "lastName": "Voice Portal",
            "languageCode": "en_us",
            "phoneNumber": "+15205551105",
            "extension": "1105"
        }
    ],
    "shared_call_appearances": [],
    "business_communicator_desktop_to_upgrade_to_webex_app": [
        "PC Comm - Engg Device Profile"
    ],
    "connect_client_to_upgrade_to_webex_app": [],
    "locations": [],
"webex_for_broadworks_info": {
        "users": [
            {
                "id": "Y2lzY29zcGFyazovL3VzL1NVQlNDUklCRVIvY2QzNGViNWYtYTVmMi00OWQ1LTlkNWMtZTg1MDJiMDE4YTQ5"
            }
        ],
        "hydra_orgId": "Y2lzY29zcGFyazovL3VzL09SR0FOSVpBVElPTi9jMjJiYTMwNC1mODQ4LTRlOTktYWFmYy0zYWRlMjBmYTgzZTg",
        "hydra_customer_config_id": "Y2lzY29zcGFyazovL3VzL0VOVEVSUFJJU0UvYmIyMzA1MDEtMTUzMS00MzNiLTllM2QtODExY2FlYTExYmVk"
    }
}
The `webex_for_broadworks_info` JSON property is present for Webex for BroadWorks migrations only. The `broadcloud_info` JSON property is present for BroadCloud migrations only.
Provisioning tool
The provisioning tool can run on any machine usually the (partner's administrator laptop) and uses the Webex Public APIs. It reads the transform tool output JSON (customer.json) file as an input and provisioning the customers, locations, numbers, users, services, and devices in the Webex Wholesale RTM solution.
Prerequisites
Configure the following prerequisites inside the provisioning tool directory:
- Install Java 8, 11, 17, or 21 on the computer. Java is available from many sources, including:
- After downloading and extracting the Migration tools binaries, set the JAVA_HOME environment variable in the provisioning_tool.sh for MAC and provisioning_tool.bat for Windows.
- The partner.cfg file:
- Set the WHOLESALE_PROVISIONING_ID and REFRESH_TOKEN (Token copied from the Token
Generator Tool). The partner administrators must contact their account team to get the
PROVISIONING_ID:
WHOLESALE_PROVISIONING_ID = Y2U4YWQxYmQtMWZlNy00NjRiLWExMmItMGJkODMzN2U5NmU0 REFRESH_TOKEN=MzUwYjljODEtYmQ4MS00NGVhLTgwNGUtZjQ1NTEyZTViNzJkOTdj -
Set SEND_SUBSCRIBERS_WELCOME_EMAIL to false, if partners don’t want to send a welcome email to the users. The default value is true.
Webex sends welcome emails only to end users. Customer administrators don’t receive welcome emails.
Users and customer admins based in the U.S. and Canada locations receive a separate email notification from RedSky. The RedSky E911 platform sends this email to confirm the creation of the customer account for emergency services. This RedSky email is separate from Webex welcome emails and isn’t controlled by Webex email settings. For Wholesale organizations in the U.S. and Canada, RedSky is automatically enabled as the emergency services provider.
- Set the WHOLESALE_PROVISIONING_ID and REFRESH_TOKEN (Token copied from the Token
Generator Tool). The partner administrators must contact their account team to get the
PROVISIONING_ID:
- Use the WEBEX4BWKS_EMAIL_SUBJECT property for Webex for BroadWorks migrations to send the change password request email subject for Webex for BroadWorks subscribers.
- Use the WEBEX4BWKS_EMAIL_BODY property for Webex for BroadWorks migrations to send the change password request email body for Webex for BroadWorks subscribers.
- Use the
CUSTOM_TAGSproperty to add tags after customer creation. - To apply wholesale discounts, partner administrators must contact Cisco account
team before you start the migration.
A new property, APPLY_WHOLESALE_DISCOUNTS is added to partner.cfg. Enable this property to apply discounts to users and workspaces.
Instructions to run
Use the following steps to run the tool in Windows and macOS:
Windows
Execute the following steps to run the tool on Windows OS:
To provision single customer:
provision.bat -input=<Transform-Tool-Output-Customer-JSON-File-Path>
To provision multiple customers:
provision.bat -input=<Transform-Tool-Timestamp-Output-Directory-Path>
macOS
Execute the following steps to run the tool on macOS:
To provision single customer:
./transform.sh -input=<Transform-Tool-Output-Customer-JSON-File-Path>
To provision multiple customers:
./transform.sh -input=<Transform-Tool-Timestamp-Output-Directory-Path>
Prerequisites for Webex for BroadWorks Migration
Partner Administrators must update their BroadWorks onboarding template for Webex for BroadWorks coexistence features. Refer to the following image:

Once the Webex for BroadWorks Onboarding template is updated to support migration, request the Cisco Account Team to enable the "wholesale-partner-blending-enabled" feature toggle at the partner level. This will allow Wholesale packages to be added to existing Webex for BroadWorks customer organizations during provisioning.
Run the provisioning tool with an additional argument.
Preparation phase: is the default phase where Administrators can provision the BroadWorks users as a Wholesale subscriber and continue with the Webex for BroadWorks users.
Maintenance phase: is the second phase where Administrators can assign the Wholesale license to the existing Webex for BroadWorks users. You must run the provisioning tool with an argument maintenance.
Post Migration phase: Is the final phase when Administrators can convert the BroadWorks to Wholesale completely. You must run the provisioning tool with an argument postmigration.
Terminal logs
Following are the logs in the terminal on successful provisioning:
Tool Name: Provisioning
Version: 1.51.0
Customer(s) provisioning started...
Sending create customer provisioning request for the External ID: customer.id.1
Customer provisioning request sent for the customer with the External ID: customer.id.1
Checking customer status for the External ID: customer.id.1 and the status is: provisioning
Checking customer status for the External ID: customer.id.1 and the status is: provisioning
Checking customer status for the External ID: customer.id.1 and the status is: provisioned
Provisioning customer's calling settings with External ID: customer.id.1
Customer's settings are updated successfully for the External ID: customer.id.1
Provisioning secondary locations for the customer with the External ID: customer.id.1
Provisioning location's settings and features for the customer with the External ID: customer.id.1
Subscriber(s) provisioning will be started for the customer with the External ID: customer.id.1
Provisioning subscriber(s) and settings for the customer with External ID: customer.id.1
Subscriber(s) and settings provisioning completed for the customer with External ID: customer.id.1
Provisioning user agent settings for the customer with the External ID: customer.id.1

********** Completed File : input/customer.json ****************
A table will be printed with the number of locations created for each run:

Output
Provisioning tool generates success and error reports inside the output/<external_id>/*.success/error files. Review output success and error logs to verify successful provisioning.
The system will
generate a Provisioning_Report_*.csv file in the
output/consolidated_reports/ directory. This file contains both success
and failure details for each entity and its settings, providing a comprehensive provisioning
report.
After successful provisioning, end users receive an email from the Wholesale RTM solution.
Partner administrators can verify the customer provisioning in the Partner Hub and Control Hub portal. Refer to the following illustrations from the Partner Hub and Control Hub portal:

Figure 8: Partner Hub

Figure 9: Control Hub

Figure 10: Devices
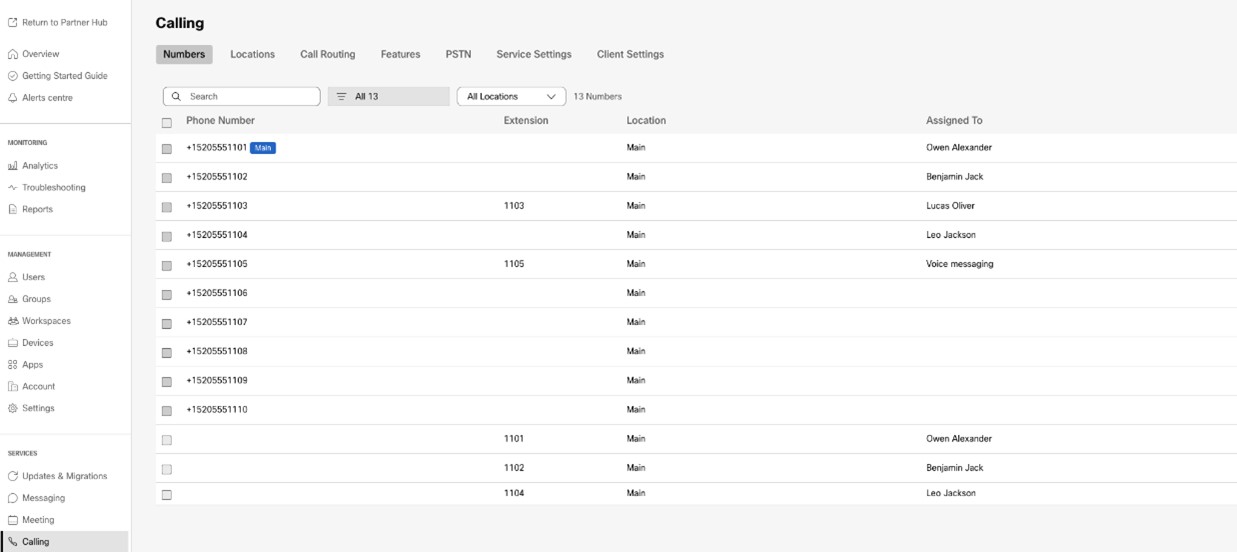
Figure 11: Calling
Post-Provisioning Restrictions
Once provisioning is complete for a BroadCloud migration, the following actions will be blocked:
- CAP Portal – Adding users or ported devices.
- SP Portal – Creating ADD orders with devices or numbers.
- RSB API – Creating ADD orders with devices or numbers and creating users. RSB ADD orders made with devices or numbers will be rejected.
Device move tool
For BroadCloud
For BroadCloud partners, use the Service Provider portal to submit a migration request for numbers, devices, and Shared Call Appearances (SCA) migrations.
Within the Service Provider portal, a migration request can include up to 50 customers. A maximum of 10 requests can be submitted within a day.
Administrators can enable automated rollback by setting
ROLLBACK_TO_BROADCLOUD=true in the conf/partner.cfg
file, which moves devices back to BroadCloud after migration. It supports both same- and
different-region migrations with NS Sync, but only for successful migrations. For failed
ones, administrators must raise a Cisco TAC before requesting
rollback.
There are two options available for selecting the migration type in the portal:
- Migration – Select this option to initiate a request for migrating numbers, devices, and Shared Call Appearances (SCA).
- Device Status – Select this option to view the current status of a device on BroadCloud and Calling.
The following figures show the Service Provider portal.
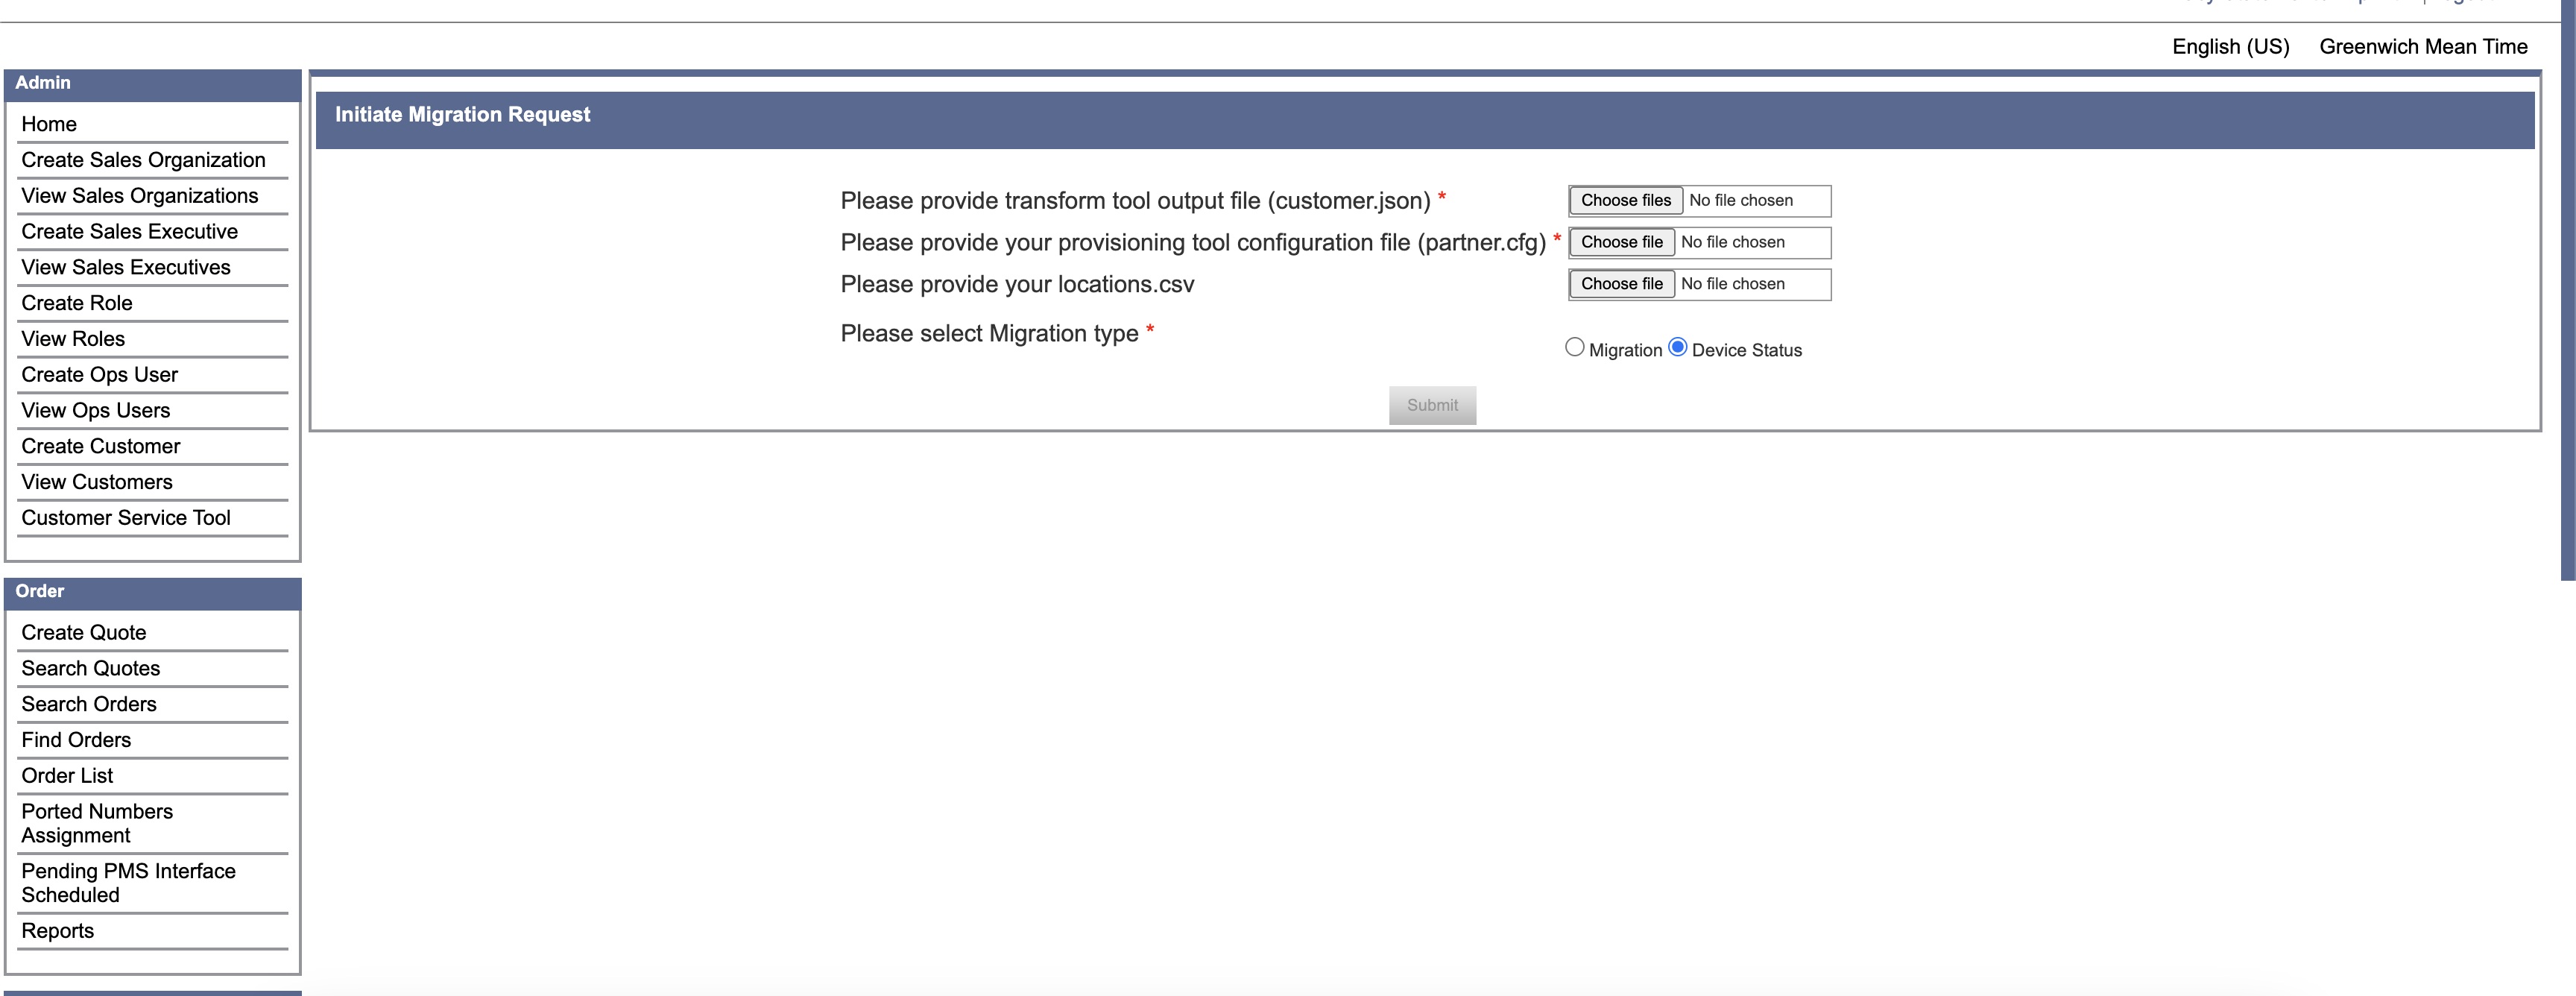
Figure 12: Service Provider portal
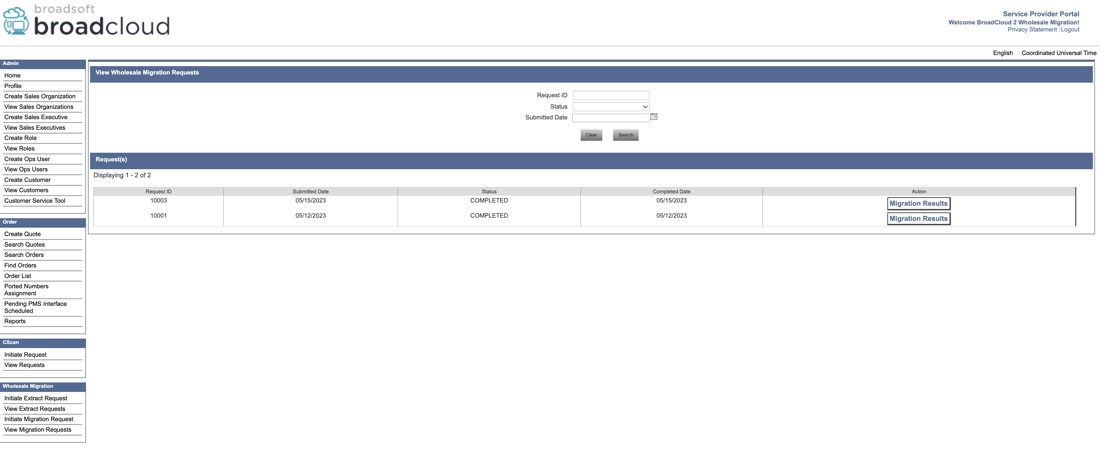
Figure 13: Service Provider portal
Migrate selected locations (optional)
To start the migration for a specific subset of
locations listed in the customer.json file, include a
locations.csv file with your request. This CSV should list only the
locations you intend to migrate.
When locations.csv is not provided, all locations in the customer.json will be migrated.
| Term | Definition |
|---|---|
|
Site ID |
The Site Id of the location to be migrated. |
|
Site Name |
The name of the location to be migrated. |
To download the list of available active sites navigate to View Customers → Select a Customer → Export Locations as CSV.
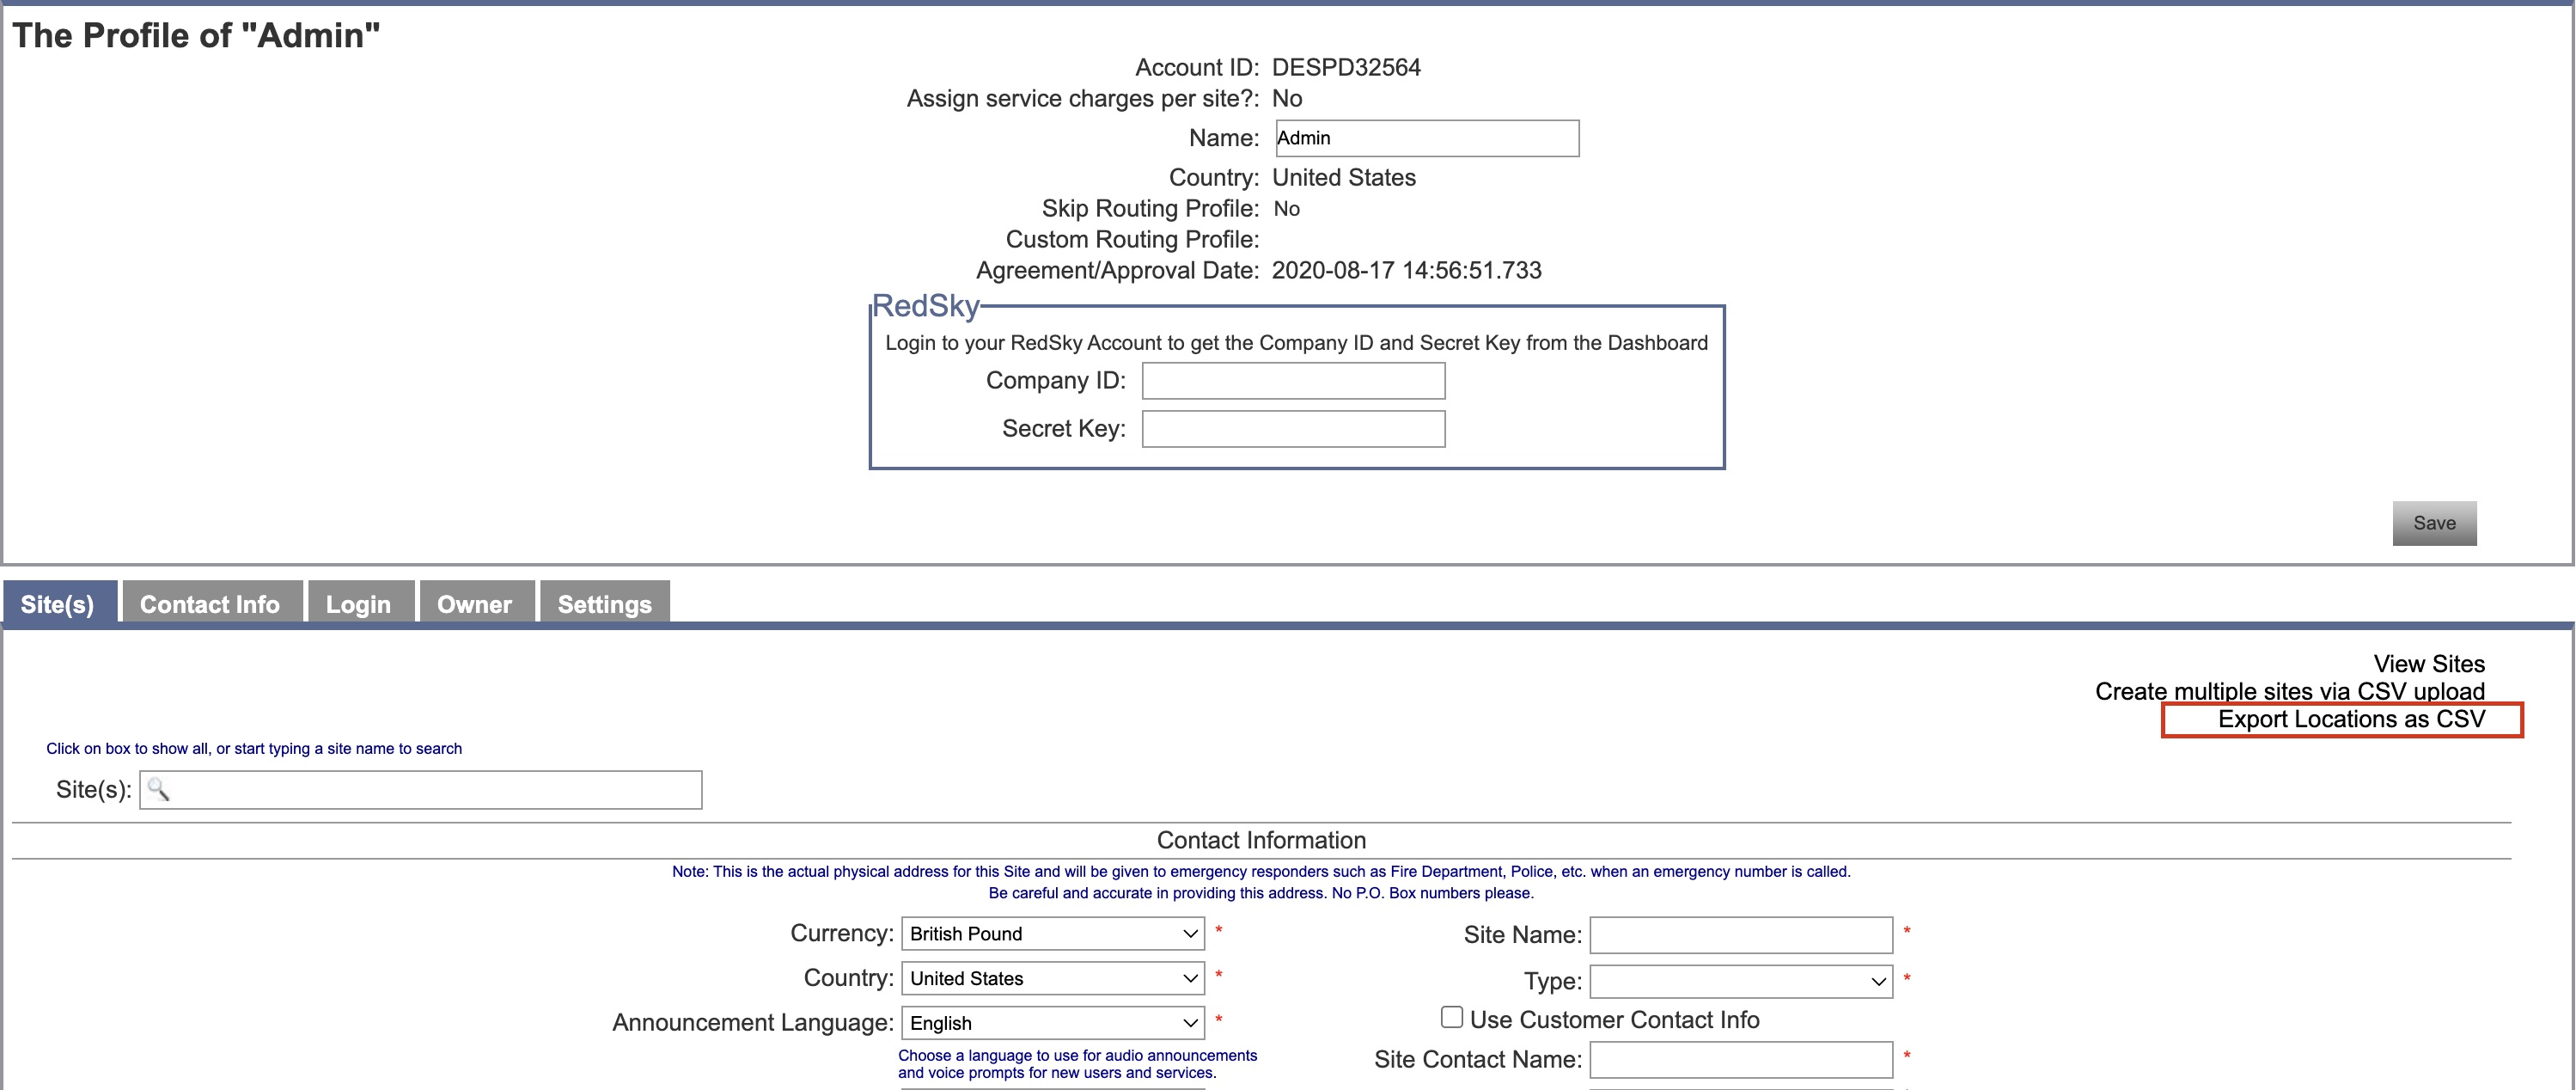
Figure 14: Export Locations as CSV
Enable the disconnect numbers option
When you use the same SIP trunk for Webex Calling and BroadCloud Carrier, administrators should use Disconnect Numbers option. This removes phone numbers from receiving incoming calls after migration in BroadCloud.
This option is required only when migrating to a different Webex Calling region. It does not apply if you remain within the same region.
- This action is irreversible
-
Enable this option only after confirming:
- Migration completes
- All devices successfully register in Webex Calling
- Numbers are active
To enable this option,
- In the partner.cfg file, set DISCONNECT_NUMBERS_FROM_RIALTO = yes.
- Re-run the migration tool using the same customer.json file and the updated partner.cfg.
If numbers fail to disconnect, raise a Cisco TAC request.
For Cisco BroadWorks and Webex for BroadWorks
For Cisco BroadWorks and Webex for BroadWorks migrations, the tool runs on the secondary Cisco BroadWorks Application Server within the partner network and connects to the AS through OCI-P. It uses the Transform Tool output JSON (customer.json) file as input and run the OCI-P commands to migrate devices and soft clients.
On successful operation, the device move tool will:
- Deregister devices from the Cisco BroadWorks and register them in Wholesale.
- Users using the UC-One client will redirect to the Webex App on first-time sign-in.
- Deactivate the Phone Numbers from Cisco BroadWorks or remove the phone numbers from BroadCloud.
- Activate numbers in Wholesale.
- Create Shared Call Appearances in Wholesale for BroadCloud migrations. [This step is applicable only for BroadCloud migrations].
SCP and SSH
- SCP the device move tool to the secondary Cisco BroadWorks Application Server.
- SSH to the secondary Cisco BroadWorks Application Server to configure the prerequisites and run the device move tool.
Prerequisites
- Set the REFRESH_TOKEN (Token copied from the Token Generator Tool) in the conf/partner.cfg file:
REFRESH_TOKEN=MzUwYjljODEtYmQ4MS00NGVhLTgwNGUtZjQ1NTEyZTViNzJkOTdj - Ensure the secondary Cisco BroadWorks Application Server User ID, Password, and Host Name are correct in the conf/deviceMoveTool.conf file:
BROADWORKS_USER_ID = admin BROADWORKS_PASSWORD = admin BROADWORKS_HOST_NAME = localhost - To resend activation emails, you need to set SEND_SUBSCRIBERS_WELCOME_EMAIL=true in the
conf/partner.cfg file.
If administrators wish to send invitation emails to their users during migration, they should uncomment the "SEND_SUBSCRIBERS_WELCOME_EMAIL=true" property in the conf/partner.cfg file. Otherwise, the property should remain unchanged.
- Verify the JDK/JRE environment path is correct in devicemove.sh
JAVA_HOME=/usr/local/java/java_base - Administrators can use the locations.csv file from the input directory to migrate the specific groups instead of all groups under an enterprise.
Polycom phones
To move Polycom phones from Cisco BroadWorks to Wholesale Calling, a partner administrator must create a new Identity/Device Profile Type File at the System level in Cisco BroadWorks each Polycom device template. Refer to figure 14 and upload the custom file device-move-tool/conf/deviceProfile/{region}/polycom_vvx.cfg. After uploading the new device file, ensure the newly created file exists at the Group level. Also ensure that file migration_%BWMAC ADDRESS%.cfg doesn’t conflict with any existing file in your system).
It’s used internally by the device move tool.
The migration process for Polycom phones:
- The device move tool replaces the file %BWMACADDRESS%.cfg at the device level with polycom_vvx2.cfg. This file refers to migration_%BWMACADDRESS%.cfg.
- Rebuild the device profiles at the group level or device level.Acting at the group level or device level depends on the configuration of parameter deviceLevelRebuild in the file device-move-tool/conf/partner.cfg.
- The device move tool asks the Cisco BroadWorks Application Server to reboot phones at the group level or device level.
- After the reboot request, Polycom phones download and process% BWMACADDRESS%.cfg, which asks the Polycom phones to download and process migration_%BWMACADDRESS%.cfg, which sets the device.prov.serverName to https://plcm.sipflash.com.https://plcm.sipflash.com for the US region, other regions have different URLs.
- The Polycom phone downloads %BWMACADDRESS%.cfg from https://plcm.sipflash.com and will be managed by the Webex Calling DMS.
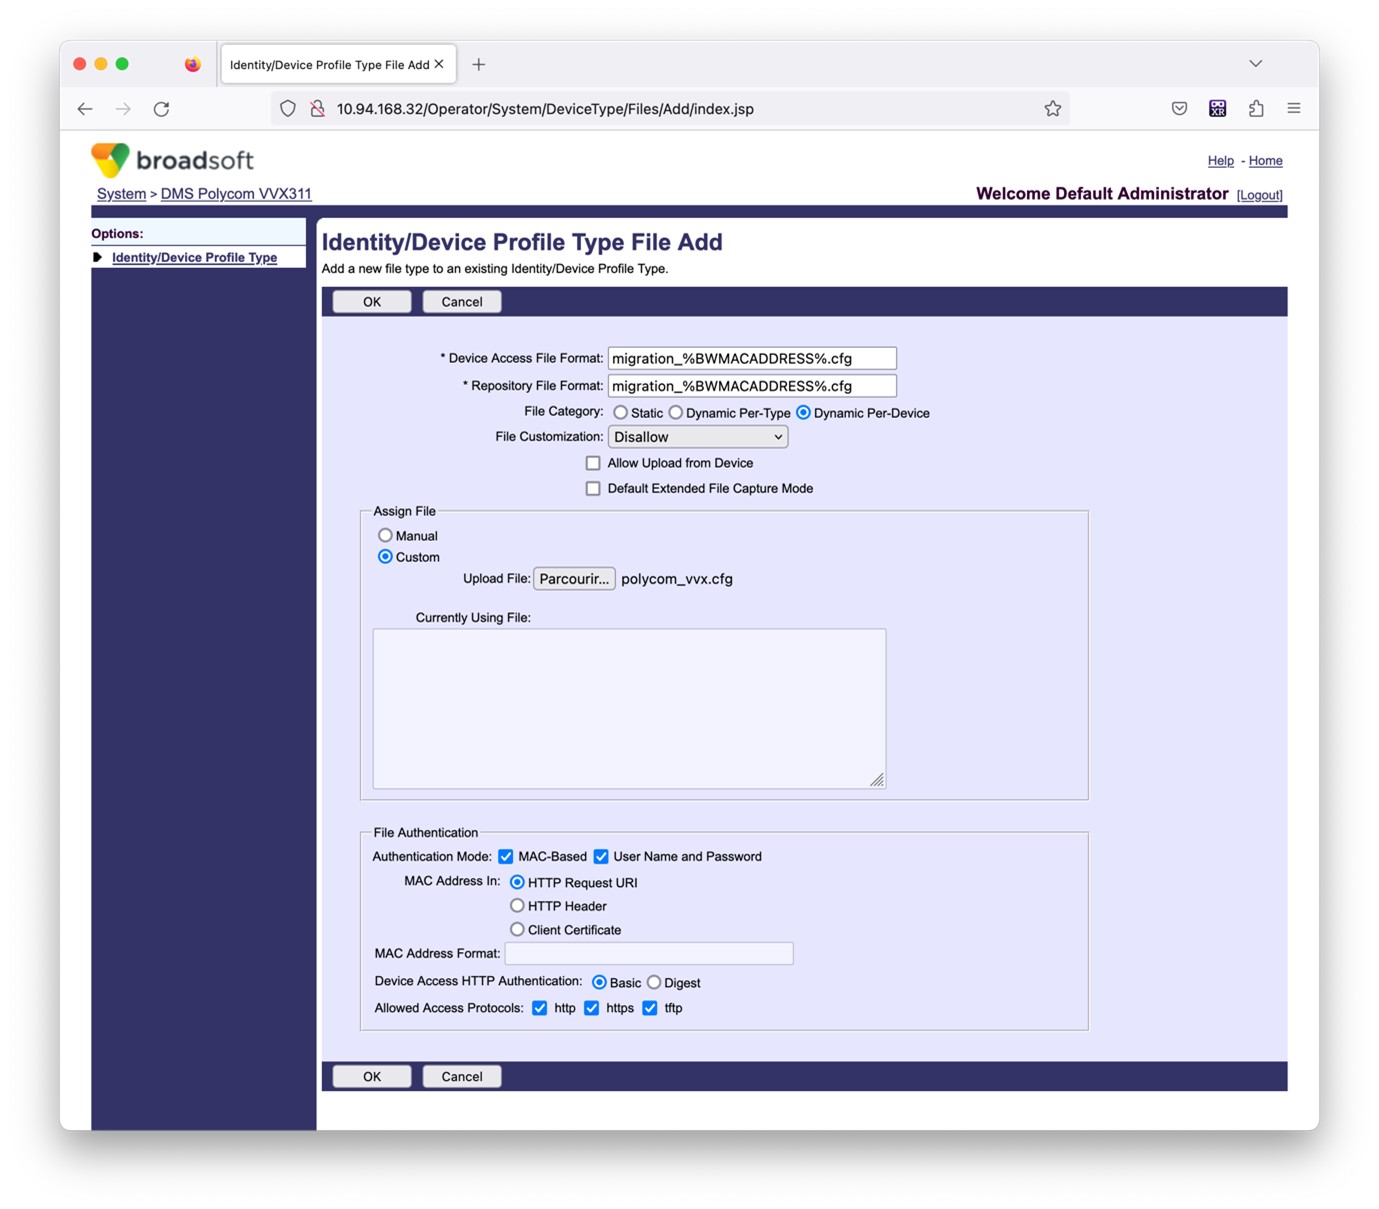
Figure 14: Identity/device profile type file add
Instructions to run
There are two methods to invoke the DMT, first one is to invoke through a single customer at a time and the other is to run through multiple customers simultaneously.
The device move tool is run from the secondary Cisco BroadWorks Application Server inside the device move tool directory:
For device move single customer:
./devicemove.sh -input=<Transform-Tool-Output-Customer-JSON-File-Path>
 ./devicemove.sh -input=/tmp/customername.json
 For device move multiple customers:
./devicemove.sh -input=<Transform-Tool-Timestamp-Output-Directory-Path>
 ls -l /tmp/directoryofcustomers/
customer1.json
customer2.json
customer3.json
Additionally, the device move tool supports migrate single/specific phone(s) from 1.35.0 release.
Use the command below:
./devicemove.sh -integration -input= <Transform-Tool-Output-Customer-JSON-File-Path> -macaddress=4CBC4883A6F8,48256741CBE9
Terminal logs
Following are the logs in the terminal on successful running the device move tool for device migration:
Tool Name: Device Move Tool
Version: 1.15.0
Device Tool Started...
Valid Devices for migration :
-------------------------------------------------------------------------------------------------------------------
|    Device Type |          Mac |                                 Version |                                 Email |
-------------------------------------------------------------------------------------------------------------------
| DMS Cisco 7861 | CC98914EAAD7 | Cisco-CP-7861-3PCC/11.3.7_cc98914eaad7_ | amareswaranvel+benjaminjack@gmail.com |
| DMS Cisco 6821 | 5486BCAE7E45 | Cisco-CP-6821-3PCC/11.3.7_5486bcae7e45_ |  amareswaranvel+lucasoliver@gmail.com |
| DMS Cisco 8811 | F87B204E4066 | Cisco-CP-8811-3PCC/11.3.7_f87b204e4066_ |     amareswaranvel+owenalex@gmail.com |
-------------------------------------------------------------------------------------------------------------------
Do you want to migrate all these devices? ([Y]es or [N]o)
yes
Uploading Device Profiles for DMS Cisco MPP LC
Rebuild Device Process Started
Rebuild Device Process Completed Successfully
Reboot Process Started
Reboot Process Completed Successfully
Modifying profiles for Business Communicator under group collabmigrationtestGRP_engg
Activate webex phone numbers process started for customer org Id : 85ea1d6f-ff9e-41a1-843f-7362aaf12b4c
Activate webex phone numbers process completed for customer org id : 85ea1d6f-ff9e-41a1-843f-7362aaf12b4c
Deactivate broadworks phone numbers process started for groupId : collabmigrationtestGRP_engg
Deactivate broadworks phone numbers process completed for groupId : collabmigrationtestGRP_engg
Device Migration Completed
Output
After the device migration, devices have come online and ready to make/receive calls. Refer to figure 15 to see an example of the device status:
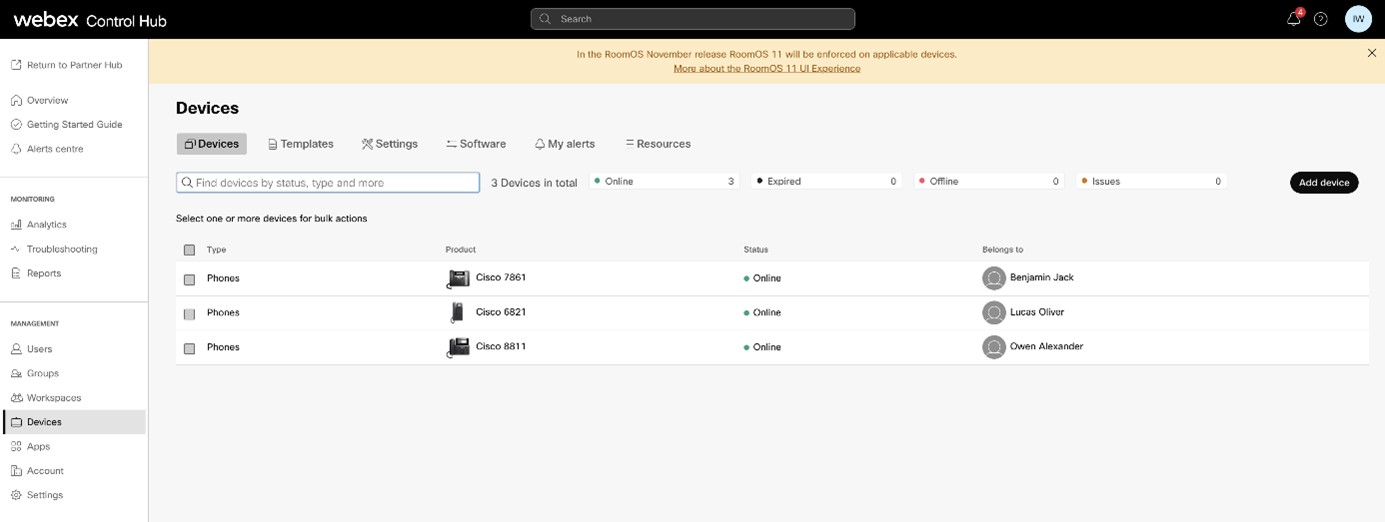
Figure 15: Device status
After the device migration, numbers have come active. Refer to figure 16 to see an example of what numbers are active:
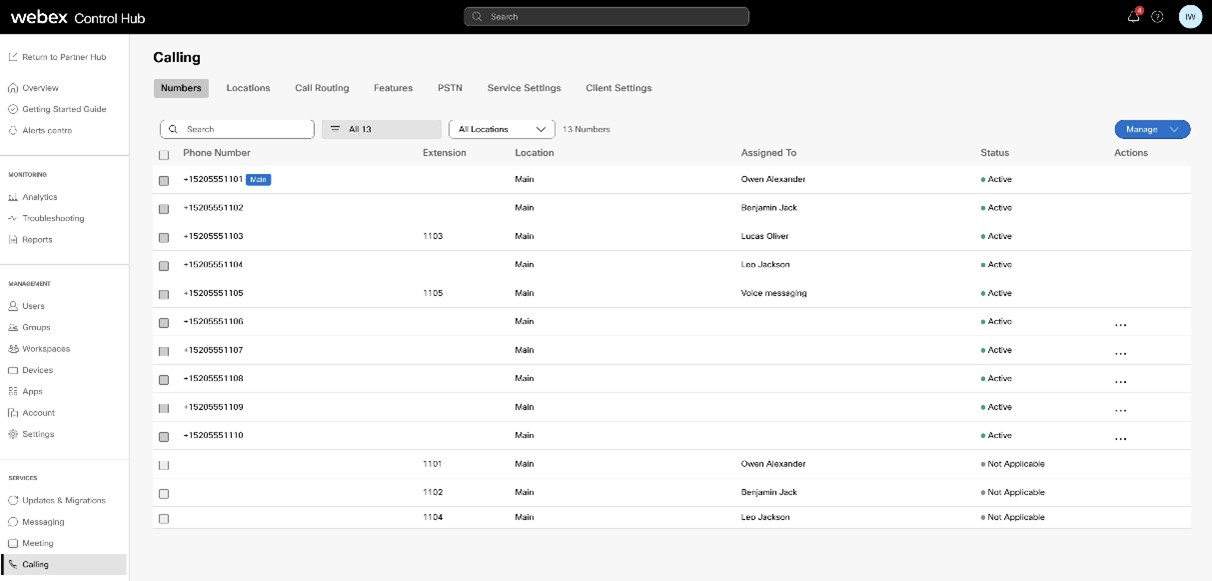
Figure 16: Numbers active
Dubber migration
You can now move call recordings from BroadCloud to Webex Calling. This keeps your existing Dubber accounts and all your old recordings accessible without losing current access to the Dubber platform during migration. For more information on dubber migration, see Migrate Dubber from BroadCloud to Webex Calling.
Revert migration
The revert operation must be executed for one enterprise at a time.
For BroadCloud Carrier
Administrators can set ROLLBACK_TO_BROADCLOUD=true in
conf/partner.cfg to enable automated rollback. This returns devices to
BroadCloud after successful migration in same or cross-region with NS Sync. For failed
migrations, contact Cisco TAC before requesting rollback.
For Cisco BroadWorks and Webex for BroadWorks
The revert process for Cisco BroadWorks and Webex for BroadWorks is as follows:
- Open a ticket with Cisco TAC to request a device revert.
- Run the device move tool on revert mode on the secondary BroadWorks Application Server to revert the device migrations. This will set the DMS URL back to the service provider DMS URL for device profiles in Cisco BroadWorks and re-activate phone numbers.
- The Webex Calling Team sets the DMS URL back to the service provider DMS URL in device profiles in Webex Calling.
- Partner administrators must deactivate or delete the phone numbers in the Webex Calling through the Control Hub portal.
- Partner administrators must move PSTN phone numbers back to Cisco BroadWorks.
Instructions to run device move tool in revert mode
Follow the steps below to run the device move tool in revert mode:
Run the command below in the secondary Cisco BroadWorks Application Server inside the device move tool directory:
Revert profiles
./devicemove.sh -input= <Transform-Tool-Output-Customer-JSON-File-Path> -revertProfilesRevert numbers
./devicemove.sh -input= <Transform-Tool-Output-Customer-JSON-File-Path> -revertNumbersTerminal logs
We will get the following logs in the terminal on successful running the device move tool for revert operation:
Revert profiles
Tool Name: Device Move Tool
Version: 1.15.0
Device Tool Started for Revert Process...
Devices that can be moved back from Webex Calling to BroadWorks:
- -------------------------------------------------------------------------------------------------------------------
|    Device Type |          Mac |                                 Version |                                 Email |
-------------------------------------------------------------------------------------------------------------------
| DMS Cisco 7861 | CC98914EAAD7 | Cisco-CP-7861-3PCC/11.3.7_cc98914eaad7_ | amareswaranvel+benjaminjack@gmail.com |
| DMS Cisco 6821 | 5486BCAE7E45 | Cisco-CP-6821-3PCC/11.3.7_5486bcae7e45_ |  amareswaranvel+lucasoliver@gmail.com |
| DMS Cisco 8811 | F87B204E4066 | Cisco-CP-8811-3PCC/11.3.7_f87b204e4066_ |     amareswaranvel+owenalex@gmail.com |
-------------------------------------------------------------------------------------------------------------------
Do you want to move back these devices from Webex Calling to BroadWorks? (Yes, Y, No, N):
yes
Uploading Device Profiles for DMS Cisco MPP LC
Rebuild Device Process Started
Rebuild Device Process Completed Successfully
Reboot Process Started
Reboot Process Completed Successfully
Device Migration Completed for Deprovision Process
Revert numbers
Tool Name: Device Move Tool
Version: 1.15.0
Do you want to continue reverting numbers to Broadworks ?  ([Y]es or [N]o):
Y
[+15205551101, +15205551102, +15205551103, +15205551104, +15205551105, +15205551106, +15205551107, +15205551108, +15205551109, +15205551110]
Starting revert
Activate broadworks phone numbers process started for groupId : collabmigrationtestGRP_engg
Activate broadworks phone numbers process completed for groupId : collabmigrationtestGRP_engg
Device Migration Revert process Completed Successfully
Appendix
Large enterprise migration
Large enterprises that have many locations can’t migrate all locations within a single maintenance window. The functionality describes in this section allows partners to migrate a few locations at a time.
Steps
Use the following steps to plan the phased migrations for a large enterprise:
- Extract the enterprise data from BroadWorks or BroadCloud.
- Run Transform tool without locations option on the extracted data.
- Look for the section Recommended location to move simultaneously in exception_report.txt to plan the migration phases to get more information on location dependencies, examine the features agent list files (refer to Transform tool below).
- Generate the input/ locations.csv by modifying locations_to_be_edited.csv.
- Run Transform tool again with the locations option.
- Examine exception_report.txt to identify any location dependency issues for current phase.
- Fix the location dependency issues as needed (by modifying locations.csv).
- Rerun Transform tool to generate customers.json for the current phase.
- Run the Provisioning tool for each customer.json.
- During the maintenance window, run the Device Move Tool.
- Repeat step 4 - 10 for the next phase.
Transform tool
To achieve the goal of migrating the locations in a large enterprise phase by phase, as mentioned above, a new file locations.csv is added as optional input (-locations=input/locations.csv) when running the transform-tool.
The locations.csv contains data that is specific to locations. It overrides the data found in input/customers.csv, which currently contains both enterprise and location data.
The following table lists the details of the locations.csv:
|
Description |
Values |
Default value |
Mandatory |
Maps in BroadWorks |
Maps in BroadCloud | |
|---|---|---|---|---|---|---|
|
enterpriseId |
Unique enterprise id |
Y |
serviceProviderId |
Rialto CustomerId | ||
|
locationId |
Location id, unique within the enterprise |
Y |
group id |
Rialto SiteId | ||
|
migration status |
Is this location migrated? |
migrated, dont_migrate, migrating |
migrating |
N | ||
|
name |
Name of this location. Leave it empty to use locationId. |
N | ||||
|
timezone |
N | |||||
|
language |
N | |||||
|
address1 |
N | |||||
|
address2 |
N | |||||
|
city |
N | |||||
|
state |
N | |||||
|
postal code |
ZIP code or postal code |
N | ||||
|
country |
2-letter code |
N |
The locations.csv can be composed from the pre-filled locations_to_be_edited.csv when running Transform tool on large enterprise. Read further to see examples.
The locations.csv is an optional input when running transform tool, hence the Transform tool will behave same as before if the option -locations=input/locations.csv is not present.
New output files
There are 5 new output files from transform tool:
- locations_to_be_edited.csv – this is pre-filled with all locations’ info for the large enterprise to be migrated.
Example:
locationId,enterpriseId,migration status,name,timezone,language,address1,address2,city,state,postal code,country

auto_mig_ent_grp1,auto_mig_ent,,auto_mig_ent_grp1,,,100 Main Street,,Gaithersburg,MD,20877,US

auto_mig_ent_grp2,auto_mig_ent,,auto_mig_ent_grp2,,,101 Main Street,,Gaithersburg,MD,20877,US

auto_mig_ent_grp3,auto_mig_ent,,auto_mig_ent_grp3,,,102 Main Street,,Gaithersburg,MD,20877,US
The partners/customers can use it to generate locations.csv to control the locations to be migrated for a specific phase (and update locations’ info as needed).
Example: locations.csv generated from the above locations_to_be_edited.csv
locationId,enterpriseId,migration status,name,timezone,language,address1,address2,city,state,postal code,country

auto_mig_ent_grp1,auto_mig_ent,migrated,auto_mig_ent_grp1,,,100 Main Street,,Gaithersburg,MD,20877,US

auto_mig_ent_grp2,auto_mig_ent,migrating,auto_mig_ent_grp2,,,101 Main Street,,Gaithersburg,MD,20877,US

auto_mig_ent_grp3,auto_mig_ent,dont_migrate,auto_mig_ent_grp3,,,102 Main Street,,Gaithersburg,MD,20877,US
This locations.csvmeans: for this phase, location auto_mig_ent_grp1 had been migrated, location auto_mig_ent_grp2 is migrating, and don’t migrate location auto_mig_ent_grp3.
- hunt_group_agents.csv, call_center_agents_supervisors.csv, paging_group_originators_targets.csv, blf_monitored_elements.csv – 4 files have the same purpose: generate the complete lists of the corresponding features agents/supervisors/originators/targets/monitored_elements in the migrating locations if the migrating locations have dependencies on other locations.
They have almost same format (the 3rd column name varies based on feature), like below (auto_mig_ent_grp2’s hunt group’s agents list for the above phase):
Example: the following is from hunt_group_agents.csv
feature name,feature location,agent,location

Sarah Rodriguez,auto_mig_ent_grp2,agent_michael@domain.com,auto_mig_ent_grp1

Sarah Rodriguez,auto_mig_ent_grp2,agent_sally@domain.com,auto_mig_ent_grp1
If the locations option not present when running the Transform tool, the above 4 files will generate the complete lists of the hunt-group/call-center/paging-group/busy-lamp-field’s agents/supervisors/originators/targets/monitored_elements for the whole enterprise, which can be used to plan the phased migrations.
New sections in exception_report
While performing phased migration for large enterprise, there will be some new sections in exception_report.txt if there are location dependencies which are not met.
Example: The following new section is for location auto_mig_ent_grp2 hunt group Sarah Rodriguez’s agents in location auto_mig_ent_grp3 which is not migrated and not migrating in this phase.
Dependencies between locations - Hunt groups

Name                          Location                        Agent                                            Agent's Location         Comment

________________________________________________________________________________________________________________

Sarah Rodriguez       auto_mig_ent_grp2    agent_william@domain.com    auto_mig_ent_grp3    Agent in different location not migrated yet

Sarah Rodriguez       auto_mig_ent_grp2   agent_melody@domain.com     auto_mig_ent_grp3    Agent in different location not migrated yet
The following new section makes the recommendation on how to group the locations in the migration phases.
Recommended locations to move simultaneously:
Location auto_mig_ent_grp1 has dependency on location(s) auto_mig_ent_grp2, auto_mig_ent_grp3

Location auto_mig_ent_grp2 has dependency on location(s) auto_mig_ent_grp3
If the locations option not present when running the Transform tool, section recommended locations to move simultaneously lists all locations dependencies to provide the convenience for the planning.
While running the Transform tool with the locations option (ie, for a migration phase), section Recommended locations to move simultaneously only list the locations’ dependencies for the current phase.
Provisioning tool
For Large enterprise, the provisioning tool can be run as usual.
Device move tool
The device move tool can run for a subset of locations from the customer.json.to achieve that add a new optional locations.csv file which has two columns.
|
External_id |
LocationNames |
|---|---|
|
External id value |
Names of the locations/group names |
- This is an optional file, if not provided or provided with the empty values it will migrate all the locations.
- If provided with the location names and their respective external_Id’s, then only those locations will be migrated.
The command is as follows:
./devicemove.sh -input=<input_path>/customer.json -locations=<input_path>/Location_names.csvTime zones
USA:
"timeZones":["America/Adak","America/Anchorage","America/Chicago","America/Denver","America/Los_Angeles","America/New_York","America/Phoenix","Pacific/Honolulu"]
Canada:
"timeZones":["America/Dawson_Creek","America/Edmonton","America/Halifax","America/Montreal","America/Regina","America/St_Johns","America/Vancouver","America/Winnipeg"]
Australia:
"timeZones":["Australia/Adelaide","Australia/Brisbane","Australia/Broken_Hill","Australia/Darwin","Australia/Hobart","Australia/Lord_Howe","Australia/Perth","Australia/Sydney"]
France:
"timeZones":["Europe/Paris"]
Portugal:
"timeZones":["Atlantic/Azores","Europe/Lisbon"]}
UK:
"timeZones":["Europe/London"]
Italy:
"timeZones":["Europe/Rome"]
Germany:
"timeZones":["Europe/Berlin"]
Frequently asked questions
Known errors
| Error | Action |
|---|---|
| Token generator tool | |
| ./tokengenerator.sh: line 77: /bin/java: No such file or directory | Set the JAVA_PATH environment variable correctly in your environment. |
| Transform tool errors | |
|
|
| Provisioning tool errors | |
|
|
| DeviceMove (BroadWorks) / Migration (BroadCloud) tool errors | |
| Migration failed due to source AS and target AS network status error |
Avoid device or number changes after provisioning and before running the Device Move tool. |
Prerequisites
1. How do I find the OrgID of the partner?
Log in to Partner Hub and go to the Accounts section. The OrgID appears there.
Extract
1. Why is a customer or site is not listed on the "Initiate Extract" page?
Only customers with at least one site with active calling services in BroadCloud appear. If no active calling sites exist, the customer will not be listed.
Transform
1. Why the user or group feature is missing in customer.json?
To see the user or group feature check exception_report.txt for related errors.
2. Why does the customer.json is not generated?
Update customers.csv with a valid address. Use the -customers parameter during transform.
3. What is the purpose of the input/customers.csv file?
The purpose is used to supply any mandatory customer data that may be missing from Cisco BroadWorks or BroadCloud during the extraction process.
4. What is the purpose of the input/users.csv file?
The input/users.csv file is used to provide user-level data that may miss
in Cisco BroadWorks or BroadCloud.
5. How to convert BroadWorks Call Centers to Cx Essentials?
Use input/cxessentials.csv to convert BroadWorks Call Centers to Cx
Essentials.
6. Is there a way to automatically convert all Call Centers to Cx Essentials?
Yes, you can enable the UPGRADE_ALL_CALL_CENTERS_TO_CX_ESSENTIALS property
to automatically convert all Call Centers to Cx Essentials without using the CSV file.
7. How do I provision new phones for users?
To provision new phones, add the MAC address and the user’s email address to the
input/newphones.csv file. This step is only necessary if the partner
administrators intend to set up new phones in the Wholesale Calling environment.
8. How do I set up generic gateway devices?
To set up generic gateway devices, add the device’s MAC address and the associated user ID
to the input/genericgateways.csv file. You must also specify whether the
user is the PRIMARY owner or a SHARED user (for shared call appearances).
9. Is generic gateway device setup available for BroadCloud to Wholesale migrations?
No, this feature is not supported for BroadCloud to Wholesale migrations.
Provisioning
1. How partners can configure for more than 100 customers JSON files at a time, as
configured in the maxCustomersProvisioning property in
conf/app.cfg?
Set the maxCustomersProvisioning=<no.of.customers> in app.cfg and run provisioning.
2. Provisioning blocked because org is in "pending_rpl_review"?
Cisco finance is reviewing the customer. This can take up to 72 hours. Retry after approval.
3. How do I resolve an issue where the wholesale package, its features, and users were assigned to the incorrect organization because of an incorrect external ID during the migration process?
Step 1: Delete all users / features provisioned by the provisioning tool.
Step 2: In Partner Hub, select the customer, go to the 'Packages' section, disable all wholesale packages, and save your changes.
4. How do I resolve an issue, when you encounter the message "OrgId is a mandatory parameter when provisioning a pre-existing customer with Wholesale services," while running the provisioning tool?
Attempt to run the tool using a different email address by updating the customer.json file. Additionally, verify whether the email domain is claimed by another organization. if so, try to release the claimed domain from that organization or attempt to use a different unclaimed domain.
DeviceMove (BroadWorks) / Migration (Broadcloud)
1. In customer.json out of all the devices one or two did not come online? How to fix this?
If only a few devices are not coming online, please try manually rebooting them.
2. Is rialtoIdentifier is required in customer.json for Broadcloud migration?
Yes.
3. How to run Device move tool in revert mode for Broadcloud?
Add ROLLBACK_TO_BROADCLOUD=true in partner.cfg, and then upload customer.json and partner.cfg file, and rerun migration.
4. What should I do if the provisioning tool fails to add devices due to an error (usually because the device is already in EDOS) and the migration for the site proceeds anyway?
Usually, we recommend the administrator to resolve the provisioning errors prior to migration, but in this case the site was migrated to the Wholesale Webex Calling Platform before the device was successfully provisioned in Webex Calling.
Workaround to add the MAC Address to Webex Calling:
Step 1: Fix the issue that caused the device to not be added (Usually its removing the MAC from EDOS).
Step 2: There are two options.
Option 1: Rollback and Retry
- Roll back the site to BroadCloud.
- Add the device in Webex Calling either manually via the Control Hub or re-run the provisioning tool.
- Once the device is added, proceed with the migration again.
Option 2: Continue on Webex
If rollback is not preferred:
- Let us (wholesale migration team) know so we can set the BroadCloud NS Sync status to LOCAL.
- The administrator can then:
- Unassign the MAC address from the user from Rialto.
- Remove the MAC from the site in Rialto.
- After cleanup, the device is added manually to Webex Calling using the Control Hub portal.
- After adding the device in Webex Calling, manually reboot the device.


