
Obrigado pelos seus comentários.
Restrições de colaboração Webex Meetings no Control Hub
 Comentários?
Visão geral
Você pode impedir que usuários externos à sua organização participem de reuniões ou restringir o acesso a determinados recursos durante a reunião para garantir que os usuários sigam as políticas da sua organização. Quando os usuários tentam usar um recurso desativado, um indicador aparece para deixá-los saber sobre a restrição definida pela organização.
Para garantir a segurança, recomendamos aplicar restrições aos seus navegadores e a todos os seus dispositivos.
As restrições de colaboração são compatíveis apenas com o Webex Meetings e o Webex Webinars. Essas restrições não se aplicam às Webex Events (clássicas), Webex Training e Webex Support.
Essas configurações se aplicam somente a usuários que utilizam a versão 42.3 ou superior do cliente Webex Meetings e a versão 43.6 ou superior do cliente do aplicativo Webex.
Os usuários podem contornar essas restrições participando de reuniões internas e externas com seus endereços de e-mail pessoais ou como convidados. Para evitar que os usuários ignorem essas restrições, siga as etapas em Restringir recursos de colaboração para dispositivos Windows, Mac, Android e iOS e navegadores da Web Chrome e Edge para adicionar um token aos dispositivos da empresa para garantir que as contas usadas com os dispositivos sigam as restrições definidas por sua organização.
Ao aplicar restrições de colaboração:
- Se o usuário fizer login com um ID de organização diferente do registrado, o Control Hub seguirá a política mais restritiva. Tanto a política do usuário quanto a política da organização são verificadas.
- Se o usuário fizer login com o mesmo ID de organização registrado no sistema, o Control Hub seguirá a política do usuário conectado.
Restrições de colaboração em nível de grupo ou usuário
Para definir políticas para grupos específicos ou por usuário em vez de para toda a organização, crie um modelo de configurações de reuniões.
Permitir ou bloquear usuários externos de entrar em reuniões na sua organização
Você pode permitir ou bloquear usuários fora da sua organização de participarem de reuniões organizadas por usuários em sua organização.
| 1 | |
| 2 |
Acesse . |
| 3 |
Em Reuniões, selecione uma das seguintes opções ao lado de Interno:
|
| 4 |
Se você selecionou Permitir usuários externos com domínios de e-mail aprovados, insira um domínio de e-mail aprovado e clique em Adicionar. Você também pode ativar a opção Aplicar essas configurações somente às reuniões da Sala Pessoal. |
| 5 |
Se você selecionou Bloquear usuários externos com domínios de e-mail selecionados, insira um domínio de e-mail para bloquear usuários externos e clique em Adicionar. Você também pode ativar a opção Aplicar esta configuração apenas às reuniões da Sala Pessoal. |
Quando você bloqueia os usuários de entrar em reuniões externas, eles não podem entrar em reuniões organizadas a partir de sites Webex fora da sua organização. Mas você pode permitir que os usuários participem de reuniões em determinados sitesWebex adicionando esses sites Webex a uma configuração de lista aprovada.
| 1 | |
| 2 |
Acesse . |
| 3 |
Em Reuniões, selecione uma das seguintes opções ao lado de Externa:
|
| 4 |
Se você selecionou Permitir sites externos aprovados, insira um nome de site Webex e clique em Adicionar. |
| 5 |
Se você selecionou Bloquear sites externos selecionados, insira os sites do Webex que deseja bloquear e clique em Adicionar para aplicar a restrição. |
O que fazer em seguida
Restringir os recursos de colaboração em Webex Meetings
Essas configurações se aplicam a usuários que participam de reuniões internas e externas. Se você quiser restringir os recursos da sua reunião, você pode criar e usar um tipo de sessão personalizado ou um modelo de configurações de reunião.
Os tipos de sessão suportam apenas políticas de reunião internas. Os tipos de sessão só se aplicam quando o usuário é o anfitrião da reunião.
Os modelos de configurações de reunião são compatíveis com políticas de reunião internas e externas. Os modelos de configurações de reunião são aplicáveis quando o usuário é o anfitrião ou um participante da reunião.
Quando um anfitrião agenda uma reunião, o modelo de configurações de reunião do anfitrião controla a disponibilidade de recursos durante essa reunião. Se o anfitrião tiver desativado uma funcionalidade, essa funcionalidade ficará desativada para todos os participantes da reunião. Se o anfitrião tiver ativado um recurso, esse recurso estará habilitado para a reunião, mas a capacidade de cada participante usar o recurso depende das configurações da reunião.
| 1 | ||||||||||||||||||||||||||||||||||||||||||||||||||||||||||||||||||||||||||||||||||||||||
| 2 |
Acesse . | |||||||||||||||||||||||||||||||||||||||||||||||||||||||||||||||||||||||||||||||||||||||
| 3 |
Ative ou desative funcionalidades para usuários durante reuniões internas ou externas: Reuniões persistentes de espaço— Permite ativar Permitir reuniões persistentes para espaços. Sessões de breakout
Ferramentas de colaboração
Em reunião
Gravando
Controle remoto
Compartilhamento
Telefonia
Vídeo
Gravando downloads
Links de gravação
Expiração do link de gravação
Substituição de configurações
Webex Salas de reunião
|
Restringir recursos de colaboração para dispositivos Windows, Mac, Linux, Android e iOS, e para os navegadores Chrome e Edge.
Se você quiser restringir esses dispositivos de configurações de colaboração em sua organização, você pode editar os arquivos do sistema para que essas configurações se apliquem a qualquer pessoa que utilizar o dispositivo para entrar em uma reunião fora da sua organização.
Para fazer isso, você deve primeiro encontrar e copiar a ID da organização no Control Hub. Depois de obter a ID da organização, siga os passos que se aplicam aos dispositivos que você deseja editar.
Certifique-se de bloquear a ID da organização no registro para que os usuários não possam alterá-la eles mesmos. Se os usuários alterarem a ID da organização, as restrições de colaboração não se aplicarão a seus dispositivos.
Para garantir a segurança, recomendamos aplicar restrições aos seus navegadores e a todos os seus dispositivos.
| 1 |
Faça login no Hub de Controlee acesse . |
| 2 |
Clique no ícone Copiar no campo ID da organização. |
Você pode escolher entre três opções para configurar restrições de recursos de colaboração para dispositivos Windows:
-
Configurar manualmente usando um valor de registro— Você pode editar manualmente dispositivos específicos adicionando o ID da organização ao registro:
-
Abra o registro e navegue até o contexto onde deseja aplicar esta política. Um dos seguintes:
-
HKEY_CURRENT_USER\SOFTWARE\Policies\CiscoWebex\ -
HKEY_LOCAL_MACHINE\SOFTWARE\Policies\CiscoWebex\
-
- Crie um novo valor de string chamado
OrganizationID. - Clique com o botão direito do mouse no novo valor e selecione Modificar...
- Cole o ID da organização nos dados de valorda nova string.
-
-
Configurar usando um modelo de Política de Grupo— Você pode importar um modelo administrativo de Política de Grupo (.adm) para aplicar o ID da organização aos mesmos valores de registro acima.
-
Configurar usando uma instalação MSI— Você pode executar um comando para instalar o webexapp.msi usando o ID da organização para editar este valor do registro:
HKEY_LOCAL_MACHINE\SOFTWARE\WOW6432Node\Webex\Policies\OrganizationID.
Configurar usando as chaves de registro
-
Abra o Editor de registro.
-
Adicione a ID da organização a um dos seguintes valores de registro:
-
HKEY_CURRENT_USER\SOFTWARE\Policies\CiscoWebex\OrganizationID -
HKEY_LOCAL_MACHINE\SOFTWARE\Policies\CiscoWebex\OrganizationID
-
Configurar usando um modelo de Política de Grupo
-
Importe um arquivo
.adm. -
Em uma ferramenta de gerenciamento de políticas de grupo, clique em:
-
Configuração do computador para aplicar o ID da organização a
HKEY_CURRENT_USER\SOFTWARE\Policies\CiscoWebex\OrganizationID -
Configuração do usuário para aplicar a organização a
HKEY_LOCAL_MACHINE\SOFTWARE\Policies\CiscoWebex\OrganizationID
-
-
No painel de navegação, clique em .
-
Clique duas vezes em Configurar a ID da organização Cisco Webex.
-
Clique em Habilitado, adicione o ID da sua organização na caixa Opções e clique em Aplicar.
Configure usando uma instalação MSI.
-
Execute o seguinte comando para instalar
webexapp.msicom o parâmetroORGANIZATIONIDpara configurarHKEY_LOCAL_MACHINE\SOFTWARE\WOW6432Node\Webex\Policies\OrganizationID:msiexec /i webexapp.msi /log webexapp.log ORGANIZATIONID="xxxxxxxx-xxxx-xxxx-xxxx-xxxxxxxxxxxx"
Para configurar restrições de colaboração em dispositivos Mac, crie um arquivo .plist chamado com.cisco.webexmeetings.config.plist em /Library/Preferences/e adicione a seguinte chave ao arquivo:
|
Nome da chave |
Valor |
Descrição |
|---|---|---|
|
ID da organização |
%OrganizationID% |
Especifique a ID da organização que você copiou do Control Hub para as restrições de colaboração. |
Para configurar restrições de colaboração em dispositivos móveis Android e iOS, você deve configurar a ID da organização usando o serviço de Configuração de aplicativos de gerenciamento de dispositivos móveis.
Esse recurso funciona apenas para dispositivos móveis que usam o aplicativo Webex Meetings na versão 41.7 e posterior.
|
Chave de configuração |
Tipo de valor |
Descrição |
|---|---|---|
|
ID da organização |
sequência |
Especifique a ID da organização que você copiou do Control Hub para as restrições de colaboração. |
Para que as políticas da sua organização se apliquem aos usuários que participem do Google Chrome, você deve adicionar o plug-in da Política do Webex Meetings baixado da Chrome Web Store e, em seguida, adicionar uma regra para a sua organização à política.
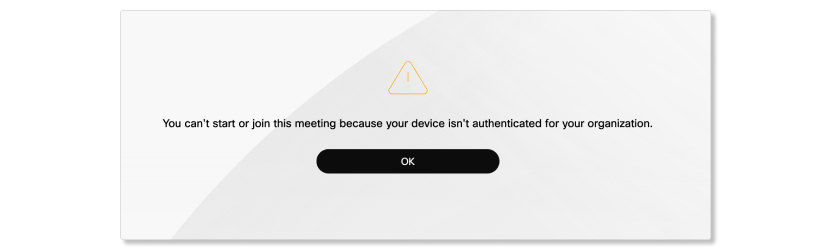
Usuários que estão impedidos de participar de determinadas reuniões veem a seguinte mensagem ao tentarem entrar em uma reunião restrita pelo Google Chrome.
-
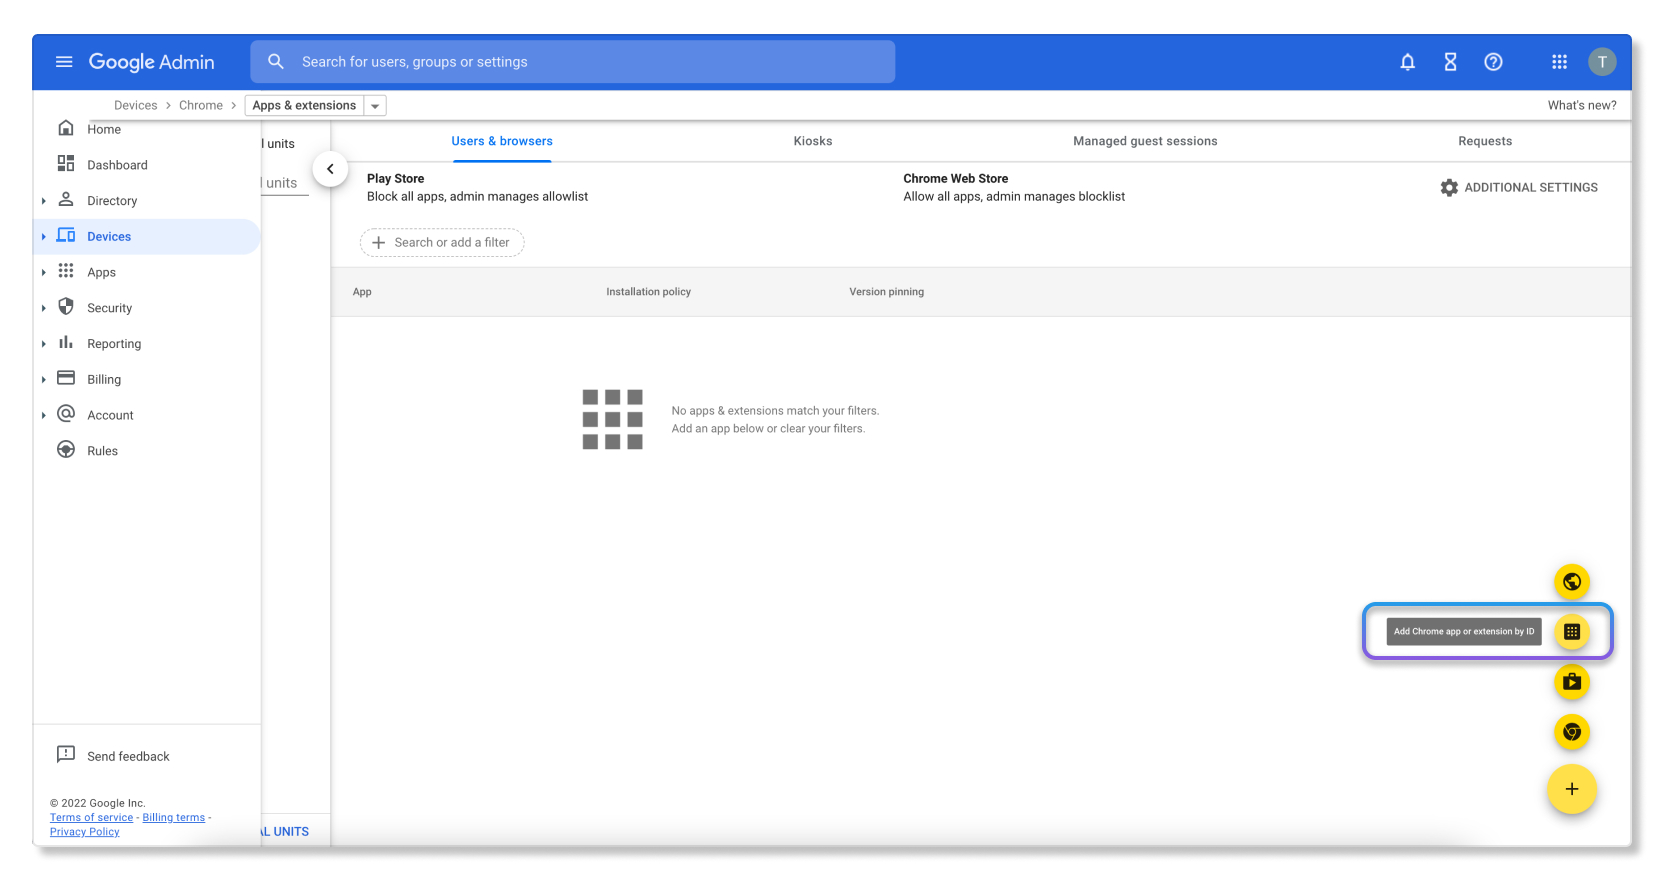
Abra a página de administração de TI do Google Chrome em https://admin.google.com.
-
Adicione a extensão Webex Meetings Política de plug-in da ajuda indo para Chrome >
-
Adicione o seguinte ramal por ID:
denhmfenjcamjiamkogegcjieeiahjgp.
-
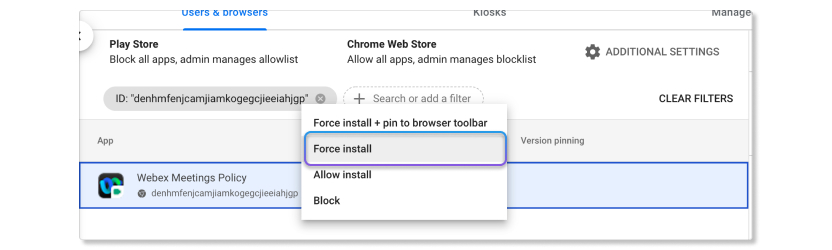
Adicione a seguinte regra à política (usando o ID da sua organização):
{"orgID": {"Value": "xxxxxxxx-xxxx-xxxx-xxxx-xxxxxxxxxxxx"}}
-
Clique com o botão direito do mouse na guia e selecione Forçar instalação.
Configure usando um modelo de política de grupo.
Você pode usar políticas de grupo para instalar a extensão de política do Webex Meetings.
Antes de começar, certifique-se de ter importado os modelos ADM ou ADMX para oGoogle Chrome.
-
No Editor de Política de Grupo, acesse .
Selecione 'Configurar a lista de aplicativos e extensões instalados à força'.
Clique com o botão direito e selecione Editar.
Selecione Ativado.
Clique em Mostrar.
Insira o seguinte ID em 'Extension/App IDs e URLs de atualização para serem instalados silenciosamente'.
denhmfenjcamjiamkogegcjieeiahjgp;https://clients2.google.com/service/update2/crxClique em Aplicar.
Pode demorar um pouco para o Chrome carregar a configuração. Você pode reiniciar o Google Chrome ou recarregar as políticas digitando chrome://policy/ na barra de endereços.

Configure o ID da organização com a chave de registro usando uma política de grupo.
Você pode usar a Política de Grupo da Microsoft para instalar a extensão de Política de Reuniões do Webex no Google Chrome e configurar o ID da organização.
-
No Editor de Gerenciamento de Política de Grupo, crie um novo Objeto de Política de Grupo (GPO).
Você também pode editar um GPO existente.
Vincule o GPO à organização que contém seus usuários ou dispositivos e alterne para o modo de edição do GPO.
Acesse .
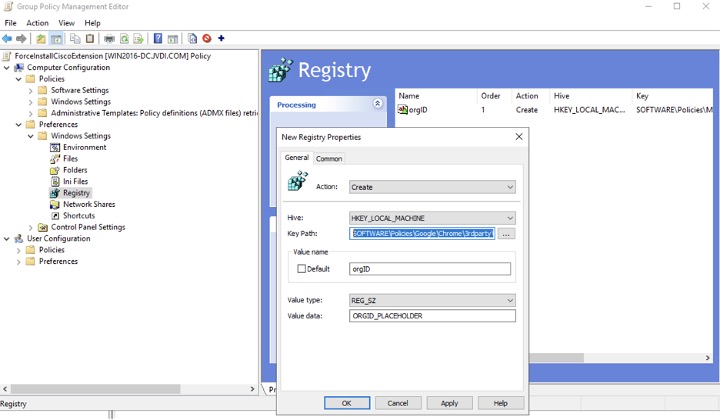
Clique com o botão direito do mouse em Registro e selecione .
Na janela Novas Propriedades do Registro, selecione a guia Geral.
- Em Ação, selecione Criar.
-
Insira os seguintes detalhes:
-
Colmeia—
HKEY_LOCAL_MACHINE -
Caminho da chave—
SOFTWARE\Policies\Google\Chrome\3rdparty\extensions\denhmfenjcamjiamkogegcjieeiahjgp\policy -
Nome do valor—
orgID -
Tipo de valor—
REG_SZ -
Dados de valor— O ID da organização fornecido pela Cisco.
-
Clique em Aplicar.
Você precisa instalar e configurar a extensão de política do Webex Meetings em navegadores Chrome. Esta configuração aplica a política de restrições de reuniões da sua organização aos usuários que participam de reuniões usando o Chrome em computadores MacOS. Os detalhes que você precisa são:
- ID da extensão: Isso vale para todos:
denhmfenjcamjiamkogegcjieeiahjgp - Seu ID de organização: Exclusivo para a sua organização Webex. Você pode copiar este ID do Control Hub, no Página da conta.
Utilizando o console de administração do Google
Este guia descreve como forçar a instalação da extensão Webex Meetings usando o Google Admin Console e configurá-la com o ID da sua organização.
-
Faça login no seu console de administração do Google em https://admin.google.com.
-
Acesse o .
-
Adicione o seguinte ramal por ID:
denhmfenjcamjiamkogegcjieeiahjgp. -
Adicione a seguinte regra à política (usando o ID da sua organização):
{"orgID": {"Value": "xxxxxxxx-xxxx-xxxx-xxxx-xxxxxxxxxxxx"}} -
Clique com o botão direito do mouse na guia e selecione Forçar instalação.
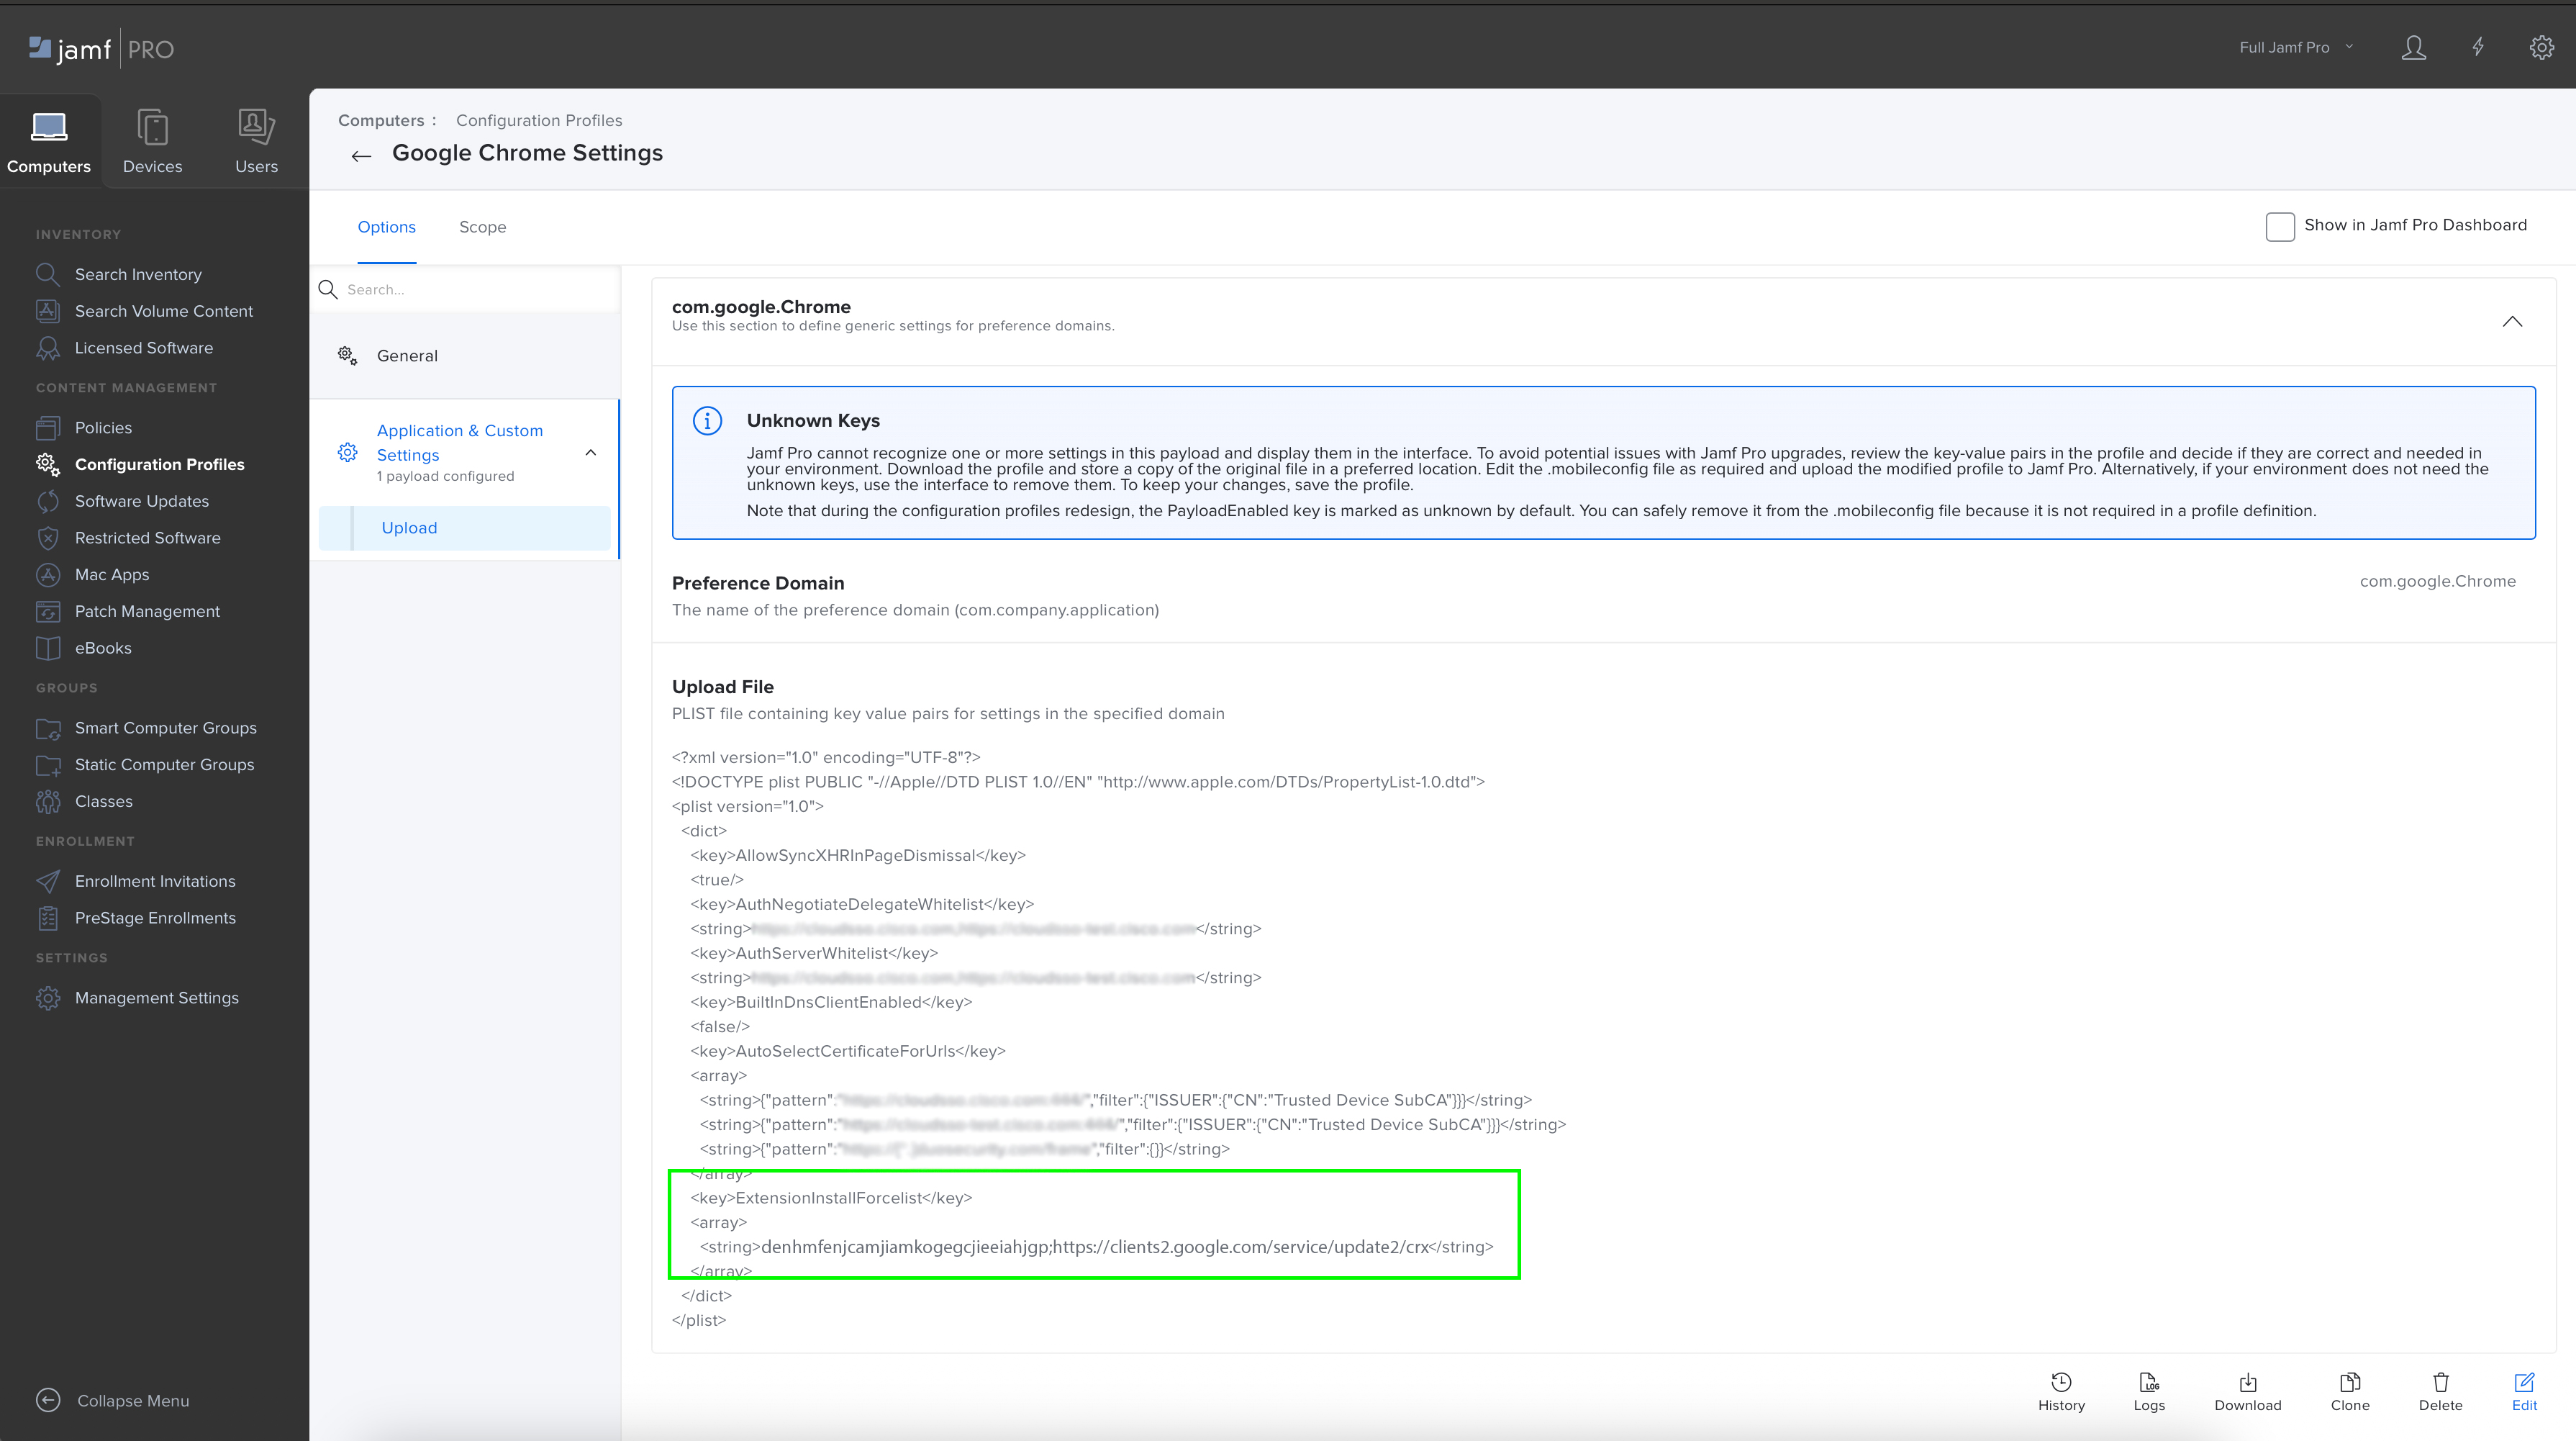
Configurar preferências do macOS
Descreve como forçar a instalação da extensão Webex Meetings usando a preferência
ExtensionInstallForcelistdo Chrome no MacOS e, em seguida, configurar a extensão com o ID da sua organização.
- Leia o tópico ExtensionInstallForcelist na documentação de política do Chrome Enterprise do Google.
-
Use o software de gerenciamento de dispositivos móveis para atualizar a preferência
ExtensionInstallForcelist
.-
Adicione o seguinte ID de extensão:
denhmfenjcamjiamkogegcjieeiahjgpe -
Adicione o URL de atualização para a extensão:
https://clients2.google.com/service/update2/crx
Você deverá obter uma nova string na matriz que define a lista de instalação forçada da extensão:
denhmfenjcamjiamkogegcjieeiahjgp;https://clients2.google.com/service/update2/crx other-extension-id;other-extension-update-URL another-extension-id;another-extension-update-URL -
- Implante o perfil de configuração modificado em seus computadores MacOS.
- Verifique se a extensão está instalada no Mac.
Criar um perfil de configuração
Descreve como configurar o ID da sua organização para a extensão de política do Webex.
-
Crie um arquivo de lista de propriedades
com.google.Chrome.extensions.denhmfenjcamjiamkogegcjieeiahjgp.plistcom o ID da sua organização usando o seguinte valor:orgID xxxxxxxx-xxxx-xxxx-xxxx-xxxxxxxxxxxx -
Implante o perfil de configuração modificado em seus computadores MacOS.
-
Verifique se a sua política de Reuniões se aplica quando um usuário em um computador MacOS gerenciado usa o Chrome para participar de uma reunião.

Você pode aplicar restrições de colaboração à sua organização para usuários que ingressarem pelo Microsoft Edge. Você também pode usar a extensão do navegador Google Chrome no Microsoft Edge.
Antes de começar, certifique-se de que seu dispositivo esteja cadastrado no gerenciamento de dispositivos móveis (MDM).
Criar um novo perfil de configuração
-
Faça login na página de administração da Microsofte acesse Dispositivos .
-
Selecione as seguintes propriedades:
-
Plataforma— Windows 10 ou posterior.
-
Tipo de perfil— Modelos.
-
-
Clique em Criar.
-
Em Básico, selecione um nome e uma descrição para a política da sua organização.
-
Clique em Próximo.
-
Em , procure por 'Controlar quais extensões são instaladas silenciosamente' e selecione-o.
-
Selecione Ativado e insira o seguinte ID em 'Extension/App IDs e URLs de atualização a serem instalados silenciosamente':
denhmfenjcamjiamkogegcjieeiahjgp;https://clients2.google.com/service/update2/crx?response=updatecheck&x=id%3Ddenhmfenjcamjiamkogegcjieeiahjgp%26uc -
Clique em Próximo.
(Opcional) Em Etiquetas de escopo, você pode atribuir etiquetas de escopo ao perfil.
Em Atribuições, selecione 'Adicionar todos os usuários' e 'Adicionar todos os dispositivos'.
-
Clique em Próximo.
-
Em revisão + criar, revise suas configurações e clique em Criar.
Sincronize seu dispositivo gerenciado
-
No seu dispositivo gerenciado, acesse .
Em 'Conectado ao MSFT MDM', clique em Informações.
Deslize até 'Status de sincronização do dispositivo' e clique em Sincronizar.
A extensão do Google Chrome é instalada assim que a sincronização for concluída. Você pode verificar a sincronização consultando o Editor do Registro no seguinte local:
HKEY_LOCAL_MACHINE\SOFTWARE\Policies\Microsoft\Edge\ExtensionInstallForcelistA extensão também está disponível no Microsoft Edge em edge://extensions.
Configure usando a chave de registro.
Para configurar a política para um ID de organização específico, a extensão do Chrome lê uma política que está definida no registro. Você pode importar manualmente uma chave de registro criando um arquivo .reg.
-
Abra o Editor de registro.
- Crie um arquivo
.regcom o seguinte valor:Windows Registry Editor Version 5.00 [HKEY_LOCAL_MACHINE\SOFTWARE\Policies\Microsoft\Edge\3rdparty\extensions\denhmfenjcamjiamkogegcjieeiahjgp\policy] "orgID"="xxxxxxxx-xxxx-xxxx-xxxx-xxxxxxxxxx" - Clique duas vezes no arquivo para instalar a chave de registro.
Você também pode usar o PowerShell para instalar a chave de registro. Utilize o seguinte valor:
reg import
            .\edge_policy.reg
Verifique a identidade da sua organização.
-
Reinicie o Microsoft Edge e acesse web.webex.com.
Abra o console do desenvolvedor e digite
webex.config.meetings.installedOrgID.O ID da organização do arquivo
.regé exibido.
Configure usando um modelo de política de grupo.
Você pode usar políticas de grupo para instalar a extensão de política do Webex Meetings.
Antes de começar, certifique-se de ter importado os modelos administrativos do Microsoft Edge.
-
No Editor de Política de Grupo, acesse .
- Selecione 'Controlar quais extensões são instaladas silenciosamente'.
Selecione Ativado.
Clique em Mostrar.
Insira o seguinte ID em 'Extension/App IDs e URLs de atualização para serem instalados silenciosamente'.
denhmfenjcamjiamkogegcjieeiahjgp;https://clients2.google.com/service/update2/crxClique em Aplicar.
Configure o ID da organização com a chave de registro usando a política de grupo.
Você pode usar a Política de Grupo da Microsoft para instalar a extensão de Política de Reuniões do Webex no Microsoft Edge e configurar o ID da organização.
-
No Editor de Gerenciamento de Política de Grupo, crie um novo Objeto de Política de Grupo (GPO).
Você também pode editar um GPO existente.
Vincule o GPO à organização que contém seus usuários ou dispositivos e alterne para o modo de edição do GPO.
Acesse .
Clique com o botão direito do mouse em Registro e selecione .
Na janela Novas Propriedades do Registro, selecione a guia Geral.
- Em Ação, selecione Criar.
-
Insira os seguintes detalhes:
-
Colmeia—
HKEY_LOCAL_MACHINE -
Caminho da chave—
SOFTWARE\Policies\Microsoft\Edge\3rdparty\extensions\denhmfenjcamjiamkogegcjieeiahjgp\policy -
Nome do valor—
orgID -
Tipo de valor—
REG_SZ -
Dados de valor— O ID da organização fornecido pela Cisco.
-
Clique em Aplicar.
Você pode aplicar restrições de colaboração à sua organização para usuários que ingressarem pelo Mozilla Firefox. Você pode implementar a política de ID da organização Webex e a extensão Webex para Firefox para todos os seus usuários por meio do Microsoft Intune.
Configure usando modelos de política
Antes de começar, certifique-se de ter baixado os modelos de política da Mozilla.
Os arquivos ADMX incluem:
mozilla.admxfirefox.admx
Os arquivos ADML incluem:
mozilla.admlfirefox.adml
- Abra o arquivo
firefox.admxe localize a tag.Insira o seguinte valor dentro da tag
e salve o arquivo: - Clique em
en_US, abra o arquivofirefox.adml.Localize a tag
<e adicione o seguinte valor:stringTable>orgID Webex Meeting Policy SettingLocalize a tag
<e adicione o seguinte valor:presentationTable> -
Faça login na página de administração da Microsofte acesse Dispositivos .
- Vá para a guia Importar ADMX e clique em Importar.
- Siga as instruções para carregar os arquivos ADMX e ADML.
Importe primeiro os arquivos
mozilla.admxemozilla.adml. Certifique-se de que o status mostre "Disponível". Em seguida, importe os arquivosfirefox.admxefirefox.adml.
Criar um novo perfil de configuração
-
Faça login na página de administração da Microsofte acesse Dispositivos .
- Vá para a guia Políticas e clique em .
-
Selecione as seguintes propriedades:
-
Plataforma— Windows 10 ou posterior.
-
Tipo de perfil— Modelos > Modelos administrativos importados (Pré-visualização).
-
- Clique em Criar.
- Em Básico, selecione um nome e uma descrição para a política da sua organização.
- Clique em Próximo.
- Em Configurações, selecione
orgIDe configure as definições que deseja na sua política. - Selecione Ativado e insira o ID da sua organização.
- Clique em Próximo.
- (Opcional) Em Etiquetas de escopo, você pode atribuir etiquetas de escopo ao perfil.
- Em Tarefas, clique em Adicionar Grupos e selecione um grupo para receber seu perfil.
Se o perfil for atribuído a grupos de usuários, as configurações ADMX definidas serão aplicadas a qualquer dispositivo no qual o usuário se inscrever e fizer login. Se o perfil for atribuído a grupos de dispositivos, as configurações serão aplicadas a qualquer usuário que fizer login no dispositivo. Isto aplica-se tanto às configurações do computador (
HKEY_LOCAL_MACHINE) como às configurações do utilizador (HKEY_CURRENT_USER). Algumas configurações atribuídas pelo usuário também podem afetar outros usuários no mesmo dispositivo. - Clique em Próximo.
-
Em revisão + criar, revise suas configurações e clique em Criar.
Configure a política para instalar extensões do Firefox.
Antes de começar, certifique-se de baixar o modelo ADMX do Firefox. Você pode baixar o arquivo policy_templates_v6.3.zip, extrair o arquivo e encontrar o Windows. > firefox.admx.
-
Faça login na página de administração da Microsofte acesse Dispositivos .
- Vá para a guia Políticas e clique em .
-
Selecione as seguintes propriedades:
-
Plataforma— Windows 10 ou posterior.
-
Tipo de perfil— Modelos > Personalizado.
-
- Clique em Criar.
- Em Básico, selecione um nome e uma descrição opcional para a política da sua organização.
- Clique em Próximo.
-
Em Configurações, clique em Adicionar:
- Insira um nome e uma descrição opcional.
-
OMA-URI—Digite:
./Device/Vendor/MSFT/Policy/ConfigOperations/ADMXInstall/Firefox/Policy/FirefoxAdmx -
Tipo de dados—Selecione String.
- Valor—Copia todo o texto do arquivo
firefox.admx.
- Clique em Salvare depois clique em Próximo.
- Em Tarefas, clique em Adicionar Grupos e selecione um grupo para receber seu perfil.
- Clique em Próximo.
- Em revisão + criar, revise suas configurações e clique em Criar.
Adicionar políticas individuais
-
Faça login na página de administração da Microsofte acesse Dispositivos .
- Clique na política que você criou.
- Em Propriedades, role até Configurações de configuraçãoe clique em Editar.
-
Clique em Adicionar.
- Insira um nome e uma descrição opcional.
-
OMA-URI—Digite:
./Device/Vendor/MSFT/Policy/Config/Firefox~Policy~firefox~Extensions/ExtensionSettings -
Tipo de dados—Selecione String.
- Valor— Insira o valor da política que deseja alterar.
- Em revisão + Salve, revise suas alterações e clique em Salvar.
Restringir recursos de colaboração para dispositivos Windows, Mac, Linux, Android e iOS, e para os navegadores Chrome e Edge.
Se você quiser restringir esses dispositivos de configurações de colaboração em sua organização, você pode editar os arquivos do sistema para que essas configurações se apliquem a qualquer pessoa que utilizar o dispositivo para entrar em uma reunião fora da sua organização.
Para fazer isso, você deve primeiro encontrar e copiar a ID da organização no Control Hub. Após obter o ID da organização, siga os passos para os dispositivos que deseja editar.
Certifique-se de bloquear a ID da organização no registro para que os usuários não possam alterá-la eles mesmos. Se os usuários alterarem a ID da organização, as restrições de colaboração não se aplicarão a seus dispositivos.
Para garantir a segurança, recomendamos aplicar restrições aos seus navegadores e a todos os seus dispositivos.
| 1 |
Faça login no Hub de Controlee acesse . |
| 2 |
Clique no ícone Copiar no campo ID da organização. |
Você pode restringir os recursos de colaboração no aplicativo Webex para dispositivos Windows, especificando quais usuários da organização podem fazer login. Ao definir OrganizationID no registro do Windows, você garante que apenas os usuários da sua organização possam entrar no aplicativo Webex nesse dispositivo.
Se um usuário tentar entrar com uma conta de uma organização diferente, o aplicativo Webex negará o acesso e exibirá um erro. Se você remover o valor OrganizationID do registro, essa restrição deixará de se aplicar e usuários de qualquer organização poderão fazer login.
Você pode escolher entre estas opções para configurar restrições de recursos de colaboração para dispositivos Windows:
Configurar usando as chaves de registro
Você pode editar manualmente dispositivos específicos adicionando OrganizationID a um destes valores de registro:
-
Abra o Editor de registro.
-
Adicione a ID da organização a um dos seguintes valores de registro:
-
HKEY_LOCAL_MACHINE\SOFTWARE\Policies\CiscoWebex\OrganizationID -
HKEY_LOCAL_MACHINE\SOFTWARE\Cisco Spark Native\OrganizationID
-
Para reuniões na plataforma Webex Suite, você pode definir a chave de registro HKEY_LOCAL_MACHINE\SOFTWARE\Policies\CiscoWebex\AllowOrganizationIDInHKCU com o valor 1 e o tipo DWORD32e aplicar o ID da organização a um destes valores de registro:
-
HKEY_CURRENT_USER\SOFTWARE\Policies\CiscoWebex\OrganizationID -
HKEY_ CURRENT_USER\SOFTWARE\Cisco Spark Native\OrganizationID
Configurar usando um modelo de Política de Grupo
Você pode importar um modelo administrativo de Política de Grupo .adm ou .admx arquivo para aplicar o ID da organização aos mesmos valores de registro acima.
Importar um arquivo .adm :
- Baixe o modelo administrativo de política de grupo e adicione-o à ferramenta de gerenciamento de política de grupo.
-
Na ferramenta de gerenciamento de políticas de grupo, clique em:
-
Configuração do computador para aplicar o ID da organização a
HKEY_LOCAL_MACHINE\SOFTWARE\Policies\CiscoWebex\OrganizationID -
Configuração do usuário para aplicar a organização a
HKEY_ CURRENT_USER\SOFTWARE\Policies\CiscoWebex\OrganizationID
-
-
No painel de navegação, clique em .
-
Clique duas vezes em Configurar a ID da organização Cisco Webex.
-
Clique em Habilitado, adicione o ID da sua organização na caixa Opções e clique em Aplicar.
Importar um arquivo .admx :
- Baixe o modelo administrativo de política de grupo e adicione-o à pasta PolicyDefinitions.
-
Na ferramenta de gerenciamento de políticas de grupo, clique em:
-
Configuração do computador para aplicar o ID da organização a
HKEY_LOCAL_MACHINE\SOFTWARE\Policies\CiscoWebex\OrganizationID -
Configuração do usuário para aplicar a organização a
HKEY_ CURRENT_USER\SOFTWARE\Policies\CiscoWebex\OrganizationID
-
-
No painel de navegação, clique em .
-
Clique duas vezes em Configurar a ID da organização Cisco Webex.
-
Clique em Habilitado, adicione o ID da sua organização na caixa Opções e clique em Aplicar.
Configurar usando uma instalação MSI
Você pode executar o seguinte comando para instalar webexapp.msi com o parâmetro ORGID para configurar o ID da organização para este valor de registro: HKEY_LOCAL_MACHINE\SOFTWARE\Cisco Spark Native\OrganizationID.
Por exemplo:
msiexec /i c:\work\Webex.msi ACCEPT_EULA=TRUE EMAIL=xxxx@example.com ORGID=xxxxxxxx-xxxx-xxxx-xxxx-xxxxxxxxxxxxConfigure usando uma ordem de prioridade.
Você pode definir a ordem de prioridade de maior para menor.
Você pode definir a chave de registro HKEY_LOCAL_MACHINE\SOFTWARE\Policies\CiscoWebex\AllowOrganizationIDInHKCU com Valor como 1 e Tipo como DWORD32.
O ID da organização é obtido na seguinte sequência, da mais alta para a mais baixa prioridade:
-
HKEY_CURRENT_USER\SOFTWARE\Policies\CiscoWebex\OrganizationID(configurado manualmente ou por meio de modelo de política de grupo) -
HKEY_CURRENT_USER\SOFTWARE\Cisco Spark Native\OrganizationID -
HKEY_LOCAL_MACHINE\SOFTWARE\Policies\CiscoWebex\OrganizationID(configurado manualmente ou por meio de modelo de política de grupo) -
HKEY_LOCAL_MACHIN\SOFTWARE\Cisco Spark Native\OrganizationID(configurado através da instalação MSI)
Configure usando o gerenciamento de dispositivos móveis (MDM)
Recomendamos seguir o procedimento de Implantação do Webex App MDM para adicionar o ID da organização ao domínio de preferências Cisco-Systems.Spark.
Para configurar restrições de colaboração para a plataforma de reuniões Webex Suite em dispositivos Linux, crie um arquivo .json chamado managedConfig.json e adicione a seguinte chave ao arquivo:
|
Nome da chave |
Local |
Conteúdo do arquivo |
|---|---|---|
|
ID da organização |
/etc/cisco-webex/managedConfig.json |
|
Para configurar restrições de colaboração em dispositivos móveis Android e iOS, recomendamos seguir as instruções em Ativar configurações de segurança para versões móveis do aplicativo Webex.
Para que as políticas da sua organização se apliquem aos usuários que participem do Google Chrome, você deve adicionar o plug-in da Política do Webex Meetings baixado da Chrome Web Store e, em seguida, adicionar uma regra para a sua organização à política.
Usuários que estão impedidos de participar de determinadas reuniões veem a seguinte mensagem ao tentarem entrar em uma reunião restrita pelo Google Chrome.
-
Abra a página de administração de TI do Google Chrome em https://admin.google.com.
-
Adicione a extensão Webex Meetings Política de plug-in da ajuda indo para Chrome >
-
Adicione o seguinte ramal por ID:
denhmfenjcamjiamkogegcjieeiahjgp. -
Adicione a seguinte regra à política (usando o ID da sua organização):
{"orgID": {"Value": "xxxxxxxx-xxxx-xxxx-xxxx-xxxxxxxxxxxx"}} -
Clique com o botão direito do mouse na guia e selecione Forçar instalação.
Configure usando um modelo de política de grupo.
Você pode usar políticas de grupo para instalar a extensão de política do Webex Meetings.
Antes de começar, certifique-se de ter importado os modelos ADM ou ADMX para oGoogle Chrome.
-
No Editor de Política de Grupo, acesse .
Selecione 'Configurar a lista de aplicativos e extensões instalados à força'.
Clique com o botão direito do mouse e selecione Editar.
Selecione Ativado.
Clique em Mostrar.
Insira o seguinte ID em 'Extension/App IDs e URLs de atualização para serem instalados silenciosamente'.
denhmfenjcamjiamkogegcjieeiahjgp;https://clients2.google.com/service/update2/crxClique em Aplicar.
Pode demorar um pouco para o Chrome carregar a configuração. Você pode reiniciar o Google Chrome ou recarregar as políticas digitando chrome://policy/ na barra de endereços.
Configure o ID da organização com a chave de registro usando uma política de grupo.
Você pode usar a Política de Grupo da Microsoft para instalar a extensão de Política de Reuniões do Webex no Google Chrome e configurar o ID da organização.
-
No Editor de Gerenciamento de Política de Grupo, crie um novo Objeto de Política de Grupo (GPO).
Você também pode editar um GPO existente.
Vincule o GPO à organização que contém seus usuários ou dispositivos e alterne para o modo de edição do GPO.
Acesse .
Clique com o botão direito do mouse em Registro e selecione .
Na janela Novas Propriedades do Registro, selecione a guia Geral.
- Em Ação, selecione Criar.
-
Insira os seguintes detalhes:
-
Colmeia—
HKEY_LOCAL_MACHINE -
Caminho da chave—
SOFTWARE\Policies\Google\Chrome\3rdparty\extensions\denhmfenjcamjiamkogegcjieeiahjgp\policy -
Nome do valor—
orgID -
Tipo de valor—
REG_SZ -
Dados de valor— O ID da organização fornecido pela Cisco.
-
Clique em Aplicar.
Você precisa instalar e configurar a extensão de política do Webex Meetings em navegadores Chrome. Esta configuração aplica a política de restrições de reuniões da sua organização aos usuários que participam de reuniões usando o Chrome em computadores MacOS. Os detalhes que você precisa são:
- ID da extensão: Isso vale para todos:
denhmfenjcamjiamkogegcjieeiahjgp - Seu ID de organização: Exclusivo para a sua organização Webex. Você pode copiar este ID do Control Hub, no Página da conta.
Utilizando o console de administração do Google
Este guia descreve como forçar a instalação da extensão Webex Meetings usando o Google Admin Console e configurá-la com o ID da sua organização.
-
Faça login no seu console de administração do Google em https://admin.google.com.
-
Acesse o .
-
Adicione o seguinte ramal por ID:
denhmfenjcamjiamkogegcjieeiahjgp. -
Adicione a seguinte regra à política (usando o ID da sua organização):
{"orgID": {"Value": "xxxxxxxx-xxxx-xxxx-xxxx-xxxxxxxxxxxx"}} -
Clique com o botão direito do mouse na guia e selecione Forçar instalação.
Configurar preferências do macOS
Descreve como forçar a instalação da extensão Webex Meetings usando a preferência
ExtensionInstallForcelistdo Chrome no MacOS e, em seguida, configurar a extensão com o ID da sua organização.
- Leia o tópico ExtensionInstallForcelist na documentação de política do Chrome Enterprise do Google.
-
Use o software de gerenciamento de dispositivos móveis para atualizar a preferência
ExtensionInstallForcelist
.-
Adicione o seguinte ID de extensão:
denhmfenjcamjiamkogegcjieeiahjgpe -
Adicione o URL de atualização para a extensão:
https://clients2.google.com/service/update2/crx
Você deverá obter uma nova string na matriz que define a lista de instalação forçada da extensão:
denhmfenjcamjiamkogegcjieeiahjgp;https://clients2.google.com/service/update2/crx other-extension-id;other-extension-update-URL another-extension-id;another-extension-update-URL -
- Implante o perfil de configuração modificado em seus computadores MacOS.
- Verifique se a extensão está instalada no Mac.
Criar um perfil de configuração
Descreve como configurar o ID da sua organização para a extensão de política do Webex.
-
Crie um arquivo de lista de propriedades
com.google.Chrome.extensions.denhmfenjcamjiamkogegcjieeiahjgp.plistcom o ID da sua organização usando o seguinte valor:orgID xxxxxxxx-xxxx-xxxx-xxxx-xxxxxxxxxxxx -
Implante o perfil de configuração modificado em seus computadores MacOS.
-
Verifique se a sua política de Reuniões se aplica quando um usuário em um computador MacOS gerenciado usa o Chrome para participar de uma reunião.
Você pode aplicar restrições de colaboração à sua organização para usuários que ingressarem pelo Microsoft Edge. Você também pode usar a extensão do navegador Google Chrome no Microsoft Edge.
Antes de começar, certifique-se de que seu dispositivo esteja cadastrado no gerenciamento de dispositivos móveis (MDM).
Criar um novo perfil de configuração
-
Faça login na página de administração da Microsofte acesse Dispositivos .
-
Selecione as seguintes propriedades:
-
Plataforma— Windows 10 ou posterior.
-
Tipo de perfil— Modelos.
-
-
Clique em Criar.
-
Em Básico, selecione um nome e uma descrição para a política da sua organização.
-
Clique em Próximo.
-
Em , procure por 'Controlar quais extensões são instaladas silenciosamente' e selecione-o.
-
Selecione Ativado e insira o seguinte ID em 'Extension/App IDs e URLs de atualização a serem instalados silenciosamente':
denhmfenjcamjiamkogegcjieeiahjgp;https://clients2.google.com/service/update2/crx?response=updatecheck&x=id%3Ddenhmfenjcamjiamkogegcjieeiahjgp%26uc -
Clique em Próximo.
(Opcional) Em Etiquetas de escopo, você pode atribuir etiquetas de escopo ao perfil.
Em Atribuições, selecione 'Adicionar todos os usuários' e 'Adicionar todos os dispositivos'.
-
Clique em Próximo.
-
Em revisão + criar, revise suas configurações e clique em Criar.
Sincronize seu dispositivo gerenciado
-
No seu dispositivo gerenciado, acesse .
Em 'Conectado ao MSFT MDM', clique em Informações.
Deslize até 'Status de sincronização do dispositivo' e clique em Sincronizar.
A extensão do Google Chrome é instalada assim que a sincronização for concluída. Você pode verificar a sincronização consultando o Editor do Registro no seguinte local:
HKEY_LOCAL_MACHINE\SOFTWARE\Policies\Microsoft\Edge\ExtensionInstallForcelistA extensão também está disponível no Microsoft Edge em edge://extensions.
Configure usando a chave de registro.
Para configurar a política para um ID de organização específico, a extensão do Chrome lê uma política que está definida no registro. Você pode importar manualmente uma chave de registro criando um arquivo .reg.
-
Abra o Editor de registro.
- Crie um arquivo
.regcom o seguinte valor:Windows Registry Editor Version 5.00 [HKEY_LOCAL_MACHINE\SOFTWARE\Policies\Microsoft\Edge\3rdparty\extensions\denhmfenjcamjiamkogegcjieeiahjgp\policy] "orgID"="xxxxxxxx-xxxx-xxxx-xxxx-xxxxxxxxxx" - Clique duas vezes no arquivo para instalar a chave de registro.
Você também pode usar o PowerShell para instalar a chave de registro. Utilize o seguinte valor:
reg import
            .\edge_policy.reg
Verifique a identidade da sua organização.
-
Reinicie o Microsoft Edge e acesse web.webex.com.
Abra o console do desenvolvedor e digite
webex.config.meetings.installedOrgID.O ID da organização do arquivo
.regé exibido.
Configure usando um modelo de política de grupo.
Você pode usar políticas de grupo para instalar a extensão de política do Webex Meetings.
Antes de começar, certifique-se de ter importado os modelos administrativos do Microsoft Edge.
-
No Editor de Política de Grupo, acesse .
- Selecione 'Controlar quais extensões são instaladas silenciosamente'.
Selecione Ativado.
Clique em Mostrar.
Insira o seguinte ID em 'Extension/App IDs e URLs de atualização para serem instalados silenciosamente'.
denhmfenjcamjiamkogegcjieeiahjgp;https://clients2.google.com/service/update2/crxClique em Aplicar.
Configure o ID da organização com a chave de registro usando a política de grupo.
Você pode usar a Política de Grupo da Microsoft para instalar a extensão de Política de Reuniões do Webex no Microsoft Edge e configurar o ID da organização.
-
No Editor de Gerenciamento de Política de Grupo, crie um novo Objeto de Política de Grupo (GPO).
Você também pode editar um GPO existente.
Vincule o GPO à organização que contém seus usuários ou dispositivos e alterne para o modo de edição do GPO.
Acesse .
Clique com o botão direito do mouse em Registro e selecione .
Na janela Novas Propriedades do Registro, selecione a guia Geral.
- Em Ação, selecione Criar.
-
Insira os seguintes detalhes:
-
Colmeia—
HKEY_LOCAL_MACHINE -
Caminho da chave—
SOFTWARE\Policies\Microsoft\Edge\3rdparty\extensions\denhmfenjcamjiamkogegcjieeiahjgp\policy -
Nome do valor—
orgID -
Tipo de valor—
REG_SZ -
Dados de valor— O ID da organização fornecido pela Cisco.
-
Clique em Aplicar.
Problemas conhecidos
Problemas conhecidos do aplicativo Webex
- Ao aplicar restrições de colaboração, pode levar até 30 minutos para que as novas políticas sejam aplicadas às reuniões na plataforma Webex Suite.
- Quando um usuário emparelha um dispositivo com um dispositivo em modo pessoal, as políticas de gravação em nuvem desse usuário são aplicadas ao seu dispositivo pessoal. Mas quando um usuário é emparelhado com um dispositivo de sala compartilhada, as políticas de gravação na nuvem são determinadas pela política da reunião e não pela política do usuário. Isso se aplica a reuniões na plataforma Webex Suite.
- Ao usar a plataforma de reuniões Webex Suite, se um usuário do Windows, Mac ou iOS não tiver permissão para participar de uma reunião, será solicitado que ele troque de conta. Ao clicar em Trocar de conta, o aplicativo Webex é reiniciado e o usuário é redirecionado para a página de login. Mas, para usuários do Android, clicar em Trocar de conta não reinicia o aplicativo Webex, em vez disso, fecha o aplicativo.
- Ao usar reuniões na plataforma de reuniões Webex Suite, a política de reunião para Capturar Apresentador só se aplica se o usuário for o anfitrião.
- Ao iniciar o aplicativo Webex pelo Safari ou Firefox, mesmo que o vídeo ou o VoIP estejam desativados, o usuário ainda poderá enviar e receber vídeos e mensagens de voz.
Problemas conhecidos dos dispositivos Webex
Quando os administradores desativam os quadros brancos, as legendas ocultas ou as gravações, esses recursos são bloqueados nos dispositivos, mas a mensagem de erro não mostra o motivo do bloqueio para reuniões do aplicativo Webex na plataforma de reuniões do Webex Suite.
- Em dispositivos no modo pessoal, os recursos são bloqueados com base na política do usuário.
- Os recursos são bloqueados com base na política de reuniões para dispositivos em modo compartilhado.
Problemas conhecidos com versões mais antigas do cliente
Recomendamos que você atualize o aplicativo Webex para a plataforma de reuniões Webex Suite para a versão do cliente WBS 43.6 ou superior, para que os usuários tenham a melhor experiência com os recursos de colaboração. Se os usuários estiverem utilizando uma versão mais antiga do cliente, alguns recursos de colaboração podem não estar disponíveis ou podem funcionar incorretamente.


